
Chapter 9: Layers Like an Onion: Core Animation
The iPhone has made animation central to the mobile experience. Views slide in and out, applications zoom into place, pages fly into the bookmark list. Apple has made animation not just a beautiful part of the experience, but a better way to let the user know what’s happening and what to expect. When views slide into place from right to left, it’s natural to press the left-pointing button to go back to where you were. When you create a bookmark and it flies to the toolbar, it’s obvious where you should look to get back to that bookmark. These subtle cues are a critical part of making your user interface intuitive as well as engaging. To facilitate all this animation, iOS devices include a powerful GPU and frameworks that let you harness that GPU easily.
In this chapter, you discover the two main animation systems of iOS: view animations and the Core Animation framework. You find out how to draw with Core Animation layers and how to move layers around in two and three dimensions. Common decorations like rounded corners, colored borders, and shadows are trivial with CALayer, and you discover how to apply them quickly and easily. You learn how to create custom automatic animations, including animating your own properties. Finally, Core Animation is all about performance, so you find out how to manage layers in multithreaded applications.
This chapter focuses on animations for view-based programming. These frameworks are ideal for most iOS applications except games. Game development is outside the scope of this book, and it’s usually best served by built-in frameworks like OpenGL ES or third-party frameworks like Cocos2D. For more information on OpenGL ES, see the OpenGL ES for iOS portal at developer.apple.com. For more information on Cocos2D, see cocos2d-iphone.org.
View Animations
UIView provides rich animation functionality that’s very easy to use and well optimized. Most common animations can be handled with +animateWithDuration:animations: and related methods. You can use UIView to animate frame, bounds, center, transform, alpha, backgroundColor, and contentStretch. Most of the time, you’ll animate frame, center, transform, and alpha.
It’s likely that you’re familiar with basic view animations, so I’ll just touch on the high points in this section and then move on to more advanced layer-based drawing and animation.
Let’s start with a very simple animation of a ball that falls when you tap the view. CircleView just draws a circle in its frame. The following code creates the animation shown in Figure 9-1.
ViewAnimationViewController.m (ViewAnimation)
- (void)viewDidLoad {
[super viewDidLoad];
self.circleView = [[CircleView alloc] initWithFrame:
CGRectMake(0, 0, 20, 20)];
self.circleView.center = CGPointMake(100, 20);
[[self view] addSubview:self.circleView];
UITapGestureRecognizer *g;
g = [[UITapGestureRecognizer alloc]
initWithTarget:self
action:@selector(dropAnimate)];
[[self view] addGestureRecognizer:g];
}
...
- (void)dropAnimate {
[UIView animateWithDuration:3 animations:^{
self.circleView.center = CGPointMake(100, 300);
}];
}
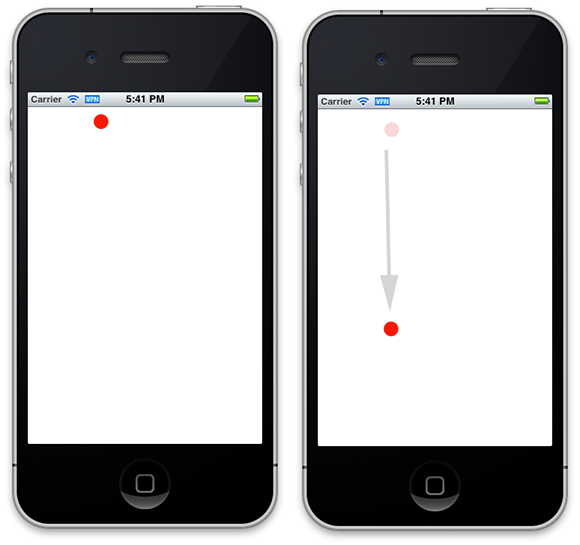
Figure 9-1 CircleView animation
This is the simplest kind of view-based animation, and it can handle most common problems, particularly animating size, location, and opacity. It’s also common to animate transform to scale, rotate, or translate the view over time. Less commonly, you can animate backgroundColor and contentStretch. Animating the background color is particularly useful in HUD-style interfaces to move between mostly transparent and mostly opaque backgrounds. This can be more effective than just animating the overall alpha.
Chaining animations is also straightforward, as shown in the following code.
- (void)dropAnimate {
[UIView
animateWithDuration:3 animations:^{
self.circleView.center = CGPointMake(100, 300);
}
completion:^(BOOL finished){
[UIView animateWithDuration:1 animations:^{
self.circleView.center = CGPointMake(250, 300);
}
];
}];
}
Now the ball will drop and then move to the right. But there’s a subtle problem with this code. If you tap the screen while the animation is in progress, the ball will jump to the lower-left and then animate to the right. That’s probably not what you want. The issue is that every time you tap the view, this code runs. If an animation is in progress, then it’s canceled and the completion block runs with finished==NO. You look at how to handle that next.
Managing User Interaction
The problem mentioned in the previous section is caused by a user experience mistake: allowing the user to send new commands while you’re animating the last command. Sometimes that’s what you want, but in this case, it isn’t. Anytime you create an animation in response to user input, you need to consider this issue.
When you animate a view, by default it automatically stops responding to user interaction. So, while the ball is dropping, tapping it won’t generate any events. In this example, however, tapping the main view causes the animation. There are two solutions. First, you can change your user interface so that tapping the ball causes the animation:
[self.circleView addGestureRecognizer:g];
The other solution is to ignore taps while the ball is animating. The following code shows how to disable the UIGestureRecognizer in the gesture recognizer callback and then enable it when the animation completes.
- (void)dropAnimate:(UIGestureRecognizer *)recognizer {
[UIView
animateWithDuration:3 animations:^{
recognizer.enabled = NO;
self.circleView.center = CGPointMake(100, 300);
}
completion:^(BOOL finished){
[UIView
animateWithDuration:1 animations:^{
self.circleView.center = CGPointMake(250, 300);
}
completion:^(BOOL finished){
recognizer.enabled = YES;
}];
}];
}
This technique is nice because it minimizes side effects to the rest of the view, but you might want to prevent all user interaction for the view while the animation runs. In that case, you replace recognizer.enabled with self.view.userInteractionEnabled.
Drawing with Layers
View animations are powerful, so rely on them whenever you can, especially for basic layout animation. They also provide a small number of stock transitions that you can read about in the Animations section of the View Programming Guide for iOS available at developer.apple.com. If you have basic needs, these are great tools.
But you’re here to go beyond the basic needs, and view animations have a lot of limitations. Their basic unit of animation is UIView, which is a pretty heavyweight object, so you need to be careful about how many of them you use. UIView also doesn’t support three-dimensional layout, except for basic z-ordering, so it can’t create anything like Cover Flow. To move your UI to the next level, you need to use Core Animation.
Core Animation provides a variety of tools, several of which are useful even if you don’t intend to animate anything. The most basic and important part of Core Animation is CALayer. This section explains how to draw with CALayer without animations. You explore animating later in the chapter.
In many ways, CALayer is very much like UIView. It has a location, size, transform, and content. You can override a draw method to draw custom content, usually with Core Graphics. There is a layer hierarchy exactly like the view hierarchy. You might ask, why even have separate objects?
The most important answer is that UIView is a fairly heavyweight object that manages drawing and event handling, particularly touch events. CALayer is all about drawing. In fact, UIView relies on a CALayer to manage its drawing, which allows the two to work very well together.
Every UIView has a CALayer to do its drawing. And every CALayer can have sublayers, just like every UIView can have subviews. Figure 9-2 shows the hierarchy.
A layer draws whatever is in its contents property, which is a CGImage (see the note at the end of this section). It’s your job to set this somehow, and there are various ways of doing so. The simplest approach is to assign it directly, as shown here (and discussed more fully in “Setting Contents Directly” later in this section).
UIImage *image = ...;
CALayer *layer = ...;
layer.contents = (__bridge id)[image CGImage];

Figure 9-2 View and layer hierarchies
If you do not set the contents property directly, then Core Animation will go through the following CALayer and delegate methods in the order presented in the following list to create it.
1. [CALayer setNeedsDisplay]—Your code needs to call this. It marks the layer as dirty, requesting that contents be updated using the following steps in this list.
Unless setNeedsDisplay is called, the contents property is never updated, even if it’s nil.
2. [CALayer displayIfNeeded]—The drawing system automatically calls this as needed. If the layer has been marked dirty by a call to setNeedsDisplay, then the drawing system will continue with the next steps.
3. [CALayer display]—This is called by displayIfNeeded when appropriate. You shouldn’t call it directly. The default implementation calls the delegate method displayLayer: if the delegate implements it. If not, display calls drawInContext:. You can override display in a subclass to set contents directly.
4. [delegate displayLayer:]—The default [CALayer display] calls this if the delegate implements it. Its job is to set contents. If this method is implemented, even if it does nothing, then no further custom drawing code will be run.
5. [CALayer drawInContext:]—The default display method creates a view graphics context and passes it to drawInContext:. This is similar to [UIView drawRect:], but no UIKit context is set up for you automatically. To draw with UIKit, you need to call UIGraphicsPushContext() to make the passed context the current context. Otherwise, just use the passed context to draw with Core Graphics. The default display method takes the resulting context, creates a CGImage (see note below) and assigns it to contents. The default [CALayer drawInContext:] calls [delegate drawLayer:inContext:] if it’s implemented. Otherwise, it does nothing. Note that you may call this directly. See the section “Drawing in Your Own Context,” later in this section, for information on why you would call this directly.
6. [delegate drawLayer:inContext:]—If implemented, the default drawInContext: calls this to update the context so that display can create a CGImage.
As you can see, there are several ways to set the contents of a layer. You can set it directly with setContent:, you can implement display or displayLayer:, or you can implement drawInContext: or drawLayer:inContext:. In the rest of this section, we discuss each approach.
The drawing system almost never automatically updates contents in the way that UIView is often automatically refreshed. For instance, UIView draws itself the first time it’s put onscreen. CALayer does not. Marking a UIView as dirty with setNeedsDisplay automatically redraws all the subviews as well. Marking a CALayer as dirty with setNeedsDisplay doesn’t impact sublayers. The thing to remember is that the default behavior of a UIView is to draw when it thinks you need it. The default behavior of a CALayer is to never draw unless you explicitly ask for it. CALayer is a much lower-level object, and it’s optimized to not waste time doing anything that isn’t explicitly asked for.
The contents property is usually a CGImage, but this is not always the case. If you use custom drawing, Core Animation will use a private class, CABackingStorage, for contents. You can set contents to either a CGImage or the contents of another layer.
Setting Contents Directly
Providing a content image (shown in the following code) is the easiest solution if you already have an image handy.
LayersViewController.m (Layers)
#import <QuartzCore/QuartzCore.h>
...
UIImage *image = [UIImage imageNamed:@”pushing.png”];
self.view.layer.contents = (__bridge id)[image CGImage];
You must always import QuartzCore.h and link with QuartzCore.framework to use Core Animation. This is an easy thing to forget.
The cast to __bridge id is needed because contents is defined as an id, but actually expects a CGImageRef. To make this work with ARC, a cast is required. A common error is to pass a UIImage here instead of a CGImageRef. You won’t get a compiler error or runtime warning. Your view will just be blank.
By default, the contents are scaled to fill the view, even if that distorts the image. As with contentMode and contentStretch in UIView, you can configure CALayer to scale its image in different ways using contentsCenter and contentsGravity.
Implementing Display
The job of display or displayLayer: is to set contents to a correct CGImage. You can do this any way you’d like. The default implementation creates a CGContext, passes it to drawInContext:, turns the result into a CGImage, and assigns it to contents. The most common reason to override this is if your layer has several states and you have an image for each. Buttons often work this way. You can create those images by loading them from your bundle, drawing them with Core Graphics, or any other way you’d like.
Whether to subclass CALayer or use a delegate is really a matter of taste and convenience. UIView has a layer, and it must be that layer’s delegate. In our experience, it’s dangerous to make a UIView the delegate for any of the sublayers. Doing so can create infinite recursion when the UIView tries to copy its sublayers in certain operations such as transitions. So you can implement displayLayer: in UIView to manage its layer, or you can have some other object be the delegate for sublayers.
Having UIView implement displayLayer: seldom makes sense in our opinion. If your view content is basically several images, it’s usually a better idea to use a UIImageView or a UIButton rather than a custom UIView with hand-loaded layer content. UIImageView is highly optimized for displaying images. UIButton is very good at switching images based on state, and includes a lot of good user interface mechanics that are a pain to reproduce. Don’t try to reinvent UIKit in Core Animation. UIKit likely does it better than you will.
What can make more sense is to make your UIViewController the delegate for the layers, particularly if you aren’t subclassing UIView. This avoids extra objects and subclasses if your needs are pretty simple. Just don’t let your UIViewController become overcomplicated.
Custom Drawing
As with UIView, you can provide completely custom drawing with CALayer. Typically, you’ll draw with Core Graphics, but using UIGraphicsPushContext, you can also draw with UIKit.
See Chapter 8 for information on how to draw with Core Graphics and UIKit.
Using drawInContext: is just another way of setting contents. It’s called by display, which is called only when the layer is explicitly marked dirty with setNeedsDisplay. The advantage of this over setting contents directly is that display automatically creates a CGContext appropriate for the layer. In particular, the coordinate system is flipped for you. (See Chapter 8 for a discussion of Core Graphics and flipped coordinate systems.) The following code shows how to implement the delegate method drawLayer:inContext: to draw the string “Pushing The Limits” at the top of the layer using UIKit. Because Core Animation does not set a UIKit graphics context, you need to call UIGraphicsPushContext before calling UIKit methods, and UIGraphicsPopContext before returning.
DelegateView.m (Layers)
- (id)initWithFrame:(CGRect)frame {
self = [super initWithFrame:frame];
if (self) {
[self.layer setNeedsDisplay];
}
return self;
}
- (void)drawLayer:(CALayer *)layer inContext:(CGContextRef)ctx {
UIGraphicsPushContext(ctx);
[[UIColor whiteColor] set];
UIRectFill(layer.bounds);
[[UIColor blackColor] set];
UIFont *font = [UIFont systemFontOfSize:48.0];
[@”Pushing The Limits” drawInRect:[layer bounds]
withFont:font
lineBreakMode:NSLineBreakByWordWrapping
alignment:NSTextAlignmentCenter];
UIGraphicsPopContext();
}
Note the call to setNeedsDisplay in initWithFrame:. As discussed earlier, layers don’t automatically draw themselves when put onscreen. You need to mark them as dirty with setNeedsDisplay.
You may also notice the hand-drawing of the background rather than using the backgroundColor property. This is intentional. Once you engage in custom drawing with drawLayer:inContext:, most automatic layer settings like backgroundColor and cornerRadius are ignored. Your job in drawLayer:inContext: is to draw everything needed for the layer. There isn’t helpful compositing going on for you like in UIView. If you want layer effects like rounded corners together with custom drawing, then put the custom drawing onto a sublayer and round the corners on the superlayer.
Drawing in Your Own Context
Unlike [UIView drawRect:], it’s completely legal to call [CALayer drawInContext:] yourself. You just need to generate a context and pass it in, which is nice for capturing the contents of a layer onto a bitmap or PDF so you can save it or print it. Calling drawInContext: this way is mostly useful if you want to composite this layer with something else, because, if all you want is a bitmap, you can just use contents.
drawInContext: only draws the current layer, not any of its sublayers. If you want to draw the layer and its sublayers, use renderInContext:, which also captures the current state of the layer if it’s animating. renderInContext: uses the current state of the render tree that Core Animation maintains internally, so it doesn’t call drawInContext:.
Moving Things Around
Now that you can draw in a layer, take a look into how to use those layers to create powerful animations.
Layers naturally animate. In fact, you need to do a small amount of work to prevent them from animating. Consider the following example.
LayerAnimationViewController.m (LayerAnimation)
- (void)viewDidLoad {
[super viewDidLoad];
CALayer *squareLayer = [CALayer layer];
squareLayer.backgroundColor = [[UIColor redColor] CGColor];
squareLayer.frame = CGRectMake(100, 100, 20, 20);
[self.view.layer addSublayer:squareLayer];
UIView *squareView = [UIView new];
squareView.backgroundColor = [UIColor blueColor];
squareView.frame = CGRectMake(200, 100, 20, 20);
[self.view addSubview:squareView];
[self.view addGestureRecognizer:
[[UITapGestureRecognizer alloc]
initWithTarget:self
action:@selector(drop:)]];
}
- (void)drop:(UIGestureRecognizer *)recognizer {
NSArray *layers = self.view.layer.sublayers;
CALayer *layer = [layers objectAtIndex:0];
[layer setPosition:CGPointMake(200, 250)];
NSArray *views = self.view.subviews;
UIView *view = [views objectAtIndex:0];
[view setCenter:CGPointMake(100, 250)];
}
This draws a small red sublayer and a small blue subview. When the view is tapped, both are moved. The view jumps immediately to the new location. The layer animates over a quarter-second. It’s fast, but it’s not instantaneous like the view.
CALayer implicitly animates all properties that support animation. You can prevent this by disabling actions:
[CATransaction setDisableActions:YES];
We discuss actions further in the “Auto-Animate with Actions” section, later in this chapter.
disableActions is a poorly named method. Because it begins with a verb, you expect it to have a side effect (disabling actions) rather than returning the current value of the property. It should be actionsDisabled (or actionsEnabled to be parallel with userInteractionEnabled). Apple may remedy this eventually, as it has with other misnamed properties. In the meantime, make sure to call setDisableActions: when you mean to change its value. You won’t get a warning or error if you call [CATransaction disableActions] in a void context.
Implicit Animations
You now know all the basics of animation. Just set layer properties, and your layers animate in the default way. But what if you don’t like the defaults? For instance, you may want to change the duration of the animation. First, you need to understand transactions.
Most of the time when you change several layer properties, you want them all to animate together. You also don’t want the renderer to waste the renderer’s time calculating animations for one property change if the next property change affects it. For instance, opacity and backgroundColor are interrelated properties. Both affect the final displayed pixel color, so the renderer needs to know about both animations when working out the intermediate values.
Core Animation bundles property changes into atomic transactions (CATransaction). An implicit CATransaction is created for you the first time you modify a layer on a thread that includes a run loop. (If that last sentence piqued your interest, see the “Core Animation and Threads” section, later in this chapter.) During the run loop, all layer changes are collected, and when the run loop completes, all the changes are committed to the layer tree.
To modify the animation properties, you need to make changes to the current transaction. The following changes the duration of the current transaction to 2 seconds rather than the default quarter-second.
[CATransaction setAnimationDuration:2.0];
You can also set a completion block to run after the current transaction finishes animating using [CATransaction setCompletionBlock:]. You can use this to chain animations together, among other things.
Although the run loop creates a transaction for you automatically, you can also create your own explicit transactions using [CATransaction begin] and [CATransaction commit]. These allow you to assign different durations to different parts of the animation or to disable animations for only a part of the event loop.
See the “Auto-Animate with Actions” section of this chapter for more information on how implicit animations are implemented and how you can extend them.
Explicit Animations
Implicit animations are powerful and convenient, but sometimes you want more control. That’s where CAAnimation comes in. With CAAnimation, you can manage repeating animations, precisely control timing and pacing, and employ layer transitions. Implicit animations are implemented using CAAnimation, so everything you can do with an implicit animation can be done explicitly as well.
The most basic animation is a CABasicAnimation. It interpolates a property over a range using a timing function, as shown in the following code:
CABasicAnimation *anim = [CABasicAnimation
animationWithKeyPath:@”opacity”];
anim.fromValue = [NSNumber numberWithDouble:1.0];
anim.toValue = [NSNumber numberWithDouble:0.0];
anim.autoreverses = YES;
anim.repeatCount = INFINITY;
anim.duration = 2.0;
[layer addAnimation:anim forKey:@”anim”];
This pulses the layer forever, animating the opacity from one to zero and back over 2 seconds. When you want to stop the animation, remove it:
[layer removeAnimationForKey:@”anim”];
An animation has a key, fromValue, toValue, timingFunction, duration, and some other configuration options. The way it works is to make several copies of the layer, send setValue:forKey: messages to the copies and then display. It captures the generated contents and displays them.
If you have custom properties in your layer, you may notice that they’re not set correctly during animation. This is because the layer is copied. You must override initWithLayer: to copy your custom properties if you want them to be available during an animation. We discuss this later in the “Animating Custom Properties” section of this chapter.
CABasicAnimations are basic, as the name implies. They’re easy to set up and use, but they’re not very flexible. If you want more control over the animation, you can move to CAKeyframeAnimation. The major difference is that instead of giving a fromValue and toValue, you now can give a path or a sequence of points to animate through, along with individual timing for each segment. The Animation Types and Timing Programming Guide at developer.apple.com provides excellent examples. They’re not technically difficult to set up. Most of the work is on the creative side to find just the right path and timing.
Model and Presentation
A common problem in animations is the dreaded “jump back.” The mistake looks like this:
CABasicAnimation *fade;
fade = [CABasicAnimation animationWithKeyPath:@”opacity”];
fade.duration = 1;
fade.fromValue = [NSNumber numberWithDouble:1.0];
fade.toValue = [NSNumber numberWithDouble:0.0];
[circleLayer addAnimation:fade forKey:@”fade”];
This fades the circle out over 1 second, just as expected, and then suddenly the circle reappears. To understand why this happens, you need to be aware of the difference between the model layer and the presentation layer.
The model layer is defined by the properties of the “real” CALayer object. Nothing in the preceding code modifies any property of circleLayer itself. Instead, CAAnimation makes copies of circleLayer and modifies those. These become the presentation layer. They represent roughly what is shown on the screen. There is technically another layer called the render layer that really represents what’s on the screen, but it’s internal to Core Animation, and you very seldom encounter it.
So what happens in the preceding code? CAAnimation modifies the presentation layer, which is drawn to the screen, and when it completes, all its changes are thrown away and the model layer is used to determine the new state. The model layer hasn’t changed, so you snap back to where you started. The solution to this is to set the model layer, as shown here:
circleLayer.opacity = 0;
CABasicAnimation *fade;
fade = [CABasicAnimation animationWithKeyPath:@”opacity”];
...
[circleLayer addAnimation:fade forKey:@”fade”];
Sometimes this works fine, but sometimes the implicit animation in setOpacity: fights with the explicit animation from animationWithKeyPath:. The best solution to that is to turn off implicit animations if you’re doing explicit animations:
[CATransaction begin];
[CATransaction setDisableActions:YES];
circleLayer.opacity = 0;
CABasicAnimation *fade;
fade = [CABasicAnimation animationWithKeyPath:@”opacity”];
...
[circleLayer addAnimation:fade forKey:@”fade”];
[CATransaction commit];
Sometimes you see people recommend setting removedOnCompletion to NO and fillMode to kCAFillModeBoth. This is not a good solution. It essentially makes the animation go on forever, which means the model layer is never updated. If you ask for the property’s value, you continue to see the model value, not what you see on the screen. If you try to implicitly animate the property afterward, it won’t work correctly because the CAAnimation is still running. If you ever remove the animation by replacing it with another with the same name, calling removeAnimationForKey: or removeAllAnimations, the old value snaps back. On top of all of that, it wastes memory.
All of this becomes a bit of a pain, so you may like the following category on CALayer that wraps it all together and lets you set the duration and delay. Most of the time, I still prefer implicit animation, but this can make explicit animation a bit simpler.
CALayer+RNAnimation.m (LayerAnimation)
@implementation CALayer (RNAnimations)
- (void)setValue:(id)value
forKeyPath:(NSString *)keyPath
duration:(CFTimeInterval)duration
delay:(CFTimeInterval)delay
{
[CATransaction begin];
[CATransaction setDisableActions:YES];
[self setValue:value forKeyPath:keyPath];
CABasicAnimation *anim;
anim = [CABasicAnimation animationWithKeyPath:keyPath];
anim.duration = duration;
anim.beginTime = CACurrentMediaTime() + delay;
anim.fillMode = kCAFillModeBoth;
anim.fromValue = [[self presentationLayer] valueForKey:keyPath];
anim.toValue = value;
[self addAnimation:anim forKey:keyPath];
[CATransaction commit];
}
@end
A Few Words on Timings
As in the universe at large, in Core Animation, time is relative. A second does not always have to be a second. Just like coordinates, time can be scaled.
CAAnimation conforms to the CAMediaTiming protocol, and you can set the speed property to scale its timing. Because of this, when considering timings between layers, you need to convert them just like you need to convert points that occur in different views or layers.
localPoint = [self convertPoint:remotePoint fromLayer:otherLayer];
localTime = [self convertTime:remotetime fromLayer:otherLayer];
This isn’t very common, but it comes up when you’re trying to coordinate animations. You might ask another layer for a particular animation and when that animation will end so that you can start your animation.
CAAnimation *otherAnim = [layer animationForKey:@”anim”];
CFTimeInterval finish = otherAnim.beginTime + otherAnim.duration;
myAnim.beginTime = [self convertTime:finish fromLayer:layer];
Setting beginTime like this is a nice way to chain animations, even if you hard-code the time rather than ask the other layer. To reference “now,” just use CACurrentMediaTime().
This raises another issue, however. What value should your property have between now and when the animation begins? You would assume that it would be the fromValue, but that isn’t how it works. It’s the current model value because the animation hasn’t begun. Typically, this is the toValue. Consider the following animation:
[CATransaction begin];
anim = [CABasicAnimation animationWithKeyPath:@”opacity”];
anim.fromValue = [NSNumber numberWithDouble:1.0];
anim.toValue = [NSNumber numberWithDouble:0.5];
anim.duration = 5.0;
anim.beginTime = CACurrentMediaTime() + 3.0;
[layer addAnimation:anim forKey:@”fade”];
layer.opacity = 0.5;
[CATransaction commit];
This animation does nothing for 3 seconds. During that time, the default property animation is used to fade opacity from 1.0 to 0.5. Then the animation begins, setting the opacity to its fromValue and interpolating to its toValue. So the layer begins with opacity of 1.0, fades to 0.5 over a quarter-second, then 3 seconds later, and jumps back to 1.0 and fades again to 0.5 over 5 seconds. This almost certainly isn’t what you want.
You can resolve this problem using fillMode. The default is kCAFillModeRemoved, which means that the animation has no influence on the values before or after its execution. This can be changed to “clamp” values before or after the animation by setting the fill mode to kCAFillModeBackwards, kCAFillModeForwards, or kCAFillModeBoth. Figure 9-3 illustrates this.
In most cases, you want to set fillMode to kCAFillModeBackwards or kCAFillModeBoth.
Into the Third Dimension
Chapter 8 discussed how to use CAAffineTransform to make UIView drawing much more efficient. This technique limits you to two-dimensional transformations: translate, rotate, scale, and skew. With layers, however, you can apply three-dimensional transformations by adding perspective. This is often called 2.5D rather than 3D because it doesn’t make layers into truly three-dimensional objects in the way that OpenGL ES does. But it does allow you to give the illusion of three-dimensional movement.
You rotate layers around an anchor point. By default, the anchor point is in the center of the layer, designated {0.5, 0.5}. It can be moved anywhere within the layer, making it convenient to rotate around an edge or corner. The anchor point is described in terms of a unit square rather than in points. So the lower-right corner is {1.0, 1.0}, no matter how large or small the layer is.
Here’s a simple example of a three-dimensional box.
BoxViewController.h (Box)
@interface BoxViewController : UIViewController
@property (nonatomic, readwrite, strong) CALayer *topLayer;
@property (nonatomic, readwrite, strong) CALayer *bottomLayer;
@property (nonatomic, readwrite, strong) CALayer *leftLayer;
@property (nonatomic, readwrite, strong) CALayer *rightLayer;
@property (nonatomic, readwrite, strong) CALayer *frontLayer;
@property (nonatomic, readwrite, strong) CALayer *backLayer;
@end
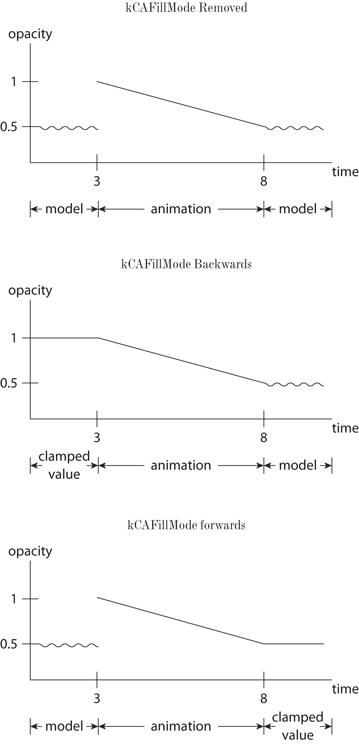
Figure 9-3 Effect of fill modes on media timing functions
BoxViewController.m (Box)
@implementation BoxViewController
const CGFloat kSize = 100.;
const CGFloat kPanScale = 1./100.;
- (CALayer *)layerWithColor:(UIColor *)color
transform:(CATransform3D)transform {
CALayer *layer = [CALayer layer];
layer.backgroundColor = [color CGColor];
layer.bounds = CGRectMake(0, 0, kSize, kSize);
layer.position = self.view.center;
layer.transform = transform;
[self.view.layer addSublayer:layer];
return layer;
}
static CATransform3D MakePerspetiveTransform() {
CATransform3D perspective = CATransform3DIdentity;
perspective.m34 = -1./2000.;
return perspective;
}
- (void)viewDidLoad {
[super viewDidLoad];
CATransform3D transform;
transform = CATransform3DMakeTranslation(0, -kSize/2, 0);
transform = CATransform3DRotate(transform, M_PI_2, 1.0, 0, 0);
self.topLayer = [self layerWithColor:[UIColor redColor]
transform:transform];
transform = CATransform3DMakeTranslation(0, kSize/2, 0);
transform = CATransform3DRotate(transform, M_PI_2, 1.0, 0, 0);
self.bottomLayer = [self layerWithColor:[UIColor greenColor]
transform:transform];
transform = CATransform3DMakeTranslation(kSize/2, 0, 0);
transform = CATransform3DRotate(transform, M_PI_2, 0, 1, 0);
self.rightLayer = [self layerWithColor:[UIColor blueColor]
transform:transform];
transform = CATransform3DMakeTranslation(-kSize/2, 0, 0);
transform = CATransform3DRotate(transform, M_PI_2, 0, 1, 0);
self.leftLayer = [self layerWithColor:[UIColor cyanColor]
transform:transform];
transform = CATransform3DMakeTranslation(0, 0, -kSize/2);
transform = CATransform3DRotate(transform, M_PI_2, 0, 0, 0);
self.backLayer = [self layerWithColor:[UIColor yellowColor]
transform:transform];
transform = CATransform3DMakeTranslation(0, 0, kSize/2);
transform = CATransform3DRotate(transform, M_PI_2, 0, 0, 0);
self.frontLayer = [self layerWithColor:[UIColor magentaColor]
transform:transform];
self.view.layer.sublayerTransform = MakePerspetiveTransform();
UIGestureRecognizer *g = [[UIPanGestureRecognizer alloc]
initWithTarget:self
action:@selector(pan:)];
[self.view addGestureRecognizer:g];
}
- (void)pan:(UIPanGestureRecognizer *)recognizer {
CGPoint translation = [recognizer translationInView:self.view];
CATransform3D transform = MakePerspetiveTransform();
transform = CATransform3DRotate(transform,
kPanScale * translation.x,
0, 1, 0);
transform = CATransform3DRotate(transform,
-kPanScale * translation.y,
1, 0, 0);
self.view.layer.sublayerTransform = transform;
}
@end
BoxViewController shows how to build a simple box and rotate it based on panning. All the layers are created with layerWithColor:transform:. Notice that all the layers have the same position. They only appear to be in the shape of a box through transforms that translate and rotate them.
You apply a perspective sublayerTransform (a transform applied to all sublayers, but not the layer itself). We won’t go into the math here, but the m34 position of the 3D transform matrix should be set to -1/EYE_DISTANCE. For most cases, 2000 units works well, but you can adjust this to “zoom the camera.”
You could also build this box by setting position and zPosition rather than translating, as shown in the following code. This may be more intuitive for some developers.
BoxTransformViewController.m (BoxTransform)
- (CALayer *)layerAtX:(CGFloat)x y:(CGFloat)y z:(CGFloat)z
color:(UIColor *)color
transform:(CATransform3D)transform {
CALayer *layer = [CALayer layer];
layer.backgroundColor = [color CGColor];
layer.bounds = CGRectMake(0, 0, kSize, kSize);
layer.position = CGPointMake(x, y);
layer.zPosition = z;
layer.transform = transform;
[self.contentLayer addSublayer:layer];
return layer;
}
- (void)viewDidLoad {
[super viewDidLoad];
CATransformLayer *contentLayer = [CATransformLayer layer];
contentLayer.frame = self.view.layer.bounds;
CGSize size = contentLayer.bounds.size;
contentLayer.transform =
CATransform3DMakeTranslation(size.width/2, size.height/2, 0);
[self.view.layer addSublayer:contentLayer];
self.contentLayer = contentLayer;
self.topLayer = [self layerAtX:0 y:-kSize/2 z:0
color:[UIColor redColor]
transform:MakeSideRotation(1, 0, 0)];
...
}
- (void)pan:(UIPanGestureRecognizer *)recognizer {
CGPoint translation = [recognizer translationInView:self.view];
CATransform3D transform = CATransform3DIdentity;
transform = CATransform3DRotate(transform,
kPanScale * translation.x,
0, 1, 0);
transform = CATransform3DRotate(transform,
-kPanScale * translation.y,
1, 0, 0);
self.view.layer.sublayerTransform = transform;
}
You now need to insert a CATransformLayer to work with. If you just use a CALayer, then zPosition is used only for calculating layer order. It’s not used to determine location in space. This makes the box look completely flat. CATransformLayer supports zPosition without requiring you to apply a perspective transform.
Decorating Your Layers
A major advantage of CALayer over UIView, even if you’re working only in 2D, is the automatic border effects that CALayer provides. For instance, CALayer can automatically give you rounded corners, a colored border, and a drop shadow. All of these can be animated, which can provide some nice visual effects. For instance, you can adjust the position and shadow to give the illusion of clicking as the user presses and releases a layer. The following code will create the layer shown in Figure 9-4.
DecorationViewController.m (Decoration)
CALayer *layer = [CALayer layer];
layer.frame = CGRectMake(100, 100, 100, 100);
layer.cornerRadius = 10;
layer.backgroundColor = [[UIColor redColor] CGColor];
layer.borderColor = [[UIColor blueColor] CGColor];
layer.borderWidth = 5;
layer.shadowOpacity = 0.5;
layer.shadowOffset = CGSizeMake(3.0, 3.0);
[self.view.layer addSublayer:layer];
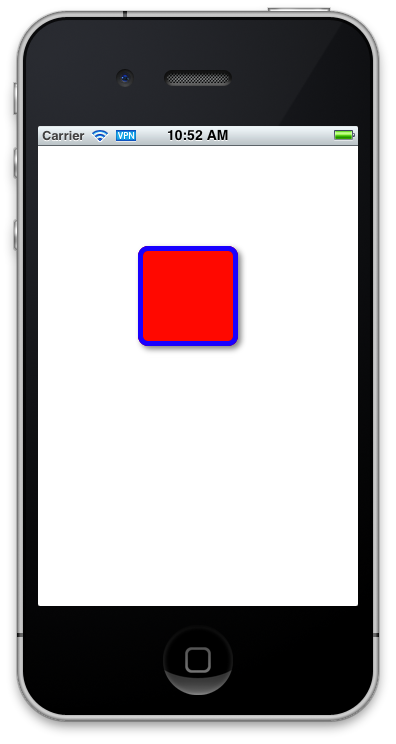
Figure 9-4 Layer with colored, rounded border and shadow
Auto-Animate with Actions
Most of the time, implicit animations do what you want, but there are times you’d like to configure them. You can turn off all implicit animations using CATransaction, but that applies only to the current transaction (generally the current run loop). To modify how an implicit animation behaves, and especially if you want it to always behave that way for this layer, you need to configure the layer’s actions. This allows you to configure your animations when you create the layer rather than apply an explicit animation every time you change a property.
Layer actions are fired in response to various changes on the layer, such as adding or removing the layer from the hierarchy or modifying a property. When you modify the position property, for instance, the default action is to animate it over a quarter-second. In the following examples, CircleLayer is a layer that draws a red circle in its center with the given radius.
ActionsViewController.m (Actions)
CircleLayer *circleLayer = [CircleLayer new];
circleLayer.radius = 20;
circleLayer.frame = self.view.bounds;
[self.view.layer addSublayer:circleLayer];
...
[circleLayer setPosition:CGPointMake(100, 100)];
Let’s modify this so that changes in position always animate over 2 seconds:
CircleLayer *circleLayer = [CircleLayer new];
circleLayer.radius = 20;
circleLayer.frame = self.view.bounds;
[self.view.layer addSublayer:circleLayer];
CABasicAnimation *anim =
[CABasicAnimation animationWithKeyPath:@”position”];
anim.duration = 2;
NSMutableDictionary *actions =
[NSMutableDictionary dictionaryWithDictionary:
[circleLayer actions]];
[actions setObject:anim forKey:@”position”];
circleLayer.actions = actions;
...
[circleLayer setPosition:CGPointMake(100, 100)];
Setting the action to [NSNull null] disables implicit animations for that property. A dictionary cannot hold nil, so you need to use the NSNull class.
There are some special actions for when the layer is added to the layer tree (kCAOnOrderIn) and when it’s removed (kCAOnOrderOut). For example, you can make a group animation of growing and fade-in like this:
CABasicAnimation *fadeAnim = [CABasicAnimation
animationWithKeyPath:@”opacity”];
fadeAnim.fromValue = [NSNumber numberWithDouble:0.4];
fadeAnim.toValue = [NSNumber numberWithDouble:1.0];
CABasicAnimation *growAnim = [CABasicAnimation
animationWithKeyPath:
@”transform.scale”];
growAnim.fromValue = [NSNumber numberWithDouble:0.8];
growAnim.toValue = [NSNumber numberWithDouble:1.0];
CAAnimationGroup *groupAnim = [CAAnimationGroup animation];
groupAnim.animations = [NSArray arrayWithObjects:fadeAnim,
growAnim, nil];
[actions setObject:groupAnim forKey:kCAOnOrderIn];
Actions are also important when dealing with transitions (kCATransition) when one layer is replaced with another. This is commonly used with a CATransition (a special type of CAAnimation). You can apply a CATransition as the action for the contents property to create special effects like slide show whenever the contents change. By default, the fade transition is used.
Animating Custom Properties
Core Animation implicitly animates several layer properties, but what about custom properties on CALayer subclasses? For instance, in the CircleLayer, you have a radius property. By default, radius is not animated, but contents is (using a fade CATransition). So changing the radius causes your current circle to cross-fade with your new circle. This probably isn’t what you want. You want radius to animate just like position. There are a few steps to make this work correctly, as shown in the following example.
CircleLayer.m (Actions)
@implementation CircleLayer
@dynamic radius;
- (id)init {
self = [super init];
if (self) {
[self setNeedsDisplay];
}
return self;
}
- (id)initWithLayer:(id)layer {
self = [super initWithLayer:layer];
[self setRadius:[layer radius]];
return self;
}
- (void)drawInContext:(CGContextRef)ctx {
CGContextSetFillColorWithColor(ctx,
[[UIColor redColor] CGColor]);
CGFloat radius = self.radius;
CGRect rect;
rect.size = CGSizeMake(radius, radius);
rect.origin.x = (self.bounds.size.width - radius) / 2;
rect.origin.y = (self.bounds.size.height - radius) / 2;
CGContextAddEllipseInRect(ctx, rect);
CGContextFillPath(ctx);
}
+ (BOOL)needsDisplayForKey:(NSString *)key {
if ([key isEqualToString:@”radius”]) {
return YES;
}
return [super needsDisplayForKey:key];
}
- (id < CAAction >)actionForKey:(NSString *)key {
if ([self presentationLayer] != nil) {
if ([key isEqualToString:@”radius”]) {
CABasicAnimation *anim = [CABasicAnimation
animationWithKeyPath:@”radius”];
anim.fromValue = [[self presentationLayer]
valueForKey:@”radius”];
return anim;
}
}
return [super actionForKey:key];
}
@end
We’ll start with a reminder of the basics. You call setNeedsDisplay in init so that the layer’s drawInContext: is called the first time it’s added to the layer tree. You override needsDisplayForKey: so that whenever radius is modified, you automatically redraw.
Core Animation makes several copies of the layer in order to animate. It uses initWithLayer: to perform the copy, so you need to implement that method to copy your custom properties.
Now you come to your actions. You implement actionForKey: to return an animation with a fromValue of the currently displayed (presentationLayer) radius. This means that you’ll animate smoothly if the animation is changed midflight.
It’s critical to note that you implemented the radius property using @dynamic here, not @synthesize. CALayer automatically generates accessors for its properties at runtime, and those accessors have important logic. It’s vital that you not override these CALayer accessors by either implementing your own accessors or using @synthesize to do so.
Core Animation and Threads
It’s worth noting that Core Animation is very tolerant of threading. You can generally modify CALayer properties on any thread, unlike UIView properties. drawInContext: may be called from any thread (although a given CGContext should be modified on only one thread at a time). Changes to CALayer properties are batched into transactions using CATransaction. This happens automatically if you have a run loop. If you don’t have a run loop, you need to call [CATransaction flush] periodically. If at all possible, though, you should perform Core Animation actions on a thread with a run loop to improve performance.
Summary
Core Animation is one of the most important frameworks in iOS. It puts a fairly easy-to-use API in front of an incredibly powerful engine. There are still a few rough edges to it, however, and sometimes things need to be “just so” to make it work correctly (for example, implementing your properties with @dynamic rather than @synthesize). When it doesn’t work correctly, it can be challenging to debug, so having a good understanding of how it works is crucial. Hopefully, this chapter has made you confident enough with the architecture and the documentation to dive in and make some really beautiful apps.
Further Reading
Apple Documentation
The following documents are available in the iOS Developer Library at developer.apple.com or through the Xcode Documentation and API Reference.
Animation Types and Timing Programming Guide
Core Animation Programming Guide
Other Resources
millen.me. (Milen Dzhumerov), “CA’s 3D Model” An excellent overview of the math behind the perspective transform, including the magic -1/2000.http://milen.me/technical/core-animation-3d-model/
Cocoa with Love, (Matt Gallagher), “Parametric acceleration curves in Core Animation,” Explains how to implement timing curves that cannot be implemented with CAMediaTimingFunction, such as damped ringing and exponential decay.cocoawithlove.com/2008/09/parametric-acceleration-curves-in-core.html