
Product Category
The Beauty & Me sample app that accompanies this book presents products to users in a traditional way. First of all, we let users sell all brands we are carrying. If you don’t know any brand, I will make up some, such as Origins, NUDE Skincare, etc. Under each brand, we have all products. When a user selects a product, the app displays the product detail. This chapter introduces the brand, or a more general name, product category.
In iOS app development, Model-View-Controller (MVC) is a widely used design pattern. I have structured the remaining chapters such that they follow this MVC pattern: first, I present the models used for implementing the feature discussed, then the views, and finally the controllers when applicable.
In this chapter, you learn about:
- The product category model
- The category view (UITableViewCell)
- The category controller
- Putting model, view, and controller together with UIStoryboard
- Adding sample data in Parse.com
Product Category Model
The Product Category model is used to mimic the makeup product brand. A brand has a title as the minimum, a logo, origin country, and a description about this brand. For this example, since I only carry well-known brands, l only use the brand title and logo image.
I have introduced PFObject in Chapter 3. Your category model will be a subclass of PFObject. Subclassing PFObject requires giving a ParseClassName. This ParseClassName needs to be the same you chose when setting it on the Parse website. In other words, if you create a model class called Category in your project on Parse.com, you need to use “Category” as the ParseClassName in the subclass file. The following sample code shows how this is done.
Start by registering a kCategory string constant with EMCAConstants.h:
extern NSString *const kCategory;
and in the EMABConstants.m file:
NSString *const kCategory = @"Category";
Next, create an EMABCategory subclass to represent your makeup product category. The class has two properties, title and image, which represent the brand name and logo. In Chapter 3, I explained how to create a PFObject subclass—for example, you use an NSString instance to hold the brand title and UIImage for the logo. The image file for each brand is stored on the Parse server; your iOS app will fetch the image file and convert it into UIImage, and then show the image with an UIImageView. Loading an image file from a remote server is always a challenging task in iOS. If you want to cache the image file so you don’t need to fetch it again next time, you have more work to do.
Since this is a common task you are facing while developing an iOS app, Parse makes it easier by introducing a class called PFFile. I will use an example shortly to demonstrate how using this class makes a developers’ live easier. For now, just use PFFile class to hold the image.
The iPhone app will also fetch all product categories from the Parse server. Chapter 3 introduced the PFQuery class. For this example, you will need to create a helper class method called +(PFQuery *)basicQuery in your EMABCategory subclass.
Here is the complete EMABCategory header file:
If PFObject is not recognized, verify that you have included #import <Parse/Parse.h>.
The implementation of EMABCatgory is perhaps the simplest one in this book. Besides importing a header file of this subclass, you import “EMABConstants.h” because the required +(NSString *)ParseClassName method needs to return an NSString. You can write something like this:
+(NSString *)parseClassName {
      return @"Category";
}
If you use the @"Category" model class name at different locations but later on you want to change it to @”Brand,” you have to look for it in the whole project and replace it with “Brand.” Using a global constant helps to solve this issue. You just need to change it from “Category” to “Brand’ in the “EMABConstants.m” once.
In the +(PFQuery *)basicQuery implementation, you sort the fetch results based on the title alphabetically by simply using “orderByAscending” method—this is another benefit of Parse. Imagine you develop for iOS, Android, or the Web. If you want to have the same features for the three platforms, platform engineers needs to write their own sorting method, given the back end doesn’t have it, which is quite typical.
Here is the complete implementation:
Product Category View
As shown in the prototype of the sample app in Chapter 2, a UITableViewController is used to present all brands. While the UITableView itself looks pretty simple, what makes it look richer is each UITableViewCell, as shown in Figure 5-1. For the brand, focus on the UITableViewCell.
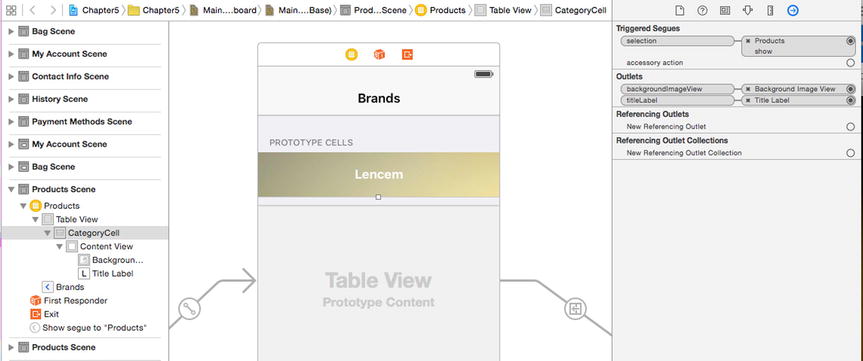
Figure 5-1. Category cell in EMABCategoryTableViewController
The EMABCategory has two properties, title and image; the EMABCategoryTableViewCell, a subclass of PFTableViewCell, also has two properties to hold the title and image: one is UILabel, the other is PFImageView.
You also want to let an EMABCategory model object hook up with EMABCategoryTableViewCell, so you create a helper method: -(void)configureItem:(EMABCategory *)item. Here is the complete header file:
As you can see, you don’t define the UILabel and PFImageView properties in the header file—you define them in the implementation file. The reason is that the properties are private; there is no need to let the outside world know what you are using. On the other hand, your UI is fairly simple, so for the purpose of keeping the code clean, you will use IBOutlet to hook up the properties in your implementation with the Main UIStoryboard. Here is the interface category in the .m file:
@interface EMABCategoryTableViewCell()
@property (nonatomic, weak) IBOutlet PFImageView *backgroundImageView;
@property (nonatomic, weak) IBOutlet UILabel *titleLabel;
@end;
The titleLabel will display a brand’s title. Simple enough, use self.titleLabel.text = item.title. To display a brand’s image, you use PFImageView and PFFile:
self.backgroundImageView.file = item.image;
[self.backgroundImageView loadInBackground];
The magic is [self.backgroundImageView loadInBackground]. It automatically handles async image loading and displaying, as well as caching.
Here is the complete implementation:
You may be wondering why I set self.backgroundImageView.image = nil. While UITableView reuses its UITableViewCell, the images in the old and offscreen cells will show before new images are loaded to replace those images. When you scroll UITableView, you will see the funky image refresh. There are a few different ways to solve this problem; one is in -(void)prepareForReuse in the UITableViewCell where you do it in -(void)configureItem:(EMABCategory)item for simplicity.
Product Category Controller
Next, you will be working on the controller.
First, create a new class named “EMABCategoriesTableViewController” and make sure it is a subclass of PFQueryTableViewController. I have already introduced PFQueryTableViewController in Chapter 3. In this view controller, you create a one-to-one mapping between the EMABCategory class and the EMABCateogryUITableViewCell. You will also use the features such as pull-to-refresh, pagination, and showing and dismissing a loading activity indicator before and after any data is loaded.
Here is the automatically generated header file:
In the .m implementation file, start by importing the necessary helper files such as “EMABConstants.h,” “EMABCategory.h,” and “EMABCategoryTableViewCell.h.”
Next, implement the -(void)awakeFromNib method. parseClassName, objectsPerPage, and pullToRefreshEnabled are the properties of PFQueryTableViewController so you can just use them and set the values you want. In this case, the ParseClassName is defined by kCategory. You want to show 10 objects per page and enable pull-to-refresh. The activity loading indicator will be shown by default.
- (void)awakeFromNib {
    [super awakeFromNib];
    self.parseClassName = kCategory;
    self.paginationEnabled = YES;
    self.objectsPerPage = 10;
    self.pullToRefreshEnabled = YES;
}
Keep in mind you are using Storyboard to initialize your view controller so -(void)awaeFromNib method is a good place to enable pull-to-fresh, pagination, etc. If you use a different way such as -(instancetype)initWithStyle:(UITableViewStyle)style, then this method is the place for you to set ParseClassName, pagination, etc.
Next, you need to let the PFQueryTableViewController subclass know what kind of query you need to perform. You implement the method -(PFQuery *)queryForTable. In the EMABCategory class, you have defined a helper method called +(PFQuery *)basicQuery. Now you can just use it.
PFQuery *query = [EMABCategory basicQuery];
Or, you can just use the default implementation:
PFQuery *query = [PFQuery queryWithClassName:self.pasreClassName];
[query orderByAscending:@"title"];
If you end up using the same code a few more times, implementing it in the EMABCategory class makes more sense.
Next, PFQuery also has a method for you to manage cache policy: kPFCachePolicyCacheThenNetwork. This policy is quite self-explanatory. Keep in mind, when using kPFCachePolicyCacheThenNetwork as your caching policy your callback is always triggered twice. This is because the policy is to use the cache and then to go to the network, not to use the cache exclusively. There are other cache options such as kPFCachePolicyIgnoreCache, kPFCachePolicyCacheOnly, kPFCachePolicyNetworkOnly, kPFCachePolicyCacheElseNetwork, kPFCachePolicyNetworkElseCache, and kPFCachePolicyCacheThenNetwork.
if ([self.objects count] == 0) {
query.cachePolicy = kPFCachePolicyCacheThenNetwork;
}
The complete implementation of +(PFQuery *)queryForTable looks like this:
-(PFQuery *)queryForTable {
    PFQuery *query = [EMABCategory basicQuery];
    if ([self.objects count] == 0) {
        query.cachePolicy = kPFCachePolicyCacheThenNetwork;
    }
    return query;
}
Next, implement the PFQueryTableViewController datasource method. First, you want to extent the default cell height, so you set the height of each cell to 60 points:
-(CGFloat)tableView:(UITableView *)tableView heightForRowAtIndexPath:(NSIndexPath *)
indexPath
{
    return 60.0;
}
PFQueryTableViewController has overridden the standard UITableView’s -tableView:cellForRowAtIndexPath: method. Namely, -tableView:cellForRowAtIndexPath:object:. Traditionally, you need the object array. Then you use indexPath.row to get the object for each row. Now you have this object automatically.
However, this override method assumes that you will give an object to each row and there is only one section. If you have multiple sections, this method won’t work automatically.
Since you also enable pagination, and there are 10 objects on each page, each cell will be configured with an item. For this, you use the EMABCategoryTableViewCell -(void)configureItem:(EMABCategory *)item method.
You also need a way to load the next page. Here you add an extra cell after 10 objects. This cell has a title of “Load More…”. If a user taps this cell, the app will load another 10 objects or one more page.
Here is the complete implementation:
- (EMABCategoryTableViewCell *)tableView:(UITableView *)tableView cellForRowAtIndexPath:(NSIndexPath *)indexPath object:(EMABCategory *)object{
    EMABCategoryTableViewCell *cell = [tableView dequeueReusableCellWithIdentifier:@"CategoryCell" forIndexPath:indexPath];
    if (indexPath.row == [[self objects] count]) {
        cell.textLabel.text = NSLocalizedString(@"Load More…", @"");
    } else {
        [cell configureItem:object];
    }
    return cell;
}
The last step is to handle when a user taps “Load more…” and tap other CategoryCell. When the “Load more…” cell is tapped, another 10 objects are loaded and displayed in the table. Luckily, Parse has prepared this method for you. Simply call the method -(void)loadNextPage, and you are good to go.
A single tap on a brand cell displays all products under this brand (I will talk more about this in the next chapter).
Here is the complete implementation:
-(void)tableView:(UITableView *)tableView didSelectRowAtIndexPath:(NSIndexPath *)indexPath{
    if (indexPath.row == [[self objects] count]) {
        [self loadNextPage];
    } else {
        //todo
    }
}
Those are all the code parts. But there is still some more work you need to do in the UIStoryboard.
Putting It All Together: UIStoryboard
First, you need to set the brand UITableViewController introduced in Chapter 2 as your “EMABCategoryTableViewController.” Figure 5-2 shows how to do this.
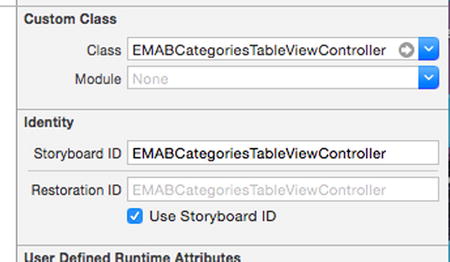
Figure 5-2. Set the Storyboard ID for a custom class
Personally, I also like to use the Class name as the Storyboard ID and Restoration ID to make sure they are unique.
Second, change TableView Content from Static Cells to Dynamic Protyotypes as shown in Figure 5-3.
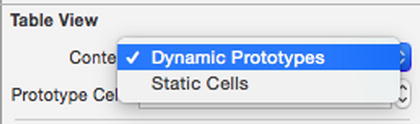
Figure 5-3. Use Dynamic Prototypes for the UITableViewCell
Then set the TableViewCell Style from “Basic” to “Custom,” and an Identifier “CategoryCell” as shown in Figure 5-4.
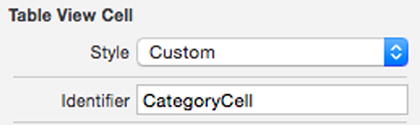
Figure 5-4. Use Custom Style
Also set the class of this cell “EMABCategoryTableViewCell,” as shown in Figure 5-5.

Figure 5-5. Use EMABCategoryTableViewCell class
Next, set the cell height to 60, as shown in Figure 5-6.
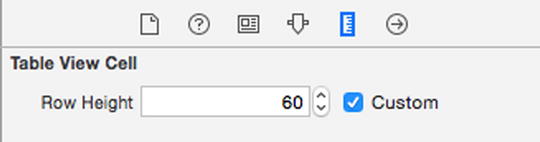
Figure 5-6. Set the Row Height
Finally, set the UIImageView to PFImageView, as shown in Figure 5-7.
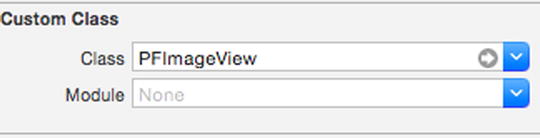
Figure 5-7. Use PFImageView
Now it’s time to build and run this project.
Add Sample Data
If you followed along so far, the project will run just fine; but there is nothing to show. You need to add some sample data to the Parse back end first.
- Go to Parse.com, log in, and browse to the “Core” page of the project. Then click “Add Class” and give it a name “Category.”
- Click “+Col” and, for the first column, select the String type and set its value to “title,” then click “Create Column.”
- Click “+Col” again, this time select File type and set its value to image, then click “Create Column.”
- Next, add some sample data. For this sample, I have prepared seven (7) brands, namely, Original, Nade Skincare, Lencome, Fresh Skin, Aven, Diar, and Esta Louder. You can also use any pictures for those brands for demo purposes. Or just use the images I have included with the Chapter 5 source code.
- Click the “+Row” button. Parse creates an empty row with “undefined” placeholder for each column. For this example, you only need to care about the “image” and “title” columns. Tap the “(undefined)” area in “Image” column. Parse asks you to upload an image. Upload an image. And set a title such as “Origins.” When you press “Enter,” Parse will automatically generate an objectId, createdAt, updatedAt and ACL for you. (I will cover ACL in Chapter 18.)
- Repeat steps 5 six times to add six more rows.
Now when you return to your Xcode project or open the app in the simulator or your device, you should see the seven brands you just added when you build and run your project.
Summary
In this chapter, I covered how to implement the product brands feature. I introduced the EMABCategory model, EMABCategoryTableViewCell view, and the EMABCategoriesTableViewController controller. I also demonstrated how to connect the view, view controller with UIStoryboard. Finally, I talked about how to add sample data into Parse so your app can load data dynamically.