Introduction
Whether you’re making the transition from an older Apple iPhone or iPad model that was running iOS 7 (or an earlier version of Apple’s iOS) and upgrading to a new device running iOS 8, or you’re keeping your current device but upgrading to iOS 8, the word that best describes the biggest changes you should expect from iOS 8 is continuity.
Apple has implemented hundreds of new features and functions, not just into iOS 8 itself, but into the core apps that come preinstalled with your mobile device—like Contacts, Calendar, Reminders, Notes, Safari, Mail, Messages, and so on—and you’ll learn how to use many of these new features shortly. If you use a Mac, as well as an iPhone and/or iPad, you’ll discover that all of your Apple computers and mobile devices now work more seamlessly together, thanks to iCloud and other technologies, so your content and data are always available when and where it’s needed, and you can communicate more effectively, regardless of which computer or mobile device you happen to be using at any given time.
Thanks to iOS 8’s Continuity and Handoff features, you can begin using one application on your iPhone, for example, and then pick up exactly where you left off on your iPad or Mac. This now happens automatically if you want it to.
Plus, it’s now possible to answer incoming calls made to your iPhone from your iPad or Mac, as long as your smartphone is nearby and wirelessly linked with your other computers and devices. This is just a preview of the Handoff-related features you can soon be utilizing and that will be explained shortly.
Apple’s iPhone smartphones and iPad tablets continue to revolutionize the way people communicate and handle their everyday computing and communications needs. These devices have also altered our perception about what a smartphone and tablet is and what they’re capable of.
The fact is, in just over six years, hundreds of millions of people around the world have somehow incorporated an Apple iOS mobile device into their lives. With each new iPhone or iPad model that Apple introduces, and each revision of the iOS operating system, these mobile devices become more powerful, and they introduce us to new features and functionality that seem as if they have been lifted directly from the pages of science-fiction novels and made a reality.
This year, with the release of the latest iPhone 6, iPhone 6 Plus, and new iPad models, as well as the early-2015 release of the much-anticipated Apple Watch, the launch of the Apple Pay service, and enhancements made to Apple’s iCloud service, our ability to utilize these devices and technologies in our everyday lives has once again taken a giant leap forward. This book will help you prepare yourself for this latest evolution.
![]() Note
Note
Throughout this book, an “iOS mobile device” refers to any Apple iPhone, iPad, or Apple mobile device that’s running the iOS 8 operating system. If you plan to continue using iOS 7 with your iOS mobile device, pick up a copy of iPad and iPhone Tips and Tricks, Third Edition, which focuses on the older version of Apple’s mobile device operating system.
If you’re a veteran iPhone or iPad user, when you upgrade from iOS 7 to iOS 8, you’ll discover that the graphical interface is pretty similar to what you’re already accustomed to. However, based on how you tap, swipe, or hold the mobile device, you’ll be able to easily take advantage of some of iOS 8’s newest features and functions.
For those first-time iPhone or iPad users, congratulations! Now is the perfect time to introduce yourself to these mobile devices or switch from another smartphone or tablet to what Apple has to offer. Not only can you expect an exciting experience as you begin using your new iPhone or iPad hardware that’s running the iOS 8 operating system, but you have the opportunity to access the App Store to utilize any of the more than 1.3 million apps that can greatly expand the capabilities of these mobile devices.
![]() What’s New
What’s New
It’s now possible to use the official Microsoft Word, Excel, PowerPoint, or OneNote apps, and/or Outlook Web App (OWA) on your iPhone or iPad to view, create, edit, and manage Microsoft Office–related documents and files that are fully compatible with the version of Microsoft Office you have running on your Mac or PC. These documents and files sync with your other computers and devices when used with your paid Office 365 subscription and Microsoft OneDrive account.
Whether you’re a veteran iPhone or iPad user or are just learning how to use an iOS mobile device, this book will teach you what you need to know to quickly become proficient using the device itself, as well as the majority of the apps that come bundled with it. The focus of this all-new fourth edition of iPad and iPhone Tips and Tricks is to quickly get you acquainted with iOS 8 and help you adapt to this new version of the operating system while learning how to best utilize the newest features and functions it offers.
![]() Note
Note
The iOS 8 operating system is compatible with the iPhone 4s, iPhone 5, iPhone 5c, iPhone 5s, iPhone 6, and iPhone 6 Plus, as well as the iPad 2, iPad 3rd Generation, iPad 4th Generation, iPad Air, iPad mini, iPad mini with Retina Display, the newest iPad models released by Apple in late 2014, and the iPod touch (5th generation or later).
If you purchased a new iPhone, iPad, or iPod touch after September 2014, iOS 8 came pre-installed on your mobile device, but you might be able to upgrade to an updated version of iOS 8, such as iOS 8.1.
How to Upgrade from iOS 7 to iOS 8
Anyone who purchased an iPhone, iPad, or iPod touch before September 2014 will need to upgrade to iOS 8. The easiest way to do this is to use your mobile device to access any Wi-Fi hotspot or wireless home network to establish a high-speed Internet connection. Then, from the Home screen, launch Settings.
Before upgrading your iOS mobile device from iOS 6 or iOS 7 to iOS 8, be sure to create a backup of your iPhone or iPad using the iTunes Sync Backup feature or, better yet, the iCloud Backup feature. After you install the iOS 8 operating system, all of your apps and related data will automatically be fully restored.
Next, tap on the General option from the main Settings menu, and then tap on the Software Update option (shown in Figure I.1). If your device is running iOS 6 or iOS 7, a message will appear indicating that an operating system upgrade is available. Follow the onscreen prompts to download and install iOS 8 for free. The upgrade process will take between 20 and 45 minutes, depending on which iPhone or iPad model you’re using, its internal storage capacity, and how much information is currently stored on your device.
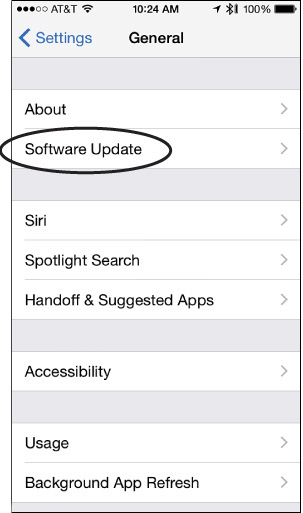
FIGURE I.1 The easiest way to upgrade your iPhone or iPad from iOS 7 to iOS 8 is to use Wi-Fi and access the Software Update option from within Settings.
Every few months, Apple updates the iOS to add new features to your iPhone or iPad. When a free iOS update is required, a message appears on your device’s screen, plus a Badge icon appears within the Settings app icon on your Home screen. For example, iOS 8 was released on September 17, 2014; however, Apple had already announced a planned iOS 8 update in October 2014 to add the Apple Pay functionality to the iPhone 6 and iPhone 6 Plus.
Interacting with Your iPhone or iPad
If you’re a veteran iPhone or iPad user, you already know that Apple’s iOS mobile operating system enables you to interact with your mobile device using its touchscreen. Data entry, for example, is typically done using the virtual keyboard that is displayed on the screen when it’s needed. Based on the type of information you’re entering and the app you’re using, the keyboard’s layout adapts automatically.
![]() What’s New
What’s New
Among the improvements made to iOS 8 is the introduction of the QuickType virtual keyboards. From an appearance standpoint, the virtual keyboard that appears on your iPhone or iPad’s screen might initially look similar to what you’re used to, but app developers now can modify virtual keyboard layouts to make apps easier and more intuitive to use.
Plus, iOS 8 is designed to better predict what you’re typing, as you’re typing it, so as you’re using the virtual keyboard, data entry can occur faster and be more accurate than ever before.
When not using the virtual keyboard, much of your interaction with the iPhone or iPad is done using a series of taps, swipes, and other finger gestures on the Multi-Touch display. However, you can also communicate with your iPhone or iPad using your voice, thanks to Apple’s Siri (which also has some added and improved functionality) and the Dictation feature, or utilize an optional external keyboard and/or pen-shaped stylus.
Touchscreen Techniques You’ll Need to Master
To navigate your way around iOS 8 on your iPhone or iPad, you need to master a series of basic taps and finger gestures. For the most part, these taps and figure gestures are pretty much the same as they were before, with occasional usage differences.
![]() What’s New
What’s New
When using the Mail app to review your Inbox(es), when you swipe from right to left across a message listing, a new menu appears giving you the option to quickly Move, Flag, or Trash that message. If you swipe across the listing from left to right, you can mark the message as read, or by tapping on the message, you can open and read it.
As you learn more about iOS 8’s new features, throughout this book you’ll also discover how to best utilize them by executing the necessary taps, swipes, pinches, and other finger gestures.
Just as when using previous editions of the iOS with an iPhone or iPad, from the moment you turn on your device (or take it out of Sleep mode), aside from pressing the Home button, virtually all of your interaction with the smartphone or tablet is done through the following finger movements and taps on the device’s highly sensitive multitouch display:
![]() Tap—Tapping an icon, button, or link that’s displayed on your device’s screen serves the same purpose as clicking the mouse when you use your main computer. And, just as when you use a computer, you can single-tap or double-tap, which is equivalent to a single- or double-click of the mouse.
Tap—Tapping an icon, button, or link that’s displayed on your device’s screen serves the same purpose as clicking the mouse when you use your main computer. And, just as when you use a computer, you can single-tap or double-tap, which is equivalent to a single- or double-click of the mouse.
![]() Hold—Instead of a quick tap, in some cases, it is necessary to press and hold your finger on an icon or onscreen command option. When a hold action is required, place your finger on the appropriate icon or command option, and hold it there with a slight pressure. There’s never a need to press down hard on the smartphone or tablet’s screen.
Hold—Instead of a quick tap, in some cases, it is necessary to press and hold your finger on an icon or onscreen command option. When a hold action is required, place your finger on the appropriate icon or command option, and hold it there with a slight pressure. There’s never a need to press down hard on the smartphone or tablet’s screen.
![]() Swipe—A swipe refers to quickly moving your finger along the screen from right to left, left to right, top to bottom, or bottom to top, in order to scroll left, right, up, or down, depending on which app you’re using.
Swipe—A swipe refers to quickly moving your finger along the screen from right to left, left to right, top to bottom, or bottom to top, in order to scroll left, right, up, or down, depending on which app you’re using.
![]() Pinch—Using your thumb and index finger (the finger next to your thumb), perform a pinch motion on the touchscreen to zoom out when using certain apps. Or “unpinch” (by moving your fingers apart quickly) to zoom in on what you’re looking at on the screen when using many apps.
Pinch—Using your thumb and index finger (the finger next to your thumb), perform a pinch motion on the touchscreen to zoom out when using certain apps. Or “unpinch” (by moving your fingers apart quickly) to zoom in on what you’re looking at on the screen when using many apps.
Another way to zoom in or out when looking at the device’s screen is to double-tap the area of the screen on which you want to zoom in. This works when you’re surfing the Web in Safari or looking at photos using the Photos app, as well as within most other apps that support the zoom in/out feature. To zoom out again, double-tap the screen a second time.
![]() Pull-down—Using your finger, swipe it from the very top of the iPhone or iPad’s screen quickly in a downward direction. This causes the Notification Center window to appear. You can be holding the device in portrait or landscape mode for this to work. As you’ll discover in Chapter 1, “Tips and Tricks for Customizing Settings,” the functionality of Notification Center, and what information you can access from it, has been enhanced in iOS 8 and is more customizable than before.
Pull-down—Using your finger, swipe it from the very top of the iPhone or iPad’s screen quickly in a downward direction. This causes the Notification Center window to appear. You can be holding the device in portrait or landscape mode for this to work. As you’ll discover in Chapter 1, “Tips and Tricks for Customizing Settings,” the functionality of Notification Center, and what information you can access from it, has been enhanced in iOS 8 and is more customizable than before.
![]() What’s New
What’s New
The pull-down gesture is also used to access the enhanced Spotlight Search feature. Use a pull-down gesture that starts in the middle of the iPhone or iPad’s Home screen to access iOS 8’s Spotlight Search feature. One use of Spotlight Search is to quickly find any information that’s stored in your mobile device, such as a Contacts entry, Calendar event, or content in an email message. Enter a keyword or search phrase into the Search field that appears, tap on the Search key on the virtual keyword, and then tap on one of the search result listings to access the related data or content by automatically launching whichever app it relates to.
When your iPhone or iPad has Internet access, Spotlight Search utilizes online-based resources automatically to give you access to Wikipedia, news, information about nearby places, the iTunes Store, App Store, iBooks Store, relevant suggested websites, movie show times, and other content based on what you’re searching for (shown in Figure I.2).
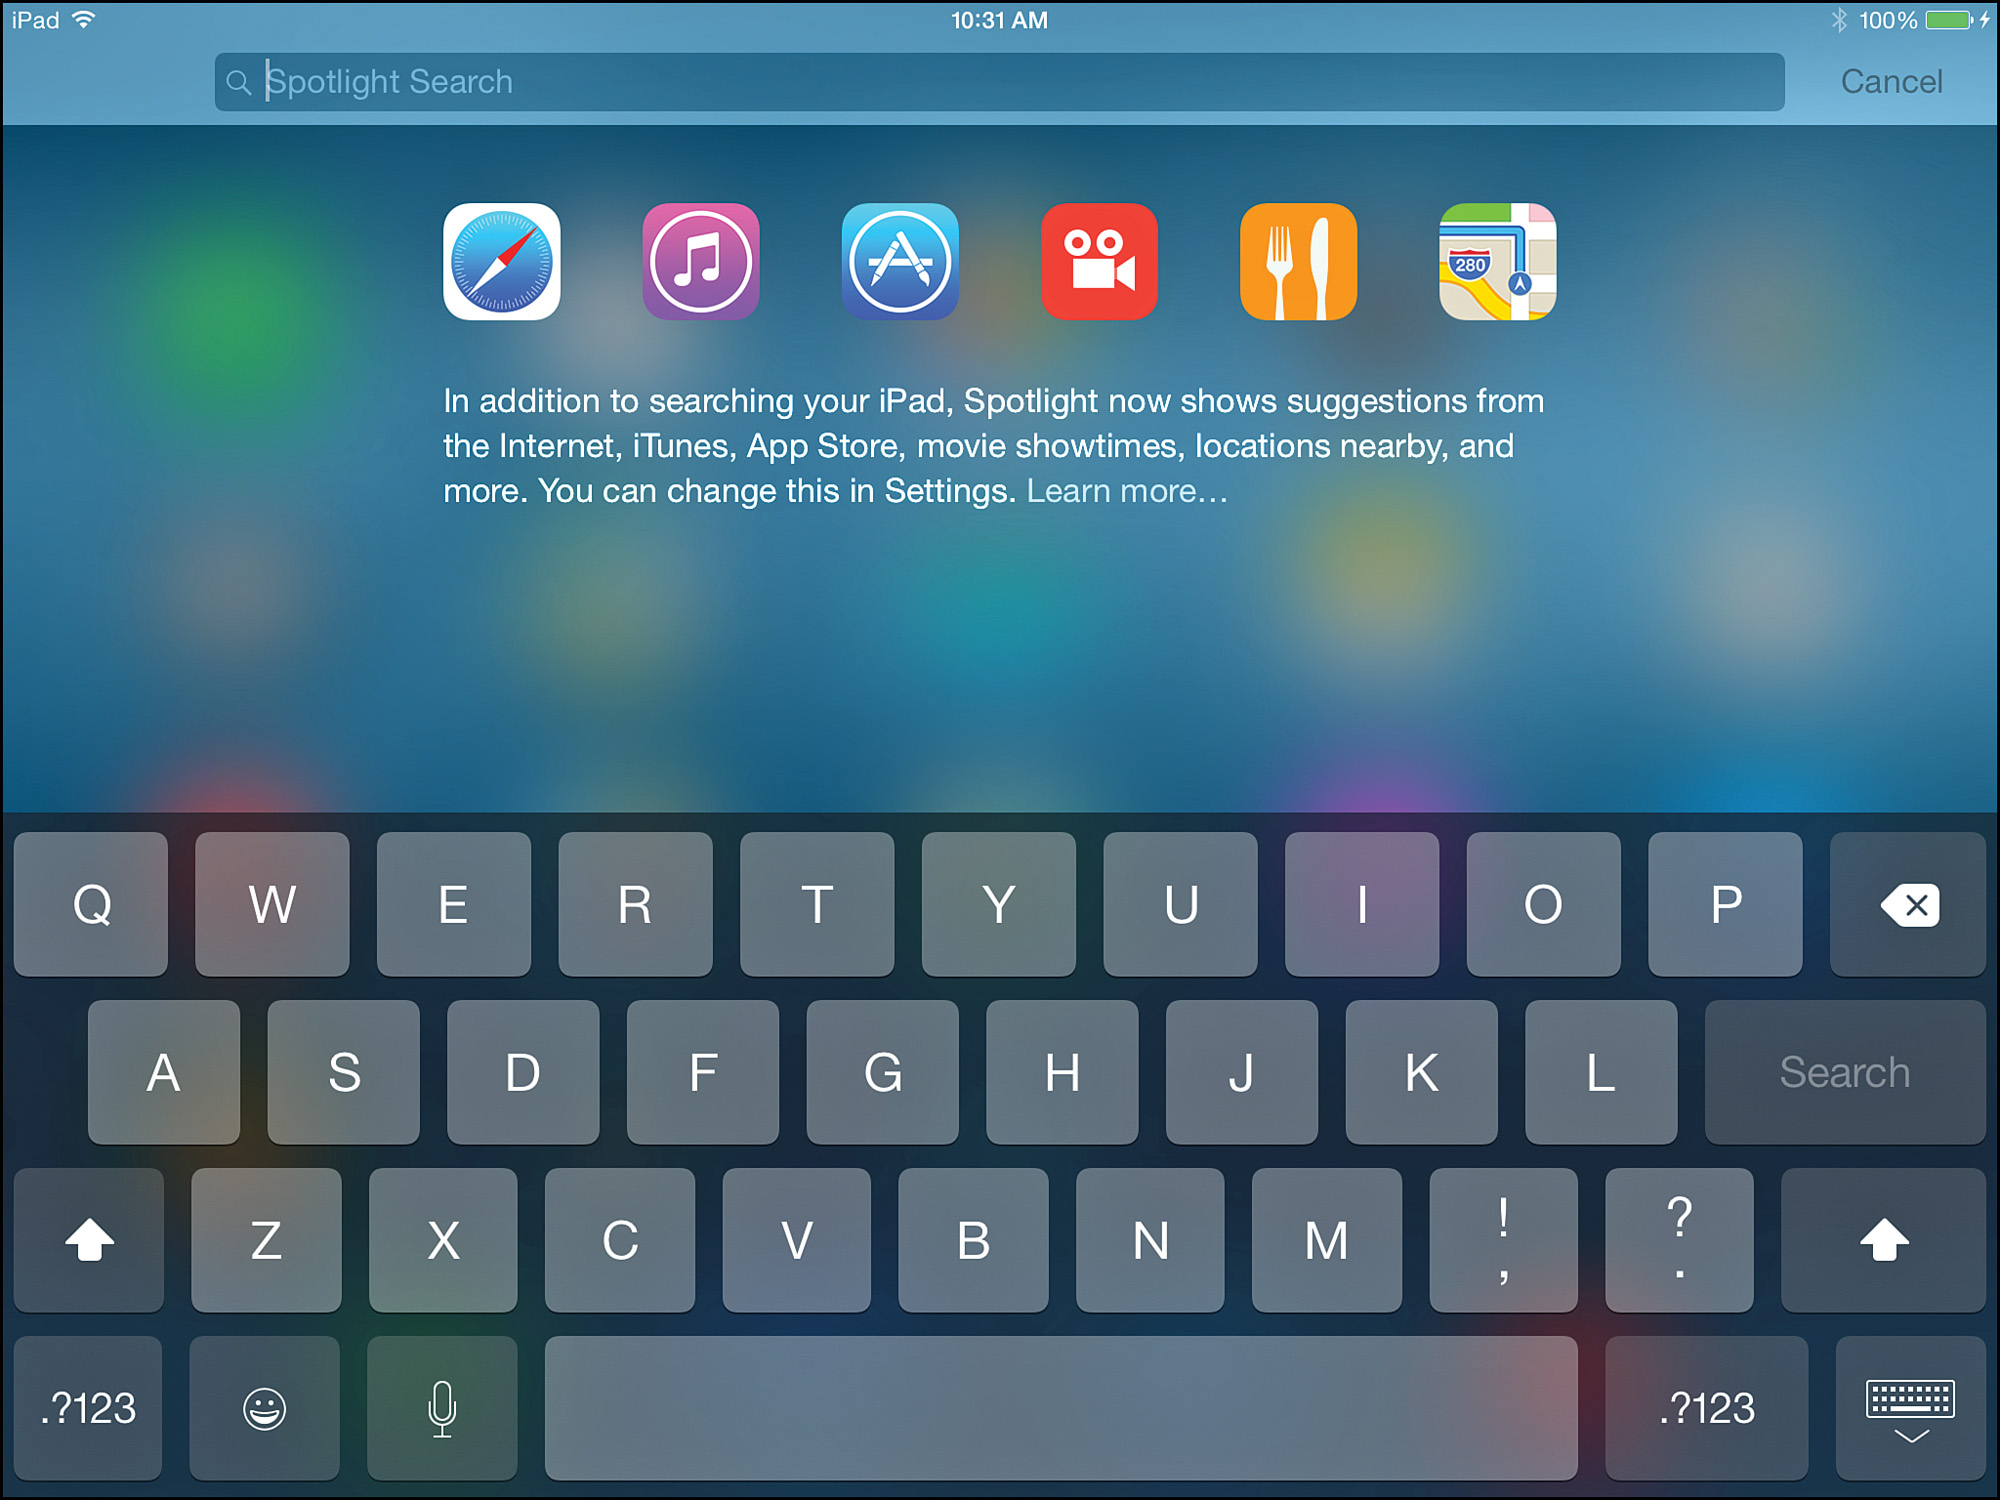
FIGURE I.2 The Spotlight Search feature gives you fast access to a broader range of information and content that’s stored in your mobile device and that’s available from the Internet.
![]() Swipe up—From the bottom of the iPhone or iPad’s screen at any time, swipe your finger in an upward direction to make the Control Center appear. From here, you can access a handful of functions, such as Airplane Mode, Wi-Fi, Bluetooth, the Do Not Disturb feature, and the Screen Rotation Lock, plus access screen brightness controls, Music app controls, utilize AirDrop and AirPlay functions, and access commonly used core apps, such as Clock, Calculator, and Camera. On the iPhone, you can also quickly turn on/off the Flashlight function. How to use Control Center is also covered in Chapter 2, “Using Siri, Dictation, and CarPlay to Interact with Your Mobile Device.”
Swipe up—From the bottom of the iPhone or iPad’s screen at any time, swipe your finger in an upward direction to make the Control Center appear. From here, you can access a handful of functions, such as Airplane Mode, Wi-Fi, Bluetooth, the Do Not Disturb feature, and the Screen Rotation Lock, plus access screen brightness controls, Music app controls, utilize AirDrop and AirPlay functions, and access commonly used core apps, such as Clock, Calculator, and Camera. On the iPhone, you can also quickly turn on/off the Flashlight function. How to use Control Center is also covered in Chapter 2, “Using Siri, Dictation, and CarPlay to Interact with Your Mobile Device.”
![]() Five-finger pinch (iPad only)—To exit out of any app and return to the Home screen, place all five fingers of one hand on the screen so that they’re spread out, and then draw your fingers together, as if you’re grabbing something. Be sure, however, that the Multitasking Gestures are turned on in the Settings app (found under the General heading).
Five-finger pinch (iPad only)—To exit out of any app and return to the Home screen, place all five fingers of one hand on the screen so that they’re spread out, and then draw your fingers together, as if you’re grabbing something. Be sure, however, that the Multitasking Gestures are turned on in the Settings app (found under the General heading).
![]() Tip
Tip
Return to the Home screen anytime by pressing the Home button once, regardless of which app is being used.
![]() Multi-finger horizontal swipe (iPad only)—When multiple apps are simultaneously running, swipe several fingers from left to right or from right to left on the screen to switch between the active app and the other apps that are currently running in the background (using the app switcher). Alternatively, iPad and iPhone users alike can access the app switcher to quickly switch between apps by quickly pressing the Home button twice.
Multi-finger horizontal swipe (iPad only)—When multiple apps are simultaneously running, swipe several fingers from left to right or from right to left on the screen to switch between the active app and the other apps that are currently running in the background (using the app switcher). Alternatively, iPad and iPhone users alike can access the app switcher to quickly switch between apps by quickly pressing the Home button twice.
![]() Tip
Tip
Apple continues to make navigating around your favorite apps with taps, figure gestures, and swipes easy. For example, on any screen where you’re scrolling downward, such as when you’re surfing the Web with Safari, you can simply tap on the time that’s displayed at the top center of the screen to quickly return to the top of the page or screen.
Meanwhile, if you’re in the process of typing something on your iPhone and don’t like what you typed, instead of pressing and holding the Delete key to delete your text, simply shake the smartphone in your hand for a second or two to “undo” your typing.
![]() What’s New
What’s New
With iOS 8, Apple has incorporated ways to more easily interact with the iPhone using just one hand. On the iPhone 6 and iPhone 6 Plus, the Sleep/Wake button is now positioned on the side, as opposed to the top of the phone.
When using the iPhone 6 or iPhone 6 Plus, double touch the Home button, and everything that’s displayed on the screen shifts downward, so you can more easily reach it with your thumb. Plus, as you’re reading emails, you can use your thumb (on the hand you’re holding the iPhone with) to swipe left or right across an Inbox message listing to manage that incoming message.
Home Button Quick Tips
Positioned on the front of your iPhone or iPad, below the main touchscreen, is the Home button. Here’s how to use some of the Home button’s main functions when using iOS 8:
![]() Activate Siri—Press down and hold the Home button for 2 seconds from the Home screen or when using any app.
Activate Siri—Press down and hold the Home button for 2 seconds from the Home screen or when using any app.
![]() Access the app switcher—From any app (or from the Home screen), quickly press the Home button twice. Press the Home button again to exit the app switcher.
Access the app switcher—From any app (or from the Home screen), quickly press the Home button twice. Press the Home button again to exit the app switcher.
![]() Exit an app and return to the Home screen—When using any app, press the Home button once to exit it and return to the Home screen. Keep in mind, in most cases this does not shut down the app; it will continue running in the background.
Exit an app and return to the Home screen—When using any app, press the Home button once to exit it and return to the Home screen. Keep in mind, in most cases this does not shut down the app; it will continue running in the background.
![]() Reboot the device (without deleting any of your apps or data)—Press and hold the Home button simultaneously with the Sleep/Wake button for about 5 seconds, until the Apple logo appears on the screen.
Reboot the device (without deleting any of your apps or data)—Press and hold the Home button simultaneously with the Sleep/Wake button for about 5 seconds, until the Apple logo appears on the screen.
![]() Return to the main Home screen—When viewing any of the Home screens on your mobile device, press the Home button once to return to the main Home screen.
Return to the main Home screen—When viewing any of the Home screens on your mobile device, press the Home button once to return to the main Home screen.
![]() Wake up the device from Sleep mode—Press the Home button once when your iPhone or iPad is in Sleep mode. If the device is powered down, press and hold the Power button for several seconds instead.
Wake up the device from Sleep mode—Press the Home button once when your iPhone or iPad is in Sleep mode. If the device is powered down, press and hold the Power button for several seconds instead.
![]() Readjust what’s displayed for one-handed iPhone operation—Double touch the Home button to shift everything that’s displayed on the iPhone’s screen downward, so you can interact with that content using the same hand you’re holding the smartphone with. (This works with the newer iPhone models only.)
Readjust what’s displayed for one-handed iPhone operation—Double touch the Home button to shift everything that’s displayed on the iPhone’s screen downward, so you can interact with that content using the same hand you’re holding the smartphone with. (This works with the newer iPhone models only.)
Use the Touch ID that’s built in to the Home button (available in the more recently released iOS mobile devices) to unlock the device or confirm a payment using Apple Pay, or when making a content purchase from the App Store, iTunes Store, iBookstore, or Newsstand.
How to Make the Best Use of the Virtual Keyboard
Whenever you need to enter data into your iPhone or iPad, you almost always use the virtual keyboard that pops up on the bottom portion of the screen when it’s needed. The virtual keyboard typically resembles a typewriter or computer keyboard; however, certain onscreen keys have different purposes, depending on which app you’re using.
For example, when you access the Spotlight Search screen (refer to Figure I.2), you will notice the large Search key on the right side of the keyboard. However, when you use the Pages or Microsoft Word apps, the Search key becomes the Return key. When you surf the Web using Safari, the Search key becomes the Go key in certain situations, and other keys along the bottom row of the virtual keyboard change as well.
When you’re using an app that involves numeric data entry, such as Numbers, the layout and design of the virtual keyboard can change dramatically.
Virtual Keyboard Quick Tips
Use these tips to help you more easily work with the virtual keyboard on your iPhone or iPad.
![]() Divide the virtual keyboard in half (iPad and iPad mini only)—Make it easier to type on the virtual keyboard with your two thumbs while holding the device. To split the keyboard, use the index fingers on your right and left hand simultaneously, place them in the center of the virtual keyboard when it’s visible, and then move them apart.
Divide the virtual keyboard in half (iPad and iPad mini only)—Make it easier to type on the virtual keyboard with your two thumbs while holding the device. To split the keyboard, use the index fingers on your right and left hand simultaneously, place them in the center of the virtual keyboard when it’s visible, and then move them apart.
![]() Unlock and move the virtual keyboard upward (iPad and iPad mini only)—Hold down the Hide Keyboard key (displayed in the lower-right corner of the keyboard). You’ll be given the opportunity to split or merge the keyboard, as well as unlock the keyboard.
Unlock and move the virtual keyboard upward (iPad and iPad mini only)—Hold down the Hide Keyboard key (displayed in the lower-right corner of the keyboard). You’ll be given the opportunity to split or merge the keyboard, as well as unlock the keyboard.
![]() Turn on/off the keyboard’s key click sound—Launch Settings, tap on the Sounds option, and then from the Sounds menu, scroll down and turn on or off the virtual switch associated with Keyboard Clicks.
Turn on/off the keyboard’s key click sound—Launch Settings, tap on the Sounds option, and then from the Sounds menu, scroll down and turn on or off the virtual switch associated with Keyboard Clicks.
![]() Adjust auto-capitalization, autocorrection, check spelling, enable caps lock, predictive, split keyboard (iPad only), and the keyboard shortcuts options—Launch Settings, tap on the General option, and then tap on the Keyboard option to access the Keyboard menu. Turn on or off the virtual switch associated with each option.
Adjust auto-capitalization, autocorrection, check spelling, enable caps lock, predictive, split keyboard (iPad only), and the keyboard shortcuts options—Launch Settings, tap on the General option, and then tap on the Keyboard option to access the Keyboard menu. Turn on or off the virtual switch associated with each option.
![]() Access alternate keys within the virtual keyboard—When you press and hold down certain keys, it’s possible to access alternative letters, characters or symbols. For example, this works when you press and hold down the A, C, E, I, N, O, U, S, Y, or Z keys. When using Safari, press and hold down the period (“.”) for a second or two to access the .us, .org, .edu, .net, and .com extensions.
Access alternate keys within the virtual keyboard—When you press and hold down certain keys, it’s possible to access alternative letters, characters or symbols. For example, this works when you press and hold down the A, C, E, I, N, O, U, S, Y, or Z keys. When using Safari, press and hold down the period (“.”) for a second or two to access the .us, .org, .edu, .net, and .com extensions.
![]() Tip
Tip
When using the virtual keyboard, to turn on Caps Lock, quickly double tap the Shift key (it displays an upward-pointing arrow). Tap the key again to turn off Caps Lock as you’re typing or doing data entry.
![]() Make the virtual keyboard disappear—You can often tap anywhere on the screen except on the virtual keyboard itself, or you can tap on the Hide Keyboard key (iPad and iPad mini only), which is always located in the lower-right corner of the keyboard.
Make the virtual keyboard disappear—You can often tap anywhere on the screen except on the virtual keyboard itself, or you can tap on the Hide Keyboard key (iPad and iPad mini only), which is always located in the lower-right corner of the keyboard.
![]() Make the virtual keyboard appear—If you need to enter data into your iPhone or iPad but the virtual keyboard doesn’t appear automatically, simply tap on an empty data field. An appropriately formatted virtual keyboard will appear.
Make the virtual keyboard appear—If you need to enter data into your iPhone or iPad but the virtual keyboard doesn’t appear automatically, simply tap on an empty data field. An appropriately formatted virtual keyboard will appear.
![]() Make the keys on the virtual keyboard larger—For some people, this makes it easier to type. Simply rotate the iPhone or iPad from portrait to landscape mode. Keep in mind that not all apps enable you to rotate the screen.
Make the keys on the virtual keyboard larger—For some people, this makes it easier to type. Simply rotate the iPhone or iPad from portrait to landscape mode. Keep in mind that not all apps enable you to rotate the screen.
![]() Create keyboard shortcuts—If there’s a sentence, paragraph, or phrase you need to enter repeatedly when using an app, it’s possible to enter that text just once and save it as a keyboard shortcut. Then, instead of typing a whole sentence, you can simply type a three-letter code that you assign to that shortcut, and the virtual keyboard will insert the complete sentence. To create your own keyboard shortcuts, follow these steps:
Create keyboard shortcuts—If there’s a sentence, paragraph, or phrase you need to enter repeatedly when using an app, it’s possible to enter that text just once and save it as a keyboard shortcut. Then, instead of typing a whole sentence, you can simply type a three-letter code that you assign to that shortcut, and the virtual keyboard will insert the complete sentence. To create your own keyboard shortcuts, follow these steps:
1. Launch Settings and tap on the General option followed by the Keyboard option.
2. From the Keyboard menu, tap on the Shortcuts option.
3. When the Shortcut window appears (shown in Figure I.3), press the “+” icon to add a new shortcut.
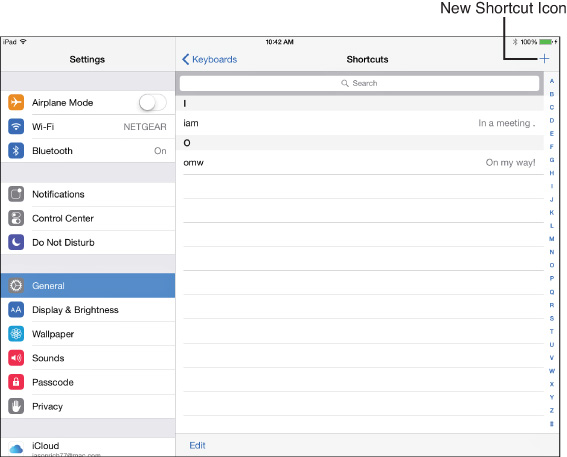
FIGURE I.3 Create keyboard shortcuts that can later save you time and help improve accuracy as you enter text into your iPhone or iPad via the virtual keyboard.
4. Fill in the Phrase field with the complete sentence you want to include, such as, “I am in a meeting and will call you back later.”
5. In the Shortcut field, enter a three-letter combination to use as the keyboard shortcut, such as “IAM” (representing In A Meeting).
6. Now, anytime the virtual keyboard is displayed (when using any app), simply type IAM to input the sentence, “I am in a meeting and will call you back later.”
![]() Change keyboard layouts—Built in to iOS are a handful of alternate keyboard layouts, some offering emoticons, such as Emoji, and some that offer characters from various foreign languages. To add an alternate keyboard to your phone or tablet, from the Keyboard menu, follow these steps:
Change keyboard layouts—Built in to iOS are a handful of alternate keyboard layouts, some offering emoticons, such as Emoji, and some that offer characters from various foreign languages. To add an alternate keyboard to your phone or tablet, from the Keyboard menu, follow these steps:
1. In Settings, tap on the General option.
2. From the General menu, tap on the Keyboard option.
3. From the Keyboards menu, tap the Keyboards option (near the top of the screen), and then from the submenu, tap on the Add New Keyboard option.
4. The Add New Keyboard screen displays a long list of alternate keyboards. Select one of them by tapping on it. It will appear on the Keyboards list.
5. Exit out of Settings.
6. From this point forward, when you access the virtual keyboard, a new key with a globe icon will appear between the 123 and Dictation key. Tap on this key (shown in Figure I.4) to replace the current keyboard with the newly added one, and then tap the key with a globe-shaped icon again to return to the default keyboard layout.
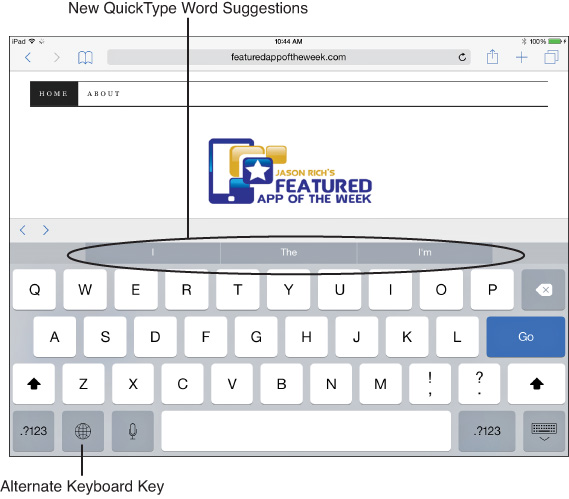
FIGURE I.4 Tap on the alternate keyboard key (which looks like a globe) to switch between preloaded keyboard layouts.
Sometimes an Optional External Keyboard or Stylus Works Better
If you expect to do a lot of data entry or word processing on your iOS mobile device, instead of using the virtual keyboard, you can purchase an optional external keyboard that connects to the smartphone or tablet using a wireless Bluetooth connection or the device’s Lightning port.
![]() More Info
More Info
Apple (http://store.apple.com), Brookstone (www.brookstone.com), Logitech (www.logitech.com), and Zagg (www.zagg.com) are just a sampling of companies that offer external iPhone or iPad keyboards. Some of these keyboards are built in to phone or tablet cases that also double as stands.
Some apps for the iPhone or iPad enable users to handwrite or draw on the phone or tablet’s screen using an optional stylus (a pen-shaped device with a special tip that’s designed to work with the touchscreen display). In the past year, several pressure-sensitive stylus pens that work with a growing number of drawing, handwriting, art-related, photo editing, and PDF file annotation apps have been released. Much less expensive, nonpressure-sensitive styluses are also available.
![]() Tip
Tip
The Siri and Dictation features in iOS 8 have also been enhanced. Discover tips and strategies that focus on how to “communicate” with your iPhone or iPad using your voice in Chapter 2.
How to Turn the iPhone or iPad On or Off, Versus Placing It into Sleep Mode
Your iOS mobile device can be turned on, turned off, placed into Sleep mode, or placed into Airplane mode.
![]() Turned on—When your phone or tablet is turned on, it can run apps and perform all the tasks it was designed to do. The touchscreen is active, as is its capability to communicate. To turn on the iPhone or iPad when it is powered off, press and hold the Power button that’s located near the top-right corner of the device for about 5 seconds, until the Apple logo appears on the screen. Release the Power button, and then wait a few additional seconds while the device boots up. When the Lock Screen appears, you’re ready to begin using the iPhone or iPad.
Turned on—When your phone or tablet is turned on, it can run apps and perform all the tasks it was designed to do. The touchscreen is active, as is its capability to communicate. To turn on the iPhone or iPad when it is powered off, press and hold the Power button that’s located near the top-right corner of the device for about 5 seconds, until the Apple logo appears on the screen. Release the Power button, and then wait a few additional seconds while the device boots up. When the Lock Screen appears, you’re ready to begin using the iPhone or iPad.
![]() What’s New
What’s New
The location of the Sleep/Wake (or Power) button on the iPhone 6 and iPhone 6 Plus has been moved to the side of the handset.
![]() Turned off—When your iPhone or iPad is turned off and powered down, it is not capable of any form of communication, and all apps that were running are shut down. The device is dormant. To turn off your phone or tablet, press down and hold the Power button for about 5 seconds, until the Slide To Power Off banner appears on the screen. Swipe your finger along this red-and-white banner from left to right. The device will shut down.
Turned off—When your iPhone or iPad is turned off and powered down, it is not capable of any form of communication, and all apps that were running are shut down. The device is dormant. To turn off your phone or tablet, press down and hold the Power button for about 5 seconds, until the Slide To Power Off banner appears on the screen. Swipe your finger along this red-and-white banner from left to right. The device will shut down.
![]() Sleep mode—To place your iPhone or iPad into Sleep mode, press and release the Power button once. To wake up the device, you can press the Power button or the Home button. In Sleep mode, your device’s screen is turned off but the phone or tablet can still connect to the Internet, receive incoming calls (iPhone) or text messages, retrieve emails, and run apps in the background. Notification Center also remains fully operational, so you can be alerted of pre-set alarms, for example. Sleep mode offers a way to conserve battery life when you’re not actively using your phone or tablet.
Sleep mode—To place your iPhone or iPad into Sleep mode, press and release the Power button once. To wake up the device, you can press the Power button or the Home button. In Sleep mode, your device’s screen is turned off but the phone or tablet can still connect to the Internet, receive incoming calls (iPhone) or text messages, retrieve emails, and run apps in the background. Notification Center also remains fully operational, so you can be alerted of pre-set alarms, for example. Sleep mode offers a way to conserve battery life when you’re not actively using your phone or tablet.
![]() Note
Note
By default, your iPhone or iPad will go into Sleep mode and Auto-Lock after 5 minutes. To adjust this time interval or turn off the Auto-Lock feature, launch Settings, tap on the General option, and then tap on the Auto-Lock feature. Options then include activating Auto-Lock after 1, 2, 3, 4, or 5 minutes, or never.
![]() Tip
Tip
On the iPad, you can place the tablet into Sleep mode by placing an Apple Smart Cover (or compatible cover) over the screen, assuming the iPad Cover Lock/Unlock option is turned on from the General menu within Settings. When in Sleep mode, an iPad will “wake up” for an incoming call (when used with iOS 8’s Continuity feature), a FaceTime call, or an incoming text message.
![]() Airplane mode—This mode enables your device to remain fully functional, except it can’t communicate in any way using a 3G or 4G (LTE) cellular connection (and the iPhone cannot make or receive calls). Apps that do not require Internet access continue to function normally. So, if you’re aboard an airplane, you can switch into Airplane mode and continue reading an eBook, playing a game, word processing, watching a movie that you’ve downloaded from the iTunes Store, or working with a wide range of other apps. After switching into Airplane mode, it is possible to turn Wi-Fi Internet access back on, yet keep the cellular connection turned off. This is useful if you’re traveling abroad, for example, and don’t want to incur international cellular roaming charges, or if you’re aboard an airplane that offers Wi-Fi service.
Airplane mode—This mode enables your device to remain fully functional, except it can’t communicate in any way using a 3G or 4G (LTE) cellular connection (and the iPhone cannot make or receive calls). Apps that do not require Internet access continue to function normally. So, if you’re aboard an airplane, you can switch into Airplane mode and continue reading an eBook, playing a game, word processing, watching a movie that you’ve downloaded from the iTunes Store, or working with a wide range of other apps. After switching into Airplane mode, it is possible to turn Wi-Fi Internet access back on, yet keep the cellular connection turned off. This is useful if you’re traveling abroad, for example, and don’t want to incur international cellular roaming charges, or if you’re aboard an airplane that offers Wi-Fi service.
![]() Tip
Tip
To turn on/off Airplane mode, launch Settings, and from the main Settings menu, tap on the virtual switch that’s associated with Airplane mode. Alternatively, launch Control Center and tap on the Airplane mode icon.
On the iPhone, you can also place the device into Do Not Disturb mode. This automatically routes incoming calls directly to voice mail. As you’ll discover, you can customize the Do Not Disturb feature to allow certain people that you preselect to reach you, when you otherwise want to be left alone.
![]() Tip
Tip
To activate and customize the Do Not Disturb feature, launch Settings and tap on the Do Not Disturb option. To later turn on or off the feature, access the Control Center and tap on the crescent moon-shaped icon (shown in Figure I.5).
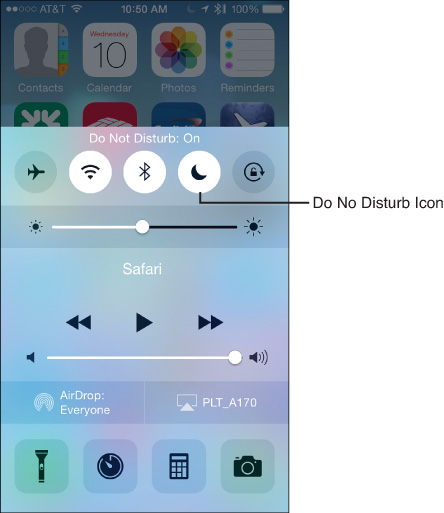
FIGURE I.5 Turning on or off the Do Not Disturb feature is now much easier using Control Center in iOS 8.
When turned on, a moon icon is displayed on the iPhone or iPad’s Status Bar, and all calls and alerts are silenced. This feature can be turned on or off at anytime, or you can preschedule specific times you want Do Not Disturb to be activated, such as between 11:00 p.m. and 7:00 a.m. on weekdays. From the Do Not Disturb menu within Settings (shown in Figure I.6), you can also determine whether certain callers are allowed to reach you when the phone is in Do Not Disturb mode.
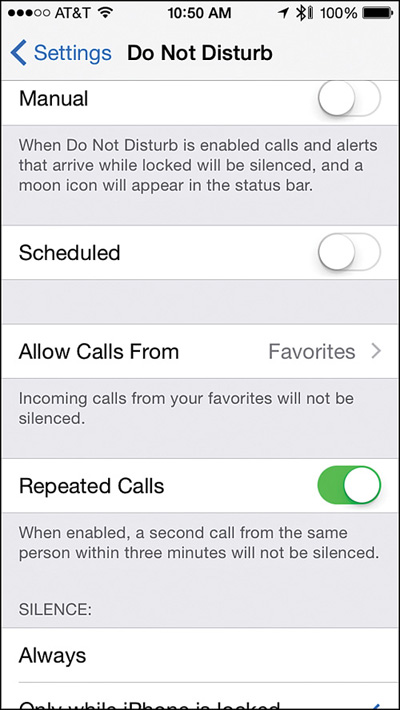
FIGURE I.6 From the Do Not Disturb menu screen within Settings, be sure to customize this feature so it best meets your needs and schedule, based on when you want to be left alone.
Keep in mind that when your iPhone is turned off, all incoming calls are forwarded directly to voicemail, and it is not possible to initiate an outgoing call. Likewise, incoming text messages, FaceTime calls, and other communications from the outside world cannot be accepted when an iPhone or iPad is turned off. Instead, when you turn on the device, notifications for these missed messages are displayed in Notification Center, within their respective apps, and potentially on the Lock Screen, depending on how you set up Notification Center.
Discover What’s New in iOS 8
Among the major enhancements to iOS 8 are the ways it enables your iPhone or iPad to communicate and easily share data and information wirelessly with others. You’ll also discover better integration with online social networking services, as well as with Apple’s own iCloud service. Plus, thanks to Handoff and iCloud integration, your iPhone, iPad, and Mac more seamlessly work with each other.
Let’s take a quick look at some of the major new features and enhancements made to iOS 8. You’ll learn strategies for best utilizing the majority of these features later in the book. But first, here’s a rundown of what’s new and noteworthy about iOS 8:
![]() Camera—The Camera app on the iPhone has several new features, like a Time-Lapse and Timer shooting mode. On the iPad, several Camera app features that were previously available only on the iPhone can now be used when snapping photos with the tablet’s built-in camera, including the Pano (panoramic) shooting mode. Chapter 8, “Shoot, Edit, and Share Photos and Videos,” focuses on using the Camera app to take awesome photos.
Camera—The Camera app on the iPhone has several new features, like a Time-Lapse and Timer shooting mode. On the iPad, several Camera app features that were previously available only on the iPhone can now be used when snapping photos with the tablet’s built-in camera, including the Pano (panoramic) shooting mode. Chapter 8, “Shoot, Edit, and Share Photos and Videos,” focuses on using the Camera app to take awesome photos.
![]() Photos—In addition to providing a more powerful collection of photo editing and organizational tools, the Photos app now works with iCloud’s Family Sharing feature, so you can share images and videos with up to five other family members. Plus, in 2015, Apple will be changing iCloud’s My Photo Stream and Shared Photo Stream features, making them easier to use. Thus, sharing photos with others via the Internet will be easier than ever using a new feature called iCloud Photo Library.
Photos—In addition to providing a more powerful collection of photo editing and organizational tools, the Photos app now works with iCloud’s Family Sharing feature, so you can share images and videos with up to five other family members. Plus, in 2015, Apple will be changing iCloud’s My Photo Stream and Shared Photo Stream features, making them easier to use. Thus, sharing photos with others via the Internet will be easier than ever using a new feature called iCloud Photo Library.
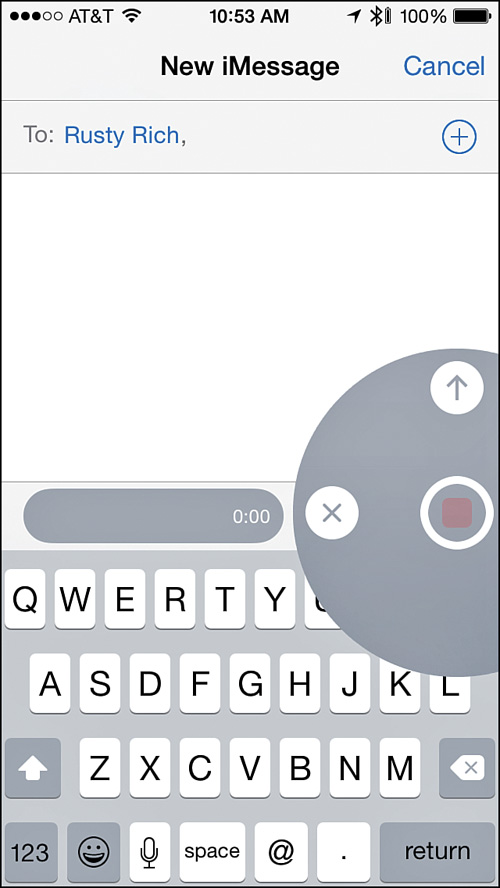
![]() Messages—In addition to giving you greater control over your text messaging, iOS 8 makes it easier to participate in group conversations and withdraw from group conversations that no longer interest you. Plus, you can now send sound (see Figure I.7) and/or video clips as a text message, more easily share your location with others during a conversation, see attachments sent and received during a text message conversation on one scrollable screen, and send multiple photos or video clips at once.
Messages—In addition to giving you greater control over your text messaging, iOS 8 makes it easier to participate in group conversations and withdraw from group conversations that no longer interest you. Plus, you can now send sound (see Figure I.7) and/or video clips as a text message, more easily share your location with others during a conversation, see attachments sent and received during a text message conversation on one scrollable screen, and send multiple photos or video clips at once.
![]() QuickType—Whenever you use the iPhone or iPad’s virtual keyboard, not only does it better anticipate what you’re typing, it understands context and adjusts word or phrase suggestions accordingly.
QuickType—Whenever you use the iPhone or iPad’s virtual keyboard, not only does it better anticipate what you’re typing, it understands context and adjusts word or phrase suggestions accordingly.
![]() Family Sharing—Now, up to six family members can share iTunes Store, iBookstore, and App Store content purchases, plus share photos. Yet, each person can have their own (private) iCloud account that utilizes their own Apple ID and password. So, while selected content can be shared, other data and content stored in an iCloud account or iOS mobile device can be kept private.
Family Sharing—Now, up to six family members can share iTunes Store, iBookstore, and App Store content purchases, plus share photos. Yet, each person can have their own (private) iCloud account that utilizes their own Apple ID and password. So, while selected content can be shared, other data and content stored in an iCloud account or iOS mobile device can be kept private.
![]() iCloud Drive—In addition to app-specific data and files, it’s now possible to manually or automatically back up or sync other types of files, data, and documents using a personal iCloud account. This feature works more like other cloud-based file sharing services, such as Dropbox.
iCloud Drive—In addition to app-specific data and files, it’s now possible to manually or automatically back up or sync other types of files, data, and documents using a personal iCloud account. This feature works more like other cloud-based file sharing services, such as Dropbox.
![]() Health—Using the iPhone’s new Health app with third-party apps, the Apple Watch, and/or other optional equipment, you can manage aspects of your health, fitness, diet, sleep, and daily activity, so you can lead a healthier lifestyle.
Health—Using the iPhone’s new Health app with third-party apps, the Apple Watch, and/or other optional equipment, you can manage aspects of your health, fitness, diet, sleep, and daily activity, so you can lead a healthier lifestyle.
![]() Handoff—Your iPhone, iPad, and Mac(s) now work more seamlessly together, so you can always have access to the information you need, when and where you need it. Plus, you can communicate more efficiently. For example, it’s now possible to answer an incoming phone call (to your iPhone) from your nearby iPad or Mac (running OS X Yosemite), as shown in Figure I.8.
Handoff—Your iPhone, iPad, and Mac(s) now work more seamlessly together, so you can always have access to the information you need, when and where you need it. Plus, you can communicate more efficiently. For example, it’s now possible to answer an incoming phone call (to your iPhone) from your nearby iPad or Mac (running OS X Yosemite), as shown in Figure I.8.

FIGURE I.8 When turned on, if your iPhone and iPad are within wireless range of each other (about 33 feet), you can answer incoming calls to your iPhone on your iPad, and then use your tablet as a speakerphone.
![]() Enhanced Notification Center—Notification Center (shown in Figure I.9) offers a centralized place where your iPhone or iPad keeps track of alerts, alarms, and notifications related to the apps you’re running and functions you’re using. Thanks to iOS 8, additional information, such as the current weather forecast and/or local traffic conditions, can now be displayed as part of Notification Center’s Today screen. In Chapter 1, discover strategies for managing Notification Center and learn how to customize the information it tracks and displays.
Enhanced Notification Center—Notification Center (shown in Figure I.9) offers a centralized place where your iPhone or iPad keeps track of alerts, alarms, and notifications related to the apps you’re running and functions you’re using. Thanks to iOS 8, additional information, such as the current weather forecast and/or local traffic conditions, can now be displayed as part of Notification Center’s Today screen. In Chapter 1, discover strategies for managing Notification Center and learn how to customize the information it tracks and displays.
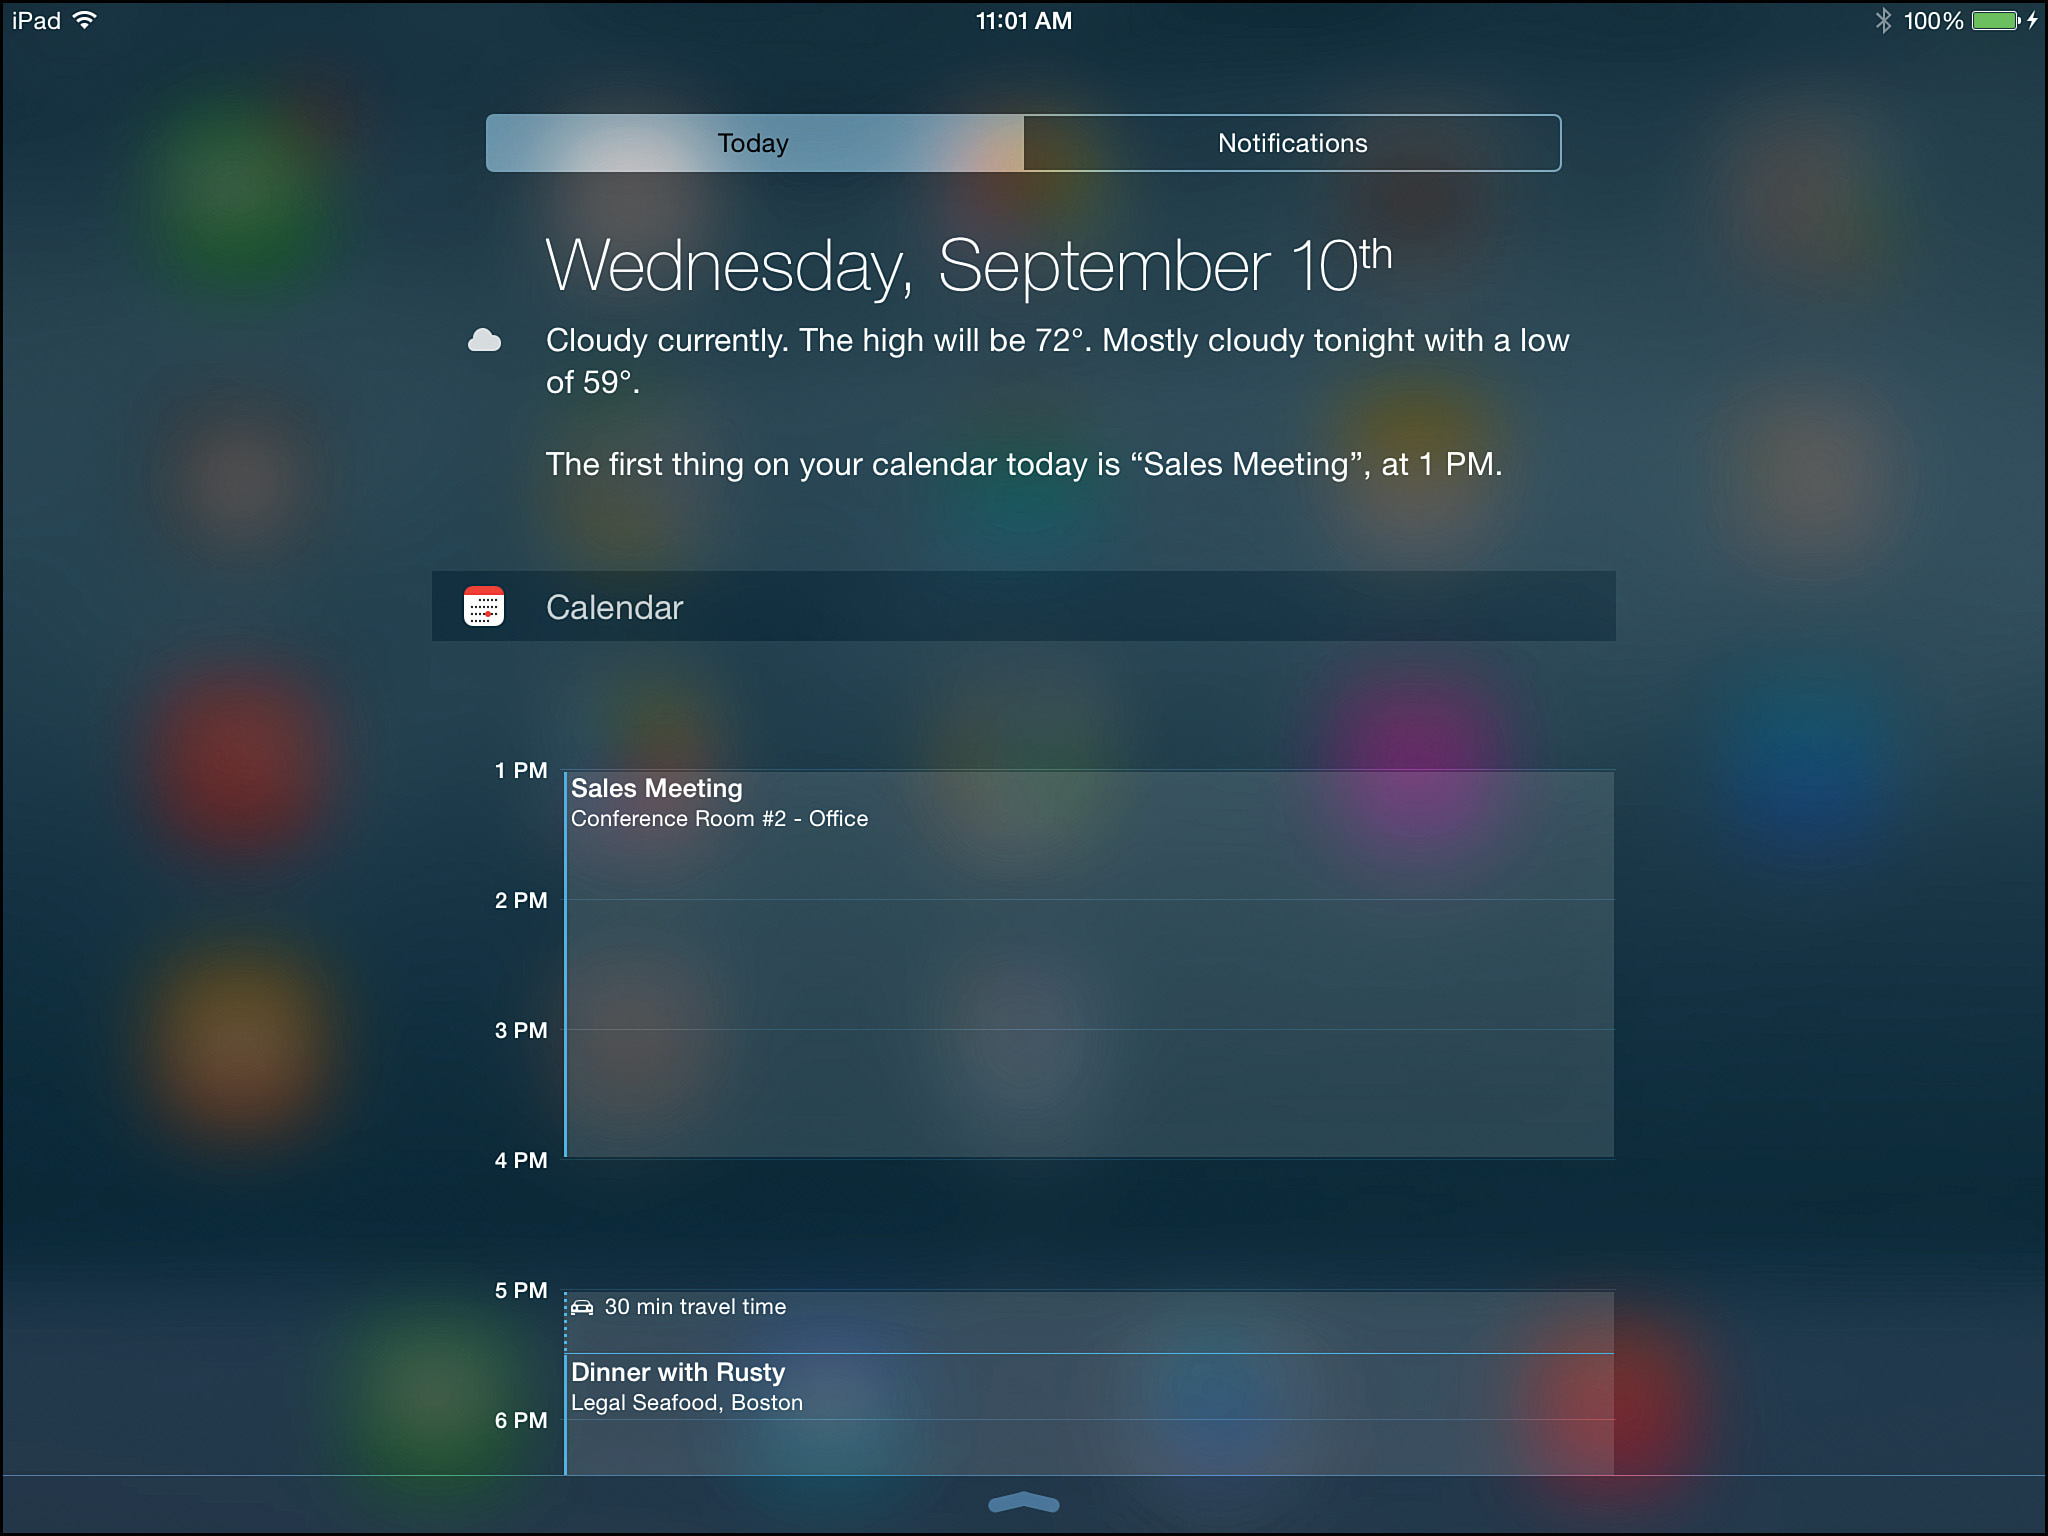
FIGURE I.9 Additional and customizable information can now be displayed on the Notification Center’s various screens.
![]() What’s New
What’s New
To access the Notification Center window, regardless of which app you’re working with or what you’re doing on your iOS mobile device, simply swipe your finger from the top of the screen in a downward direction. To begin customizing how Notification Center functions on your device, launch Settings, and then tap on the Notifications option listed in the main Settings menu.
Additional customization options can be accessed by launching Notification Center, tapping on the Today tab, and then scrolling down to the bottom of the screen. Tap on the Edit button to determine what information should appear within this screen and rearrange the order in which information is displayed.
![]() Enhanced multitasking—Your iPhone or iPad has the capability to run multiple apps simultaneously, although on the screen, you can be working with only one app at a time. The rest continue running in the background. To quickly switch between apps that are running, or shut down one or more apps, enter the app switcher on your device. To do this, press the Home button twice quickly.
Enhanced multitasking—Your iPhone or iPad has the capability to run multiple apps simultaneously, although on the screen, you can be working with only one app at a time. The rest continue running in the background. To quickly switch between apps that are running, or shut down one or more apps, enter the app switcher on your device. To do this, press the Home button twice quickly.
The app switcher displays icons for all the apps currently running on your device along the bottom of the screen, and in the main area of the screen are thumbnail images representing the apps that are running.
Scroll from right to left or from left to right (using a swipe motion with your finger) to see all the apps that are running. To switch to a different app and make it active, tap on its thumbnail or app icon.
To shut down an app while in the app switcher, swipe your finger in an upward direction along the thumbnail image for the app you want to close.
![]() What’s New
What’s New
When you access the app switcher, displayed along the top are thumbnail images representing people you’ve recently communicated with. To reconnect with any of these people via phone call, FaceTime call, or text message, tap on his or her thumbnail image.
![]() Note
Note
After you launch most apps, they continue running in the background if you simply press the Home button to exit out of them to return to the Home screen. You can shut down an app from the app switcher or by turning off your iPhone or iPad altogether. If an app was running before you turned off your device, however, it automatically reopens in the background when you restart the device.
![]() AirDrop—Instead of just being able to wirelessly send certain types of content, such as photos, from one nearby iOS mobile device to another, the AirDrop feature now works between iPhones, iPads, and Macs and can be used with more types of files and content.
AirDrop—Instead of just being able to wirelessly send certain types of content, such as photos, from one nearby iOS mobile device to another, the AirDrop feature now works between iPhones, iPads, and Macs and can be used with more types of files and content.
![]() New Web surfing features in Safari—The Safari web browser that comes bundled with iOS 8 has also been enhanced, giving users more features that make surfing the Web, as well as organizing and sharing Bookmarks and related information, much easier and more efficient. Be sure to read Chapter 12, “Surf the Web More Efficiently Using Safari,” to discover strategies for using all of Safari’s newest features.
New Web surfing features in Safari—The Safari web browser that comes bundled with iOS 8 has also been enhanced, giving users more features that make surfing the Web, as well as organizing and sharing Bookmarks and related information, much easier and more efficient. Be sure to read Chapter 12, “Surf the Web More Efficiently Using Safari,” to discover strategies for using all of Safari’s newest features.
![]() Improved Siri functionality—Siri has been given additional functionality with iOS 8. When you ask Siri a question, the feature can now access more online sources to quickly find you the answer. You can also use Siri to control more iPhone or iPad functions, such as playing music, accessing voicemails, or controlling iTunes Radio. The focus of Chapter 2 is on how to effectively “talk” to Siri.
Improved Siri functionality—Siri has been given additional functionality with iOS 8. When you ask Siri a question, the feature can now access more online sources to quickly find you the answer. You can also use Siri to control more iPhone or iPad functions, such as playing music, accessing voicemails, or controlling iTunes Radio. The focus of Chapter 2 is on how to effectively “talk” to Siri.
![]() What’s New
What’s New
If you own a 2013 or later model year vehicle from one of more than a dozen car manufacturers, including General Motors, your vehicle can probably link with your iPhone or iPad via Bluetooth, or the vehicle might have a CarPlay Lightning port built in.
Using Siri Eyes Free and other iOS 8 CarPlay functionality, it’s possible to control certain features and functions of your iPhone through your car’s in-dash infotainment system and issue commands using your voice, while never taking your eyes off the road to look at the iPhone’s screen. For example, you can listen to music stored on your iOS device, have Siri read incoming emails or text messages, access details about your contacts or schedule, and perform a wide range of other tasks verbally while driving.
![]() New features in all of iOS 8’s core apps—Your iPhone or iPad comes with a handful of preinstalled apps, such as Contacts, Calendar, Reminders, Notes, Mail, Safari, Maps, App Store, iTunes Store, Music, Weather, Messages, and Passbook. The iOS 8 versions of these and other preinstalled apps have all been redesigned and enhanced with new features and functions that will be explained throughout this book. In addition, Apple’s iWork apps (Pages, Numbers, and Keynote) and iLife apps (including iMovie) have been enhanced for use with iOS 8 and some of iCloud’s newest functions.
New features in all of iOS 8’s core apps—Your iPhone or iPad comes with a handful of preinstalled apps, such as Contacts, Calendar, Reminders, Notes, Mail, Safari, Maps, App Store, iTunes Store, Music, Weather, Messages, and Passbook. The iOS 8 versions of these and other preinstalled apps have all been redesigned and enhanced with new features and functions that will be explained throughout this book. In addition, Apple’s iWork apps (Pages, Numbers, and Keynote) and iLife apps (including iMovie) have been enhanced for use with iOS 8 and some of iCloud’s newest functions.
![]() Better integration with iCloud—In addition to serving as an online-based file sharing and data backup service, iCloud works seamlessly with many core iPhone and iPad functions built in to iOS 8, as well as many of the apps that come bundled with the operating system. With iOS 8, Apple has introduced Family Sharing, iCloud Drive, and iCloud Photo Library (coming in 2015) to make this online-based service even more powerful.
Better integration with iCloud—In addition to serving as an online-based file sharing and data backup service, iCloud works seamlessly with many core iPhone and iPad functions built in to iOS 8, as well as many of the apps that come bundled with the operating system. With iOS 8, Apple has introduced Family Sharing, iCloud Drive, and iCloud Photo Library (coming in 2015) to make this online-based service even more powerful.
![]() Note
Note
Some iCloud-related functions can be utilized from your iPhone or iPad using a 3G or 4G (LTE) cellular data connection. However, to utilize some of iCloud’s other features, such as iCloud Backup, a Wi-Fi connection is required.
![]() Improved communication tools through iOS 8’s app-related sharing buttons—Certain apps that come preinstalled with iOS 8, such as Contacts and Photos, enable you to share app-specific data with others. The latest versions of these and other apps offer enhancements in terms of how you can share app-specific data via the Mail or Messages app, Facebook or Twitter, or the AirDrop feature. You’ll discover these improvements in most apps that feature a Share button, including the optional iWork for iOS apps (Pages, Numbers, and Keynote).
Improved communication tools through iOS 8’s app-related sharing buttons—Certain apps that come preinstalled with iOS 8, such as Contacts and Photos, enable you to share app-specific data with others. The latest versions of these and other apps offer enhancements in terms of how you can share app-specific data via the Mail or Messages app, Facebook or Twitter, or the AirDrop feature. You’ll discover these improvements in most apps that feature a Share button, including the optional iWork for iOS apps (Pages, Numbers, and Keynote).
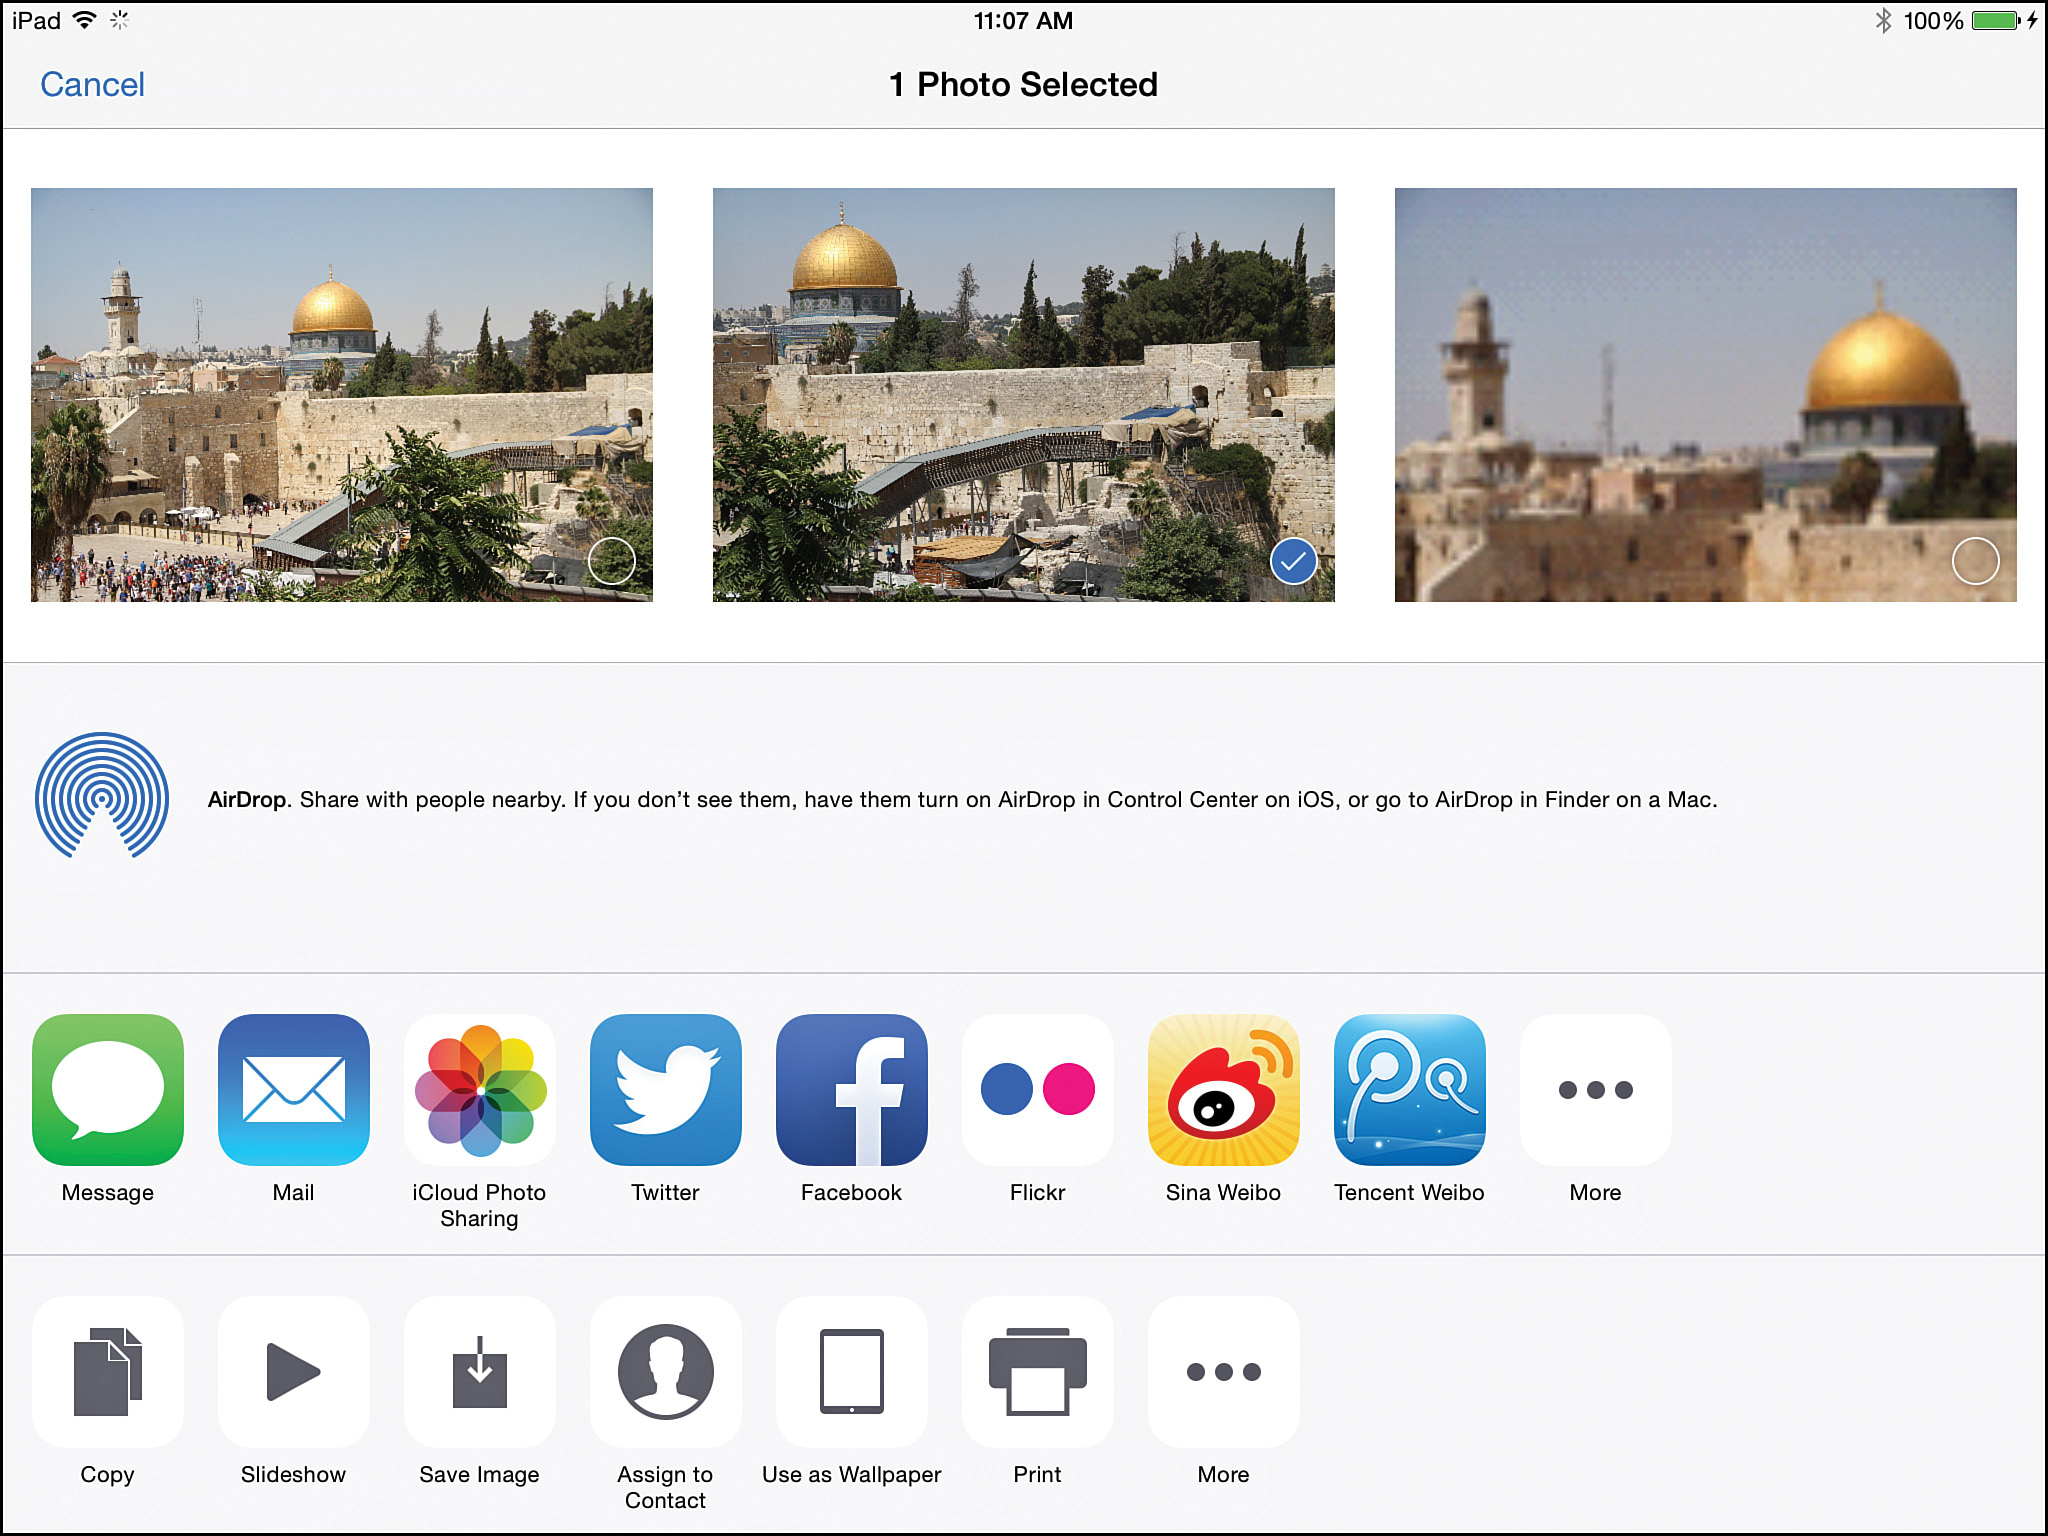
Figure I.10 shows the Share menu screen that’s displayed on the iPad Air after tapping on the Share icon in the Photos app. As you can see, digital images stored on an iOS mobile device can now be shared via AirDrop, Messages, Mail, iCloud Photo Sharing, Twitter, Facebook, or Flickr. From this menu screen, the Copy, Slideshow, Airplay, Assign to Contact, Use as Wallpaper, and Print commands are also available, and thumbnails of selected images are displayed.
Apple Pay Offers a New Way to Pay for Things
Built in to iOS 8, Apple Pay is available when using the iPhone 6, iPhone 6 Plus, Apple Watch, and perhaps the newest iPad models released in late 2014. Apple Pay is a new way to pay for purchases in retail stores throughout the United States and online.
With Apple Pay, your iPhone is used to scan each of your credit or debit cards just once. This information is then securely stored in a special chip built in to your iOS mobile device. Then, when you’re visiting a participating retail store, simply hold your compatible iOS mobile device (or Apple Watch) up to a special scanner that’s connected to a cash register, place your thumb or finger on the Touch ID sensor that’s built in to the mobile device, and within seconds, you can initiate a credit or debit card purchase in an extremely secure fashion.
The merchant doesn’t actually gain access to your credit card number or your name, and Apple does not collect any personal details related to the purchase transaction. If your iOS mobile device gets lost or stolen, simply use the Find My iPhone feature to lock down the device. Your stored credit/debit card details can’t be used by an iPhone thief, because their fingerprint will not be recognized by the Touch ID sensor, and because Apple Pay does not retain your actual credit/debit card numbers, there’s no need to contact your bank to cancel the cards and have them reissued.
Apple Pay works with the Passbook app that comes preinstalled on the iPhone with iOS 8, and the service supports Visa, MasterCard, and American Express credit and debit cards. When the Apple Pay service launched in October 2014, it was immediately supported at more than 220,000 retail and fast food locations.
Currently, Apple Pay is accepted at Macy’s, Bloomingdales, Walgreen’s, Subway, McDonald’s, Whole Foods, Disney Stores, Walt Disney World, PetCo, Toys ’R Us, Apple Stores, and many other retail chains, with more stores incorporating the Apple Pay technology into their cash registers every week.
Securing Your iOS Mobile Device with a Passcode
If you’re worried about other people being able to pick up your iPhone or iPad and access your confidential information or use it to access your favorite websites by signing in using your username, it continues to be possible to password protect your iOS mobile device. When the Passcode Lock feature is turned on, you must manually enter a four-digit passcode (or a longer password) that you preselect to get past the device’s Lock Screen.
To turn on the Passcode Lock feature, launch Settings and tap on the General option. From the General menu, tap on Passcode Lock. Then, from the Passcode Lock screen, tap on the Turn Passcode On option. You will be promoted to create a four-digit passcode for your device and reenter it twice.
When creating a passcode, do not use something obvious, like 1234, 4321, 1111, or your birthdate.
From the Passcode Lock screen, you can then customize Passcode Lock functionality. For example, you can restrict certain iPhone/iPad features from being accessible from the Lock Screen. Plus, by turning on the Erase Data option, you can set up the device to automatically delete its contents if someone enters the wrong passcode 10 times in a row.
![]() Tip
Tip
If you don’t think a four-digit passcode is secure enough for your iPhone or iPad, turn off the Simple Passcode option that’s displayed as part of the Passcode Lock menu screen within Settings. You’ll now be able to create a more complex alphanumeric password for your device.
![]() What’s New
What’s New
With iOS 8, more iOS mobile devices (including the iPhone 5s, iPhone 6, iPhone 6 Plus, iPad Air 2, and iPad mini 3) have a Touch ID sensor built in to the Home button. This enables the device to be unlocked using a fingerprint scan, as opposed to a four-digit passcode. This same Touch ID can be used to authorize purchases.
Find Your Lost or Stolen Device Using the Find My iPhone/iPad Feature
The Find My iPhone/iPad feature enables you to quickly pinpoint the exact location of your device if it gets lost or stolen, and then offers tools to help you lock down, erase, and/or retrieve your device. At the same time, if the device does get stolen, you can render the device absolutely useless unless someone knows your Apple ID and password.
For the Find My iPhone/iPad feature to work, however, it must be turned on and activated once. Then, to pinpoint the location of your phone or tablet, it will need to be turned on and be able to connect to the Internet (that is, not be in Airplane mode).
To activate Find My iPhone/iPad, as soon as you install iOS 8 or anytime thereafter, access Settings and tap on the iCloud option from the main Settings menu. Then, from the iCloud menu, make sure the virtual switch associated with Find My iPhone is turned on.
Now, if you ever need to locate your iPhone or iPad, you have several options. First, you can use the free Find My iPhone app that’s available from the App Store. Launch the app and sign in using your Apple ID and password. The location of your device will then be displayed on a detailed map.
Tap on the virtual pushpin on the map, or any of the command buttons displayed at the bottom of the app’s screen, to then use online-based tools to help you locate, lock down, or erase your mobile device remotely.
Another way to locate your iOS mobile device is to use any computer’s web browser and visit www.icloud.com/#find. Sign in to the website using your Apple and ID and password. The same tools for locating and protecting your iOS mobile device are then made available to you online—from anywhere. The Find My feature can also be set up to work with iCloud’s Family Sharing function, so you can use a family member’s Apple equipment to pinpoint the location of your iPhone or iPad.
![]() Tip
Tip
Be sure you turn on Find My iPhone/iPad on your mobile device immediately. If this feature is not active, you will not be able to use the tools Apple offers to locate, lock down, or remotely erase your device if it later gets lost or stolen.
Even if the device is not turned on or connected to the Internet when it’s initially lost or stolen, the Find My iPhone/iPad feature can alert you the moment someone finds or tries to turn on your device.
Maintain a Backup of Your Device
Using Apple’s iCloud service, it is possible to set up your iPhone or iPad to automatically back itself up once per day, as long as you turn on the auto backup feature. For this feature to work, the device needs access to a Wi-Fi Internet connection. It also must be locked and plugged in to an external power source to auto-initiate the backup process.
To set up the iCloud Backup feature, which needs to be done only once, follow these steps:
1. Launch Settings and tap on the iCloud option.
2. Make sure Wi-Fi is turned on and your device can link to the wireless network in your home or office.
3. From the iCloud menu screen, tap on the Backup option.
4. From the Backup menu screen, turn on the virtual switch that’s associated with the iCloud Backup option (shown in Figure I.11).
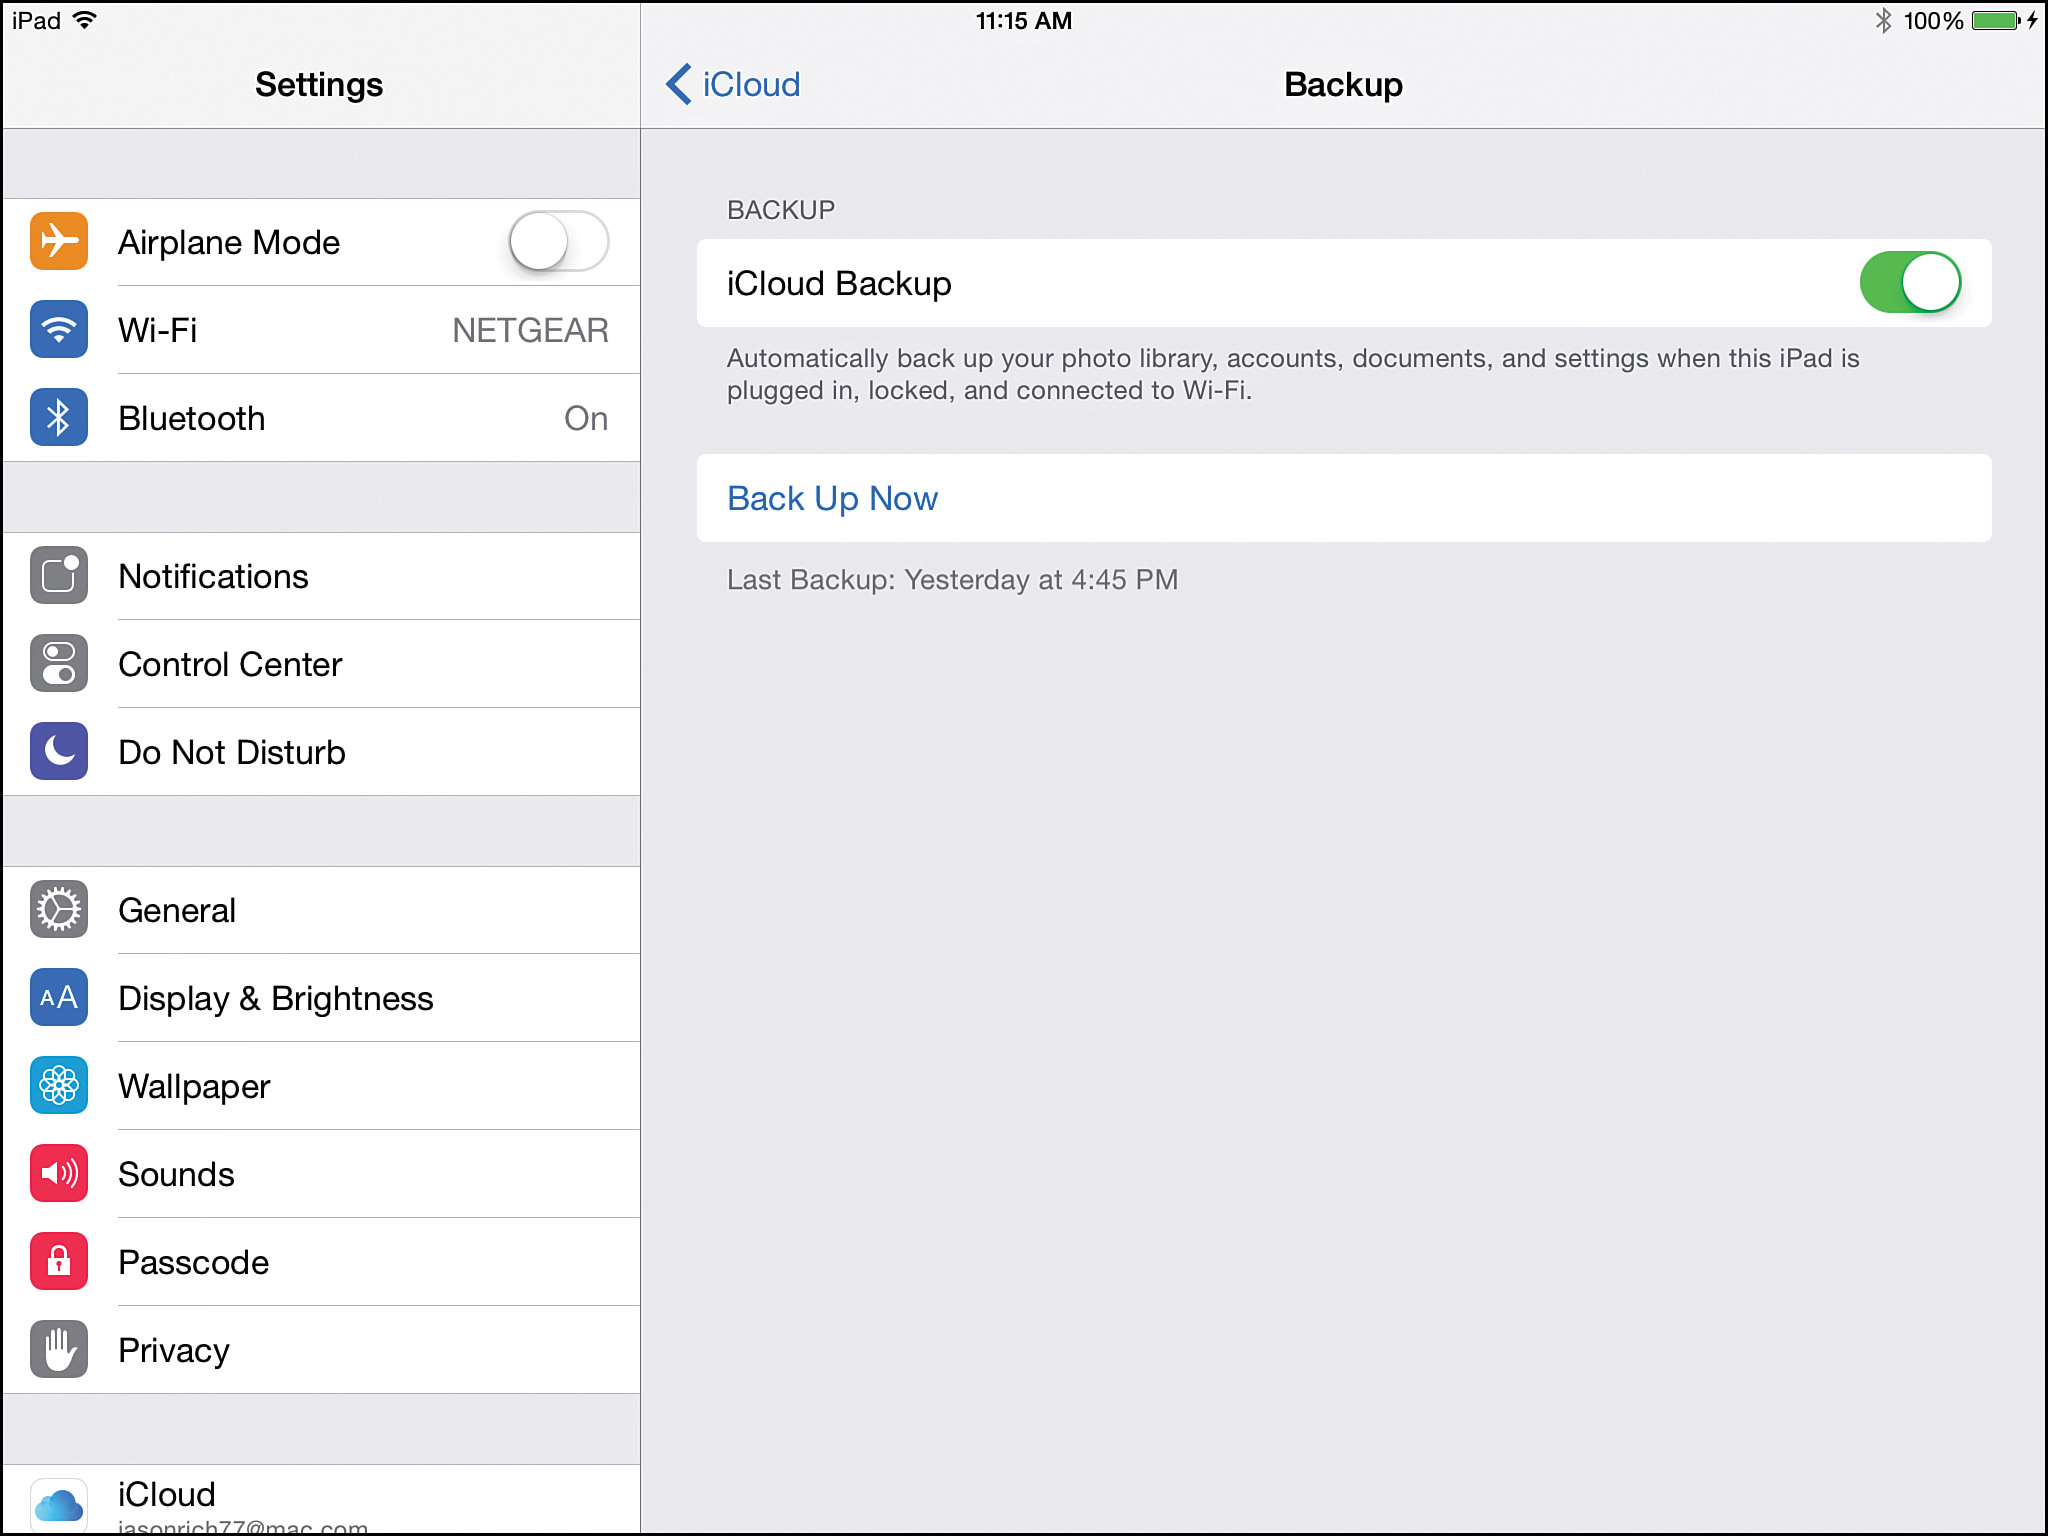
FIGURE I.11 After turning on the virtual switch that’s associated with the iCloud Backup option in Settings, it’s possible to manually initiate a backup by tapping on the Back Up Now option.
![]() Tip
Tip
At anytime, you can initiate a manual backup of your device. Access the Backup menu screen within Settings, and then tap on the Back Up Now option. You’ll notice that the time and date of the last successful backup is displayed on this screen.
Later, if you need to reset your iPhone or iPad and erase its contents, or you need to replace your phone or tablet, you can easily restore your data using the last successful iCloud backup. When using this backup method, the backup files associated with your mobile device are stored “in the cloud” within your iCloud account.
iTunes Sync Is Also a Viable Backup Option
When it comes to syncing data between your primary computer(s) and other iOS mobile device(s), as well as maintaining a backup of your iPhone or iPad, this can be done by connecting your iOS mobile device(s) directly to your primary computer via the supplied USB cable, and then by using the iTunes Sync process.
Because iOS 8 is fully integrated with iCloud, maintaining a backup of your device and syncing app-specific data, as well as transferring data, files, photos and content between your Mac(s), PC(s), and other iOS mobile device(s), can now much more easily be done using iCloud. When you use iCloud Backup, for example, your iPhone or iPad’s backup files are stored online “in the cloud,” and not on your primary computer’s hard drive. Because this is the more popular way to back up and sync data, it’s the approach we’ll focus on in this book.
![]() More Info
More Info
To use the iTunes Sync process between your iPhone or iPad and a Mac or Windows-based PC, download and install the latest version of the iTunes software onto your computer. To do this, visit www.apple.com/itunes.
To learn more about using the iTunes Sync process to transfer, sync, and back up apps, data, content, and photos, visit www.apple.com/support/itunes.
What This Book Offers
This all-new fourth edition of iPad and iPhone Tips and Tricks will help you quickly discover all the important new features and functions of iOS 8 and show you how to begin fully utilizing this operating system and its bundled apps so that you can transform your iPhone, iPad, iPad mini, or iPod touch into the most versatile, useful, and fun-to-use tool possible.
Each chapter of this book focuses on using various aspects of iOS 8 or the apps that come preinstalled with it. You’ll also discover strategies for finding and installing optional third-party apps from the App Store, plus learn all about how to experience various other types of content—from music, TV shows, and movies, to eBooks and digital editions of magazines, plus learn how to best organize, view, and share your own digital photos.
In terms of using your iPhone or iPad as a powerful communications tool, you’ll discover strategies for efficiently making and receiving calls (iPhone only), sending and receiving text messages, participating in FaceTime calls (videoconferencing), and participating on the online social networking services (like Facebook and Twitter), while simultaneously making full use of iOS 8’s latest features. The book also explores how to take full control of and customize your phone or tablet using the tools and features available from Settings, Control Center, and Notification Center.
In iPad and iPhone Tips and Tricks, Fourth Edition, you’ll also discover tricks for utilizing iCloud with your iOS mobile device, plus learn all about how to use the most popular apps that come bundled with the iOS 8 operating system (including Contacts, Calendar, Reminders, Notes, Mail, Messages, Safari, Camera, Photos, Maps, Music, Videos, Newsstand, FaceTime, and the iTunes Store), as well as popular apps released by Apple and third parties that enhance the capabilities of your device, including Find My iPhone, YouTube, iPhoto, Facebook, and Twitter.
For the first time, this fourth edition of the book offers details about how to manage your health and automate your home using new iOS 8 features and functions. For this, see Chapter 10, “Improve Your Health and Automate Your Home Using Your iOS Mobile Device.”
Plus, this edition of the book includes an introduction to Apple Watch and explains how this wearable device, which will be released in early 2015, can be used with your iPhone and various apps.
![]() Note
Note
Now that the iPhones and iPads come with a variety of different screen sizes, based on the model you choose, iOS 8 automatically adjusts all apps to best utilize available screen space. Thus, as you’re looking at screenshots throughout this book, keep in mind that what you see on your device’s screen may vary slightly if you’re using a different model iPhone or iPad than what was used to create the screenshot.
Attention, Please…
Throughout the book, look for What’s New, Tip, Note, Caution, and More Info boxes that convey useful tidbits of information relevant to the chapter you’re reading. Within each chapter, you’ll also discover Quick Tips sections, which quickly outline how to perform a series of common tasks related to the iOS 8 features, functions, or app(s) that are being discussed.
The What’s New boxes, for example, highlight new features or functionality introduced in iOS 8, while the More Info boxes provide website URLs or list additional resources that you can use to obtain more information about a particular topic.