12. Surf the Web More Efficiently Using Safari
In This Chapter
![]() How to use new features in the iOS 8 version of Safari
How to use new features in the iOS 8 version of Safari
![]() How to create and use offline Reading Lists
How to create and use offline Reading Lists
![]() How to use Safari Reader
How to use Safari Reader
![]() How to sync open browser windows with your other Macs and iOS mobile devices
How to sync open browser windows with your other Macs and iOS mobile devices
Chances are, if you know how to use a Mac or PC, you already know how to surf the Web using a browser such as Safari, Microsoft Internet Explorer, Firefox, or Google Chrome on your computer.
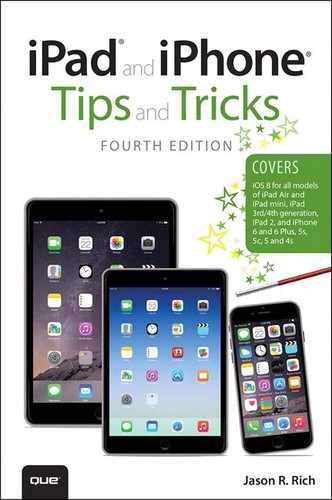
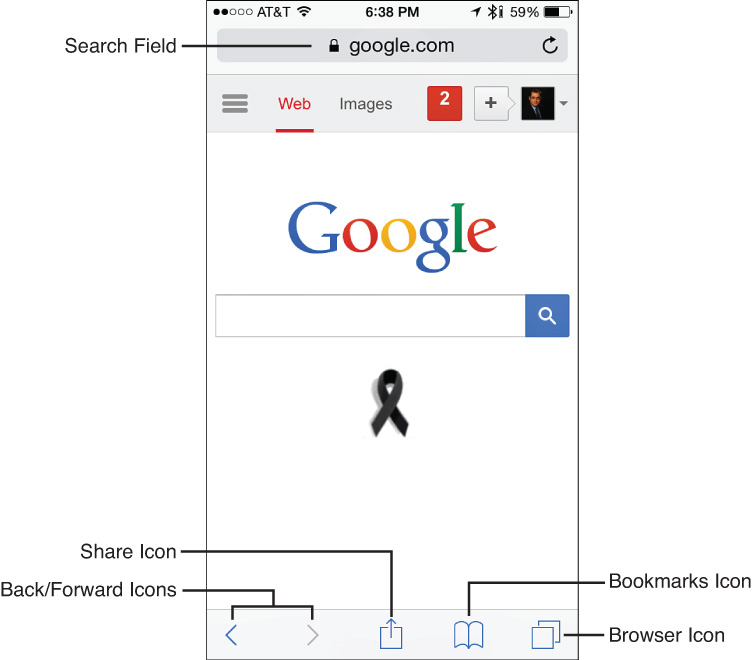
The Safari web browser on your iPhone (shown in Figure 12.1) or iPad (shown in Figure 12.2) offers the same basic functionality as the web browser for your desktop or laptop computer, but it’s designed to maximize the iPhone or iPad’s touchscreen and screen size.
With the release of iOS 8, Apple once again enhanced the Safari app, giving it a handful of new features that make web surfing a more enjoyable, secure, potentially more private, and more efficient experience.
Using iOS 8’s new “Handoff” function, you can begin surfing the Web using Safari on one of your Macs or iOS mobile devices, and then pick up exactly where you left off on another, as long as all of the equipment is linked to the same iCloud account.
![]() Tip
Tip
To turn on the Handoff feature, launch Settings, tap on the General option, and then tap on the Handoff & Suggested Apps option. From the Handoff & Suggested Apps submenu, turn on the virtual switch that’s associated with the Handoff option. This must be done on each device.
![]() What’s New
What’s New
In the iOS 8 edition of Safari, Apple has once again streamlined the interface, and some important command icons are now located in different places. For example, across the top of the Safari screen on an iPhone, you simply see the Search field. Along the bottom of the screen (from left to right) are the Back, Forward, Share, Bookmarks, and Switch Browser Window icons (also referred to as the Tabbed Browser icon).
Displayed across the top of the Safari screen on an iPad (from left to right) are the Back and Forward icons, followed by the Bookmarks icon. The Search field is displayed across the top center of the screen, and to the right of it are the Share, Add Browser Tab, and Switch Browser Window icons.
As you’d expect from your iPhone or iPad, surfing the Web using the Safari app is a highly customizable experience. For example, you can hold your device in Portrait or Landscape mode while surfing.
On most websites, you can also zoom in on or zoom out of specific areas or content, such as a paragraph of text or a photo, using the reverse-pinch finger gesture (to zoom in) or the pinch gesture (to zoom out), or by double-tapping on a specific area of the screen to zoom in or out.
Customize Your Web Surfing Experience
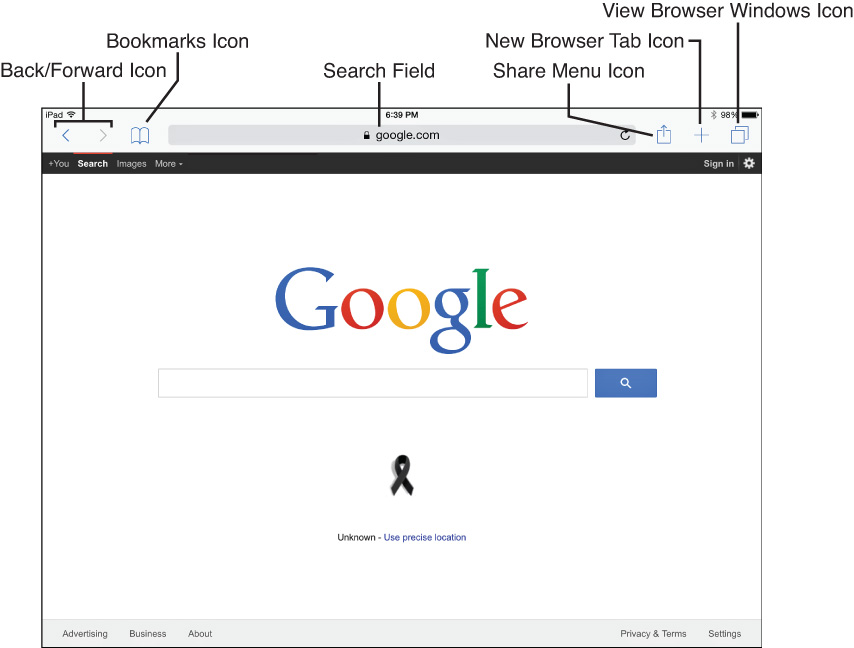
To customize your web surfing experience using Safari, launch Settings, and then tap on the Safari option. The Safari menu screen appears (shown in Figure 12.3) with a handful of customizable options. Here’s a summary of what each is used for:
![]() Search Engine—The smart Search field is used to enter specific website URLs (addresses) and to find what you’re looking for on the Web via a search engine, such as Google, Yahoo!, or Bing. This option enables you to select your default (favorite) Internet search engine. So if you select Google as your default, whenever you perform a search using Safari’s Search field, the browser automatically accesses Google to obtain your search results.
Search Engine—The smart Search field is used to enter specific website URLs (addresses) and to find what you’re looking for on the Web via a search engine, such as Google, Yahoo!, or Bing. This option enables you to select your default (favorite) Internet search engine. So if you select Google as your default, whenever you perform a search using Safari’s Search field, the browser automatically accesses Google to obtain your search results.
New Safari-related Settings options, labeled Search Engine Suggestions, Spotlight Suggestions, Quick Website Search, and Preload Top Hit, are available. Each can be turned on or off.
Search Engine Suggestions, for example, offers additional (related) search term suggestions when you enter a website address or search term in Safari’s Search field.
Spotlight Suggestions shows related websites when you perform a search using your iPhone or iPad’s Spotlight Search feature. Quick Website search can be used to search a specific website for a specific term. For example, in Safari’s search field, enter “Wiki New York” to access the Wikipedia website and display information related to New York.
Turn on the Preload Top Hit option if you want your favorite and most frequented websites to be displayed first when performing a relevant search.
These options determine when website suggestions are offered when using Safari’s Search field, Spotlight Search, or other search-related functions.
![]() Tip
Tip
Regardless of which Internet search engine you select to be your default in the Settings app (Google, Yahoo!, Bing, or DuckDuckGo), you can always add the others (or any other search engine) to your Bookmarks or Favorites menu, so that you can access the other search engines directly.
![]() Note
Note
DuckDuckGo.com is a search engine that does not track your web surfing behaviors or activities, so it offers a more private experience. However, you can utilize Safari’s newly enhanced Privacy features to prevent your web surfing activities from being tracked.
To do this, from the Safari menu within Settings, turn on the virtual switch that’s associated with the Do Not Track option (refer to Figure 12.3).
FIGURE 12.3 Customize your web surfing experience when using Safari from within Settings on your iOS device.
![]() Passwords & AutoFill—One of the more tedious aspects of surfing the Web is constantly having to fill in certain types of data fields, such as your name, address, phone number, email address, and website-related passwords.
Passwords & AutoFill—One of the more tedious aspects of surfing the Web is constantly having to fill in certain types of data fields, such as your name, address, phone number, email address, and website-related passwords.
When turned on, this feature remembers your responses and automatically inserts the data into the appropriate fields. It also pulls information from your own Contacts app entry.
To customize this option and link your personal contact entry to Safari, tap on the Passwords & AutoFill option, turn on the Use Contact Info option, and then tap on My Info to select your own Contacts entry.
You can also set whether Safari remembers names and passwords for specific websites you visit, as well as credit card information that you use to make online purchases. This functionality is part of what Apple calls iCloud Keychain. On the iPhone 6 and iPhone 6 Plus, online payments are now handled using the new Apple Pay feature.
![]() Favorites—This feature serves as a shortcut for accessing websites you frequently visit. As you begin typing a website address or website name into the Search field, Safari accesses your Favorites list and auto-inserts the appropriate website URL. When you tap on the Search field, a screen with icons representing sites in your Favorites list is displayed. Your Favorites list of websites automatically syncs between any Macs and iOS mobile devices that are linked to the same iCloud account.
Favorites—This feature serves as a shortcut for accessing websites you frequently visit. As you begin typing a website address or website name into the Search field, Safari accesses your Favorites list and auto-inserts the appropriate website URL. When you tap on the Search field, a screen with icons representing sites in your Favorites list is displayed. Your Favorites list of websites automatically syncs between any Macs and iOS mobile devices that are linked to the same iCloud account.
![]() Tip
Tip
If you’ve created custom Bookmark folders when using Safari on your Mac, you can access and manage them from your iOS mobile device. Plus from the Favorite option within Settings, you can make one of these custom folders your default.
![]() Open Links (iPhone only)—Anytime a new web page opens as a result of you tapping on a link, this feature determines whether the new browser window is opened as the new active browser window or whether it opens in the background.
Open Links (iPhone only)—Anytime a new web page opens as a result of you tapping on a link, this feature determines whether the new browser window is opened as the new active browser window or whether it opens in the background.
![]() Open New Tabs in Background (iPad only)—Anytime a new web page opens as a result of you tapping on a link, this feature determines whether the new browser window is opened as the new active browser window or whether it opens in the background.
Open New Tabs in Background (iPad only)—Anytime a new web page opens as a result of you tapping on a link, this feature determines whether the new browser window is opened as the new active browser window or whether it opens in the background.
![]() Show Favorites Bar (iPad)—When you turn on the virtual switch associated with this feature in Settings, your Favorites Bar displays across the top of the Safari screen, just below the row of command icons and the Search field. The default setting for this feature is off because it utilizes some of your onscreen real estate.
Show Favorites Bar (iPad)—When you turn on the virtual switch associated with this feature in Settings, your Favorites Bar displays across the top of the Safari screen, just below the row of command icons and the Search field. The default setting for this feature is off because it utilizes some of your onscreen real estate.
![]() Show Tab Bar (iPad)—When you turn on the virtual switch associated with this feature in Settings, when multiple browser windows are open in Safari, tabs for each window are displayed along the top of the screen, just below the row of command icons and the Search field. The default setting for this feature is on.
Show Tab Bar (iPad)—When you turn on the virtual switch associated with this feature in Settings, when multiple browser windows are open in Safari, tabs for each window are displayed along the top of the screen, just below the row of command icons and the Search field. The default setting for this feature is on.
![]() Block Pop-Ups—When turned on, this feature prevents a website you’re visiting from creating and displaying extra windows or opening a bunch of unwanted browser tabs. The default for this option is turned on because this makes for a more enjoyable web surfing experience.
Block Pop-Ups—When turned on, this feature prevents a website you’re visiting from creating and displaying extra windows or opening a bunch of unwanted browser tabs. The default for this option is turned on because this makes for a more enjoyable web surfing experience.
![]() Do Not Track—By default, when you surf the Web using Safari, the web browser remembers all the websites you visit and creates a detailed History list that you can access to quickly revisit websites. By turning on the Do Not Track feature, Safari does not store details about the websites you visit.
Do Not Track—By default, when you surf the Web using Safari, the web browser remembers all the websites you visit and creates a detailed History list that you can access to quickly revisit websites. By turning on the Do Not Track feature, Safari does not store details about the websites you visit.
![]() Block Cookies—Many websites use cookies to remember who you are and your personalized preferences when you’re visiting that site. Cookies contain data that gets saved in your iPhone or iPad and is accessible by the websites you revisit. When this option is turned on, Safari does not accept cookies from websites you visit. Thus, you must reenter site-specific preferences and information each time you visit that site. The Blocked Cookies submenu offers three options: Always (meaning all cookies are blocked), From Third Parties and Advertisers (meaning cookies unrelated to websites you purposely visit are blocked), and Never (meaning no cookies are blocked).
Block Cookies—Many websites use cookies to remember who you are and your personalized preferences when you’re visiting that site. Cookies contain data that gets saved in your iPhone or iPad and is accessible by the websites you revisit. When this option is turned on, Safari does not accept cookies from websites you visit. Thus, you must reenter site-specific preferences and information each time you visit that site. The Blocked Cookies submenu offers three options: Always (meaning all cookies are blocked), From Third Parties and Advertisers (meaning cookies unrelated to websites you purposely visit are blocked), and Never (meaning no cookies are blocked).
![]() Fraudulent Website Warning—This feature helps prevent you from visiting impostor websites designed to look like real ones, which have been created for the purpose of committing fraud or identity theft. It’s not foolproof, but keeping this feature turned on gives you an added level of protection, especially if you use your iOS device for online banking and other financial transactions.
Fraudulent Website Warning—This feature helps prevent you from visiting impostor websites designed to look like real ones, which have been created for the purpose of committing fraud or identity theft. It’s not foolproof, but keeping this feature turned on gives you an added level of protection, especially if you use your iOS device for online banking and other financial transactions.
![]() Clear History and Website Data—Using this feature, you can delete the contents of Safari’s History folder that stores details about all the websites you have visited. At the same time, cookies (data pertaining to specific websites you’ve visited) are also deleted.
Clear History and Website Data—Using this feature, you can delete the contents of Safari’s History folder that stores details about all the websites you have visited. At the same time, cookies (data pertaining to specific websites you’ve visited) are also deleted.
![]() Use Cellular Data—This option enables your iPhone or iPad to use the cellular data service (as opposed to a Wi-Fi Internet connection) to download Reading List information to your device from your iCloud account so that it can be read offline. Although this feature is convenient, it also utilizes some of your monthly cellular data allocation, which is why an on/off option is associated with it. The option is available on all iPhones, as well as iPads with Cellular + Wi-Fi capabilities.
Use Cellular Data—This option enables your iPhone or iPad to use the cellular data service (as opposed to a Wi-Fi Internet connection) to download Reading List information to your device from your iCloud account so that it can be read offline. Although this feature is convenient, it also utilizes some of your monthly cellular data allocation, which is why an on/off option is associated with it. The option is available on all iPhones, as well as iPads with Cellular + Wi-Fi capabilities.
![]() Advanced—From this submenu, you can view details about website-specific data that Safari has collected. If you choose, you can manually delete this information. You also can enable or disable the JavaScript feature.
Advanced—From this submenu, you can view details about website-specific data that Safari has collected. If you choose, you can manually delete this information. You also can enable or disable the JavaScript feature.
How to Use Tabbed Browsing with Safari
Safari’s main screen contains the various command icons used to navigate the Web. On the iPhone, these icons are displayed along the bottom of the Safari screen, while the smart Search field is displayed along the top of the screen.
If you’re using Safari on an iPad, the Title bar displays all of Safari’s command icons along the top of the screen. Immediately below the Title bar, if you have the option turned on, your personalized Favorites Bar is displayed. Below the Favorites Bar, the Tabs bar becomes visible if you have more than one web page loaded in Safari at any given time (and you have this featured turned on).
Switching Between Web Pages on an iPhone
The iPhone version of tabbed browsing involves Safari opening separate browser windows for each active web page. By tapping on the Switch Browser Window icon at the bottom-right corner of the Safari screen, you can quickly switch between open browser windows (shown in Figure 12.4) because only one at a time can be viewed.
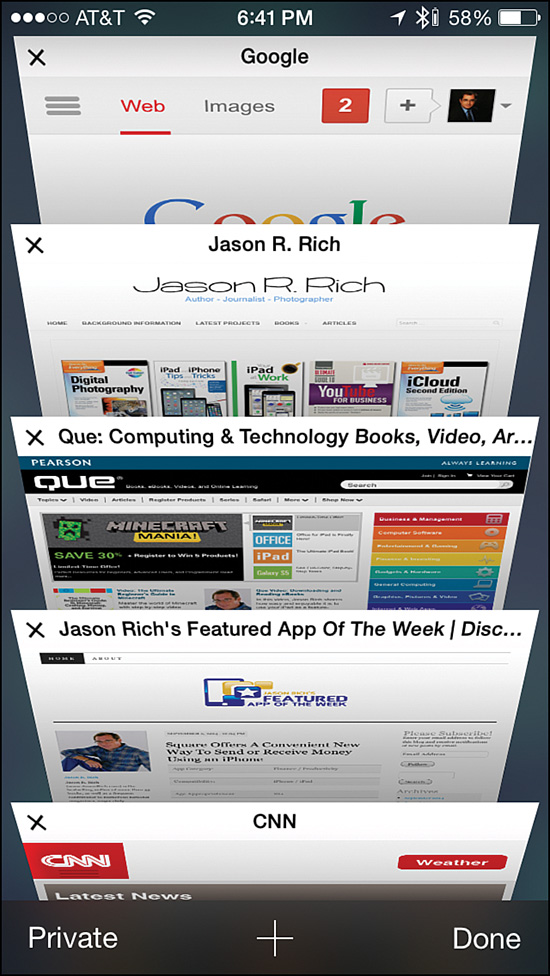
FIGURE 12.4 Safari’s Switch Browser Window View (also referred to as the Tab View) is shown here on the iPhone 5s. To open a new page, tap on the + option near the bottom center of the screen.
If you press down on the + option for a second or two, a Recently Closed Tabs menu screen appears on either the iPhone or iPad. You can easily reopen a previously visited but closed browser window by tapping on one of the items listed in this menu (which is based on your personal web surfing history).
When you’re viewing the Switch Browser Window View screen (also referred to as the Tab View), tap on the New Page icon (which looks like a plus sign) to create a new (empty) browser window, and then manually surf to a new website by typing a URL or search term into the unified smart search field, selecting a favorite icon, or selecting a bookmark.
![]() Tip
Tip
When viewing the Switch Browser Window screen in Safari, tap on the Private option to turn on the Private web surfing mode. This prevents Safari from storing details about the websites you visit and syncing this information with your iCloud account. When you’re using this privacy feature, the background color of Safari’s toolbars change to dark gray.
To switch between active (viewable) browser windows that are open, simply tap on one of the tabs displayed. You can scroll through them using an upward or downward swipe motion with your finger as needed. To rearrange the order of the taps, place your finger on a tab and drag it to a new location. To close a page (tab), tap on its “X” icon.
![]() What’s New
What’s New
If you have the Handoff feature turned on, scroll down to the bottom of the Switch Browser Window screen on your iPhone to see listings for open browser windows on your Mac(s) or other iOS mobile devices that are linked to the same iCloud account (shown in Figure 12.5). Tap on any of these listings to pick up exactly where you left off on that other device.
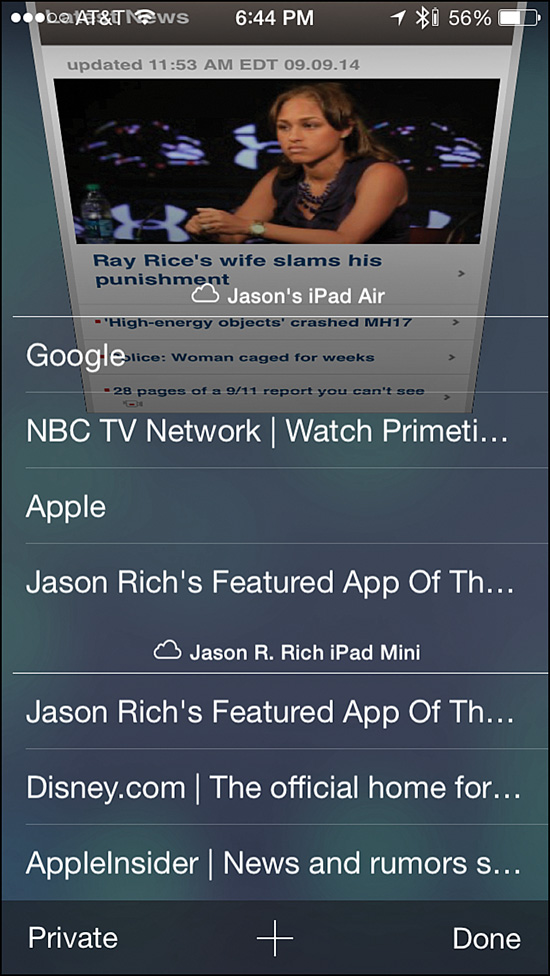
FIGURE 12.5 Use the Handoff feature to access open browser windows on your iPhone that were left open on any of your Macs or other iOS mobile devices that are linked to the same iCloud account.
Tap the Done button (in the lower-right corner of the screen) to exit the Switch Browser Window screen and return to the main Safari web browser screen. Or tap on one of the web page thumbnails as you scroll through them on the Switch Browser Window screen.
Tabbed Browsing on the iPad
When you tap on a link in a web page that causes a new web page to automatically open, a new tab in Safari is created and displayed, assuming you have the Open New Tabs in Background option (in Settings) turned off. Tabs are shown in Figure 12.6.
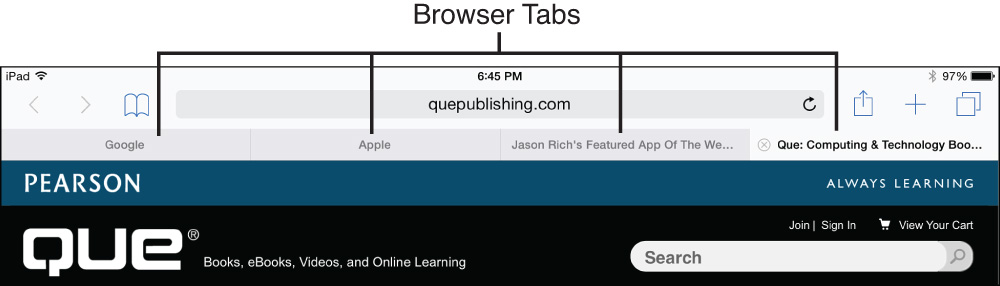
FIGURE 12.6 On the iPad, tabs are displayed along the top of the screen. Each tab represents a separate browser window that’s open. Thus, by tapping on a tab, you can quickly switch between open browser windows and visit multiple websites simultaneously.
As you’re viewing a web page, you can simultaneously open another web page by tapping on the New Browser Window icon (the + icon that’s displayed near the top-right corner of the Safari screen (between the Share and Switch Browser Window icons). When you do this, a new tab is created, and you can visit a new web page without closing the web page you’re currently viewing.
Along the Tab bar on the iPad, you can have multiple web pages accessible at once. Instantly switch between web pages simply by tapping on its related tab. The website name is displayed in the tab.
To close a tab, tap on the small x that appears on the left side of that tab.
![]() What’s New
What’s New
If you have the Handoff option turned on, when surfing the Web using your iPad, tap on the Switch Browser Window icon that’s displayed in the top-right corner of the screen to display all the open browser windows on each of your other Macs and/or iOS mobile devices that are linked to the same iCloud account (shown in Figure 12.7). Tap on any of these preview windows or listings to open that browser window on your iPad and pick up exactly where you left off when using the other computer or device.
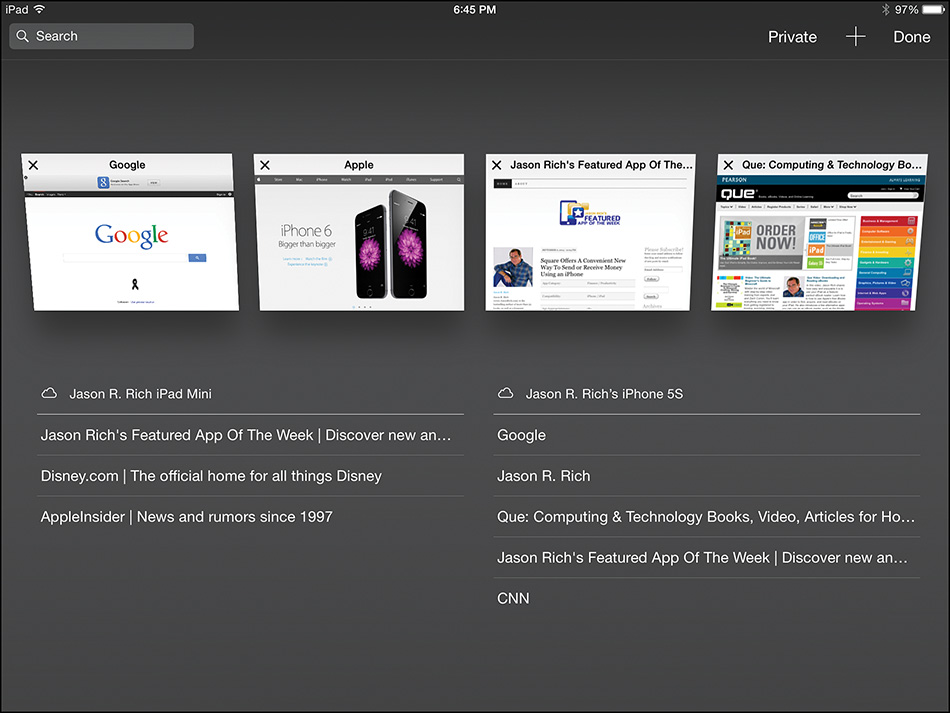
FIGURE 12.7 Access any browser window that was left open on your Mac(s) or other iOS mobile devices when you tap on the Switch Browser Window icon that’s displayed in the top-right corner of the Safari screen when using an iPad.
![]() Caution
Caution
With the Handoff feature turned on, as you’re surfing the Web on your iPhone or iPad, someone can literally follow along and see what web pages you’re visiting in real time if they’re using Safari on one of your Macs or other iOS mobile devices; that is, if they’re signed in using your account. To prevent this, activate Safari’s Private Browsing feature and turn off the Handoff feature.
Remove Screen Clutter with Safari’s Reader Option
Not to be confused with Safari’s Reading List feature (which is explained shortly), Safari Reader works on the iPhone and iPad and enables you to select a compatible website page; strip out graphic icons, ads, and other unwanted elements that cause onscreen clutter; and then read just the text (and view related photos) from that web page on your iOS device’s screen.
The Safari Reader works only with compatible websites, including those published by major daily newspapers and other news organizations. If the feature is available while you’re viewing a web page, the Reader icon (as shown in Figure 12.8 and Figure 12.9) is displayed before that web page’s URL, on the extreme left side of the Smart Search field.
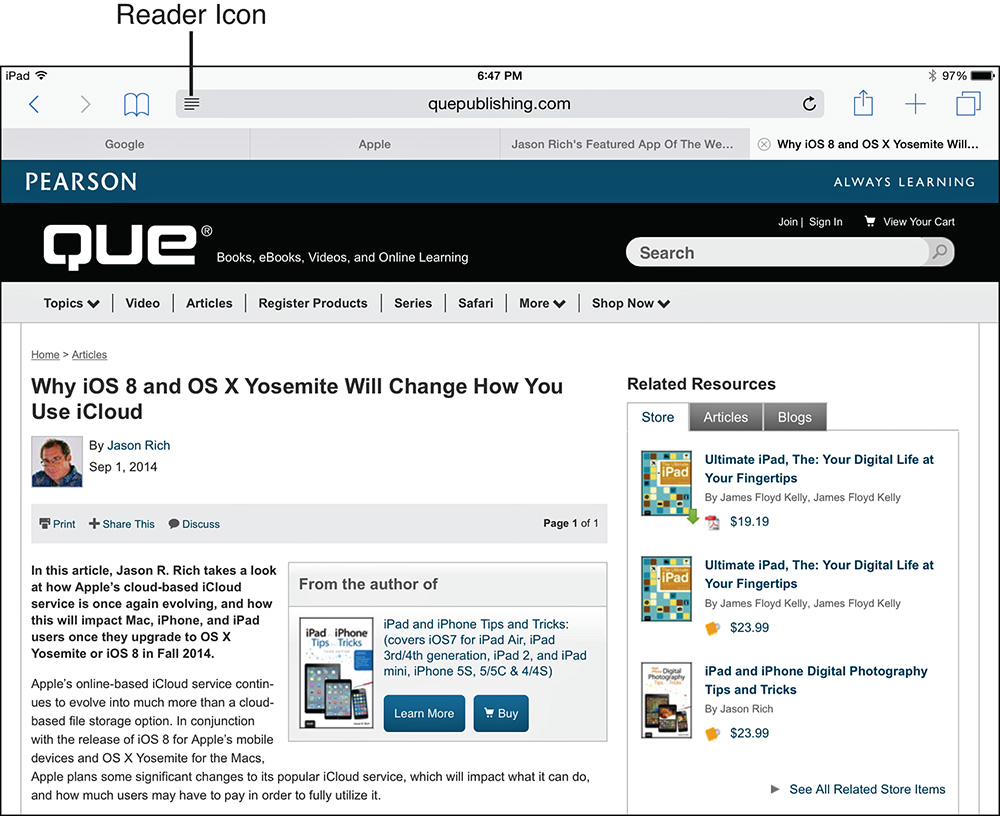
FIGURE 12.8 An article from QuePublishing.com, without the Reader feature active.
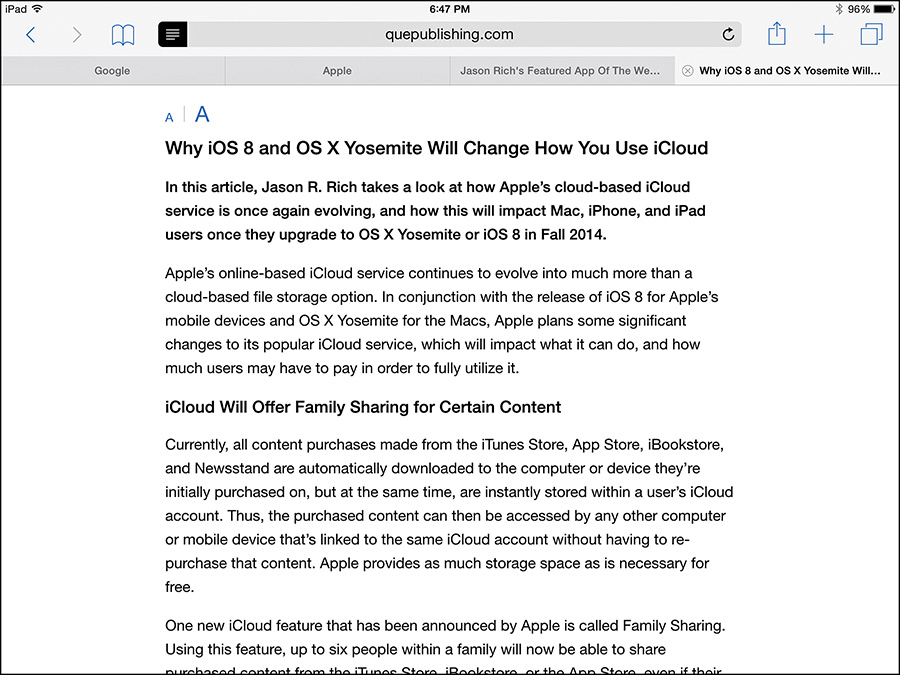
When you see the Reader icon displayed, tap on it. An uncluttered screen that contains just the article or text from that web page, along with related photos, is displayed. Use your finger to scroll up or down. Tap on the small or large “A” that’s displayed near the top-left corner of a Reader screen to decrease or increase the size of the text, respectively.
Tap the Reader icon a second time to exit the Reader window and return the web page to its normal appearance.
Create and Manage Reading Lists
As you’re surfing the Web, you might come across specific web pages, articles, or other information that you want to refer to later. In Safari, you can create a bookmark for that website URL and have it displayed as part of your Bookmarks list or within your Favorites Bar, or you can add it to your Reading List, which is another way to store web page links and content that’s of interest to you.
![]() Note
Note
The Reading List feature downloads entire web pages for offline viewing, as opposed to simply storing website addresses that you can refer to later. Although this feature downloads text and photos associated with a web page, it does not download animated graphics, video, or audio content associated with that page.
To add a website or web-based article to your personalized Reading List for later review, tap on the Share icon, and then tap on the Add to Reading List button displayed as part of Safari’s redesigned Share menu.
To later access your Reading List to view any of the stored web pages or articles, tap on the Bookmarks icon, and then tap on the Reading List tab. Figure 12.10 shows an example of a Reading List. The Reading List tab looks like eyeglasses.
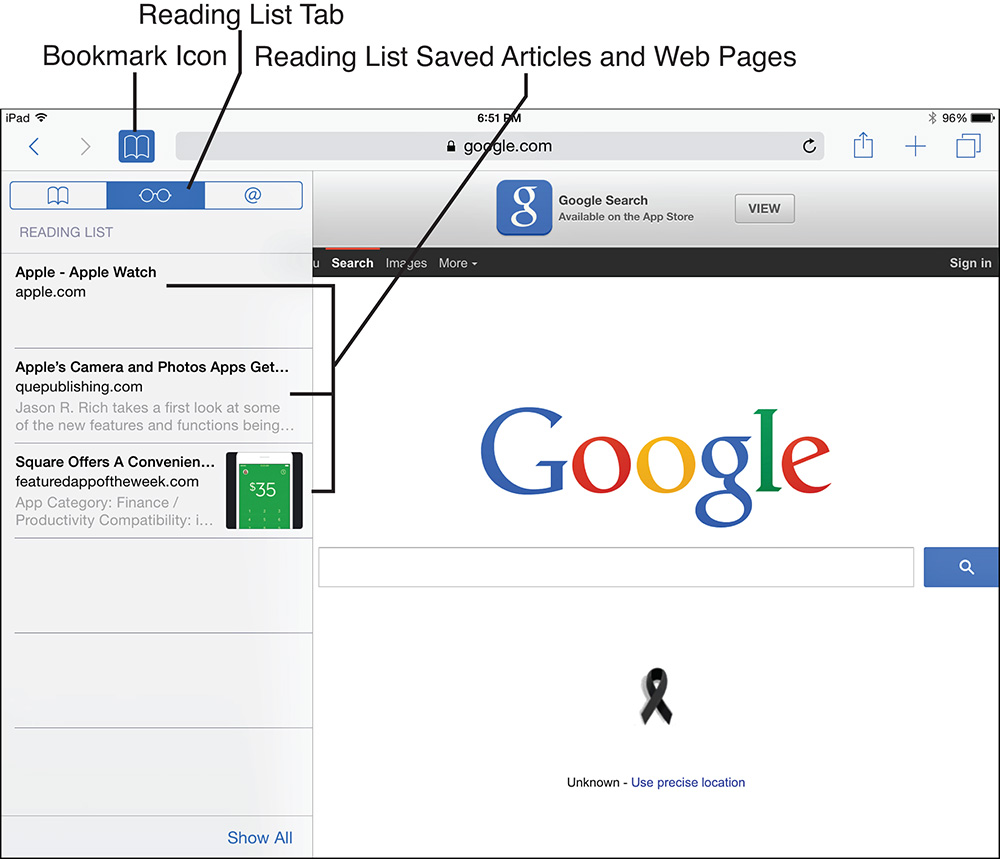
FIGURE 12.10 Creating a Reading List is another way to store links related to specific content on the Web that you want to easily be able to find again and access later.
![]() Tip
Tip
Like your Bookmarks list and Favorites Bar, the items stored in your Reading List can automatically be saved to iCloud and almost instantly made available on any other computer or iOS device that’s linked to your iCloud account. See the section, “Create, Manage, and Sync Safari Bookmarks,” for details on setting up these features for syncing with your iCloud account, as well as with your Macs and other iOS mobile devices.
Working with Bookmarks
When you tap on the Bookmarks icon on an iPad, the Bookmarks menu appears along the left side of the screen. It remains visible until you tap the Bookmarks icon again.
On the iPhone, when you tap the Bookmarks icon, the Bookmarks menu is displayed on a new screen in Safari.
At the top of the Bookmarks menu on both the iPhone and iPad are three tabs. The left-most tab (shaped like a book) is the Bookmarks tab. When you tap on it, your saved list of website bookmarks is displayed. The center tab is the Reading List tab. Tap on it to reveal your reading list.
The Shared Links tab (represented by the @ symbol) enables you to see a listing of website links shared with you by your Contacts, as well as subscriptions to RSS feeds or social media accounts (including Twitter). Set this up by tapping on the Subscriptions option that’s displayed in the lower-right corner of this menu.
After you tap on the Subscriptions option, you can add compatible social accounts (such as Twitter), or if you’re visiting a website or blog that has an RSS feed associated with it, visit that site and then tap on the Add Current Site option to make it a subscribed feed. From the Subscriptions panel that’s displayed, you can then delete a subscribed feed by tapping on its corresponding “-” icon.
Options for Sharing Web Content in Safari
There are probably times when you’re surfing the Web and come across something funny, informative, educational, or just plain bizarre that you want to share with other people, add to your Bookmarks list, or print. The iOS 8 version of Safari makes sharing web links extremely easy, thanks to a handful of available options.
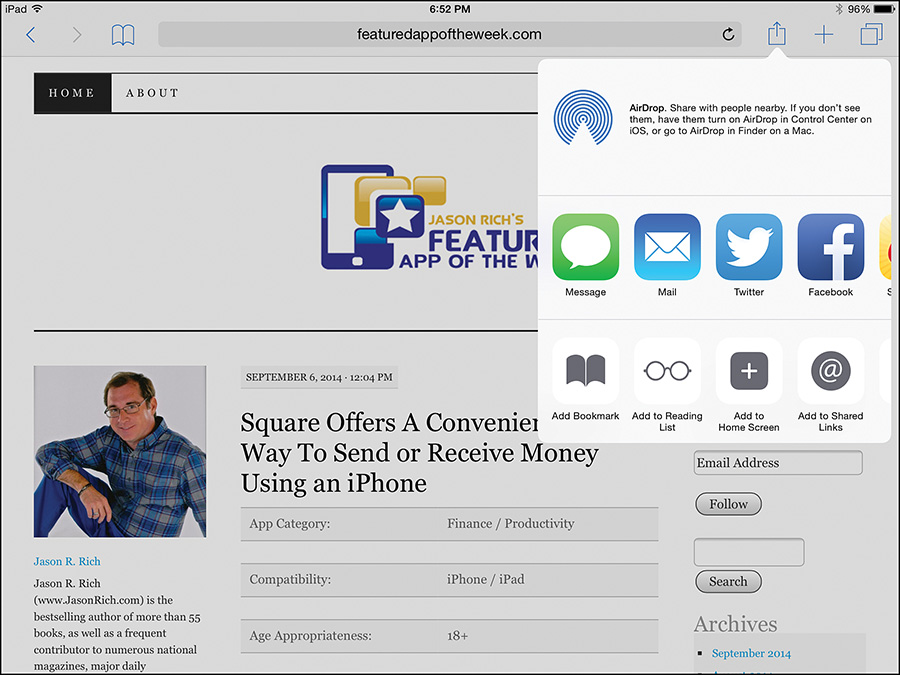
Anytime you’re visiting a web page that you want to share with others, tap on the Share icon to reveal a redesigned Share menu (as shown in Figure 12.11).
The options that are available to you from the Share menu vary depending on several factors, including the content you’re viewing, as well as whether you have Facebook, Twitter, Vimeo, or Flickr integration set up to work with iOS 8.
On the iPhone, the Share icon is displayed near the bottom center of the Safari screen. On the iPad, the Share icon can be found to the immediate right of the smart search field at the top of the screen.
![]() Tip
Tip
If you have the AirDrop feature turned on, when you access the Share menu in Safari, an AirDrop option is available. This enables you to wirelessly share content with nearby (compatible) Mac, iPhone, iPad, or iPod touch users. Some older Mac and iOS mobile device models don’t offer AirDrop.
To turn on AirDrop, open Control Center and tap on the AirDrop button. Then choose whether you want to communicate wirelessly with Contacts Only or all AirDrop users in your immediate vicinity. If AirDrop is not turned on, this feature does not appear in the Share menu.
The following options are often available from the Share menu, but vary based on the content you’re viewing and how you have integration with some Sharing-related options set up:
![]() Message—Send details about the web page you’re currently viewing to one or more other people via text or instant message using the Messages app (without having to leave Safari). Tap on Message, fill in the To field, and then tap the Send button. The website URL is automatically embedded within the text or instant message.
Message—Send details about the web page you’re currently viewing to one or more other people via text or instant message using the Messages app (without having to leave Safari). Tap on Message, fill in the To field, and then tap the Send button. The website URL is automatically embedded within the text or instant message.
![]() Mail—To share a website URL with others via email, as you’re looking at the web page or website you want to share, tap on the Share icon and select the Mail option from the Share menu. In Safari, an outgoing email window appears.
Mail—To share a website URL with others via email, as you’re looking at the web page or website you want to share, tap on the Share icon and select the Mail option from the Share menu. In Safari, an outgoing email window appears.
Simply fill in the To field with the recipient’s email address, and tap the Send icon. The website URL automatically is embedded in the body of the email, with the website’s heading used as the email’s subject. Before sending the email, you can add text to the body of the email message or change the subject.
![]() Twitter—If you have an active Twitter account that’s set up for use with iOS 8, tap on the Twitter option from the Share menu to create an outgoing tweet that automatically has the website URL attached.
Twitter—If you have an active Twitter account that’s set up for use with iOS 8, tap on the Twitter option from the Share menu to create an outgoing tweet that automatically has the website URL attached.
When the Twitter window appears, enter your tweet message (up to 140 characters, minus the length of the automatically shortened version of the website URL). Tap the Send icon when the tweet message is composed and ready to share with your Twitter followers.
![]() Tip
Tip
If you’re managing multiple Twitter accounts from your iOS mobile device, in the outgoing tweet window, tap on the From field, and then select from which of your Twitter accounts you want to send the tweet you’re composing.
![]() Facebook—Thanks to Facebook integration within iOS 8, when you tap on the Facebook option, you can update your Facebook status and include details about the web page you’re currently viewing in Safari.
Facebook—Thanks to Facebook integration within iOS 8, when you tap on the Facebook option, you can update your Facebook status and include details about the web page you’re currently viewing in Safari.
![]() Note
Note
Some other social media apps and services, including Pinterest, now enable you to display a share-related option directly within iOS 8’s Share menu.
![]() Add Bookmark—Tap on this option to add a bookmark to your personal Bookmarks menu or Favorites Bar that’s stored in Safari. You can later access your bookmarks and/or Favorites by tapping on the Bookmark icon. When you store a web page as a Favorite, it is displayed along the Favorites Bar on the top of the iPad’s screen. This Favorites Bar is displayed only if you turn on this option in Settings. To do this, launch Settings, tap on the Safari option, and then turn on the virtual switch that’s associated with the Show Favorites Bar option.
Add Bookmark—Tap on this option to add a bookmark to your personal Bookmarks menu or Favorites Bar that’s stored in Safari. You can later access your bookmarks and/or Favorites by tapping on the Bookmark icon. When you store a web page as a Favorite, it is displayed along the Favorites Bar on the top of the iPad’s screen. This Favorites Bar is displayed only if you turn on this option in Settings. To do this, launch Settings, tap on the Safari option, and then turn on the virtual switch that’s associated with the Show Favorites Bar option.
![]() Note
Note
When using Safari on the iPhone, you can maintain a Favorites Bar (if you sync this data from a computer or other iOS device); however, to conserve onscreen space, the Favorites Bar is not displayed across the top of the Safari screen like it is on an iPad. Instead, on an iPhone, the Favorites Bar is displayed as an additional Bookmark folder when you tap on the Bookmarks icon.
When you opt to save a bookmark, an Add Bookmark window appears (as shown in Figure 12.12). Here, you can enter a title for the bookmark and decide whether you want to save it as part of your Bookmarks menu or in your Favorites Bar. It’s also possible to create separate subfolders in your Bookmarks menu to organize your saved bookmarks.
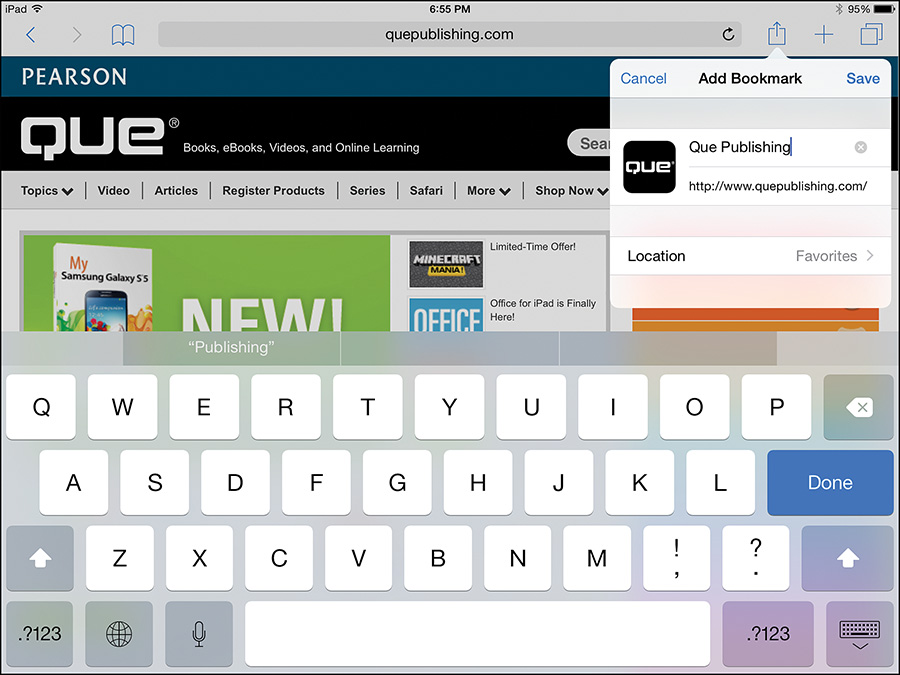
FIGURE 12.12 You can save a website URL as a bookmark in your Bookmarks menu or to be displayed as part of Safari’s Favorites Bar.
![]() Add to Reading List—Instead of adding a web page URL to your Bookmarks list or Favorites Bar, you can save it in your Reading List for later reference. (It is downloaded to your iPhone or iPad for later viewing, even if no Internet connection is then available.) To access your Reading List, tap on the Bookmarks icon, and then tap on the Reading List tab.
Add to Reading List—Instead of adding a web page URL to your Bookmarks list or Favorites Bar, you can save it in your Reading List for later reference. (It is downloaded to your iPhone or iPad for later viewing, even if no Internet connection is then available.) To access your Reading List, tap on the Bookmarks icon, and then tap on the Reading List tab.
![]() Add to Home Screen—In addition to saving a website URL in the form of a bookmark or in your Reading List, another option is to save it as a Home screen icon. This feature is explained later, in the “Launch Your Favorite Websites Quickly with Home Screen Icons” section.
Add to Home Screen—In addition to saving a website URL in the form of a bookmark or in your Reading List, another option is to save it as a Home screen icon. This feature is explained later, in the “Launch Your Favorite Websites Quickly with Home Screen Icons” section.
![]() Add to Shared Links—When applicable, this option enables you to share details about the web page you’re viewing with others who access your Shared Links menu.
Add to Shared Links—When applicable, this option enables you to share details about the web page you’re viewing with others who access your Shared Links menu.
![]() Copy—Use this command to copy the web page URL you’re looking at to the virtual clipboard that’s built in to iOS 8. You can then paste that information into another app.
Copy—Use this command to copy the web page URL you’re looking at to the virtual clipboard that’s built in to iOS 8. You can then paste that information into another app.
![]() Print—From Safari, you can wirelessly print a website’s contents to any AirPrint-compatible printer that’s set up to work with your iOS mobile device. To print a web page, tap on the Print command. From the Printer Options screen, select the printer you want to use, and then choose the number of copies you want printed. Tap the Print icon at the bottom of the Print Options window to send the web page document to your printer.
Print—From Safari, you can wirelessly print a website’s contents to any AirPrint-compatible printer that’s set up to work with your iOS mobile device. To print a web page, tap on the Print command. From the Printer Options screen, select the printer you want to use, and then choose the number of copies you want printed. Tap the Print icon at the bottom of the Print Options window to send the web page document to your printer.
Create, Manage, and Sync Safari Bookmarks
Thanks to the fact that Safari is fully integrated with iCloud, if you have an active iCloud account, your iOS device automatically syncs your Bookmarks and related Safari data with your other iOS mobile devices, as well as the compatible web browsers on your primary computer(s).
To activate this iCloud sync feature, launch Settings from the Home Screen, and then tap on the iCloud option. When the iCloud menu screen appears, make sure your iCloud account is listed at the top of the screen, and then make sure the virtual on/off switch associated with the Safari option is turned on. This must be done on each of your iOS mobile devices just once.
Your Bookmarks list, Favorites Bar, open browser windows (tabs), and Safari Reading List are automatically continuously synced with your iCloud account. Thus, when you add a new bookmark while surfing the Web on your iPad, for example, within seconds that same bookmark appears in your Bookmarks list on your iPhone and on Safari that’s running on your Mac.
![]() Note
Note
For Windows PC users, if you download the optional iCloud Control Panel for your PC (www.apple.com/icloud/setup/pc.html), you can have your Bookmarks and related web browser data on your PC sync with your iOS mobile device(s) and Mac(s). Simply add a checkmark to the Bookmarks option that’s displayed in the iCloud Control Panel. This feature is compatible with the Windows version of the Internet Explorer, Firefox, and Chrome web browsers. When prompted, simply select which web browser you want to sync your Safari bookmarks and data with.
Sync Usernames and Passwords Using iCloud Keychain
When the iCloud Keychain feature is turned on (on each of your iOS mobile devices and Macs), anytime you enter a username and password for a website you visit, Safari stores that information and syncs it in your personal iCloud account. Then, anytime you revisit that website on any of your Macs or iOS mobile devices that are linked to the same iCloud account, your username and password for that website are remembered and you’re automatically logged in.
![]() Note
Note
iCloud Keychain also remembers credit card information you use when making online purchases from a website. All usernames, passwords, and credit card details are stored using 256-bit AES encryption to maintain security.
To turn on and begin using iCloud Keychain, launch Settings and tap on the iCloud option. Then, from the iCloud Control Panel, turn on the virtual switch that’s associated with the Keychain option. Follow the onscreen prompts that walk you through the feature’s built-in security precautions.
Next, return to the main Settings menu and tap on the Safari option. Tap on the Passwords & AutoFill option. From the Passwords & AutoFill menu, turn on the virtual switch associated with the Names and Passwords option if you want iCloud Keychain to remember the usernames and passwords you use to access various websites you visit.
![]() Note
Note
Most online banking, credit card, and financial websites do not support iCloud Keychain for security purposes. When you visit these websites, Safari might remember your username, but you must manually enter your password each time.
To ensure that Safari stores all of your website-related usernames and passwords, also turn on the virtual switch associated with the Always Allow option. However, when using this feature, it’s a good strategy to also activate the Passcode Lock feature of your iOS mobile device to prevent unauthorized people from accessing personal information when using your iPhone or iPad to surf the Web.
If you also want iCloud Keychain to store your credit card details for when you shop online, turn on the virtual switch associated with the Credit Cards option. Then, tap on the Saved Credit cards option and enter your credit card details. This needs to be done only once.
Using iCloud Keychain, you no longer need to remember the unique usernames and passwords that you associate with each of the websites you frequently visit. Plus, to make your web surfing experience even more secure, you can use the built-in Password Generator feature to create highly secure passwords for you (which the web browser then remembers).
Launch Your Favorite Websites Quickly with Home Screen Icons
If you regularly visit certain websites, you can create individual bookmarks for them. However, to access those sites, you still must launch Safari from your iPhone or iPad’s Home screen, tap on the Bookmarks icon, and then tap on a specific bookmark listing to access the related site.
A time-saving alternative is to create a Home screen icon for each of your favorite websites.
To create a Home Screen icon, surf to one of your favorite websites using Safari. After it loads, tap on the Share icon, and tap on the Add to Home Screen button from the Share menu.
The Add to Home window appears. It displays a thumbnail image of the website you’re visiting and enables you to enter the title for the website (which is displayed below the icon on your device’s Home screen). Keep the title short. When you’ve created the title (or if you decide to keep the default title that Safari creates), tap on the Add option in the upper-right corner of the window.
![]() Note
Note
When you use the Add to Home feature in Safari, if you’re creating a shortcut for a website designed to be compatible with an iPhone or iPad, a special logo or related icon (as opposed to a web page thumbnail) is displayed.
Safari closes, and you are returned to your device’s Home screen. Displayed on the Home screen is what looks like a new app icon; however, it’s really a link to your favorite website. Tap on this icon to automatically launch Safari from the Home screen and load your web page.
After you create a Home screen icon for a web page, it can be treated like any other app icon. You can move it around on the Home screen, add the icon to a folder, or delete the icon from the Home screen.
Additional New Features Added to Safari
The following is information about other useful new Safari-related features to improve your web surfing experience.
Switch Between Mobile and Desktop Versions of Websites
When you visit a website from an iOS mobile device, if that website has a specially formatted mobile version available, it’s that mobile version you’re given access to by default. However, if you want to view the desktop version of a website from your iPhone or iPad, tap on the website’s URL that’s displayed in the Search field, and then place your finger near the center of the screen and swipe downward.
Next, tap on the Request Desktop Site option (shown in Figure 12.13), and the full version (as opposed to the mobile version) of that website is displayed.
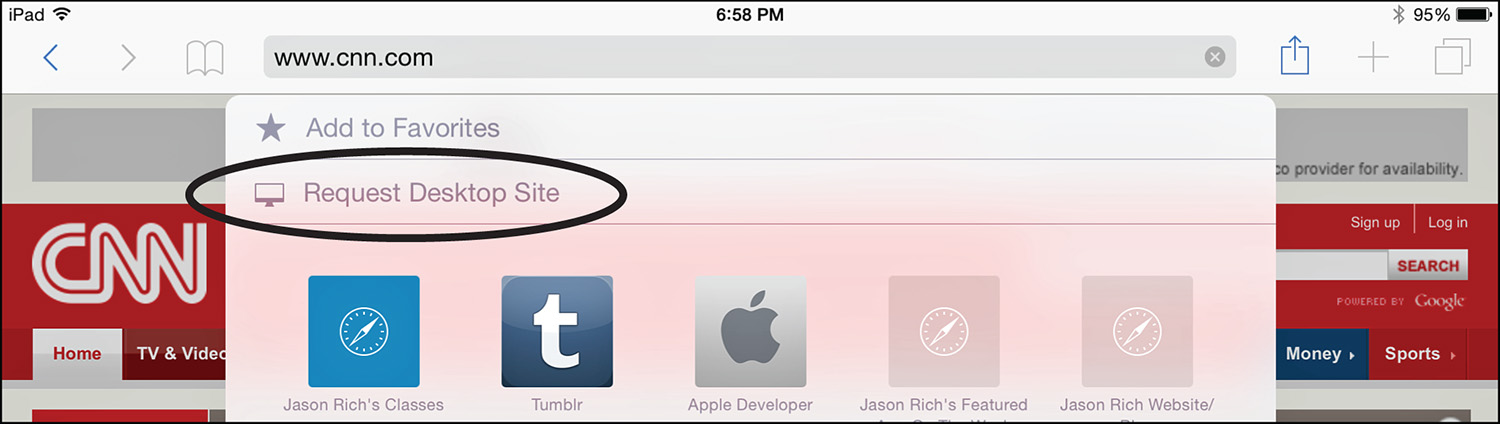
FIGURE 12.13 Switch from a mobile-formatted website to the full version of that website by tapping on the Request Desktop Site option.
Scan Credit and Debit Card Information Using Your iPhone or iPad’s Camera
Another new Safari feature is related to using iCloud Keychain to store credit card information when shopping online. When used with iOS 8, instead of manually entering new credit card details, it’s now possible to use the iPhone or iPad’s built-in camera to scan your debit or credit card(s) and have the information automatically stored in your mobile device.
To add a new credit or debit card to your iCloud Keychain, launch Settings, tap on the Safari option, and then tap on the Password & AutoFill option. Turn on the Credit Cards option, which is displayed as part of the Passwords & AutoFill menu screen. Next, tap on the Saved Credit Cards option.
Tap on the Add Credit Card option on the Credit Cards submenu. When the Add Credit Card window appears, tap on the Use Camera option to scan each of your debit or credit cards. Otherwise, manually fill in the Cardholder, Number, Expires, and Description fields, and tap the Done option.
If you’re using a newer iOS mobile device that’s compatible with Apple Pay, credit card details for this feature are added the same way, although Apple Pay can import the iCloud Keychain information that pertains to your credit card details.
![]() Note
Note
Although many improvements have been made to the web surfing capabilities of Safari on the iPhone and iPad, what’s still missing is Adobe Flash compatibility. Adobe Flash is a website programming language used to generate many of the slick animations you see on websites. Unfortunately, these animations are not visible when you access a Flash-based website using the iOS version of Safari.
If you want limited Flash compatibility on your iPhone or iPad, try using a third-party web browser app, such as Photon Flash Web Browser for iPhone ($3.99) or Photon Flash Web Browser for iPad ($4.99). Both versions are available from the App Store and offer compatibility with some (but not all) Flash-based content on the Web.
How to View YouTube Videos
After Google, YouTube has become the world’s second most popular search engine. When people want to learn new things or be entertained, they often prefer to watch free videos, as opposed to reading lots of online content.
Most of the videos published on YouTube can be viewed using Safari on your iPhone or iPad. Simply point the web browser to www.YouTube.com, and if applicable, sign in using your YouTube username and password.
However, for a more enjoyable and feature-packed YouTube experience on your iPhone or iPad, be sure to download and install the official (and free) YouTube app that’s available from the App Store. This app enables you to search for and view any YouTube videos, manage your YouTube channel subscriptions, and even manage your own YouTube channel.