10. Address Book App
Tables and UINavigationController
10.1 Introduction
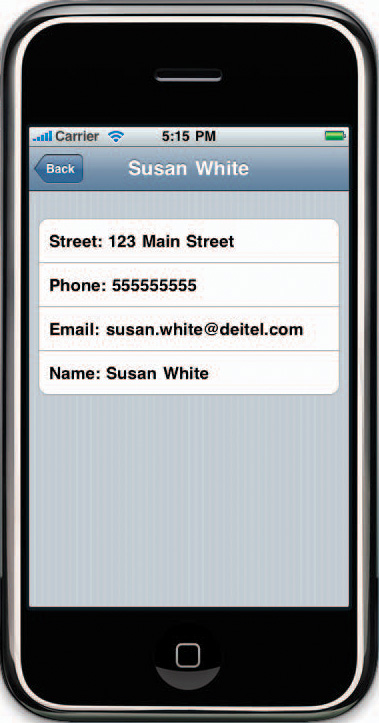
The Address Book app (Fig. 10.1) provides quick and easy access to stored contact information. On the main screen, the user can scroll through an alphabetical contact list, add contacts, delete contacts and view more information about individual contacts. Touching a contact’s name displays a screen showing the contact’s detailed information (Fig. 10.2). Touching the “Back” Button in the top-left corner of the details screen returns the user to the contacts list. You can add a new contact by touching the Add Contact Button (![]() ) in the top-right corner of the app. This shows a screen containing editable Text Fields for entering the new contact’s name, address, e-mail and phone number (Fig. 10.3). Touching the “Done” Button adds the new contact and returns the user to the main contact screen. Pressing the “Edit” Button in the top-left corner of the main screen displays the Deletion Control Buttons (
) in the top-right corner of the app. This shows a screen containing editable Text Fields for entering the new contact’s name, address, e-mail and phone number (Fig. 10.3). Touching the “Done” Button adds the new contact and returns the user to the main contact screen. Pressing the “Edit” Button in the top-left corner of the main screen displays the Deletion Control Buttons (![]() ) next to each contact (Fig. 10.4(a)). Touching one of these displays a “Delete” Button next to the chosen contact’s name (Fig. 10.4(b)). Pressing the “Delete” Button deletes the corresponding contact.
) next to each contact (Fig. 10.4(a)). Touching one of these displays a “Delete” Button next to the chosen contact’s name (Fig. 10.4(b)). Pressing the “Delete” Button deletes the corresponding contact.

Fig. 10.2 | Viewing a single contact’s details.

Fig. 10.3 | Add Contact screen.

Fig. 10.4 | Deleting a contact.

10.2 Test-Driving the Address Book App
Opening the Completed Application
Open the directory containing the Address Book app project. Double click AddressBook.xcodeproj to open the project in Xcode.
Adding a New Contact
Click the Build and Go button to run the app in the iPhone Simulator. Touch the ![]() Button in the top-right corner of the app to view the Add New Contact screen. Touch the “Name” Text Field and enter the first and last name using the keyboard. Touch the “Street” Text Field and enter the street address, then fill in the remaining contact information. When you’re finished, touch the “Done” Button in the top-right corner of the app. The name you entered appears as the only entry in the contact list. Add additional entries if you wish. Notice that they’re maintained in alphabetical order.
Button in the top-right corner of the app to view the Add New Contact screen. Touch the “Name” Text Field and enter the first and last name using the keyboard. Touch the “Street” Text Field and enter the street address, then fill in the remaining contact information. When you’re finished, touch the “Done” Button in the top-right corner of the app. The name you entered appears as the only entry in the contact list. Add additional entries if you wish. Notice that they’re maintained in alphabetical order.
Deleting a Contact
Touch the “Edit” Button in the top-left corner of the contacts list. Deletion Control Buttons (![]() ) appear next to each contact. Touch the Deletion Control Button next to one of the contacts to show the red “Delete” Button to the right of the contact’s name. Touch this Button to remove the contact from the list.
) appear next to each contact. Touch the Deletion Control Button next to one of the contacts to show the red “Delete” Button to the right of the contact’s name. Touch this Button to remove the contact from the list.
10.3 Technologies Overview
This app displays a list of contacts in a UITableView—the standard table for iPhone apps. A UITableView allows the user to scroll through the contacts by dragging a finger up or down the screen. UITableViews contain UITableViewCells. We use both editable and non-editable cells in this app. To save memory and improve the app’s performance, we reuse UITableViewCells in our UITableViews. For example, when the user is scrolling through a long list of contacts, only a limited number of contacts can appear on the screen at any time. Rather than creating new UITableViewCells for contacts as the appear on the screen, we can reuse the ones that are no longer visible by calling UITableView’s dequeueReusableCellWithIdentifier: method. This saves memory and improves the app’s performance. Similarly, we don’t need new UITableViewCells for each new contact the user adds—we can simply reuse the cells in the UITableView for each new contact. For more information on programming with UITableViews, visit:
developer.apple.com/iphone/library/documentation/UserExperience/
Conceptual/TableView_iPhone/
All UIViewControllers have a navigationController property of type UINavigationController. We use this navigation bar to add Buttons that the user can press to view, edit and add new contacts. UINavigationItems contain the Buttons that are used to navigate through the app’s screens. The RootViewController’s view contains the contact-list UITableView. The RootViewController displays a new ContactViewController when the user touches an individual contact and creates an AddViewController when the user touches the ![]() Button. Various
Button. Various UIKeyboardTypes provide the user with the correct keyboard for the type of information being entered.
10.4 Building the App
Open Xcode and create a new project. Select the Navigation-based Application template and name the project AddressBook. The RootViewController class files are automatically generated.
10.4.1 Class RootViewController
The RootViewController class (Fig. 10.5) manages the RootView. This is the starting point of the Address Book app.
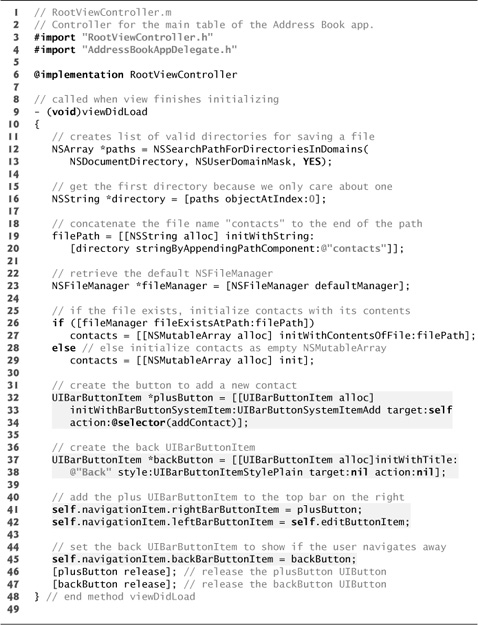
Fig. 10.5 | Controller for the main table of the Address Book app.

RootViewController is a subclass of UITableViewController (line 9)—which is a subclass of the UIViewController class we’ve used in previous apps. A UITableViewController manages UITableViews similar to the way UIViewController manages UIViews. Line 10 states that this class implements the AddViewControllerDelegate protocol—it defines the addViewControllerDidFinish: method.
RootViewController has two instance variables—contacts (line 12) and filePath (line 13). The contacts NSMutableArray contains NSDictionary objects—each represents the complete contact information for one person. The filePath contains the location of the file that stores the app’s data. The addContact method (line 16) creates a new AddContactView so the user can add a new contact.
Lines 20–23 add the sorting category to NSDictionary. The sorting category has only one method—compareContactNames: (defined in Fig. 10.12). This compares the names of two contacts represented as NSDictionarys. We use this method to sort an NSMutableArray of contacts in alphabetical order.
Defining the RootViewController Class Implementation
The viewDidLoad method (Fig. 10.6, lines 9–48) initializes class RootViewController’s instance variables after the view loads. Lines 12–13 use the NSSearchPathForDirectoriesInDomains function to get an NSArray with one item—the path name of the directory where this app can save data. The path name is stored in the directory NSString (line 16). Lines 19–20 concatenate the word contacts to the end of directory to specify the complete path of the file in which we’ll save the contact information. Line 23 creates a new NSFileManager by calling NSFileManager’s defaultManager static method. We use this object to determine whether the file already exists (line 26). If it does, we use NSMutableArray’s static initWithContentsOfFile method to initialize contacts with the contents of that file (line 27). This method parses a plist file to create an NSMutableArray containing the file’s contents. Otherwise, NSMutableArray contacts is initialized as a new, empty array (line 29). Lines 32–34 create an Add Contact Button (![]() ) as a new
) as a new UIBarButtonItem that, when touched, calls RootViewController’s addContact method. A UIBarButtonItem functions similar to a UIButton, except that a UIBarButtonItem appears only inside a Navigation Bar. Lines 37–38 create another UIBarButtonItem titled Back. We then access RootViewController’s navigationItem property (inherited from class UIViewController) to place the two UIBarButtonItems on the Navigation Bar at the top of the app (lines 41–42). The Add Contact Button is placed on the right side of the bar (line 41) and UIViewController’s editButtonItem is placed on the left (line 42). Line 45 sets navigationItem’s backBarButtonItem to backButton—causing the navigation controller to use backButton as navigationItem’s leftBarButtonItem when the user navigates away from the RootViewController’s view.
Fig. 10.6 | Method viewDidLoad of class RootViewController.
Method addContact of Class RootViewController
The addContact method (Fig. 10.7) initializes a new AddViewController (lines 54–55). UIViewController’s presentModalViewController:animated: method is called to display the controller’s View (line 58).
Fig. 10.7 | Method addContact of class RootViewController.

Method addViewControllerDidFinishAdding: of Class RootViewController
The addViewControllerDidFinishAdding: method (Fig. 10.8) adds a new contact then dismisses the AddViewController. Line 65 calls the AddViewController’s values method (defined in Fig. 10.16), which returns an NSDictionary containing the data for the new contact. If the NSDictionary is not nil, we add the new contact using NSDictionary’s addObject: method (line 70). Line 73 sorts contacts by their names using NSMutableArray’s sortUsingSelector: method. We then hide AddViewController’s view by calling UIViewController’s dismissModalViewControllerAnimated: method (line 77). Line 80 saves the contents of the contacts dictionary to a file by calling NSMutableDictionary’s writeToFile:atomically: method. Next, we reload the UITableView (line 82) to display the updated contact list data.
Fig. 10.8 | Method addViewControllerDidFinishAdding: of class RootViewController.

Methods tableView:NumberOfRowsInSection and tableView:cellForRowAtIndexPath: of Class RootViewController
Several methods inherited from UITableViewController control the table’s formatting. These methods are defined in the UITableViewDataSource and UITableViewDelegate protocols, which UITableViewController implements. A UITableView gets its data from its specified dataSource. In this case, RootViewController is the dataSource. The number of rows in each section is specified by the UITableViewDataSource protocol’s tableView:numberOfRowsInSection: method (Fig. 10.9, lines 86–90). We return the number of elements in the contacts array (line 89) in this case, since all of the saved contacts are shown in one section of the table.
Fig. 10.9 | Methods and tableView:NumberOfRowsInSection: and tableView:cellForRowAtIndexPath: of class RootViewController.

The tableView:cellForRowAtIndexPath: method returns a UITableViewCell for the given UITableView and NSIndexPath—an object that represents the index of a cell (i.e., contact) in the table. Line 97 creates an NSString which will be passed to UITableView’s dequeueReusableCellWithIdentifier: method to get a UITableViewCell from tableView (lines 98–99). The NSString specifies the type of cell we want to receive. This method attempts to reuse an existing UITableViewCell (with the specified identifier) which is not in use at the moment, possibly because it is not displayed on the screen. If tableView contains no editable UITableViewCells that can be reused (line 102), we create a new one using UITableViewCell’s initWithStyle:reuseIdentifier: method (lines 105–107). UITableViewCell styles are new to iPhone OS 3.x, you can learn more about them by searching developer.apple.com for A Closer Look at Table-View Cells. Lines 111–112 get the name of the contact corresponding to the row we’re retrieving. Lines 113–114 update cell’s textLabel property to display the correct contact’s name. We then return the configured cell to the UITableView (line 118).
Method tableView:didSelectRowAtIndexPath: of Class RootViewController
The UITableViewDelegate’s tableView:didSelectRowAtIndexPath: method (Fig. 10.10) is called when the user touches a row of the UITableView. In this case, we display a ContactView so the user can edit a contact. Lines 126–127 create a new ContactViewController. We then call ContactViewController’s setPerson and updateTitle methods to initialize the ContactView with the data from the selected contact. Line 134 calls UINavigationController’s pushViewController:animated: method to display the new ContactView.
Fig. 10.10 | Method tableView:didSelectRowAtIndexPath: of class RootViewController.

Methods tableView:commitEditingStyle:forRowAtIndexPath:, shouldAutorotateToInterfaceOrientation: and dealloc of Class RootViewController
The UITableViewDataSource protocol’s tableView:commitEditingStyle:forRowAtIndexPath: method (Fig. 10.11, lines 139–156) is called when the user edits the table, such as by deleting or inserting a row. Recall that the user can delete cells using when the app is in edit mode. If the given UITableViewCellEditingStyle is UITableViewCellEditingStyleDelete (line 144), the user touched the “Delete” Button, so line 147 calls contact’s removeObjectAtIndex method to remove the element at indexPath.row. We call UITableView’s deleteRowsAtIndexPaths:withRowAnimation method to remove the deleted row from tableView (lines 150–151). We then write the updated contacts to the file (line 154).
Fig. 10.11 | Methods tableView:commitEditingStyle:forRowAtIndexPath:, shouldAutorotateToInterfaceOrientation: and dealloc of class RootViewController.

The shouldAutoRotateToInterfaceOrientation: method (lines 159–164) is inherited from UIViewController and overridden by default in the Navigation-based Application template. This method is called by the iPhone OS to determine if this view should rotate when the iPhone’s orientation changes. The dealloc method (lines 167–171) releases the contacts NSMutableArray and calls the superclass’s dealloc method.
NSDictionary’s sorting Category
Lines 175–182 implement method compareContactNames: of NSDictionary’s sorting category (Fig. 10.12). Lines 179–180 use NSString’s caseInsensitiveCompare: method to compare the value for key Name of the given NSDictionary to that of the NSDictionary receiving the compareContactNames: message.
Fig. 10.12 | NSDictionary’s sorting category.

10.4.2 Class AddViewController
In Xcode, select File > New File and chose UIViewController subclass. Before pressing Next, ensure that the With XIB for user interface checkbox is checked so that Xcode automatically generates a nib file for the new class. Name the class AddViewController and save it in the default location provided. Open AddViewController.xib and drag a Navigation Bar to the top of the app window. Change the title of the Navigation Item to Add Contact. Next, drag a Bar Button Item from the Library to the right side of the Navigation Bar. Open the Inspector window to change the Bar Button Item’s Title to Done. Drag a TableView from the Library window and resize it to fill the remainder of the app window. Figure 10.13 shows the completed nib file.
Fig. 10.13 | AddViewController.xib in Interface Builder after placing the default TableView.

AddViewController Interface Declaration
Class AddViewController (Fig. 10.14) is a subclass of UIViewController (line 10) and implements the UITableViewDataSource protocol. This means that AddViewController acts as a data source for a UITableView. It also implements the EditableCellDelegate protocol so that it can receive messages when a user begins editing a cell, stops editing a cell or touches the “Done” Button.
Fig. 10.14 | AddViewController’s interface declaration.

Line 13 declares variable delegate of type id which implements the AddViewControllerDelegate protocol. This will be used to store the RootViewController. The UITableView table is declared as an outlet and will display the contact information for the chosen contact (line 14). In Interface Builder connect the new Table View to the table property of File’s Owner. NSArray fields will store the field names for each of the fields in table (line 15). The NSMutableDictionary data contains the data for the new contact, once the user enters it (line 16). The BOOL variable keyboardShown indicates whether or not the keyboard is currently visible (line 17). Line 18 declares an EditableCell to store the UITableViewCell currently being edited by the user.
Lines 22–24 declare delegate, table and data as properties. The AddViewController class defines three methods:
• doneAdding:sender: returns the app to the RootView when the user touches the “Done” Button
• values returns an NSDictionary containing all the contact information stored in table.
• clearFields clears all of table’s EditableCells.
Lines 31–33 declare the AddViewControllerDelegate protocol. Classes implementing this protocol define the addViewControllerDidFinishAdding: method. RootViewController implements this protocol to hide the AddView when the “Done” Button is touched.
Method initWithNibName:bundle: of Class AddViewController
The initWithNibName:bundle: method (Fig. 10.15, lines 10–27) is called when the AddViewController loads. If the inherited superclass members initialize without error (line 14), lines 17–18 initialize the fields NSArray with names of the fields in the table UITableView using NSArray’s initWithObjects: method. This method takes a comma separated list of objects ending with nil. The last argument indicates the end of the list and is not included in the NSArray. Line 21 uses NSMutableDictionary’s initWithCapacity: method to create the data NSMutableDictionary with the same number of elements as fields.
Fig. 10.15 | Methods initWithNibName:bundle: and viewDidLoad of class AddViewController.

Methods doneAdding: and values of Class AddViewController
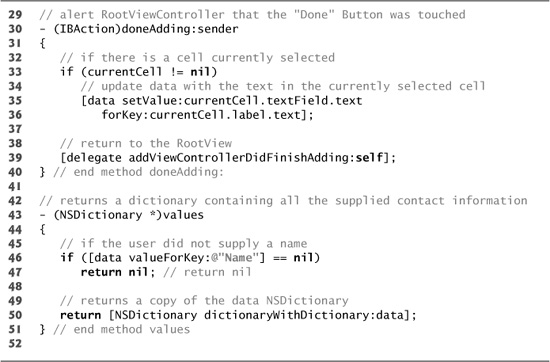
The doneAdding: method (Fig. 10.16, lines 30–40) returns the app to the RootView when the user touches the “Done” Button. If there is a currently selected UITableViewCell (line 33), we call NSDictionary’s setValue:forKey: method to update data with the selected UITableViewCell’s text. Line 39 calls RootViewController’s addViewControllerDidFinishAdding: method to switch views. If the user has not entered any contacts, the values method (lines 43–51) returns nil (line 47). Otherwise, it calls NSDictionary’s dictionaryWithDictionary: method to create a new NSDictionary containing the same information as data (line 50).
Fig. 10.16 | Methods doneAdding: and values of class AddViewController.
Methods editableCellDidBeginEditing:, editableCellDidEndEditing: and editableCellDidEndOnExit: of Class AddViewController
The editableCellDidBeginEditing: method (Fig. 10.17, lines 54–78) is called when the user touches one of table’s cells. If the keyboard is not currently displayed (line 57), we resize table to make room for the keyboard. We animate the resize to make it a visually smooth transition. Line 60 calls UIView’s beginAnimations:context: method to begin a new animation block. We set the length of the animation to 0.25 seconds by calling UIView’s setAnimationDuration: method. We call UIView’s setAnimationCurve method to specify that the animation starts slowly and accelerates until finishing. Lines 63–64 get table’s frame and decrease frame’s height by the height of the keyboard. We then apply the resized frame to table and call UIView’s commitAnimations method to end the animation block and begin animating (lines 65–66). Next, we set keyboardShown equal to YES (line 69). Line 73 passes cell as an argument to UITableView’s indexPathForCell: method to get an NSIndexPath representing cell’s location in table. UITableView’s scrollToRowAtIndexPath:atScrollPosition:animated: scrolls the table so that cell appears at the top of the screen (lines 76–77).
The editableCellDidEndEditing: method (lines 81–85) is called when the user finishes editing a cell—either by selecting another cell or hitting the “Done” Button. Line 84 stores the name of the cell and its content as a key/value pair in NSDictionary data.
Fig. 10.17 | Methods editableCellDidBeginEditing:, editableCellDidEndEditing: and editableCellDidEndOnExit: of class AddViewController.

The editableCellDidEndOnExit: method (lines 88–98) removes the keyboard when the user touches the “Done” Button. Lines 92–94 resize table’s frame to fill the entire screen and line 96 sets keyboardShown to NO.
Methods numberOfSectionsInTableView:, tableView:numberOfRowsInSection: and tableView:titleForHeaderInSection: of Class AddViewController
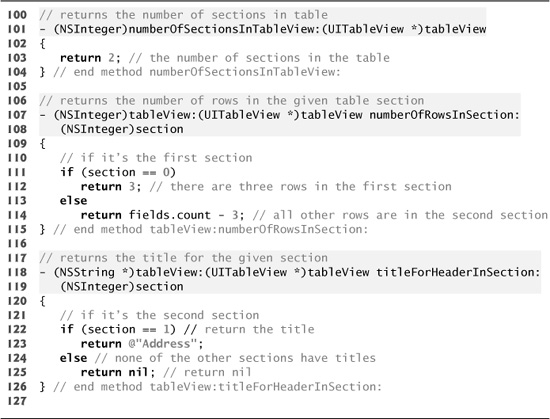
The numberOfSectionsInTableView: method (Fig. 10.18, lines 101–104) returns the number of sections in the table—two. The tableView:numberOfRowsInSection: method (lines 107–115) returns the number of rows for a given section. The first section contains three rows (name, e-mail, phone) and table’s remaining rows are in the second section (lines 111–114). The tableView:titleForHeaderInSection: method (lines 118–126) returns the title of a section. The first section is titled Address (lines 122–125). All other sections have no title, so passing them to this method returns the value nil.
Fig. 10.18 | Methods numberOfSectionsInTableView:, tableView:numberOfRowsInSection: and tableView:titleForHeaderInSection: of class AddViewController.
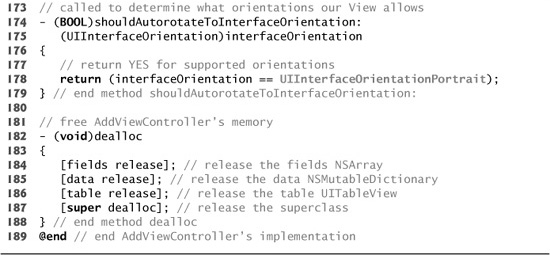
Methods tableView:cellForRowAtIndexPath:, shouldAutorotateToInterfaceOrientation: and dealloc of Class AddViewController
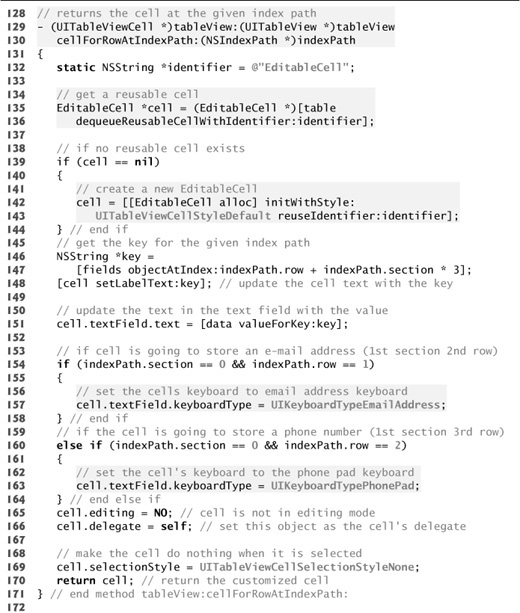
Line 132 creates an NSString that will be passed to UITableView’s dequeueReusableCellWithIdentifier: method to get an UITableViewCell from tableView (lines 135–136). If tableView contains no reusable UITableViewCells (line 139), we create a new one (lines 142–143). Once we’ve created a new cell or obtained one for reuse, we customize the cell using the saved data. Lines 146–148 get the correct label for the cell. We then set the text in the text field to what the user entered (line 151). Next, we set the keyboard type for the cell’s text field (lines 154–164). Most of the cells use the default keyboard, but the cell for entering an e-mail address and the cell for entering a phone number require special keyboards. Finally, we set the editing mode, delegate and selection style for the cell (lines 165–169). Line 170 returns the cell.
Fig. 10.19 | Method tableView:cellForRowAtIndexPath: of class AddViewController.
10.4.3 Class ContactViewController
In Xcode, select File > New File and chose UIViewController subclass. Before pressing Next, ensure that the With XIB for user interface checkbox is checked to auto-generate a nib file. Name the class ContactViewController and save it in the default location provided. Drag a TableView from the Library window and resize it to fill the entire app window.
ContactViewController Interface Declaration
Class ContactViewController (Fig. 10.20) controls the View that displays a single existing contact’s information. ContactViewController is a subclass of UIViewController and implements the UITableViewDataSource protocol (lines 7–8). The class has one instance variable, person (line 10) which is declared as a property at line 14. The updateTitle method updates the navigation bar’s title to the selected contact’s name.
Fig. 10.20 | ContactViewController’s interface declaration.

ContactViewController Class Definition
ContactViewController’s updateTitle method (Fig. 10.21, lines 11–15) sets navigationItem’s title property to the selected contact’s name. The tableView:numberOfRowsInSection: method (lines 18–22) returns the total number of pieces of information contained in the person NSDictionary (line 21). This corresponds to the number of rows in the UITableView’s only section.
Fig. 10.21 | ContactViewController class displays information for a contact.
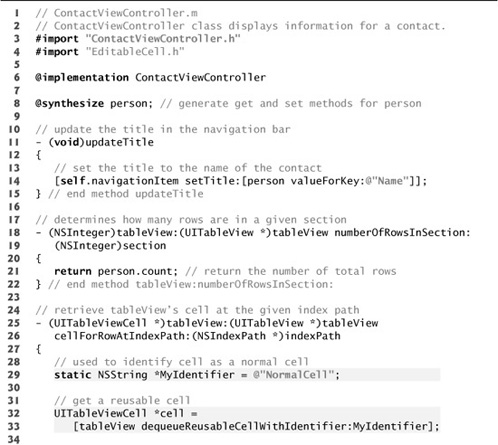

The tableView:cellForRowAtIndexPath: method (lines 25–52) returns the cell at the location specified by the NSIndexPath. Line 29 creates an NSString which we’ll use to indicate that we want to retrieve cells as standard UITableViewCells (not editable ones). Lines 32–33 use UITableView’s dequeueReusableCellWithIdentifier: method to get a UITableViewCell from tableView. This method attempts to reuse an existing cell which is no longer displayed on the screen. If tableView contains no reusable cells (line 36), we must create a new UITableViewCell (lines 39–40). Lines 44–55 retrieve the key–value pair of the given UITableViewCell from the person NSDictionary and line 46 retrieves that UITableViewCell’s Label. We then update the Label with the retrieved data from person and return the cell (lines 49–50).
10.4.4 Class EditableCell
Select File > New File... and choose Objective-C class. Choose UITableViewCell from the Subclass Of drop-down menu. This specifies that our new class will extend class UITableViewCell. Press Next then name the class EditableCell. Although we programatically create EditableCells, it’s also possible to load custom UITableViewCells from nib files. For information on doing this, see the section “A Closer Look at Table-View Cells” in the Table View Programming Guide for iPhone OS, which can be found at:
developer.apple.com/iphone/library/documentation/UserExperience/
Conceptual/TableView_iPhone/TableView_iPhone.pdf
EditableCell Interface Declaration
The EditableCell class (Fig. 10.22) extends UITableViewCell and implements the UITextFieldDelegate protocol (line 9), which states that EditableCell can respond to messages sent by a Text Field as the user edits that Text Field. All of these messages are optional, but EditableCell defines the textFieldDidBeginEditing: and textFieldDidEndEditing: methods. Lines 11–13 declare EditableCell’s instance variables.
Fig. 10.22 | Interface for a UITableViewCell that contains a Label and a Text Field.

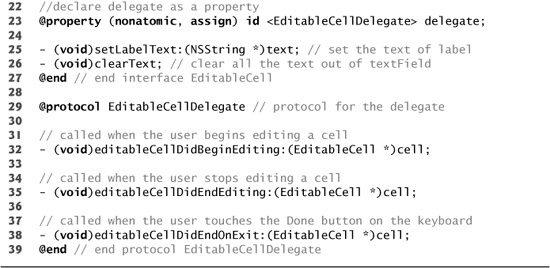
Lines 17–23 declare each of EditableCell’s instance variables as properties. The readonly keyword is used for label so that other classes will not be able to directly change its text. Lines 25–26 declare two methods. The setLabelText: method sets label’s text property. The clearText method removes all text from textField. Lines 29–39 declare the EditableCellDelegate protocol. Any class implementing this protocol should define three methods—editableCellDidBeginEditing:, editableCellDidEndEditing: and editableCellDidEndOnExit:, which are called when the user starts editing a cell, stops editing a cell or touches the keyboard’s “Done” Button, respectively.
EditableCell Class Definition
Lines 6–8 of class EditableCell (Fig. 10.23) synthesize each of EditableCell’s properties. The initWithStyle:reuseIdentifier: method (lines 11–34) initializes an EditableCell. If the superclass’s inherited members are initialized without error (line 15), we create a Label on the left side of the EditableCell (line 18). Lines 21–22 create a new Text Field to the right of the Label. We then set this EditableCell as textField’s delegate so this class will receive the textFieldDidBeginEditing: and textFieldDidEndEditing: messages. Lines 27–28 call UITextField’s addTarget:action:forControlEvents: method to specify that this EditableCell object receives the textFieldDidEndOnExit: message when the user touches the keyboard’s “Done” Button. We then add label and textField to the EditableCell’s view (lines 29–30).
Fig. 10.23 | EditableCell’s class definition.

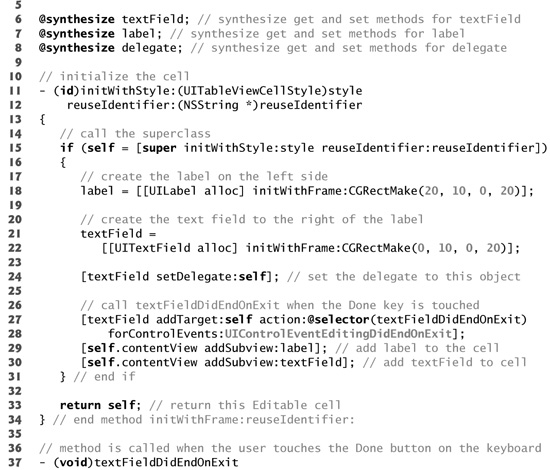


The textFieldDidEndOnExit method (lines 37–41) is called when the user touches the keyboard’s “Done” Button. Calling UITextField’s resignFirstResponder method deselects textField, causing the keyboard to disappear. Line 40 calls delegate’s editableCellDidEndOnExit: method to indicate that the user touched the “Done” Button.
The setLabelText: method (lines 44–63) updates the text displayed by label. Line 46 sets label’s text property to the given NSString. NSString’s sizeWithFont: method is used to get a CGSize object representing the size of text when it appears in label’s font. Lines 50–52 adjust label’s frame to fit the new CGSize. Lines 54–62 adjust textField’s frame to fill the remainder of the EditableCell.
The clearText method (lines 66–69) sets textField’s text property to an empty string. The textFieldDidBeginEditing: and textFieldDidEndEditing: methods call their corresponding methods of delegate.
10.5 Wrap-Up
The Address Book app used several UITableViews to display contact information stored in the app. We handled navigation between the app’s three views with a UINavigationController. We added Buttons to a UINavigationItem, allowing the user to switch between views while displaying a navigation bar throughout the whole app. Each of the views displayed contact information in a UITableView. To allow the user to enter information into a UITableView we created a custom EditableCell subclass of UITableViewCell. The EditableCell class allowed the user to enter information in a UITableView for a new contact.
In Chapter 11, we’ll develop the Route Tracker app. This app will track the user’s path showing a map and satellite image of where the user has traveled. We’ll do this using the Map Kit framework, which interacts with Google Maps web services, and using the Core Location framework, which interacts with the iPhone’s GPS and compass to provide locations and maps for the user’s current location.