15. Enhanced Address Book App
Managing and Transferring Persistent Data

15.1 Introduction
The Enhanced Address Book app is an enhanced version of the Address Book app created in Chapter 10. This version allows the user to transfer contacts between iPhones using Bluetooth technology. [Note: The Bluetooth capabilities do not work in the iPhone Simulator.] When viewing a single contact (Fig. 15.1), touching the Button in the top-right corner of the app searches for nearby iPhones and iPod Touches that are running the Enhanced Address Book app (Fig. 15.2 (a)). The app shows a list of all nearby devices (Fig. 15.2 (b)). The user touches the device’s name to send the contact, then the receiving device receives a Connection Request alert (Fig. 15.3). Touching Accept transfers the contact and adds it to that device’s Enhanced Address Book.
Fig. 15.1 | Viewing a contact.
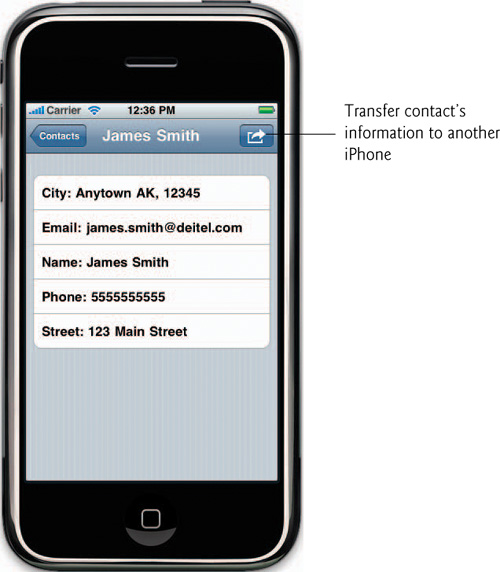
Fig. 15.2 | Requesting a connection.
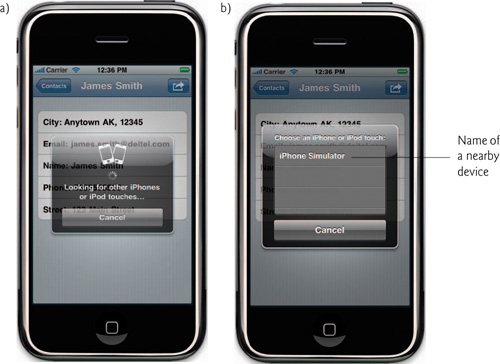
Fig. 15.3 | Getting a Bluetooth Connection Request.

15.2 Test-Driving the Enhanced Address Book App
Opening the Completed App
Open the directory containing the Enhanced Address Book app project and double click EnhancedAddressBook.xcodeproj to open the project in Xcode. To test the Bluetooth capabilities of this app you’ll need to run the app simultaneously on at least two iPhones (or Bluetooth-enabled iPod Touches). The iPhone Simulator does not support Bluetooth.
Sending a Contact
Run the Enhanced Address Book app on two iPhones in close proximity. Create a new contact on one of the iPhones then touch the new contact’s name to view it in more detail. Touch the ![]() Button in the top-right corner of the app to search for nearby iPhones. When the list of nearby devices appears, touch the name of the other iPhone and wait for a Connection Request alert to appear on the receiving iPhone. Touch Accept on the receiving iPhone and the transferred contact appears in both iPhone’s list of contacts.
Button in the top-right corner of the app to search for nearby iPhones. When the list of nearby devices appears, touch the name of the other iPhone and wait for a Connection Request alert to appear on the receiving iPhone. Touch Accept on the receiving iPhone and the transferred contact appears in both iPhone’s list of contacts.
15.3 Technologies Overview
The Core Data framework allows us to graphically define our app’s data model in a manner similar to building GUIs in Interface Builder. The framework allows apps to follow the Model-View-Controller design pattern by completely separating the data model from the controller. A Core Data data model is known as a managed object model and is created visually. The managed object model defines model objects (also known as entities) and their relationships. The Enhanced Address Book has a simple managed object model consisting of only the Person entity for storing a contact’s information. Each entity typically has several attributes. For example, our Person entity contains name, address and phone number attributes. The interface between the managed object model and our code is the Managed Object Context, which is represented by class NSManagedObjectContext. We use an object of this class to add, retrieve and update information in the data model.
Entities are represented by class NSEntityDescription. To create a new object representing a data object you must use class NSManagedObject. In this app, an individual contact’s data is represented by an NSManagedObject received from the NSEntityDescription representing the Person entity. You manipulate this object in Objective-C code then insert it back into the data model.
Information is retrieved using fetch requests (represented by class NSFetchRequest). This works similarly to querying databases, in that you specify the exact kind of data that’s returned. For example, in the Enhanced Address Book app we could construct a fetch request asking for all people from the state of Alaska, or all people whose first name begins with the letter M. We use a FetchedRequestController to update both the Core Data stored information and our UITableView displaying the contact information. We use one instance of class NSFetchRequest which is shared in the RootViewController.
The Game Kit framework allows multiple iPhones to interact via Bluetooth. [Note: App users might need to enable Bluetooth on their devices.] We use the GKPeerPickerController class to create a view displaying nearby iPhones running the Enhanced Address Book app. We specify whether or not the iPhone is receiving or transmitting data using a GKSession. An NSKeyedArchiver is used to serialize the NSMutableArray representing a contact’s information to an NSData object that we can transmit between iPhones using GKSession’s sendDataToAllPeers:withDataMode: method.
15.4 Building the App
Create a new project named EnhancedAddressBook.xcodeproj using the Navigation-based Application template. Make sure the Use Core Data for storage checkbox is checked when you choose the template so that you can use Core Data functionality in the app.
15.4.1 Building the Core Data Model
The Core Data data model is stored in EnhancedAdressBook.xcdatamodel, under the Resources group in Xcode’s Groups and Files window. Double-click this file to open it in the data model editor (Fig. 15.4). Click the Event entity class. In the top-right corner of the screen, rename the entity Person. Select the timeStamp attribute, rename it to Name in the top-right corner of the screen and change its type to String. Click the plus button in the center of the screen to add a new attribute. Name the new attribute Email. Add three more attributes named City, Phone and Street then close the data model editor. Figure 15.4 shows the completed data model.
Fig. 15.4 | Data model editor.

15.4.2 Class ContactViewController
Class ContactViewController (Fig. 15.5) is a subclass of UIViewController which implements the UITableViewDataSource protocol (lines 7–8). ContactViewController also implements the GKSessionDelegate protocol (line 8) so that it can receive messages when a visible peer device changes its state. This class also implements the GKPeerPickerControllerDelegate protocol (line 8) so that it can respond to messages from a GKPeerPickerController, which provides a standard user interface for connecting to other iPhones.
Fig. 15.5 | Controller that displays the contact information for a created contact.

ContactViewController has an NSManagedObject instance variable representing the Core Data object for the selected contact (line 10). Line 13 declares the NSManagedObject as a property. The updateTitle method (line 15) updates the navigation bar’s title to display the contact’s name.
Methods viewDidLoad and send of Class ContactViewController
The viewDidLoad method (Fig. 15.6, lines 10–17) sets up ContactViewController’s view. Lines 13–15 create a new UIBarButtonItem that, when touched, calls the send method to allow the user to send a contact to another iPhone. We pass UIBarButtonSystemItemAction enum constant as the BarButtonSystemItem parameter to get a system item action Button (![]() ). Line 16 calls
). Line 16 calls UINavigationItem’s setRightBarButtonItem: method to add the Button to the right side of the navigation bar.
Fig. 15.6 | Methods viewDidLoad and send of class ContactViewController.
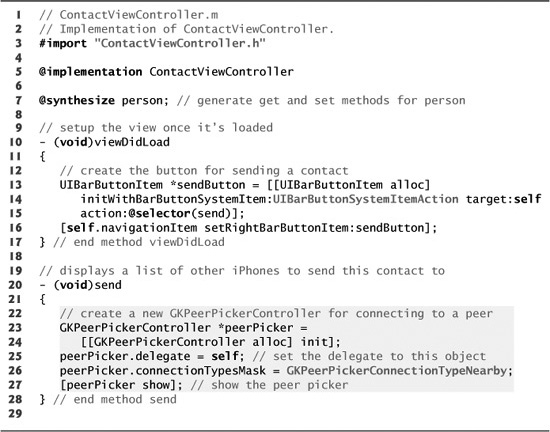
The send method (lines 20–28) is called when the user touches the UIBarButtonItem in the top-right corner of the app. Lines 23–24 create a new GKPeerPickerController to display all nearby iPhones. We set peerPicker’s delegate to self (line 25) so this ContactViewController will receive a message when the user chooses a peer. Line 26 sets peerPicker’s connectionTypesMask property to GKPeerPickerConnectionTypeNearby, which indicates that we’d like to see a list of the devices that are reachable via a Bluetooth connection. Line 27 calls peerPicker’s show method to displays the peerPicker’s view.
Method peerPickerController:didConnectPeer:toSession: of Class ContactViewController
The peerPickerController:didConnectPeer:toSession: method (Fig. 15.7) of the GKPeerPickerControllerDelegate protocol is called when the user chooses a peer device to which contact information should be sent. Line 35 retrieves an NSDictionary containing the selected contact’s information. NSManagedObject’s entity method gets an NSEntityDescription representing the Person entity. NSEntityDescription’s propertiesByName method returns an NSDictionary containing the names of the entity’s properties as keys and NSAttributeDescriptions as the values. We initialize a new NSMutableDictionary to store the information that will be sent to the peer device. Next, we iterate through the keys in personDictionary and use those keys to retrieve the corresponding values from the person object. We add these keys and values to the NSMutableDictionary. Line 47 serializes the dictionary to an NSData object using NSKeyedArchiver’s archivedDataWithRootObject: method. We then call the given GKSession’s sendDataToAllPeers:withDataMode: method to send the serialized contact information to the connected devices. The GKSendReliable argument specifies that the data will be continuously sent until it all arrives successfully or the connection times out.
Fig. 15.7 | Method peerPickerController:didConnectPeer:toSession: of class ContactViewController.

Methods peerPickerControllerDidCancel:, updateTitle and tableView:numberOfRowsInSection: of Class ContactViewController
The peerPickerControllerDidCancel: method (Fig. 15.8, lines 57–61) of the GKPeerPickerControllerDelegate protocol calls the GKPeerPickerController’s dismiss method to hide its view when the user touches the “Cancel” Button. The updateTitle method (lines 64–68) sets the navigation bar’s title to the contact’s name using UINavigationItem’s setTitle: method.
Fig. 15.8 | Methods peerPickerControllerDidCancel:, updateTitle and tableView:numberOfRowsInSection: of class ContactViewController.

Method tableView:numberOfRowsInSection: (lines 71–75) returns the number of rows in ContactViewController’s UITableView. We get an NSEntityDescription on which we call the properties method to obtain an NSArray containing all of the fields in the person data model (line 74). We then use the NSArray’s count property to determine the number of rows in the UITableView.
Method tableView:cellForRowAtIndexPath: of Class ContactViewController
Method tableView:cellForRowAtIndexPath: (Fig. 15.9, lines 78–101) returns the UITableViewCell at the given NSIndexPath in the UITableView. Lines 81–90 attempt to reuse an existing cell from the UITableView. We retrieve person’s NSEntityDescription then call its propertiesByName method to get an NSDictionary representing person’s properties (line 93). Lines 93–94 use NSDictionary’s allKeys method to obtain an NSArray of the dictionary’s keys, then use the NSIndexPath’s row property to get the selected key from the array. Line 95 gets the value for the selected key from the person object. Line 96 gets the UILabel of the selected UITableViewCell using its textLabel method. Lines 99–100 update the UITableViewCell’s UILabel with the contact information then return the configured cell.
Fig. 15.9 | Method tableView:cellForRowAtIndexPath: of class ContactViewController.

15.4.3 Class RootViewController
Class RootViewController (Fig. 15.10) implements the NSFetchedResultsControllerDelegate protocol (line 8) so that it can respond to messages from an NSFetchedResultsController, which updates a UITableView with information fetched from Core Data objects. The class also implements the GKSessionDelegate protocol (line 8) so that it can receive messages when a visible peer device changes its state.
Fig. 15.10 | Controls the main view of the Enhanced Address Book app.
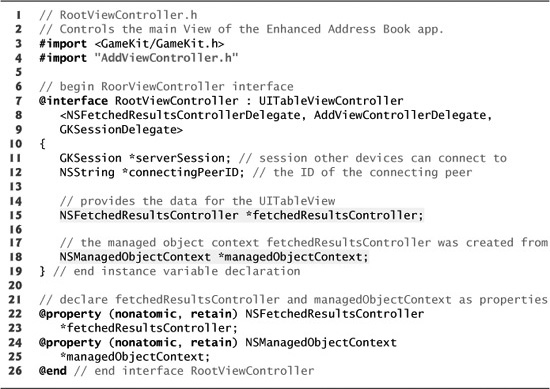
We declare a GKSession (line 11) to connect to other iPhones (peers) via Bluetooth. Line 12 declares an NSString used to identify the iPhone which is trying to send a contact. We use an NSFetchedResultsController (line 15) to populate RootViewController’s UITableView with information from our Core Data model. Line 18 declares an NSManagedObjectContext, which enables the app to interact with the Core Data services. Lines 22–25 declare our NSFetchedResultsController and NSManagedObjectContext as properties.
Method viewDidLoad of Class RootViewController
The viewDidLoad method (Fig. 15.11) sets up RootViewController’s view when it loads. Line 16 adds the “Edit” Button to the left-side of the navigation bar using UINavigationItem’s leftBarButtonItem property. We then create the ![]() Button and add it to the right-side of the navigation bar (lines 19–24). Line 28 creates an
Button and add it to the right-side of the navigation bar (lines 19–24). Line 28 creates an NSError pointer to an object representing error information. We pass this to our NSFetchedResultsController’s performFetch: method (line 31). If this method fails to retrieve data from our Core Data model (line 31), we write to console detailing the error using the NSLog function (line 32). Lines 35–36 initialize a new GKSession, passing GKSessionModeServer as the sessionMode parameter. This type of GKSession informs nearby devices of this iPhone’s peer ID and that it’s ready to receive information. We set the GKSession’s delegate to self then call its setDataReceiveHandler:withContext: method to specify that this RootViewController gets any data received during the GKSession (lines 37–40). Line 41 sets the GKSession’s available property to YES to begin accepting connections.
Fig. 15.11 | Method viewDidLoad of class RootViewController.

Method session:didReceiveConnectionRequestFromPeer: of Class RootViewController
The session:didReceiveConnectionRequestFromPeer: method (Fig. 15.12) of the GKSessionDelegate protocol is called when this app’s GKSession receives a connection request from another device. Line 48 saves the NSString representing the connecting iPhone’s peer ID. We get that iPhone’s display name (as set by its owner) using GKSession’s displayNameForPeer: method. Lines 54–61 create a new UIAlertView informing the user which iPhone is requesting to connect and providing “Allow” and “Deny” Buttons.
Fig. 15.12 | Method session:didReceiveConnectionRequestFromPeer: of class RootViewController.

Methods alertView:clickedButtonAtIndex: and alertViewCancel: of Class RootViewController
The alertView:clickedButtonAtIndex: method (Fig. 15.13, lines 65–70) is called when the user touches the “Accept” Button on the Connection Request UIAlertView. Line 69 calls GKSession’s acceptConnectionFromPeer:error: method to accept the connection and receive contact information from the sending iPhone. The alertViewCancel: method (lines 73–77) calls GKSession’s denyConnectionFromPeer: method to not connect to the requesting device (line 76).
Fig. 15.13 | Methods alertView:clickedButtonAtIndex: and alertViewCancel: of class RootViewController.

Method receiveData:fromPeer:inSession:context: of Class RootViewController
The receiveData:fromPeer:inSession:context: method (Fig. 15.14) is called by the GKSession when the app receives data from a connected device. Lines 84–85 deserialize the given NSData object into an NSMutableDictionary containing contact information. We know the NSData object represents an NSMutableDictionary because that’s the only type of object we transfer in this app.
Fig. 15.14 | Method receiveData:fromPeer:inSession:context: of class RootViewController.


Lines 88–89 use NSFetchedResultsController’s managedObjectContext method to get the app’s NSManagedObjectContext. Lines 92–93 get the NSEntityDescription from the NSFetchedResultsController. We then create a new NSManagedObject to represent the received contact’s information (lines 96–98). Lines 101–104 loop through the key–value pairs in the NSDictionary and add them to the NSManagedObject using its setValue:forKey: method. Lines 106–112 call NSManagedObject’s save method to add this data to the Core Data model, and if an error occurs, write a message to the console with function NSLog. Otherwise, we call UITableView’s insertRowsAtIndexPaths: method to insert a new empty row into RootViewController’s UITableView (lines 114–119). Line 120 calls UITableView’s reloadData method to load in a new contact into the empty row.
Methods insertNewObject and addViewControllerDidFinishAdding: of Class RootViewController
The insertNewObject method (Fig. 15.15, lines 125–133) allows the user to enter a new contact when they touch the ![]() Button in the top-right corner of the app. We create a new
Button in the top-right corner of the app. We create a new AddViewController and set its delegate to self (lines 128–129). We call UIViewController’s presentModalViewController:animated: method to show AddViewController’s view (line 132).
Fig. 15.15 | Methods insertNewObject and addViewControllerDidFinishAdding: of class RootViewController.
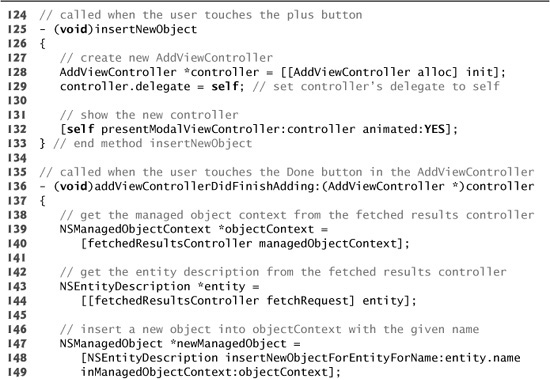
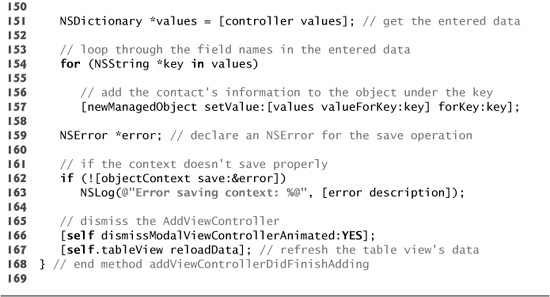
Method addViewControllerDidFinishAdding: (lines 136–168) from our AddViewControllerDelegate protocol (Fig. 10.14) is called when the user has finished adding a new contact and touches the “Done” Button in AddViewController’s view. Lines 139–149 get the app’s NSManagedObjectContext, NSEntityDescription and NSManagedObject. We then get the NSDictionary representing the new contact information from the RootViewController (line 151). Lines 154–157 loop through the key–value pairs and add them to the NSManagedObject using its setValue:forKey: method. Lines 159–163 call NSManagedObject’s save method to save the data, writing to NSLog if the save fails. We then hide the AddViewController and refresh the UITableView (lines 166–167).
Methods numberOfSectionsInTableView: and tableView:numberOfRowsInSection: of Class RootViewController
The numberOfSectionsInTableView: method (Fig. 15.16, lines 171–181) returns the number of sections in the given UITableView. Line 174 calls NSFretchedResultsController’s sections method to get an NSArray representing the UITableView’s sections. We call NSArray’s count method to get the number of sections. If count is 0, we set it to 1 (lines 177–178). We do this to fix an incompatability between the NSFetchResultsController and UITableView class in iPhone OS 3.x. For more information, visit
developer.apple.com/iPhone/library/documentation/CoreData/Reference/
NSFetchedResultsController_Class/Reference/Reference.html
Fig. 15.16 | Methods numberOfSectionsInTableView: and tableView:numberOfRowsInSection: of class RootViewController.
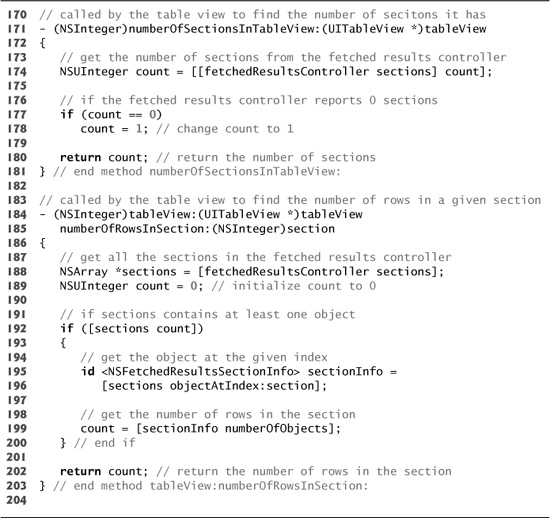
Method tableView:numberOfRowsInSection: (lines 184–203) returns the number of rows in the given UITableView’s section specified by the supplied NSInteger. We start by getting an NSArray representing the UITableView’s sections by calling NSFetchedResultsController’s sections method (line 188). If this array contains at least one section (line 192), we get the object at the given NNSInteger (lines 195–196). This object implements the NSFetchedResultsSectionInfo protocol (line 195) and we call its numberOfObjects method to get the number of rows in the selected UITableView section.
Methods tableView:cellForRowAtIndexPath: and tableView:didSelectRowAtIndexPath: of Class RootViewController
Method tableView:cellForRowAtIndexPath: (Fig. 15.17, lines 206–234) attempts to reuse an existing UITableViewCell using the dequeueReusableCellWithIdentifier: method (lines 209–221). Lines 224–225 call the NSFetchedResultsController’s objectAtIndexPath: method to get the NSManagedObject at the specified NSIndexPath.
Fig. 15.17 | Methods tableView:cellForRowAtIndexPath: and tableView:didSelectRowAtIndexPath: of class RootViewController.


The tableView:didSelectRowAtIndexPath: method (lines 237–255) is called when the user touches one of the UITableView’s rows. Lines 241–242 create a new ContactViewController. We use NSFetchedResultsController’s objectAtIndexPath: method to get the NSManagedObject specified by the given NSIndexPath. Lines 249–250 set the ContactViewController’s person property to the NSManagedObject then call its updateTitle method. We call UINavigationController’s pushViewController:animated: method to display the ContactViewController’s view. Line 232 sets cell’s accessoryType property to UITableViewCellAccessoryDisclosureIndicator to indicate that more details will be displayed when the UITableViewCell is touched.
Methods tableView:commitEditingStyle:forRowAtIndexPath: and tableView:canMoveRowAtIndexPath: of Class RootViewController
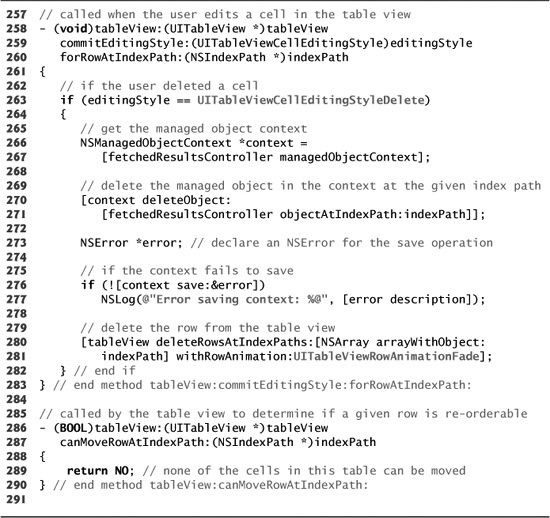
The tableView:commitEditingStyle:forRowAtIndexPath: method (Fig. 15.18, lines 258–283) is called when the user deletes a row from RootViewController’s UITableView. Line 263 checks if the given UITableViewCellEditingStyle is UITableViewCellEditingStyleDelete. If so, we call NSFetchedResultsController’s managedObjectContext method to get the app’s NSManagedObjectContext (lines 266–267). Lines 270–271 delete the contact from our data using NSManagedObjectContext’s deleteObject: method. We then save this change using NSManageObjectContext’s save: method and write an error message with NSLog if save fails (lines 273–277). Lines 280–281 call UITableView’s deleteRowsAtIndexPaths:withRowAnimation: method to remove the deleted cell. Method tableView:canMoveRowAtIndexPath: (lines 286–290) returns NO to indicate that the UITableViewCells cannot be reordered.
Fig. 15.18 | Methods tableView:commitEditingStyle:forRowAtIndexPath: and tableView:canMoveRowAtIndexPath: of class RootViewController.
Method fetchedResultsController of Class RootViewController
Method fetchedResultsController (Fig. 15.19) is auto-generated by Xcode to initialize the NSFetchedResultsController used throughout the app. We customize this method to our data model as highlighted in the source code.
Fig. 15.19 | Method fetchedResultsController of class RootViewController.


Line 296 checks whether fetchedResultsController is already initialized. If so, this method has already been called and we return the existing NSFetchedResultsController. Otherwise, line 300 creates a new NSFetchRequest. Lines 303–304 declare the NSEntityDescription representing the entity to be stored in the table. The Person entity was created by us to store contact information, so we pass Person as the entityForName argument. NSFetchedRequest’s setEntity method sets the Person entity as the one that the NSFetchedRequest is currently manipulating.
Lines 308–309 create a new NSSortDescriptor, which is used to sort the Person entities by their Name attributes. Lines 310–311 add the NSSortDescriptor to a new NSArray and pass this to NSFetchRequest’s setSortDescriptors: method to specify the sorting order of the fetches.
Lines 317–322 initialize an NSFetchedResultsController and set its delegate to this RootViewController. We then assign the new NSFetchedResultsController to RootViewController’s fetchedResultsController property.
15.5 Wrap-Up
In the Enhanced Address Book app, we used the Core Data framework to separate our data model from the rest of the app according to the Model-View-Controller design pattern. We visually designed a Person entity, which contained attributes representing a contact’s name, e-mail and address. We programmatically interacted with the data model via an NSManagedObject. Xcode generated an NSFetchedResultsController which allowed us to make fetch requests to update our UITableView. We used the Game Kit framework to transfer contact information among multiple iPhones using Bluetooth technology. The GKPeerPickerController class displayed a view that enabled the user to choose a nearby iPhone to which a contact would be transferred. We then used a GKSession to transmit an NSData object representing the contact information.
In Chapter 16, we’ll build the Twitter® Discount Airfares app which uses Twitter web services to display current discounted jetBlue® flights. We’ll use an NSURLConnection to receive an Atom feed (similar to an RSS Feed) from Twitter then parse the feed using an NSXMLParser. We’ll also use a Web View to allow the user to view the jetBlue web page where discounted flights can be purchased.