11. Route Tracker App
Map Kit and Core Location (GPS and Compass)

11.1 Introduction1
The Route Tracker app monitors the user’s location and heading (i.e., direction)—visually displaying a route on a map. The app initially presents the user with a world map containing a blue dot that approximates the iPhone’s location (Fig. 11.1). The user touches the “Start Tracking” Button to zoom the map in, centered on the iPhone’s current location (Fig. 11.2). The map shifts as the user moves, keeping the user’s location centered in the map. The route is a line colored from green (the starting location) to blue (the current location). Black arrows appear at intervals along the route, indicating the user’s direction as shown in Fig. 11.3(a) and (b). The map is always oriented in the user’s direction and that direction always points to the top of the device. The user changes the look of the map by touching Map, Satellite or Hybrid in the Segmented Control in the app’s top-right corner. Touching Map changes the display to show a Google™ Maps street map—the app’s default. Touching Satellite displays a satellite image of the area around the user (Fig. 11.4(a)) and touching Hybrid shows the map overlaid on the satellite image (Fig. 11.4(b)). The user touches the “Stop Tracking” Button to end the current route. This displays an alert containing the total distance travelled and the user’s average speed (Fig. 11.5).
Fig. 11.1 | Approximate user location on world map.
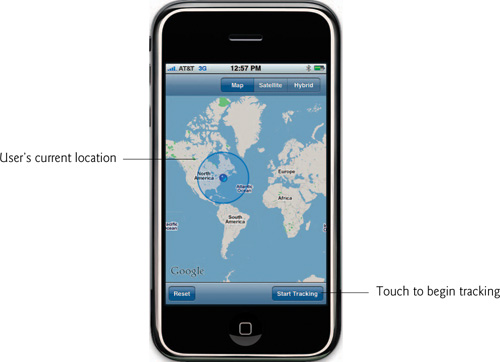
Fig. 11.2 | Map just after the user presses Start Tracking.
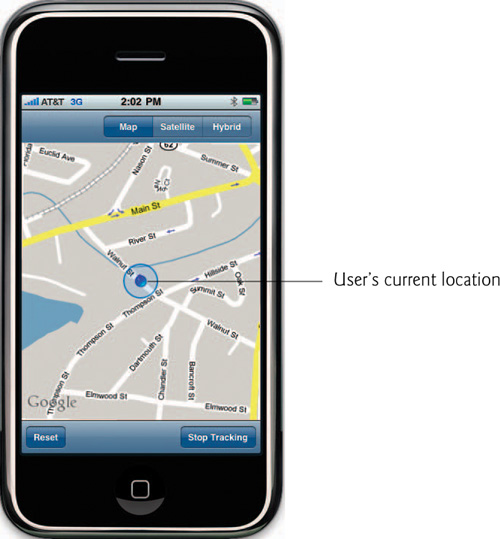
Fig. 11.3 | User’s route displayed on the map with arrows showing the user’s direction.

Fig. 11.4 | Satellite and hybrid map views.

Fig. 11.5 | Statistics for a completed route.

11.2 Test-Driving the Route Tracker App
Opening the Completed App
Open the directory containing the Route Tracker app project. Double click RouteTracker.xcodeproj to open the project in Xcode. The iPhone simulator does not have the ability to simulate the GPS capabilities of the iPhone 3GS. The app will run in the iPhone simulator, but it will show only the default location of Apple’s headquarters in Cupertino, California. Please refer to the document Program Portal User Guide in the iPhone Developer Program Portal at
developer.apple.com/iphone/manage/overview/index.action
for instructions on testing the app on your iPhone. The iPhone Developer Program Portal is available only to members of Apple’s fee-based developer program. Also, although this app runs on any iPhone model with GPS support, iPhones prior to the iPhone 3GS cannot use the compass features.
Using the Route Tracker App
Once the Route Tracker App is running on your iPhone, touch the “Start Tracking” Button in the bottom-right corner of the app. Go outside and run, walk, jog or drive around the block. As you move, the blue dot representing the iPhone’s location moves as well. Your route is marked with a line colored from green (the starting location) to blue (the current location). The iPhone 3GS compass ensures that the map is always oriented the way you’re currently facing—this will not be the case on devices that do not have the compass feature. Touching Map, Satellite or Hybrid at the top of the app changes the map’s display to a street map, a satellite image or an overlay of the two, respectively. When you’ve finished moving, touch the “Stop Tracking” Button in the bottom-right corner of the app. An alert displays your distance traveled and speed. Touch the “Return” Button to close the alert and return to the map. Touching the “Reset” Button in the lower-left corner of the app will erase your route from the map.
11.3 Technologies Overview
The Route Tracker app displays a map using the Map Kit framework’s MKMapView. We’ll use this class to rotate, zoom and draw to the map. The route is displayed by drawing directly to the MKMapView. The user’s location and compass heading are provided by the Core Location framework. A CLLocationManager monitors the iPhone’s location and compass heading and sends messages to our Controller class when either reading is updated. The user’s location is represented by a CLLocation object, which provides the iPhone’s latitude, longitude and altitude (in meters) at a specific time. Each time we receive a CLLocation from the CLLocationManager, we draw the route line to the new location. We also use the CLLocation class to calculate the distance between two CLLocations. This allows us to calculate the user’s total distance traveled in a route.
The iPhone’s heading is represented by a CLHeading object. Each time the Controller class receives a CLHeading, we rotate the map’s orientation to the same direction as the user. Each time we start tracking a route, we initialize an NSDate object to the current time. When we stop tracking, we can ask this object how long it’s been since tracking began and use that time to calculate the user’s speed.
11.4 Building the App
Open Xcode and create a new project. Select the Window-based Application template and name the project RouteTracker. Open MainWindow.xib in Interface Builder. Drag Toolbars to the top and bottom of the app window and delete their default “Item” Buttons. Drag a Map View from the Library onto the app window between the Toolbars and size it to fill the remaining space. Drag Flexible Space Bar Button Items to the top and bottom of the window. A Flexible Space Bar Button Item is an invisible component that is used to add space between other Bar Button Items. Next, to the right side of the top Flexible Space Bar Button Item drag a Segmented Control and configure it to have three sections named Map, Satellite and Hybrid. Drag two Round Rect Buttons to the left and right of the bottom Flexible Space Bar Button Item and name them Reset and Start Tracking, respectively. Connect all of the appropriate IBOutlets and actions using the Inspector window. Fig. 11.6 shows the final nib file in Interface Builder.
Fig. 11.6 | MainWindow.xib in Interface Builder.

11.4.1 Class TrackingMapView
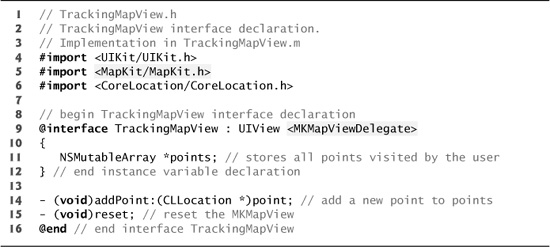
The TrackingMapView class (Fig. 11.7) is a subclass of UIView. We overlay an object of this class on the MKMapView. We could add the TrackingMapView as a subview of the MKMapView in Interface Builder; however, the TrackingMapView and MKMapView are the same size, so they would overlap in the nib file, making them difficult to work with. We chose to add the TrackingMapView programmatically to keep the nib file as simple as possible. TrackingMapView implements the MKMapViewDelegate protocol which declares several methods that respond to messages from MKMapView objects (line 9). The class MKMapView represents a map that can be displayed in our app and controlled programmatically. This class is part of the Map Kit framework that uses Google Maps web services. NSMutableArray points (line 11) stores CLLocations representing locations along the user’s route. A CLLocation object represents the iPhone’s geographical location at a specific time. Lines 14–15 declare two methods. The addPoint: method adds new CLLocations to NSMutableArray points. The reset method removes all the CLLocations from points. Both methods refresh the display after performing their tasks.
Fig. 11.7 | TrackingMapView interface declaration.
Method initWithFrame: of Class TrackingMapView
TrackingMapView’s initWithFrame: method (Fig. 11.8) is inherited from UIView and overridden. Line 13 calls the superclass’s initWithFrame: method and checks that the superclass’s inherited members were initialized without error. If so, line 15 sets this TrackingMapView’s backgroundColor property to clear using UIColor’s clearColor method and line 16 creates points as an empty NSMutableArray (line 16).
Fig. 11.8 | Method initWithFrame: of class TrackingMapView.

Method drawRect: of Class TrackingMapView
The drawRect: method (Fig. 11.9) draws the route line and arrows representing the path traveled by the user. If there’s only one CLLocation in points or the TrackingMapView’s hidden property is YES, the method exits because no line needs to be drawn (lines 27–28). Line 31 gets the current graphics context using the UIGraphicsGetCurrentContext function. The CGContextSetLineWidth function sets the width of any line drawn in context to four pixels (line 32). This will be the width of the line representing the user’s route on the map. Lines 33–34 declare the CGPoint point and float distance. Variable point is used to store the next point in the line during each iteration of the loop in lines 37–120. We initialize distance to zero. This variable helps us determine whether to place the next arrow on the line representing the route.
Fig. 11.9 | Method drawRect: of class TrackingMapView.


Lines 37–124 loop through each CLLocation in points. Line 39 stores the control variable in float variable f so that we can use the value in a floating-point division calculation. Lines 42–43 set the line color using the CGContextSetRGBStrokeColor function. The RGB values are calculated using f and points.count in such a way that the line will start green and become more blue with each additional location. Passing 0.8 as the last argument makes the line slightly transparent so the user can still see the underlying map. Line 46 gets the CLLocation at index i of points. Line 47 initializes the lastPoint CGPoint to point. This does nothing during the first iteration of the loop because point has not yet been initialized, but for each subsequent iteration this stores the previous CGPoint drawn into lastPoint. Lines 50–51 convert the nextLocation CLLocation to a CGPoint in TrackingMapView. We do this by first casting TrackingMapView’s superview to an MKMapView (line 50)—as you’ll see in Fig. 11.13, the controller sets TrackingMapView as a subview of MKMapView. We then call MKMapView’s convertCoordinate:toPointToView: method to receive a CGPoint in TrackingMapView representing nextLocation.
If this is not the first loop iteration (line 54), we call the CGContextMoveToPoint function to select the location in context of the last point drawn (line 57). The CGContextAddLineToPoint function adds a line from the last point drawn to point’s coordinates (line 60). Lines 63–64 use the formula for the distance between two points to calculate the length the last line segment and add that to distance. If this distance is greater than or equal to ARROW_THRESHOLD (line 67), we draw a new arrow onto the route. Line 70 declares a new UIImage using arrow.png and line 71 declares the frame CGRect. Lines 74–75 call the CGPointMake function to create a new CGPoint in the center of the last line segment. We then set frame’s size to that of image (lines 78 and 81) and its origin to the coordinates in the line segment’s center (lines 84–87).
The CGContextSaveGState function saves the coordinate system of the current graphics context (line 90) so we can revert back to it later. Lines 93–95 call the CGContextTranslateCTM function to translate context to the location at the center of the line segment where we wish to display the arrow. Lines 98–103 calculate the angle at which context needs to be rotated so that when we place the arrow on context it will be perpendicular to the second endpoint of the line. The CGContextRotateCTM function rotates the context by the calculated angle (line 106). Lines 109–111 call the CGContextDrawImage function to draw the image into the context. Line 114 uses the CGContextRestoreCGState function to restore context’s original coordinate system. Line 119 draws the line representing the route by calling the function CGContextStrokePath. We do this after the arrow image is displayed so that the line appears on top of the arrow.
Methods addPoint: and reset of Class TrackingMapView
The addPoint: method (Fig. 11.10, lines 124–136) adds a new CLLocation to the points NSMutableArray. Before adding a new point, we ensure that it does not describe the same geographical coordinates as the last element in the NSMutableArray, which would indicate that the user has not moved from the prior position. Line 127 receives the last element in points using NSMutableArray’s lastObject method. Lines 130–131 compare the latitude and longitude properties of CLLocations point and lastPoint. If either is different, we add the new CLLocaton to points (line 133). We then force TrackingMapView to redraw by calling UIView’s setNeedsDisplay method (line 134). The reset method (lines 139–143) removes the visual representation of the user’s route from the TrackingMapView by calling NSMutableArray’s removeAllObjects method to empty points and calling setNeedsDisplay to force TrackingMapView to redraw (lines 141–142).
Fig. 11.10 | Methods addPoint: and reset of class TrackingMapView.

Methods mapView:regionWillChangeAnimated: and mapView:regionDidChangeAnimated: of Class TrackingMapView.
The mapView:regionWillChangeAnimated: method of the MKMapViewDelegate protocol (Fig. 11.11, lines 146–150) is called by the MKMapView when the area being displayed by the map is about to shift. Line 149 hides the TrackingMapView during this transition so that the line is not temporarily displayed out of place while the map shifts. When the map finishes shifting, the mapView:regionDidChangeAnimated: method of the MKMapViewDelegate protocol is called. Line 156 indicates that the TrackingMapView should display and line 157 calls UIView’s setNeedsDisplay method so the TrackingMapView redraws.
Fig. 11.11 | Methods mapView:regionWillChangeAnimated: and mapView:regionDidChangeAnimated: of class TrackingMapView.

11.4.2 Class Controller
Controller is a subclass of UIViewController and implements the MKMapViewDelegate protocol and the CLLocationManagerDelegate protocol (Fig. 11.12, lines 9–10), which indicates that this class can receive messages from a CLLocationManager object. Class CLLocationManager is a part of the Core Location framework and provides information on the iPhone’s location and compass heading.
Fig. 11.12 | Controller class for the Route Tracker app interface declaration.

The startButton outlet (line 13) is connected to the Button pressed by the user to toggle whether or not the app is tracking the route. Line 14 declares a TrackingMapView. The MKMapView mapView represents the map displayed in the TrackingMapView (line 15). Line 16 declares a CLLocationManager that’s used to get location and compass heading information needed to draw the user’s route. BOOL variable tracking specifies whether the app is currently tracking the user’s route and distance stores the total distance traveled in the current route. The NSDate class stores a date and time. Line 19 declares an NSDate object used to store the time when tracking starts. Line 20 declares a CLHeading representing the iPhone’s compass heading.
Class Controller also declares three methods (lines 27–29):
• toggleTracking—tells the CLLocationManager to start tracking the iPhone’s position if it isn’t currently doing so. Otherwise, this method stops tracking and displays a UIAlertView containing the route’s statistics.
• resetMap—clears the previous route from the map.
• selectMapMode:—switches between street map, satellite image and combination of the two.
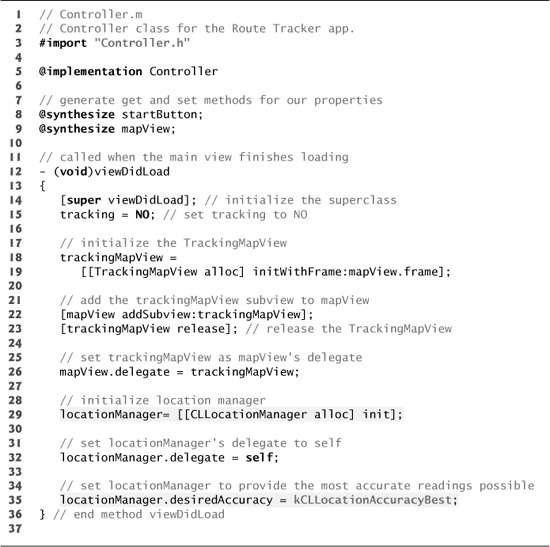
Method viewDidLoad of Class Controller
Controller’s viewDidLoad method (Fig. 11.13) begins by initializing the superclass’s inherited members and setting tracking to NO. Lines 18–19 initializes trackingMapView to have the same size as mapView, because we’re going to overlay the trackingMapView on the mapView. Line 22 calls UIView’s addSubview: method to add trackingMapView as a subview of mapView. We then set mapView’s delegate property to trackingMapView (line 26) so the mapView can deliver notifications to trackingMapView when the map moves. Lines 29 and 32 initialize locationManager and set its delegate to this Controller object. Setting locationManager’s desiredAccuracy property to kCLLocationAccuracyBest (line 35) specifies that the location and heading information provided by locationManager should be as accurate as the iPhone’s hardware can provide.
Fig. 11.13 | Method viewDidLoad of class Controller.
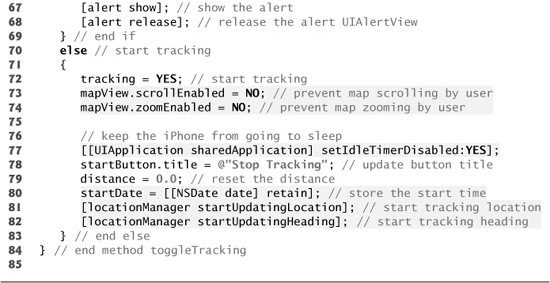
Method toggleTracking of Class Controller
The toggleTracking method (Fig. 11.14) is called when the user touches the Button in the bottom-right corner of the app which alternates between Start Tracking and Stop Tracking, depending on the current tracking state. If the app is currently tracking the user’s route (line 42) we set tracking to NO (line 44), then enable sleep mode for the iPhone by using UIApplication’s setIdleTimerDisabled: method (line 47). We also set startButton’s title property to Start Tracking (line 48). We then send stopUpdatingLocation and stopUpdatingHeading messages to prevent the locationManager from monitoring the iPhone’s position and orientation (lines 49–50). Lines 51–52 set mapView’s scrollEnabled and zoomEnabled properties to YES, allowing the user to scroll through the map and zoom in and out.
Fig. 11.14 | Method toggleTracking of class Controller.

Line 55 calls NSDate’s timeIntervalSinceNow method to return a float containing the number seconds that have elapsed since startDate was created (i.e., when the app first started tracking). We then prepare an NSString containing the distance and speed the user traveled (lines 58–61), using both standard and metric measurement units. Lines 64–66 display that NSString in a UIAlertView containing a “Return” Button.
If the app had not previously been tracking (line 70), we set tracking to YES (line 72). Lines 73–74 set mapView’s scrollEnabled and zoomEnabled properties to NO so the user cannot scroll or zoom the map while the app is tracking. We then disable sleep mode for the iPhone by using UIApplication’s setIdleTimerDisabled: method (line 77). Lines 78–79 set startButton’s title property to Stop Tracking and reset distance to zero. We create a new NSDate object to monitor how much time passes during the user’s route. We then send startUpdatingLocation and startUpdatingHeading messages to tell the locationManager to begin monitoring the iPhone’s position and direction.
Methods resetMap, selectMapMode: and mapView:viewForAnnotation: of Class Controller
The resetMap method (Fig. 11.15, lines 87–90) calls trackingMapView’s reset method when the user touches the “Reset” Button. This will clear the previous route from the map. The selectMapMode: method (lines 93–109) updates the type of map displayed when the user touches the Segmented Control containing map options. Line 95 gets UISegmentedControl’s selectedSegmentIndex property which represents the index of the touched item. If index is zero, we set mapView’s mapType property to MKMapTypeStandard—causing mapView to display a standard street map (line 101). If index is 1, we set the mapType property to MKMapTypeSatellite (line 104) to display a satellite image. If index is 2, we set the mapType property to MKTypeHybrid to display a street map on a satellite image.
Fig. 11.15 | Methods resetMap, selectMapMode: and mapView:viewForAnnotation: of class Controller.

The mapView:viewForAnnotation: method (lines 112–116) returns nil because we do not use annotations in this app. The MKAnnotationView class represents annotations (such as push pins) that can be displayed on the map to mark locations.
Method locationManager:didUpdateToLocation:fromLocation: of Class Controller
The locationManager:didUpdateToLocation:fromLocation: method (Fig. 11.16) of the CLLocationManagerDelegate protocol is called each time our CLLocationManager updates the location of the iPhone. This method receives a CLLocation representing the iPhone’s current position (newLocation) and a CLLocation representing the iPhone’s previous position (lines 119–120). Line 123 passes the newLocation to TrackingMapView’s addPoint method. If this is not the first location added (line 126), we calculate the distance between the locations using CLLocation’s getDistanceFrom: method then add the result to distance. Line 133 uses MapKit’s MKCoordinateSpanMake function to create an MKCoordinateSpan struct of size 0.005 degrees longitude and 0.005 degrees latitude. MKCoordinateSpan structs represent the size of the area covered in an MKCoordinateRegion. MKCoordinateRegion structs represent a portion of a total map to display. Lines 136–137 create a new MKCoordinateRegion the same size as span, centered around the newLocation. Line 140 passes this new region to UIMapView’s setRegion method to center the user’s location in mapView.
Fig. 11.16 | Method locationManager:didUpdateToLocation:fromLocation: of class Controller.

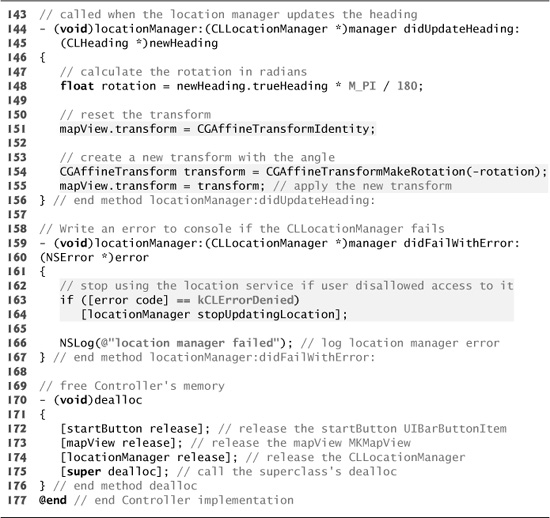
Methods locationManager:didUpdateHeading: and locationManager:didFailWithError: of Class Controller
The locationManager:didUpdateHeading: method of the CLLocationManagerDelegate protocol (Fig. 11.17) is called each time our CLLocationManager updates the iPhone’s compass heading. The newHeading’s trueHeading property is converted to radians (from degrees) and stored in the float variable rotation (line 148). Line 151 resets mapView’s transform property to CGAffineTransformIdentity. This returns mapView’s coordinate system to its original settings. Lines 154–155 create a new CGAffineTransform and apply it to mapView, causing the map to rotate at the angle received from newHeading. The locationManager:didFailWithError: method (lines 159–167) checks the error code to determine whether the user denied the use of locaton services. If so, line 164 invokes CLLocationManager method stopUpdatingLocation to stop using the location services. Line 166 writes to the log when the CLLocation manager fails. This can occur for several reasons, such as a hardware error or the user denying access to location services.
Fig. 11.17 | Methods locationManager:didUpdateHeading: and locationManager:didFailWithError: of class Controller.
11.5 Wrap-Up
In the Route Tracker app, we displayed a map using the Map Kit framework, which relies on Google Maps web services to obtain map data. The MKMapView class allowed us to draw our route on top of the map and change the display mode between a street map, a satellite image and a combination of the two. The Core Location framework and CLLocationManager class allowed us to access the user’s location and compass heading to draw the route and keep the map oriented in the same direction as the user. The NSDate class helped us determine the time it took the user to complete a route—allowing us to calculate the user’s average speed along that route.
In Chapter 12, we build the SlideShow app, which allows the user to create and display slideshows using images and music. The app will allow the user to access the iPhone’s music and photo libraries. The photo picker will be used to add new photos to the slide show, and the music picker will be used to choose a song to play during the slideshow.