Appendix A. Signup & Setup
You gotta admit it: Opening up a new iPhone brings a certain excitement. There’s a prospect of possibility, of new beginnings. There are those first few minutes—even before it’s in a case—when it’s shiny, spotless, free of fingerprints or nicks—a gorgeous thing.
This chapter is all about getting started, whether that means buying and setting up a new iPhone or upgrading an older model to the new iOS 13 software that’s described in this book.
Buying a New iPhone
Each year’s new iPhone model is faster, has a better camera and screen, and comes packed with more features than the previous one. Still, “new iPhone” doesn’t have to mean the iPhone 11 Pro Max ($1,100 to $1,450). You can still get an iPhone 8 for $450, an iPhone XR for $600, and so on. (Thank heaven, the U.S. carriers no longer obscure the true price of the phone in two-year contracts.) And of course you can get even older models dirt cheap, used.
Once you’ve chosen the model you want, you also have to choose which cellphone company you want to provide its service: AT&T, Verizon, T-Mobile, or Sprint.
Research the coverage where you live and work. Each company’s website shows a map of its coverage.
You can buy your iPhone from a phone store (Verizon, Sprint, T-Mobile, AT&T), from an Apple Store, from a retail store, from the Apple website, or even from the Apple Store app. You can buy the phone outright, or you can opt to have the price spread out in monthly payments. Or you can lease it.
All right then: You’re in the store, or sitting down to do some ordering online. Here are the decisions you’ll have to make:
Transferring your old number. You can bring your old cellphone or home number to your new iPhone. Your friends can keep dialing your old number—but your iPhone will ring instead.
It usually takes under an hour for a cellphone-number transfer to take place. During that time, you can make calls on the iPhone, but you can’t receive them.
Select your monthly calling plans. The carriers are all pushing unlimited-data plans these days, which come with a certain comfort.
But the traditional “4 gigabytes per month” plans are still around, too. Of course, the problem with fixed data allotments is this: Who has any idea what 4 gigabytes of data means? How much of that do you eat up with email alone? How much is one YouTube video?
As you approach your monthly limit, you’ll get warnings by text message, but you can also see your data usage on your phone (“Personal Hotspot”). Yes, it’s a pain to have to worry about data limits, but at least monitoring them is fairly easy. If you use more than your allotted amount, some carriers automatically bill a surcharge—for example, $15 for each additional gigabyte.
And all iPhone plans require an “activation fee” (ha!).
NOTE
The choice you make here isn’t etched in stone. You can change your plan at any time on your carrier’s website.
As you budget for your plan, keep in mind that, as with any cellphone, you’ll also be paying taxes as high as 22 percent, depending on your state. Ouch.
Upgrading to iOS 13
If you’ve recently bought a new iPhone, great! iOS 13 (or one of its successors, like iOS 13.2) comes on it preinstalled.
But you can also upgrade an older or used iPhone to this new software in any of three ways:
Upgrade it wirelessly. Upgrading means installing iOS 13 on top of whatever is already on your iPhone. You don’t lose any data or settings.
This is the easiest way to upgrade. You’ve probably already seen the little red number on your Settings app icon (see “Do Not Disturb”), and on the word “General” inside it; the phone is trying to tell you iOS 13 is ready to download. Tap Settings → General → Software Update to see the iOS 13 info; tap Download and Install. (You have to be on a Wi-Fi network, and it’s wise to have your iPhone plugged into power.)
Upgrade it from iTunes. If you wish, you can also perform the upgrade using the iTunes program on your computer (or a macOS Catalina Finder window). This method takes less time but, of course, requires being at your computer.
To begin, connect your iPhone and click its icon (see “All About Syncing”). On the Summary or General tab, click Check for Update, and then click Download and Update.
Restore it. This is a more dramatic step, which you should choose only if you’ve been having problems with your phone or if, for some other reason, you’d like to start completely fresh. This step backs up the phone, erases it completely, installs iOS, and then copies your stuff back onto the phone.
Connect the phone to your computer, open iTunes (or a Catalina Finder window), and then click Restore iPhone.
After the Restore process, treat your phone as though it were a brand-new one as you read the following pages.
The Setup Assistant
Upgrading your iPhone to iOS 13 from an older version doesn’t involve much more effort than sitting and waiting. When the upgrade is over, you get a Welcome screen, and boom: You’re at your Home screen, ready to roll.
Things aren’t so straightforward, though, if any of these situations apply:
You’ve bought a new iPhone to replace an older model.
You’ve bought your first iPhone.
You’ve upgraded your existing iPhone to iOS 13 by restoring it (erasing it, starting from scratch).
All three of these situations subject you to the iOS 13 setup assistant—a series of screens that interview you to get all the settings right.
TIP
If you’re upgrading from an older phone, you’d be very, very wise to take three preparatory steps. First, back up the old phone (see “Backing Up the iPhone”). Second, transfer your old phone’s SIM card to the new one (“Sensors”).
Finally, iOS 13 can’t open so-called 32-bit apps (the ancient ones). You may own a few old favorites that you’ll have to give up.
The screens you encounter, and their sequence, vary wildly depending on what phone model you have, whether you choose Quick Start and Express Settings, what backup you’re restoring from, and other factors. But, in general, this is what you’ll find when you turn on the phone for the first time after buying or upgrading it:
Hello. Your new phone’s life begins with a screen that flashes “Hello” in various languages. (At this point, you can turn on VoiceOver [“Zooming”] or Zoom [“Zooming”] if you have trouble seeing it.) Tap Continue.
[Choice of Language]. You won’t get very far setting up your phone if you can’t understand the instructions. So the goal here is to tell it what language you speak.
Select Your Language and Country. Now tell the phone where in the world you live. (It proposes the country where you bought the phone. Clever, eh?)
Quick Start. If you’re upgrading from an older phone, you’re in luck: The Quick Start feature is about to save you the tedium of entering passwords and setting up initial preferences. It works only, however, if your old phone is running iOS 11, 12, or 13.
If you don’t have another iOS 11, 12, or 13 device, tap Set Up Manually and skip to step 5.
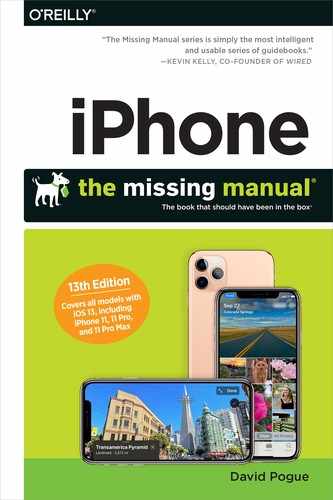
If you do have one, though, this is a blast. The Set Up Your iPhone screen (on the new phone) directs you to bring the old phone close to the new phone. The old one shows a Set Up New iPhone screen bearing your iCloud address; tap Continue.
Suddenly, the new phone displays an animation that looks like a swirling cloud of glitter. Hold the old phone a few inches over the new phone’s screen, so the animation fits in the brackets on the old one’s screen. Boom! They’re paired. The old phone begins to send encrypted data to the new one.
You’re now directed to enter the old phone’s passcode on the new phone; it’s going to become your new phone’s passcode, too.
The basic Quick Start process doesn’t actually transfer much: only your Wi-Fi password, your iCloud password, a few settings, and of course your iPhone passcode.
But when it’s over, you’re offered the chance to bring over everything else: all your apps, settings, and data from the older phone. You can tap Transfer from iPhone, which copies everything over Wi-Fi (or a Lightning cable and an Apple Lightning to USB camera adapter). That’s slow but sure, and it doesn’t require a computer or an iCloud backup.
If you do have an iCloud backup, you can choose Download from iCloud instead.
When it’s all over, you get to skip most of the rest of these steps.
Choose a Wi-Fi Network. Tap the name of the Wi-Fi network you want, enter the password if required, and tap Join.
Or, if there’s no Wi-Fi you can (or want to) hop onto right now, tap Use Mobile Connection.
NOTE
At this point, your phone becomes activated, which means it marries your cell carrier. If there’s a SIM card from your carrier in your phone (“Sensors”), this step takes only a second or two. If there isn’t a SIM card in the phone, though, you can’t activate it; you can’t proceed to the Home screen. (The workarounds: Borrow a SIM card from your carrier, even from a deactivated account—or use Quick Start to inherit the settings from another iOS 11, 12, or 13 phone, as described in step 4.)
Data & Privacy. A little statement about Apple’s philosophy: collecting as little data from you as possible.
Touch ID or Face ID. You’re now invited to teach the phone your fingerprint or “face print” for the purposes of unlocking it without having to type a password. Start in “Fingerprint Security (Touch ID)” for more on Touch ID and Face ID.
You can also tap Set Up Later. When the time comes, you can revisit this process in Settings → Touch ID & Passcode (or Face ID & Passcode).
Create a Passcode. Whether you opted to store a fingerprint/face or not, you’re now asked to make up a six-digit passcode for unlocking your phone. You’ll need it whenever the phone won’t accept Touch ID or Face ID—for example, after you’ve restarted.
TIP
You don’t have to accept iOS’s proposal of a six-digit passcode. Tap Passcode Options to reveal more choices, like Custom Alphanumeric Code (any password you like, any length, any characters), Custom Numeric Code (any number of digits), or 4-Digit Numeric Code (like in the old days).
Apps & Data. This screen offers to reload all your stuff from your most recent backup. (See Chapter 15 and Chapter 16 for details on iPhone backups.)
The new phone may guess about what recent backup you want to use. If it’s correct, tap Continue.
If not, tap Choose Other Backup or Don’t Restore. Now you’re offered a choice: Restore from iCloud Backup (if your backup was on iCloud), Restore from Mac or PC (if your backup was on your computer, like in iTunes or macOS Catalina), Move Data from Android, or Don’t Transfer Apps & Data (if you’ve never owned an iPhone before or want to start fresh).
NOTE
The Move Data from Android option prompts you to download a companion app on your old Android phone called Move to iOS. When you open it, the app (on Android) asks you to enter a number code that’s offered by your iPhone at this stage. Then the Android phone asks what kinds of data you’d like copied to your iPhone: your Google account (email, calendar, and so on), web bookmarks, text messages, contacts, and photos. When you hit Next, the transfer begins, wirelessly and automatically.
Apple ID. A million features require an Apple ID—just about any transaction you make with Apple online, from buying a song to buying a laptop. Using iCloud (Chapter 16). Playing games against other people online. Making an appointment at an Apple Store.
If you already have an Apple ID, enter your email address and iCloud password here. If not, tap Don’t have an Apple ID or forgot it? You’ll be asked to provide your name, birthday, email address (or you can create a new iCloud email address), a password of your choice, and answers to a few security questions (you’ll have to get them right if you ever forget your password). You also get to decide if you’d like the honor of receiving junk email from Apple.
You’ll be sent, by the way, an Apple ID Verification Code—that is, a two-factor authentication code as described in “Two-Factor Authentication”.
Terms and Conditions. Tap Agree.
NOTE
You may encounter a step 11.5 here: Enter Old Passcode. If you’ve used this phone before (with a different passcode), you’ll have to enter the old one to recover all your old passwords and the layout of your Home screens.
Express Settings. Do you want to set up Apple Pay (“Apple Pay”)? How about Siri (Chapter 5)? Are navigation and other apps allowed to monitor your location using Location Services (“Privacy”)? Will you agree to let Apple collect anonymous Analytics data about how you use the phone?
Here, Apple gives you the chance to say “Yeah, sure, fine” (tap Continue) for all these items at once, thereby skipping over a few steps in the setup assistant.
Otherwise, you can tap Customize Settings and walk through those screens individually before proceeding.
Some of these screens involve some setup. For example, Apple Pay requires registering your credit cards, and if you want to be able to use the “Hey Siri” hands-free mode (“What to Say to Siri”), then you’re supposed to speak a few sample sentences so Siri learns your voice.
NOTE
If your new phone is slurping up the backup from an older phone (if you used Quick Start, for example), you don’t get Express Settings. Instead you get Settings from Your Backup. It serves much the same purpose—letting you skip the Siri, Location, and Analytics questions—except that it grabs the settings from your backup rather than using Apple’s suggested defaults.
Keep Your iPhone Up to Date. Apple would really love it if you agreed to turn on Automatic Updates here. That way, every time it comes out with a new iOS version—which is usually more stable and richer in features—you’ll get it automatically. (You’ll still get a notification before it’s installed.)
Apple Pay. You’re now invited to store your credit cards, for the purpose of turning on Apple Pay. See “Apple Pay”.
If you don’t want to use Apple Pay, or don’t want to set it up now, hit Next anyway, and then hit Set Up Later in Wallet.
iCloud Keychain. Do you want your iPhone to memorize all your web passwords and sync them to your other Apple gear, so you don’t have to? (Yes, you do.)
Siri. Want to set up “Hey Siri”? You can always do it later.
Screen Time. Apple invites you to set up Screen Time, to control your gadget addiction (“Screen Time”).
App Analytics. Behind the scenes, your iPhone sends records to Apple, including your location and what you’re doing on your iPhone. By analyzing this data en masse, Apple can figure out where the dead spots in the cellular network are, how to fix bugs, and so on. The information is anonymous—it’s not associated with you. But if the idea seems invasive, here’s your chance to stop this data from being sent.
True Tone Display. This option appears only on the iPhone 8 and later models. It adjusts the screen colors in an attempt to keep them consistent under different lighting conditions (see “Accessibility”).
Appearance. And here it is, folks, the big deal in iOS 13: a choice between the traditional white-background look and the new Dark mode (“What’s New in iOS 13”).
Meet the New Home Button. On the iPhone 7 and 8 models, this screen introduces you to the clickless home button—and invites you to choose how hard its click feels (“Control Center”).
Display Zoom. At this point, bigger-screened phones (iPhone 6s, 7, 8, XR, and all Plus and Max models) ask how you want to exploit the larger screen. If you choose Standard, you’ll see more stuff (icons, menus, lines of text) per screenful than on smaller iPhones. If you choose Zoomed, then you’ll see the same amount of stuff, but bigger. You can always change your mind in Settings → Display & Brightness.
Go Home, Switch Between Recent Apps, Quickly Access Controls. These informational screens appear on Face ID iPhones. They’re designed to teach you some of the gestures you’ll need as you adapt to life without a home button.
Welcome to iPhone. Your phone is set up. Tap Get Started to jump to the Home screen.
If you’ve restored your phone from a backup, you’re not quite finished, though; now your phone should sit in a Wi-Fi hotspot for 30 or 60 minutes as it downloads all your existing apps, music, photos, and videos from Apple’s servers.
See, an iPhone backup doesn’t include any of that stuff. Instead, iOS simply remembers which apps, songs, photos, and videos you had. After your backup is restored, your phone proceeds to re-download them from the internet; you’ll see your dimmed app icons filling up as they arrive.
The benefit of this arrangement, of course, is that your backups don’t take up much time or disk space. The downside: If you’re trying to restore several phones from a single backup, you’re going to eat up a lot of data and time.
In any case, this is an excellent argument for beginning the restore process when (a) you’re in a Wi-Fi hotspot, and (b) you’ve got some time to kill.
Software Updates to Come
As you’re probably aware, phone software like the iPhone’s is a perpetual work in progress. Apple constantly fixes bugs, adds features, and makes tweaks to extend battery life and improve other services.
Updating Directly on the Phone
One day you’ll be minding your own business, and you’ll see a red number badge appear on the Settings app’s icon. Open Settings → General → Software Update to read about the new update and install it. Note, though, that unless it’s plugged into a power source, your phone won’t install an iOS update unless its battery is at least half full.
Install Updates from Your Computer
Maybe you’re not that adventurous and you’d prefer to install your software update the old-fashioned way. No problem: Connect the iPhone to iTunes, wirelessly or not (“All About Syncing”). Then click the iPhone’s icon in iTunes; on the Summary pane, tap Check for Update.
Two-Factor Authentication
By now, it’s probably clear that passwords aren’t enough to protect us from the bad guys. Even if your password is é$*@çg45e+7r6ü, someone can still steal it. There are all kinds of ways: An inside job. Poor security on a company’s servers. Social engineering, where someone calls up pretending to be you and saying, “I forgot my password.”
Fortunately, security experts have come up with a way to keep baddies out of your account even if they’ve got your password. It’s a system called two-factor authentication—and it’s no longer optional. (Let’s call it 2FA to save paper.)
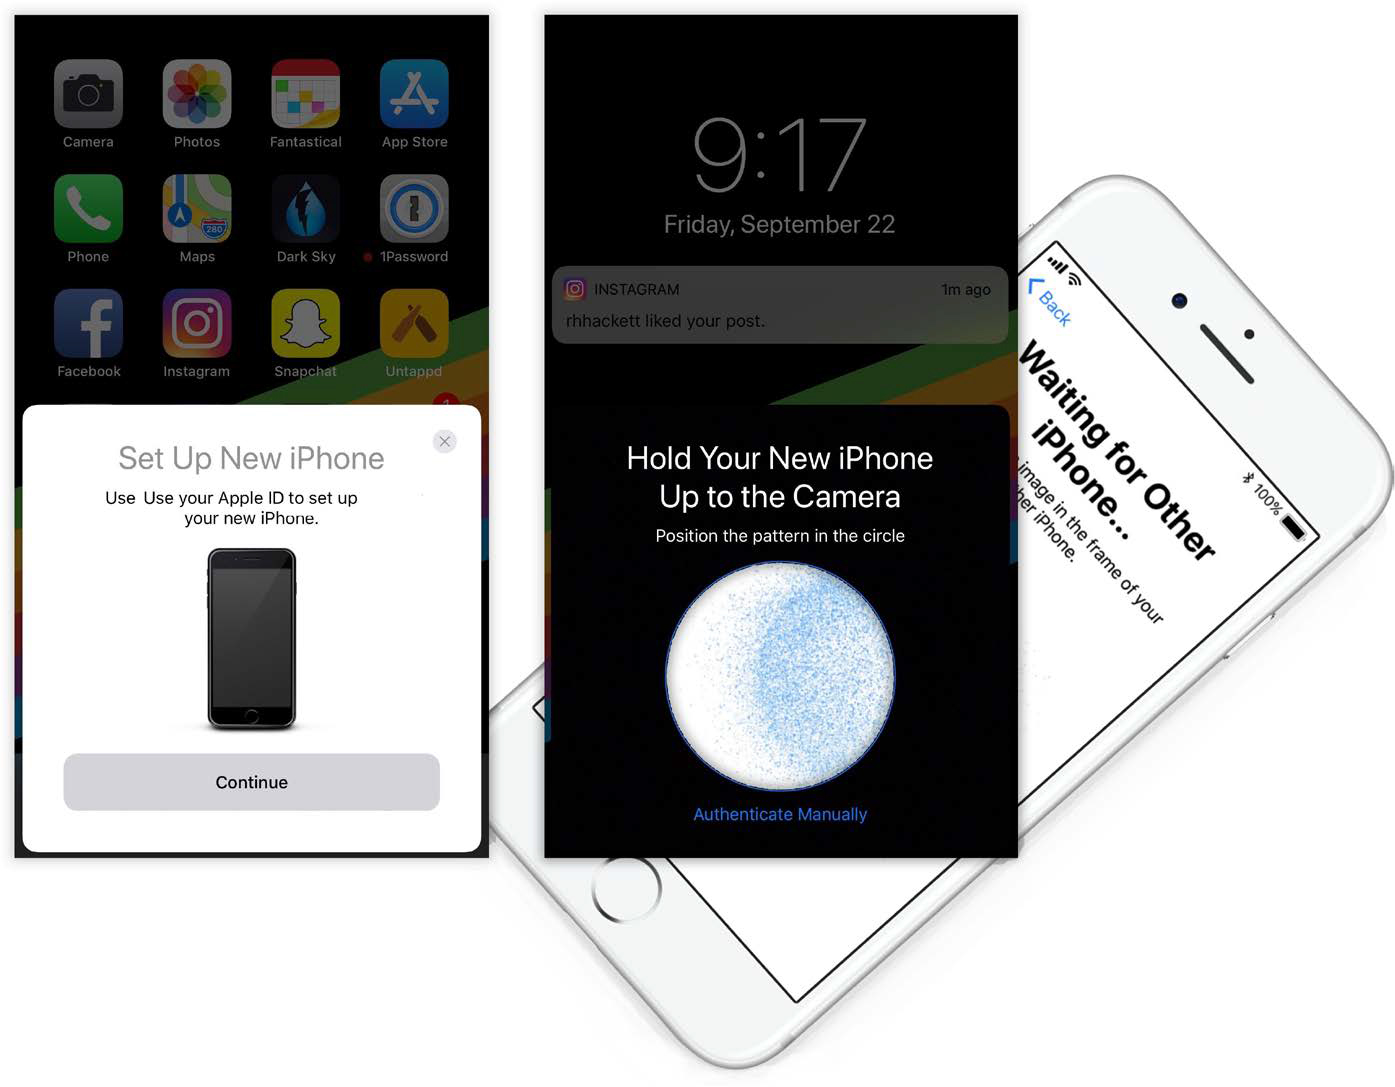
Here’s how it works: Suppose you’re setting up a new Apple device, or you’re trying to log into icloud.com with a new web browser. You log in with your iCloud password.
Almost immediately, Apple sends a message to the screens of all your other Apple machines—devices it knows you own: “Your Apple ID is being used to sign in to an iPad [or whatever] in Hinsdale, IL” (and there’s a little map).
TIP
And what if you don’t have another Apple device? Then you can get the code via automated phone call or text; tap Didn’t get a verification code.
And what if you’re not online? No problem. You can make the older, trusted device cough up a code on demand, in Settings → [your name] → Password & Security → Get Verification Code.
If Hinsdale is not where you are right now, it means someone is pretending to be you! Tap Don’t Allow and shut him down!
If it is you, though, hit Allow. Now your older device displays a six-digit code; on the new machine or browser, there’s a box where you can enter it. You’re in.
NOTE
Sometimes the code and “enter code” box appear on the same device! What sense does that make?
Easy: You’re using a new browser for the first time. The operating system treats that browser as a new “device,” even though it’s running on an already-accepted machine.
If some Russian hacker does get your password, he still can’t get into your account, because he doesn’t have the code. Sneaky, eh? And incredibly effective; 2FA almost completely eliminates the chance of someone else accessing your account. He’d have to have your iCloud password and your phone or laptop and your password for that device.
Each time, you’re adding to your list of trusted devices. At any time, you can look over a list of them at appleid.apple.com/account/manage. (You’ll get a 2FA code just to get into your account.)
NOTE
This all works smoothly on Apple products. But what about programs (like calendar and email programs) that also need access to your iCloud account? They’re locked out just as though they were hackers.
Fortunately, you can go to appleid.apple.com/account/manage to generate an app-specific password. If you enter this 16-character password as your iCloud password in your third-party calendar or email program, it will then be able to access your iCloud account as it did before.