Chapter 2. The Lock Screen & Notifications
The Lock screen—the first thing you see when you wake the iPhone—is more than just a big Do Not Disturb sign. It’s a lively bulletin board for information about your life. It’s possible to have complete work sessions right at the Lock screen, without even fully unlocking the iPhone.
For starters, you can use the iPhone as a watch—millions of people do. Just lift the sleeping phone, or press the side button, to consult the Lock screen’s time and date display, and then shove the phone right back into your pocket. It goes back to sleep after a few seconds.
Better yet, the Lock screen gives you a handy status report. Here you see a record of everything that happened while you weren’t paying attention. It’s a list of missed calls, text messages received, notifications from your apps, and other essential information.
Lock Screen Swipes
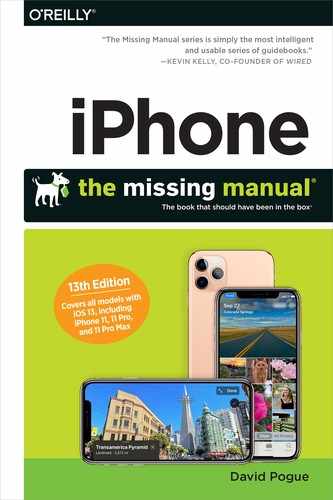
The Lock screen is the centerpiece of two other important screens. You can swipe left or right to bring them into view.
Swipe left to open the Camera app (“The Camera App”).
Swipe right to reveal the Today (Widgets) screen (“Making DNDWD Mandatory”).
Actually, there two more screens you can reach from the Lock screen:
The Control Center. You reach it by swiping up from the bottom of the screen (home-button phones), or down from the right ear (Face ID phones); see “Control Center”.
The Notification Center. Get here by swiping up—but this time from the middle of the screen; see “The Notification Center”.
Keep this map in your head every time you wake your phone:
Notifications
A notification is an update from an app trying to get your attention. You get one every time a text message comes in, an alarm goes off, a calendar appointment is imminent, your battery is running low, and so on. Almost every app can display a notification, if you let it.
Notifications show up in two places, or maybe 2½:
On your screen, while you’re working. They pop up individually to get your attention.
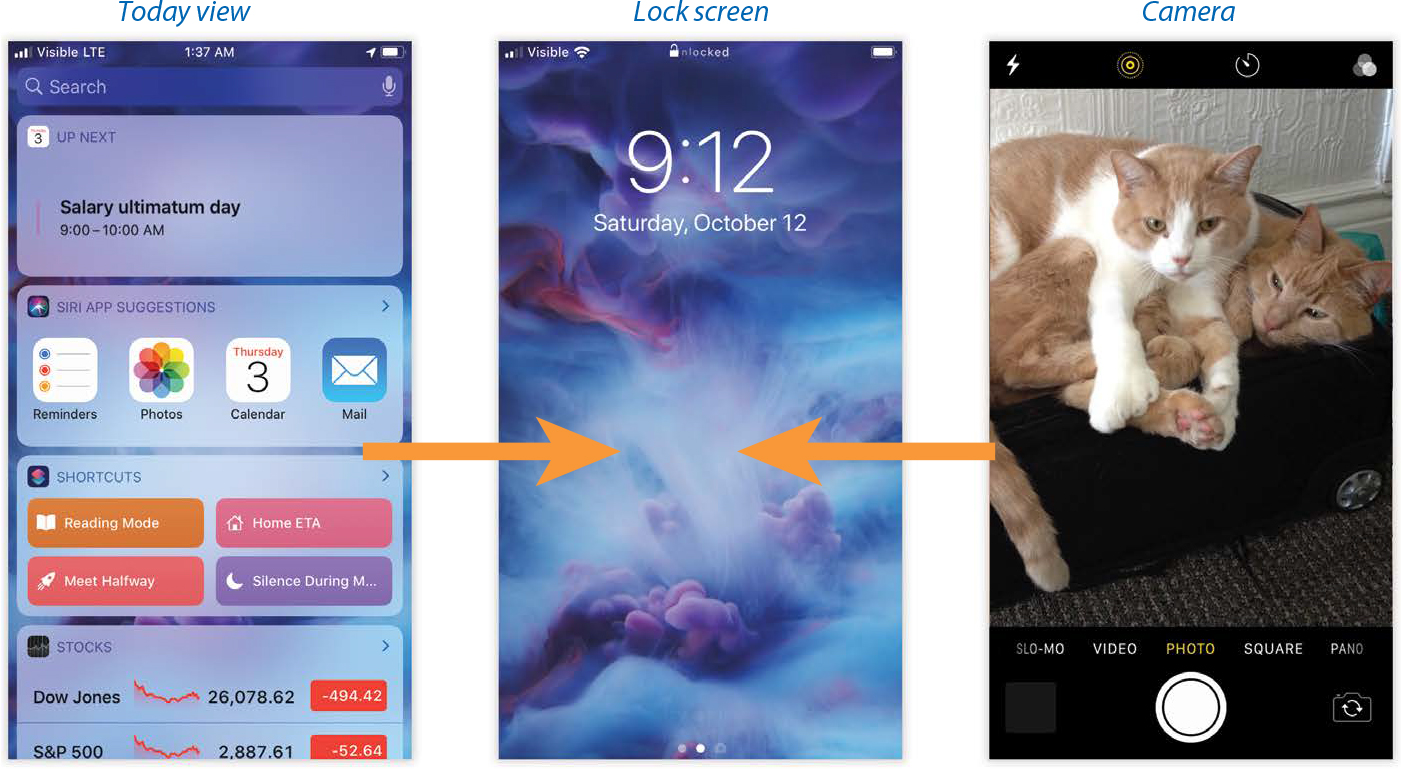
On the Lock screen, in a scrolling list of alerts that came in while you were away (facing page, left). Unlocking the phone wipes them away. The next time you unlock the phone, that batch will be gone.
On the Notification Center. If you swipe down from the top of the screen, you open another list of notifications. It’s almost identical to the Lock screen, complete with wallpaper, day, and date. You can even swipe left for the Camera or swipe right for the Today screen.
But there are two key differences. First, this screen (facing page, right) shows all the notifications that have come in recently—both the new ones from the Lock screen and ones you’ve already seen, even if they’re several days old.
TIP
On the actual Lock screen, you can swipe up to see these older ones.
Second, you can specify, for each app, where its notifications appear. You can make them appear on the Lock screen, in the swipe-down notifications screen, on both, or on neither; see “The Notification Center”.
Apple doesn’t really have a name for the swipe-down-from-top screen, and “kind of like the Lock screen except that you get it by swiping down, and it also shows your notifications history” is too clumsy to use repeatedly in this chapter. So let’s just call it the Notification Center, even though the Notification Center is technically only the bottom part of it, as shown above.
To close this screen, swipe any empty area up and away, or press the home button (if you have a home button), or do a quick up-swipe (if you have a Face ID phone).
Your options for dealing with incoming notifications are dizzying these days. They depend on which kind of phone you have, what your settings are, whether the phone is locked, and so on.
The following pages tackle the 2½ notification situations one by one.
While You’re Working
Here are your options if the phone is unlocked and you’re using it.
Flick it away. If a notification banner appears, flick it upward to make it vanish. (If it’s a “Temporary” banner, as described in “Do Not Disturb”, just wait; it’ll go away momentarily.)
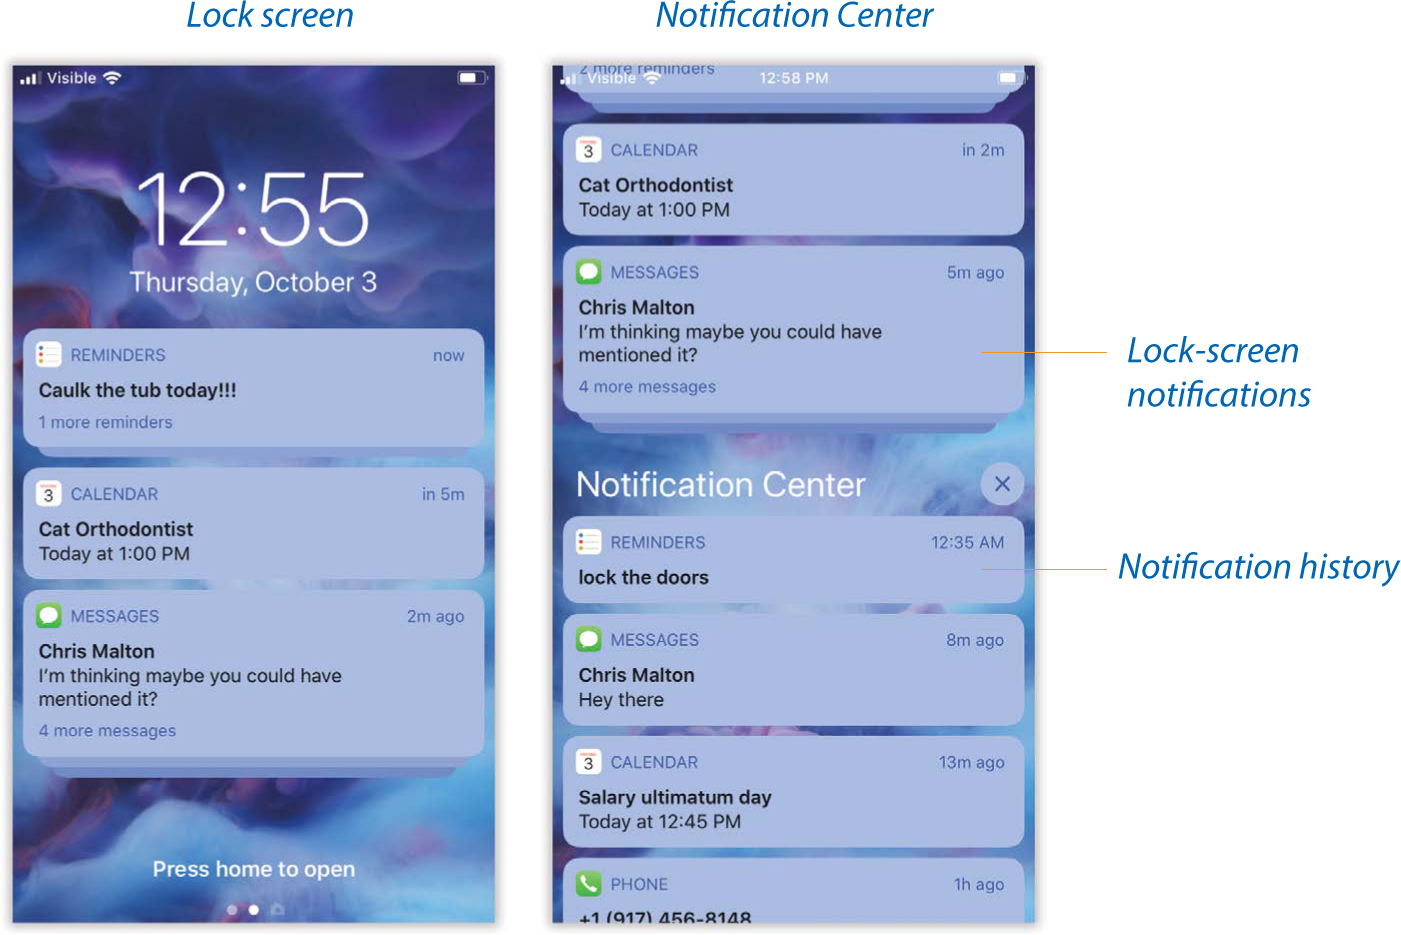
Process it in place. You can take direct action on many kinds of notifications—incoming text messages, emails, or calendar invitations, for example. Without leaving the notification banner, you can reply to the text message, delete the email, accept the calendar invitation, see where your Uber car is, mark the Reminder as done, and so on.
Just long-press the banner to expand it and see your action options. If it’s a text message, you get a miniature version of Messages in the window, so you can reply (below, right). If it’s a reminder, you can choose Mark as Completed, Remind me in 1 Hour, or Remind me Tomorrow. And so on.
You can also swipe to the left on the banner to reveal some option buttons instead. For a text message, they include Clear, View (which produces the insta-reply screen shown above at right), and Manage (read on). If it’s an email, they say Trash and Mark as Read; and so on.
Open it. Finally, you can tap a notification to open the app it came from. Tap an email notification to open the message in Mail; tap a text-message notification to open the text in Messages; and so on. That’s handy when you want to dig in and see the full context of the notification.
On the Lock Screen
When notifications appear while you’re not using your phone, they accumulate on the Lock screen.
Here’s what you can do with them:
Ungroup them. Notifications stack up in groups, by app. If you have eight text messages and three reminders waiting, you see only two stacked-looking bubbles, one per app. It’s a triumph of software engineering over chaos. (You can see some of these stacked notifications in the illustration in “While You’re Working”.)
With a tap, you can expand a stack to view the individual notifications within it. (Depending on how you’ve fiddled with your privacy settings, you may first have to unlock the Lock screen—with your face, fingerprint, or passcode, as described in “The Lock Screen”. This doesn’t mean getting past the Lock screen to the Home screen; it just means the padlock icon on the Lock screen must be open.)
At that point, you can process each one individually, or you can nuke them all at once.
TIP
If the iPhone thinks there’s enough room to fit all the expanded notifications—for example, if all you got were two missed calls—you don’t even have to tap to expand it. The stack expands automatically, as soon as your face or fingerprint has unlocked the phone.
Clear them. Apple has made sure you can delete notifications in convenient units.
Delete an individual notification by swiping it to the left; tap the Clear button that appears.
Delete a whole stack (a whole app’s worth) by swiping it all the way to the left. (The long way: Drag partway to the left, and then tap the Clear All button that appears.)
Tune this app’s notifications. iOS lets you shut up a certain app right here in the list of notifications, without having to burrow into Settings. Just long-press on a bubble stack, or an individual notification, from that app. (The long way: Swipe left, and then tap Manage, as shown on the next page at left.)
NOTE
This operation, too, requires that you’ve unlocked the Lock screen with your face, fingerprint, or passcode.
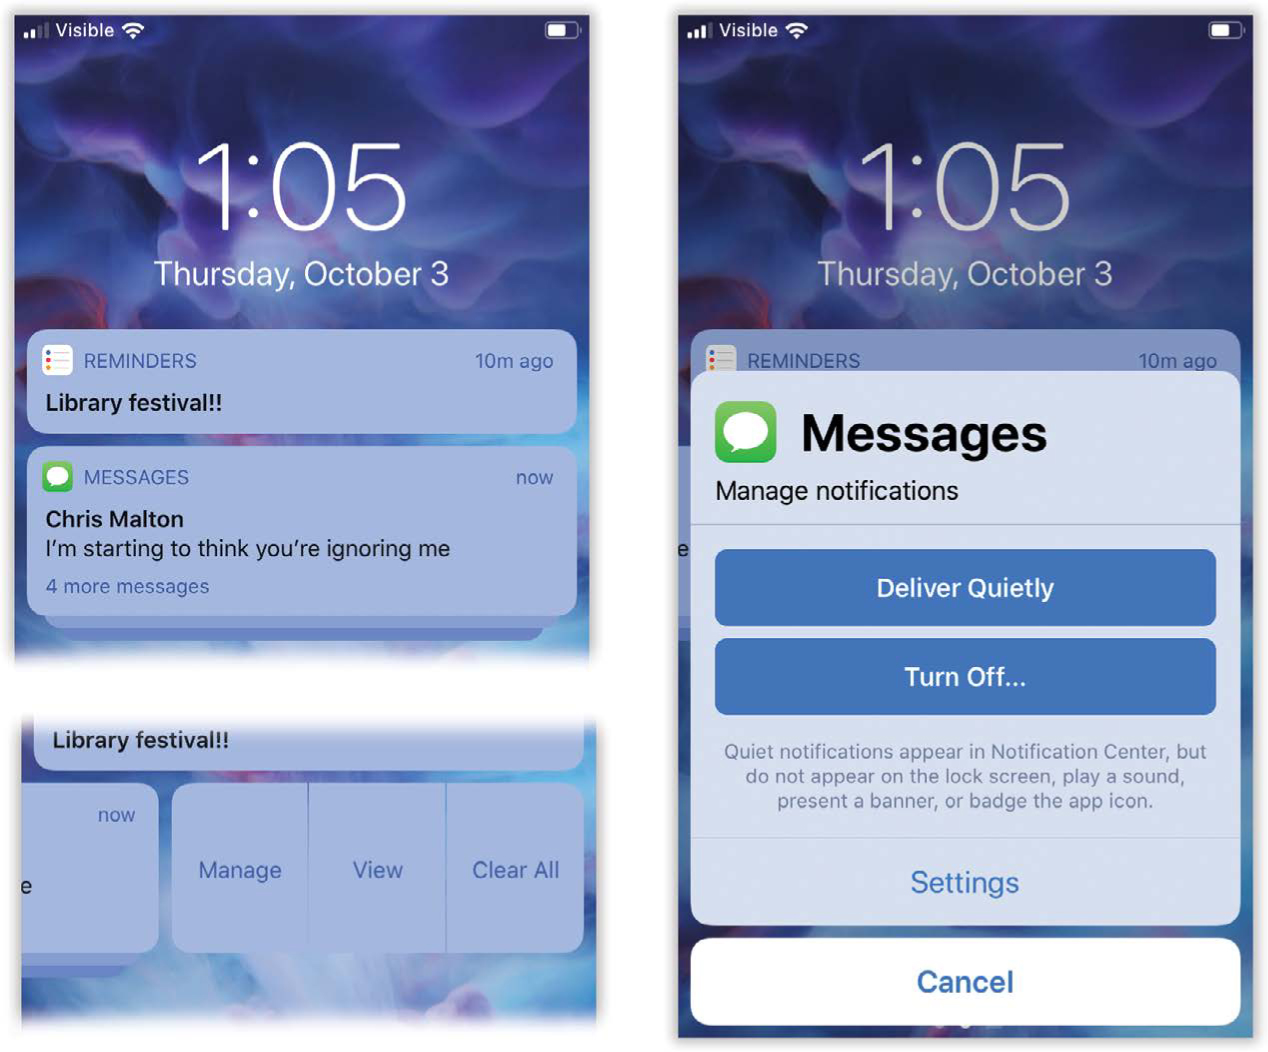
A screen appears, offering two massive blue buttons. Deliver Quietly means that, from now on, this app’s notifications will no longer make sounds, vibrate, display a badge like this
 on its icon, or appear on the Lock screen. The only place you’ll see the notifications is in the Notification Center, the swipe-down list. That’s a much quieter, more out-of-the-way place.
If you silence enough apps, the notifications from the apps you really do consider important will stand out that much more.
NOTE
If iOS notices that you always ignore a certain app’s notifications, it might even suggest that you turn on Deliver Quietly for it. Now that’s proactivity!
The other big button here, Turn Off, means this app’s notifications won’t show up anywhere. It’s dead to you.
The Settings button opens the app’s corresponding page in Settings, where you can make much finer adjustments to its notifications’ behaviors (read on).
Process notifications in place. You can long-press an expanded notification bubble to view the action buttons, exactly as described in “On the Lock Screen”. (Alternatively, swipe left and then tap View.)
Open the app. Swiping all the way to the right opens the app itself. (The long way: Swipe a bit to the right and then tap Open.)
The Notification Center
When the phone is awake, and you swipe down from the top edge of your screen, you get another variation of the notification list.
When those notification bubbles are staring you in the face, you can process them using all the techniques you’d use on the Lock screen: Ungroup them, clear them, tune them, open them.
There are a few differences:
This is a more complete list than what you see on the Lock screen, because it also shows you older notifications (under the heading “Notification Center”). These are bubbles that you’ve already seen on the Lock screen but haven’t yet cleared or opened. (You can see the Notification Center at right in “While You’re Working”.)
This screen may show the alerts from many more apps, because you may have told certain apps to “Deliver Quietly,” as described.
You don’t have to worry about unlocking anything before you process the notifications on this screen. After all, the phone is already on. You’ve already unlocked it.
In addition to clearing notifications individually or by app, you can also clear everything under the words “Notification Center” at once—your whole history. To do that, tap the
 button and then hit Clear to confirm. (Or long-press the
  button and then tap Clear All Notifications to confirm.)
Customizing Notifications
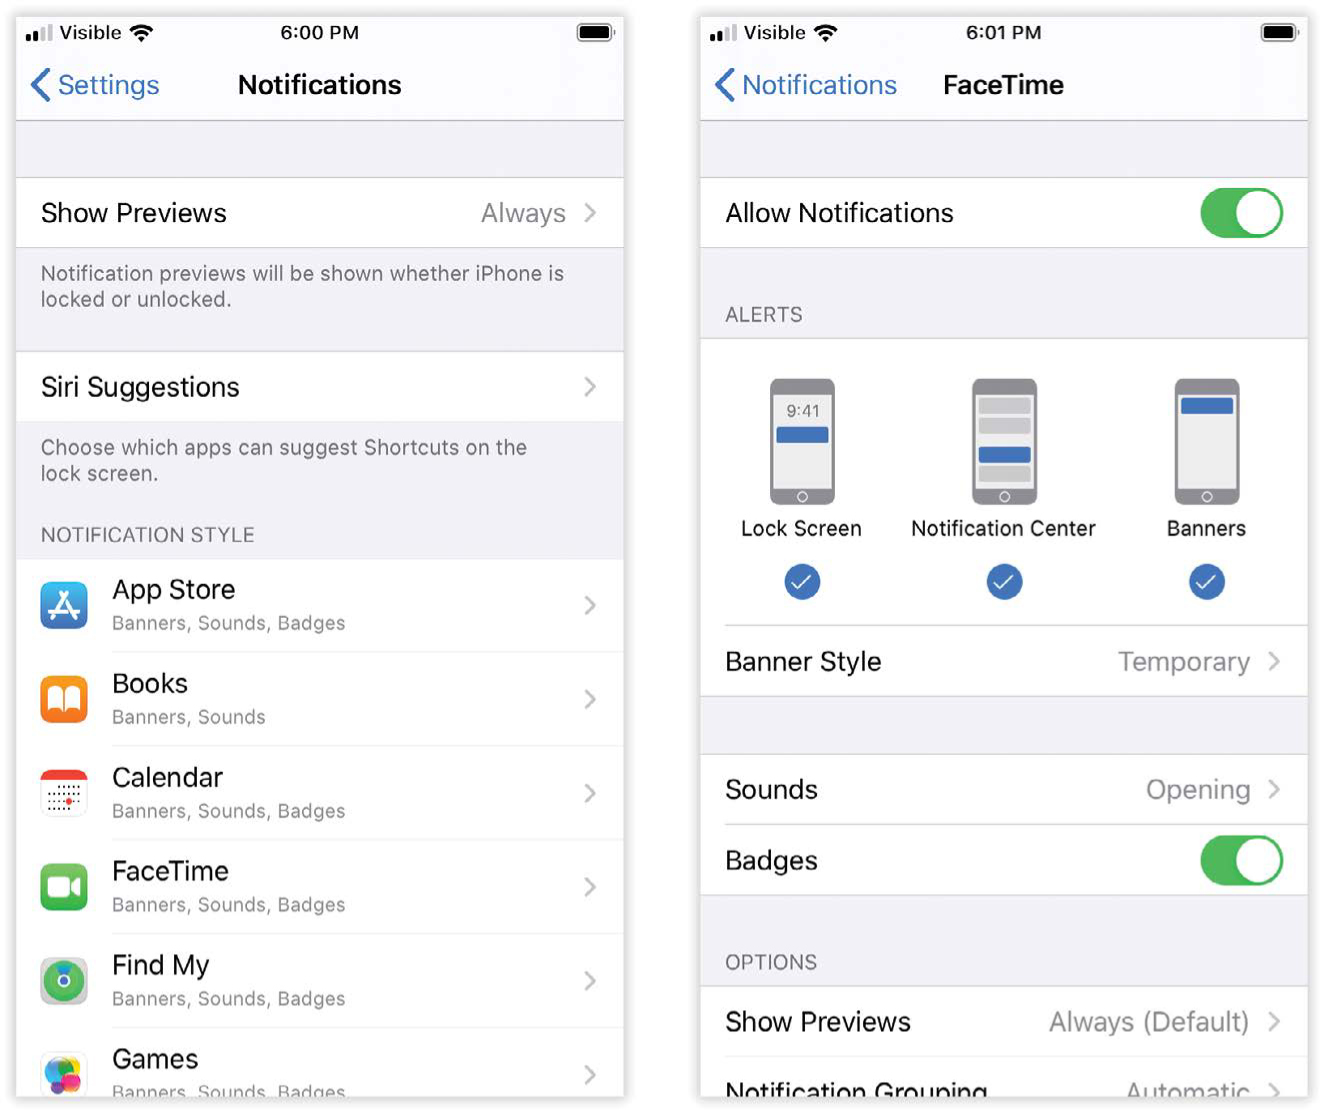
You can (and should) specify which apps are allowed to junk up your notification screens. Open Settings → Notifications to see the master list, with one entry for every app that might ever want your attention. (Or just tell Siri, “Open notification settings.”)
At the top of this screen, you get the master Show Previews switch (next page, left). This is a privacy thing. When someone sends you a text, do you want the notification banner to include the message itself, right there on your locked phone? (That’s the preview.) Or do you want the banner to indicate only that a person has sent some message, which you can read only after unlocking the phone?
And it’s not just texts. Do you want Uber information to appear in the banner? How about the Facebook alerts? The name of your alarm or reminder?
You have three choices here: Always (always show the message in the notification banner), When Unlocked (show only if I’m using the phone—not when it’s locked), and Never.
NOTE
This Show Previews switch is a global switch—but individual apps can override it. You’ll also find a separate Show Previews switch for each app that’s capable of displaying information.
You’ll quickly discover that every app thinks it’s important; every app wants its notifications to blast into your face when you’re working. You, however, may not agree. You may not consider it essential to know when your kid’s Plants vs. Zombies score has changed, for example.
So: Tap an app’s name to open its individual Notifications screen. Here you’ll find settings that vary by app, but they generally run along these lines (above, right):
Allow Notifications. If you don’t want this app to make any notifications pop up at all, turn this off.
Lock Screen, Notification Center, Banners. As you now know, there are three places where alerts may appear: the Lock Screen (when you’re first waking your phone), the Notification Center (swipe down from the top of the screen), or the Banners that appear when you’re using the phone. Using these three buttons, you can specify, just for this app, where you’ll permit the notifications to appear.
Maybe you want the Lock screen to show only missed calls, new text messages, and new email—but you’d like the pull-down Notification Center to be fully stocked with Twitter and Facebook updates. Or maybe you’d rather not permit passing evildoers to pick up your phone and see your notifications without even having to unlock it.
Banner Style appears as an option only if you’ve turned on Banners.
A Temporary banner appears at the top of the screen, holds still long enough for you to read it, and then goes away after a few seconds. Facebook and Twitter updates and incoming email messages do well as temporary banners.
A Persistent banner stays on your screen until you tap or swipe it. You might use this option for apps whose messages are too important to miss, like alarms, flight updates, or texts.
Sounds. Some apps try to get your attention with a sound effect when a notification appears. Turn this off if you think your phone makes too many beeps and burbles as it is. (Some apps also let you choose which sound effect plays to get your attention. You can change the sound or choose None.)
Badges. A badge is a little red circled number (
 , for example). It appears right on an app’s icon to indicate how many updates are waiting for you. Turn it off if you really don’t need that reminder.
Show Preview. This setting allows this app to override your global Show Previews setting (described earlier). If you generally don’t want your apps displaying private information while the phone is locked, but it’s OK for the Uber app to do so (for example), here’s your ticket.
Notification Grouping. You’ve already seen iOS’s alert-bubble stacking feature at work. What you may not realize is that you can turn that on or off independently for each app.
Off means every notification appears in its own bubble; no grouping for you! By App means all banners from a single app appear in a stack. And Automatically groups banners logically: separate stacks for individual conversations in Messages, correspondents in Mail, news sources in News, and so on.
As you poke around in the Notifications settings, you’ll discover that certain apps offer oddball options that don’t match up with the settings you see for most apps. Don’t freak out. It’s all part of Apple’s master plan to put controls where it hopes you’ll find them.
NOTE
Siri may make suggestions of her own, which take the form of notifications on the Lock screen.
If you order a certain drink every morning at a certain coffee shop, Siri will begin to remind you when the time comes. If you’re running late for a meeting, Siri offers to send a “running late” text on your behalf. If you’ve put a movie ticket into the Wallet app, Siri can turn on Do Not Disturb for the duration of the movie.
You won’t see these often. But if even one is too many, you can turn them off in Settings → Siri & Search → Suggestions on Lock Screen. On that same screen, you can find a list of all your apps, so you can turn this feature off app by app.
Do Not Disturb
When you turn on Do Not Disturb (in Settings → Do Not Disturb, shown on the next page at left, or on your Control Center), the phone is quiet and dark. It doesn’t ring, chirp, vibrate, light up, or display messages. A ![]() appears on the status bar to remind you why it seems so uncharacteristically calm.
appears on the status bar to remind you why it seems so uncharacteristically calm.
Airplane mode does the same thing, but there’s a big difference: In Do Not Disturb, the phone is still online. Calls, texts, emails, and other communications continue to arrive; they just don’t draw attention to themselves.
Do Not Disturb is what you want when you’re in bed, in a meeting, in a movie, or on a date. You don’t really want to be bothered with chirps for Facebook status updates and Twitter posts, but it’s fine for the phone to collect them for the morning or your next free moment.
Over the years, Apple has made DND smarter and more flexible. Today, for example, it offers these options:
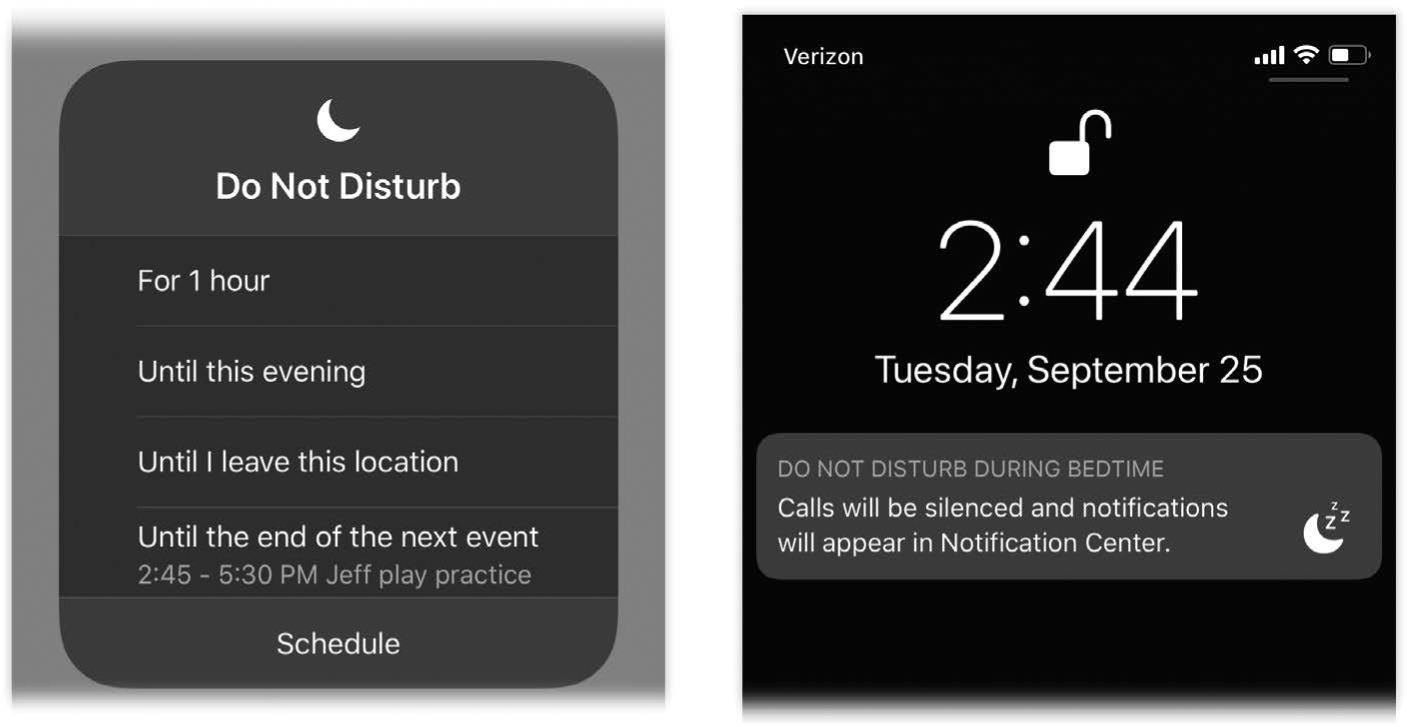
Do Not Disturb on a schedule. You can set things up so that DND turns on and off automatically on a schedule, so the phone goes dark each night at the same time you do.

Do Not Disturb auto-off. Do Not Disturb can shut itself off, returning your phone to full noisiness, according to a time interval or place—like when the movie is over, or when you leave a meeting.
Do Not Disturb at Bedtime. This feature prevents even any visual indication that notifications have arrived.
Do Not Disturb exceptions. You can designate important people whose calls and texts are allowed to get through Do Not Disturb. You know—for emergencies.
Do Not Disturb While Driving. The phone can auto-detect when you’re in a car—and prevent incoming rings and dings from distracting you.
Turning on Do Not Disturb
To turn on Do Not Disturb manually, you have three options:
Tell Siri, “Turn on Do Not Disturb.”
Open the Control Center (“Control Center”), and tap
 so that it turns blue.
Open Settings, tap Do Not Disturb, and turn on Do Not Disturb (above, left).
Do Not Disturb Auto-Off
When you turn on DND as you enter a movie or a meeting, you can tell it to turn itself off automatically when the time comes.
To see your options, long-press the ![]() on the Control Center.
on the Control Center.
A pop-up menu appears (below, left), offering to turn off DND after an hour; until later in the day or night; as you leave your current location; or—if iOS knows from your calendar that you’re at a meeting or appointment—when that appointment time slot ends.
This is really excellent. You’ll never again miss calls and texts because you forgot to turn off DND.
Scheduled Do Not Disturb
In Settings → Do Not Disturb, turn on Scheduled, and then tap the From/To block to specify starting and ending hours. (There’s no separate setting for weekends; Do Not Disturb will turn on and off for the same hours every day of the week.)
Bedtime
Once you set up a schedule, the Bedtime switch appears. It’s intended to solve a real-world problem: You wake up to pee in the middle of the night, you can’t help checking your phone, you see a bunch of notifications on the screen, and you wind up getting so sucked in that you can’t get back to sleep.
With Bedtime turned on, these exciting changes take place during your scheduled sleeping hours:
The Lock screen is solid black. No more colorful wallpaper to jangle you awake.
No notification bubbles show up at all. Instead, if you wake the screen, you see nothing but the time, date, and the little message shown on the facing page at right.
You can exit DND During Bedtime by long-pressing that bubble (or swiping to the left) and tapping Turn Off. Or just unlock your phone as usual and swipe down from the top to see your missed notifications. But you might sleep better if you resist that temptation.
Locked or Unlocked
The Silence option on the Settings → Do Not Disturb screen works like this: If you choose Always, then Do Not Disturb works exactly as described.
But if you choose Only while iPhone is locked, then the phone does ring and vibrate when you’re using it. Because, obviously, if the phone is awake, so are you. It’s a great way to ensure that you don’t miss important calls if you happened to have awakened early today and started working.
Allowing Special Callers Through
What if your child, your boss, or your elderly parent needs you urgently in the middle of the night? Turning the phone off completely, or putting it into airplane mode, would leave you unreachable in an emergency.
Fortunately, you can create wormholes through your Do Not Disturb blockade for specified callers and texters:
Allow Calls From. When you open Settings → Do Not Disturb and then tap Allow Calls From, you’re offered options like Everyone (all calls and texts come through), No One (the phone is still online, but totally silent), or Favorites, which may be the most useful option of all.
That setting permits calls and texts from anybody you’ve designated as a favorite in the Phone app (“The Favorites List”). Since those are the people you call most often, it’s fairly likely they’re the most important people in your life.
You can also create an arbitrary group of people—just your mom and sister, just your boss and kids, whatever. You have to create these address-book groups on your computer (“Groups”)—for example, in Contacts on the Mac. Once you’ve done that, their names appear on the Allow Calls From screen under Groups. You can designate any one of them as the exception to Do Not Disturb.
Emergency Bypass. This feature lets you designate any person in your Contacts list as an “It’s OK to Disturb” person. That person’s calls and texts will always go through. See the Tip in “Adding a Contact on the Fly”.
One More Safety Measure
The Do Not Disturb settings screen also offers something called Repeated Calls. If you turn this on, then if anybody tries to call you more than once within three minutes, she’ll ring through.
The idea here is that nobody would call you multiple times unless she needed to reach you urgently. You certainly wouldn’t want Do Not Disturb to block somebody who’s trying to tell you that there’s been an accident, that you’ve overslept, or that you’ve just won the lottery.
Do Not Disturb While Driving
According to the latest statistics, 100 percent of all car accidents are caused by people. Human beings are the worst drivers.
One of our chief idiocies is attempting to handle text messages and calls while we’re driving; fortunately, Apple has tried to do something about it.
If you turn on the Do Not Disturb While Driving feature, then whenever you’re driving, notifications from your apps don’t show up to distract you. Your phone remains dark and silent. (Alarms and timers still ring, and you still see and hear Maps navigation instructions. Incoming phone calls follow whatever Do Not Disturb exceptions you’ve set up as described on the previous pages.)
You can set it up so that if someone texts you, they get an auto-response like, “I’m driving. I’ll see your message when I get where I’m going.” A second text from you then says, “(I’m not receiving notifications. If this is urgent, reply ‘urgent’ to send a notification through with your original message.)”
Isn’t that smart? Now senders know that if this really is an emergency, they can send an “urgent” text. Now you’ll see that and the original text, and you can pull over to see what the issue is.
How to Turn on DND While Driving
The first time you drive with your phone, an introductory screen appears. “Your iPhone can detect when you may be driving and automatically silence your incoming alerts and notifications.” Tap the big, fat Turn On While Driving button to make sure this feature is always on when you’re behind the wheel.
If you missed that opportunity (by tapping Not Now), then here’s how you set up DND While Driving: Open Settings → Do Not Disturb → Activate. Here you have four options:
Automatically. This is by far the best option. Let Do Not Disturb turn itself on every time you’re driving. The phone will use its motion and network sensors to figure out when it’s in motion.
TIP
This setting engages DND even when you’re or in the passenger seat of a car. In that situation, wake the phone. Long-press the Do Not Disturb bubble on the Lock screen (or swipe left on it and then tap View) to view the I’m Not Driving button. Tap it to let messages through. This feature was intended to prevent you from being distracted behind the wheel, not to ruin your life.
When Connected to Car Bluetooth. If your car has Bluetooth—if, for example, you make calls and play music wirelessly through its sound system—this is a better option. It means the phone will know it’s in your car by recognizing its Bluetooth. As a bonus, you’ll still be able to make and receive phone calls through the car’s audio, using the car’s buttons.
Manually. This option means that you intend to turn DND While Driving on and off manually, using the Control Center. See “Customizing the Control Center” for instructions on adding the DND While Driving button to the Control Center.
But you know what? Don’t use this option. It’s much easier and safer to let DND While Driving switch on automatically. If you have to do it manually, you’ll forget. You’ll fall out of the habit. You won’t enjoy its life-saving safeguards.
Activate With CarPlay means you won’t be disturbed while driving in your CarPlay-equipped car.
Auto-Reply Settings
Who should receive those “I’m driving; I’ll get back to you later” text messages? That’s up to you.
Open Settings → Do Not Disturb → Auto-Reply To. Here you can choose No One (nobody gets an auto-reply), Recents, Favorites (“The Favorites List”), or All Contacts. In other words, total strangers (people not in your Contacts, whom you’ve never communicated with before) never get the auto-reply, no matter what you choose here.
You can also tap Auto-Reply on this screen to edit the actual message. You can make it say, for example, “I’m sorry, my car can’t talk right now.” Or “Your text is very important to us…”
NOTE
You can’t, however, edit the second text reply, the one that says “I’m not receiving notifications. If this is urgent, reply ‘urgent’ to send a notification through with your original message.” That one always goes out as you see it here.
Making DNDWD Mandatory
If you’re the parent of a teenager, you might wish DND While Driving weren’t quite so optional. You might wish you could require that it be turned on when your newbie driver is behind the wheel.
You can. Do Not Disturb While Driving is now one of the options in Settings → Screen Time → Content & Privacy Restrictions, which means your offspring won’t be able to turn off DNDWD without your special password (see “Content & Privacy Restrictions”).
The Today Screen (Widgets)
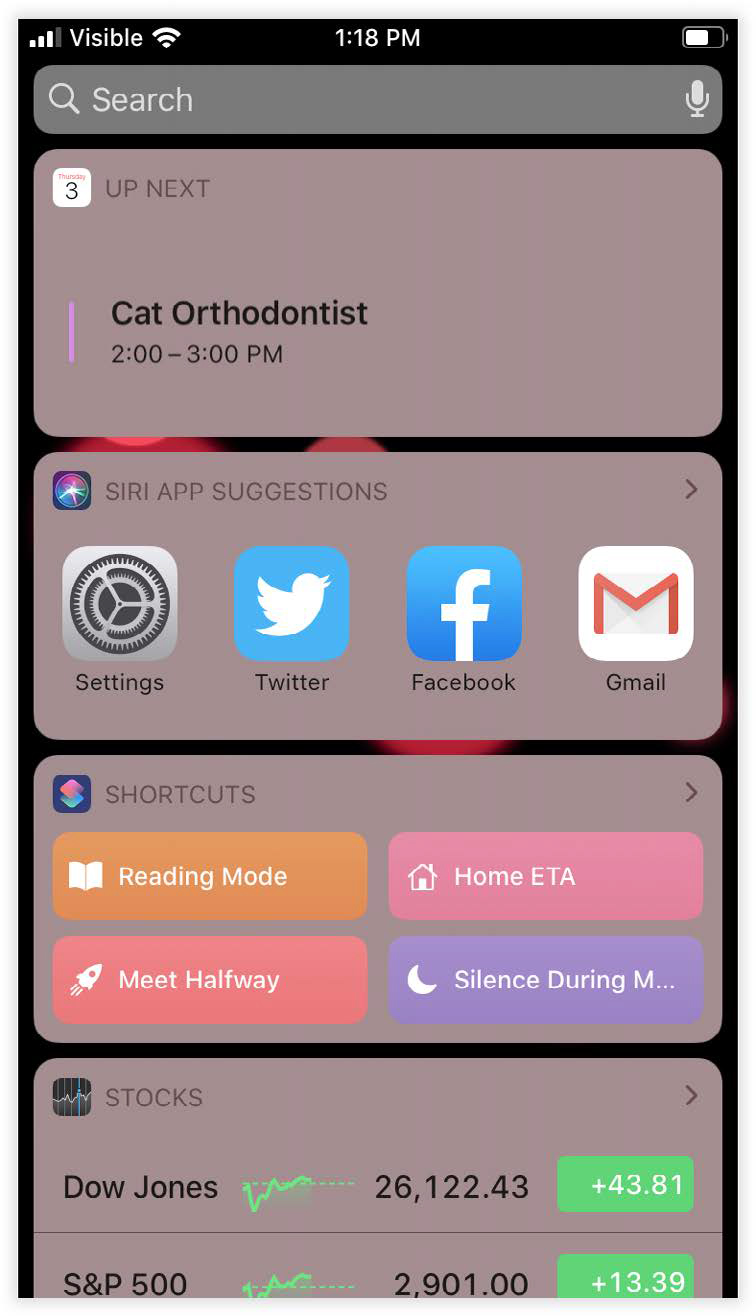
To the left of the Lock screen or the Notification Center screen, you’ll find what Apple calls the Today screen. It’s a motley assortment of panels that Apple calls widgets.
Some are quick-access buttons that launch related apps, like quick-dial (or quick-text) buttons for your favorite contacts; others are info-bits that you might want to check throughout the day, like your calendar, news, sports, stocks, and weather.
This entire wonderland is available before you’ve even unlocked the phone. Just swipe right from the Lock screen. Great when you want to check your calendar for your next thing.
It’s also available when you’ve opened the pull-down Lock screen (swipe right, above or below the notification banners), and even when you’re at the Home screen (swipe right).
Truth is, many people don’t even know the Today screen is there; even if they do, most people don’t use it. That’s partly because this feature doesn’t really become useful until you customize it: Rearrange the widgets, remove the ones you’d never touch, and install more useful ones.
The very first time you open the Today screen, you see things like the search bar (“Speak!”), Up Next, Siri App Suggestions, and News. (They’re described on these pages.) But the key to the real magic is the Edit button, which is hiding below all the widgets, several scrolls down.
The list you find here has two parts: the widgets that are currently installed and the ones that aren’t. Delete a widget by tapping its ![]() ; add one by tapping its
; add one by tapping its ![]() . Rearrange the installed ones by dragging their
. Rearrange the installed ones by dragging their ![]() handles. When you’re finished, tap Done.
handles. When you’re finished, tap Done.
So what widgets are available? Here’s a rundown:
Up Next. The next couple of things on your calendar. Tap to log in and open the Calendar app, which shows you details of the event.
Siri App Suggestions. This little row of app icons actually has nothing to do with Siri, the voice-controlled assistant. Instead, these are the iPhone’s suggestions of apps you may want to use right now, based on your location, the time of day, and your typical routine. For example, if you open the Music app every evening during your 6:30 p.m. gym workout, then the Music app appears at that time, ready to open. If you check your Fitbit app every morning when you wake, then this screen offers its icon at that time of day. The idea is to save you from having to hunt for these apps when you need them again.
If you find these icons unhelpful, you can turn off this widget. You can also prevent certain apps’ icons from appearing here. Open Settings → Siri & Search. Here, if you scroll down, you’ll find the names of all apps that might be inclined to appear as a Siri App Suggestion; you can tap them to turn them off, one at a time.
News. Headlines from the News app (“The Level”).
Weather. You guessed it.
Maps Destinations. If you use Apple’s Maps app, and routinely enter the addresses of your appointments on the Calendar, here’s the payoff: a list of upcoming and predicted destinations, including your next calendar appointment and where you parked your car (“Night Mode”).
Stocks. The latest on whatever stocks you follow (“Stocks”).
Tips. This is the closest Apple comes to offering a manual for iOS 13.
Screen Time. This one’s a color-coded time-o-meter, showing how many minutes and hours you’ve sucked away using your phone—and what you’ve been doing. It’s a reflection of the Screen Time app described in “Screen Time”.
Calendar. Today’s agenda. Tap an appointment to unlock your phone and see its details screen.
Favorites. This is your speed-dial list. The first four people you’ve designated as favorites appear here, for quick speed-dialing.
But it’s not just about phone calls—who does that anymore? You can also designate a texting or email address, Skype handle, or other communication address as a favorite (“The Favorites List”). Which means that, using this widget, you can insta-text your spouse or your kid without having to open the app, access the address book, choose the person’s name, and so on. Shortcuts, baby!
Files. Here are the most recent files you’ve moved to or from your iCloud Drive (“Files”).
Find Friends. This widget shows a map that pinpoints the location of any loved ones you’re tracking (“Favorites Folders”).
Mail. A speed-dial list of the people you’ve designated as VIPs (“Filters”), for quick emailing.
Maps Nearby. These icons are shortcuts for time-appropriate searches, like coffee in the morning or nightlife after dark.
Maps Transit. If you use Maps’ public-transportation feature, this widget lets you know about delays and service interruptions.
Music. Playback controls for whatever you were playing last.
Notes. You see the first couple of lines of the Notes page you most recently edited.
Photos. Thumbnails that, after you unlock the phone, open Memories (automated slideshows of recent time periods).
Podcasts. Here are the icons for podcasts you’ve been listening to. It’s a quick way to jump back in without fumbling through the app.
Reminders. Your unfinished to-dos. You can mark one as done here, without having to unlock the phone and open the app. That’s a big deal.
TV. Shows any shows you’ve been watching in the TV app (“More in “More””).
You probably have many other widgets, too, installed by your apps. Waze, Yelp, The New York Times, NPR, Google Maps, Kindle, Evernote, Dropbox, Chrome, Amazon, and many other apps put widgets here for your quick-glancing pleasure.
TIP
Many widgets are expandable. If you see a Show More button on a widget, it means a larger area, showing more information, is available to you. For example, expanding the Favorites widget shows icons for eight speed-dial people instead of four; expanding the Notes widget shows the three notes you’ve most recently viewed instead of one; and so on.
Widgets on the Home Screen
You don’t have to swipe onto the Today screen to view a widget you need right now. You can long-press (“Edge Swipes”) an app’s Home screen icon to view not just its shortcut menu but also its widget, for quick consultation. (This pop-up panel also includes a tiny Add Widget button, should you decide to install it on the Widgets screen.)
In Case of Emergency
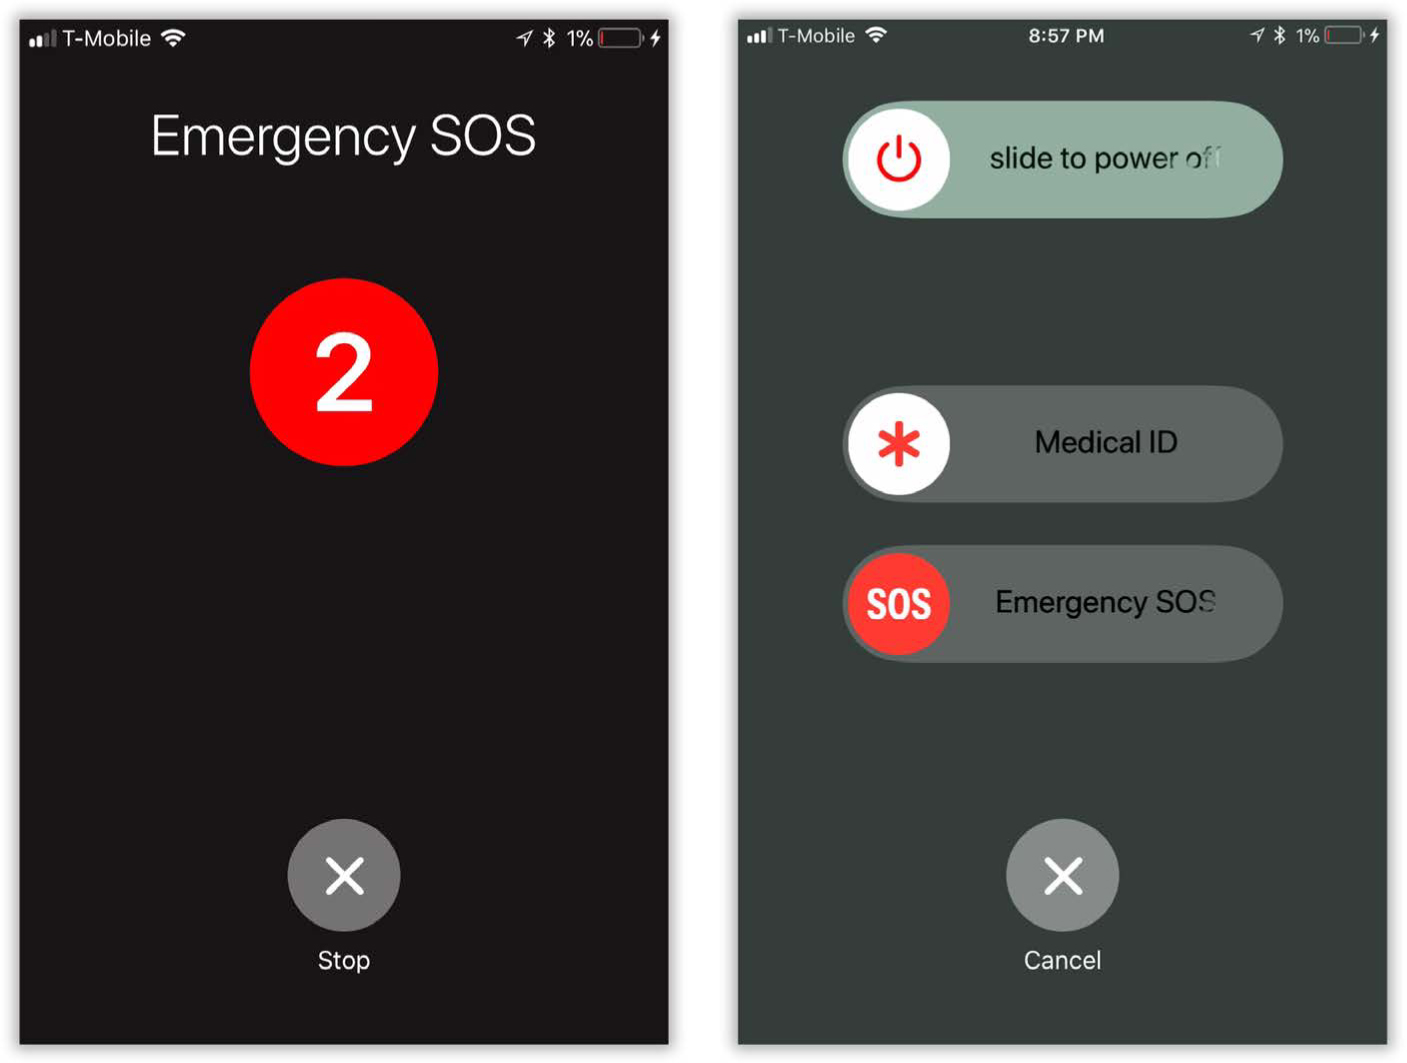
Apple has turned the iPhone into an ingenious, smart emergency beacon. When you’re in trouble—you’re being followed, you’re being attacked, you’ve fallen and you can’t get up—the phone can automatically dial both 911 and send text messages to specified loved ones, letting them know you have an emergency and including your location. (If you move, they get additional texts letting them know where.)
When you need help, trigger the automatic emergency call like this:
iPhone 7 and earlier. Click the side button five times fast. Drag the Emergency SOS slider on the resulting Shut Down screen.
iPhone 8 and later. Hold in the side button and either volume button for two seconds. Drag the Emergency SOS slider on the Shut Down screen.
TIP
In Settings → Emergency SOS, you’ll find a fascinating option for your newer phone called Call with Side Button. If you turn it on, then pressing the side button five times rapidly also works to trigger the emergency dialing, just as it does on older iPhones. In times of danger, this method may be faster than pressing and waiting.
In all cases, a big red five-second countdown starts. At 3, a whooping audio alarm begins. At zero, the phone dials 911. (This countdown is designed to give you a chance to change your mind.)
Then, after a 10-second countdown, the phone texts your designated contacts, accompanied by a little map. “Emergency SOS,” it says. “[Your name] has made an emergency call from this approximate location. You are receiving this message because [your name] has listed you as an emergency contact.”
TIP
If you have a newer iPhone, you have a sneakier method of triggering this feature: Just keep pressing the side and volume keys. If you press those buttons long enough, the whole thing is automatic, even if you can’t see the big red countdown on the screen. After five seconds, the whooping alarm starts; two seconds later, the phone dials 911.
The advantage of this method, of course, is that you can do it entirely in your pocket. You don’t have to be looking at your phone, which might be useful when an unpleasant human is staring you in the face.
To set this up, open Settings → Emergency SOS. Here you can:
Turn off “Call with Side Button.” That’s the five-click side-button trick.
Turn off Auto Call. That’s the part that dials 911 automatically when the countdown ends. If you’re worried about that, turn it off. In this case, there’s no countdown, alarm, or auto-dialing. You must swipe your finger across an Emergency SOS slider to place the call, and the call goes to the nearest police office line (not 911).
Set Up Emergency Contacts in Health. Tap this, then Create Medical ID, and then add emergency contact to specify who gets called when you trigger the Emergency SOS feature.
Countdown Sound. Lets you turn off the whooping alarm (available only if Auto Call is turned on). On one hand, you no longer have an audible alert that your phone is about to call 911—if, for example, you triggered Emergency SOS accidentally. On the other hand, there’s no alarm sound to warn a bad guy that you’re calling.
Medical ID on the Shutdown Screen
It’s worth noticing that on the Emergency SOS screen (previous page, right), you get more than the Emergency SOS slider; you also get a Medical ID slider.
Swipe to open a screenful of essential medical information about you. And where does the Medical ID screen get this information? You’ve filled it out in the Health app (“Me”).
Note that both of these features are available even if the phone is locked. Anyone can bring up this screen on any iPhone in the world—click the side button five times fast (iPhone 7 and earlier), or press the side button and volume button together for three seconds (iPhone 8 and later). You can get help on the way, even if it’s not your phone.
The “Forcible Unlock” Situation
When the public first heard about Face ID, there was panic. “Oh, great,” people said. “So now a mugger can force me to unlock the phone by holding it up to my face!” (There were also variants: “So now a cop can force me to unlock the phone by holding it up to my face!”)
Apple has you covered. If anyone demands your phone under threat, bring up the shutdown screen described above (five clicks, or side button + volume key). What your antagonist probably doesn’t realize is that when that screen appears, Touch ID and Face ID are turned off. Neither your face nor your fingerprint will unlock the phone at this point—only the passcode will work.
Of course, the mugger or rogue officer could still try to force you to enter your passcode—but now you’ve got bigger problems.