Chapter 8: How Can I Get More Out of Audio Features on My iPhone?

Although the eye candy of the gorgeous screen garners the lion’s share of kudos and huzzahs, your iPhone offers quite a bit of ear candy as well. With numerous audio accessories available, and with the built-in Music and iTunes apps, your iPhone packs a real audio punch. This chapter takes you on a tour of these audio features and shows you how to get the most out of them to maximize your listening pleasure.
Getting More Out of the Music App
Getting More Out of the Music App
Your iPhone is a full-fledged digital music player thanks to its built-in Music app, which you can fire up any time you want by tapping the Music icon in the Home screen’s Dock. In the next few sections, you learn a few useful techniques that help you get more out of the Music app.
Navigating the Music app
The most recent incarnation of the Music app incorporate features of the Apple Music service which, after a free trial, will set you back $9.99 per month for an individual, or $14.99 per month for a family. If you’re just interested in listening to the music on your phone, then you might find the configuration of the new app confusing (I know I did). Here are the basic steps to follow to navigate the app:
- In the iPhone Dock, tap Music to launch the app.
- Tap My Music in the menu bar at the bottom of the screen. This shows you the music that’s on your iPhone.
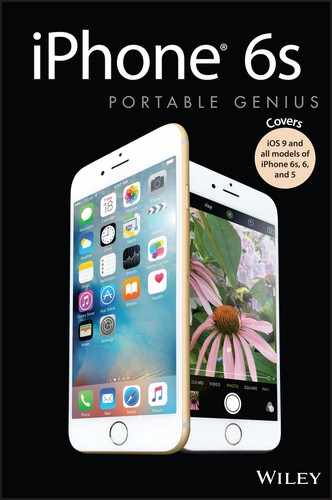
- Tap the Category list, which appears about a third of the way down the screen and has Artists selected by default. You see a list of all the categories you can use, as shown in Figure 8.1.
- Tap the category you want to use.
- To play, create, or edit playlists, tap Playlists in the menu bar. See “Working with Playlists,” later in this chapter.
- To listen to online radio stations curated by Apple, tap Radio in the menu bar and then sign in with your Apple ID, if prompted.
- To follow bands, singers, and other music artists, tap Connect in the menu bar and then sign in with your Apple ID, if prompted.
8.1 The categories available in the My Music section of the Music app.
Controlling music with Siri voice commands
If you’re using your iPhone in a hands-free environment, you can still control your music by using the handy Siri app, which recognizes a number of music-related voice commands. To get started, tap and hold the Home button (or press and hold the mic button of the iPhone headset, or the equivalent button on a Bluetooth headset) until the Siri screen appears.
The most basic music voice commands mimic the on-screen controls you see when you play a song. That is, while a song is playing, you can speak any of the following commands to control the playback:
- “Pause.”
- “Play.”
- “Next track (or next song).”
- “Previous track (or previous song).”
In each case, your iPhone repeats the command back to you so you know whether it heard you correctly. You can also get more sophisticated by speaking commands that use roughly the following format:
Verb object subject.
Here, verb is the action you want the Music app to take, which will most often be play; object is the type of item you want to work with, such as a song, album, or playlist; and subject is the particular item you want included in the action, such as the name of a song, album, playlist, or artist. Here are a few examples:
- “Play songs by the Submarines.”
- “Play album Blue Horse.”
- “Play some blues.”
- “Play playlist My Top Rated.”
Again, Siri confirms the command by saying it back to you (for example, “Playing songs by the Submarines”).
Here are a few more voice commands to play with:
- “Shuffle.” Activates the Music app’s Shuffle mode.
- “Shuffle playlist.” Plays the specified playlist in Shuffle mode.
- “Skip.” Skips to the next track.
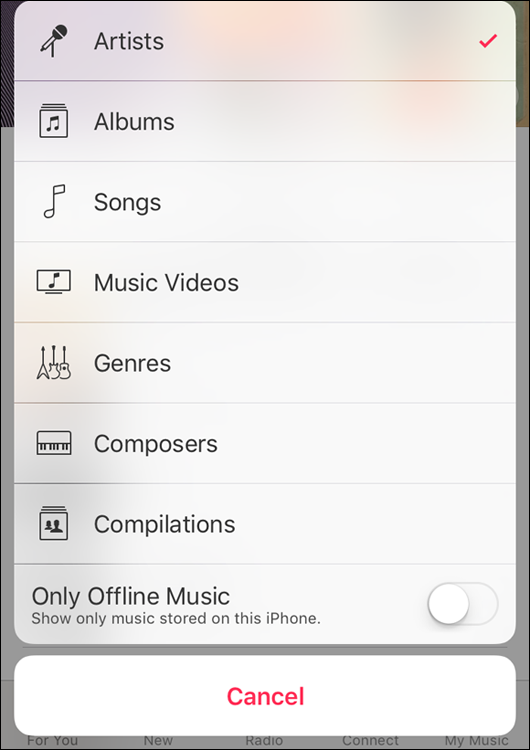
- “What song is this?” Tells you the name of the current song and artist. Siri responds, “Naming that tune,” and then identifies the song, as shown in Figure 8.2.
8.2 Ask Siri “What song is this?” and most of the time you get the name of the song, the artist, and the album.
Answering an incoming call while listening to music on the headset
If you’re listening to music on your iPhone and a call comes in, you obviously don’t want the caller to be subjected to Tame Impala at top volume. Fortunately, your iPhone smartphone is smart enough to know this, and it automatically pauses the music. If you have your iPhone headset on when the call arrives, use the following techniques to deal with it:
- Answer the call. Press and release the headset mic button (it’s the plastic button on one of the headset cords).
- Decline the call (send it directly to voicemail). Press and hold the mic button for about two seconds, and then release. If you hear a couple of beeps, you successfully declined the call.
- End the call. Press and release the mic button.
Using AirPlay to stream iPhone audio
If you have an Apple TV that supports AirPlay, you can use AirPlay to stream audio from your iPhone to your TV or other audio device. Here’s how it works:
- Make sure your Apple TV is turned on.
- On your iPhone, start the audio you want to stream.
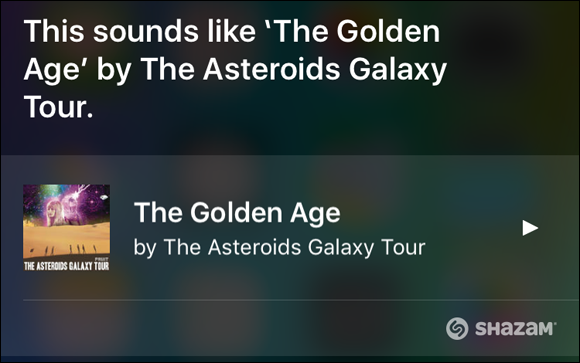
- Swipe up from the bottom of the screen to open the Control Center, and then tap AirPlay. The Music app displays a menu of output choices, as shown in Figure 8.3.
- Tap the name of your Apple TV device. Your iPhone streams the video to that device and, hence, to your TV or receiver.
8.3 Tap the AirPlay button in the Control Center to stream the audio to your Apple TV.
Getting More Out of the iTunes Store App
If you have a fast Wi-Fi connection going (an LTE or 3G cellular connection will do in a pinch), you can use your iPhone to purchase music directly from the iTunes Store. To get there, tap the iTunes Store icon in the Home screen.
Creating a custom iTunes Store menu bar
Just like the Music app, the iTunes Store also presents you with a series of browse buttons, each one of which represents a section or feature of the mobile version of the iTunes Store. For example, tapping the Search browse button enables you to search for artists, albums, songs, and more.
You see four browse buttons in the default menu bar: Music, Movies, TV Shows, and Search. A fifth button called More displays a list of five more browse buttons. Here’s a summary of all nine:
- Music. Enables you to browse and purchase music on the iTunes Store using the Genres, Featured, and Charts tabs.
- Movies. Enables you to browse movie content on the iTunes Store and then buy or rent movies to watch on your iPhone.
- TV Shows. Enables you to browse TV series content on the iTunes Store and then buy episodes to watch on your iPhone.
- Search. Enables you to search the iTunes Store.
- Tones. Enables you to browse ringtones on the iTunes Store using the New Releases, Top Tens, and Genres tabs.
- Genius. Displays Genius-generated lists of music, movies, and TV shows based on your current content in these categories.
- Purchased. Displays a list of songs that you have purchased from the iTunes Store.
- Downloads. Lists the current downloads in progress. This button appears only while content is downloading from the iTunes Store.
If there’s a browse button on the More list that you use all the time, you can move it to the menu bar for easier access. Here’s how:
- On the Home screen, tap iTunes to open the iTunes app.
- Tap More in the menu bar.
- Tap Edit. Your iPhone displays the Configure screen, which lists all the browse buttons.
- Drag a browse button that you want to add to the menu bar and drop it on whatever existing menu bar browse button you want it to replace. For example, if you want to replace the TV Shows browse button with Purchased, drag the Purchased button and drop it on TV Shows. Your iPhone replaces the old browse button with the new one.
- Repeat Step 4 to add any of your other preferred browse buttons to the menu bar.
- Tap Done to save the new menu bar configuration.
Redeeming an iTunes gift card
If you’ve been lucky enough to receive an iTunes gift card or gift certificate for your birthday or some other special occasion (or just for the heck of it), you’d normally use the iTunes Store on your computer to redeem it. However, if you’re not at your computer and the gift card is burning a hole in your pocket, don’t fret: You can redeem the gift card right on your iPhone. Here’s how:
- Sign in to the iTunes Store on your iPhone. You do this by tapping Settings, tapping iTunes & App Store, tapping Sign In, typing your iTunes Store username and password, and then tapping Sign In.
- On the Home screen, tap iTunes Store. The iTunes Store screen appears.
- Tap any content-related browse button in the menu bar, such as Music, Movies, or TV Shows.
- Scroll to the bottom of the screen and then tap Redeem. You might need to type your iTunes password at this point. iTunes displays the Redeem screen.
- To use the iPhone camera to enter the redeem code, tap Use Camera, and then align the white box on-screen with the box containing the redeem code. Otherwise, tap You Can Also Enter Your Code Manually and then type the code from the gift card or gift certificate.
- Tap Redeem. iTunes redeems the gift card and adds the amount to your iTunes Store credit.
Creating a Custom Ringtone
Your iPhone comes stocked with a few dozen predefined ringtones. Although some of them are amazingly annoying, you ought to be able to find one you can live with. If you can’t, or if you crave something unique, you can create a custom ringtone and use that.
In earlier versions of iTunes, the easiest way to cobble together a custom ringtone was to convert a song you purchased through the iTunes Store. Unfortunately, that feature was removed in iTunes 10. You can always purchase ringtones in the iTunes Store, but there are still a couple of techniques you can use to create a custom (and free!) ringtone, as the next couple of sections show.
Using iTunes to create a custom ringtone
The old Create Ringtone command may be gone from iTunes, but that application still comes with features that enable you to create a custom ringtone. Here’s how it works:
- In iTunes, play the track you want to use. While the track is playing, watch the playback time and note the start time and end time of the portion of the track you want to use as your ringtone.
- Choose File ⇒ Get Info, or press
 +I. The track’s Info dialog appears.
 - Click the Options tab.
- Use the Start Time and Stop Time text boxes to type the starting and ending points for your ringtone snippet (see Figure 8.4), and then click OK.
- With the track still selected, choose File ⇒ Create New Version ⇒ Create AAC Version. iTunes creates a version of the track that includes only the snippet you specified in Step 4.
- Click the new version of the track, then choose File ⇒ Show in Finder, or press Shift++R. A new Finder window appears with the short version of the track selected.
- Press Return to open the filename for editing, change the extension from m4a to m4r, and then press Return. The m4r extension designates the file as a ringtone. OS X asks you to confirm the extension change.
- Click Use .m4r. OS X converts the file to a ringtone.
- In iTunes, make sure the short version of the track is selected, and then choose Edit ⇒ Delete. iTunes asks you to confirm.
- Click Delete Song. iTunes asks if you want to move the file to the Trash.
- Click Keep File.
- Return to the Finder window that contains the ringtone, and then double-click the file. iTunes plays the ringtone, but more importantly, it adds the file to the Tones section of the library.
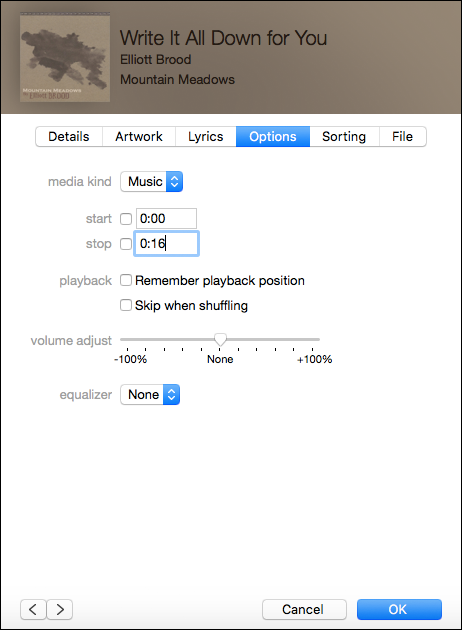
8.4 Use the Options tab to set the start and end points of the ringtone snippet.
Using GarageBand to create a custom ringtone
The technique I showed you in the previous section is easy, for sure, but it’s a bit convoluted. So let’s look at a second, more straightforward method that uses GarageBand, the Apple application for making homebrew music.
First, here are the steps to follow to create a ringtone out of any song in your iTunes library:
- Click the GarageBand icon in the Dock to launch the program, click Ringtone, click Choose. GarageBand starts a new project for you.
- Switch to iTunes, click the song you want to use for your ringtone, and then choose File ⇒ Show in Finder, or press Shift++R. OS X displays the song’s file in a Finder window.
- Click and drag the file and drop it inside GarageBand. Note that you need to drop the song inside the box that includes the message “Drag Apple loops here.” The program creates a new track for the song.
- If needed, drag the song to the left so that the beginning of the song lines up on the left edge of the box.
- Click and drag the Cycle Range to the approximate area of the song you want to use for the ringtone. The Cycle Range, pointed out in Figure 8.5, defines the portion of the song that you would use for a ringtone. If you don’t see the Cycle Range tool, click the Cycle Range button pointed out in Figure 8.5.
- Click and drag the left edge of the Cycle Range to define the starting point of the ringtone. By default, the left edge of the Cycle Range starts at 0:00.
- Click and drag the right edge of the Cycle Range to define the ending point of the ringtone. By default, the right edge of the Cycle Range starts at 0:20.
- Click Play to play back the ringtone.
- If your start and end points aren’t quite right, repeat Steps 6 to 8 until your ringtone is set.
- Choose Share ⇒ Send Ringtone to iTunes. GarageBand converts the track to a ringtone, and then adds it to the Tones category in iTunes.

8.5 Use the Cycle Range to define what part of the song you want to use for the ringtone.
Syncing ringtones
The next time you sync your iPhone through iTunes, follow these steps to include one or more custom ringtones in the sync:
- Click your iPhone in the iTunes Devices list.
- Click the Tones tab.
- Select the Sync Tones check box.
- Select the Selected tones option.
- Select the check box beside each custom ringtone you want to use on your iPhone.
- Click Apply.
To use the custom ringtone on your iPhone, tap Settings in the Home screen, tap Sounds, and tap Ringtone. Your ringtones appear at the top of the Ringtone list. Tap a custom ringtone to use the snippet as your ringtone.
Working with Playlists
Although you can purchase and download songs directly from the iTunes Store on your iPhone, I’m going to assume that the vast majority of your music library is cooped up on your Mac or PC, and that you’re going to want to transfer that music to your iPhone. Or perhaps I should say that you’re going to want to transfer some of that music to the iPhone. Most of us now have multigigabyte music collections and, depending on the storage capacity of your iPhone and the amount of other content you’ve stuffed into it (particularly videos and movies), it’s likely that you want to copy only a subset of your music library.
If that’s the case, iTunes gives you three choices when it comes to selecting what tunes to transfer: artist, genre, and playlists. The first two are self-explanatory, but it’s the last of these three where you can take control of syncing music to your iPhone.
A playlist is a collection of songs that are related in some way, and using your iTunes library, you can create customized playlists that include only the songs that you want to hear. For example, you might want to create a playlist of upbeat or festive songs to play during a party or celebration. Similarly, you might want to create a playlist of your current favorite songs.
Playlists are the perfect way to control music syncing for the iPhone, so before you start transferring tunes, consider creating a playlist or three in iTunes.
Creating a favorite tunes playlist for your iPhone
Your iTunes library includes a Rating field that enables you to supply a rating for your tracks: one star for songs you don’t like so much, up to five stars for your favorite tunes. You click the song you want to rate, and then click a dot in the Rating column (click the first dot for a one-star rating, the second dot for a two-star rating, and so on). Rating songs is useful because it enables you to organize your music. For example, the Playlists section features a My Top Rated playlist that includes all your four- and five-star-rated tunes, ordered by the Rating value.
Rating tracks comes in particularly handy when deciding what music to use to populate your iPhone. If you have tens of gigabytes of tunes, only some of them will fit on your iPhone. How do you choose? One possibility would be to rate your songs, and then just sync the My Top Rated playlist to your iPhone.
The problem with the My Top Rated playlist is that it includes only your four- and five-star-rated tunes. You can fit thousands of tracks on your iPhone, but it’s unlikely that you’ve got thousands of songs rated at four stars or better. To fill out your playlist, you should also include songs rated at three stars, a rating that should include a lot of good, solid tunes.
To set this up, you have two choices:
- Modify the My Top Rated playlist. In iTunes, click Playlists, right-click the My Top Rated playlist, and then click Edit Smart Playlist. In the Smart Playlist dialog, click the second star, and then click OK.
- Create a new playlist. This is the way to go if you want to leave My Top Rated as your best music. In iTunes, choose File ⇒ New ⇒ Smart Playlist to open the Smart Playlist dialog. Choose Rating in the Field list, choose Is Greater Than in the Operator list, and then click the second star. Figure 8.6 shows the configured dialog. Click OK, type a title for the playlist (such as Favorite Tunes), and then press Return (or Enter).

8.6 Use the Smart Playlist dialog to create a playlist that contains your tracks rated at three stars or more.
The next time you sync your iPhone, be sure to include either the My Top Rated playlist or the Smart Playlist you created.
Creating a playlist on your iPhone
The playlists on your iPhone are those you’ve synced via iTunes, and those playlists are either generated automatically by iTunes or they’re ones you’ve cobbled together yourself. However, when you’re out in the world and listening to music, you might come up with an idea for a different collection of songs. It might be girl groups, boy bands, or songs with animals in the title.
Whatever your inspiration, don’t do it the hard way by picking out and listening to each song one at a time. Instead, you can use your iPhone to create a playlist on the fly.
To create a playlist using the Music app, follow these steps:
- Open the Music app.
- Tap the Playlists browse button. If you’re signed in to Apple Music, tap the My Music browse button, instead, and then tap the Playlists tab. This displays your playlists.
- Tap New. The Music app displays the New Playlist screen.
- Type the name of your playlist. You can also type an optional description of the playlist.
- Tap Add Songs to open the Add Music screen.
- Tap Songs (or whatever category you prefer) and then tap each song you want to add to your list.
- When you’ve added all the songs you want, tap Done. The Music app displays the playlist.
- Tap Done. The Music app returns to the Playlists screen.
Your playlist isn’t set in stone by any means. You can get rid of songs, change the song order, and add more songs. Follow these steps:
- In the Music app, tap the Playlists browse button to see your playlists.
- Tap your playlist. The Music app displays the playlist settings and music.
- Tap Edit. This changes the list to the editable version, as shown in Figure 8.7.
- To remove a song, tap the red Minus (–) button to the left of the song. Then, tap the Delete button that appears. If you change your mind, tap the red minus button again to cancel the deletion.
- To move a song within the playlist, slide the song’s Drag button (it’s on the right) up or down to the position you prefer.
- To add more tracks, tap Add Songs, tap a category, and then tap each song you want to add.
- When you finish editing, tap Done. This sets the playlist.

8.7 A playlist in Edit mode.
Customizing Your Audio Settings
Audiophiles in the crowd don’t get much to fiddle with in the iPhone, but there are a few audio settings to play with. Here’s how to get at them:
- Press the Home button to get to the Home screen.
- Tap the Settings icon. The Settings app opens.
- Tap the Music icon. Your iPhone displays the Music settings screen.
You get nine settings to try:
- Show Apple Music. This switch toggles the Music app’s Apple Music features on and off.
- Use Cellular Data. If you tap this setting to On, Music will play iCloud tracks and download music even when you’re using a cellular connection. If you’d rather not have your music eating up your data plan, leave this switch Off.
- Sort Albums. Tap this setting and then tap a sort order for the Albums browse button: By Artist or By Title.
- Genius. If you tap this switch to On, you enable the Genius feature, which you can use to listen to music that’s similar to a particular song. To set this up, display the album that contains the song, tap the song’s More button (the three dots to the right of the song), and then tap Create Genius Playlist.
- iCloud Music Library. When this setting is On, Music shows not only the albums and songs that you’ve purchased on or synced to your iPhone, but also those tunes that are associated with your iCloud account that currently reside in the cloud. These albums and songs display a cloud icon with a downward pointing arrow, and you tap that icon to download the music to your iPhone. If you want to see only the music that is physically on your iPhone, tap this setting to Off.
- iTunes Match. If you have an iCloud account and you’ve shelled out the extra $24.99 per year for the iTunes Match service, tap this switch to On to activate iTunes Match on your iPhone. This means that any songs that you own that aren’t available via the iTunes Store will be automatically synced to your iPhone as soon as you upload those songs to iCloud.
- EQ. This setting controls the built-in equalizer in your iPhone, which is actually a long list of preset frequency levels that affect the audio output. Each preset is designed for a specific type of audio: vocals, talk radio, classical music, rock, hip-hop, and a lot more. To set the equalizer, tap EQ and then tap the preset you want to use (or tap None to turn off the equalizer).
- Volume Limit. You use this setting to prevent the iPhone volume from being turned up too high and damaging your (or someone else’s) hearing. You know, of course, that pumping up the volume while you have your EarPods on is an audio no-no, right? I thought so. However, I also know that when a great tune comes on, it’s often a little too tempting to go for 11 on the volume scale. If you can’t resist the temptation, use Volume Limit to limit the damage. Tap Volume Limit and then drag the Volume slider to the maximum allowed volume.
- Sound Check. Every track is recorded at different audio levels, so invariably you get some tracks that are louder than others. With the Sound Check feature, you can set your iPhone to play all your songs at the same level. This feature affects only the baseline level of the music and doesn’t change any of the other levels, so you still get the highs and lows. If you use it, you don’t need to worry about having to quickly turn down the volume when a really loud song comes on. To turn on Sound Check, in the Music settings page, tap the Sound Check switch to On.