
Chapter 14: How Do I Fix My iPhone?

The good news about iPhone problems — whether they’re problems with iPhone software or with the actual iPhone — is that they’re relatively rare. On the hardware side, although the iPhone is a sophisticated device that’s really a small computer (not just a fancy phone), it’s far less complex than a full-blown computer, and so much less likely to go south on you. On the software side (and to a lesser extent on the accessories side), app developers (and accessory manufacturers) only have to build their products to work with a single device made by a single company. This really simplifies things, and the result is fewer problems. Not, however, zero problems. Even the iPhone sometimes behaves strangely or not at all. This chapter gives you some general troubleshooting techniques for iPhone woes and also tackles a few specific problems.
General Techniques for Troubleshooting Your iPhone
General Techniques for Troubleshooting Your iPhone
If your iPhone is behaving oddly or erratically, it’s possible that a specific component inside the phone is the cause. In that case, you don’t have much choice but to ship your iPhone back to Apple for repairs. Fortunately, however, most glitches are temporary and can often be fixed by using one or more of the following techniques:
- Restart your iPhone. By far the most common solution to an iPhone problem is to shut it down and then restart it. By rebooting the iPhone, you reload the entire system, which is often enough to solve many problems. You restart your iPhone by pressing and holding the Sleep/Wake button for a few seconds until you see the Slide to Power Off screen (at which point you can release the button). Drag the Slide to Power Off slider to the right to start the shutdown. When the screen goes completely black, your iPhone is off. To restart, press and hold the Sleep/Wake button until you see the Apple logo and then release the button.
- Reboot your iPhone hardware. When you restart your iPhone by pressing and holding Sleep/Wake for a while, what you’re really doing is rebooting the system software. If that still doesn’t solve the problem, you might need to reboot the iPhone hardware as well. To do that, press and hold down the Sleep/Wake and Home buttons. Keep them pressed until you see the Apple logo (it takes about 8 seconds or so), which indicates a successful restart.
- Recharge your iPhone. It’s possible that your iPhone just has a battery that’s completely discharged. Connect your iPhone to your computer or to the dock. If it powers up and you see the battery logo (this might take a minute or two), then it’s charging just fine and will be back on its feet in a while.
- Shut down a stuck app. If your iPhone is frozen because an app has gone haywire, you can usually get it back in the saddle by forcing the app to quit. Press and hold the Sleep/Wake button until you see the Slide to Power Off screen; then press and hold the Home button for about 6 seconds. Your iPhone shuts down the app and returns you to the Home screen. If an app is frozen but your iPhone still works fine otherwise, double-press the Home button to display the multitasking bar, scroll right or left as needed to bring the app’s thumbnail screen into view, then drag the app thumbnail up to the top of the screen. Your iPhone sends the thumbnail off the screen and shuts down the app.
- Check for iPhone software updates. If Apple knows about the problem you’re having, it will fix it and then make the patch available in a software update. I tell you how to update your iPhone a bit later in this chapter.
- Check for app updates. It’s possible that a bug in an app is causing your woes, so you can often solve such problems by updating the app. Fortunately, app updates are automatic in iOS (since version 7), so this should never be much of a problem. To confirm that your apps are updating automatically, open Settings, tap iTunes & App Store, and make sure the Updates switch is On.
- Erase and restore your content and settings. This may seem like drastic advice, but it’s possible to use iTunes to perform a complete backup of everything on your iPhone. You can then reset the iPhone to its original, pristine state, and then restore the backup. I show you how to back up your iPhone in Chapter 2, and I explain the rather lengthy restore process later in this chapter.
- Reset your settings. Sometimes your iPhone goes down for the count because its settings have become corrupted. In that case, you can fix the problem by restoring the iPhone to its original settings. If iTunes doesn’t recognize your iPhone, then the restore option is out. However, you can still reset the settings on the iPhone. Tap Settings in the Home screen, tap General, tap Reset, and then tap Reset All Settings. When your iPhone asks you to confirm, tap Reset All Settings.
Troubleshooting connected devices
There are only a few ways that you can connect devices to your iPhone: using the headset jack, the Lightning connector, or Bluetooth. Although the number of devices you can connect is relatively limited, that doesn’t mean you might never have problems with those devices.
If you’re having trouble with a device attached to your iPhone, the good news is that a fair chunk of those problems have a relatively limited set of causes. You may be able to get the device back on its feet by attempting a few tried-and-true remedies. If it’s not immediately obvious what the problem is, then your hardware troubleshooting routine should always start with these very basic techniques:
- Check connections, power switches, and so on. Some of the most common (and most embarrassing) causes of hardware problems are the simple physical things, so make sure that a device is turned on and check that cable connections are secure. For example, if you can’t access the Internet through the Wi-Fi connection on your iPhone, make sure your network’s router is turned on. Also make sure that the cable between your router and the ISP’s modem is properly connected.
- Replace the batteries. Wireless devices such as headsets really chew through batteries, so if such a device is working intermittently (or not at all), always try replacing the batteries to see if that solves the problem.
- Turn the device off and then on again. You power cycle a device by turning it off, waiting a few seconds for its innards to stop spinning, and then turning it back on. You’d be amazed how often this simple procedure can get a device back up and running. For a device that doesn’t have an On/Off switch, try either unplugging it from the power outlet or removing and replacing the batteries.
- Reset the device’s default settings. If you can configure a device, then perhaps some new setting is causing the problem. If you recently made a change, try returning the setting back to its original value. If that doesn’t do the trick, most configurable devices have some kind of Restore Default Settings option that enables you to quickly return them to their factory settings.
- Upgrade the device’s firmware. Some devices come with firmware — a small program that runs inside the device and controls its internal functions. For example, all routers have firmware. Check with the manufacturer to see if a new version exists. If it does, download the new version and then see the device’s manual to learn how to upgrade the firmware.
Updating software
The iPhone software should check for available updates from time to time when you connect it to your computer, provided the computer has an Internet connection. This is another good reason to sync your iPhone regularly. The problem is, you might hear about an important update that adds a feature you’re really looking forward to or perhaps fixes a gaping security hole. What do you do if iTunes isn’t scheduled to check for an update for a few days? In that case, you take matters into your own hands and check for updates yourself.
You can check for updates right on your iPhone by following these steps:
- On the Home screen, tap Settings. The Settings app appears.
- Tap General. Your iPhone displays the General options screen.
- Tap Software Update. Your iPhone begins checking for available updates. If you see the message “Your software is up to date,” then you can move on to bigger and better things.
- If an update is available, tap Download and Install. Your iPhone downloads the update and then proceeds with the installation, which takes a few minutes.
Here’s the iTunes route:
- Connect your iPhone to your computer. iTunes opens and connects to your iPhone.
- Click your iPhone in the Devices list.
- Click the Summary tab.
- Click Check for Update. iTunes connects to the Apple servers to see if any iPhone updates are available. If an update exists, you see the iPhone Software Update dialog, which offers a description of the update.
- Click Next. iTunes displays the Software License Agreement.
- Click Agree. iTunes downloads the software update and installs it.
Restoring data and settings
Sometimes your iPhone goes down for the count because its settings have become corrupted. In that case, you can attempt to fix the problem by restoring iPhone to its original settings. The best way to go about this is to use the Restore feature in iTunes because that enables you to make a backup of your settings. However, it does mean that your iPhone must be able to connect to your computer and be visible in iTunes.
If that’s not the case, see the instructions for resetting in Chapter 2. Otherwise, follow these steps to restore your iPhone:
- On your iPhone, turn off Find My iPhone, if it’s turned on. You do this by opening Settings, tapping iCloud, tapping Find My iPhone, tapping the Find My iPhone switch to Off, and then entering your Apple password.
- Connect your iPhone to your computer.
- In iTunes, click your iPhone in the Devices list.
- Click Sync. This ensures that iTunes backs up your iPhone and has copies of all the data from your iPhone.
- Click the Summary tab.
- Click Restore iPhone. iTunes asks you to confirm you want to restore.
- Click Restore. iTunes downloads the software and restores the original software and settings. When your iPhone restarts, iTunes connects to it and might ask you to enter your Apple ID credentials. After you’ve done that, iTunes displays the Welcome to Your New iPhone screen, as shown in Figure 14.1.
- Select the Restore from this backup option.
- If you happen to have more than one iPhone backed up, use the list to choose yours.
- Click Continue. iTunes restores your backed-up data, restarts your iPhone, and syncs it.
- Go through the tabs and check the sync settings to make sure they’re set up the way you want.
- If you made any changes to the settings, click Apply. This ensures that your iPhone has all its data restored.

14.1 When your factory-fresh iPhone restarts, use iTunes to restore your settings and data.
Putting your iPhone in Device Firmware Upgrade mode
In some rare cases, your iPhone goes utterly haywire, where not only does iTunes not recognize the device, but even completely resetting it doesn’t solve the problem. (This sort of scenario occurs most often if you’ve tried something naughty, such as jailbreaking your iPhone.) If this happens, you can still recover everything, but you have to do it using a special hardware mode called Device Firmware Upgrade (DFU). This mode essentially bypasses the current OS installed on the phone (which is good because in this scenario your current OS is toast) and tells iTunes to install a factory-fresh version of the OS. You can then restore your stuff as described in the previous section.
Follow these steps to put your iPhone into DFU mode:
- Turn off your iPhone.
- Connect your iPhone to your Mac or Windows PC.
- Launch iTunes.
- Press and hold down the Sleep/Wake and Home buttons for exactly 10 seconds.
- After 10 seconds, release the Sleep/Wake button, but continue to hold down the Home button for another 10 seconds.
- After 10 seconds, release the Home button. iTunes now recognizes your iPhone and displays the dialog shown in Figure 14.2.
- Click OK.
- Click Restore iPhone. iTunes asks you to confirm, as shown in Figure 14.3.
- Click Restore and Update. iTunes restores your iPhone to the factory state.

14.2 When you boot your iPhone in DFU mode, iTunes recognizes the phone and displays this dialog to remind you to restore it.

14.3 iTunes asks you to confirm that you want to revert to the iPhone factory settings.
Taking Care of the iPhone Battery
Your iPhone comes with a large lithium-ion battery. Apple claims that the iPhone 6s Plus gives you up to 16 days of standby time, 24 hours of talk time on a 3G network, 12 hours of Internet use on an LTE, 3G, or Wi-Fi connection, 80 hours of audio playback, and 14 hours of video playback. For the iPhone 6s, the corresponding numbers are 10 days standby, 14 hours talk, 10 hours Internet use (11 hours on Wi-Fi), 50 hours audio, and 11 hours video.) Those are all impressive times, although you should count on getting less in the real world.
The biggest downside to the iPhone battery is that it’s not, in Apple parlance, user-installable. If your battery dies, you have no choice but to return it to Apple to get it replaced. This is all the more reason to take care of your battery and try to maximize its life.
Tracking battery use
Your iPhone doesn’t give a ton of battery data, but you can monitor both the total usage time (this includes all activities: calling, surfing, playing media, and so on) and standby time (time when your iPhone was in sleep mode). Also, one of the nice features in iOS is a breakdown of recent (the last three hours) battery usage by app, so you can see which apps have been draining your battery. Follow these steps to track your iPhone battery use:
- On the Home screen, tap Settings. The Settings app appears.
- Tap Battery. Your iPhone displays the Battery screen.
- Tap the Battery Percentage switch to On. Your iPhone shows you the percentage of battery life left in the status bar beside the battery icon (see Figure 14.4).
- Use the Battery Usage section to view recent usage by app, as shown in Figure 14.4.

14.4 The new Battery Usage screen breaks down recent battery usage by app.
Tips for extending battery life
Reducing battery consumption as much as possible on the iPhone not only extends the time between charges but also extends the overall life of your battery. The Battery Usage screen usually offers a suggestion or two for extending battery life, but here are a few suggestions you’re not likely to see on that screen:
- Turn off Background App Refresh. Some apps update their content even when you’re not using them, and this handy feature is called Background App Refresh. Handy, yes, but also a major battery hog, so turn off this feature when you need to go easy on the juice. Open Settings, tap General, tap Background App Refresh, and then tap the Background App Refresh switch to Off. As an alternative, consider leaving that switch on but turning off Background App Refresh for individual apps (particularly active apps such as Facebook and Gmail).
- Turn on Low Power mode. This mode (it’s new in iOS 9) saves battery life by turning off Background App Refresh, Mail push, and automatic content and app downloads, disabling a few visual effects, and dimming the screen. iOS asks if you want to switch to Lower Power mode when the battery level falls to 20 percent, as shown in Figure 14.5. (This message also appears when the level falls to 10 percent.) Tap Low Power Mode to activate this feature. To activate Low Power Mode full-time, open Settings, tap Battery, tap the Low Power Mode switch to On, and then tap Continue. Note that you can tell when this feature is active by looking at the battery icon, which turns yellow during Low Power mode.
- Dim the screen. The touchscreen drains a lot of battery power, so dimming it reduces the amount of power used. On the Home screen, tap Settings, tap Display & Brightness, and then drag the Brightness slider to the left to dim the screen.
- Cycle the battery. All lithium-based batteries slowly lose their charging capacity over time. If you can run your iPhone on batteries for 4 hours today, later on you’ll only be able to run it for 3 hours on a full charge. You can’t stop this process, but you can delay it significantly by periodically cycling the iPhone battery. Cycling — also called reconditioning or recalibrating — a battery means letting it completely discharge and then fully recharging it again. To maintain optimal performance, you should cycle your iPhone battery every one or two months.
- Slow the auto-check on your email. Having your email frequently poll the server for new messages eats up your battery. Set it to check every hour or, ideally, set it to Manual check if you can. To do this, tap Settings; tap Mail, Contacts, Calendars; tap Fetch New Data; and then in the Fetch section, tap either Hourly or Manual.
- Turn off push. If you have an iCloud or Exchange account, consider turning off the push feature to save battery power. Tap Settings; tap Mail, Contacts, Calendars; and then tap Fetch New Data. In the Fetch New Data screen, tap the Push switch to Off, and in the Fetch section, tap Manually.
- Minimize your tasks. If you won’t be able to charge your iPhone for a while, avoid background chores, such as playing music, or secondary chores, such as organizing your contacts. If your only goal is to read all your email, stick to that until it’s done because you don’t know how much time you have.
- Put your iPhone into sleep mode manually, if necessary. If you are interrupted — for example, the pizza delivery guy shows up on time — don’t wait for your iPhone to put itself to sleep because those few minutes use precious battery time. Instead, put your iPhone to sleep manually right away by pressing the Sleep/Wake button.
- Avoid temperature extremes. Exposing your iPhone to extremely hot or cold temperatures reduces the long-term effectiveness of the battery. Try to keep your iPhone at a reasonable temperature.
- Turn off Wi-Fi if you don’t need it. When Wi-Fi is on, it regularly checks for available wireless networks, which drains the battery. If you don’t need to connect to a wireless network, turn off Wi-Fi to conserve energy. Tap Settings, tap Wi-Fi, and then tap the Wi-Fi switch to Off.
- Turn off cellular data if you don’t need it. Your iPhone constantly looks for nearby cellular towers to maintain the signal, which can use up battery power in a hurry. If you’re surfing on a Wi-Fi network, you don’t need cellular data, so turn it off. Tap Settings, tap Cellular, and then tap the Cellular Data switch to Off.
- Turn off GPS if you don’t need it. When GPS is on, the receiver exchanges data with the GPS system regularly, which uses up battery power. If you don’t need the GPS feature for the time being, turn off the GPS antenna. Tap Settings, tap Privacy, tap Location Services, and then tap the Location Services switch to Off.
- Turn off Bluetooth if you don’t need it. When Bluetooth is running, it constantly checks for nearby Bluetooth devices, and this drains the battery. If you aren’t using any Bluetooth devices, turn off Bluetooth to save energy. Tap Settings, tap Bluetooth, and then tap the Bluetooth switch to Off.

14.5 When your iPhone’s battery level falls to 20 percent, iOS asks if you want to switch to Low Power mode.
Solving Specific Problems
The generic troubleshooting and repair techniques that you’ve seen so far can solve all kinds of problems. However, there are always specific problems that require specific solutions. The rest of this chapter takes you through a few of the most common of these problems.
The iPhone screen won’t respond to taps
Every now and then, your iPhone might freeze and no amount of tapping, swiping, or threatening will get the phone to respond. The most likely problem is that the touchscreen has become temporarily stuck. To fix that, press the Sleep/Wake button to put the iPhone to sleep, press Sleep/Wake again to wake the iPhone, and then drag Slide to Unlock. In most cases, you should now be able to resume normal iPhone operations.
If that doesn’t work, then it’s possible that the app you’re using has crashed, so you need to shut it down as I described earlier in the “General Techniques for Troubleshooting Your iPhone” section.
Your battery won’t charge
If you find that your battery won’t charge, here are some possible solutions:
- If the iPhone is plugged in to a computer to charge via the USB port, it may be that the computer has gone into standby. Waking the computer should solve the problem.
- The USB port might not be transferring enough power. For example, the USB ports on most keyboards and hubs don’t offer much in the way of power. If you have your iPhone plugged in to a USB port on a keyboard or hub, plug it in to a USB port on your Mac or PC.
- Attach the USB cable to the USB power adapter, and then plug the adapter in to an AC outlet.
- Double-check all connections to make sure everything is plugged in properly.
- Try another Lightning cable if you have one.
If you can’t seem to locate the problem after these steps, you may need to send your iPhone in for service.
You have trouble accessing a Wi-Fi network
Wireless networking adds a whole new set of potential snags to your troubleshooting chores because of problems such as interference and device ranges. Here’s a list of a few troubleshooting items that you should check to solve any wireless connectivity problems you’re having with your iPhone:
- Make sure the Wi-Fi antenna is on. Tap Settings, tap Wi-Fi, and then tap the Wi-Fi switch to On.
- Make sure the iPhone isn’t in Airplane mode. Tap Settings and then tap the Airplane Mode switch to Off.
- Check the connection. The iPhone has a tendency to disconnect from a nearby Wi-Fi network for no apparent reason. Tap Settings. If the Wi-Fi setting shows as Not Connected, tap Wi-Fi, and then tap your network in the list.
- Renew the lease. When you connect to a Wi-Fi network, the access point gives your iPhone a Dynamic Host Control Protocol (DHCP) lease that allows it to access the network. You can often solve connectivity problems by renewing that lease. Tap Settings, tap Wi-Fi, and then tap the blue More Info icon to the right of the connected Wi-Fi network. Tap the DHCP tab, and then tap the Renew Lease button, shown in Figure 14.6.
- Reconnect to the network. You can often solve Wi-Fi network woes by disconnecting from the network and then reconnecting. Tap Settings, tap Wi-Fi, and then tap the blue More Info icon to the right of the connected Wi-Fi network. Tap the Forget This Network button to disconnect, and then reconnect to the same network.
- Reset the network settings on your iPhone. This removes all stored network data and resets everything to the factory state, which might solve the problem. Tap Settings, tap General, tap Reset, and then tap Reset Network Settings. When your iPhone asks you to confirm, tap Reset Network Settings.
- Reboot and power cycle devices. Reset your hardware by performing the following tasks, in order: Restart your iPhone, reboot your iPhone hardware, power cycle the wireless access point, and power cycle the broadband modem.
- Look for interference. Devices such as baby monitors and cordless phones that use the 2.4 GHz radio frequency (RF) band can play havoc with wireless signals. Try either moving or turning off such devices if they’re near your iPhone or wireless access point.
- Check your range. If you’re getting no signal or a weak signal, your iPhone could be too far away from the access point. You usually can’t get much farther than about 230 feet (for an 802.11n Wi-Fi network; 115 feet for 802.11a/b/g networks) away from an access point before the signal begins to degrade. Either move closer to the access point or, if it has one, turn on the access point’s range booster. You could also install a wireless range extender.
- Update the wireless access point firmware. The wireless access point firmware is the internal program that the access point uses to perform its various chores. Wireless access point manufacturers frequently update their firmware to fix bugs, so you should see if an updated version of the firmware is available. See your device documentation to learn how this works.
- Reset the router. As a last resort, reset the router to its default factory settings (see the device documentation to learn how to do this). Note that if you do this, you need to set up your network from scratch.

14.6 Open the connected Wi-Fi network settings, and then tap Renew Lease to get a fresh lease on your Wi-Fi life.
iTunes doesn’t see your iPhone
When you connect your iPhone to your computer, iTunes should start and you should see the iPhone in the Devices list. If iTunes doesn’t start when you connect your iPhone, or if iTunes is already running but the iPhone doesn’t appear in the Devices list, it means that iTunes doesn’t recognize your iPhone. Here are some possible fixes:
- Check the connections. Make sure the USB connector and the Lightning connector are fully seated.
- Try a different USB port. The port you’re using might not work, so try another one. If you’re using a port on a USB hub, try using one of the computer’s built-in USB ports.
- Restart your iPhone. Press and hold the Sleep/Wake button for a few seconds until the iPhone shuts down. Press and hold Sleep/Wake again until you see the Apple logo.
- Restart your computer. This should reset the computer’s USB ports, which might solve the problem.
- Check your iTunes version. You need at least iTunes version 12 to work with iOS 9.0.
- Check your operating system version. On a Mac, your iPhone requires OS X Lion (10.7.5) or later. On a Windows PC, your iPhone requires Windows 7 or later.
iTunes won’t sync your iPhone
If iTunes sees your iPhone, but you can’t get it to sync, you probably have to adjust some settings. See Chapter 7 for some troubleshooting ideas related to syncing. Another possibility is that your iPhone is currently locked. That’s not usually a problem for iTunes, but it sometimes gets confused by a locked iPhone. The easy remedy is to unplug the iPhone, unlock it, and then plug it in again.
You have trouble syncing music or videos
You may run into a problem syncing your music or videos to your iPhone. The most likely culprit here is that your files are in a format that the iPhone can’t read, such as WMA, MPEG-1, or MPEG-2. First, convert the files to a format that the iPhone does understand using converter software. Then put them back on iTunes and try to sync again. This should solve the problem.
iPhone-supported audio formats include AAC, Protected AAC, HE-AAC, MP3, MP3 VBR, Audible (formats 2, 3, and 4, Audible Enhanced Audio, AAX, and AAX+), Apple Lossless, AIFF, and WAV. iPhone-supported video formats include H.264, MPEG-4, and Motion JPEG.
You can’t get your iPhone serial number
There are times when you might need the serial number of your iPhone. For example, if you contact Apple support, it asks you for your iPhone serial number.
Under normal circumstances, you follow these steps to get the serial number:
- Connect your iPhone to your computer.
- In iTunes, click the iPhone in the Devices list.
- Click the Summary tab.
- Read the Serial Number value.
If iTunes doesn’t recognize your iPhone, you may still be able to get the serial number by following these steps:
- Connect your iPhone to your computer.
- In iTunes, choose iTunes ⇒ Preferences (Mac) or Edit ⇒ Preferences (Windows). The iTunes preferences appear.
- Click the Devices tab.
- Hover the mouse over a backup of your iPhone. As you can see in Figure 14.7, iTunes displays a message that includes the phone’s serial number.

14.7 Hover the mouse pointer over a backup of your iPhone to get your serial number.
If you can’t boot your iPhone, if iTunes doesn’t recognize your iPhone, or you don’t have a backup of your iPhone, you can still get the serial number. Shut down your iPhone, remove the SIM card tray, and then read the serial number that’s printed on the side of the SIM tray.
An app is taking up a large amount of space
The iPhone is so useful and so much fun, it’s easy to forget that it has limitations, especially when it comes to storage. This is particularly true if you have a 16GB model, but even a big 32GB iPhone can fill up in a hurry if you stuff it with movies, TV shows, and tons of magazine subscriptions.
You can tell how much free space your iPhone has left either by connecting it to iTunes or by tapping Settings, then General, and then Storage & iCloud Usage. The Storage & iCloud Usage screen not only shows you how much storage space you have available but also lets you tap Manage Storage in the Storage section to see how much space each app is using, as shown in Figure 14.8.

14.8 The Storage screen tells you how much space each app is taking up.
If you see that your iPhone is running low on space, check the apps to see if any of them are taking up more than their fair share of hard drive real estate. If you see a hard drive hog, you have two ways to delete its data and give your iPhone some room to breathe:
- Third-party apps. For an app you picked up via the App Store, tap the app, tap Delete App, and then tap Delete App when your iPhone asks you to confirm.
- Built-in apps. For an app that came with your iPhone (such as Music or Video), tap the app to display a list of the data it’s storing on your iPhone, and then tap Edit. This puts the list in Edit mode, as shown in Figure 14.9. To remove an item, tap the red Delete button to the left of the item, and then tap the Delete button that appears.
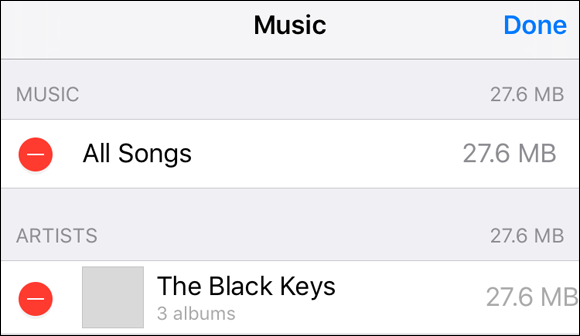
14.9 You can free up storage space by deleting individual items from some of the built-in apps.