In This Chapter
Improving the composition
Maintaining high resolution
Utilizing a color card
Making a new button — Reset becomes Revert
Removing individual photos from an Event
The importance of being organized
Working with multiple Libraries
Comments — a picture is worth a thousand words
Improving iPhoto's startup time
Customizing iPhoto keyboard shortcuts
Photographers, whether professional or amateur, love to find and exploit little tricks with the hardware or software they use. Sometimes, the tricks are undocumented, which makes finding them even more enjoyable. There are also skills learned at the "school of hard knocks" which I love to pass along. You'll find some of those in this chapter.
Regardless of the sophistication of the software and hardware a photographer chooses to use after a photo shoot, there are things that can and should be done before taking a picture. Things that'll help ensure a good photograph and make the task of editing your photos simpler and more rewarding. Here are a few I'd like to pass along.
One simple tip to help you get better photos to start with is to get close to your subject. Of course, sometimes, getting physically closer to your subject is impossible, if not downright dangerous. With the availability of true (optical) zoom lenses on many less-expensive cameras, though, you can now get closer — and better — shots in some locales. For example, if you're shooting at the zoo, zoom in on that monkey's face instead of always taking a wider-angle shot.
And although people tend to stay in one place while shooting photos and let the zoom "transport" them to closer to their subject, don't be afraid to see what the shot looks like from different vantage points. That's something a zoom lens can't do. I've often found that a shot that was marginally good from one angle becomes really exciting from another, opening up all kinds of creative possibilities.
Note
As is true with all composition "rules," they aren't hard and fast. I've broken a few of them on occasion but always with a purpose; the scene just appealed to me more by breaking a rule. But don't do it just because you didn't know any better.
Don't be afraid to try things. It's how we learn what we like and what we don't.
Depending on the sophistication and price of your camera, you have choices regarding the format of the captured photos. The camera's resolution, on the other hand, is set by the capabilities of the sensor being used. My guideline is that you can never have too high of a resolution! But the photo format choice — RAW, TIFF, and JPEG to name a few — can ultimately affect resolution as well.
In the sidebar in Chapter 9, I discuss the advantages of capturing in RAW format. If your camera can do so, I highly recommend using that format for any photos that you plan to print at larger than an 8″ × 10″ size.
If your camera can't capture in RAW, choose TIFF, if available — and if not, use the highest quality JPEG capture you can. Doing so will give you the most leeway when it comes to editing your photos in iPhoto.
At one time or another, I'm sure you all had the rude shock of taking a photo of a beautiful scene, only to discover that the captured photo has a color cast in it. For instance, photos taken indoors where incandescent bulbs are prevalent often have a yellow cast. Our eyes and brain make an adjustment and we may not notice this, but the camera does. And, you may find, there aren't any neutral colors in the photo to use for white balance in the Adjust tool window. You can certainly guess at what changes need to be made, but I know a better way.
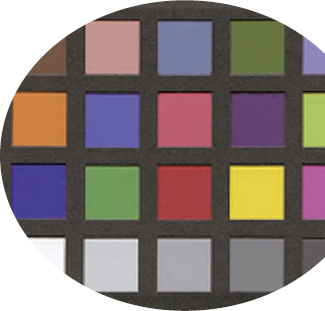
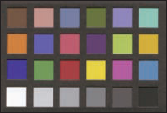
I use a pocket-sized color card that I always take with me to ensure that I have a neutral color to correct with. (Figure 15-1 shows my 3¼″ × 2¼″ card.) I also have a larger version for use in large landscape scenes.
Here's how to use a color card while you're shooting:
Place the card near your subject.
Tip
If you're doing a portrait or photographing a group of people, have a person in the shot hold the card.
Take the shot.
You'll use this to set the white balance.
Take the card away and take the actual photo.
Later, in iPhoto, use the photo with the card in it. When you use the Adjust palette, click the White Balance eyedropper on the second square from the left in the bottom row. Refer to Figure 15-1.
This tells you the white balance for the real shot.
Use that value as you use the Adjust tool window to edit the real photo.
These cards aren't inexpensive, but if getting the color right is important, color cards are a great tool and convenient to carry. You can still use the small card for a landscape scene provided you ensure the card is in the same light as the subject of your photo (not always easy to do).
Now that you have taken your photos, it's time for using the iPhoto tools to make them even better. Here are some tips I've found helpful for this process.
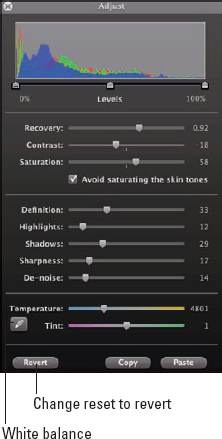
In Chapter 10, I show you the wonderful capabilities of the controls in the Adjust tool window. (See Figure 15-2.) With them, you can change the exposure, contrast, highlights, shadows, and several other characteristics of your photo. Being totally interactive, you can move the various sliders around to your heart's content, always knowing that by clicking the Reset button, you could go back to the default values and undo any mistakes you had made.
Being able to use Reset provides you with a great safety net — that is, provided these were the first editing changes you were making. But what if they weren't?
Look at Figure 15-2 again. All these values were saved for this photo. If you now try to make some additional changes and then decide you don't like them and want to return to the ones shown here, you have a problem. Clicking the Reset button puts all values back to the defaults, but these are not default values. Arg. You really want to revert to previous values.
Luckily, there's an easy way out. You can, of course, choose Photos
If some photos in a particular Event aren't worth keeping, you'll probably want to trash them. Just open the Event (read about Events in Chapter 4) so that you can see each individual photo. Then pick the one(s) to delete and drag it (them) to the Trash.
If you decide to save the photo after all — before emptying the Trash, that is — no a problem. Just drag the photo and drop it over the Events icon in the Source list. It knows where its home is and will return to its rightful place in the Event it belongs to.
As the size of your iPhoto Library grows, employing some important organizational techniques become even more important. After all, the real test of the usefulness of your Library is how quickly, accurately, and easily you can retrieve the photos you want.
Although you do have to invest a little upfront work, adding keywords to your photos directly after importing them really pays off. Everything about the photos is fresh in your mind, and assigning accurate and descriptive keywords will never be easier. Even with the addition of Faces and Places capabilities and the help they give in retrieving photos of interest, keywords are still the bedrock of any search.
I also highly recommend using Albums and Smart Albums. With appropriate naming of the Albums, retrieving whole groups of related photos is a cinch. And, of course, iPhoto handles automatic updating of Smart Albums. Read more about Albums in Chapter 5.
There's no firm rule defining when a single iPhoto Library is so large that it should be saved and a new one started. For me, I think a safe rule is that a Library nearing 700MB is a prime candidate because not exceeding that size means that you can save it to a regular CD. You create an archive as well as a quick and easy way to switch libraries. In addition, Library size does affect iPhoto performance, so keeping them manageable will enhance your iPhoto experience and performance.
Tip
If you have a large amount of free external hard drive space, you can also archive the Library to that drive unless you feel more secure using a CD.
No matter which method you use (hard drive or media), here's a tip to help you sleep better:
If you write the library to a CD, be sure and verify that the write operation was successful. If you do the burn to a CD/DVD in the Finder or any of the commercial burn software packages, a Verify operation is begun after the burn, if you wish. I recommend doing that each time you do a burn.
With either storage medium, immediately make sure you can use the archived library with iPhoto. (Remember: You're counting on it!) Press and hold the Option key when starting iPhoto and then choose the archived Library as the one to use. Or, use the iPhoto Library Manager (as I describe in Chapter 14) to do this.
Note
Never assume that your copy is successful until you test it!
Adding a description (or as I call them, comments) to a photo can be a chance to add a narrative that more extensively explains the circumstances of the photo than you can accomplish by using a few keywords. Photos are the video recording of an event, but to explain what led to the event or what happened just before the photo was taken requires some text. For such photos, I recommend taking the time to add comments when you're importing them. As a reminder, the easiest ways to do this are:
Click Photos in the Source list. For any photo, click on the small information icon in the right corner. When the photo flips over, you'll see the area labeled Enter Description. Start typing.
Highlight a photo in the iPhoto main window, then click the information icon in the center of the small toolbar. At the bottom of the information window that pops up is the area to type a description.
Another nice thing is that editing a photo's description changes it in the photo Library as well as in all Albums and books where it appears. Do it once in the photo, and the rest is taken care of by iPhoto.
This particular tip will be helpful regardless of the speed of your computer although it will certainly have a greater effect on a slower machine.
Ever wonder why it takes applications, including iPhoto, so long to start? A lot of necessary activity takes place, but in the case of iPhoto, there's also something wasteful going on. It has to do with languages, and here's how to trim down the memory required to load them:
In the Applications folder on your hard drive, click the iPhoto icon.
Choose File
Get Info or press +I.
+I.
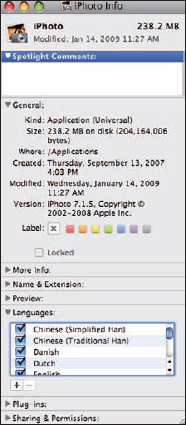
In the iPhoto Info dialog that appears (see Figure 15-3), see how (under Languages) that every box is checked. I don't know about you, but I speak only English (and a little Italian), so having all these other languages loaded each time iPhoto starts really takes time and for no purpose.
In the Languages section, clear (uncheck) each check box for each unneeded language.
In my case, I leave only English loaded.
Close the Get Info dialog.
The next time you start iPhoto, you should see at least some improvement in loading speed, at least a second or two — perhaps a lot. You also will see between a 15–20% decrease in the real memory used by iPhoto.
A simple thing, but it does make a difference.
Using keyboard shortcuts can save you a lot of time and wasted motion when working with an application like iPhoto. Instead of moving your hand to use the mouse and select from a menu, you can just type the necessary shortcut.
The nice thing on Macs is that you can set your own shortcuts in OS X for particular applications, like iPhoto. Here's how:
In System Preferences, click the Keyboard & Mouse icon.
Click the Keyboard Shortcuts tab.
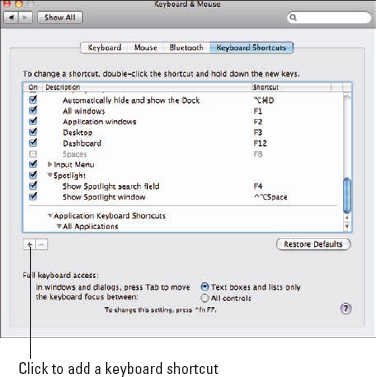
Click the + (Add) button just below the list of current shortcuts. See Figure 15-4.
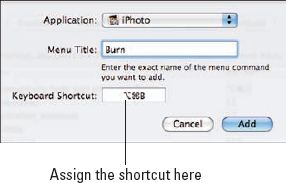
In the dialog that appears, you can select the application you're creating the shortcut for (in this case, iPhoto) and the menu title (which, in this case, must be the exact name of the iPhoto command). So before you go any further, you need to find the command in the iPhoto menu so you know exactly what it says.
In the Keyboard Shortcut field, just press the keys you want, in the order you want.
I used Option+
Click Add.
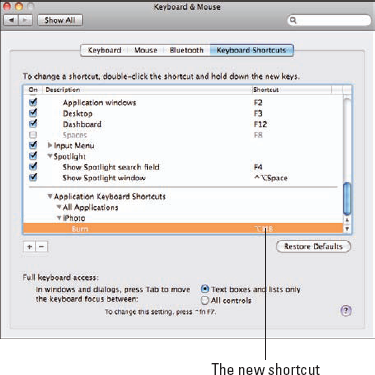
The Keyboard Shortcuts pane now contains your new shortcut. If, after all your careful checking, you have chosen an already used shortcut in iPhoto, the shortcut will be removed from where it was so your shortcut will work. For instance, if I wanted the Share
Try out your new shortcut to make sure it works.
If the shortcut didn't work, maybe you used a combination for the shortcut that isn't allowed. Try something else and repeat the process.