
Chapter 3. Entertain Yourself With the iPod Touch
You’ll learn to:
Play music, audiobooks, and podcasts
Shoot and edit videos and photos
Play games and compete through Game Center
Read papers and magazines
Get fit with the Nike + iPod Touch exercise program
FROM ITS HUMBLE BEGINNINGS as a boxy little music player in 2001, the iPod has always been about entertainment. Back then, that meant music and maybe an audiobook or two.
Today, the Touch has significantly expanded the iPod’s repertoire, and this chapter shows you the ways. Sure, the Touch still plays music and audiobooks, but it also serves up movies, TV shows, and video podcasts. And your iPod doesn’t just play videos—it shoots them, too, so you’re never without a camcorder with your Touch on hand. The same camera that shoots videos can snap good-quality still photos as well, and you can enhance and crop the images right on your ’Pod.
The Touch is also a handheld videogame console, an ebook reader, a podcast player, and a personal trainer. You’ll learn how to get rolling with all of these features in this chapter, which is all about play. (If you’re looking for work, skip ahead to Chapter 4 to learn about the Touch’s business-like apps, like Contacts and Calendars.)
The Touch is still an iPod, so to jump into your music—a task the device still excels at after all these years—turn the page.
What’s in the Music Menu
SINCE YOU HAVE AN iPod, you probably want to play some music, right? To do that, tap the Music icon; you’ll see your audio collection sorted into all kinds of helpful categories, like songs, artists, and albums. Click a category to reveal its list of tunes, musicians, or albums. Flick your finger up and down the screen to scroll through a list. In categories that include songs, tap a song’s title to hear the tune. For other categories, like Artists or Albums, click a name or title to see all the songs in that category, and then tap a song to play it.
Icons on the bottom row of the Touch’s screen take you to the first four music categories, which vary depending on whether you synced up Genius Mixes (Chapter 12) from iTunes. Here’s what the categories look like:
Genius. If you did sync Genius Mixes, tap this button to play them.
Playlists. If you didn’t go for a Genius Mix sync session (or haven’t gotten to it yet), Playlists shows up as the first icon. In case you haven’t heard of a playlist, it’s a collection of songs you think sound good together A playlist for your gym routine could contain high-energy dance tracks, for example. (Chapter 12 shows you how to create playlists.)
Artists. To sort your music by band or performer, tap Artists. Even if your collection has just one measly track from an obscure bar band, the band’s name will show up proudly next to Elvis Presley and The Beatles. Tap the band’s or artist’s name to see the available tracks, and then tap a song to start playing it.
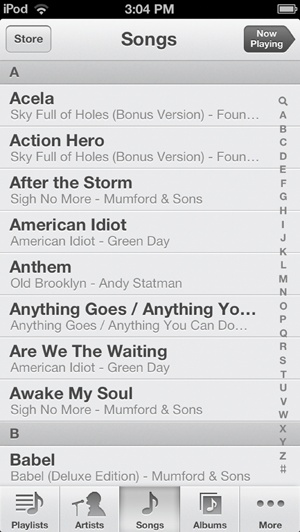
Songs. Tap here to see a complete list of the songs on your iPod, nicely arranged in alphabetical order. If you don’t feel like flicking forever to get down to “Zing! Went the Strings of My Heart,” tap the vertical index bar to jump to a specific letter—and all the songs that start with it.
Note
If you didn’t sync Genius Mixes to your Touch, the fourth category (the one before the More button) is Albums. There’s more on More—and Albums—on the next page.
The last icon in the row is aptly named More. Tap it to see more ways to sort your audio collection, including these categories:
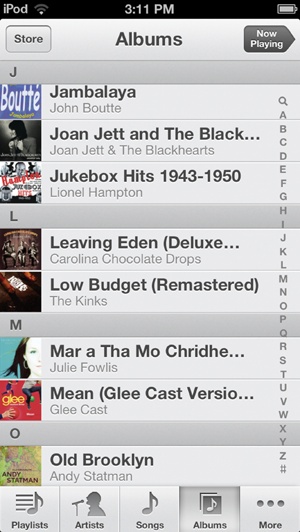
Albums. Far from its roots on discs of black vinyl, the notion of “album” still thrives on music players everywhere, whether you have a complete set of tracks or not. Tap here to see all your music grouped according to the name of the album it appears on.
Audiobooks. Tap here to see the narrated books you bought and downloaded from the iTunes Store or Audible.com (Chapter 13). Tracks you ripped from audiobook CDs don’t show up here automatically; you have to edit the file type first (see Change a Song’s Start and Stop Times).
Compilations. Soundtracks, tribute records, and any other album with tracks from multiple artists are usually considered a compilation. If iTunes doesn’t automatically tag these albums as compilations, you can do it yourself by heading to Edit Album Information.
Composers. All your music, listed by songwriter, resides here.
Genres. If you’re in a jazz, country, pop, or other music-specific mood, tap Genres to see all the music in a particular category.
Shared. If you’re hooked into iTunes Home Sharing (Share Your iTunes Music and Videos), you can stream music over your home network from the iTunes libraries of computers on the same network and logged in with the same Apple ID.
As you tap around your collection, your Touch is ready if you want to add tunes right there: A Store button in the top-left corner of most screens awaits your impulses. (Looking for Podcasts and iTunes U content? See Cover Flow in Motion.)
Tip
Don’t like the way Apple orders things, and want to put your lists where you want them? Tap More and, on the next screen, tap the Edit button in the top-left corner. On the black Configure screen, drag the ghostly white list icons down into the bottom row in the order you prefer them. Once you get your favorite icons within easy reach, tap Done.
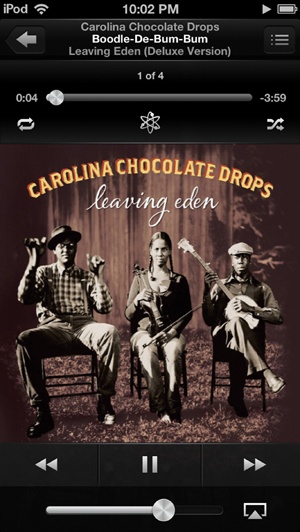
Explore the Now Playing Screen
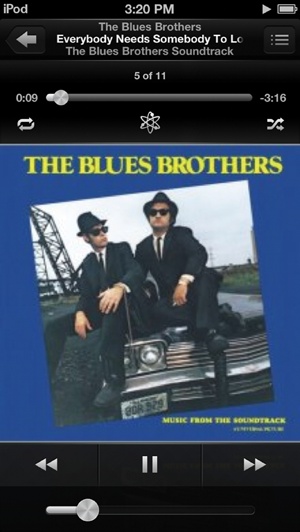
THE TOUCH SHOWS OFF photos and videos quite nicely, and it even makes your music look good. Cover Flow (Cover Flow in Motion) is one way it does that, but even if you’re just listening to an album, you get a big, lovely album cover on the Now Playing screen.
In addition to cover art, the Now Playing screen has icons and information along its top edge to help you manage your music. Here’s what everything means, starting from left to right:
Back arrow (
 ). Just like the Back button on a web browser, tap here to go back to the screen you were on before you landed here. This could be back to the playlist the current song is from, the album containing the track, or the artist’s track list.
Song information. The top-center of the Now Playing screen displays the name of the current song, the artist performing it, and the album it’s on.
Track listing (
 ). The information in the middle of the screen tells you the current song’s name. Tap this icon to see all the tracks you have from that album. You can also double-tap the album cover to spin it around and reveal the track list.
Tip
Ever wanted a computer like the ones on Star Trek, where you could speak a music playback command and have the machine obey? On the fifth-generation iPod Touch (October 2012), Siri (Command Siri) handles that for you. Summon her and tell her what you want.
On Touch models from 2010 or 2011 (or older models with Apple’s headset/microphone combo), you can get things done with the Voice Control feature. Hold down the Home button until the Voice Control screen appears and beeps, and then speak your commands into the Touch.
Sample commands include “Play artist Beyoncé” or “Play album “Let It Be.” Say “Shuffle” to shuffle tunes or “Genius” to hear similar tracks. “Play” and “Pause” work as spoken commands, and you can even ask “What’s playing?” To turn off Voice Control, say “Stop” or “Cancel.” If English isn’t your native tongue, you can change the language that Voice Control responds to by choosing Settings→General→International→Voice Control→[Language].
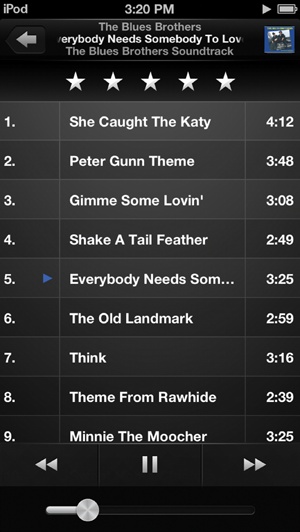
When you tap
on the Now Playing screen to see an album’s song list in high-contrast white-on-black, a blue triangle identifies the track currently playing. If you’re tired of that tune, tap a different title.Once you have songs listed on the Now Playing screen, you can rate them. As the song plays, swipe the row of dots along the top of the screen to convert the dots to stars. You can rate songs from 1 to 5 stars, and the ratings you add to your songs here get synced back to iTunes when you connect Touch to computer. Chapter 11 has more on star ratings.
Once you tire of looking at track names and rating songs, you can return to the full-screen album art view by tapping the tiny album cover in the top-right corner.
The Now Playing screen looks the coolest when you have big, bright, colorful album covers for your songs. If you purchased your music from the iTunes Store or another online music emporium, the album art should have come with the song. If you ripped the tracks yourself and didn’t add any album art, you probably see a boring old gray music note. If that doesn’t thrill you, flip to Fetch Missing Album Covers for art lessons.
Control Music on the Now Playing Screen
THE NOW PLAYING SCREEN is more than just a pretty face for your music. It lets you manage current-song playback from this screen, too. Here’s what the various icons mean, starting with that strip along the bottom of the screen:
Play/Pause (
 /
/ ) button. The Now Playing screen usually means something is playing; you pause the song by tapping , and restart it by tapping .
Previous, Next (
 ,
,  ). To hear a currently playing song from the beginning, tap
  . If you’re already at the beginning of a song, tap to go to the previous track. Conversely, if you want to skip a long fade-out and blow on through to the end of a song, tap . Tapping the same key at the end of a song takes you to the next track.
Miss the days of fast-forwarding or rewinding cassette tapes to hear the quality parts of a song? Press and hold
or to simulate the process. The longer you keep the button pressed, the faster the song leaps by.Volume. Sure, your Touch has physical volume buttons on its outer edge, but sometimes you don’t feel like readjusting your grip on the player to scootch the volume up a notch. With the volume slider at the bottom of the screen, you can boost or reduce the sound by dragging the big white dot with the tip of your finger. (If you do use the physical volume buttons while looking at the Now Playing screen, you see the on-screen slider move magically by itself.)
If you connect an Apple TV or an AirPort Express to your TV, home-entertainment sound system, stereo, or set of powered speakers (Connect Your iPod to a Home Entertainment System), you also see the AirPlay icon (![]() ) on the playback control bar. Tap it and choose a set of speakers from the drop-down list.
) on the playback control bar. Tap it and choose a set of speakers from the drop-down list.
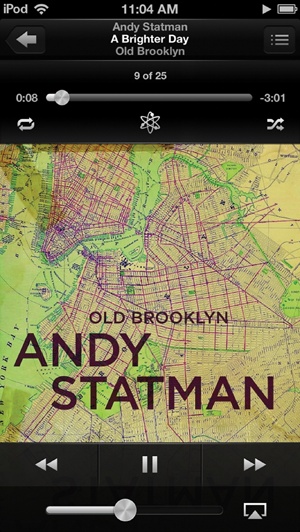
But wait, there’s more to the Now Playing screen! Look closely, right above the top edge of the album cover—this collection of four controls lets you fine-tune your music playback down to the second or change the order of an album or playlist on the fly. Here’s what each does:
Loop. Certain songs are so good that you want to play them over and over and over again. To make that happen, tap the Loop button (
 ) button twice until it looks like
  . If you want to put the album itself on repeat, tap the Loop button only once, so that it turns a nice shade of orange (
 ).
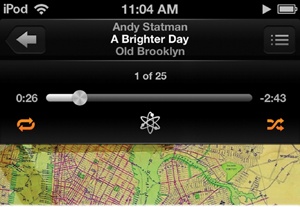
).Scrubber bar. This slider at the top of the screen shows you the total length of the current song, how much time has elapsed, and how much is left to go. Drag the white dot (formally known as the “playhead”) to a different time to skip to that part of the song. The “2 of 19” (or whatever) number above the scrubber bar tells you where this track falls in the album or playlist.
Genius playlist. Tap the
 icon to make a Genius playlist based on the current song. Chapter 12 has details.
Shuffle. If you like to mix things up, the Touch can shuffle the tracks in the current album or playlist. Just tap the
 button. When it turns orange, the Touch plays songs in random order. Tap
  again to turn off shuffle and return to the standard playback order.
Playing Audiobooks
If you’re listening to an audiobook, you might see three other icons. They include:
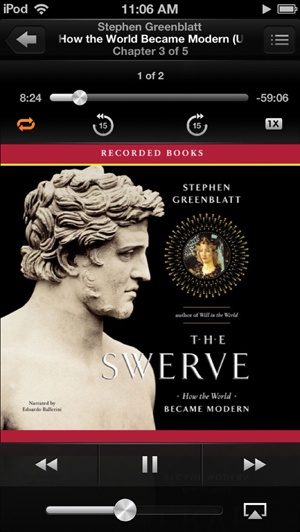
Repeat the last 15 seconds. Tap the first 15-in-a-circular-arrow icon to jump back a quarter of a minute in the book’s narration to repeat a line you missed.
Skip the next 15 seconds. Tap the second 15-in-a-circular-arrow icon to jump ahead in 15-second leaps.
Playback speed. Tap until you see
 to hear the audio in double time, or tap
  to hear it slowed to half-speed. Tap the default
  icon to hear the narrator at normal speed. Whenever you switch from narration, the icon turns orange to remind you that you adjusted the audio.
Cover Flow in Motion
THE TOUCH CAMERA IS great, but if you like moving pictures—or pictures that really move—check out Cover Flow. Designed to show off your music collection to maximum effect, Cover Flow is basically a parade of album artwork that also lets you start playing music right away.
To use Cover Flow, tap the Music icon on the Home screen to get into your audio library. Instead of tapping through lists with the Touch in portrait mode, rotate it to landscape (horizontal) view. The text-based lists go away, replaced by full-color album covers. Flick your finger across the screen to see them whiz by.
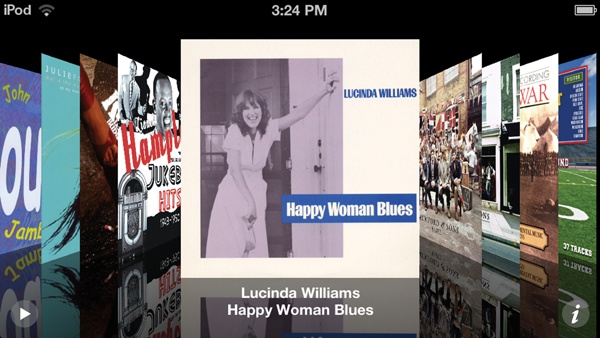
An album cover doesn’t tell you what songs are on the disk, so tap it to see its track listing. You can also tap ![]() in the lower-right corner to spin the cover around and see the song list. To hear a song play, tap its title. To pause the song, tap
in the lower-right corner to spin the cover around and see the song list. To hear a song play, tap its title. To pause the song, tap ![]() in the lower-left corner; press
in the lower-left corner; press ![]() to start it up again.
to start it up again.
To flip back to the album art, tap the track listing (![]() ) or
) or ![]() button again. Once you exhaust the sheer visual excitement of Cover Flow (or you have to do something else for a while), turn the iPod back to portrait mode (upright) to return to your lists and screen icons. Cover Flow may not do much for some people, but it sure is pretty to watch.
button again. Once you exhaust the sheer visual excitement of Cover Flow (or you have to do something else for a while), turn the iPod back to portrait mode (upright) to return to your lists and screen icons. Cover Flow may not do much for some people, but it sure is pretty to watch.
Use the Podcasts and iTunes U Apps
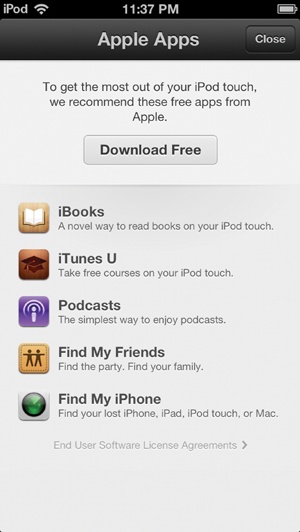
In 2012, Apple overhauled its Music app by spinning off two of its components, Podcasts and iTunes U, into their own apps. The Touch should prompt you to download these apps (opposite page, top) when you first visit the App Store. If not, you can search them out and install them later (Buy iPod Touch Apps).
Podcasts
On the Touch, if you want to download a podcast—those free audio and video shows on any given topic—you need to do it through the Podcasts app. (And when you sync podcasts from your computer to your Touch, they land here in the Podcasts app and not in the Music app.)
To browse for shows, open the Podcasts app and tap the Store button. To see all the audio and video podcasts on hand, tap either Audio or Video to sort the list accordingly.
Tap the Categories button to find shows sorted by subject (Arts, Comedy, News & Politics, and so forth). When you see a show that interests you, tap its thumbnail to see an episode list, download the available installments, or subscribe to it—iTunes automatically downloads the new episodes to your iPod. Tap Library to return to your Touch’s collection.
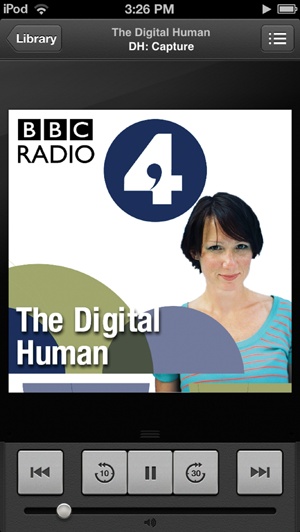
To play a podcast, tap its thumbnail and then tap the name of the episode you want to hear or see. Playback controls at the bottom of the screen (middle-right) let you pause, play, jump back 10 seconds, or jump ahead 30 seconds in the track. Tap the cover art to reveal another screen of controls that let you adjust the speed of the audio, set a sleep timer, or share your find with friends on Twitter or Facebook—or by email or instant message.
iTunes U
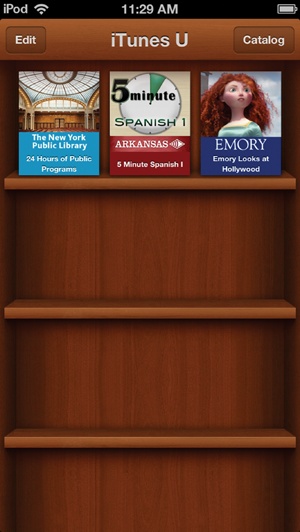
Billed as “the world’s largest online catalog of free educational content,” Apple’s iTunes U project offers half a million lectures, books, courses, and other materials from major universities. The best way to get started is to grab the iTunes U app, open it up, and tap the Catalog button to see what you want to learn today.
Once on the virtual iTunes U campus, you can browse and download audio and video lectures at random—or even subscribe to online courses, complete with weekly reading assignments. Your downloaded lectures and course materials await you on the shelves of the iTunes U app, shown above.
What’s in the Videos Menu
VIDEO COMES IN MANY forms today: movies, TV shows, music videos, and so on. If you have moving images on your Touch, they’re in one of these categories:
Movies. Hollywood blockbusters from the iTunes Store, movies you made yourself, and trailers you snagged off the Web all live happily here.
TV Shows. Don’t have time for TV the traditional way (on the couch and with a beverage)? When you grab TV shows from the iTunes Store, you see them in this part of the Videos menu.
Music Videos. You find music videos you bought from the iTunes Store (or those that come with some albums) here.
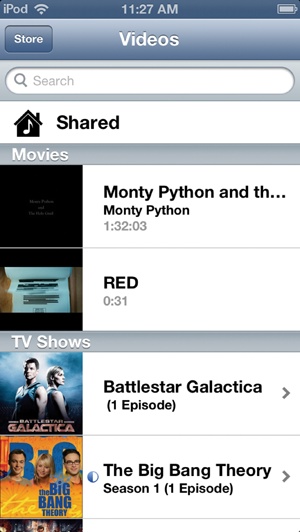
The thumbnail photo next to each video gives you a hint to its content, and information like running time and number of episodes appears here as well.
Tap a title to play a video. If you have multiple episodes of a TV show or podcast, tap the show title, and then tap the name of the episode you want to watch. Rotate the Touch to landscape view and enjoy the show. (Flip ahead to Chapter 14 if you want to know more about video right now.)
In addition to the stuff stored on your Touch, you can wirelessly stream videos from your iTunes library or a shared one. Tap the Shared icon at the top of the menu and select an iTunes collection to browse. You need to have iTunes Home Sharing turned on to share, so visit Share Your iTunes Music and Videos if you don’t.
What’s in the Photos Menu
WHO NEEDS TO DRAG around a photo album or laptop full of slideshows when you’ve got a Touch? And the current Touch offers not only a picture viewer but a whole digital camera and camcorder.
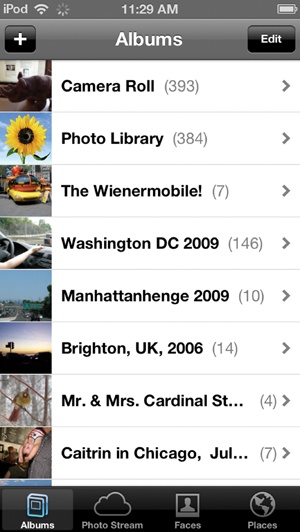
Odds are, though, you probably took most of your photos with a standard digital camera. As Chapter 15 explains, you can transfer copies of your favorite pictures and photo albums onto the Touch through iTunes or with the iCloud Photo Stream. And when you do, they land here in the Photos app.
Give the Photos icon (the happy sunflower) a tap on the Home screen, and all those pictures await you in the iPod’s Photo library. Many photo-organizer programs, like Adobe Photoshop Elements and Apple’s iPhoto, let you sort pictures into albums, and you can see those same albums in the Photos app if you opted to sync them over. The number in parentheses next to the album name reveals how many photos live there.
The Camera Roll album at the top of the screen collects all the photos and videos you take with the Touch itself. You can import them to your computer using your photo-organizer app. Other images that come right to the Touch—like screenshots you snap or photos you save from email messages—land here, too. Chapter 15 has all the photographic details.
Snap and Edit Photos
PHOTOGRAPHERS OFTEN SAY THAT the best camera is the one you have with you. If you rely on your Touch as an entertainment machine, odds are you have it with you. And with the Touch, you get two cameras—a 5-megapixel one on the back (with a flash!) and a 1.2-megapixel camera on the front. Together, they provide the hardware you need for high-def FaceTime video calls, shooting video clips, and snapping still photos.
To start using the Camera app, tap the camera icon on the Touch’s Home screen. Make sure the little slider in the corner is set to ![]() (still camera) and not
(still camera) and not ![]() (video camera). Tap
(video camera). Tap ![]() to toggle the flash off or on, or to have it fire automatically. Then line up your shot and press the big round shutter button (
to toggle the flash off or on, or to have it fire automatically. Then line up your shot and press the big round shutter button (![]() ) in the middle of the toolbar; if you’re holding the iPod like a regular camera, you can also press either volume button to take the photo. The Touch even makes a little shutter-click noise when you pop the shot.
) in the middle of the toolbar; if you’re holding the iPod like a regular camera, you can also press either volume button to take the photo. The Touch even makes a little shutter-click noise when you pop the shot.
The Touch saves your newly snapped picture in Photos→Camera Roll. A thumbnail of the last shot you snapped also appears in the corner of the Camera app screen; tap it to jump right to the photo in the Camera Roll album.
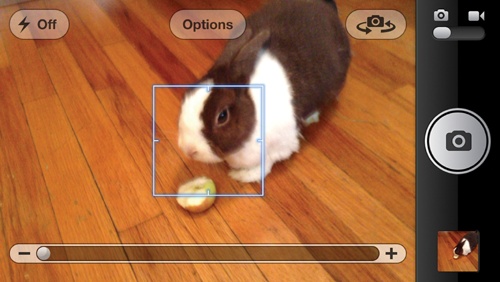
The Touch camera offers a few controls for better photos:
Exposure adjustment. Here, you fiddle with the exposure (the overall lightness or darkness) of an image. If you have a shot lined up but part of the frame is in shadow, tap a lighter area of the image. A blue-white square appears briefly on-screen, and the Touch adjusts its exposure settings based on that area. Now snap the picture.
Zoom. Touching the screen with your finger to adjust a photo’s exposure brings up the zoom slider (shown above). To narrow in on your subject, drag the slider to the right until you have the framing you want. Drag the slider the other way to zoom back out.
Grid. Tap the Options button to overlay the screen with a nine-square grid to help you align and compose your shots.
HDR. Great for still-life and architecture shots, High Dynamic Range combines three exposures into one to bring out the best in a photo. You can turn it on by tapping Camera→Options→HDR→On.
Panorama. Need a shot wider than the Touch can take? Tap Camera→ Options→Panorama. Tap the
 button and then steadily move the Touch from left to right to capture the whole scene. Tap Done when you finish.
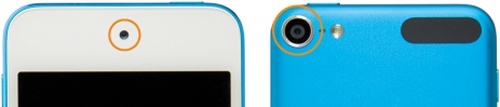
You can take photos in either portrait (vertical) or landscape (horizontal) mode. To change cameras and take a self-portrait with the front camera (circled, below left), tap the ![]() icon in the upper-right corner of the screen. The Touch’s rear camera (circled, below right) sits in the corner on the back, so be careful when you shoot with it or you may get a stunning portrait of your own finger.
icon in the upper-right corner of the screen. The Touch’s rear camera (circled, below right) sits in the corner on the back, so be careful when you shoot with it or you may get a stunning portrait of your own finger.
Editing Photos on the Touch
You can do basic image-editing on your Touch. Tap open a photo that needs fixing, and then tap the Edit button at the top of the screen. Here are your options:
Rotate. Tap the Rotate button to spin a vertical shot into a horizontal one or flip it upside down.
Enhance. Tap here to have the iPod analyze your picture and improve its contrast, exposure, and saturation.
Red Eye. If your subject has glowing red demon eyes from your camera flash, tap the Red Eye button to give those devil peepers a neutral color.
Crop. Tap here to chop out the boring, distracting, or ex-boyfriend parts of a picture. In Crop mode, tap the Constrain button to conform to standard photo sizes, like 4 x 6, and then tap the yellow Crop button.
Hate that change you just made to a pic? Tap the Cancel button to reverse it. Once you like an edited photo, tap Save to put a copy in your Camera Roll.

Shoot and Edit Videos on the Touch
CELLPHONES AND POCKET CAMCORDERS that can shoot video have boomed in popularity over the years—which could explain the noticeable increase in YouTube videos of cats riding Roomba vacuum cleaners. Thanks to its back camera that shoots high-definition video (at a resolution of 1080p and 30 frames per second), the Touch is part of the video party. Warn your pets.
Shooting a video on the Touch works a lot like shooting a still photo. And even though you can tap an area of the screen to adjust the exposure, there’s no zoom feature for video as there is for still photos.
Tap the Camera icon on the Touch’s Home screen to get started. To shoot videos, make sure the slider on the toolbar is set to video (![]() ) and not still photos (
) and not still photos (![]() ).
).
The tiny microphone next to the camera lens on the back of the Touch records audio to go along with your video.
You can hold the Touch vertically or horizontally to shoot video. Portrait-shot clips may get shrunk or letterboxed if you upload them to a video-sharing site that uses the more cinematic horizontal orientation. When you’re ready to start filming, tap the big round ![]() button. It flashes from dull to bright red as you record.
button. It flashes from dull to bright red as you record.
The time stamp in the corner of the screen shows the current length of your video-in-progress. When you’re ready to virtually yell “Cut!”, tap the ![]() button again to stop recording.
button again to stop recording.

When you do, the Touch stores your clip in Photos→Camera Roll. To see what you shot without leaving the Camera app, tap the thumbnail preview at the end of the gray toolbar. Tap ![]() to play it back.
to play it back.
Editing Video on the Touch
Do you have a video where all the good action is in the middle? You know, the one where the first 5 minutes capture your voice trying to wheedle your toddler into dancing for Grandma—while the last 2 minutes show the inside of your shirt pocket because you forgot to turn off the camera? That stuff is easy to fix on the Touch.
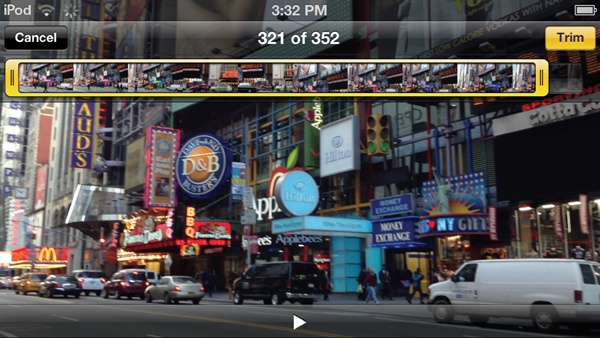
Here’s how to trim off the unnecessary parts on either end of a clip (you can’t edit within a clip):
Open the video you want to edit.
Tap the screen to call up the editing controls. The frame-viewer bar at the top of the screen displays scenes from the clip.
Press the outer edge of the frame-viewer so it turns yellow, and then drag either end of the yellow bar to isolate just the frames you want to keep. Tap the Trim button to cut away the detritus.
After you press Trim, the Touch offers you a choice of cutting the original clip (which makes this edit permanent) or saving the edited video as a whole new clip—while leaving the original version intact.
Share and Upload Photos and Videos
NOW THAT YOU’VE TAKEN all these great photos and videos on your Touch, don’t you want to share them with the world—or at least your friends and relatives? No matter how you want to share (privately through email, publicly on Facebook, for example), the Touch offers several ways to show off your work:
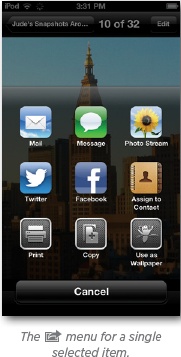
Email. Tap Photos→Camera Roll to see your photos and videos (if you have the Camera app open on-screen, tap the thumbnail preview in the toolbar to jump to your collection). If you have just one photo you want to share, tap open its thumbnail image so it fils your Touchscreen and tap the
 icon. A menu pops up with nine options (below left). To send the picture as an email attachment, tap Mail to create a new message with the photo already attached and ready to address.
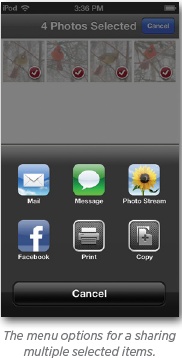
To share multiple photos by email, stay on the thumbnails screen of the photo album and tap Edit. Next, tap the thumbnails of the photos and videos you want to send to select them with a
 . Tap the Share button at the bottom of the screen, and then tap the mail icon in the drop-down menu (above right). A mail message appears with your files attached, ready for you to address and send. (You can also use the Edit button to select files for deletion out of the Camera Roll or to copy into a new album in the Photos app—just tap Edit, select the photos you have in mind, and then tap either Delete or Add To New Album.)
Message. Tap
on a selected photo or video to send it as an instant message (Use Messages) to friends with iOS 5 or later devices. You send multiple images in a message the same way you send multiple photos with an email: On the album’s screen, tap the Edit button, select your images, tap , and then tap Message.Photo Stream (Photos only). If you use the Photo Stream feature (Share and Stream Photos With iCloud), tap
on a selected picture to send it to your stream. As with mail and messages, you can send multiple images to the Photo Stream as described above.Twitter (Photos only). Got Twitter? Select a photo and tap
to get the Twitter button so you can share the image with your followers.Facebook (Photos only). If you’re one of the billion people with a Facebook account and want to post a pic from your Touch right to your profile page, tap
and select Facebook. You can share several images using the bulk-share method described above for mail, messages, and the Photo Stream.Assign to Contact (Photos only). Just snapped a nice picture of a friend and want to assign it to her address card in the iPod’s Contacts app? Tap
and then Assign to Contact. The next chapter has more on contacts.Print (Photos only). If you have an AirPrint printer (Print from Your Touch), select a photo and tap
for the Print option. You can print multiple photos by tapping the album’s Edit button, selecting the photos, and tapping Share and then Print.Copy (Photos only). Tap
and then Copy to grab the photo for pasting into a document or message. Use the Edit button method described above to copy multiple images at once.Use as Wallpaper (Photos only). To turn a selected picture into your Touch’s background image, tap Tap
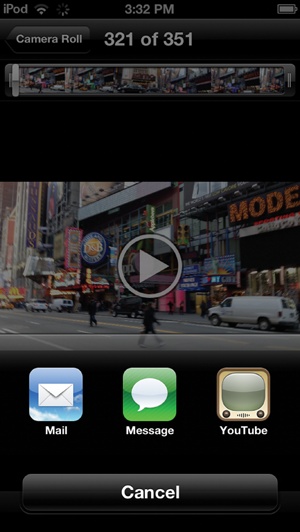
and then tap Use as Wallpaper.Upload to YouTube (Videos only). With a video clip on-screen (right), tap the
button and then tap YouTube.
Tip
You can transfer your Camera Roll contents to your computer. Connect your Touch to your Windows PC or Mac and use the Import command in your photo-organizer program (like Adobe Photoshop Elements or iPhoto) to copy over photos and videos. Once you have the files on your computer, you can post them to your blog or a photo site.
Play Around in Game Center
UNLESS YOU’RE PLAYING SOLITAIRE, games are usually more fun when you play with someone. Once you sign up for the Touch’s Game Center, you can compete against thousands of other players around the world. You can add pals to a Friends list for quick competitions, do battle with strangers in multiplayer games, and join the race to the top of each game’s leaderboard.
Here’s how to get started with Game Center:
Tap the Game Center icon on the Touch’s Home screen and sign up for an account or type in your Apple ID (Set Up an Apple Account); games you buy and download get billed to this account. You need to tap through a few account setup screens (including one with legal terms) to create an Apple ID.
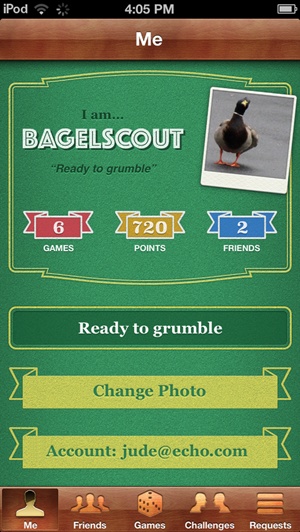
Pick an online nickname—it may take a few tries to find an available one. You can also add a photo to your profile. When you fire up Game Center later, your carefully constructed gamer identity greets you as shown below. (To switch to a different, more fear-inspiring photo later, tap the Change Photo button, and then select a new image from the Photos app.)
March through the rest of the account setup screens. You can configure your settings so you get invitations to games and so Game Center members can find you based on your email address. Game Center also asks if you’d like to add your Facebook friends to your list of recommended opponents. You can also get push notifications for game invitations and updates by configuring your iPod’s Notifications (Use Notifications).
Get Games
Not every game out there works with Game Center, but if you’ve already downloaded some that do, tap the Games icon to see them. If you need more games, flick down to the bottom of the screen and tap Find Game Center Games for a quick trip to the App Store.
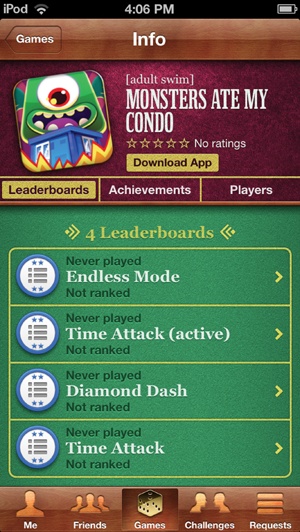
The Games screen also shows recommendations for games you might like based on previous purchases. To see the leaderboards and possible achievements (goals) in a game, tap the name of the game. The next screen has buttons that reveal who’s leading and the list of achievements you earned in that game.
Find Someone to Play With
Game Center is its own social-gaming network for global competition (it’s similar to the Open Feint network, which works with some Game Center games as well). Tap the Friends button at the bottom of the screen to see a list of friends you already have—or potential new ones Game Center recommends based on your common gaming interests. To see a player’s profile, tap his or her name to see the games that person plays and the points scored.
You can add gaming friends two ways:
Tap Friends→Add Friends (or tap
 in the upper-left corner). On the next screen, type the nickname of the person you wish to send a Friend Request message. (To find friends on Game Center, you need to know the person’s email address or Game Center nickname.)
On the Friends screen, flick through the list of Game Center-recommended potential pals. When you see someone who looks like fun, tap the name and then, on the next screen, tap Send Friend Request.
If you’ve gotten friend requests, tap the Requests button to see who wants to play. To invite a friend to a multiplayer game, open that game and tap the Play button. Next, select the friends to whom you want to send invites, and when everyone accepts, start the game.
You can issue challenges to other players by tapping Games→[Name of Game]→Achievements→[Name of Achievement]→Challenge Friends; tap the Share button to brag on your achievement by email, message, Facebook, or Twitter. And to see who’s thrown down the digital gauntlet at your feet, tap the Challenges button on the main Game Center screen.
Use Newsstand and iBooks
Even though the iPod Touch’s screen is several inches smaller than the Amazon Kindle’s or even the iPad Mini’s, it displays electronic magazines, newspapers, books, and other reading material with a pair of Apple apps: Newsstand (which comes with iOS 5 and later) and iBooks (which you can download from the App Store, as explained below). These apps turn your Touch into a pocket reading room—and it’s easier to hold on crowded trains, planes, and other tight spots.

Newsstand
This app sits quietly on the iPod’s Home screen, waiting for you to download an electronic periodical so it can proudly display the material on its virtual shelves.
“Hey,” you say, “That all sounds great, but how do I find and subscribe to digital magazines and newspapers in the first place?” Apple, in its quest to sell you more content, has made it extremely easy: Just launch the Newsstand app and tap the Store button in the top-right corner (right).
The Newsstand whisks you to a special part of the App Store where you can buy, subscribe to, and download electronic periodicals. The Store displays each title like an app, offering price, ratings, and other info. Tap a title to learn more, buy a single issue, or sign up for a subscription. The bill goes to the credit card linked to your Apple ID (Set Up an Apple Account).
If you need to cancel, renew, or adjust a subscription, log into your Store account. You can do that right from the Touch by opening the iTunes Store app, flicking to the bottom of the screen, and tapping either your Apple ID (if you’re signed in already) or Sign In. Tap View Apple ID, log in, and flick down to Subscriptions. Tap Manage, and then tap the title you want to change.
If you sign up for a subscription, the Newsstand app automatically grabs each new issue and sends you a notification (if you have your settings configured to do so). The app also lists the number of new e-rags in a red circle on the Newsstand icon. Tap it open to see what awaits you on the faux-IKEA shelves.
iBooks
The first time you visit the App Store, you get a note from Apple (shown at the top of Podcasts) asking if you’d like to download a free copy of iBooks and a few other apps. If this appeals to you, tap the Download Free button. If the time’s not right, you can also go back and download iBooks later (Chapter 6).
When you open iBooks, you see that it, too, has a Store button beckoning you to tap it. Once you do, you’re swept right into the ebook section of the App Store. After you find something to read, tap the price to buy it—and to have it billed to your iTunes account. If you’re not sold yet, tap the Sample button to download a portion of the book to evaluate. Tap the Library button to leave the Store and return to your personal book collection.

The books you download appear on the iBooks shelves; tap the Books button at the top and choose Purchased Books to see (and re-download) all the iBooks you’ve ever bought. Tap a book cover to open the title and start reading. You can read your book in either portrait (vertical) or landscape (horizontal) mode.
By tapping the electronic page of an ebook, you summon iBooks’ navigation and customization controls:

Tap
 to go to the book’s table of contents or list of pages you’ve bookmarked.
Tap
 to make the type larger or smaller by tapping either the big A or the little A buttons. In the same menu, you can move the
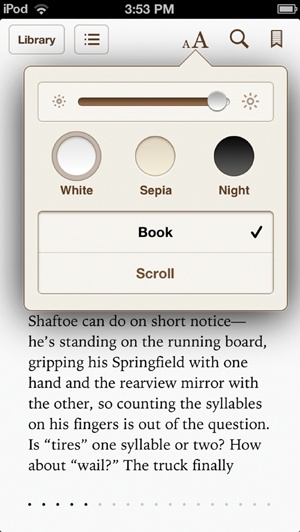
  slider to adjust the screen brightness. Tap Fonts to pick a different typeface. Tap Themes (right, bottom) to add a light-brown sepia tone to the page to make it easier to read, or switch to the Night theme (white-text-on-a-black-background) for bedtime reading. You can also change the way the book’s pages move: tap Book for the animated page-turning action or Scroll to get the text in one continuous vertical page.
Tap
 to search for text within the book—or on the Web and Wikipedia.
Tap
 to bookmark your place. If you’re reading the book on different iOS devices, iBooks offers to sync your bookmarks between them.
With your fingertip, use the brown slider at the bottom of the page to skip around in the book. When you’re done reading, tap the Library button in the top-left corner to close the book and return to your Library. You can also open, read, and store PDF files in the iBooks app.
Get Fit With Nike + iPod Touch
IN ADDITION TO THE stopwatch feature mentioned on The iPod Nano as Personal Trainer, the Touch has another plus for fitness buffs: the Nike + iPod software. With this built-in iTrainer beside you at the gym (and some Nike gear, mentioned below), you can record your workout statistics, pick your favorite exercise music, and upload your daily results to www.nikeplus.com to track your progress over time (you need to register for a free account at the Nike site to store your workout data).
Nike + iPod Touch
To use the fitness feature on the Touch, you need to buy a special set of Nike gym shoes—they include a small compartment where you stick in the iPod-compatible shoe sensor. You can find the shoes at most athletic-footwear stores.
The sensor costs $19 and can be found online at www.apple.com/ipod/nike. It transmits your steps to the Touch, which dutifully records the information.
That information lives in the Nike + iPod app. If you don’t see a red Nike icon on your Touch, tap Home→Settings→Nike + iPod→On.
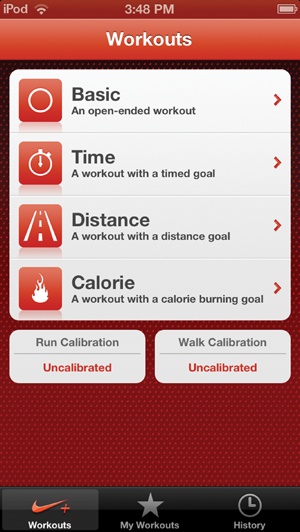
Tap the Workouts screen to pick an exercise session that suits your needs. You can choose:
A basic workout with no set goals.
A timed workout based on 20 to 90 minutes (or a custom amount) of activity.
A distance goal to cover a specific amount of ground (like 3K or 5 miles).
A calorie workout that lets you target the fat you want to burn after last night’s pizza-and-cookies binge.
Once you choose a workout, the Touch asks you to pick a playlist from the inspiring collection you created in the Music app. You can shuffle the songs or, if you’re feeling all Zen, skip the music and work out in silence.
The first time you work out, the Touch prompts you to enter your current weight. Once you do, it asks you to “pair” (electronically link) the iPod and shoe sensor so the two can communicate. If you don’t get a prompt, tap Settings→Nike + iPod→Sensor to open a dialogue between the electronics in your hand and the electronics under your foot. A screen like the one on the right guides you through the process.

Once you have the shoe sensor linked and your chosen workout ready to go, tap the green ![]() button (right, bottom) to get rolling. The Touch keeps track of the time, distance, and calories for you.
button (right, bottom) to get rolling. The Touch keeps track of the time, distance, and calories for you.
If you find your playlist of soothing classical violin favorites isn’t exactly pumping you up, tap the orange Change Music button to pick something livelier.
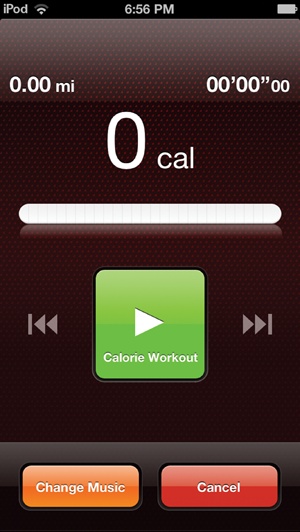
To pause a workout session to catch your breath, press the Touch’s Sleep/Wake button, and then tap Pause (![]() ) on the Lock Screen. When you’re ready to start up again, tap
) on the Lock Screen. When you’re ready to start up again, tap ![]() to pick up where you left off.
to pick up where you left off.
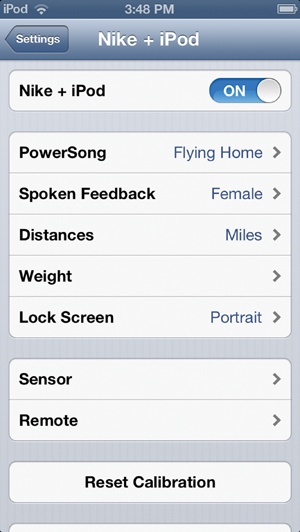
Tap Settings→Nike + iPod to further personalize your workout with a power song, spoken feedback, and your weight (it may change if you keep working out, you know). The Settings screen, shown at the top of the opposite page, also holds controls for displaying metric or imperial units of measure in case you prefer to run in kilometers instead of miles.
As mentioned earlier, the Nike software comes with several stock routines in its workout library, but you can get creative with your exercise sessions. To create your own routines, tap the My Workouts icon at the bottom of the screen. Tap ![]() and compile a new workout by selecting the Basic, Time, Distance, or Calorie options. To calibrate the Touch to your own stride, when you finish a workout, tap the End Workout button, and then tap Calibrate. (You can recalibrate the Touch by tapping Settings→Nike + iPod→Reset Calibration.)
and compile a new workout by selecting the Basic, Time, Distance, or Calorie options. To calibrate the Touch to your own stride, when you finish a workout, tap the End Workout button, and then tap Calibrate. (You can recalibrate the Touch by tapping Settings→Nike + iPod→Reset Calibration.)
When your workout is over, you can send all this info to your online Nike+ account via WiFi. Just tap History→Send to Nike+ to log your daily stats.