Chapter 6. The Power of Playlists
A playlist is a group of songs you gather from your iTunes library that you think go well together. You can include pretty much any set of tunes arranged in any order. For example, if you’re having a party, you can make playlists out of the current Top 40 downloads or the dance music in your iTunes library. If you’re in a 1960s Brit-girl pop mood, you can whip together the hits of Dusty Springfield, Lulu, and Petula Clark. Some people may question your taste if you, say, mix tracks from La Bohème with Queen’s A Night at the Opera, but hey—it’s your playlist.
Creating playlists has become something of an art form since the iPod arrived in 2001. You can find books filled with sample playlists. Academics around the world write papers about group dynamics and cultural identity after studying how people create playlists—and which ones they choose to share with others. You can publish your own playlists in the iTunes Store (see Publish Your Own Playlists (iMixes)) so others can bear witness to your mixing prowess. Some nightclubs even invite people to hook up their iPods so they can share their playlists with the dance-floor audience.
If you don’t have time to make your own playlists, Apple lends you an expert hand. Its Genius feature lets you create one-click mixes of songs that sound like they were actually meant to go together.
So get cracking and create a playlist (or 42) of your own.
Make a New Playlist in iTunes
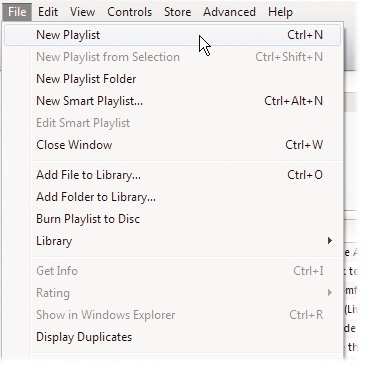
To create a playlist, press Ctrl+N (⌘-N) in iTunes. You can also choose File→New Playlist or click the ![]() button at the bottom-left corner of the iTunes window.
button at the bottom-left corner of the iTunes window.
All freshly minted playlists start out with the impersonal name “untitled playlist.” Fortunately, iTunes highlights this generic monicker so it’s ready for editing—just type in a better name: “Cardio Workout,” “Hits of the Highland Lute,” or whatever you want to call it. As you add playlists, iTunes alphabetizes them in the Playlists area of the Source list.
Once you create and name a spanking-new playlist, you’re ready to add songs or videos. You can do so in several ways, so choose the one you like best.
Playlist-Making Method #1
If this is your first playlist, open the playlist in its own window so it’s easy to see what’s going on. To make that happen, double-click the name of the playlist in the Source panel. You end up with your full library in one window and your empty playlist in the other. (If this is your first playlist, iTunes pops up an intro screen; ignore it and go to step 2.)
Go back to the main iTunes window and drag the song titles you want from your library over to the new playlist window. (Make sure you click the Music icon in the Source list to see all your songs.) Drag songs one at a time, or grab a bunch by selecting tracks as you go: Just Ctrl-click (⌘-click) each title.

Playlist-Making Method #2
Playlist-Making Method #3
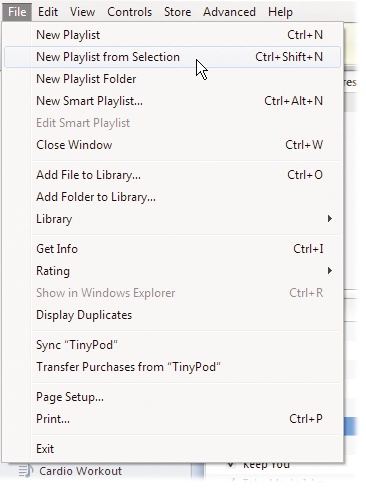
You can also pick and choose songs in your library and then create a playlist out of the highlighted songs. Select tracks by Ctrl-clicking (⌘-clicking) the titles.
Choose File→New Playlist From Selection, or press Ctrl-Shift-N (⌘-Shift-N). The songs you selected appear in a brand-new playlist. If all of them came from the same album, iTunes names the playlist after the album (but it also highlights the title box so you can rename it).
Don’t worry about clogging up your hard drive. When you drag a song title onto a playlist, you don’t copy the song, you just tell iTunes where it can find the file. In essence, you’re creating a shortcut to the track. That means you can have the same song on several playlists, but only one copy of it resides on your PC.
That nice iTunes even gives you some playlists of its own devising, like “Top 25 Most Played” and “Purchased” (a convenient place to find all your iTunes Store goodies listed in one place—and one to definitely back up to a CD or DVD; see Back Up Your iTunes Files to Disc to learn how).
Change an Existing Playlist
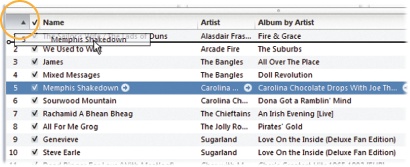
If you change your mind about a playlist’s tune order, drag the song titles up or down within the playlist window. Just make sure to sort the playlist by song order first (click the top of the first column, the one with the numbers listed in front of the song titles).
You can always drag more songs into a playlist, and you can delete titles if you find that your list needs pruning. Click the song in the playlist window, and then hit Backspace (Delete). When iTunes asks you to confirm your decision, click Yes. Remember, deleting a song from a playlist doesn’t delete it from your music library—it just removes the title from that particular playlist. (You can get rid of a song for good only by pressing Backspace or Delete from within the iTunes library; select the Music icon under “Library” to get there.)
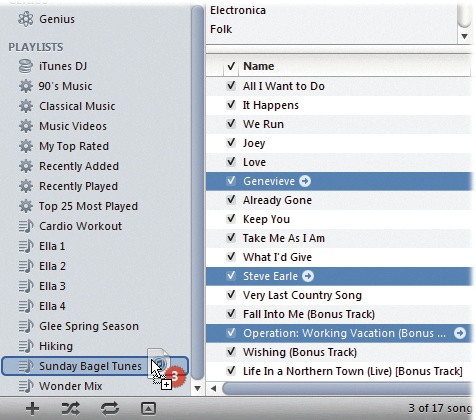
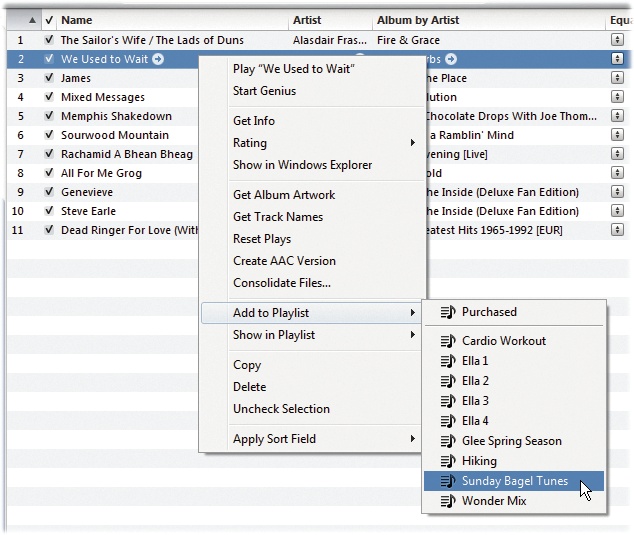
You can quickly add a song to an existing playlist right from the main iTunes window, no matter which view you happen to be using: Select the song, right-click (Control-click) it, and then, in the pop-up menu, choose Add to Playlist. Scroll to the playlist you want to use and then click the mouse button to add the track to that playlist.
If you want to see how many playlists contain a certain song, select the track, right-click (Control-click) it, and choose Show in Playlist in the pop-up menu.
Add a Playlist to Your iPod
Adding that fabulous new playlist to your iPod doesn’t take any heavy lifting on your part. In fact, if you set your iPod to autosync with iTunes, the only thing you need to do is grab your USB cable and plug in your iPod. Once iTunes recognizes the iPod, it copies any new playlists you created over to it.
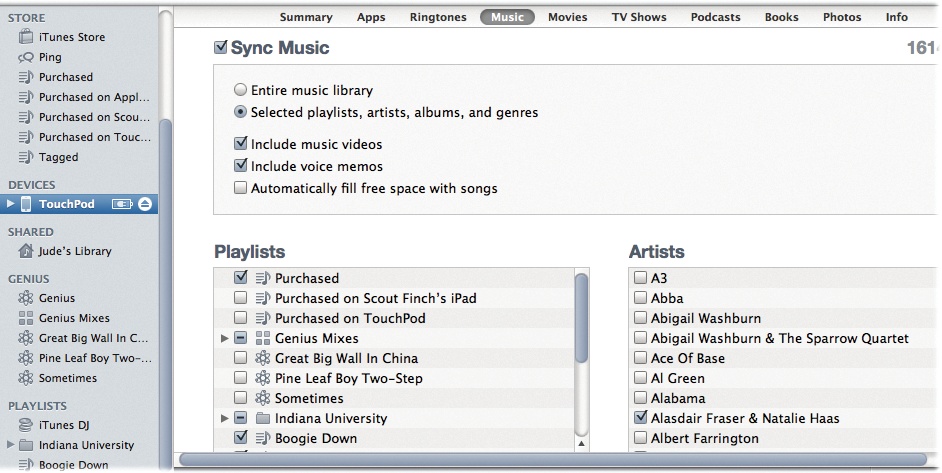
You can also tell iTunes to sync different playlists to different iPods—helpful if you’re in a multiple-iPod-owning household and you all share the same computer and iTunes library. Just plug in your iPod, select it in the Source list, and then click the Music tab. In the Sync Music area, click the button for “Selected playlists” and then turn on the checkboxes for the playlists you want.
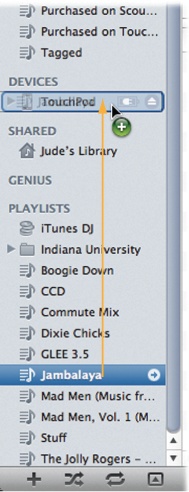
If you manually manage the syncing process, adding new playlists is a total drag—literally, because dragging is all you have to do. With your iPod connected, click the playlist icons you want to transfer and drag them onto the iPod’s icon. That’s it.
Tip
If you find that your Source list is longer than the line for a Justin Bieber concert, you can save some space by putting batches of song mixes, like “Dinner Party” or “Cardio Workouts,” inside playlist folders in the Source list. Making a folder is easy: just choose File→New Playlist Folder. Once the new folder appears in the Playlists area of the Source panel, give it a name and then drag a bunch of playlists onto the folder icon. To open the folder and crank up a playlist inside, click the flippy triangle next to the folder name to reveal the playlist names. Click the triangle again to close the folder and shorten your Source list.
Delete a Playlist
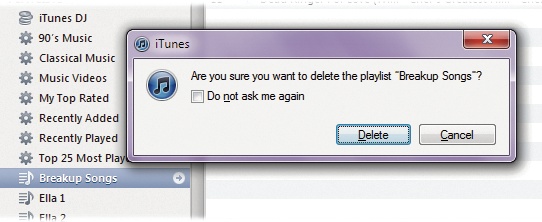
The party’s over, and you want to get rid of that iTunes playlist. Start by clicking it in the Source list, and then press the Backspace (Delete) key. iTunes presents you with a warning box, double-checking that you really want to vaporize the list. (Again, this maneuver just zaps the playlist itself, not the songs you had in it. Those remain available in the main iTunes window.)
If you have your iPod set to autosync, then any playlist you delete from iTunes will disappear from your iPod the next time you plug in and sync your player.
If you manually manage your iPod and all its contents, then connect the player and spin open the flippy triangle next to its name in the Source list. That gives you a look at all its libraries and playlists. Click the one you want to dump and then hit the Backspace (Delete) key.
Make and Edit Playlists on the iPod Touch and Nano
Playlist inspiration can strike anywhere, and you may not be sitting in front of iTunes when it does. Thankfully, the Touch and Nano let you follow your musical whims wherever you may be. To make a playlist on the player, all you need are some songs and a finger. Here’s how:
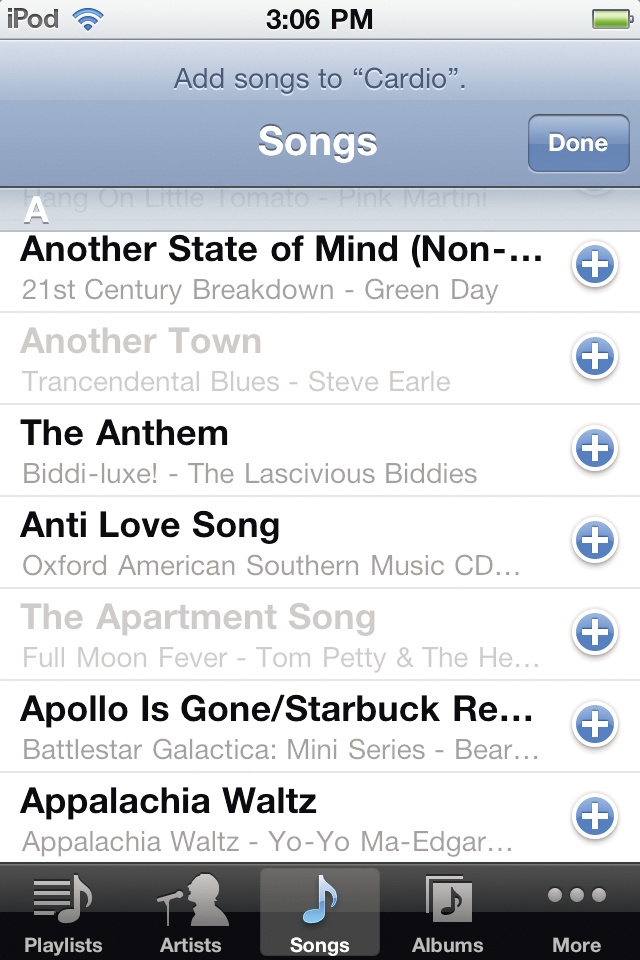
Create the playlist. On the Touch’s Home screen, tap the Music icon. Tap Playlists. Near the top of the Playlists screen, tap Add Playlist and type in a name for it. A master list of all your songs appears. Each time you see one worth adding, tap its name (or the
 button). You can also tap one of the icons at the bottom of the screen, like Playlists, Artists, or Albums, to find the stuff you want. At the top of every list is an “Add All Songs” option that does just that—adds all the songs listed to your playlist-in-progress. When you finish, tap Done. Your playlist is ready to play.
On the Nano’s Home screen, tap Playlists, and then flick to the Add button and tap it. Tap the name of the category—Songs, Albums, you know the drill—and then tap the title of the song you want to add. You can swipe left to add stuff from several categories, like if you want to stick in a podcast for your cooldown walk after you’ve played all the songs on your jogging playlist. Tap Done when you finish. Your creation is called New Playlist 1, but you can change that after you sync the Nano with iTunes.
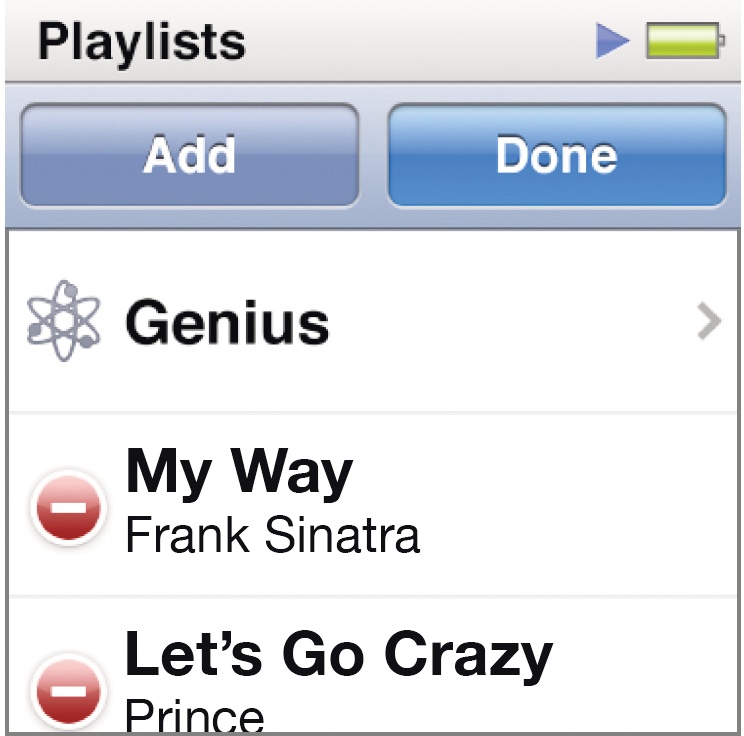
Edit the playlist. On the Playlists screen, tap the playlist name; on the next screen, tap Edit. Tap the Delete symbol (
 ), and then tap the Delete button to remove a song from the playlist. Tap Done when you finish. (On the Touch, tap the Clear button to kill the whole playlist.)
To add songs to a list, tap the Add or
 button at the top left. Each time you see a song worth adding, tap it.
You can reorder your tunes on the iPod Touch. See that “grip strip” (
 ) at the right edge of the screen? Press and hold it with a finger and drag the strip up or down to rearrange the songs. When you finish, tap Done.
Make a Playlist on an iPod Classic
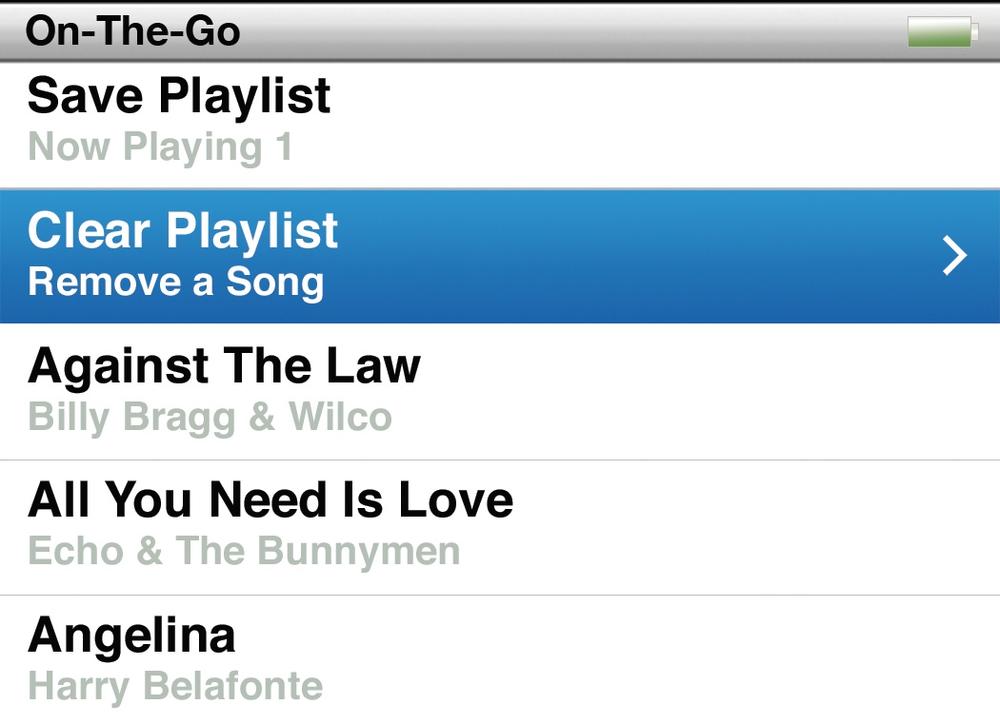
The iPod Classic may be older than the Touch and Nano, but it, too, lets you create playlists right there on the player. They sync back to iTunes the next time you connect. The iPod Classic calls its song collections “On-The-Go” playlists:
Scroll through your iPod’s list of songs until you get to the title of the first one you want to add to a playlist.
Hold down the iPod’s center button for a few seconds until a new set of menus appears. Choose Add to On-The-Go.
Scroll to the next song you want to add and repeat the process.
When you’re done adding songs, press the iPod’s menu button until you get to the Music menu; go to Playlists→On-The-Go. Under On-The-Go, you see the number of songs you just compiled. Press the Select button to see the song titles.
If you like what you see, scroll up to Save Playlist and click the center button. If you don’t like the collection, choose Clear Playlist to dump the songs and start over. If you like most, but not all, of the songs, you can remove individual tunes by selecting one, holding down the center button, and choosing Remove from On-The-Go.
Your freshly inspired playlist now appears in your Playlists menu as On-The-Go 1. The next one you make and save will be On-The-Go 2, and so on. When you reconnect your iPod to iTunes, you can click these names and change them to something peppier—or more descriptive.
Make a Genius Playlist in iTunes
Playlists are fun to make, but occasionally you just don’t have the time or energy. If that’s the case, call in an expert—the iTunes Genius. With the Genius feature, you click any song you’re in the mood for and iTunes crafts a playlist of 25 to 100 songs that it thinks go well with the one you picked.
The first time you use it, Genius asks permission to go through your music collection and gather song information. Then it uploads that data to Apple. When your information has been analyzed (by software) and anonymously added to a big giant database of everybody else’s song info (to improve the Genius’s suggestions), the Genius is ready for duty. Here’s the procedure:
Click a song title in your library.
Click the Genius button (
 ) at the bottom right of iTunes. (If you’re playing the song, click the Genius icon in the iTunes display window.)
iTunes presents you with your new playlist in a flash.
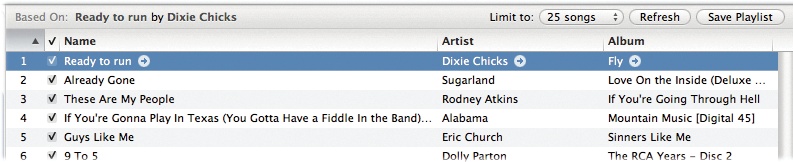
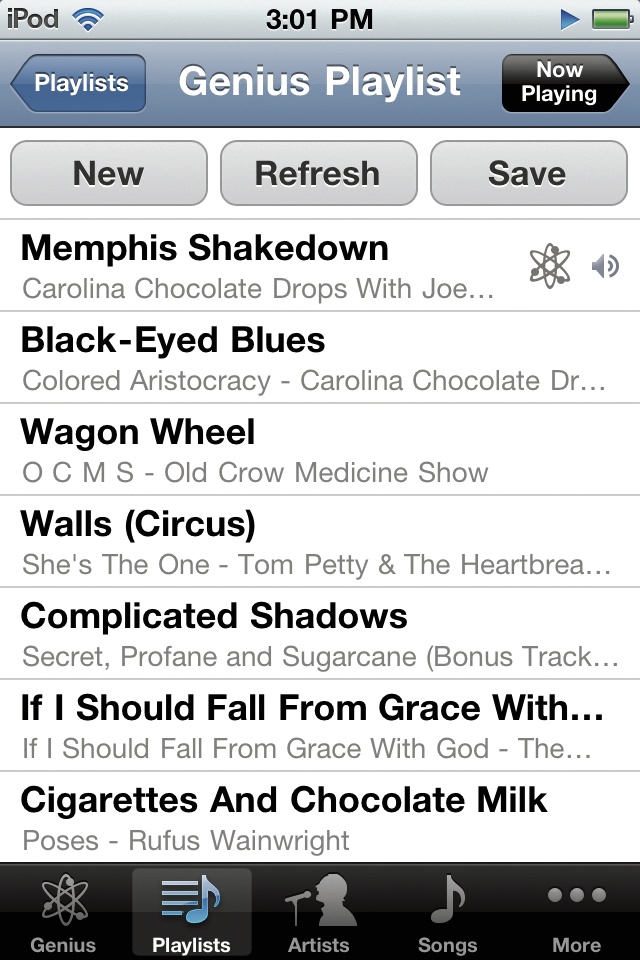
Use the buttons at the top of the Genius window to adjust the number of songs in the playlist, to refresh it with new songs if you want a different mix, and—best of all—to save the list permanently.
The Genius doesn’t work if it doesn’t have enough information about a song—or if there aren’t enough similar songs available to match up with it. In that case, pick another tune. If you frequently add new music to your library and want to get it in the mix, inform the Genius at Store→Update Genius.
And if you happen to have the Genius Sidebar panel open in your iTunes window (Chapter 4), the Genius cheerfully presents you with a list of other songs that you can buy right there to round out your listening experience.
Make a Genius Playlist on the iPod
You may get so hooked on making Genius playlists in iTunes that you never want to leave your computer. Before you end up on a neighborhood “Lost” flier, consider this: You can also make Genius playlists on the iPod itself. You just need to have a recent Touch, Nano, or Classic.
To use your portable pocket Genius, though, you first have to set it up and upload your information from iTunes to Apple, as described on the previous page. But you’ve probably already done that by now, so here’s how to make the Genius do your bidding when you’re away from your computer.
On the Touch, tap Music→Playlists→Genius Playlist and then tap the song you want Genius to use as a starting point. If you’re currently listening to that song, tap the screen to summon the playback controls (Chapter 3), and then tap the
icon.On the Nano, play the song you want to start with and tap the album cover on the Now Playing screen. Swipe the screen to the left and tap the
icon.On a Classic, select a song and hold down the iPod’s center button for a few seconds, until a menu appears; choose Start Genius. If you’re already playing the song you want to use, press the center button until you see the Genius option appear, and then flick the click wheel over to Start.
If you don’t like the resulting mix, select or tap the Refresh option atop the screen to get new tunes.
If you love the work of the Genius, select or tap the Save option at the top of the screen.
As in iTunes, Genius playlists are titled with the name of the song you originally chose as the foundation for your mix. When you sync the iPod with iTunes, the traveling Genius playlists get copied back to iTunes.
Genius Mixes in iTunes
Yes, the iTunes Genius feature takes almost all the effort out of making a play-list—all you do is click the Genius button. But if even a one-button click seems like too much effort, iTunes makes computerized playlist creation even easier. Welcome to Genius Mixes.
The Genius Mix feature works like this: iTunes takes it upon itself to search your entire music library and then automatically compose (depending on the size of your library) up to 12 different types of song collections. Unlike a Genius playlist of songs calculated to go well together, a Genius Mix is more like a radio station or cable-TV music channel, with the music based on genre. Depending on what’s in your iTunes library, the Genius could present you with a hip-hop mix, a country mix, a classical mix, and so on. In addition, the Genius Mix creates up to 12 playlists at once, all saved and ready to play, unlike the Genius’s single mix that you have to save to preserve.
If you don’t already see a square Genius Mix icon in your iTunes Source list, choose Store→Update Genius. Once activated, the Genius quietly stirs up its sonic concoctions from your music library.
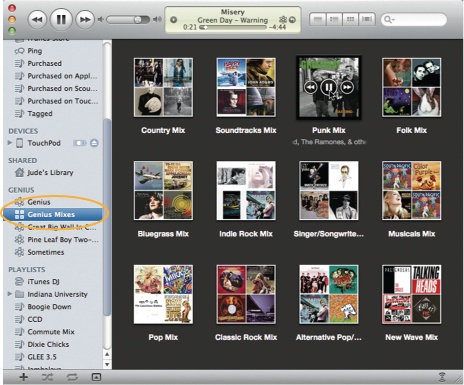
To play a Genius Mix, click the Genius Mix icon in the Source list. The iTunes window reverts to Grid View and displays the different mixes it’s created. It represents each by a quartet of album covers from tracks in the mix. Pass your mouse over the album squares to see the name of the mix, or click the squares to start playing the songs.
Like more traditional radio stations, you don’t get to see a playlist of what’s actually in a particular Genius Mix—it’s all a surprise. If you don’t care for a particular song the Genius has included, you can always hit the forward button or tap the right arrow key on the computer’s keyboard to skip to the next track.
Genius Mixes can be another great way to effortlessly toss on some background music at a party, and you may even hear songs you haven’t played in forever. Want to take the Genius Mix with you? The next page explains how.
Genius Mixes on the iPod
As with most playlists (except for those mobile made-on-the-iPod kind), you need to copy Genius Mixes over to the iPod by way of iTunes. But there’s one other little requirement: You have to copy the Genius Mixes over by syncing them through iTunes.
People who autosync their entire libraries don’t have to do anything to get the Genius Mixes onboard their iPods. People who manually manage music by dragging tracks from the iTunes library onto the iPod can’t physically drag a Genius Mix onto the player—for now, anyway. For those who selectively sync, copying a Genius Mix takes just a few steps:
Connect your iPod to your computer and click its icon when it appears in the Source list.
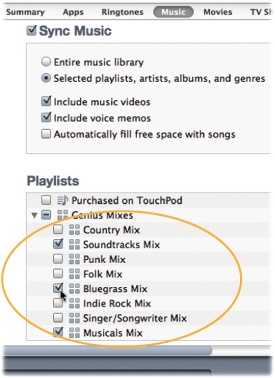
Click the Music tab in the middle of the iTunes window.
If you haven’t done so, turn on the checkbox for Sync Music and click the button for “Selected playlists, artists, and genres”. (If you selectively sync anyway, you’ve already done this step.)
Turn on the checkboxes next to the Genius Mixes you want to copy to your iPod. Click the Apply and/or Sync button to transfer them to the player.
To play a mix on your iPod Touch, tap Home→Music→Genius. Swipe your finger across the screen until you get to the mix you want, and then tap the Play triangle to fire it up. (The dots at the bottom of the screen tell you how many mixes you have.) On a Nano, tap the Genius icon and swipe the screen to browse the mixes. On a Classic, choose iPod→Music→Genius Mixes. Use the click wheel’s Next or Previous buttons to get to the right mix. Press the center button or Play/Pause to listen it.

Publish Your Own Playlists (iMixes)
An iMix is a playlist you publish in the iTunes Store, so everyone on earth can see your masterwork. You can name it, write your own liner notes explaining your inspiration, and put it out there for everyone to see. (You’re not actually copying songs up to the Store; you’re just showing off your cool taste, which Apple hopes will lead others to buy those songs.) Here’s how you publish iMixes:
Start by signing into your Store account.
In the iTunes Source list, select the playlist you want to publish. (If it contains any songs that Apple doesn’t sell, or copy-protected songs you bought elsewhere, they’ll get knocked off the list—which may ruin your carefully constructed mix.)
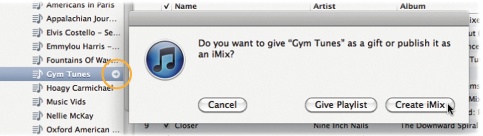
Click the arrow next to the playlist and click the Create iMix button in the box that pops up. You now find yourself in the iTunes Store.
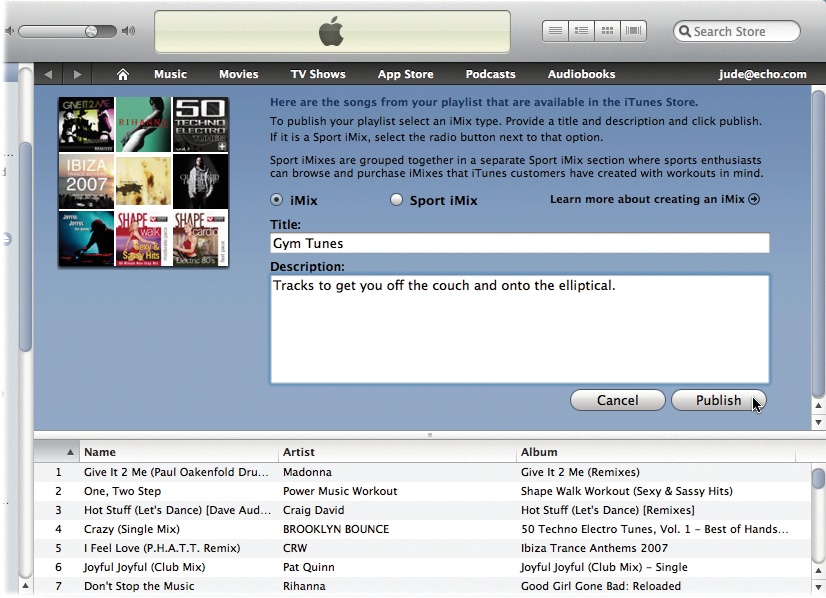
Click the Publish button after you fill in all the info about your list.
Once you click the Publish button, iTunes releases your playlist into the wild. Now other people can see it, rate it, be inspired by it, or—and let’s face it, here’s the important thing from Apple’s perspective—buy the songs for themselves.
Smart Playlists: Another Way for iTunes to Assemble Your Songs
As cool as the Genius is, sometimes you want a little more control over what goes into your automatically generated mixes. That’s where Smart Playlists rise to the occasion.
Once you give it some guidelines, a Smart Playlist can go sniffing through your music library and come up with its own music mix. A Smart Playlist even keeps tabs on the music that comes and goes to and from your library, and adjusts itself based on that.
You might tell one Smart Playlist to assemble 45 minutes’ worth of songs that you’ve rated higher than four stars but rarely listen to, and another to play your most-often-played songs from the 1980s. The Smart Playlists you create are limited only by your imagination.
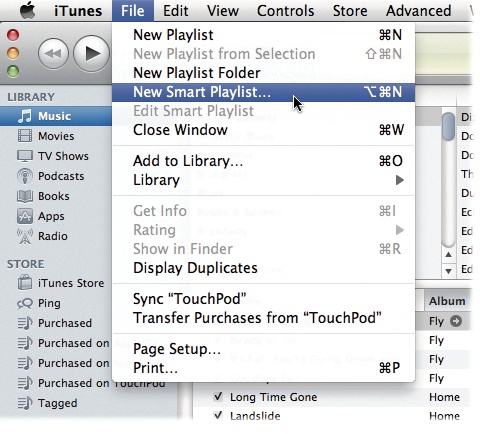
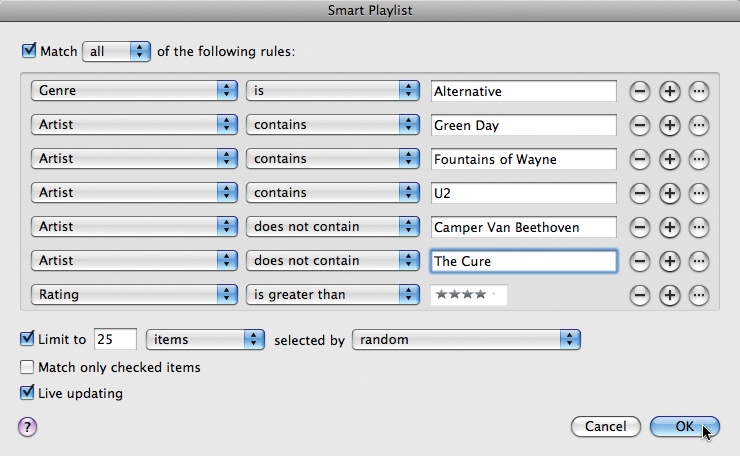
To start a Smart Playlist, press Ctrl+Alt+N (Option-⌘-N) or choose File→New Smart Playlist. A Smart Playlist box opens: It sports a gear-shaped icon next to its name in the Source list (a regular playlist has a musical staff icon with a note on it).
Give iTunes detailed instructions about what you want to hear. You can select a few artists you like and have iTunes leave off the ones you’re not in the mood for, pluck songs that fall within a certain genre or year, and so on. To add multiple, cumulative criteria, click the plus (+) button.
Turn on the “Live updating” checkbox. This tells iTunes to keep the playlist updated as your collection, ratings, and play count change. (The play count tells iTunes how often you play a track, a good indicator of how much you like a song.)
To edit an existing Smart Playlist, right-click (Control-click) the playlist’s name. Then choose Edit Smart Playlist.
A Smart Playlist is a dialogue between you and iTunes: You tell it what you want in as much detail as you want, and the program whips up a playlist according to your instructions.
You can even instruct a Smart Playlist to pull tracks from your current Genius playlist. Just click the + button to add a preference, choose Playlist as another criteria, and select Genius from the list of available playlists.
iTunes DJ: Get the Party Started
The standard iTunes song-shuffle feature can be inspiring or embarrassing, depending on which songs the program happens to play. The iTunes DJ feature, on the other hand, lets you control which songs iTunes selects when it shuffles at your next shindig. It also shows you what’s already been played and what’s coming up in the mix, so you know what to expect.
Click the iTunes DJ icon in the Playlists area of the iTunes Source list. Now you see a new pane at the very bottom of iTunes.
Use the Source pop-up menu to select a music source for the mix. You can use either an existing playlist, the Genius, or your whole library.
If you don’t like the song list that iTunes proposes, click the Refresh button at the bottom right of the iTunes window. iTunes generates a new list of songs for your consideration.
Click the Settings button at the bottom of the window. In the Settings box, you can change the number of recently played and upcoming songs that iTunes displays. If iTunes is DJ’ing your interactive music party, the Settings box also has a place to add a welcome message for guests changing up your music with the Remote program on their iPhones and iPod Touches. (View Video and Photos with Apple TV has more on the Remote app.)
Arrange the songs if you feel like it. Back on the playlist, you can manually add songs, delete them from the playlist, or rearrange the playing order. To add songs, click the Source list’s Music icon and then drag your selected tunes onto the iTunes DJ icon.
Click the Play button. And let the music play on.


Three Kinds of Discs You Can Create with iTunes
If you want to record a certain playlist on a CD for posterity—or for the Mr. Shower CD player in the bathroom—iTunes gives you the power to burn. In fact, it can create any of three kinds of disc:
Standard audio CDs. This is the best option: If your computer has a CD burner, it can serve as your own private record label. iTunes can record selected sets of songs, no matter what their original sources (except for non-iTunes Store tunes that have copy protection), onto a blank CD. When it’s all over, you can play the burned CD on any standard CD player, just like the albums you get from Best Buy—but this time, you hear only the songs you like, in the order you like.
MP3 CDs. A standard audio CD contains high-quality, enormous song files in the AIFF format. An MP3 compact disc, however, is a data CD that contains music files in the MP3 format. Because MP3 songs are much smaller than AIFF files, many more of them fit in the standard 650 or 700 MB of space on a recordable CD. The bottom line? Instead of 74 or 80 minutes of music, a CD full of MP3 files can store 10 to 12 hours of tunes. The downside? Older CD players may not be able to play these CDs.
Backup CDs or DVDs. If your computer can play and record CDs and/or DVDs, you have another option: iTunes can back up your entire library, playlists and all, by copying it to a CD or DVD. (The disc won’t play in any kind of player; it’s just a glorified backup disk for restoration when something goes wrong with your hard drive.) Chapter 5 tells you how to use data discs to back up your iTunes library.
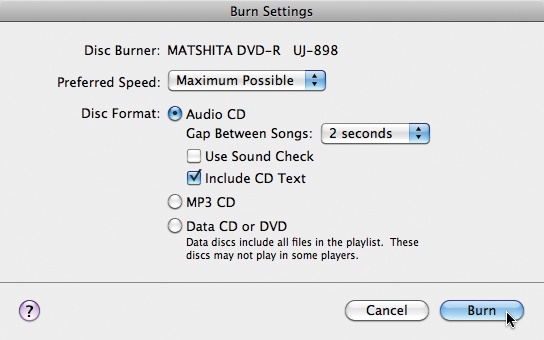
To see if your disc drive is compatible with iTunes, select a playlist and click the Burn Disc button on the iTunes window to get the Burn Settings box. If your drive name is listed next to “CD Burner,” iTunes recognizes it.
Burn a Playlist to a CD
Making a CD out of your favorite playlist takes just a few steps with iTunes, so get your blank disc ready and click along.
Select the playlist you want to burn. Check to make sure your songs are in the order you want them; drag any tune up or down to reorder.
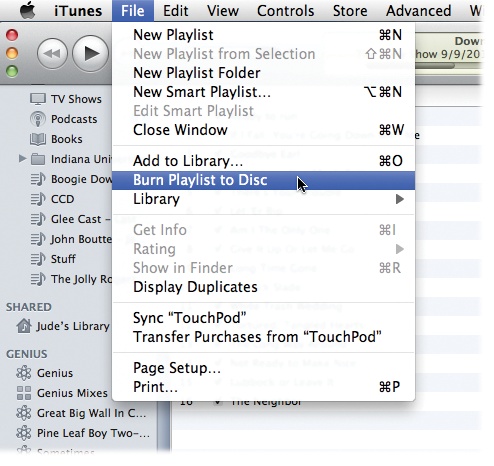
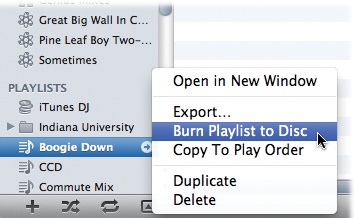
When you’re ready to roll, choose File→ Burn Playlist to Disc or right-click (Control-click) the playlist in the Source list and choose Burn Playlist to Disc. When the Burn Settings box pops up, pick the type of disc you want to create (see the previous page for your choices).
Insert a blank disc into your computer drive when prompted. If your computer has a CD platter that slides out, push it back in. Then sit back as iTunes handles things.
iTunes prepares to record the disc, which may take a few minutes. In addition to prepping the disc for recording, iTunes has to convert the files (if you’re burning an audio CD) to the industry-standard format for CDs.
Once iTunes has taken care of business, it lets you know that it’s now burning the disc. Again, depending on the speed of your computer and disc burner, as well as the size of your playlist, the recording process could take several minutes. When the disc is done, iTunes pipes up with a musical flourish. Eject the disc and off you go. But if you want to make a nice-looking CD cover…
Print Playlists and Snazzy CD Covers
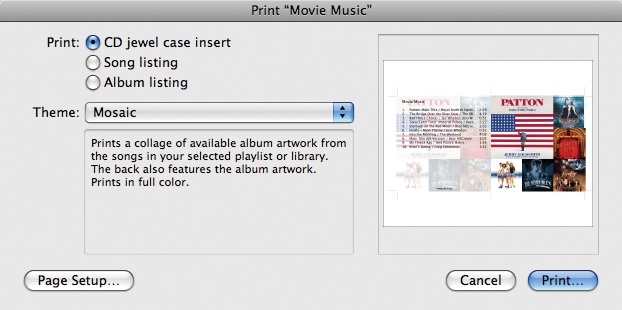
You used to have to do a lot of gymnastics just to print a nice-looking song list that would fit into a CD case. But with iTunes, all you need to do is choose File→Print, select a preformatted option, and then click the Print button.
The Print dialog box is full of choices.
CD jewel case insert. You can print out a perfectly sized insert for a CD jewel case, complete with a song list on the left and a miniature mosaic of all your album artwork on the right—or just a plain list of songs on a solid-color background. (If you choose to make a CD insert, your resulting printout even comes with handy crop marks to guide your scissors when you trim it down to size.)
Song listing. If you want something simpler, you can opt for a straightforward list of all the songs on the playlist. This option is also great for printing out a list of all the podcasts you currently have in your iTunes library—just click the Podcasts icon in the Source list, click the “Song listing” option, and print away.
Album listing. You can also print a list of all the albums that have contributed songs to your playlist, complete with the album title, artist name, and the songs’ titles and play times for each track culled from that album.
Want to use one of your own photos for the cover of your CD case? Start by adding the artwork of your choice to a track (Chapter 5). When you’re ready to print, select that track on the playlist and then choose File→Print→CD jewel case insert→Theme: Single Cover to place your photo front and center. This method also works great if you’re looking to create jewel-case inserts that look just like the ones that come with commercial CDs.