
Chapter 13. What to Do When Your iPod Isn’t Working Right
It’s bound to happen sometime: Your iPod locks up, freaks out, or just isn’t its usual cheerful self. Luckily, you can solve many iPod problems with a button-tap here or a battery charge there. Then your portable ‘Pod life is back to normal.
But your iPod is a mini-computer in its own right, and getting it back in working order might involve more than a button press or two, and maybe even the attention of a technical expert. This chapter explains what to do if your iPod starts acting weird—and where to go if you need more information or can’t fix it yourself.
Apple’s Alphabet: The Five “Rs” of iPod Repair
No matter which iPod model you have, when you’re having trouble and don’t know where to start, take a browser ride to Apple’s iPod support section at www.apple.com/support/ipod (below) to find help guides. However, when you encounter trouble with a Nano, Shuffle, or Classic, Apple suggests first trying its “Five Rs” approach to troubleshooting:
Retry your iPod connection by plugging it into a different USB port on your computer.
Restart your computer and check for iPod software updates (Update the iPod’s Software).
Reinstall your iPod and iTunes software at www.apple.com/itunes.
Restore your iPod’s software (also explained later in this chapter).

If you have an iPod Touch, try this set of “Rs”:
Recharge. Make sure your Touch has gas in its battery tank.
Restart. Press the Sleep/Wake button until the red Off/On slider appears. Slide the Touch off, and then press Sleep/Wake to turn it on again. If that doesn’t do much, try resetting the Touch as described on the next page.
Remove. Synced content may be sinking your Touch. Connect your iPod to iTunes, remove any recently added stuff (since they may have triggered the problem), and resync.
Reset Settings. Tap Settings→General→Reset→Reset All Settings. The option to erase all your content and settings may solve the problem, but it’s a drastic move. (If you’re just having trouble connecting to the Internet, first try the Reset Network Settings button.)
Restore. Connect your Touch to iTunes and click Restore to reformat it.
The next few pages cover these steps and more, so you can avoid that sixth, painful “R”: Ramming your head into the wall when your iPod won’t work.
Reset Your iPod
If your iPod seems frozen, confused, or otherwise unresponsive, you can reset it without losing your music and data files. You might not be able to save some settings, like bookmarks in long audio books or unsynced playlists, but you can get things running again with this easy, quick fix—after you check to make sure the issue isn’t simply an out-of-juice battery.
Here’s the reset sequence for all four 2010 iPod models:

iPod Touch. If restarting the Touch (see the previous page) does nothing for you, go for the Reset. Simultaneously hold down the Sleep/Wake and Home buttons (basically, the two buttons that are not the volume controls). Let go when you see the shimmering Apple logo.
iPod Nano. Press the Volume Down and the Sleep/Wake buttons (the two outer ones on the Nano’s edge) for about 6 seconds, and let go when you see the Apple logo pop up onscreen.
iPod Shuffle. The tiniest iPod may also need a good, firm reset from time to time, but like the Shuffle itself, resetting it is a bit simpler than wrestling with the other iPods: Turn the On/Off switch to the Off position, wait 10 seconds or so, and then flip it back to the On position.
iPod Classic. Slide the Hold switch on and off. Press and hold down the Menu and center Select buttons simultaneously until you see the Apple logo appear on the screen. This could take up to 10 seconds, and you may have to do it twice, but keep at it until you see the logo.
If the technology gods are smiling at you, your iPod will go through its start-up sequence and return you to the main menu.
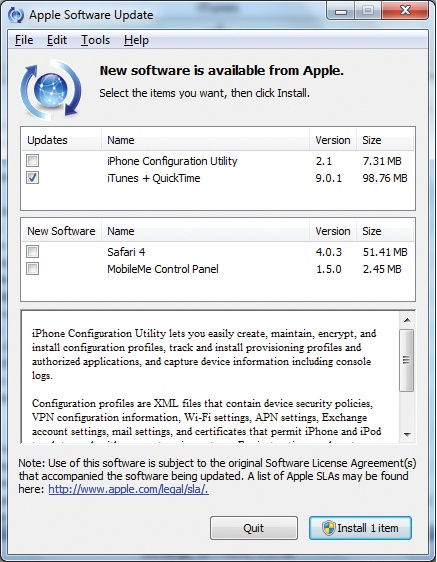
Download and Reinstall iTunes and iTunes Updates
If iTunes is acting up, you may need to download and install a fresh version of the program. The latest version is always waiting at www.apple.com/itunes/download. Your iTunes program itself may alert you to a new version—or you can make sure it does so in the future:
If you installed iTunes on a Windows PC and installed the Apple Software Update utility at the same time, then iTunes displays an alert box when an update is ready; it also offers to install the new version for you. If you skipped installing the utility, choose Edit→Preferences→General and turn on “Check for updates automatically”. If you prefer to check manually, choose Help→Check for Updates. In either case, your iPod prompts you to snag any available updates.
The Mac’s Software Update program is designed to alert you, via a pop-up dialog box, about new iTunes updates. If you turned Software Update off (in System Preferences), then you can run it manually by choosing Software Update from the Apple menu.
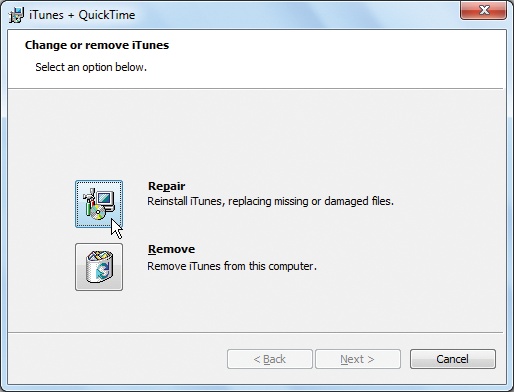
As with any update, once you download the software, double-click the installer file’s icon and follow along as the program takes you through several screens of upgrade excitement. If the version of iTunes you’re installing is newer than the one you’ve got, you get Upgrade as a button option when you run the installer—and an upgrade usually takes less time than a full reinstallation.
If you’re installing the same version of the program, the iTunes installer may politely ask if you want to either Repair or even Remove the software. Choosing Repair can often fix damaged files or data that iTunes needs to run properly. It can also be a quicker fix than fully removing and reinstalling the program.
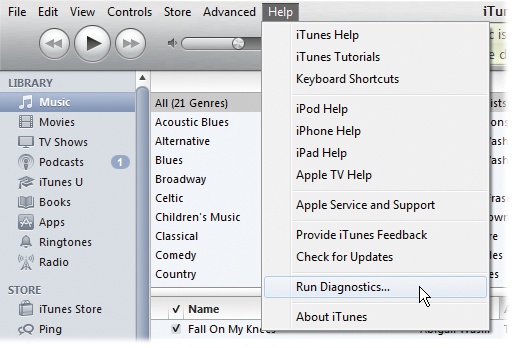
Use the Diagnostics Tools in iTunes for Windows
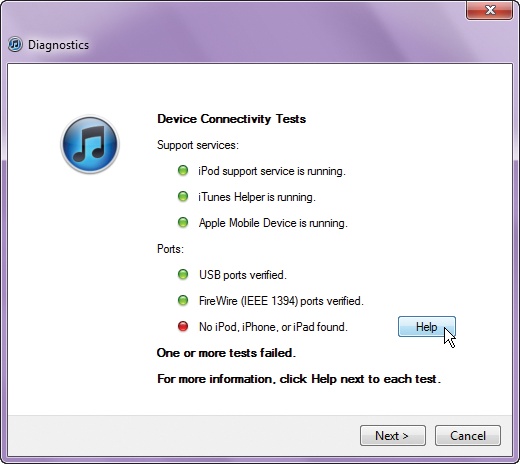
With different PC hardware manufacturers out there and multiple versions of Windows in the mix, the PC side of the iTunes/iPod fence can be a little unpredictable. To help sort things out, iTunes 10 for Windows includes a feature called Diagnostics, which helps troubleshoot four categories of woes. These are your choices:
Network Connectivity. These tests check your computer’s Internet connection and its ability to access the iTunes Store.
DVD/CD Drive. If you’re having trouble importing music to iTunes from a CD—or if you can’t burn your own discs—these tests inspect your PC’s disc drive for problems and incompatibilities.
Device Connectivity. These diagnostics don’t actually test the iPod’s hardware or software; they examine the way your PC connects to your iPod.
Device Sync. These programs actually do test the Touch’s hardware and software to make sure it can transport the data you’re trying to sync.
To run this battery of tests, choose Help→Run Diagnostics, select a category, and then follow the onscreen directions. Each diagnostic program runs tests and then displays a red, yellow, or green light. Click the Help button next to a red or yellow light to get troubleshooting help from Apple’s website. (Green means groovy.) Once you finish the tests, you can copy the results to the Clipboard and save them to a text file so you can share them with support techies.
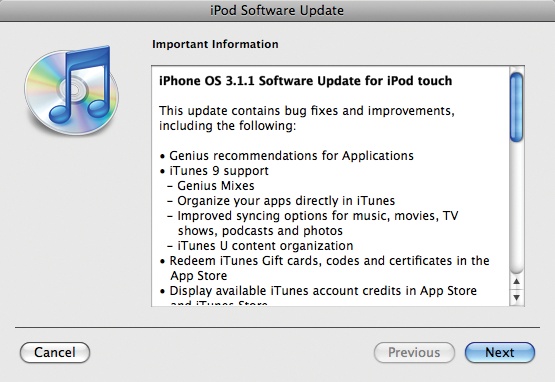
Update the iPod’s Software
Updating the iPod’s internal software—which Apple does occasionally to fix bugs and add features—is much easier than it used to be, thanks to iTunes. No matter which iPod model you have, iTunes 10 and later handles all software update chores for you.
If you formatted your iPod Nano or Classic for Windows, then update it on a Windows PC; likewise, update a Mac-formatted iPod on a Macintosh. You can tell which system you formatted your iPod for by choosing Settings→About. On the Nano, flick down to Version to get to the format info. On the Classic, press the Select button twice. You can update a Touch from either machine. (If you have an iPod that’s set to autosync with a computer, then update it on the PC or Mac you sync it with to avoid erasing your iPod.)
To make sure you have the latest version of the iPod software, follow these steps:
Connect your iPod to your computer, and then select it in the Source list.
On the Summary tab, click the Check for Update button in the Version area. If your iPod is up to date, iTunes tells you so.
If iTunes finds new iPod software, you’ll be prompted to download it. Click the Downloading icon in the Source pane to monitor your download progress (shown below). Sometimes iTunes will have already downloaded the new iPod software. In that case, just click the Update button in iTunes’ main window.
Follow the onscreen instructions.

Older iPod models may require the use of an AC adapter to finish the update, but newer iPods mainly just sit there quietly with a progress bar and an Apple logo onscreen. Once all that goes away, your iPod screen returns to normal and iTunes displays a message letting you know it’s completed the update.

If you’re updating your iPod Shuffle, play close attention to the progress bar on the iTunes screen and follow any instructions given. Since the Shuffle has no screen, iTunes is the place to monitor your update. You’ll know when iTunes finishes because it returns the Shuffle’s icon to the Source list.
Note
As mentioned earlier in this chapter, the iPod support section of Apple’s website (www.apple.com/support/ipod) has grown tremendously since Apple introduced the first iPod in 2001. It includes knowledge-based articles and user forums for troubleshooting. But if you need to dig deeper or want to attempt your own hardware repairs, check out the iPod forums and repair guides at the do-it-yourself site www.ifixit.com/Browse/iPod. If it’s an out-of-warranty hardware problem that’s too daunting for your taste, try a specialized iPod repair shop like www.iresq.com or www.techrestore.com/ipod. And when it does come time to upgrade or replace your ‘Pod, you can learn about Apple’s recycling policy at www.apple.com/recycling.
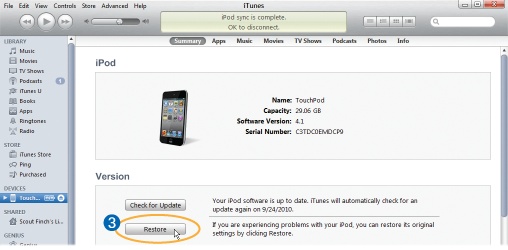
Start Over: Restoring Your iPod’s Software
Just like the operating system that runs your computer, your iPod has its own software that controls everything it does. Restoring the iPod software isn’t the same thing as updating it. Restoring is a much more drastic procedure, like reformatting the hard drive on your computer. For one thing, restoring the software erases everything on your iPod (unless you’re restoring your Touch from a previous backup; see the note below.)
So restore with caution, and do so only after you try all the other troubleshooting measures in this chapter. If you decide to take the plunge, first make sure you have the most recent version of iTunes (flip back a page for information on that), and then proceed as follows:
Start iTunes, and connect your iPod to your computer with its cable.
When your iPod appears in the iTunes Source list, click its icon to see the Summary information (in the main area of the iTunes window).
In the Summary area, click the Restore button.
Note
As with any computer, it’s a great idea to back up your data regularly, and the Touch is no exception. In fact, it’s such a good idea that iTunes does it automatically as you sync your Touch. When disaster strikes and your Touch is either a zombie—or worse, stolen—you can restore your contacts, calendars, notes, and settings without having to start from scratch. Just connect the Touch (old or new replacement) and right-click (Control-click) on its icon. Choose “Restore from Backup” and click Restore in the box that pops up.
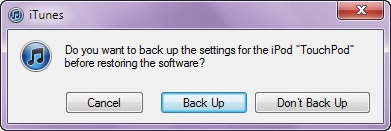
If you have an iPod Touch, iTunes gives you the chance to back up your settings—like your contacts and calendar syncing preferences and other personal data. This means much less work getting your Touch all re-personalized if you have to reinstall its software. If you want to wipe every trace of your existence from the Touch, then skip the backup.
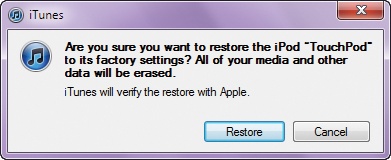
Because restoring erases everything on your iPod, you get a warning message. If you’re sure you want to continue, click Restore again. If you use a Mac, enter an administrator password; a progress bar appears on your iPod’s screen.
Leave the iPod connected to your computer to complete the restoration process. You may also see an Apple logo appear onscreen.
After iTunes finishes the restore process, its Setup Assistant window appears, asking you to name your iPod and choose your syncing preferences—just like when you connected your iPod for the first time. In fact, if you have everything in your iTunes library that was originally on your iPod, let iTunes autosync it all back to where it was before you started the restore session. You can add back your songs, photos, apps, and videos manually and see if this little procedure has fixed the iPod’s ailment.
Tip
If you manually manage your music and you restore your iPod’s software, you’ll lose any songs not stored in your iTunes library (if you copied a song from a friend’s computer to your iPod, for example, but didn’t sync the ‘Pod back to iTunes). If you manually update, you may want to get a program that lets you harvest songs off the iPod (www.ilounge.com lists several and so does Chapter 5) and back up your music to iTunes regularly.
Understanding the iPod’s Battery Messages
Remember how you were taught that certain kinds of batteries (in laptops and camcorders, say) worked better if you occasionally fully drained and then recharged them? Forget it. You want to keep the iPod’s lithium-ion battery charged always, or else you’ll lose your clock, date, and other settings.
The color screens on the Touch, Nano, and Classic display a green battery that virtually runs out of juice as you use the player. When the battery turns red, it’s time to recharge, because you have less than 20 percent of your iPod’s power left. The screenless Shuffle communicates its battery needs through a small colored light: green for a good charge (between 100 and 50 percent), amber for 25 percent of the charge left, and red for a battery that needs juice pronto.

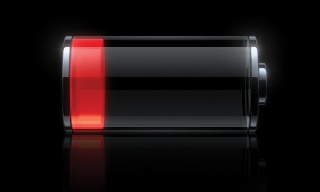
Some imperiled iPods display a dull gray charging icon and won’t turn on. This means the poor thing doesn’t even have enough energy left to show its battery-charging icon in color. On other iPod models, you may see a yellow triangle next to a colorless battery graphic and the stern message, “Connect to Power.”
Plug your iPod into your computer or an optional AC adapter, and give it about half an hour of power to get back to its regular screen graphic. (When the battery gets this depleted, you may have to charge it up for a while to even get the iPod to show up in iTunes.)
Note
If you leave your iPod plugged into your computer all night and it still barely shows a charge, it’s probably because something went to sleep besides you: your computer. An iPod won’t charge properly when your machine goes into Sleep, Hibernate, or Standby modes, so adjust its power settings to make sure it doesn’t conk out before your iPod gets juiced up. An AC adapter, available at most iPod accessory shops (Chapter 12), lets you skip the whole computer-charging thing.
Apple’s Tips for Longer iPod Battery Life
Apple has posted various recommendations on its website for how to treat an iPod battery to ensure a long life:

Don’t expose your iPod to extreme hot or cold temperatures. (In other words, don’t leave it in a hot, parked car, and don’t expect it to operate on Mount Everest.)
Use your iPod regularly (not that you wouldn’t). And be sure to charge it at least once a month to keep that battery chemistry peppy.
Put the iPod to sleep to conserve battery power. (Press the Play/Pause button until the iPod display goes blank, settling into slumber; on the Touch, click the Sleep/Wake button on top.)
Take the iPod out of any heat-trapping cases before you charge it up.
On the Classic, use the Hold switch when you’re not actively fiddling with the iPod’s controls. This keeps it from getting turned on accidentally.
When you see the Low Battery icon or message, plug your iPod into a computer or an electrical outlet with the AC adapter.
iPod features like the backlight and the equalizer—or jumping around within your media library—can make the battery drain faster, as can using big, uncompressed song file formats, like AIFF.
That wireless chip inside the iPod Touch saps power even if you’re not trawling the Web. Save energy by turning it off when you don’t need it at Settings→WiFi. Lowering the frequency with which your Touch checks email or has data pushed to it from the Internet can save some energy as well—you can make those adjustments by choosing Settings→Mail, Contacts, Calendars.
Replace Your iPod’s Battery
The iPod uses a rechargeable lithium-ion battery. Unlike players that run on Duracells, you can’t easily pop out an old battery and replace it when the cell wears out after repeated charge-and-use cycles.
But that doesn’t mean you can’t replace the iPod’s battery; it just takes a little time and effort. If your battery is too pooped to power your ’Pod, here are some options:
You get a full one-year warranty on your iPod battery (two years with the optional AppleCare Protection Plan; see the opposite page). But Apple itself offers an out-of-warranty battery replacement service for $49 to $79, depending on the iPod model, at www.apple.com/support/ipod/service/battery.
Milliamp (www.ipodjuice.com), offers do-it-yourself iPod battery replacement kits for most iPod models, with prices starting at around $20.
PDASmart.com will replace your iPod’s ailing battery for $50 (parts and labor included). Learn more at www.pdasmart.com/ipodpartscenter.htm. The company can also fix broken screens and hard drives.
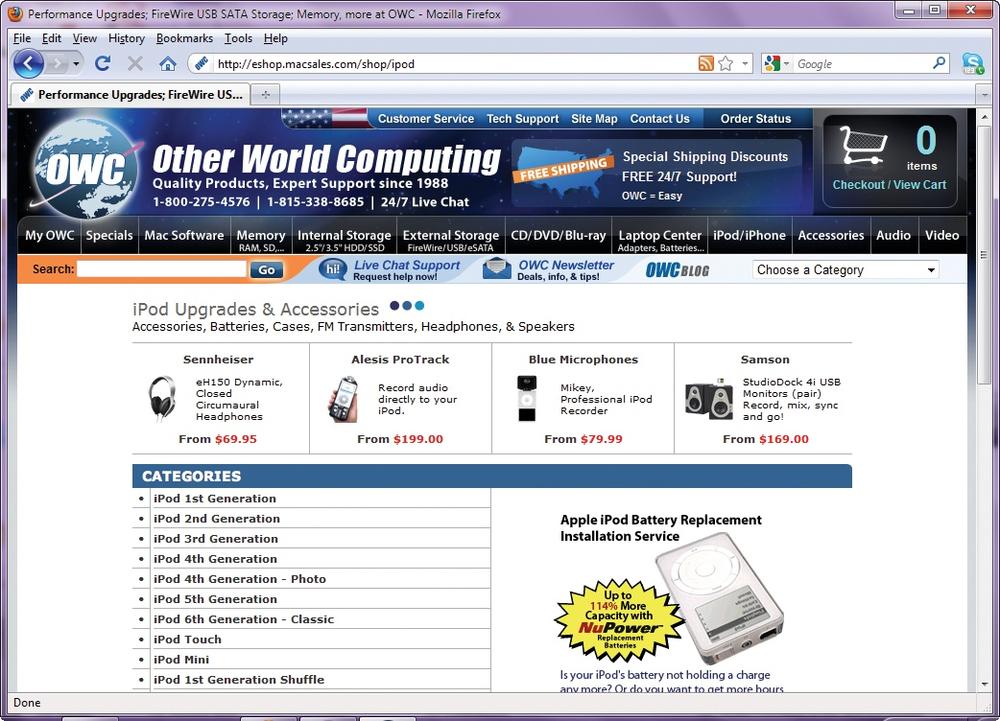
Other World Computing sells high-capacity NewerTech iPod batteries for all models of iPod. The company has do-it-yourself instructional videos on its site but will also replace the battery for you if you send in your iPod (http://eshop.macsales.com/shop/ipod).
AppleCare—What It Is and Whether You Need It
You probably have an insurance policy on your house and car, so why not get one for your iPod? That’s the logic behind the AppleCare Protection Plan. The price for this peace of mind? For the iPod Classic and Touch, it’s $59, and coverage for the Nano and Shuffle is $39.
When you buy a brand-new iPod, you automatically get free telephone support to fix one problem within your first 90 days of iPod ownership, plus a year-long warranty on the hardware. The latter means that if the iPod starts acting up or stops working altogether, Apple will fix it for free or send you a replacement ’Pod.
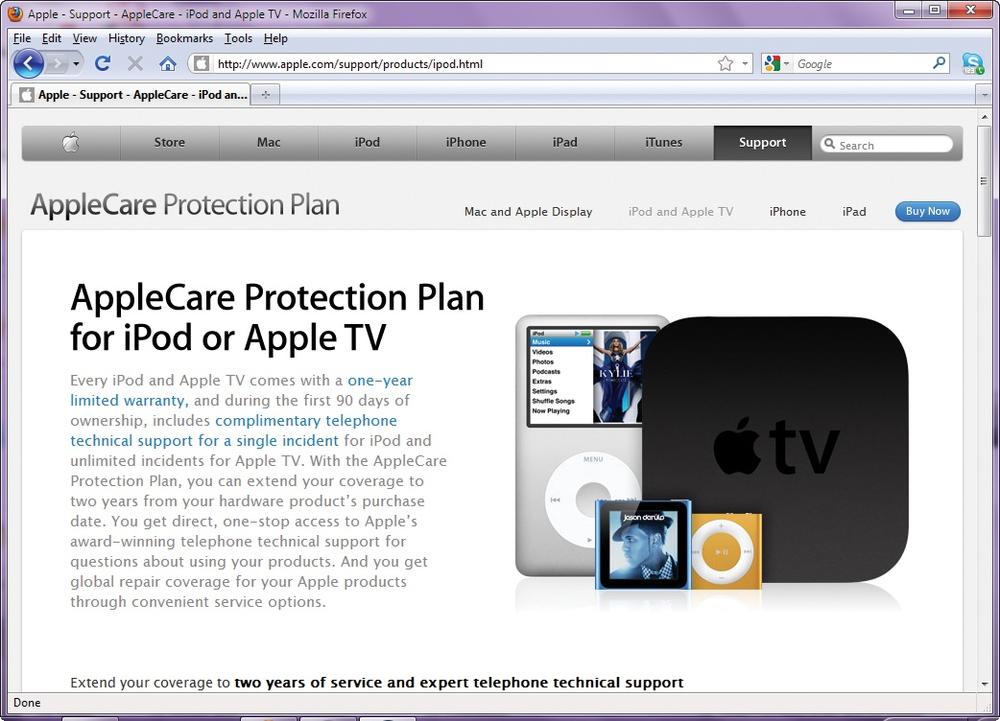
If you buy the AppleCare Protection Plan (available in many places where you buy iPods or at www.apple.com/support/products/ipod.html), you get the following:
Two full years of free telephone support from the date of your iPod purchase
Two full years of hardware protection from the date of your iPod purchase
If you need an iPod repair or replacement, you’re covered, and the plan covers your iPod’s earphones, battery, and cables, too. Paying an extra $39 or $59 for the extended warranty may not appeal to everyone, but if you want a little peace of mind with your new iPod, it’s a small price to pay.