


iSCSI storage connection security
Internet Small Computer System Interface (iSCSI) is fundamentally a storage area network (SAN) protocol that is similar to Fibre Channel (FC). The key difference is that FC uses a specialized network and iSCSI uses TCP networks. iSCSI technology benefits from the low cost and familiarity of Ethernet and IP networking. The flexibility of Ethernet and IP networking enables iSCSI attached systems to share hardware, extend range, and increase bandwidth by adding hardware.
However, this familiarity and flexibility lead to a requirement for appropriate network security. Each of the different types of networks that are used by iSCSI-attached systems has its own security considerations.
This chapter describes the following topics:
5.1 iSCSI security model
Each of the different types of networks that are used by iSCSI-attached systems has its own security consideration.
5.1.1 iSCSI network security
Consider the following types of iSCSI network traffic:
•Storage security can involve one or more of the following mechanisms:
– Network isolation and physical security
– Firewalls
– Challenge Handshake Authentication Protocol (CHAP)
•Virtual Ethernet security can involve one or more of the following mechanisms:
– Network isolation and physical security
– Firewalls
– A Secure Sockets Layer (SSL) connection for sensitive data during user enrollment and remote command submission
Network isolation and physical security
Network isolation minimizes the risk of data being accessed by unauthorized devices and data being modified as it traverses the network. You can create an isolated network by using a dedicated Ethernet switch or a dedicated virtual local area network (VLAN) on a physical VLAN switch/network. When you configure VLANs on a network, you must configure the VLAN on switch ports and end points (hosts and targets).
Physical security involves physical barriers that limit access to the network equipment and the network endpoints at some level (locked rack enclosures, locked rooms, locked buildings, and so on).
Firewalls
A firewall can be used between a shared network and host node to protect a node from unwanted network traffic. iSCSI-attached system traffic has the following attributes that can be helpful when you configure a firewall.
IP Security
IP Security (IPSec) encrypts storage and virtual Ethernet traffic on the iSCSI network. A related protocol, Internet Key Exchange (IKE), ensures that the communicating IP end points are authentic. IPSec, a set of security extensions that are developed by the Internet Engineering Task Force (IETF), provides privacy and authentication services at the IP layer (by enabling a host to select the required security protocols that determine the algorithms to use for the services) and puts in place the hidden keys that are required for these services. To help protect the contents of IP datagrams, IPSec uses encryption algorithms to transform the data.
Challenge Handshake authentication Protocol
CHAP protects against the possibility of an unauthorized system by using an authorized system’s iSCSI name to access storage. CHAP does not encrypt network traffic, but limits which system can access an IBM Storwize storage path.
Using CHAP authentication can facilitate the management of access controls because it restricts access through account names and passwords.
CHAP authentication
There are two types of CHAP authentication:
•One-way CHAP
The IBM Storwize storage system authenticates the initiator node.
•Two-way CHAP
In addition to the one-way CHAP authentication, the initiator node also authenticates the target IBM Storwize storage system.
|
Note: CHAP secrets that you select for one-way authentication and two-way authentication must be different.
|
5.2 Configuring CHAP for an IBM Storwize storage system
You can use the command-line interface (CLI) or the graphical user interface (GUI) to configure CHAP to authenticate the IBM Storwize clustered system with iSCSI-attached hosts. CHAP authentication must be configured both on the SAN Volume Controller storage system and iSCSI-attached hosts. The SAN Volume Controller storage system supports both one-way and two-way CHAP authentication. When CHAP authentication is configured for a host by using the chhost CLI, the same CHAP secret must be configured on the host. To isolate connectivity problems, CHAP authentication settings can be delayed until you establish that the iSCSI host can access and discover the iSCSI ports of a SAN Volume Controller storage system.
5.2.1 Configuring CHAP for the IBM Storwize storage system by using the GUI
To configure authentication between an IBM Storwize clustered system and the iSCSI attached hosts, complete one of the following tasks:
Configuring one-way CHAP on the IBM Storwize iSCSI host by using the GUI
To configure one-way CHAP between an IBM Storwize iSCSI host and the iSCSI-attached hosts, complete the following steps:
1. Connect to the IBM Storwize system with a browser and create a host object. If the host object is already created, skip this step and go to step 2.
To create a host object, click Hosts → Host → Add Host.
A window opens, as shown in Figure 5-1.

Figure 5-1 Adding a host object in the IBM Storwize system
You must enter the IQN of the host into the iSCSI port field. You can choose to have a meaningful name for the host object by completing the Name field. Although this field is optional, it is a preferred practice to provide a meaningful name to the host object to identify the host in the future.
After providing the information, click Add, which creates a host object.
2. Select Hosts → Hosts to display the list of configured host objects. Right-click the host object for which the one-way CHAP secret must be set. Then, click Properties, as shown in Figure 5-2.

Figure 5-2 Modifying the host properties
3. Click the Show Details button in the lower left corner, which opens the iSCSI CHAP Secret field. Click Edit, complete the iSCSI CHAP Secret field, and click Save, as shown in Figure 5-3.

Figure 5-3 Setting a one-way iSCSI CHAP secret for a host object
4. To disable the CHAP secret for a host object, complete steps 2 on page 58 and 3 and set the iSCSI CHAP Secret field to blank.
Configuring two-way CHAP for the IBM Storwize storage system by using a GUI
To configure authentication between an IBM Storwize clustered system and the iSCSI-attached hosts, complete the following steps:
1. Connect to the IBM Storwize clustered system with a browser by clicking Settings → Network → iSCSI, as shown in Figure 5-4.
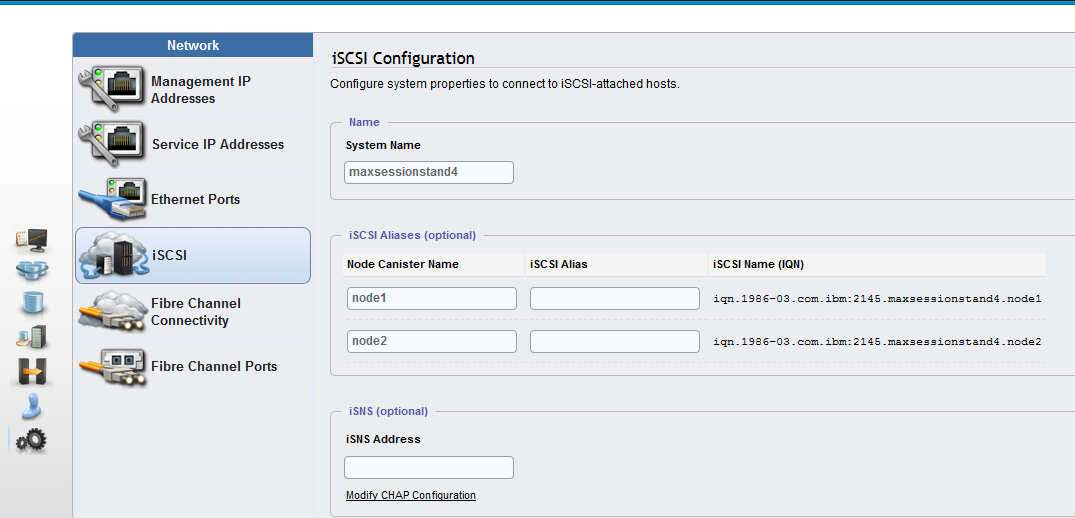
Figure 5-4 IBM Storwize iSCSI configuration

Figure 5-5 Modifying the CHAP configuration
5.2.2 Configuring CHAP for the IBM Storwize storage system by using the CLI
Use the tasks in this section to configure CHAP for the IBM Storwize storage system.
Configuring one-way CHAP on IBM Storwize storage systems
To configure the CHAP configuration with the CLI, complete the following steps:
1. To enable the CHAP secret, run the following command:
chhost -chapsecret chap_secret
2. If wanted, to disable the CHAP secret, run the following command:
chhost -nochapsecret
For more information about the chhost command, see IBM Knowledge Center.
Configuring two-way CHAP on IBM Storwize storage systems
To configure the CHAP configuration with the CLI, complete the following steps:
1. Configure a host object by using the mkhost CLI command. If the host object is already created, skip this step. Provide the host’s IQN as iscsiname and optionally provide a name to the host object.
mkhost -iscsiname iqn.1994-05.com.redhat:eb5cdafabfe6 -name RHEL_host
2. To enable the CHAP secret, run the following command:
chsystem -chapsecret chap_secret
3. To disable the CHAP secret, run the following command:
chsystem -nochapsecret
5.3 Configuring CHAP authentication for the host
A host system is an open systems computer that is connected to the switch through iSCSI. CHAP is a basic level of security. It is a protocol that is used to authenticate the peer of a connection and is based on the peer sharing a secret.
5.3.1 Setting up authentication for Linux hosts
This section provides instructions for setting up authentication for Linux hosts.
To set up CHAP authentication for a Linux host, complete the following steps:
1. Open /etc/iscsi/iscsid.conf or /etc/iscsid.conf with an appropriate editor.
2. Go to the CHAP settings paragraph. Example 5-1 shows the output.
Example 5-1 CHAP settings for a Linux host
# *************
# CHAP Settings
# *************
# To enable CHAP authentication set node.session.auth.authmethod
# to CHAP. The default is None.
node.session.auth.authmethod = CHAP
# To set a CHAP username and password for initiator
# authentication by the target(s), uncomment the following lines:
#node.session.auth.username = username
#node.session.auth.password = password
node.session.auth.username = iqn.host.test.com
node.session.auth.password = xxxxxxxxxxxxx
# To set a CHAP username and password for target(s)
# authentication by the initiator, uncomment the following lines:
#node.session.auth.username_in = username_in
#node.session.auth.password_in = password_in
node.session.auth.password_in = yyyyyyyyyyyyy
# To enable CHAP authentication for a discovery session to the target
# set discovery.sendtargets.auth.authmethod to CHAP. The default is None.
discovery.sendtargets.auth.authmethod = CHAP
# To set a discovery session CHAP username and password for the initiator
# authentication by the target(s), uncomment the following lines:
discovery.sendtargets.auth.username = username
discovery.sendtargets.auth.password = password
# To set a discovery session CHAP username and password for target(s)
# authentication by the initiator, uncomment the following lines:
#discovery.sendtargets.auth.username_in = username_in
discovery.sendtargets.auth.password_in = password_in
3. Make the following changes to the CHAP settings section:
a. Set up one-way authentication on the Linux host by completing the following steps:
i. Set a CHAP user name and password to the initiator name:
node.session.auth.authmethod = CHAP
node.session.auth.username = <initiator IQN name>
node.session.auth.password = <CHAP secret for host>
node.session.auth.username = <initiator IQN name>
node.session.auth.password = <CHAP secret for host>
ii. Set a discovery session CHAP user name and password to your initiator name:
discovery.sendtargets.auth.authmethod = CHAP
discovery.sendtargets.auth.username = <initiator IQN name>
discovery.sendtargets.auth.password = <CHAP secret for host>
discovery.sendtargets.auth.username = <initiator IQN name>
discovery.sendtargets.auth.password = <CHAP secret for host>
iii. Save these settings. You must log out of any current sessions, restart the iscsi service, and rediscover the system iSCSI target for the CHAP secret to be effective.
|
Note: In the previous example, xxxxxxxxxxxxx is the CHAP secret for the host, and iqn.host.test.com is the IQN name of the initiator. The IQN name must be the same name that is used to create a host object in the IBM Storwize storage system with the mkhost command.
|
b. Set up two-way authentication on the Linux host:
i. Edit the password_in to CHAP secret that you set up with the chsystem command on the IBM Storwize storage system.
ii. Set a CHAP user name and password for the target or targets:
node.session.auth.password_in = <CHAP secret for clustered system>
iii. Set a discovery session CHAP user name and password for the target or targets:
discovery.sendtargets.auth.password_in = <CHAP secret for clustered system>
|
Note: Do not set the user name (field node.session.auth.username_in and discovery.sendtargets.auth.username_in) for two-way CHAP.
|
iv. Save these settings. You must log out of any current sessions and rediscover the system iSCSI target for the CHAP secret to be effective.
|
Note: It is not mandatory to set up two-way authentication. Before you configure two-way authentication, ensure that you have one-way authentication configured and working for your host.
|
5.3.2 Setting up authentication for Microsoft Windows hosts
This section describes the authentication methods that are available for Windows hosts.
IBM Storwize storage system supports two CHAP methods:
•One-way CHAP authentication (the IBM Storwize storage system authenticates the host iSCSI initiator).
•Two-way CHAP authentication (both the IBM Storwize storage system and the initiator authenticate each other).
Setting up authentication for discovery sessions for Windows hosts
This section provides instructions for setting up authentication for discovery sessions for Windows hosts.
After you install the initiator software, complete the following steps to configure one-way authentication for Windows hosts:
1. Go to the Control Panel and click Administrative Tools → iSCSI Initiator, as shown in Figure 5-6.

Figure 5-6 iSCSI Initiator Properties
2. Click the Discovery tab.
3. Click Add under the Target Portals section. You see the Add Target Portal dialog box, as shown in Figure 5-7.

Figure 5-7 iSCSI Initiator Discover Target Portal

Figure 5-8 iSCSI Advanced Settings
5. Select CHAP logon information. For Windows Server 2012, select Enable CHAP logon.
6. Enter a value for the User name & Target secret, as shown in Figure 5-9. The user name must be the iSCSI qualified name (IQN) of the iSCSI host. The target secret must be a value of 12 characters. This value is the same value that you set with the chhost command on the IBM Storwize storage system for this host. After you enter all the required information, click OK.

Figure 5-9 CHAP configuration on Windows host
|
Note: Radius authentication is not supported for IBM Storwize storage systems.
|
Configuring two-way authentication for a Microsoft Windows host
Before you begin, verify that one-way authentication is working. Complete the following steps on the Microsoft Windows host:
1. Go to the Control Panel and click the iSCSI Initiator option.
2. From the iSCSI Initiator Properties window, click the Configuration tab, as shown in Figure 5-10.

Figure 5-10 iSCSI initiator configuration tab
3. Click CHAP. On the iSCSI Initiator Mutual CHAP secret window, enter the IBM Storwize storage system CHAP secret and click OK, as shown in Figure 5-11.

Figure 5-11 iSCSI Initiator Mutual CHAP Secret
|
Tips: Remember the following things.
•This setting applies to both the discovery session and normal session.
•The length restrictions in Example 5-2 on page 68 for CHAP secrets that apply to one-way authentication also apply to two-way authentication.
•The CHAP secrets for the IBM Storwize storage system and the host initiator cannot be the same.
|
To set up the two-way authentication, repeat the previous steps, but in this instance, select Perform mutual authentication from the Advanced Settings window. For more information, see “Setting up authentication for discovery sessions for Windows hosts” on page 63.
5.3.3 Setting up authentication for AIX hosts
This section describes how to set up CHAP authentication for AIX hosts.
Although the IBM Storwize storage system supports both one-way authentication and two-way authentication for iSCSI, the AIX software initiator supports only one-way authentication, where the IBM Storwize storage system target authenticates the initiator.
CHAP settings are defined in the /etc/iscsi/targets file on the host. The AIX initiator or host bus adapter (HBA) always uses its IQN as the CHAP user name.
To configure authentication on AIX hosts, complete the following steps:
1. Open the /etc/iscsi/targets file with your preferred editor.
2. For each line that contains a target definition, append the CHAP secret of the initiator in quotation marks:
10.2.1.105 3260 iqn.com.ibm-K167-42.fc1a "my_chapsecret"
The CHAP secret value that you set here must match the value that was configured on the IBM Storwize V7000 clustered system for the host object that is associated with this host. Because the IBM Storwize V7000 storage system authenticates on a per-initiator basis, the CHAP secret is the same for all the IBM Storwize V7000 storage system targets on a particular clustered system.
Example 5-2 CHAP setting section for AIX hosts
# ChapSecret = %x22 *( any character ) %x22
# ; " "
# ; ChapSecret is a string enclosed in double quotation marks. The
# ; quotation marks are required, but are not part of the secret.
# EXAMPLE 1: iSCSI Target without CHAP(MD5) authentication
# Assume the target is at address 192.168.3.2,
# the valid port is 5003
# the name of the target is iqn.com.ibm-4125-23WTT26
# The target line would look like:
# 192.168.3.2 5003 iqn.com.ibm-4125-23WWT26
# EXAMPLE 2: iSCSI Target with CHAP(MD5) authentication
# Assume the target is at address 10.2.1.105
# the valid port is 3260
# the name of the target is iqn.com.ibm-K167-42.fc1a
# the CHAP secret is "This is my password."
# The target line would look like:
# 10.2.1.105 3260 iqn.com.ibm-K167-42.fc1a "This is my password."
# EXAMPLE 3: iSCSI Target with CHAP(MD5) authentication and line continuation
# Assume the target is at address 10.2.1.106
# the valid port is 3260
# the name of the target is iqn.2003-01.com.ibm:00.fcd0ab21.shark128
# the CHAP secret is "123ismysecretpassword.fc1b"
# The target line would look like:
# 10.2.1.106 3260 iqn.2003-01.com.ibm:00.fcd0ab21.shark128 # "123ismysecretpassword.fc1b"
192.168.1.41 3260 iqn.1986-03.com.ibm:2145.hostsessionstand1.node1
192.168.2.43 3260 iqn.1986-03.com.ibm:2145.maxsessionstand4.node1 "chapsecret"
The two targets in the previous example are members of different IBM Storwize clustered systems. One target is configured to authenticate the initiator, and the other target is not configured to authenticate the initiator.
Target iqn.1986-03.com.ibm:2145.hostsessionstand1.node1 is not configured for authentication; therefore, the CHAP secret field is blank.
Target iqn.1986-03.com.ibm:2145.maxsessionstand4.node1 is configured for authentication; therefore, the CHAP secret field is set to chapsecret for authentication.
5.3.4 Setting up authentication for VMware hosts
To set up authentication on the VMware host, complete the following steps:

Figure 5-12 vSphere Client Console

Figure 5-13 Showing the physical server storage adapter information

Figure 5-14 The vSphere Client iSCSI initiator properties
4. Click CHAP.
5. Select the preferred settings and enter the password, as shown in Figure 5-15.

Figure 5-15 CHAP credentials
The IBM Storwize storage system supports only one-way CHAP with VMware hosts until release 7.7. Therefore, select the option Do not use CHAP in the Mutual CHAP field, as shown in Figure 5-15.
a. From the CHAP (target authenticates host) menu, click Use CHAP.
b. Click Use initiator name.
c. Enter the CHAP secret.
5.4 iSCSI security
You can use the iSCSI protocol in networks where unauthorized data can be accessed, enabling different security methods. Encoding methods, such as IPSec, which use lower levels, do not require additional matching because they are transparent for higher levels and for the iSCSI. Various solutions can be used for authentication, for example, CHAP, Kerberos, or private keys exchange. An iSNS server can be used as a repository of keys.
5.5 Mandatory security in real-world situations
Security is not part of the design for the iSCSI protocol. The control packets and data packets are vulnerable to attack because messages are sent and received in plain text. The iSCSI protocol also enables configuration without any security measures. In this scenario, security is left to alternative protocols, such as CHAP and IPSec.
As a result, authentication for iSCSI that employs advance authentication methods to establish security, such as the CHAPv2, is important.
Security engineering principles, such as “security by obscurity”, are frequently adapted into iSCSI solutions. Improper design can cause security vulnerabilities.
The IETF considers security mandatory for iSCSI and mandates IPSec, as explained in RFC 3723, Securing Block Storage Protocols over IP.
However, the appropriate method must be chosen based on the given, specific surrounding parameters of the environment. Where possible, it is a preferred practice to use a combination of Authentication Header (AH) and Encapsulated Security Payload (ESP) to ensure reliable authentication, guaranteed integrity, and confidentiality.
When iSCSI is used in the real world, security requires the utmost attention. iSCSI with added complements enables varying levels and complexity of security, depending on the security practices of an organization:
•Authentication
•CRC checksums
•Access control lists (ACLs)
•Firewall
•Encryption
•Isolation
•Segregation
•VLAN
•Virtual private network (VPN) for remote access
Consider the viability of system usage when you determine the correct security mechanisms for a solution. System usage and security must have a proportionate response. The more security a system has, the more complex a system becomes. The opposite also applies, where the less security a system has, the easier it is for a user to expose a system to security threats, increasing the potential for data theft, integrity issues, and confidentiality breaches. When security becomes inconvenient, it frequently leads to an infeasible system that can then lead to circumvention.
A good iSCSI security solution must have relative security benefits and few inconveniences. Therefore, a well-rounded solution involves physical security, operating system security, application security, network security, effective policies, and practical procedures.
For more information about iSCSI, see the following references:
•IBM BladeCenter iSCSI SAN Solution, REDP-4153
..................Content has been hidden....................
You can't read the all page of ebook, please click here login for view all page.