
Chapter 7
Audio
You enter a dungeon and you realize you forgot to buy torches at the shop. You can’t see anything, but there are plenty of sounds that tell you something about the area — the sound of dripping water, the low growl of some animal, the clicking of claws on stone, and the chittering of many insects. There’s a lot of life and activity in the dungeon even though you can’t see it. Since your vision is useless you have to rely on your sense of hearing to give you clues as to what to expect. Cautiously you inch forward, waiting for the inevitable encounter and wondering how you’re going to fight in the dark.
All worlds are full of sound, and an RPG world is no different (at least it shouldn’t be if the developer did his job correctly). From background sounds like a bubbling brook and birds chirping to the crackle of fire and the crack of a lightning bolt being cast by a mage or swords ringing as they strike armor and shields, your RPG has to have sound in order to help further pull the player into the world. Sounds will also help the player know what is happening in the world that he might not be able to see — voices behind a closed door to tell him he’s in for a fight if he opens it, the sounds of combat in a room down the hall to indicate where the rest of the party is. Sound can be an extremely useful tool in your game, but it’s almost always the least thought about portion of most games.
If you’ve done any programming with DirectX, you’re probably pretty familiar with the portion that handles audio playback — DirectSound. Unfortunately, you’ll need to pretty much forget most of what you’ve learned in stepping up to the XNA Framework and Game Studio. Audio in XNA games is created using a tool called XACT (Cross-Platform Audio Creation Tool) and played using either associated classes or a simple API set that doesn’t require XACT. If you plan on making games for the Xbox 360 using Game Studio, you’ll have to use one of these two options. On the PC you’re free to use whatever sound file format and API you wish, although I recommend using the built-in functionality that comes with the XNA Framework as it’s extremely simple to set up and use. Some of the better known formats include .wav, .mp3, and .ogg (the Ogg Vorbis format). Some of the APIs that are available to you on the PC include DirectSound, OpenAL, and FMOD. On the 360, the only audio format available is .xma.
We’ll first look at the latter of the two options (the simple API set), as it’s the easiest way to go and recommended if you don’t have any special needs for your audio playback. We’ll then take a look at XACT and how to go about setting up and playing sounds using it.
Playing Sounds with the SoundEffect and SoundEffectInstance Classes
The easiest way to play sounds that don’t require any modification to the sound itself is to use the SoundEffect and SoundEffectInstance classes. These classes are found in the Microsoft.Xna.Framework.Audio namespace. For most of the sounds you normally need in a game, these two classes provide all the functionality to play a sound with the ability to modify the volume, panning, and pitch during playback.
To play a sound using these classes, you first load the sound using the Content Manager:
Listing 7-1
SoundEffect soundEffect;
string soundName = "kaboom";

soundEffect = contentManager.Load<SoundEffect>(soundName);
There are three overloaded Play methods of the SoundEffect class that you can use, depending on your needs:
Table 7-1
Name | Description |
SoundEffect.Play () | Creates a new SoundEffectInstance and plays it. |
SoundEffect.Play (Single) | Creates a new SoundEffectInstance and plays it at the specified volume. |
SoundEffect.Play (Single, Single, Single, Boolean) | Creates a new SoundEffectInstance and plays it using the specified volume, pitch, panning, and loop control. |
You can call the Play method that takes no parameters and modify the Volume, Pitch, and Pan properties of the returned SoundEffectInstance. You can also call the Pause and Stop methods of the SoundEffectInstance if you need to.
These two classes are meant only for rudimentary sound playback. If you need more advanced sound support, including 3D audio, you will need to use XACT, which is covered in depth later in this chapter. For most games, though, the SoundEffect class should be enough.
So you’ve got sound effects working in your game and now you’re wondering about doing things like playing a song when your game starts or allowing the player to play his own playlist in place of what you have in your game. Luckily, XNA Game Studio 3.0 has got you covered.
Playing Songs
New to XNA Game Studio 3.0 is support for playing songs in a media library on the PC, Xbox 360, and Zune. The classes responsible for this functionality can be found in the Microsoft.Xna.Framework.Media namespace. On the 360 and Zune the media library is known, and songs that are uploaded to the device are automatically added to the library. On the PC, before you can use the functionality in the XNA Framework to play songs in a media library, the library first has to be compiled using Windows Media Player to search the PC for song files to add to the library.
The main classes that enable song playback are:
![]() MediaLibrary — Provides access to songs, playlists, and pictures in the device’s media library.
MediaLibrary — Provides access to songs, playlists, and pictures in the device’s media library.
![]() MediaPlayer — Provides methods and properties to play, pause, resume, and stop songs. MediaPlayer also exposes shuffle, repeat, volume, play position, and visualization capabilities.
MediaPlayer — Provides methods and properties to play, pause, resume, and stop songs. MediaPlayer also exposes shuffle, repeat, volume, play position, and visualization capabilities.
![]() Song — Provides access to a song in the song library.
Song — Provides access to a song in the song library.
![]() MediaQueue — Provides methods and properties to access and control the queue of playing songs.
MediaQueue — Provides methods and properties to access and control the queue of playing songs.
![]() Playlist — Provides access to a playlist in the media library.
Playlist — Provides access to a playlist in the media library.
Playing a song isn’t much more difficult than playing a sound effect. The following code will select a random album from the device’s playlist and play the first track of that album:
Listing 7-2
using System;
using Microsoft.Xna.Framework;
using Microsoft.Xna.Framework.Audio;
using Microsoft.Xna.Framework.Content;
using Microsoft.Xna.Framework.Graphics;
using Microsoft.Xna.Framework.Input;
using Microsoft.Xna.Framework.Media;

namespace Media_Sample
{
    public class Game1 : Microsoft.Xna.Framework.Game
    {
        GraphicsDeviceManager graphics;
        SpriteBatch spriteBatch;
        MediaLibrary sampleMediaLibrary;
        Random rand;

        public Game1()
        {
            graphics = new GraphicsDeviceManager(this);
            Content.RootDirectory = "Content";

            sampleMediaLibrary = new MediaLibrary();
            rand = new Random();

        }

        protected override void Initialize()
        {
            MediaPlayer.Stop(); // stop current audio playback

            // generate a random valid index into Albums
            int i = rand.Next(0, sampleMediaLibrary.Albums.Count - 1);

            // play the first track from the album
            MediaPlayer.Play(sampleMediaLibrary.Albums[i].Songs[0]);

            base.Initialize();
        }

        protected override void Update(GameTime gameTime)
        {
            // Allows the game to exit
            if (GamePad.GetState(PlayerIndex.One).Buttons.Back ==
                ButtonState.Pressed)
                this.Exit();

            base.Update(gameTime);
        }

        protected override void Draw(GameTime gameTime)
        {
            GraphicsDevice.Clear(Color.CornflowerBlue);

            base.Draw(gameTime);
        }
    }
}
Between the new sound and song support that XNA Game Studio 3.0 offers, you should be covered. If you’re not, however, you can dig into XACT for more advanced functionality.
XACT
XACT uses compression to make sound files smaller, which is important for Xbox games. Since your game files are stored on the Xbox hard drive and you have limited space on it for your files, the less space your files take up the more content you can include in your game. This isn’t as important on the PC since hard drives these days are many times larger than the one in the 360. You also have the option of storing and using files on CD or DVD. This isn’t an option on the 360 since the XNA Framework currently doesn’t allow access to the DVD drive.
One good thing about using XACT is that it works the same for both PC and 360, meaning you can use the same files and code for projects for both systems. Before we get into the code though, some definitions might be in order. The four main objects that you’ll be using for your sound system are AudioEngine, WaveBank, SoundBank, and Cue, so it’ll help to know what they are.
![]() AudioEngine — Fairly self-explanatory. The AudioEngine is what is used to create wave banks and sound banks. The constructor for the class takes as a parameter the path (including file name) to the .xgs file that is created by XACT.
AudioEngine — Fairly self-explanatory. The AudioEngine is what is used to create wave banks and sound banks. The constructor for the class takes as a parameter the path (including file name) to the .xgs file that is created by XACT.
![]() WaveBank — A wave bank is a collection of wave files that can be used to logically group similar files together. For example, all the weapons sounds could go in one wave bank, all your voices in another, background sounds in a third, etc. The constructor for the WaveBank class takes as a parameter an AudioEngine instance and the path (including file name) to the .xwb file that is created by XACT.
WaveBank — A wave bank is a collection of wave files that can be used to logically group similar files together. For example, all the weapons sounds could go in one wave bank, all your voices in another, background sounds in a third, etc. The constructor for the WaveBank class takes as a parameter an AudioEngine instance and the path (including file name) to the .xwb file that is created by XACT.
![]() SoundBank — A sound bank is a collection of sounds and cues. The actual sounds are not stored in a sound bank, just references to the wave files that are in a wave bank. The sound bank stores information on how sounds are to be played, whether or not they loop, any distortions that may be applied to a sound, etc. The constructor for the SoundBank class takes as a parameter an AudioEngine instance and the path (including file name) to the .xsb file that is created by XACT.
SoundBank — A sound bank is a collection of sounds and cues. The actual sounds are not stored in a sound bank, just references to the wave files that are in a wave bank. The sound bank stores information on how sounds are to be played, whether or not they loop, any distortions that may be applied to a sound, etc. The constructor for the SoundBank class takes as a parameter an AudioEngine instance and the path (including file name) to the .xsb file that is created by XACT.
![]() Cue — Cues are the objects that are created by the programmer to play sounds. A cue can contain one or more sounds. When the cue is played, all the sounds in that cue are played in order unless the cue is stopped.
Cue — Cues are the objects that are created by the programmer to play sounds. A cue can contain one or more sounds. When the cue is played, all the sounds in that cue are played in order unless the cue is stopped.
There are some other terms that you’ll run across when working in XACT, the two main ones being track and event. A sound in a sound bank contains one or more tracks, each of which contains at least one event. An event is an action that is performed within a track. Every track will have at least a Play Wave event. Other events are Stop, Volume, Pitch, and Marker. We’ll look at some of these a bit later.
Creating Sounds with XACT
Before starting up XACT you might need to install the .NET Framework 1.1 Redistributable. You’ll find the URL in the appendix. At the time of this writing there’s a known bug with a feature in XACT that causes an error if the redistribution is not installed. After launching XACT, you’ll be presented with a window that looks something like the following figure:
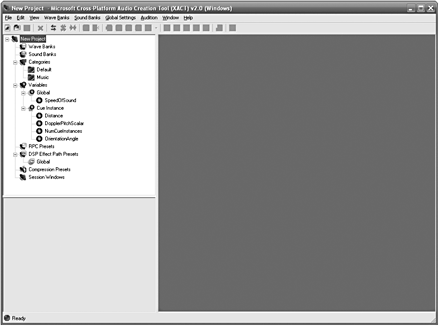
Figure 7-1
Click the leftmost button on the toolbar (“Creates a new project”) and give your project a name in the dialog that pops up. The next thing you’ll need to do is create a wave bank to store the sounds for your game. Click on the Wave Banks | New Wave Bank menu item or the New Wave Bank button on the toolbar:

Figure 7-2
You’ll also need to create a sound bank, so go ahead and click the Sound Banks | New Sound Bank menu item or the New Sound Bank button on the toolbar:

Figure 7-3
Click the Window | Tile Horizontally menu item to make it a little easier to work with the Wave Bank and Sound Bank windows.
Now we’ll add some wave files to the wave bank. We have four sounds that we’re going to use — an instrumental piece that we’ll play in a loop when the main menu is displayed, a sound for when the player character attacks with a sword, a sound that plays when a monster attacks, and a sound for when the player’s character dies. You can use either your own sounds or the ones in the Content folder for this chapter’s project in the downloadable zip file.
Just like other content, we will be referring to the sounds using the name of the content:
Table 7-2
Original File Name | Content Name |
song.wav | song |
sword.wav | sword |
attack.wav | attack |
die.wav | die |
If you’re using your own sounds, just make sure they’re named properly. Otherwise, you’ll have an exception thrown when you try to play the sounds using the code we’ll write a little later or you’ll end up playing the wrong sounds.
Now that we have our wave bank, we need to add the sounds to the sound bank. Select the four sounds and drag the items into the Cue Name section of the Sound Bank window. You should end up with something that looks like the following figure:

Figure 7-4
Now we want to set our title song to play repeatedly. Click on the sound name called “song” in the Sound Bank window, and then click on the Play Wave node under the Track 1 node to the right (you may need to expand the node by clicking the plus sign to the left of Track 1 if it’s not already expanded). In the properties window at the bottom left, find the check box that says “Infinite” in the Looping group. Checking this will cause the sound to loop until the cue is stopped.
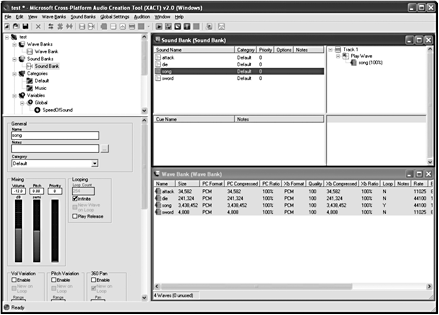
Figure 7-5
That’s pretty much all we need to do for our game. Before building the project, however, you might want to set the locations for where the files are placed after building. Click on the Wave Bank and Sound Bank nodes in the upper-left tree, and set the Windows Build Path property as desired in the property window for each bank. Once you’ve done that save the project by clicking the File | Save Project menu item. Build the project by clicking the File | Build menu item or the Build button on the toolbar:
Figure 7-6
Playing 2D Sound
The XACT project that was created can now be used to play the sounds it contains. The first thing that needs to be done is to add AudioEngine, WaveBank, and SoundBank objects and create them along with some Cue objects:
Listing 7-3
AudioEngine audio;
WaveBank wavebank;
SoundBank soundbank;

GamepadState _curState;
GamepadState _lastState;

Cue songCue;
Cue swordCue;
Cue attackCue;
Cue dyingCue;

public Game1()
{
    graphics = new GraphicsDeviceManager(this);
    content = new ContentManager(Services);

    audio = new AudioEngine("Chapter7sounds.xgs");
    wavebank = new WaveBank(audio, "Wave Bank.xwb");
    soundbank = new SoundBank(audio, "Sound Bank.xsb");
}
The Cue objects are loaded in the LoadContent method:
Listing 7-4
protected override void LoadContent()
{
    songCue = soundbank.GetCue("song");
    swordCue = soundbank.GetCue("sword");
    attackCue = soundbank.GetCue("attack");
    dyingCue = soundbank.GetCue("die");
}
The only other thing that’s needed is some code in the Update method:
Listing 7-5
protected override void Update(GameTime gameTime)
{
    _curState = Gamepad.GetState(PlayerIndex.One);

    // Allows the game to exit
    if (_curState.Buttons.Back == ButtonState.Pressed)
        this.Exit();

    if (_curState.Buttons.A == ButtonState.Pressed)
    {
        if (!songCue.IsPlaying)
        {
            songCue = soundbank.GetCue("song");
            songCue.Play();
        }
    }

    if (_curState.Buttons.B == ButtonState.Pressed)
    {
        if (!swordCue.IsPlaying)
        {
            swordCue = soundbank.GetCue("sword");
            swordCue.Play();
        }
    }

    if (_curState.Buttons.X == ButtonState.Pressed)
    {
        if (!attackCue.IsPlaying)
        {
            attackCue = soundbank.GetCue("attack");
            attackCue.Play();
        }
    }

    if (_curState.Buttons.Y == ButtonState.Pressed)
    {
        if (!dyingCue.IsPlaying)
        {
            dyingCue = soundbank.GetCue("dying");
            dyingCue.Play();
        }
    }

    if (_curState.DPad.Up == ButtonState.Pressed &&
        _lastState.DPad.Up == ButtonState.Released)
    {
        soundbank.PlayCue("song");
    }

    if (_curState.DPad.Down == ButtonState.Pressed &&
        _lastState.DPad.Down == ButtonState.Released)
    {
        soundbank.PlayCue("sword");
    }

    if (_curState.DPad.Left == ButtonState.Pressed &&
        _lastState.DPad.Left == ButtonState.Released)
    {
        soundbank.PlayCue("attack");
    }

    if (_curState.DPad.Right == ButtonState.Pressed &&
        _lastState.DPad.Right == ButtonState.Released)
    {
        soundbank.PlayCue("dying");
    }

    _lastState = _curState;

    base.Update(gameTime);
}
Here we see the two different ways cues can be played. You can either get a cue from the sound bank and keep it for playing over and over, or you can have the sound bank play it directly.
Let’s make a quick change to the buttons so that we can pause and resume a cue. Make the following change to each button:
Listing 7-6
if (_curState.Buttons.A == ButtonState.Pressed &&
    _lastState.Buttons.A == ButtonState.Released)
{
    if (!songCue.IsPlaying)
    {
        songCue = soundbank.GetCue("title");
        songCue.Play();
    }
    else if (songCue.IsPaused)
        songCue.Resume();
    else if (songCue.IsPlaying)
        songCue.Pause();

}
Note that the order of your checks here is important. If you reverse the checks for IsPaused and IsPlaying, you’ll end up pausing the sound and never being able to get it started again, since IsPlaying will return true when the sound is paused. We also need to check the last state of the buttons to prevent the sound from immediately being paused. Try removing the check of _lastState and see what happens when you press the A button.
Let’s make another modification to change the volume of the sounds. We’ll replace the code in the DPad buttons to do this:
Listing 7-7
if (_curState.DPad.Up == ButtonState.Pressed)
{
    volume = MathHelper.Clamp(volume + 0.01f, 0.0f, 5.0f);
}

if (_curState.DPad.Down == ButtonState.Pressed)
{
    volume = MathHelper.Clamp(volume - 0.01f, 0.0f, 5.0f);
}

category.SetVolume(volume);
The category object is an AudioCategory object and the volume variable is a float. That means we need some new declarations and some code to get the category object:
Listing 7-8
float volume = 1.0f;
AudioCategory category;

public Game1()
{
    graphics = new GraphicsDeviceManager(this);
    content = new ContentManager(Services);

    audio = new AudioEngine("Chapter7sounds.xgs");
    wavebank = new WaveBank(audio, "Wave Bank.xwb");
    soundbank = new SoundBank(audio, "Sound Bank.xsb");

    category = audio.GetCategory("Default");
}
The Default category is what every sound is set to that you add to an XACT project. You can create your own categories and group the sounds as you’d like. The one caveat here is that all the sounds in a group are affected by the change in volume, so you’ll need to plan accordingly if you’re going to make volumes dynamic in your game.
Summary
There’s a lot of functionality in the Audio and Media namespaces of the XNA Framework. With XACT and the Audio namespace you can do things like distort sounds, create a Doppler effect on a sound, or use the events in XACT to handle sounds differently. With the Media namespace you can do music visualization; access song properties like the artist, genre, and user rating; and get the album’s cover art. Feel free to explore both XACT and the Audio and Media namespaces further.
As we add functionality to the game in later chapters, we can easily add new sounds — background sounds and different songs for various environments; sounds for every weapon, item, and spell; even vocal versions of the text. Don’t just add sounds because you can, though. Make your sounds memorable in a good way. It’ll make your game more interesting and therefore more enticing to potential players.