
Chapter 12
Multiplayer Considerations
So there you are, alone in a dungeon and you realize that you’re in an area that’s just a bit out of your league. It’s time to call in the reinforcements. You head back to town and stop by the local tavern where you post a notice for other adventurers, letting them know what you’re planning and that you need some help. You stop by the next day and there are a couple of people who saw your notice and would like to join you, for a cut of the treasure that you recover, of course.
Adding multiplayer capability to a game is almost a requirement these days. It used to be that adding multiplayer functionality was extremely difficulty to do well. Part of that was an Internet that was young and not quite up to the task of handling all the data that was passed through it, resulting in gameplay that was less than ideal. With broadband connections accessible to almost everyone at relatively cheap prices, it’s become more expected to have some sort of multiplayer capability in most games.
In this chapter, we’ll discuss various ways to offer a multiplayer experience in your game and briefly look at the functionality that’s offered by the XNA Framework for implementing such an experience.
Who’s the Boss?
There are two components to a multiplayer game from an application standpoint — the server and the client. These two components can be in the same executable or in separate executables, running on the same machine or different machines. A server isn’t always necessary before or during the game, but you need something to find other players over the Internet. On a local network or the Xbox LIVE network, a server isn’t necessary as clients can find one another easily. In addition, one of the clients may act as the host before and during the game.
The host is one of the players who basically says to the world, “I’m having a party, come on in and join the fun.” That player hosts the party, in other words. The host can have limited or total control over the way the multiplayer aspect of the game functions. He can allow certain people to join the game, refuse entry to others, or kick current players out of the game. The exact functionality the host is given depends on the developer. A typical setup for a game that uses this type of architecture would be something like the following:
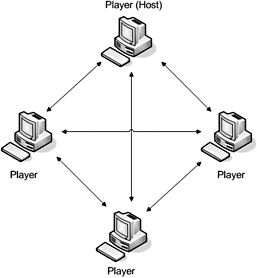
Figure 12-1
This is known as a peer-to-peer type of setup. Once the game is started, every player will send all the necessary messages to every other player. Any validation of data is done on every client. It’s not the most secure method, but it’s less work than writing a separate server application.
The server is the component that controls the gameplay to a certain extent and allows clients to join. It’s usually a separate piece of software from the game application in order to keep it free from the prying eyes of players seeking an exploit. The person controlling the server usually can set certain options of the game — time limits, the number of people that can join, victory conditions, etc. The server is the boss. It enforces the rules of the game and can set up certain rules the way it wants. The setup for this type of architecture would look like this:

Figure 12-2
In some cases the server could be running on the same machine as a player that is connecting to it. Such a setup would look like this:
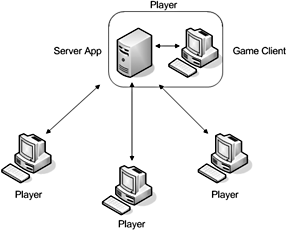
Figure 12-3
The server controls communication between the players, passing messages to the proper parties and sending out its own messages as needed, such as notifying players when someone joins or leaves the game. It validates player movements and changes what a player has tried to do if it violates the game’s rules. You can think of part of the server’s responsibility as a referee at a sporting event.
If the server is the referee, the clients are the players, doing what the server tells them when necessary, but otherwise playing the game the way they want. The client doesn’t know anything about the way the multiplayer aspect of the game works; it just knows how to join and quit a game and how to send and receive messages, either to other players or through the server. It usually doesn’t verify any messages it receives; it just accepts them and continues doing what it was doing. It relies on the server to make sure the other players are doing what they say they’re doing.
So now we know what our options are from an architectural standpoint. The various types of multiplayer games that can be created will use one of these types of architectures. Which one is up to you. Some pairings will make more sense than others once you look at them both.
Multiple-Player Party
The multiplayer party is the example that was used at the beginning of the chapter, but it could also be random people that get together in a game lobby or even in the game in the case of an MMORPG. This type of game can use any of the network architectures, which in most cases will determine how the players can find one another and join together.
Lionhead Studios added a multiplayer component to the sequel to its mega-hit Fable. Fable 2 allows a player to jump right into a friend’s game over Xbox LIVE, through System Link, or on the same console. There are restrictions to this (for example, the joining player has to use a premade character, not one he uses when he plays his single-player game), but it at least allows players to have fun together. The player hosting the game can set various rules — how to split loot that is gained between the players, whether friendly fire is active, etc.
Here are some other things you’ll need to consider when setting up a multiplayer party type experience:
![]() How is experience split between players? Do you split it equally? If so, is a player that does 95% of the damage to an enemy or takes 95% of the damage an enemy inflicts on the party (think MMORPG tank type character, whose job is to take the punishment his character is built for so others who can’t take it don’t have to) going to complain about how unfair the experience is split? If you try to make it fair, you’re adding more code to do the calculations and thus more testing.
How is experience split between players? Do you split it equally? If so, is a player that does 95% of the damage to an enemy or takes 95% of the damage an enemy inflicts on the party (think MMORPG tank type character, whose job is to take the punishment his character is built for so others who can’t take it don’t have to) going to complain about how unfair the experience is split? If you try to make it fair, you’re adding more code to do the calculations and thus more testing.
![]() It’s almost inevitable that a player will find loot that he can’t use but another player can. How do you handle getting the item from one player to another? Do you force the player with the item to drop it and the other player to pick it up? This is probably not the best solution. Do you allow the player with the item to drag it from his inventory onto the other player’s character? That would be nice, but now you need to implement functionality to recognize when this occurs, which potentially opens up a whole new can of worms. You would probably want to implement a trade dialog of some kind, which means you need to plan for the additional coding and testing that will be required. If you have a dialog that’s used for buying items from and selling items to an NPC shopkeeper, you might be able to reuse it and cut down on the coding, but it will have to be tested in both cases.
It’s almost inevitable that a player will find loot that he can’t use but another player can. How do you handle getting the item from one player to another? Do you force the player with the item to drop it and the other player to pick it up? This is probably not the best solution. Do you allow the player with the item to drag it from his inventory onto the other player’s character? That would be nice, but now you need to implement functionality to recognize when this occurs, which potentially opens up a whole new can of worms. You would probably want to implement a trade dialog of some kind, which means you need to plan for the additional coding and testing that will be required. If you have a dialog that’s used for buying items from and selling items to an NPC shopkeeper, you might be able to reuse it and cut down on the coding, but it will have to be tested in both cases.
![]() How do you handle level disparities between characters? If you allow characters with a sizable level gap between them in the same party, you could end up with the experience being too easy or too hard for players. You could dynamically generate enemies that are of a level that’s the average of the entire party, but again you’re adding more code to do so, which takes more development time and means more testing. Are you noticing a pattern here? The more functionality you add to your game, the more time you’ll need to allocate for development and testing. This might seem obvious, but it’s something you always need to keep in mind.
How do you handle level disparities between characters? If you allow characters with a sizable level gap between them in the same party, you could end up with the experience being too easy or too hard for players. You could dynamically generate enemies that are of a level that’s the average of the entire party, but again you’re adding more code to do so, which takes more development time and means more testing. Are you noticing a pattern here? The more functionality you add to your game, the more time you’ll need to allocate for development and testing. This might seem obvious, but it’s something you always need to keep in mind.
![]() How do you handle loot? If you are dynamically generating items, you’ll need to verify that there are roughly the same number of items that can be used by all the characters. You could add a check to the levels that are used in your multiplayer game so that they’re designed around a minimum and maximum level. This is a nice solution in that it removes some of the headaches associated with level disparity. It doesn’t take much more code to do this than to just build levels generically, either.
How do you handle loot? If you are dynamically generating items, you’ll need to verify that there are roughly the same number of items that can be used by all the characters. You could add a check to the levels that are used in your multiplayer game so that they’re designed around a minimum and maximum level. This is a nice solution in that it removes some of the headaches associated with level disparity. It doesn’t take much more code to do this than to just build levels generically, either.
![]() How do you handle alignment differences between party members? Do you allow evil characters to join with good characters? If so, how does this change the game experience? If you have an evil character as part of the party, he’s probably going to want to be able to do things that the rest of the party disagrees with, so he’ll want to be able to do them without the party noticing. A thief will probably want to be able to steal without the rest of the party being informed. He may even want to be able to steal from party members! Obviously you would want to give the party members a chance to notice this theft, with perhaps a greater chance of noticing it if it’s from another player rather than an NPC. What happens if a player notices this? Do you allow the other players to kick the thief out of the party? If so, what happens to him? Can he still play the game in the same session, perhaps trailing the party and harassing them?
How do you handle alignment differences between party members? Do you allow evil characters to join with good characters? If so, how does this change the game experience? If you have an evil character as part of the party, he’s probably going to want to be able to do things that the rest of the party disagrees with, so he’ll want to be able to do them without the party noticing. A thief will probably want to be able to steal without the rest of the party being informed. He may even want to be able to steal from party members! Obviously you would want to give the party members a chance to notice this theft, with perhaps a greater chance of noticing it if it’s from another player rather than an NPC. What happens if a player notices this? Do you allow the other players to kick the thief out of the party? If so, what happens to him? Can he still play the game in the same session, perhaps trailing the party and harassing them?
What if the evil character is an assassin type character and wants to be able to kill the other party members and steal their loot? If you don’t allow this, you’re potentially alienating a percentage of players. If you do allow it, you could end up having to deal with griefing.
Griefing: Playing a game in a way that’s meant to simply aggravate and harass other players. This type of play is normally associated with MMORPGs.
Normally RPGs that use an alignment system have penalties or bonuses for players that actually play the game as their character would act. If you allow conflicting alignments within a party, what is this going to do to your system?
RPGs are considered one of the hardest types of games to create, mainly because the action is supposed to take place in a living, breathing world. It’s difficult enough to try to anticipate what one player will do, let alone an entire party. Not only could the party members be affecting the world in ways the designer didn’t think about, the party members could be affecting one another.
GM-Controlled Game
There have been several computer games where one person takes the role of the GM (Game Master), making the game more dynamic and adaptive to the players and their actions. Vampire: The Masquerade — Redemption, published in 2000 by Activision and developed by Nihilistic Software, featured a multiplayer mode that allowed one person to become the Storyteller, changing the game as necessary to adapt to the players and keep it interesting and challenging.
Neverwinter Nights had a dungeon master client feature that gave a person complete control over the server portion of the game that allowed people to join a semi-persistent world. A key piece of the DM client was the ability for the DM to take control of an NPC, helping to make the game seem more realistic by responding to players as they would expect them to and engaging them directly in order to further the adventure in case the players had strayed too far afield.
A GM-controllable game is much more difficult to create and test than a multiplayer party game. Each piece of functionality that you allow the GM to have adds another layer of complexity to the game. What if the GM spawns dozens of high-level monsters? Can your game handle the additional rendering and AI requirements? What if the GM takes control of a monster; does your AI for that entity stop running and start back up when he relinquishes control?
Players as Both Good and Bad Entities
The recently released Left 4 Dead takes the multiplayer experience one step further by allowing a player to become one of the many zombies that the group of human players have to take on during the game. Not only can players become normal zombies, but they can also control one of the several types of boss-type creatures that the game features. Although it’s not an RPG, it offers a type of gameplay that can be used in a multiplayer RPG.
In RPGs you normally don’t see players taking the role of one of the bad guys (unless it’s part of the storyline), but it could be very interesting to change things up and give them this ability. There are a lot of ways this could be done. Here are a few:
![]() Two groups of players, one good and one bad, race for a weapon of ultimate power. Obstacles that stand in the way would be tailored to each group and force the group to make decisions based on their alignment that would shorten the journey to the goal but negatively affect their characters. (The evil group has to help out someone to get a piece of the puzzle that shows where the weapon is, and the good group has to kill someone in cold blood.)
Two groups of players, one good and one bad, race for a weapon of ultimate power. Obstacles that stand in the way would be tailored to each group and force the group to make decisions based on their alignment that would shorten the journey to the goal but negatively affect their characters. (The evil group has to help out someone to get a piece of the puzzle that shows where the weapon is, and the good group has to kill someone in cold blood.)
![]() Plain deathmatch type gameplay where experience and/or money is made (think Gladiator Arena).
Plain deathmatch type gameplay where experience and/or money is made (think Gladiator Arena).
![]() An assault type game where one group defends a base or some area and another group has to assault and take it over.
An assault type game where one group defends a base or some area and another group has to assault and take it over.
The last two are first-person shooter types of multiplayer gaming, but I think they can be adapted to RPG play with little problem.
This is one area that RPGs typically haven’t gotten into, but coming up with a solid game that has a unique feature like this would increase the chance of your game doing well.
Setting Up for Multiplayer
There are a couple of decisions you have to make in deciding which API to use to implement your networking functionality. The .NET Framework comes with all the functionality you would need to create a multiplayer game, but if you want to submit your game to the Xbox LIVE Community Games system you have to use the network functionality specifically provided in the XNA Framework. While this means you have an instant audience of millions of gamers, it does limit you somewhat for a PC version of the game. The Games for Windows - Live functionality is not included in the redistributable of the XNA Framework, which means that any PC that attempts to play a game that uses the functionality must have XNA Game Studio installed or have another game installed that uses Games for Windows - Live (not many at this time). Furthermore, the profile that is signed in must be tied to a Creators Club membership.
If you want to release a strictly local network game that uses system link networking for the PC, there’s nothing required in terms of extra software installed on the player’s PC or memberships. This limits your audience on the PC side, however.
Another alternative is to use the Live network for your Xbox 360 version of the game and give the player the option of Games for Windows - Live or another networking library for the PC. If you have the knowledge and time to implement something like this, it’s a great alternative.
For our purposes we’ll assume that the Live networking is enough and we’ll discuss various issues related to it. That said, there’s a lot to consider so let’s jump right in.
Getting Started
Before any kind of networking can be done, the gamer services system must be initialized. The gamer services system provides access to the messages that the Guide raises, such as sign-in status changes and game invitations. Since a player has to be signed in to play an XNA Framework game, he’ll have to have access to the Guide, and in order to have access to the Guide, the system that provides access to it has to be active. Fortunately, it’s extremely simple to get the service up and running:
Components.Add(new GamerServicesComponent(this));
That’s it — we’re done. By adding an instance of the GamerServicesComponent to the game’s Components list, we get the benefit of having the service’s Update method called automatically.
If you’re not using the XNA Framework application model or component infrastructure, you can use the GamerServicesDispatcher class. In this case, you’ll have to do a little extra work. First, some initialization, best done in your startup code:
Listing 12-1
protected override void Initialize()
{
    GamerServicesDispatcher.WindowHandle = Window.Handle;

    GamerServicesDispatcher.Initialize(Services);

    base.Initialize();
}
You’ll then need to call the Update method of the class once per frame:
Listing 12-2
protected override void Update(GameTime gameTime)
{
    GamerServicesDispatcher.Update();
    base.Update(gameTime);
}
A game can now call any networking API function without an exception being thrown.
In-Game Chat
Being able to communicate with the other players in a group is important to ensuring the group survives in places like dungeons or any combat situation. If the group has no way of communicating and all but one of the group decides to run from an encounter, the remaining player is probably going to be pretty upset to find himself facing a horde of monsters by himself.
Having to type to communicate is one option, but can be problematic in combat when a player has to concentrate on the enemy he’s facing. A multiplayer game can’t be paused like a single-player game to type a message to the other players. Providing this functionality is fine, but having another solution would be ideal.
Luckily, voice support in XNA Framework games comes free of charge. The voice data is automatically transmitted and replayed without having to write one line of code. There are a couple of pieces of data that have to be checked, however:
![]() Are the players allowed to send and receive communications using voice, text, messaging, or game invites?
Are the players allowed to send and receive communications using voice, text, messaging, or game invites?
If GamerPrivileges.AllowCommunication is set to false the XNA Framework will automatically take care of disabling voice chat in game.
![]() Do they have voice access?
Do they have voice access?
NetworkGamer.HasVoice will be set to false if the player doesn’t have a headset. You might want to note this in-game somehow. There are icons available on the Creators Club web site that can be used. A couple of examples are shown in the following figure:

Figure 12-4
![]() Are they currently talking?
Are they currently talking?
If the player is currently talking (NetworkGamer.IsTalking) you could use something like one of the icons shown above or highlight the player in the game’s GUI.
![]() Are they muted?
Are they muted?
If you don’t let the other players know a person is muted (NetworkGamer.IsMutedByLocalUser) they could talk to the muted player and if don’t get a reply they may think something is wrong with the game.
![]() If you want to enable things like team chat or in-game location-based chat there’s the LocalNetworkGamer.EnableSendVoice method.
If you want to enable things like team chat or in-game location-based chat there’s the LocalNetworkGamer.EnableSendVoice method.
“I sense a presence…”
So gamers are playing your game and their friends want to know exactly what they’re doing in the game. If you’ve ever played on Xbox LIVE, you know that your Friends List will have text next to a friend like “Playing Rock Band 2 - Band Quickplay - Smile Like You Mean It.” This is called Presence information.
Each game sets and displays pieces of the information during the game to reflect what’s going on. The first piece of information is set automatically. The second and third pieces are general and specific, respectively, and are set by the developer. Games created using the XNA Framework also have the ability to specify information like this, but in a limited fashion. Because XNA Game Studio games are not certified, any information that’s displayed has to be limited to something that would fall under what would be a rating of E - Everyone. In order to be certain that this is the case, Microsoft has provided a list of strings that can be displayed, some with values that can be provided by the developer. The Figure 12-5 shows the current list from which the developer can select.
The first two lines of displayed information will be set to “Xbox LIVE Community Game” and the game’s title, and the item will be displayed on the third line. The following items can specify a value along with the text by setting the PresenceValue property of the GamerPresence class:
![]() GamerPresenceMode.Stage
GamerPresenceMode.Stage
![]() GamerPresenceMode.Level
GamerPresenceMode.Level
![]() GamerPresenceMode.Score
GamerPresenceMode.Score
![]() GamerPresenceMode.CoopStage
GamerPresenceMode.CoopStage
![]() GamerPresenceMode.CoopLevel
GamerPresenceMode.CoopLevel
![]() GamerPresenceMode.VersusScore
GamerPresenceMode.VersusScore

Figure 12-5
To set the gamer’s presence, you would do something like the following:
Listing 12-3
foreach (SignedInGamer signedInGamer in SignedInGamer.SignedInGamers)
{
    signedInGamer.Presence.PresenceMode = GamerPresenceMode.InCombat;
}
Session Management
Before any multiplayer game can begin, there has to be a session for the players to join. As there are several reasons that creating a session could fail, it would be a good idea to trap for them, as the following code shows:
Listing 12-4
void CreateSession(NetworkSessionType sessionType)
{
    try
    {
        IAsyncResult asyncResult =
            NetworkSession.BeginCreate(sessionType, 1,
            World.MaximumPlayers, null, null);

    }
    catch (NetworkException ne)
    {
       System.Console.WriteLine("Failed to create session: " +
           ne.Message);
    }
    catch (GamerPrivilegeException gpe)
    {
       System.Console.WriteLine(
           "Insufficient privilege to create session: " + gpe.Message);
    }
}
The NetworkSessionType variable can be one of four values:
![]() Local
Local
![]() SystemLink
SystemLink
![]() PlayerMatch
PlayerMatch
![]() Ranked
Ranked
Note that the Ranked value is only used for commercial games that have earned Xbox LIVE certification.
If you want to be notified when the session is created, you can pass in a callback as the fourth argument of the BeginCreate function. The object returned from the call to BeginCreate can be used to monitor the progress of the session creation, however.
You can simply check it each call to the Update method to see if it’s finished:
if ((asyncResult != null) && asyncResult.IsCompleted)
Once the session is created, you’ll want to save the session object for future use and set some properties for it:
Listing 12-5
void SessionCreated(object sender, OperationCompletedEventArgs e)
{
    NetworkSession networkSession = null;
    try
    {
        networkSession = NetworkSession.EndCreate(e.AsyncResult);
    }
    catch (NetworkException ne)
    {
        System.Console.WriteLine("Failed to create session: " +
            ne.Message);
    }
    catch (GamerPrivilegeException gpe)
    {
        System.Console.WriteLine(
          "Insufficient privilege to create session: " +
          gpe.Message);
    }
    if (networkSession != null)
    {
        networkSession.AllowHostMigration = true;
        networkSession.AllowJoinInProgress = false;
    }
}
At this point you can display a screen to let the player who has created the session wait to see if any players join the session. You would also allow them to indicate that they’re ready for the game to start. See the following figure for an example of a screen like this from the Net Rumble Starter Kit:

Listing 12-6
In order for other players to find this session, they have to be given an interface to see the available sessions. The code to do this looks suspiciously familiar:
void FindSession(NetworkSessionType sessionType)
{
    try
    {
        IAsyncResult asyncResult =
          NetworkSession.BeginFind(sessionType, 1, null,
          null, null);
    }
    catch (NetworkException ne)
    {
        System.Console.WriteLine("Failed to search for session: " +
          ne.Message);
    }
    catch (GamerPrivilegeException gpe)
    {
        System.Console.WriteLine(
          "Insufficient privilege to search for session: " +
          gpe.Message);
    }
}
When the available sessions are found, you would display them to the player in a GUI of some type:
Listing 12-7
private AvailableNetworkSessionCollection availableSessions = null;

try
{
    availableSessions = NetworkSession.EndFind(e.AsyncResult);
}
catch (NetworkException ne)
{
    System.Console.WriteLine("Failed to search for session: " +
        ne.Message);
}
catch (GamerPrivilegeException gpe)
{
    System.Console.WriteLine(
        "Insufficient privilege to search for session: " + gpe.Message);
}

if (availableSessions != null)
{
    foreach (AvailableNetworkSession availableSession in
        availableSessions)
    {
        if (availableSession.CurrentGamerCount < World.MaximumPlayers)
        {
            Console.WriteLine(availableSession.HostGamertag + " (" +
                availableSession.CurrentGamerCount.ToString() + "/" +
                World.MaximumPlayers.ToString() + ")"));
        }
    }
}
World.MaximumPlayers is a game-implemented class member that can be anywhere from 2 to 31 (there is an XNA Framework imposed limit of 31 players in a multiplayer game). The other two pieces of data come from the session data that is transmitted by the host.
Once the player has picked the session he wants to join, you would begin an attempt to join the session:
Listing 12-8
try
{
    IAsyncResult asyncResult = NetworkSession.BeginJoin(
        availableSessions[entryIndex], null, null);
}
catch (NetworkException ne)
{
    System.Console.WriteLine("Failed to join session: " +
        ne.Message);
}
catch (GamerPrivilegeException gpe)
{
    System.Console.WriteLine(
        "Insufficient privilege to join session: " + gpe.Message);
}
If joining the session succeeds, you’ll get the network session that the player is joined to:
Listing 12-9
NetworkSession networkSession = null;
try
{
    networkSession = NetworkSession.EndJoin(e.AsyncResult);
}
catch (NetworkException ne)
{
    System.Console.WriteLine("Failed joining session: " + ne.Message);
}
catch (GamerPrivilegeException gpe)
{
    System.Console.WriteLine(
        "Insufficient privilege to join session: " + gpe.Message);
}
if (networkSession != null)
{
    LobbyScreen lobbyScreen = new LobbyScreen(networkSession);
    lobbyScreen.ScreenManager = this.ScreenManager;
    ScreenManager.AddScreen(lobbyScreen);
}
The last couple of lines of code come from the Net Rumble Starter Kit, which uses classes to represent the various screens needed to display the network data to the player to allow him to get to this point. The LobbyScreen class is what you saw back in Figure 12-6.
From here, you have a couple of events that need to be handled and the information for those events displayed to the player:
![]() GamerJoined — You need to update the screen to display the data for the player that has joined.
GamerJoined — You need to update the screen to display the data for the player that has joined.
![]() GamerLeft — You need to remove the player from the list of players that are in the session so his or her data is no longer displayed.
GamerLeft — You need to remove the player from the list of players that are in the session so his or her data is no longer displayed.
![]() GameStarted — Whatever needs to be done to start the gameplay would happen. This code should only happen on the host and then be transmitted to the other players.
GameStarted — Whatever needs to be done to start the gameplay would happen. This code should only happen on the host and then be transmitted to the other players.
![]() SessionEnded — You would need to let the player know the session is ended and then take the player back to the appropriate screen.
SessionEnded — You would need to let the player know the session is ended and then take the player back to the appropriate screen.
Once the game has started, there are two class you’ll be constantly using — the PacketWriter and PacketReader. You would use the PacketWriter class anytime something happens in the world that the other players need to know about. This includes player movement or actions and events that are caused by NPCs or the world itself. In order to transmit this data to players, you first need to figure out what type of information it is that you need to send. A common way to do this is to create an enum that contains a value for every type of packet that you need to send. Here’s a sample enum:
Listing 12-10
public enum PacketTypes
{
    PlayerData,
    EntityData,
    WorldSetup,
    WorldData,
    PlayerInput,
    GamestateChange,
    GameWon,
};
You could get a lot more, depending on how much depth you want, but making the values somewhat generic gives a little more flexibility. The combination of GamestateChange and PlayerInput could be used for anything from combat to conversation handling, for example. If you had a game state of InitiateConversation, you could send this to display the conversation dialog. The PlayerInput packets would then be used to show the other players the selections made as the conversation goes on.
To send data, the easiest thing to do is to serialize a class that holds the data for that packet type. For example, to send a change to an entity’s stat, you would do something like:
Listing 12-11
packetWriter.Write(_entities[0].Name);
_entities[0].Stats["Strength"].Serialize(packetWriter);
localGamer.SendData(packetWriter, SendDataOptions.ReliableInOrder);

// Serialize method for EntityStat class
public void Serialize(PacketWriter packetWriter)
{
    // safety-check the parameter, as it must be valid.
    if (packetWriter == null)
    {
        throw new ArgumentNullException("packetWriter");
    }

    packetWriter.Write(_stat);
    packetWriter.Write(_value);
}
The other players would get this data as part of the game’s update:
Listing 12-12
private void ProcessPackets()
{
    if ((networkSession != null) &&
        (networkSession.LocalGamers.Count > 0))
    {
        // process all packets found, every frame
        while (networkSession.LocalGamers[0].IsDataAvailable)
        {
            NetworkGamer sender;
            networkSession.LocalGamers[0].ReceiveData(packetReader,
               out sender);
            // read the type of packet...
            PacketTypes packetType =
               (PacketTypes)packetReader.ReadInt32();
            // ... and dispatch appropriately
            switch (packetType)
            {
                case PacketTypes.PlayerData:
                UpdatePlayerData(sender);
                break;

            case PacketTypes.WorldSetup:
                // apply the world setup data, but only once
                if (!Initialized)
                {
                    Initialize();
                }
                break;

            case PacketTypes.EntityData:
                if ((sender != null) && !sender.IsLocal)
                {
                    UpdateEntityData(sender);
                }
                break;

            case PacketTypes.WorldData:
                if (!networkSession.IsHost && Initialized)
                {
                    UpdateWorldData();
                }
                break;

            case PacketTypes.PlayerInput:
                if (sender != null)
                {
                    PlayerData playerData = sender.Tag as PlayerData;
                    if ((playerData != null)
                    {
                       playerData.ProcessInputPacket(packetReader);
                    }
                }
                break;

            case PacketTypes.GameWon:
                gameWon = true;
                if (networkSession.IsHost &&
                   (networkSession.SessionState ==
                   NetworkSessionState.Playing))
                {
                    networkSession.EndGame();
                }
                break;
            }
        }
    }
}
Summary
What we’ve gone over in this chapter is a far from exhaustive look at the networking functionality that’s offered by the XNA Framework. A complete discussion of the subject would likely take up several chapters. What’s been covered here should be enough, however, to give you some information that you can use to start planning for offering multiplayer functionality in your game. Offering multiplayer gameplay is a great way to increase both your potential audience and the longevity of your game. As with most games that offer a multiplayer component, once the player completes the single-player portion of your game, he can then get a potentially completely different experience by jumping into the multiplayer portion of the game. Some games live on for years after their release, based solely on the strength of the multiplayer experience. The longer you can keep your game in the awareness of gamers, the more your name will be known, and the easier it will be for you to get gamers to pick up games you release from then on.