
Chapter 8
Creating the Tile Engine and Level Editor
Up until now, we’ve been dealing only with the data and objects that make up an RPG. Finally we’ll actually be able to see the fruits of our efforts. The reason I’ve held off with graphics is partly because I’m of the opinion that graphics are one of the least important parts of an RPG. A lot of people might argue that point. They can feel free to write their own book on the topic. ![]() Graphics in an RPG only hold my attention for so long. If the guts on a game are weak the graphics won’t hold it up. Once the “wow” factor wears off, I’ll get bored and possibly not even finish it. On the other hand, I can put up with average graphics if there’s tons of data to play with — stats to tweak and deciding what skills to work on and what spells to learn. When I’m about to go on an adventure I like having to decide what items to take along, what armor to wear, what weapons to use, and how much of what items to take.
Graphics in an RPG only hold my attention for so long. If the guts on a game are weak the graphics won’t hold it up. Once the “wow” factor wears off, I’ll get bored and possibly not even finish it. On the other hand, I can put up with average graphics if there’s tons of data to play with — stats to tweak and deciding what skills to work on and what spells to learn. When I’m about to go on an adventure I like having to decide what items to take along, what armor to wear, what weapons to use, and how much of what items to take.
Having said that, you have to have graphics or it would be hard to tell where to go, what to do, or what’s happening around you (unless you’re playing a text-based RPG, of course). In this chapter we’ll implement a fairly simple and straightforward 2D tile engine. While it won’t have cool spell effects and blood splatters from hacked up monsters and dynamic, moving environments, it’ll do the job. As you learn how to do these things, probably using shaders, you can implement them. Or you can make the move to a full 3D engine. Several already exist in various states of completion for use with the XNA Framework and Game Studio, although some might not have made the upgrade to version 3.0. You can check the links in the appendix for some sites that provide 3D engines. Some are complete packages that include sound and network pieces as well as the graphics engine.
Tiles
The basic building block of a tile engine is the tile, a usually square (although sometimes rectangular, hexagonal, diamond, or octagonal shaped) area of the level that holds information about that area, both graphical and other. This information describes the terrain in that area as well as whether the character can move onto or through the area, whether an entity occupies that area, what other object might be in that area (such as a building or items of any kind), and any other information that affects either the world or an entity that moves into that area (a trap of some kind, be it magical or nonmagical, an event trigger that fires when an entity moves into the area, etc.).
In a level where the tiles were created with care and time, it’s usually difficult to distinguish each individual tile. The artist must take the time to create tiles that blend one area into another (water into a beach, beach into grass, grass into rocky terrain, etc.).
We’ll represent a tile using the LevelSquare class:
Listing 8-1
public class LevelSquare
{
    public int TileX, TileY;
    public string TilesetName;

    public bool trapped;
    public Trap trap;

    public bool hasTrigger;

    public ObjectType type;
    public short typeIndex;

    public bool passable;

    public string EntityID;

    private List<Trigger> _triggers;

    public List<Trigger> Triggers
    {
        get { return _triggers; }
    }

    public LevelSquare()
    {
        TileX = -1;
        TileY = -1;
    }

    public bool HasTriggers()
    {
        bool ret = false;

        if (!(_triggers == null))
            ret = (_triggers.Count > 0);

        return ret;
    }

    public void AddTrigger(Trigger trigger)
    {
        if (_triggers == null)
            _triggers = new List<Trigger>();

        _triggers.Add(trigger);

    }
}
The class contains all the information we’ll need to draw the level. The first three members are used to get the specific tile in the tileset that was used to set the graphical contents of this tile.
Tileset: A graphics file that contains many different individual graphics. These graphics are stored in one file to make loading quicker and handling the graphics when drawing easier.
We’ll be using three different tilesets in our editor — two for buildings and other structures and objects both man-made and not, and one for the ground. Following are the tilesets that we have:

Figure 8-1
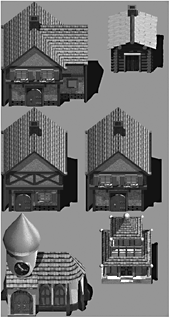
Figure 8-2

Figure 8-3
The background of each tileset is magenta so that the tiles can be drawn over each other and not obscure the tile behind it. Magenta (RGB[255,0,255]) is handled as a transparent color automatically by the SpriteBatch object since it’s a color that’s rarely used in sprites. Notice that the buildings have shadows built into the graphic. This means we’re somewhat restricted in the use of lighting, but that’s not a big issue for us. If you add support for an actual day/night cycle in your game, you probably would have replaced the graphics beforehand anyway.
The next two members in the LevelSquare class are used to determine whether or not the tile is trapped and, if so, what kind of trap is used. If the tile is trapped, the trap member will be set to an instance of the Trap class:
Listing 8-2
public struct Trap
{
    public TrapType Type;
    //use either DamageAmount from Damager or
    //Level * base damage for trap type if Damager is empty
    public byte Level;
    public Damager TrapDamager;
    public short Range;
    public bool Active;
    public bool SingleUse;
}
The TrapType enum contains the following values:
Listing 8-3
public enum TrapType
{
    None,
    Missile,     //normal missile-type
    Gas,
    Magic,       //spell is cast
    Explosion
}
The Level and TrapDamager members are used to calculate the amount of damage an entity suffers if he trips the trap, by either walking into the tile or failing in an attempt to disarm the trap.
We looked at the Damager structure in an earlier chapter, but we’ll repeat it here for completeness:
Listing 8-4
[Serializable]
public struct Damager
{
    public string Affects;
    public string DamageAmount;
    public DamageType Type;
}
In this case, the DamageType member of the structure is ignored. We could have created another structure without it, but it’s easier to reuse this structure. The base damage for each trap type is set in the BaseTrapDamage enum:
Listing 8-5
public enum BaseTrapDamage
{
    MissileTrap = 6,
    GasTrap = 4,
    MagicTrap = 10,
    ExplosionTrap = 20
}
The Range member is used if the trap damage extends beyond the tile the trap is on. This value is a number of expanding tiles outward from the trapped tile. A Range of 2 would affect the following tiles:

Figure 8-4
The center tile is the trapped tile. An entity in the gray tiles will also take damage. I’ve colored the tiles light and dark for a reason. It’s probably not very realistic to have entities in the surrounding tiles take full damage. In this situation, you can have entities in the dark gray tiles take 50% damage and those in the light gray tiles take 25% damage. You would have to do calculations based on the value of the Range member and come up with some value if it’s not evenly divisible, but that’s up to you to determine how best to handle.
The Active member determines if the trap is still active. If the SingleUse member is set to true, the trap could still exist after being tripped, but the Active member would be switched to false.
Next in the LevelSquare class is the hasTrigger member. If set to true, the Triggers member will contain any triggers in the tile. The triggers are used as a sort of scripting mechanism in lieu of true scripting. The Trigger class has just a few members:
Listing 8-6
public enum TriggerType
{
    SetTrap,
    LockUnlock,
    Message,
    Spawn
}


public struct Trigger
{
    public TriggerType Type;
    public string SpawnName;    //if the trigger type is spawn

    //false to lock, lock is reserved so using unlock :)
    public bool Unlock;
    public Point TargetTile;

}
Currently we only have four types of triggers:
![]() SetTrap — Used to make a trap active.
SetTrap — Used to make a trap active.
![]() LockUnlock — Locks or unlocks an object on a tile. This could be a door, chest, etc. The Unlock member is used to determine whether the object is to be locked or unlocked.
LockUnlock — Locks or unlocks an object on a tile. This could be a door, chest, etc. The Unlock member is used to determine whether the object is to be locked or unlocked.
![]() Message — Displays a message to the player. Useful for things like reading signs, scrolls, etc.
Message — Displays a message to the player. Useful for things like reading signs, scrolls, etc.
![]() Spawn — Creates a creature or monster of the type noted in the SpawnName member.
Spawn — Creates a creature or monster of the type noted in the SpawnName member.
For every trigger type except Message, the TargetTile is where the action occurs. This doesn’t have to be the tile containing the trigger, it could be a tile on the other side of the level. The tile does have to be in the current level, though. It would be problematic to make it work across levels, although not impossible.
The type and typeIndex members are used to determine what object, if any, is in the level. Currently only two things can be in the level, as noted by the ObjectType enum:
Listing 8-7
public enum ObjectType
{
    None = -1,
    Entity,
    Item
}
That’s a lot of data stuffed into a tile. Put a lot of those tiles together and you have a level.
The passable member is used in detecting collisions between an entity and the type of terrain or object that may be on the tile. A building or an entity standing at the bottom of a cliff would not be able to pass through the tile. An enhancement to this collision detection could be to allow varying types of passible tiles. Thick mud wouldn’t prevent an entity from passing through it, but would make for slow progress. Water would require the entity to have some skill in swimming or he would drown.
The EntityID member identifies a particular entity that might be standing on the tile. If the member is set to anything less than 1, there is no entity on that tile. This is a less than ideal way to do this since entities will almost always be moving around the level. For our demo this isn’t a big deal since the one person that will be in the town will always be in the same spot and monsters will not be smart enough to move around. I’ve left this as an exercise for the reader to consider how to best enhance this. Here’s a hint: A List<int> might be useful in a different scope than the tile level.
The Level Class
Our game world will be composed of a set of levels. A level can be just about any size you want, limited only by the memory available on the player’s machine. Given that most gamers these days have pretty beefy machines, you should be able to create some pretty large levels. Note that the larger the level, the longer it will take to load. Players will get annoyed very quickly if a level takes more than 30 seconds to a minute to load, and even that’s pushing it. The trade-off between large levels and load time is something you’ll have to experiment with. Note that even a small level can take a while to load if it’s heavily populated.
There’s a lot of data in the Level class, in a relatively small number of members:
Listing 8-8
public class Level
{
    private string _name;
    private string _description;

    private int _width;
    private int _height;

    private int _minEntityLevel;

    [ContentSerializerIgnore]
    private Dictionary<string, Texture2D> _tiles;

    private LevelSquare[,] _groundSquares;
    private LevelSquare[,] _structureSquares;

    private Dictionary<string, Texture2D> _entities;

    //height and width of the viewport area in pixels
    [ContentSerializerIgnore]
    private int _viewportWidth;
    [ContentSerializerIgnore]
    private int _viewportHeight;

    public string Name
    {
        get { return _name; }
        set { if (!string.IsNullOrEmpty(value)) _name = value; }
    }

    public string Description
    {
        get { return _description; }
        set { _description = value; }
    }

    public int Width
    {
        get { return _width; }
        set { _width = value; }
    }

    public int Height
    {
        get { return _height; }
        set { _height = value; }
    }

    public int MinimumEntityLevel
    {
        get { return _minEntityLevel; }
        set { _minEntityLevel = value; }
    }

    [ContentSerializerIgnore]
    public int ViewportWidth
    {
        get { return _viewportWidth; }
        set { _viewportWidth = value; }
    }

    [ContentSerializerIgnore]
    public int ViewportHeight
    {
        get { return _viewportHeight; }
        set { _viewportHeight = value; }
    }

    public Dictionary<Point, LevelSquare> GroundSquares
    {
        get
        {
           Dictionary<Point, LevelSquare> squares =
              new Dictionary<Point, LevelSquare>();

           Point pt;

           for (int x = 0; x < _groundSquares.GetUpperBound(0); x++)
           {
               for (int y = 0; y < _groundSquares.GetUpperBound(1); y++)
               {
                   //only store if there's a tile here
                   if (!string.IsNullOrEmpty(_groundSquares[
                       x, y].TilesetName))
                   {
                       pt = new Point(x, y);
                       squares.Add(pt, _groundSquares[x, y]);
                   }
               }
           }

           return squares;
        }
        set
        {
           _groundSquares = new LevelSquare[_width, _height];

           for (int x = 0; x < _width; x++)
           {
               for (int y = 0; y < _height; y++)
               {
                   _groundSquares[x, y] = new LevelSquare();
               }
           }

           foreach (KeyValuePair<Point, LevelSquare> kvp in value)
           {
               _groundSquares[kvp.Key.X, kvp.Key.Y].TilesetName =
                   kvp.Value.TilesetName;
               _groundSquares[kvp.Key.X, kvp.Key.Y].TileX =
                   kvp.Value.TileX;
               _groundSquares[kvp.Key.X, kvp.Key.Y].TileY =
                   kvp.Value.TileY;
           }
        }
    }

    public Dictionary<Point, LevelSquare> StructureSquares
    {
        get
        {
           Dictionary<Point, LevelSquare> squares =
               new Dictionary<Point, LevelSquare>();

           Point pt;

           for (int x = 0; x < _structureSquares.GetUpperBound(0); x++)
           {
               for (int y = 0; y < _structureSquares.GetUpperBound(1);
                  y++)
               {
                   //only store if there's a tile here
                   if (!string.IsNullOrEmpty(_structureSquares[
                       x, y].TilesetName))
                   {
                       pt = new Point(x, y);
                       squares.Add(pt, structureSquares[x, y]);
                   }
               }
           }

           return squares;
        }
        set
        {
           _structureSquares = new LevelSquare[_width, _height];

           for (int x = 0; x < _width; x++)
           {
               for (int y = 0; y < _height; y++)
               {
                   _structureSquares[x, y] = new LevelSquare();
               }
           }

           foreach (KeyValuePair<Point, LevelSquare> kvp in value)
           {
               _structureSquares[kvp.Key.X, kvp.Key.Y].TilesetName =
                   kvp.Value.TilesetName;
               _structureSquares[kvp.Key.X, kvp.Key.Y].TileX =
                   kvp.Value.TileX;
               _structureSquares[kvp.Key.X, kvp.Key.Y].TileY =
                   kvp.Value.TileY;
           }
        }
    }
}
The first couple of members should be obvious as to what they contain. The _minEntityLevel member is used to restrict the level to characters of a certain level. While this is usually done in MMORPGs, not single-player RPGs, I added it in case someone finds it useful. We won’t be using it in our demo game.
The _tiles member contains the tilesets that are used. Note that the member is set so that the textures aren’t stored in the level data on the hard drive. This would be kind of silly to do, especially since the tileset files are compiled already by the ContentBuilder class. The tilesets are compiled so that we can use the same code to draw the level as is used in the game. You can find out more about the ContentSerializerIgnore attribute used here in the excellent posts by Shawn Hargreaves in his blog (start at http://blogs.msdn.com/shawnhar/archive/2008/08/12/everything-you-ever-wanted-to-know-about-intermediateserializer.aspx).
The next two members are used to give us two layers in which to draw things. This allows objects to be hidden behind other objects and lets the character walk behind things like buildings or trees.
The _entities member is used so that we don’t have to load every entity that exists when the level is loaded. This conserves memory, which is a wise thing to do if your levels get to be fairly large. This isn’t so much an issue on most PCs nowadays as it is on the Xbox 360, which can be considered to have a limited amount of memory. It would take a lot to use all its memory, but it’s a good practice not to use more than you need to.
The _viewportWidth and _viewportHeight members are used only in the level editor, which is why we see again that the data in the members isn’t written to the level file.
The Level class only contains a couple of methods besides the Draw method — one each to set and remove a tile, FillGroundLayer, which allows the tiles to be easily set to one tile type, one to put an entity on a tile, and a couple of functions to load tiles and entities. We’ll take a look at a few of these. Feel free to look at the others when you can.
Listing 8-9
public void SetTile(int squareType, int x, int y, string tileset,
    int tileCoordX, int tileCoordY)
{
    switch ((Layer)squareType)
    {
        case Layer.Ground:
        {
            _groundSquares[x, y].TilesetName = tileset;
            _groundSquares[x, y].TileX = tileCoordX;
            _groundSquares[x, y].TileY = tileCoordY;

            break;
        }
        case Layer.Structure:
        {
            _structureSquares[x, y].TilesetName = tileset;
            _structureSquares[x, y].TileX = tileCoordX;
            _structureSquares[x, y].TileY = tileCoordY;

            break;
        }
    }
}

public void RemoveTile(int squareType, int x, int y)
{
    switch ((Layer)squareType)
    {
        case Layer.Ground:
        {
            _groundSquares[x, y].TilesetName = "";
            _groundSquares[x, y].TileX = -1;
            _groundSquares[x, y].TileY = -1;

            break;
        }
        case Layer.Structure:
        {
            _structureSquares[x, y].TilesetName = "";
            _structureSquares[x, y].TileX = -1;
            _structureSquares[x, y].TileY = -1;

            break;
        }
    }
}

public void FillGroundLayer(string tileset, int tileCoordX, int tileCoordY)
{
    for (int x = 0; x < _width; x++)
    {
        for (int y = 0; y < _height; y++)
        {
            _groundSquares[x, y].TilesetName = tileset;
            _groundSquares[x, y].TileX = tileCoordX;
            _groundSquares[x, y].TileY = tileCoordY;
        }
    }
}

public void InsertEntity(string entityID, int x, int y)
{
    _structureSquares[x, y].EntityID = entityID;
}
Although we only have two layers in our level, I used a switch statement in the methods to set and remove a tile in case you want to add more layers. Some RPG levels have three or more layers. Just add another value to the Layer enum and another member for the array of LevelSquare objects, copy and paste one case, and you’re done.
Listing 8-10
public enum Layer
{
    Ground,
    Structure
}
The only remaining method is the main one, the Draw method:
Listing 8-11
public void Draw(SpriteBatch sb, int topX, int topY)
{
    int tileX, tileY;

    for (int x = 0; x <=  (int)(_viewportWidth / 32); x++)
    {
        for (int y = 0; y <=  (int)(_viewportHeight / 32); y++)
        {
            tileX = x + topX;
            tileY = y + topY;

            if (!string.IsNullOrEmpty(_groundSquares[tileX,
              tileY].TilesetName))
                sb.Draw(_tiles[_groundSquares[tileX, tileY].TilesetName],
                new Rectangle(x * 32, y * 32, 32, 32),
                new Rectangle(_groundSquares[tileX, tileY].TileX *
                    32, _groundSquares[tileX, tileY].TileY * 32,
                    32, 32), Color.White);

            if (!string.IsNullOrEmpty(_structureSquares[tileX,
              tileY].TilesetName))
                sb.Draw(_tiles[_structureSquares[tileX,
                    tileY].TilesetName], new Rectangle(x * 32, y * 32,
                    32, 32),
                new Rectangle(_structureSquares[tileX, tileY].TileX * 32,
                    _structureSquares[tileX, tileY].TileY * 32, 32, 32),
                    Color.White);

            if (!string.IsNullOrEmpty(_structureSquares[tileX,
              tileY].EntityID))
            {
                if (_entities.ContainsKey(_structureSquares[tileX,
                    tileY].EntityID))
                {
                    sb.Draw(_entities[_structureSquares[tileX,
                        tileY].EntityID], new Rectangle(x * 32 —
                        _entities[_structureSquares[tileX,
                        tileY].EntityID].Width - 32, x * 32 —
                        _entities[_structureSquares[tileX,
                        tileY].EntityID].Width - 32,
                        _entities[_structureSquares[tileX,
                        tileY].EntityID].Width,_entities[
                        _structureSquares[tileX, tileY]
                        .EntityID].Height), Color.White);
                }
            }
        }
    }
}
As with many of our classes, a relatively small amount of code does a lot of work, mainly due to the object-oriented nature of C#. A simple loop through the LevelSquare arrays is all that is needed to get the level drawn on the screen. Only what’s visible in the viewport is drawn and only if the ground tile and structure tile is set. The entity in the tile, if one exists, is also drawn. It’s important to draw the tiles in the correct order from the top left to the bottom right and to draw the ground layer before the structure layer. You’ll quickly know if things are not being drawn correctly.
The Level Editor
The code for this chapter contains the level editor that will be used to construct the levels for our sample game. The editor looks like Figure 8-5 when you first launch it.
The left side contains a tabbed dialog with the three tilesets we’ll be using. The right side is the rendering area for the level. The two combo boxes in the toolbar are used to set the layer being drawn to and select an entity to be placed in a tile. Most of the code in the editor is support for the work done in the Level class. Feel free to fire up the editor and create some test levels to get used to the functionality. You can also look at the source code to see how using the SpriteBatch object in a non-XNA game project is done.

Figure 8-5
Summary
We can now create just about whatever worlds we can imagine. Of course we would have to add some new graphics to really get something that seems like a living, breathing world, but the ability to create that world is there. If you have a really good artist working for you, you’ll be amazed at what you can create.
We now have a world, but no way for the player to really interact with it. He can’t even see what his character is wearing! In the next chapter, we’ll discuss what interface elements are needed to get the player to where he needs to be as far as interacting with the world and everything and everyone in it. We’ll implement a very rudimentary interface with inventory and quest windows and a toolbar for allowing the player to have quick access to items or skills.