
Chapter 9
Interface
A game’s interface is the door between our world and the game world. A good interface should be informative but unobtrusive. Too many game interfaces are cumbersome and get in the way of playing the game. An RPG is very complex, but some companies don’t seem to try very hard to make an interface that makes it any easier.
An interface covers such things as displaying a character’s stats, skills, inventory, and other vital information that must constantly be monitored. It also usually offers a quick way to select and use spells and items such as weapons and potions. Actions such as trading, buying, and selling are also handled by the interface. Interactions with NPCs are sometimes handled with dialogs, which are another part of the interface.
The interface can be designed in many different ways. Figures 9-1 to 9-3 are screenshots of parts of the interface of one RPG — Neverwinter Nights.
Neverwinter Nights also came up with a unique use for the right-click function. Right-clicking on something brings up a set of general function buttons around the object or entity. Clicking on one of these buttons replaces the general buttons with more specific buttons if any are available. The outward-pointing arrow next to a button indicates whether or not it has more specific functionality. After spending a short time using this, you learn how to quickly drill down to what you need. I like this idea very much. It doesn’t take up much space and, after you spend a short amount of time learning it, you have quick access to almost everything that pertains to what you click on.
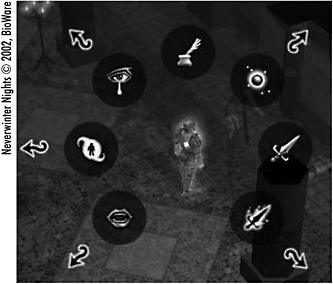
Figure 9-1
Figure 9-2 is the character information window that is located in the top right-hand corner of the game window. It gives you quick access to basically everything to do with your character and any members of your party. Immediately to the left of the character’s picture is a bar that shows the character’s health. Having something like this on the screen at all times is extremely convenient and almost necessary if your RPG is quick moving, as the status of a character could change quickly. If you have to stumble around the interface to find out if your character needs healing because he’s taking damage, it’s likely that your character could be dead by the time you get to the information. That’s not a good way to get people to like a game.

Figure 9-2
The piece of this interface that we’ll be developing is a combination inventory/character equipment window. It will show the armor and items that the player has equipped the character with and the contents of the character’s inventory. The inventory piece will be very basic and won’t require the player to shuffle items around in the inventory. The player will be able to drag an item that’s in the inventory onto an area of the character’s equipped items, assuming it’s an item that can be equipped at that location. Any item that’s currently equipped at that location will be dropped back into the inventory.
Figure 9-3 shows a couple of interface elements — a status window to give feedback to the player with information that’s happening in the game, a compass to show the direction in which the character is heading, a small window to allow the player to talk to other players, and a toolbar to allow quick access to items, skills, or other functionality.

Figure 9-3
We’ll be constructing just the toolbar piece of this interface. It would be great to have all the other pieces, but I’ll leave that to you to decide if they would be useful for your game.
The Toolbar
The ToolBar class we’ll be using will provide the player with access to 10 items or skills. The graphic it draws will look like the following:
Figure 9-4
The toolbar in this figure has been equipped in the first two slots with a sword and a potion from the character’s inventory. The potion is a one-use item that will be removed from the inventory and toolbar when it’s used. The sword will remain as long as the character is holding it.
The code for the toolbar is fairly simple and straightforward:
Listing 9-1
public class ToolBar : DrawableGameComponent
{
    private const int NumToolbarIcons = 10;

    private Texture2D _graphic;
    private Rectangle _rect;

    private Texture2D[] _icons;

        private MouseState _lastState;

        public delegate void ToolbarButtonClickedDelegate(int index);

        public event ToolbarButtonClickedDelegate ToolbarButtonClicked;

    public ToolBar(Game game)
        : base(game)
    {
        _icons = new Texture2D[NumToolbarIcons];
    }

    public void SetIcon(int index, Texture2D icon)
    {
        if (index < NumToolbarIcons)
               _icons[index] = icon;
    }

    protected override void LoadContent()
    {
       _graphic = this.Game.Content.Load<Texture2D>("toolbar");

       int x;

       x = (this.Game.GraphicsDevice.Viewport.Width / 2) -
              (_graphic.Width / 2);

       _rect = new Rectangle(x,
              this.Game.GraphicsDevice.Viewport.Height - 66,
              _graphic.Width, _graphic.Height);

       base.LoadContent();
    }

       public override void Update(GameTime gameTime)
       {
           MouseState state = Mouse.GetState();

           //check to see if button was clicked
           if (state.LeftButton == ButtonState.Released &&
                 _lastState.LeftButton == ButtonState.Pressed)
           {
               if (!(Rectangle.Intersect(_rect, new Rectangle(state.X,
                  state.Y, 1, 1)) == Rectangle.Empty))
               {
                   //figure out which icon was clicked
                   int index = (int)((state.X - _rect.X) / 64);
                   ToolbarButtonClicked(index);
               }
           }

           _lastState = state;

           base.Update(gameTime);
       }

    public override void Draw(GameTime gameTime)
    {
        SpriteBatch sb = ((Game1)this.Game).spriteBatch;

        sb.Begin();

        sb.Draw(_graphic, _rect, Color.White);

        //loop through icons and draw
        for (int i = 0; i < NumToolbarIcons; i++)
        {
            if (_icons[i] != null)
            sb.Draw(_icons[i], new Rectangle(
                _rect.X + (i * 64) + 1, _rect.Y + 1, 64,
                64), Color.White);
        }

        sb.End();

        base.Draw(gameTime);
    }
}
The class has been inherited from the DrawableGameComponent class, giving us some instant functionality to hook into, such as the LoadContent, Update, and Draw methods. The icons that are drawn can be changed by calling the SetIcon method and passing the slot for the icon to be placed into.
Since the class inherits from DrawableGameComponent, we can use the Update method to be able to tell when a button is clicked and let the game know which button is clicked. The code outside of the class would be responsible for figuring out what skill, spell, or item is in that spot on the toolbar and taking the appropriate action.
It’s not very exciting, but it doesn’t have to be. The code has two jobs — to show the player what items have been set to each slot and to let the game know when a toolbar button has been clicked. The next piece of interface — the inventory window — is a bit more complicated.
The Inventory Window
Here’s a screenshot of the inventory window as it appears at the start of a game with nothing in the inventory and no items equipped:
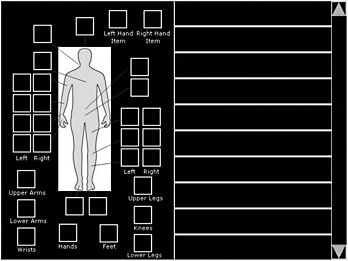
Figure 9-5
The InventoryWindow class that is used to display this works almost exactly like the ToolBar class. As items are picked up, they’ll fill the slots on the right side of the screen, showing the icon for the item and the item name next to it. The player can drag the icon from the right side to its corresponding location on the body on the left side, and the class will handle setting that item to be equipped on the character.
As with the ToolBar class, the InventoryWindow class inherits from DrawableGameComponent:
Listing 9-2
public class InventoryWindow : Microsoft.Xna.Framework.DrawableGameComponent
{
    //the height of the area that an item displays in
    //on the right side of the screen
    private const int ItemInfoBarHeight = 48;

    private Inventory _inventory;
    private Texture2D _graphic;

    //the image of the inventory item being dragged to the equipped area
    private Texture2D _dragGraphic;

    private Rectangle _rect;

    private Rectangle _inventoryRect;
    private Dictionary<ArmorArea, Rectangle> _armorRects;
    private Rectangle _leftHandItem;
    private Rectangle _rightHandItem;

    private List<Rectangle> _inventoryItemRects;

    //the up and down arrows on the right side of the window
    private Rectangle _topButton;
    private Rectangle _bottomButton;

    private MouseState _lastState;

    private int _inventoryIDSelected;

    private int _topInventoryItemIndex;

    private SpriteFont _font;

    public Inventory Inventory
    {
        set { _inventory = value; }
    }

    public InventoryWindow(Game game)
        : base(game)
    {
        _inventoryIDSelected = -1;
    }

    public override void Initialize()
    {
        _armorRects = new Dictionary<ArmorArea, Rectangle>();

        _topButton = new Rectangle(611, 3, 26, 25);
        _bottomButton = new Rectangle(611, 452, 26, 25);

        _leftHandItem = new Rectangle(202, 20, 30, 30);
        _rightHandItem = new Rectangle(266, 20, 30, 30);

        _inventoryItemRects = new List<Rectangle>();

        _inventoryItemRects.Add(new Rectangle(322, 2, 288, 44));
        _inventoryItemRects.Add(new Rectangle(322, 50, 288, 44));
        _inventoryItemRects.Add(new Rectangle(322, 98, 288, 44));
        _inventoryItemRects.Add(new Rectangle(322, 146, 288, 44));
        _inventoryItemRects.Add(new Rectangle(322, 194, 288, 44));
        _inventoryItemRects.Add(new Rectangle(322, 242, 288, 44));
        _inventoryItemRects.Add(new Rectangle(322, 260, 288, 44));
        _inventoryItemRects.Add(new Rectangle(322, 308, 288, 44));
        _inventoryItemRects.Add(new Rectangle(322, 352, 288, 44));
        _inventoryItemRects.Add(new Rectangle(322, 400, 288, 44));

        base.Initialize();
    }

    protected override void LoadContent()
    {
        _graphic = this.Game.Content.Load<Texture2D>("inventory");

        int x = (this.Game.GraphicsDevice.Viewport.Width / 2) -
            (_graphic.Width / 2);
        int y = (this.Game.GraphicsDevice.Viewport.Height / 2) -
            (_graphic.Height / 2);

        _rect = new Rectangle(x, y, _graphic.Width, _graphic.Height);

        _inventoryRect = new Rectangle(x + 322, y + 2,  315, 476);

        _armorRects.Add(ArmorArea.Head, new Rectangle(141 + _rect.X, 33 +
            _rect.Y, 30, 30));
        _armorRects.Add(ArmorArea.Neck, new Rectangle(63 + _rect.X, 47 +
            _rect.Y, 30, 30));
        _armorRects.Add(ArmorArea.Chest, new Rectangle(63 + _rect.X, 97 +
            _rect.Y, 30, 30));
        _armorRects.Add(ArmorArea.LeftUpperArm, new Rectangle(25 + _rect.X,
            137 + _rect.Y, 30, 30));
        _armorRects.Add(ArmorArea.UpperArms, new Rectangle(33 + _rect.X, 315
            + _rect.Y, 30, 30));
        _armorRects.Add(ArmorArea.LeftLowerArm, new Rectangle(25 + _rect.X,
            175 + _rect.Y, 30, 30));
        _armorRects.Add(ArmorArea.LowerArms, new Rectangle(33 + _rect.X, 369
            + _rect.Y, 30, 30));
        _armorRects.Add(ArmorArea.LeftWrist, new Rectangle(25 + _rect.X, 212
            + _rect.Y, 30, 30));
        _armorRects.Add(ArmorArea.Wrists, new Rectangle(33 + _rect.X, 421 +
            _rect.Y, 30, 30));
        _armorRects.Add(ArmorArea.LeftHand, new Rectangle(25 + _rect.X, 249 +
            _rect.Y, 30, 30));
        _armorRects.Add(ArmorArea.Hands, new Rectangle(110 + _rect.X, 414 +
            _rect.Y, 30, 30));
        _armorRects.Add(ArmorArea.RightUpperArm, new Rectangle(62 + _rect.X,
            137 + _rect.Y, 30, 30));
        _armorRects.Add(ArmorArea.RightLowerArm, new Rectangle(62 + _rect.X,
            175 + _rect.Y, 30, 30));
        _armorRects.Add(ArmorArea.RightWrist, new Rectangle(62 + _rect.X, 212
            + _rect.Y, 30, 30));
        _armorRects.Add(ArmorArea.RightHand, new Rectangle(62 + _rect.X, 249
            + _rect.Y, 30, 30));
        _armorRects.Add(ArmorArea.Waist, new Rectangle(242 + _rect.X, 108 +
            _rect.Y, 30, 30));
        _armorRects.Add(ArmorArea.Groin, new Rectangle(242 + _rect.X, 146 +
            _rect.Y, 30, 30));
        _armorRects.Add(ArmorArea.LeftUpperLeg, new Rectangle(224 + _rect.X,
            200 + _rect.Y, 30, 30));
        _armorRects.Add(ArmorArea.LeftKnee, new Rectangle(224 + _rect.X,
            275 + _rect.Y, 30, 30));
        _armorRects.Add(ArmorArea.UpperLegs, new Rectangle(248 + _rect.X, 327
            + _rect.Y, 30, 30));
        _armorRects.Add(ArmorArea.Knees, new Rectangle(248 + _rect.X, 381 +
            _rect.Y, 30, 30));
        _armorRects.Add(ArmorArea.LeftLowerLeg, new Rectangle(224 + _rect.X,
            275 + _rect.Y, 30, 30));
        _armorRects.Add(ArmorArea.LowerLegs, new Rectangle(248 + _rect.X, 433
            + _rect.Y, 30, 30));
        _armorRects.Add(ArmorArea.LeftFoot, new Rectangle(122 + _rect.X, 365
            + _rect.Y, 30, 30));
        _armorRects.Add(ArmorArea.Feet, new Rectangle(185 + _rect.X, 415 +
            _rect.Y, 30, 30));
        _armorRects.Add(ArmorArea.RightUpperLeg, new Rectangle(264 + _rect.X,
            200 + _rect.Y, 30, 30));
        _armorRects.Add(ArmorArea.RightKnee, new Rectangle(264 + _rect.X, 238
            + _rect.Y, 30, 30));
        _armorRects.Add(ArmorArea.RightLowerLeg, new Rectangle(264 + _rect.X,
            275 + _rect.Y, 30, 30));
        _armorRects.Add(ArmorArea.RightFoot, new Rectangle(165 + _rect.X, 365
            + _rect.Y, 30, 30));

        _font = this.Game.Content.Load<SpriteFont>("font");

        base.LoadContent();
    }

    public override void Update(GameTime gameTime)
    {
        //check to see if player is moving an item
        //if so, update the inventory
        MouseState state = Mouse.GetState();
        Rectangle rectClicked = new Rectangle(state.X, state.Y, 1, 1);

        if (state.LeftButton == ButtonState.Pressed && _lastState.LeftButton
            == ButtonState.Released)
        {
            //figure out if an inventory item has been clicked and set index
            if (Rectangle.Intersect(_inventoryRect, rectClicked) !=
                  Rectangle.Empty)
            {
                _inventoryIDSelected =
                   _inventory.Items[_topInventoryItemIndex + (int)((state.Y -
                   _inventoryRect.Y) / ItemInfoBarHeight)].ID;
                   _dragGraphic =
                      GlobalData.Items[_inventoryIDSelected].Picture;
            }
            else if (Rectangle.Intersect(_topButton, rectClicked) !=
                 Rectangle.Empty)
            {
                if (_topInventoryItemIndex > 0)
                    _topInventoryItemIndex--;

            }
            else if (Rectangle.Intersect(_bottomButton, rectClicked) !=
                 Rectangle.Empty)
            {
                if (_topInventoryItemIndex + ((int)(_rect.Height /
                  ItemInfoBarHeight)) < _inventory.Items.Count - 1)
                  _topInventoryItemIndex++;
            }
        }
        else if (state.LeftButton == ButtonState.Released &&
            _lastState.LeftButton == ButtonState.Pressed)
        {
            //figure out if an inventory item has been dragged
            //onto an equip area
            if (GlobalData.Items[_inventoryIDSelected].GetType() ==
               typeof(Armor))
            {
                foreach (KeyValuePair<ArmorArea, Rectangle> kvp in
                    _armorRects)
                {
                    if (Rectangle.Intersect(kvp.Value, rectClicked) !=
                         Rectangle.Empty)
                    {
                         //see if item can be equipped in this spot
                         if
                         (((Armor)GlobalData.Items[_inventoryIDSelected]).
                             Location == kvp.Key)
                         {
                             _inventory.EquipItem(_inventoryIDSelected,
                                kvp.Key);
                         }
                    }
                }
            }
            else if (GlobalData.Items[_inventoryIDSelected].GetType() ==
                typeof(Weapon) && Rectangle.Intersect(rectClicked, new
                Rectangle(_rightHandItem.X + _rect.X, _rightHandItem.Y +
                _rect.Y, _rightHandItem.Width, _rightHandItem.Height)) !=
                Rectangle.Empty)
            {
                _inventory.WeaponEquippedID = _inventoryIDSelected;
            }
            else if (GlobalData.Items[_inventoryIDSelected].GetType() ==
                typeof(Shield) && Rectangle.Intersect(rectClicked,
               _leftHandItem) != Rectangle.Empty)
            {
               _inventory.ShieldEquippedID = _inventoryIDSelected;
            }

            _inventoryIDSelected = -1;
        }

        _lastState = state;

        base.Update(gameTime);
    }

    public override void Draw(GameTime gameTime)
    {
        SpriteBatch sb = ((Game1)this.Game).spriteBatch;

        sb.Begin();

        sb.Draw(_graphic, _rect, Color.White);

        int count = 0;

        //draw items
        foreach (EntityItem item in _inventory.Items)
        {
            sb.Draw(GlobalData.Items[item.ID].Picture, new
                Vector2(_inventoryItemRects[count].X + _rect.X + 4,
                _inventoryItemRects[count].Y + _rect.Y + 4), Color.White);

            sb.DrawString(_font, GlobalData.Items[item.ID].Name, new
                Vector2(_inventoryItemRects[count].X + _rect.X + 48,
                _inventoryItemRects[count].Y + _rect.Y + 8), Color.White);

            count++;

            if (count == 10)
                break;
        }

        //draw equipped armor and weapon/shield
        foreach (int area in Enum.GetValues(typeof(ArmorArea)))
        {

            if (_inventory.EquippedItemID((ArmorArea)area) > 0)
            {
                sb.Draw(_inventory.EquippedItem((ArmorArea)area).Picture,
                    _armorRects[(ArmorArea)area], Color.White);
            }
        }

        if (_inventory.ShieldEquippedID > 0)
        {
            sb.Draw(GlobalData.Items[_inventory.ShieldEquippedID].Picture,
                new Rectangle(_leftHandItem.X + _rect.X, _leftHandItem.Y +
                _rect.Y, _leftHandItem.Width, _leftHandItem.Height),
                Color.White);
        }

        if (_inventory.WeaponEquippedID > 0)
        {
            sb.Draw(GlobalData.Items[_inventory.WeaponEquippedID].Picture,
               new Rectangle(_rightHandItem.X + _rect.X, _rightHandItem.Y
               + _rect.Y, _rightHandItem.Width, _rightHandItem.Height),
               Color.White);
        }

        sb.End();

        base.Draw(gameTime);
    }
}
One thing you’ll probably notice right off is all the hard-coded Rectangle objects. While I’m not a big fan of hard-coding numbers, there’s not much way around it here. You have to know where the player can click to drag and drop items.
The _inventoryRect member allows us to check whether the player clicks in the area that displays the inventory items to see if he’s attempting to drag an item to equip it. We do this by creating a Rectangle object for the pixel that the player has clicked on and seeing if it intersects with the _inventoryRect member:
if (Rectangle.Intersect(_inventoryRect, rectClicked) != Rectangle.Empty)
If the player has clicked on an item, we find the ID associated with that item and keep track of it in the _inventoryIDSelected member. Once the player releases the left mouse button, we figure out where the player has dropped the item and whether that spot is valid based on the type of item he dragged:
Listing 9-3
else if (state.LeftButton == ButtonState.Released &&
   _lastState.LeftButton == ButtonState.Pressed)
{
    //figure out if an inventory item has been dragged
    //onto an equip area
    if (GlobalData.Items[_inventoryIDSelected].GetType() == typeof(Armor))
    {
        foreach (KeyValuePair<ArmorArea, Rectangle> kvp in _armorRects)
        {
            if (Rectangle.Intersect(kvp.Value, rectClicked) != Rectangle.Empty)
            {
                //see if item can be equipped in this spot
                if
                (((Armor)GlobalData.Items[_inventoryIDSelected]).
                    Location == kvp.Key)
                {
                    _inventory.EquipItem(_inventoryIDSelected, kvp.Key);
                }
            }
        }
    }
    else if (GlobalData.Items[_inventoryIDSelected].GetType() ==
        typeof(Weapon) && Rectangle.Intersect(rectClicked, new
        Rectangle(_rightHandItem.X + _rect.X, _rightHandItem.Y +
        _rect.Y, _rightHandItem.Width, _rightHandItem.Height)) !=
        Rectangle.Empty)
    {
        _inventory.WeaponEquippedID = _inventoryIDSelected;
    }
    else if (GlobalData.Items[_inventoryIDSelected].GetType() ==
        typeof(Shield) && Rectangle.Intersect(rectClicked,
        _leftHandItem) != Rectangle.Empty)
    {
        _inventory.ShieldEquippedID = _inventoryIDSelected;
    }
If the player is dragging a piece of armor and drops it on one of the armor rectangles, we have to do an additional check to see if that area is a valid location for that piece of armor. If it is, the EquipItem member of the Inventory class is called, passing the ID and location.
If the player is dragging a shield or weapon, the check is simpler since we only have one area for each of those types of items. The Inventory class has two members, one for the shield that’s equipped and one for the weapon. If you want to enable dual-wielding so players can have a character such as a thief using two daggers, the Inventory and InventoryWindow classes will have to be modified. It’s a fairly simple modification, though. The graphic is already generic in that it says “Item” and not “Weapon” or “Shield,” so that wouldn’t need to be changed. The code for this chapter includes a new Inventory class that has _weaponEquipped and _shieldEquipped members added. These members could be changed to match the _leftHandItem and _rightHandItem members in the InventoryWindow class. You would have to implement additional checks so that a player can’t do something like equip two shields.
Drawing the items is fairly easy because of the hard-coded rectangles we have. The _armorRects and the _equippedItems members are Dictionaries where ArmorArea values are the keys for the Rectangle objects and item IDs so all that has to be done is a simple lookup to see if an item is in that area. We do this, returning a value from the EquippedItemID that’s either an item ID or –1 if there’s nothing equipped in that area:
Listing 9-4
foreach (int area in Enum.GetValues(typeof(ArmorArea)))
{

    if (_inventory.EquippedItemID((ArmorArea)area) > 0)
    {
     sb.Draw(_inventory.EquippedItem((ArmorArea)area).Picture,
         _armorRects[(ArmorArea)area], Color.White);
    }
}


//in the Inventory class
public int EquippedItemID(ArmorArea area)
{
    if (_equippedItems != null)
    {
        if (_equippedItems.ContainsKey((int)area))
            return _equippedItems[(int)area];
        else
            return -1;
    }
    else
        return -1;
}
Drawing the inventory items is even easier. We simply get each item in the inventory. The icon and name of the item are drawn for up to 10 of them, and the name of the item is offset to the right of the icon:
Listing 9-5
foreach (EntityItem item in _inventory.Items)
{
    sb.Draw(GlobalData.Items[item.ID].Picture, new
        Vector2(_inventoryItemRects[count].X + _rect.X + 4,
        _inventoryItemRects[count].Y + _rect.Y + 4), Color.White);

    sb.DrawString(_font, GlobalData.Items[item.ID].Name, new
        Vector2(_inventoryItemRects[count].X + _rect.X + 48,
        _inventoryItemRects[count].Y + _rect.Y + 8), Color.White);

    count++;

    if (count == 10)
        break;
}
The sample project for this chapter puts both of these interface elements together in one game window, as seen in Figure 9-6.

Figure 9-6
GUI Libraries
Rather than creating your own GUI windows, you could take a look at the various GUI libraries that exist for use with XNA Game Studio games. Although they are all still in the early stages of their life (and some have already died through starvation and neglect) and thus tend to be buggy and incomplete in terms of features, using one of these libraries may save you time on the front end of development in getting a GUI up and running quickly. You may have to spend time later on in development if you come upon a bug or need a feature that isn’t implemented. If the creator of the library has released the source code, you can fix the bug or implement the feature yourself. If not, you’ll have to report the bug or feature request and wait for the release of a new version.
One GUI library that I’ve found to be fairly full featured is the Neoforce Controls library, which can be found at http://tomshane.cz/dnn/Default.aspx. It currently has 20 controls in it and supports a lot of nice features:
![]() Resizable windows
Resizable windows
![]() Movable windows
Movable windows
![]() Auto-scrolling windows
Auto-scrolling windows
![]() Windows shadows
Windows shadows
![]() Transparent controls
Transparent controls
![]() Skinnable hardware cursor
Skinnable hardware cursor
Probably the nicest feature of this library is that it’s skinnable, meaning you can change the way the controls look simply by creating a text file that describes the appearance of the controls. You then tell the controls to use this skin when you create them.
One problem you may run into when searching for a good GUI library for XNA Game Studio games is that some of the ones that were built for previous versions of XNA Game Studio have been abandoned and don’t necessarily indicate which version they were built for. If the latest version of a library is over a year old, it will have been for an older version and you’ll probably run into some issues with trying to get it working for XNA Game Studio 3.0, especially if you want to get your game running on the Xbox 360. Feel free to take a look at the code though, as you’ll almost always learn something useful that can be applied to what you’re doing.
Areas for Improvement
One downside to what we’ve done here is that it’s not as generic as it could be. Each class has the functionality hard-coded in it. A more generic interface system might use basic controls to construct each window, having events tied to each control, kind of like the way the .NET Framework handles things. Doing this would be very difficult and take a lot of time to develop and test. While some AAA-level games have done something like this, even allowing players to modify the interface through scripting (World of Warcraft is a good example, even having an add-on for Visual Studio), I think it’s overkill for the average indie developer.
As you gain more experience, you could begin constructing a GUI library and replace pieces of the interface with a custom version built using individual controls. Since this is a big area that XNA Game Studio and the XNA Framework are lacking in, the community would definitely welcome such a library, myself included.
Some specific things that could be improved:
![]() The InventoryWindow class doesn’t allow for unequipping items. You can only replace an equipped item with another item. There are several ways to fix this:
The InventoryWindow class doesn’t allow for unequipping items. You can only replace an equipped item with another item. There are several ways to fix this:
![]() Implement code to check for a right-click on an area and unequip the item
Implement code to check for a right-click on an area and unequip the item
![]() Implement code to handle dragging an item off an area and unequip the item
Implement code to handle dragging an item off an area and unequip the item
![]() Although the Item class has an _autoReady member, the functionality to equip an item when the player picks it up is not implemented.
Although the Item class has an _autoReady member, the functionality to equip an item when the player picks it up is not implemented.
![]() The _dragGraphic texture is being set for the item in the inventory that’s being dragged, but it’s not being drawn as the drag progresses. This would be a simple matter of grabbing the X and Y coordinates from the _lastState member and drawing the _dragGraphic texture as long as the left mouse button is down. Checking the _inventoryIDSelected member should suffice here as it’s set to –1 when the mouse button is released.
The _dragGraphic texture is being set for the item in the inventory that’s being dragged, but it’s not being drawn as the drag progresses. This would be a simple matter of grabbing the X and Y coordinates from the _lastState member and drawing the _dragGraphic texture as long as the left mouse button is down. Checking the _inventoryIDSelected member should suffice here as it’s set to –1 when the mouse button is released.
![]() The InventoryWindow class cannot be moved. The graphic could be modified to have a title bar on which you can check for a click. You could then allow the player to drag the window. Whether or not you allow the player to drag the window partially off the screen is up to you. If you choose not to, you have to implement boundary checks on the edges of the screen.
The InventoryWindow class cannot be moved. The graphic could be modified to have a title bar on which you can check for a click. You could then allow the player to drag the window. Whether or not you allow the player to drag the window partially off the screen is up to you. If you choose not to, you have to implement boundary checks on the edges of the screen.
![]() Repairing (and damaging for that matter) items is not implemented, although the members are there to handle it. This would probably require more than just an interface to allow the player to select an item to repair, since in RPGs you normally have to take the item to a black smith or armorer, but the interface is important. You may want to charge the player to repair items. In this case, you would have to let the player know how much it’s going to cost and allow him to confirm that he wants to have the item repaired.
Repairing (and damaging for that matter) items is not implemented, although the members are there to handle it. This would probably require more than just an interface to allow the player to select an item to repair, since in RPGs you normally have to take the item to a black smith or armorer, but the interface is important. You may want to charge the player to repair items. In this case, you would have to let the player know how much it’s going to cost and allow him to confirm that he wants to have the item repaired.
![]() Since a player can have more than one of the same item and these items can have different properties, displaying only the name of the item is not enough to allow the player to figure out which one he wants to use. You could shrink the font used to display the item and include enough of the properties of an item to allow the player to figure out exactly what it’s capable of.
Since a player can have more than one of the same item and these items can have different properties, displaying only the name of the item is not enough to allow the player to figure out which one he wants to use. You could shrink the font used to display the item and include enough of the properties of an item to allow the player to figure out exactly what it’s capable of.
![]() The toolbar doesn’t currently support shortcut keys. Ideally this would be configurable and saved in a configuration file of some kind.
The toolbar doesn’t currently support shortcut keys. Ideally this would be configurable and saved in a configuration file of some kind.
Summary
This has been a very brief look at several basic pieces of an interface that every RPG needs.
A good interface is a must. It will aid players without drawing them out of the game world. Ideally, the interface should allow the player to customize it to suit the way he plays the game and remember that customization the next time he starts up the game. There’s plenty of room for improvement in the small pieces of interface we’ve developed in this chapter. It was never meant to be the ultimate interface experience, just provide some basics in how to build one. You should now have enough understanding to modify what was developed here so that it works the way you determine it should work for your game. Try to get some feedback from other gamers to see how well your interface works before you get too far into development and are stuck with hard-to-modify code. Keeping your interface code design open and modular will benefit you when you get feedback that requires changes to the interface.
In the next chapter we’ll be developing code to create quests and handling having a player work through them. You can use the knowledge you’ve gained in this chapter to begin the creation of a window in which to display these quests.