
1 Smooth Skin

STEP ONE The keys to achieving smooth skin are very sharp pencils, very light pressure, adding several layers of color in light washes, and patience. For this example of golden, tan skin, start with a light outline and a wash of jasmine.
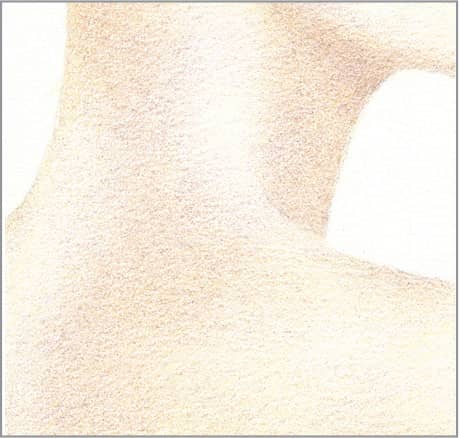
STEP TWO Add a wash of rosy beige over the jasmine. If any blobs of pigment appear, dab them off with poster putty pinched down to a tiny point the size of the blob.
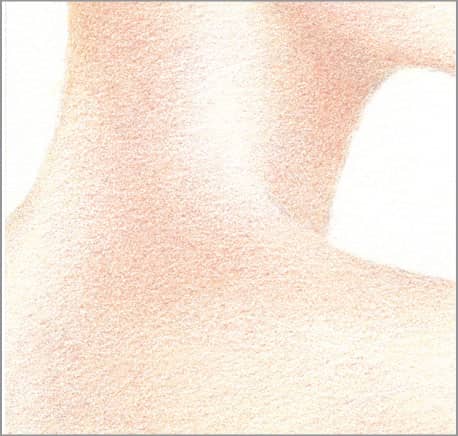
STEP THREE Add a wash of peach over the rosy beige.
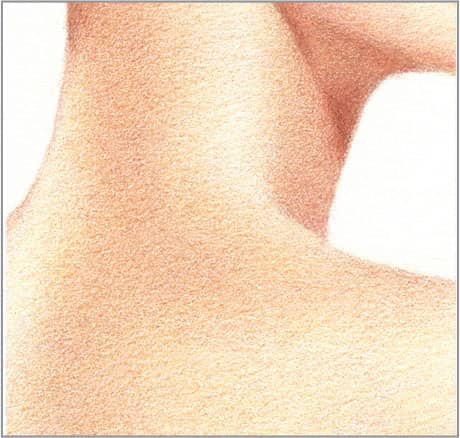
STEP FOUR Add a wash of goldenrod over the peach and a wash of burnt ochre over the goldenrod in just the warmest areas of skin. Add the shadow area under the jaw and on the neck with burnt ochre and sienna brown, using light pressure. If necessary, return to previous colors to even out the overall tone and increase contrast. Use cream or a colorless blender to smooth any roughness in the darker tones.
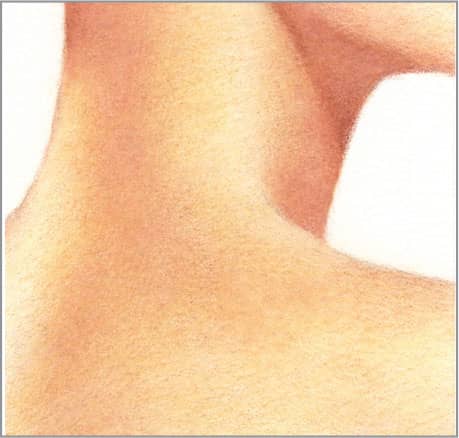
STEP FIVE This step is optional. Moisten a brush or cotton swab with odorless mineral spirits and apply it overall to dissolve the wax away. If any blotchiness results, even it out with very light touches of the predominant color of that location.
2 Aged Skin
STEP ONE Aged, wrinkled skin is surprisingly easy to draw, because it tends to have an uneven texture and color. Begin with a light outline of the major wrinkles and an allover, medium layer of cream.

STEP TWO With a sharp point and light pressure, apply an allover layer of beige. Then use very sharp sienna brown and medium pressure to define the major wrinkles. Use the sienna brown with light pressure to draw the shadow edge of these wrinkles, stroking in the same direction as the wrinkle lines.
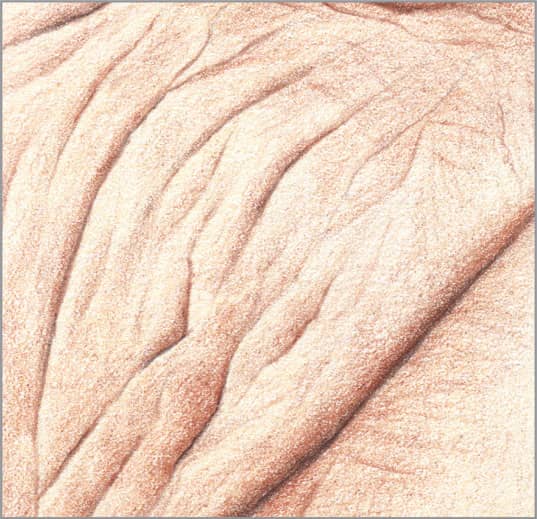
STEP THREE With very sharp dark umber and medium pressure, enhance the depth of the most pronounced wrinkles. Use sharp terra cotta and light pressure to further form the shadow edge of the major wrinkles and to create minor wrinkles by drawing their shadow edges, taking care to avoid applying any more pigment to the lighted edges of any wrinkles.

STEP FOUR Continue adding smaller and smaller wrinkles, as in the previous step, with sharp terra cotta and very light pressure. Add some uneven color between wrinkles with terra cotta and sharp rosy beige, using very light pressure. Finish by lightly enhancing or extending some of the existing creases.
3 Straight Hair
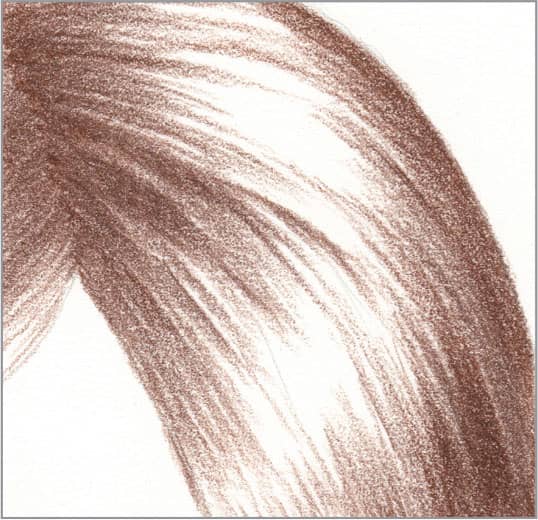
STEP ONE Straight hair is very easy to draw, because all the strokes are straight, following the direction of the hair growth. For this example of dark brown hair, begin with sharp chocolate. Make each stroke outward from the part or upward from the bottom, applying pressure from heavy to light as you approach the highlights. Vary the stroke lengths, and create gaps and darker sections to represent strands. Reserve bare paper for the brightest highlights.
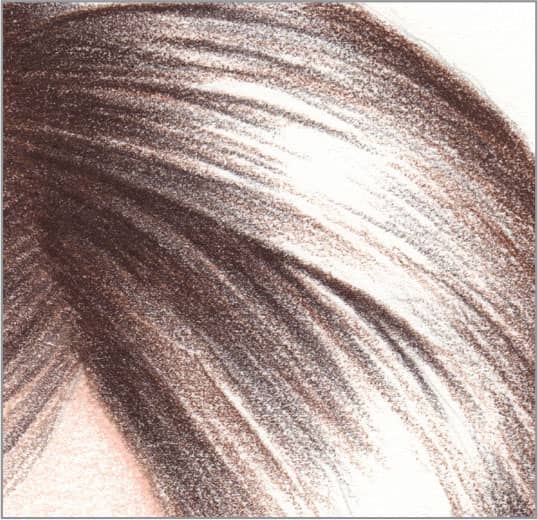
STEP TWO Repeat the previous step with dark umber, allowing some of the chocolate to remain exposed.
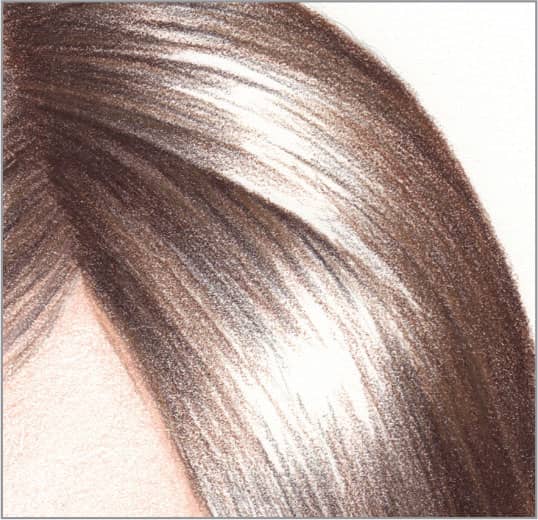
STEP THREE Repeat the first step again with light umber. Bring some strokes farther into the highlights.
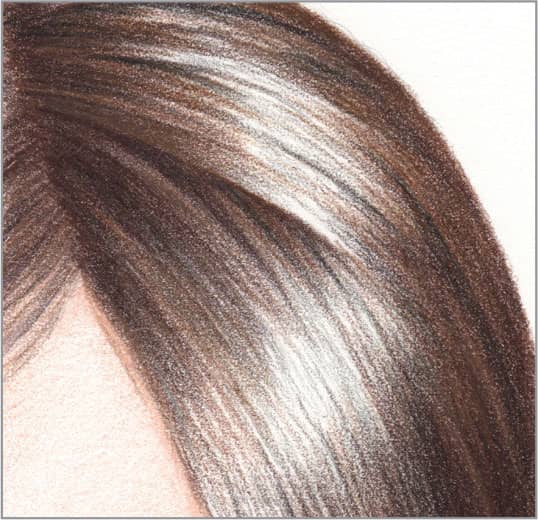
STEP FOUR Use sharp black with light-to-medium pressure to darken some of the gaps, and with very light pressure to suggest individual hairs in the highlights. To finish, touch up any strands or gaps where you’d like to have more color or contrast.
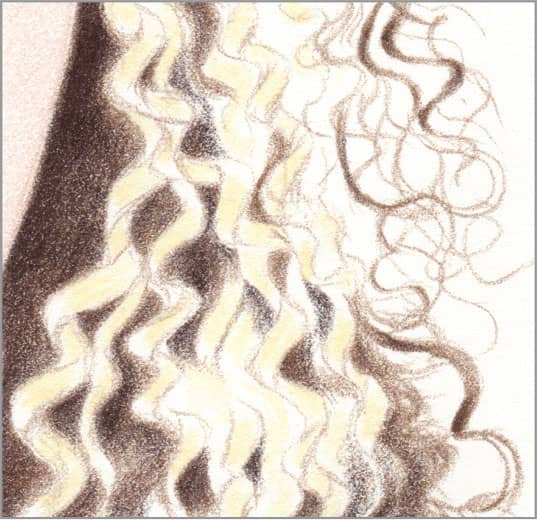
4 Curly Hair
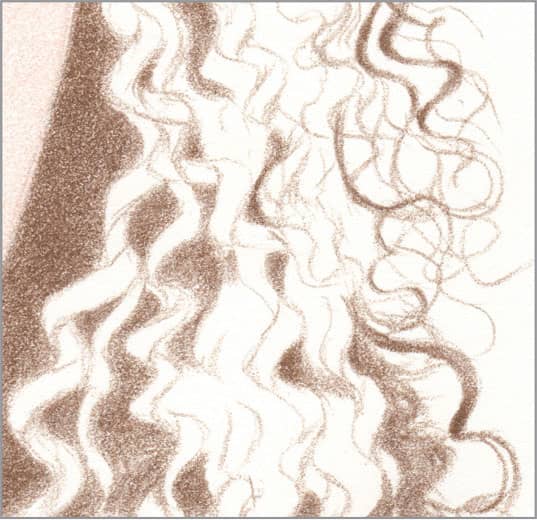
STEP ONE Curly hair can be intimidating, because each strand is a complex spiral, and many strands together form a tangle of overlapping spirals. The key is to divide and conquer, working from major shapes to minor shapes. For this dark golden blonde, begin with sharp chocolate to outline the most prominent spiral strands, fill the largest dark areas behind them, and draw some of the flyaway strands.
STEP TWO Note that the highlights on the major curl strands are where the light hits most directly. Use sharp cream with medium pressure to place these highlights. Further darken the dark areas with sharp dark umber and medium pressure; allow it to be uneven, since there is hair in the dark areas too. With very light pressure, use dark umber to emphasize some flyaway strands.
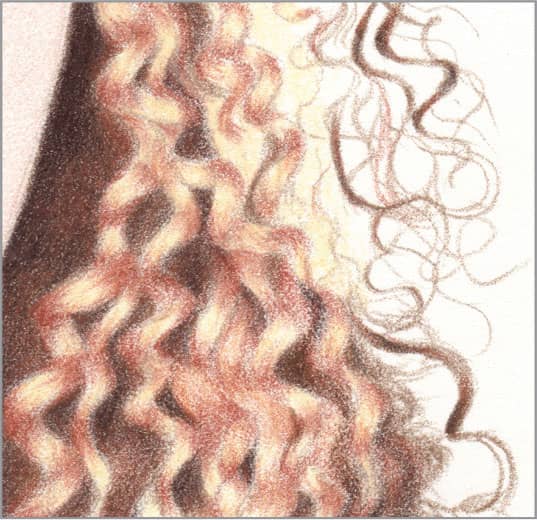
STEP THREE Apply very sharp burnt ochre with light pressure between the highlights on the major curl strands, where the light hits indirectly; stroke in the same direction as the hairs, into the cream. Use it with very light pressure to give color to some of the flyaways, and with heavy pressure in the dark areas.
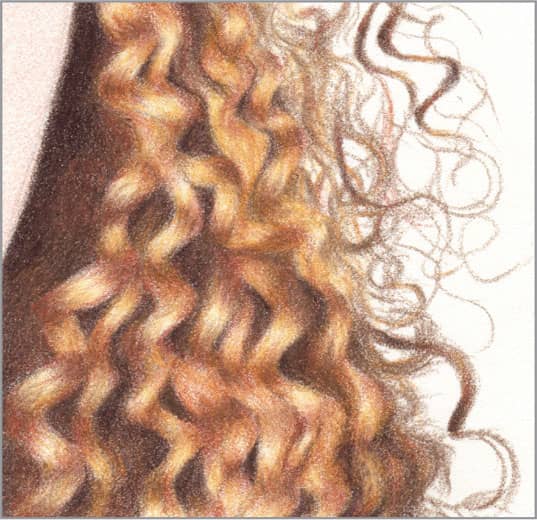
STEP FOUR Use sharp goldenrod with medium pressure on top of the burnt ochre on the strands, stroking in the same direction as the hairs. Then use sharp light umber with medium pressure just at the spots on the strands where the light hits the most indirectly. Use both the sharp goldenrod and light umber with light pressure to draw more flyaway curls. Finish by sharpening the boundaries of the major strands with very sharp raw umber and medium pressure, and, if desired, use a colorless blender with heavy pressure for a smoother look.
5 Wavy Hair

STEP ONE Wavy hair requires all strokes to curve in the direction of the hair. For this auburn example, begin with a light outline and a medium layer of cream where the highlights will be. Use sharp chocolate and medium pressure to define the largest gaps behind the strands, and light pressure to block in the areas between the highlights. Allow it to overlap the cream a bit, with very light pressure.

STEP TWO Use sharp terra cotta and light pressure on top of the chocolate on the strands, with more coverage where the light is the most indirect. Allow it to overlap the cream a bit farther than the chocolate. Add a layer of dark brown on top of the chocolate in the gaps.

STEP THREE With colored pencil work we normally work from light to dark, but this is one instance when adding light over dark works well. Use sharp beige with medium pressure over all the hair, except the brightest highlights, to blend the previous layers together. If you wanted to depict blonde hair, this would be a good stopping point after drawing some individual hairs in the strands.

STEP FOUR Use very sharp terra cotta and light pressure again to add redness to the waves and suggest individual hairs in the strands. Use very sharp dark brown and light pressure again to add contrast to the darkest parts of the waves and suggest individual hairs in the strands. Finish by adding a few flyaway hairs with very sharp chocolate and very light pressure and by sharpening the boundaries of the waves as needed.
6 Facial Hair
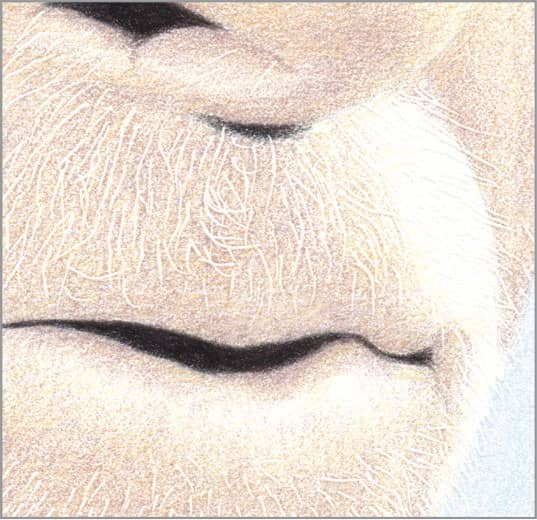
STEP ONE Coarse whiskers are easy to create using a stylus. Start with a basic outline, and then impress short whisker marks into the paper with a stylus, some straight, some slightly curled. They’re easier to see with a strong light across the surface. Apply a light wash of jasmine over all the skin, except the highlight areas, and another wash of rosy beige over the jasmine. Use sharp black and heavy pressure to fill the nostril and open mouth gap, and medium pressure for the dark shadow under the nose. Fill the background with sharp sky blue light, using light pressure.
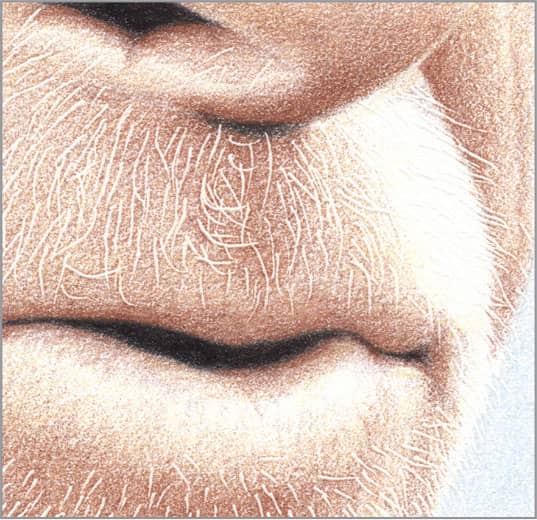
STEP TWO Use sharp sienna brown and light pressure on top of the rosy beige, with more coverage on the underside of the nose, under the nose, the underside of the top lip, under the bottom lip, and on the cheek crease. Note that the white whiskers are becoming visible.
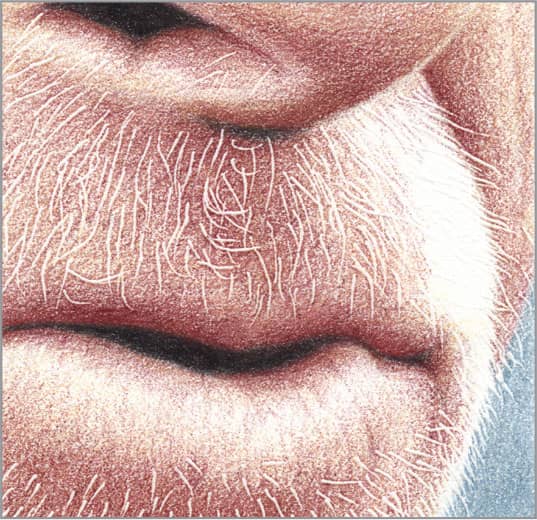
STEP THREE Use sharp Tuscan red and light pressure on top of the sienna brown and in the same manner as the previous step. Use it with very light pressure to add some creases in the lower lip. This man’s coarse, ruddy complexion requires no painstaking smooth blending. Add a medium layer of slate gray to the background.
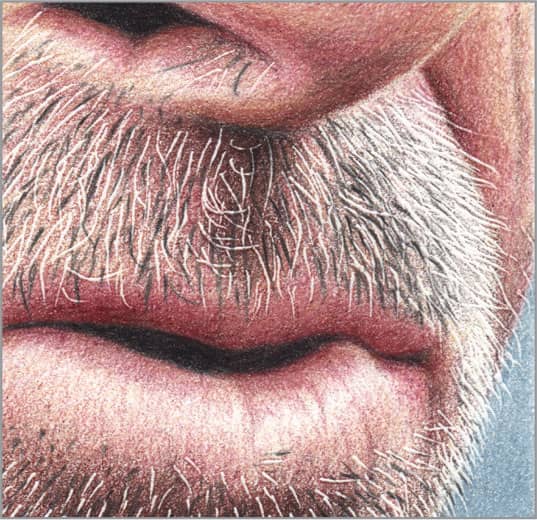
STEP FOUR Use sharp dark umber and light pressure to increase the contrast on the underside of the nose, under the nose, under the lower lip, and along the cheek crease. Then use it with very light pressure in the whiskers next to the cheek crease to suggest other whiskers. With very sharp black and medium pressure, apply short, individual strokes to create coarse black whiskers among the white ones to render a salt-and-pepper look. If desired, use a colorless blender to smooth the skin tones, but avoid the black whiskers.
7 Eye

STEP ONE The keys to drawing an eye correctly are to remember that the iris and pupil are perfectly circular, the pupil is exactly centered in the iris, reflections curve with the surface of the lens, and the iris usually contains multiple colors. Begin with a basic outline and a light layer of cream on the flesh, iris, and inner corner. Apply a light layer of white on the eyeball. Reserve the bare paper for the reflection, since it is lighter than the white of the eyeball.
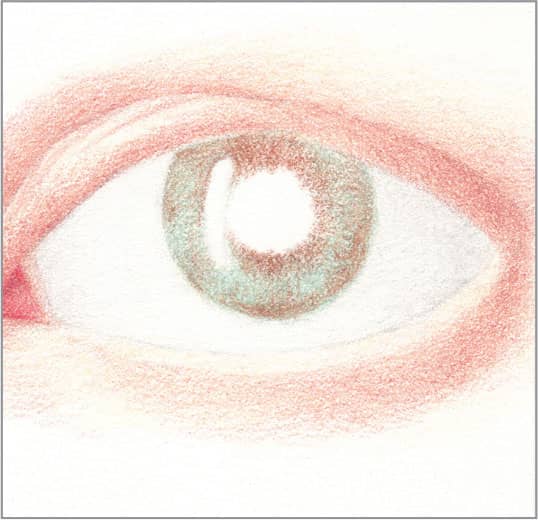
STEP TWO Add a wash of light peach all over the flesh, and then begin to model the eyelids and inner corner with sharp nectar and light pressure. Apply some initial, even color to the iris with sharp jade green and light pressure, followed by uneven color radiating from the pupil and inside border of the iris with very sharp burnt ochre and light pressure. Use warm gray 10% and very light pressure on the inside corner and outside half of the eyeball, with more coverage closest to the corners. Add a bit of carmine red to the innermost corner.
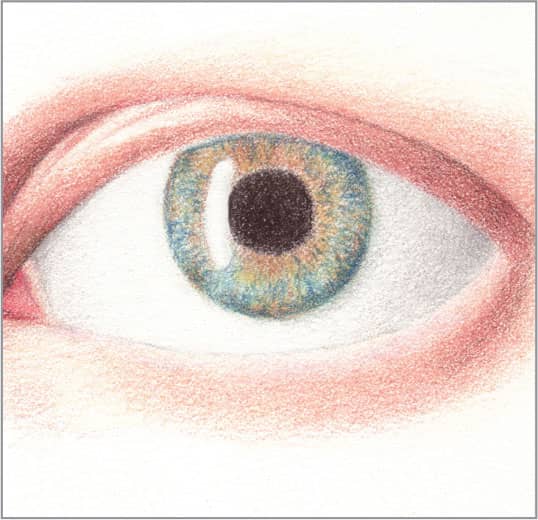
STEP THREE Use sharp henna and light pressure to further model the crease and eyelids, followed by sharp peach and light pressure to blend it a bit, finishing with very sharp dark umber with light pressure to draw the line of the crease. On the iris, add touches of sharp jasmine with light pressure on top of the burnt ochre. Also on the iris, darken the inside border and radiate some marks toward the pupil with very sharp indigo blue and light pressure. Fill the pupil with sharp dark umber and heavy pressure. Use very sharp warm gray 30% and very light pressure to further model the inside corner and outside half of the eyeball.

STEP FOUR Use sharp terra cotta and light pressure to finish modeling the eyelids. On the iris, radiate more burnt umber in the same locations as you did in step two. Add more touches of indigo blue to the iris, and give final definition to its border with both indigo blue and dark umber. Fill the pupil with sharp black and heavy pressure on top of the dark umber. Finish modeling the eyeball with warm gray 70% at the outside corner. Finish by drawing the eyelashes with very sharp dark umber and light-to-medium pressure. If necessary, soften the border of the iris with a little bit of white drawn around the edge.
8 Nose
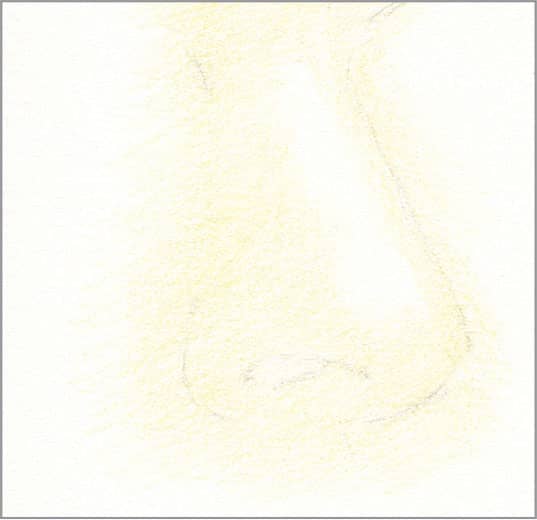
STEP ONE Each nose is a little different in shape, and these differences determine the shapes and sizes of the highlights, midtones, and shadows. We need to build skin tones that depict convincing shapes. Begin with a light outline of the edge of the nose, the tip, and the nostril. Reserving bare paper for the brightest highlight, add a light wash of cream to provide a waxy base for a smooth blend of the colors to come.
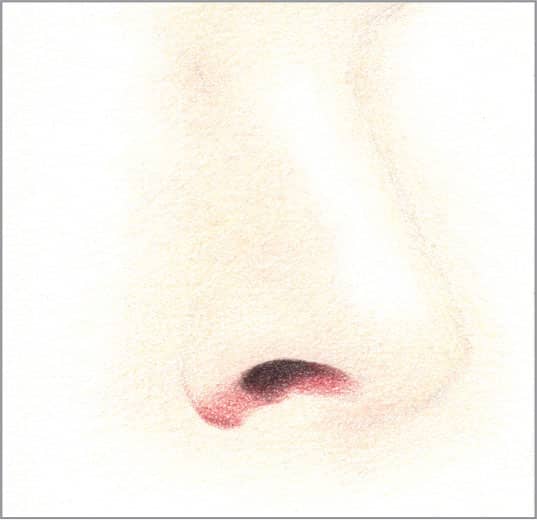
STEP TWO Draw the darkest recess of the nostril with dark umber and the darkest area under it with sharp henna and light pressure. Add a second layer everywhere else, again reserving the highlight, with sharp peach and very light pressure.

STEP THREE Use sharp nectar and very light pressure to build the shape of the nose, with more coverage under the tip and around the curl where it meets the cheek. Further darken the area under the tip and the curl with sharp henna and light pressure. Note that the edge of the nose is indistinct at this angle, and the highlight is not at the edge.
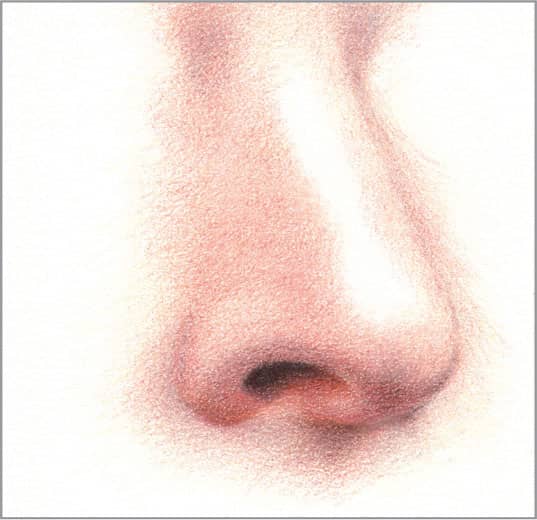
STEP FOUR Despite warm light, some areas have cooler, pinker tones. Use sharp rosy beige and light pressure to hint at these tones along the edge, around the tip and nostril, and next to the eyes. Further darken around the nostril and under the tip with very sharp dark umber and very light pressure. Finish by using cream again to very lightly blend away any roughness.
9 Lips
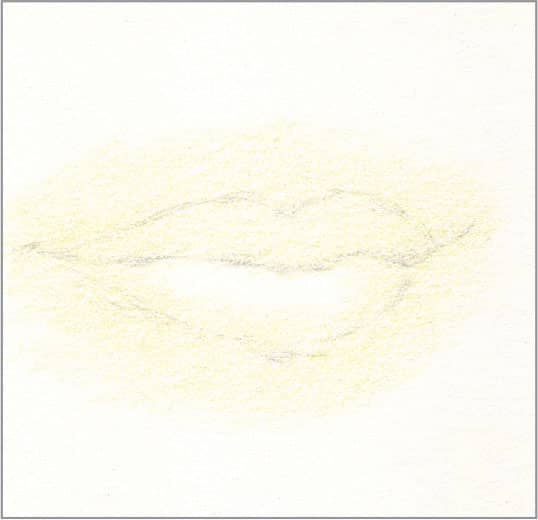
STEP ONE Natural, unpainted lips have soft boundaries and many subtleties of color. Begin with a very light outline and a light wash of cream to provide a waxy base for a smooth blend of the colors to come, reserving bare paper for the brightest highlight.

STEP TWO Draw the line where the lips meet with dark umber, darker at the corners. Add a second layer around the mouth with sharp peach and light pressure. Lightly wash the lips with sharp pink rose and pink. Use sharp carmine red with light pressure along the bottom of the upper lip, and add a few touches of it on the fullest part of the lower lip.

STEP THREE The area around the mouth helps shape the lips. Use sharp nectar and very light pressure as a third layer, with more coverage at the corners, under the center of the bottom lip, and above the center of the top lip. Use it with very light pressure to continue forming the lips; this will also help unify the colors.

STEP FOUR Use very sharp henna and very sharp terra cotta with very light pressure to further deepen the color on the lips, along the bottom and near the upper boundary of the upper lip, and in the fullest part and underneath the center of the lower lip. Use very sharp dark umber with light pressure to sharpen the line of the mouth. Finish with very sharp pink rose and very light pressure to create the natural creases in the lower lip.