
By default, operators in Blender operate on a 2D plane tangential to the view. This is a fancy way of saying that without any additional controls, it can be hard to predict how a movement or rotation operation will work. For instance, moving something in a random view can include moving up and down more than expected. This effect won't be clear until the view is changed and the transformation is inspected from a different angle, as shown here:
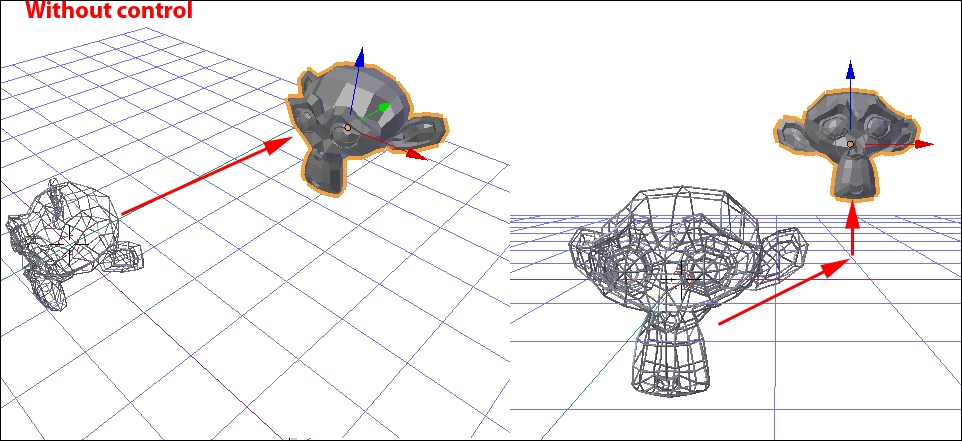
If you can't predict how operations will work, it can be hard to make the things you want. So it is very important to be able to control transformations.
There are two main ways of controlling operators: controlling the view and axis locking.
The first way to control the operation is by controlling the view. By default, operators depend on the view, so by controlling the view, you can control the action. For instance, an object, when added to a scene, is exactly halfway through the grid plane of the world by default. If you want to make sure the object stays halfway through the grid plane when moving, follow these steps:
- Select a newly added object.
- Switch to Top Ortho view by pressing 7 on the number pad.
- Grab and move (G) the object around.

Adjust the view to see how exactly how the object moved. When moved while in the top view, the object stays on the grid plane. This is because from the top view, only forward, backward, and side-to-side motion is possible.
In the same way, moving objects while in the side views will only move them forward and back and up and down, and while in the front or back view, they will only move side to side and up and down.
Likewise, rotating depends on the view. When viewing from the top, rotation will be like, a top spinning around its middle. If viewed from the side when doing rotation, it will flip over its middle, and if viewed from the front, it will roll side to side around its middle.
Controlling the view is a quick and easy way of controlling movement and rotation, but always be sure to adjust the view to make sure things are happening the way you expect. However, to control scaling, as well as to control movement and rotation independent of the view, there is another way.
Blender has special commands for changing the behavior of operations. These commands are available while performing transformations.
The first thing to understand is about the three axes that we'll be locking along. 3D refers to the three dimensions, or unique directions, that things happen in. The dimensions are called by the letters X, Y, and Z. There is an illustration in the corner of the 3D View that shows which way is which, and is always pointing in the right direction:

In Blender, and generally in 3D printing, X is side-to-side motion, Y is back-and-forth motion, and Z is up and down. In the previous screenshot, the X axis is red, Y is green, and Z is blue.
When performing a transformation, you can lock the transformation to the axis you want by starting the transformation as mentioned previously, and while moving the mouse or using the keyboard, doing the following:
- Pressing X, Y, or Z on your keyboard to lock the transformation to the desired axis
- Pressing Ctrl + X, Ctrl + Y, or Ctrl + Z to lock the transformation to all but the chosen axis
- Holding the middle mouse button and moving the mouse to choose an axis to lock the transformation to

Note
Try out axis locking with movement, rotation, and scaling, and adjust the view to see what effect it has. Notice that with axis locking, the scale function has some additional abilities that aren't possible just by controlling the view. It actually only scales in the chosen axis. This can be very powerful while adjusting the shape of objects.
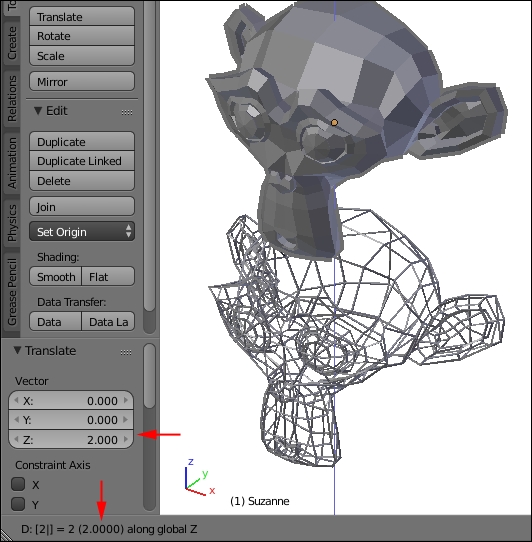
Finally, under the category of controlling transformations, during transformation operations, the transformation can be precisely controlled by typing in a number that will relate to the operation being performed or edited afterwards in the operation properties in the tool box, on the left side of the 3D View. In other words, to move something exactly two units up, for example, follow these steps:
Typing commands has different effects for different commands, as follows:
- When moving, typed commands are used to state the number of units an object will move along the selected axis. For example, 2 along the
Zmoves it two units up, and -2 along theZmoves it two units down. - When scaling, typed commands specify the scale factor. 1 means no change, 2 means twice as big, and 0.5 means half size.
- When rotating, typed commands specify clockwise degrees. For instance, 180 turns it around backwards.
Typed commands can include negative numbers and decimals and can be edited with the Backspace key. While performing a transformation, the menu for the 3D View changes to a description of the transformation, including the typed units, which can be useful when editing your typed commands.
Objects in Blender have an origin. Origins are depicted as a dot and start out in the middle of the object. Individual object transformation commands take place relative to the object's origin. It's possible that the origin can be moved as a result of editing, which can cause unexpected results when rotating or scaling the object. The origin can also be moved on purpose to control the effect of modifiers.
The origin can be reset using the origin controls. The origin controls can be found by one of the following methods:
- In the 3D View menu, choose Object | Transform and find the origin controls.
- In the Tool Shelf, find the Set Origin dropdown and choose the desired option.
- On the keyboard, press Ctrl + Shift + Alt + C.
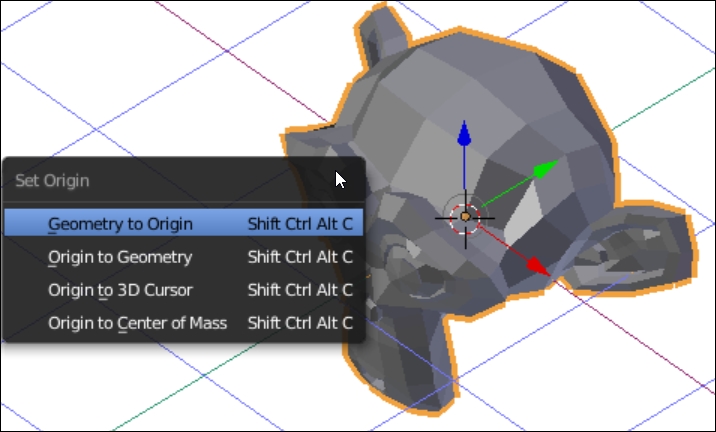
These are the commands to manipulate the origin:
- Geometry to Origin: Move the object so that its middle is now wherever the origin was located.
- Origin to geometry: Move the origin to the middle of the object. This is the most common option chosen.
- Origin to 3D Cursor: Relocate the origin to where the 3D cursor is.
- Origin to Center of Mass: Calculate the center of mass of the object and move the origin there.