
Blender's interface is made up of many smaller windows called panels. There are many different panels available in Blender. Like most things in Blender, the panels are completely configurable. Panels can be added or removed as needed, and panel layouts can be saved and switched among easily. For simplicity, the default view—the way Blender is presented the first time it loads up—will be used throughout this series. It provides most of the necessary functionality:
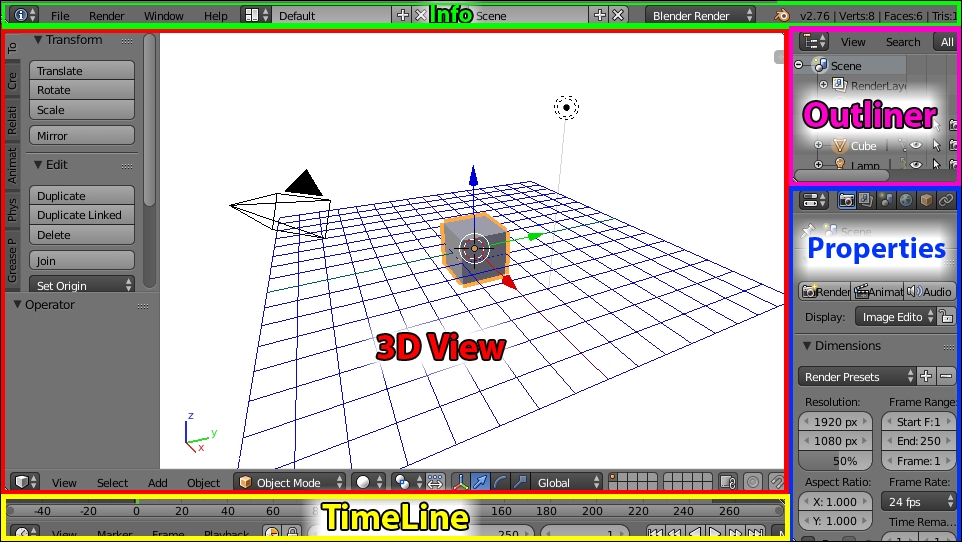
Here's an explanations of the different panels in the default view:
- The Info panel: Located across the top of the window, the Info panel has many of the menu options in most programs, such as File, Window, and Help. It also has Layout settings, Scene settings, and Renderer options, but we won't be using them much. Finally, there are specific details about the version of Blender, the current scene, and selected objects. If the Info panel is cut off, bringing the mouse pointer over to the panel and using the scroll wheel will bring the information into view.
- The Outliner: Located in the upper-right section of the window, the Outliner contains the list of all objects.
- The Properties panel: Located in the lower-right section of the window, the Properties panel is broken into many tabs related to the currently selected object. Which tabs and properties are available will change depending on what is selected. If the tabs are cut off, bringing the mouse pointer over them and using the scroll wheel will bring them back into view.
- The Timeline: This panel is largely unnecessary for the purposes of this book series, so it can be removed or ignored.
- The 3D View: Taking up most of the screen, the 3D View is where most things will be happening, and it consists of many smaller parts itself.
Each of the panels has its own keyboard shortcuts. In order to use them, the mouse pointer must be over the panel. If a keyboard shortcut isn't working, it's probably because the mouse pointer isn't in the right place.
Because it's so complex and important, the 3D View will be given some special attention.
The 3D View is where most of the action takes place, and it has the most visual feedback of the work. The 3D View has its own menus and panels:

Here's what the panels do:
- Menu: At the bottom of the 3D View is its Menu. It contains options and commands specific to the 3D View. If the menu is cut off, bringing the mouse pointer over the panel and using the scroll wheel will bring the cut-off information into view.
- Tool Shelf: On the left-hand side is the Tool Shelf. It contains a tabulated set of buttons that can be used to do many useful things and change depending on the object selected. The bottom half of the Tool Shelf contains operator options. Any time an operation is performed, this area will be populated with options for that operation that can be edited until the next operation is performed. The Tool Shelf can be hidden or revealed by using the 3D View menu and selecting View | Tool Shelf or by pressing T key on the keyboard.
- Properties: On the right-hand side is the Properties panel. Hidden by default, this panel contains information about the currently selected object as well as other options about the scene in general. The panel can be hidden or revealed by using the 3D View menu and selecting View | Properties or by pressing N key on the keyboard.
- Main View: Of course, in the middle is the view of the current scene with all the visible objects.
In the 3D View, there is a little red-and-white circle that starts in the middle of the 3D space. New objects will be created wherever the 3D cursor is located, and it's very easy to move the 3D cursor accidently, so it'd be good to know how to put the 3D cursor back in the middle and how to move it on purpose. The 3D cursor can be manipulated by:
- Clicking the right mouse button in the 3D View to move the 3D cursor wherever it is clicked in a plane relative to the view, which can be unpredictable.
- Navigating to View | Align View | Center Cursor and View All or pressing Shift + C on the keyboard while in the 3D View to put the 3D cursor back in the middle quickly. This is the easiest way to fix the 3D cursor if it gets moved unexpectedly.
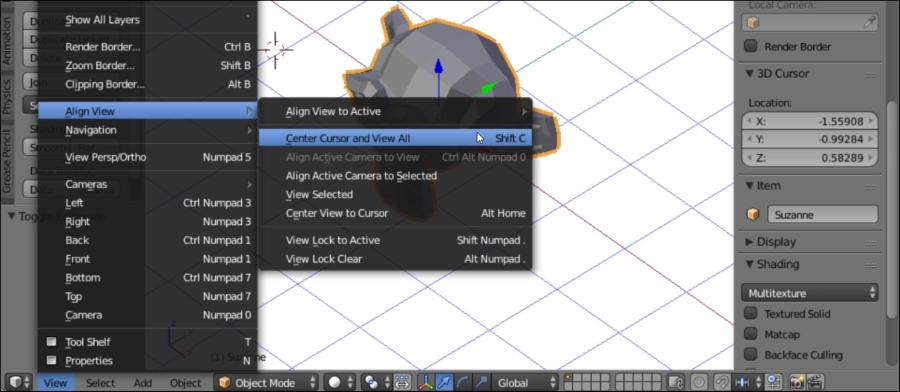
- Typing the 3D cursor's
X,Y, andZcoordinates in the 3D View properties.