
Chapter 10
Considering Consumer-Level 3D Printers
IN THIS CHAPTER
![]() Exploring Cartesian 3D printers
Exploring Cartesian 3D printers
![]() Reviewing delta options
Reviewing delta options
![]() Introducing polar fabrication
Introducing polar fabrication
![]() Seeing SCARA and robot arm motion
Seeing SCARA and robot arm motion
![]() Preparing for new alternatives
Preparing for new alternatives
![]() Using flexible materials
Using flexible materials
![]() Looking at edible printing
Looking at edible printing
![]() Exploring beyond RepRap
Exploring beyond RepRap
Commercial 3D printing systems have many materials and fabrication techniques still under intellectual property protection, but the earliest types of additive manufacturing processes — such as stereolithography (SLA), fused filament fabrication (FFF), and fused deposition modeling (FDM) — have passed into the public domain. FFF/FDM 3D printers are growing in number; vendors, specialty shops, and online giants such as Amazon.com now offer a wide range of 3D printers in hundreds of configurations at varying prices. Materials for 3D printers are also big business; demand for rolls of filament and resin formulations is rising each year. Some attempts to use proprietary cartridges have not succeeded, which allows companies around the world to develop a more open standard of materials.
This chapter examines the types of 3D printers you can obtain or build for yourself now, for the price of a home appliance.
Examining Cartesian 3D Printers
The first desktop 3D printer variation — the RepRap Darwin, shown in Figure 10-1 — uses FFF/FDM to fashion objects from melted thermoplastic formed into a round filament wire. The filament could be fed steadily into the extruder’s hot-end, which melted the plastic as it was added, one layer at a time, to the solid object being formed.
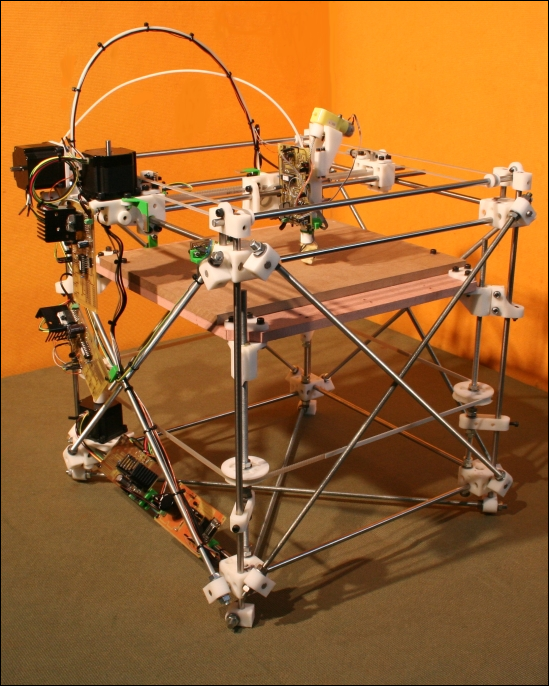
FIGURE 10-1: The first consumer-level RepRap 3D printer: the Darwin.
The Darwin printer (like many of its derivatives) resembles a commercial overhead crane, moving the extruder in a rigid framework above the build plate, lowering one layer at a time as the object is constructed. In its simplest form, the extruder applies melted thermoplastic within an area defined by X-, Y-, and Z-axis Cartesian coordinates (see Figure 10-2).
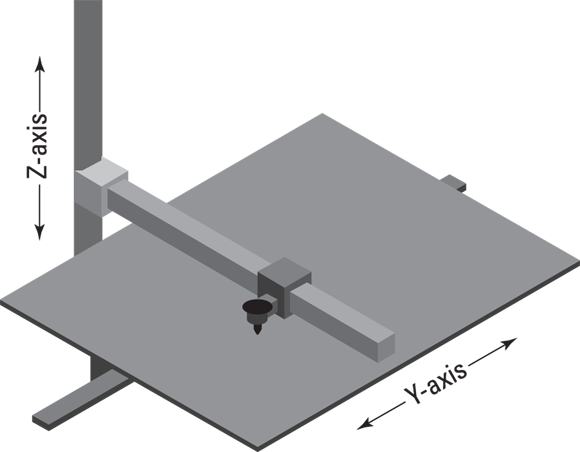
FIGURE 10-2: A Cartesian-style 3D printer creates objects by moving the extruder (hot-end) in three dimensions.
 The Cartesian coordinate system is named for the French mathematician and philosopher René Descartes. His system is used to describe any location in 3D space by measuring the distance in three dimensions from an origin point. For a 3D printer, that origin point represents the home location of the extruder and build plate.
The example shown in Figure 10-2 is like the Mendel Max design we discuss in Chapters 11 through 15. It involves an extruder moving on the X axis along a rigid frame that’s elevated on the Z axis one layer at a time, while a motor performs the Y-axis movement by sliding the build plate below the extruder. Like the original Darwin, other Cartesian designs move the extruder via a rigid gantry that provides both X-axis and Y-axis movements, while the build plate itself is lowered one layer’s height at a time and doesn’t otherwise move. This strategy is also used by Polar 3D printers, which we discuss in the “Understanding Polar Fabrication” section later in this chapter.
Whether the build plate is lowered or the extruder framework is raised, the overall volume available to Cartesian format printers is a box limited by the framework’s maximum span along each axis, as illustrated in Figure 10-3. You can scale up a Cartesian system to larger volumes by extending and reinforcing the framing and upgrading to larger, more powerful motors and motor controllers.
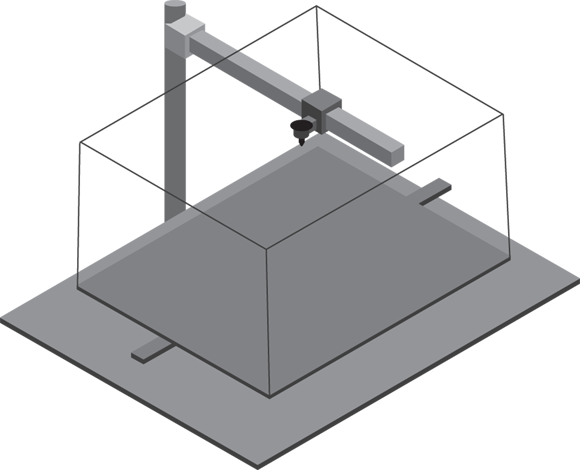
FIGURE 10-3: The available build volume for a Cartesian-style 3D printer.
Oversize FFF/FDM thermoplastic-extrusion printers are often equipped with larger extruder nozzles, limiting individual layer resolution in favor of faster print jobs.
Any objects that exceed the build volume’s capacity can be scaled down to fit in the available space, or their design can be cut into pieces for assembly after fabrication. Many techniques can be used to link separated parts from clips and spaces for magnets to threaded holes for screw assembly, like the ones shown in Figure 10-4. Even traditional adhesives and resins can be used to join 3D-printed components to achieve assemblies larger than the build volume of an available printer.

FIGURE 10-4: Components of this nonfunctional 3D-printed firearm are held together with 3D-printed screws that match threads built into the model itself.
Exploring Delta Options
Another strategy used to create 3D-printed objects is based on the techniques used for delta-style robots, which move in 3D space by moving connections along separate parallel frame components. In this technique, movement relies on multiple frames attached via linkages to a rigid central extruder (as shown in Figure 10-5). The three carriages (A, B, and C) are connected to the central point where the hot-end extruder nozzle is located, and the printer moves them up and down. The hot-end is positioned by triangulation in 3D space (X, Y, and Z). The required print position and the opposite movement (delta) of the extruder can be calculated mathematically by the printer’s control electronics.

FIGURE 10-5: As the frame sliders in a delta printer move up and down, the extruder moves along all three axes of motion.
Examples of delta-format printers include the Rostock Max (discussed in Chapters 11 through 15) and Richard’s 3DR design (see Figure 10-6).
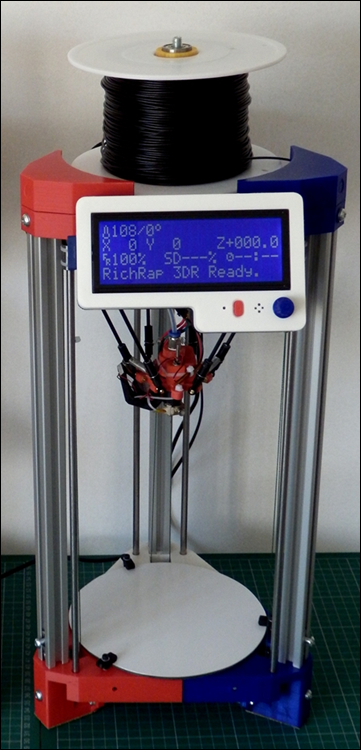
FIGURE 10-6: The delta-style 3DR printer designed by Richard Horne.
Richard’s red, white, and blue printer is an open-source RepRap design shared via GitHub and available on his blog at http://richrap.blogspot.com.
Delta printers rely on simpler frameworks than their Cartesian cousins because the electronics provide all three movements along the X, Y, and Z axes; the transit uses the same motors. No separate systems exist for moving the extruder and build plate independently within a rigid framework.
Because FFF/FDM printers rely on the adhesion of layers of melted thermoplastic, rather than gravity, to hold down successive layers, some designs can be operated upside down without changing the print quality. This configuration is being explored by NASA in microgravity, using a FFF/FDM printer on the International Space Station in orbit around the Earth.
Some people describe delta-style printers as being fun to watch because they’re always in motion, whether the extruder is being raised or lowered, transferred along a flat plane, or transferred between any two locations in 3D space. The length of the linkages between the sliders and the extruder mount limits the build volume, which at its highest point must still fit below the extruder and within the support framework. Although technically a triangular space, the build volume for most delta-style printers is represented by a tall cylinder above the build plate, as shown in Figure 10-7. Objects can be built so long as all elements fit within the virtual cylindrical volume. Many RepRap delta 3D printers have linkages that allow access beyond the triangular edge, but many designs provide slightly smaller build volume to reduce the mechanical components needed for the slider’s linkages.

FIGURE 10-7: Possible build volume for a delta-style 3D printer.
A delta-style printer doesn’t rely on its framework to support the increasing weight of the printed object, so it can be made from lightweight metals such as aluminum or locally available structural materials such as bamboo. Like all RepRaps, delta-style printers can be equipped with FFF/FDM thermoplastic hot-end extruders (like the one shown in Figure 10-8) or with gel or paste extruders for other purposes. The figure shows a standard J-head-style FFF/FDM extruder hot-end, which would be fed plastic filament incrementally by the extruder’s stepper motor. The thicker wires provide power to the heating element; the smaller wires report temperature measurement back to the electronics from a small thermocouple. Both sets of wires are secured within the hot-end by polyimide adhesive tape (originally designed for spacesuits).

FIGURE 10-8: A standard J-head-style FFF/FDM extruder hot-end.
Based on the weight of the extruder and the print material, delta-style printers can be controlled by toothed belts, lightweight chains, or even braided fishing line to connect each slider with its associated motor.
Understanding Polar Fabrication
A third technique for moving the extruder within a 3D volume involves rotating either the build plate or the extruder’s support around a central point to build a single layer. This type of design, based on the polar coordinate system described by Greek astronomers and astrologers, relies on rotation around a fixed pole (like the Cartesian system) and measurement of the distance along a radius or ray from that pole at an angle theta (θ) to represent the measure of rotation. If you know the pole’s location, the angle theta, and the measure of the radius from an axis running through that pole, you can define any point in a flat plane by using the polar coordinate system.
Figure 10-9 shows a true polar 3D printer, which uses a rotating build plate over which the extruder is placed and can move along in the X axis (front to back). The combined rotation of the build surface (imagine a potter’s wheel) and the front-to-back motion allows the extruder to be positioned anywhere on the build platform. The height (Z axis) can then be altered by lowering the rotating build surface or the moving X axis. Some problems need to be overcome with the rotational motion. One full rotation of the object, however, results in distortion due to adhesive drag of the melted thermoplastic as the build plate revolves around the pole. Other alternatives place the extruder’s framework through the center of the build plate, but this arrangement requires more complex mechanical connections and makes leveling more difficult.

FIGURE 10-9: A true polar-style 3D printer.
Getting to Know SCARA and Robot Arm Motion
Similar to polar fabrication but without a rotating platform, the Selective Compliance Assembly Robot Arm (SCARA) motion system is similar to the movement of a human or robot arm. In the polar system, the arm moves in and out; the SCARA arm can move both in and out and left to right. A multipart arm rotates around a common pole (see Figure 10-10). An example of a basic SCARA-designed 3D printer was conceived by South African engineer Quentin Harley, who named his RepRap printer Morgan (see the nearby sidebar “Building a Morgan”).

FIGURE 10-10: The Morgan has a SCARA-robotic extruder movement with a two-segment arm.
By using an articulated arm and a stable build plate, this design avoids the difficulties of a true polar system because the object needs to drop only one layer at a time, like some Cartesian systems without the need to operate in a full circular path around the pole. Because the object being printed drops down only and doesn’t rotate, the printer exerts no twisting force on the object, so no torque is transferred due to the cohesion of melted thermoplastic. To reduce the complexity of mechanical support elements, the SCARA polar design only uses part of the possible full circle around the central pole. Its build volume is typically limited to a half-circle or less, leaving room for structural support to either side of the build plate. Objects can be built so long as all elements fit within the virtual half cylinder’s area (see Figure 10-11).
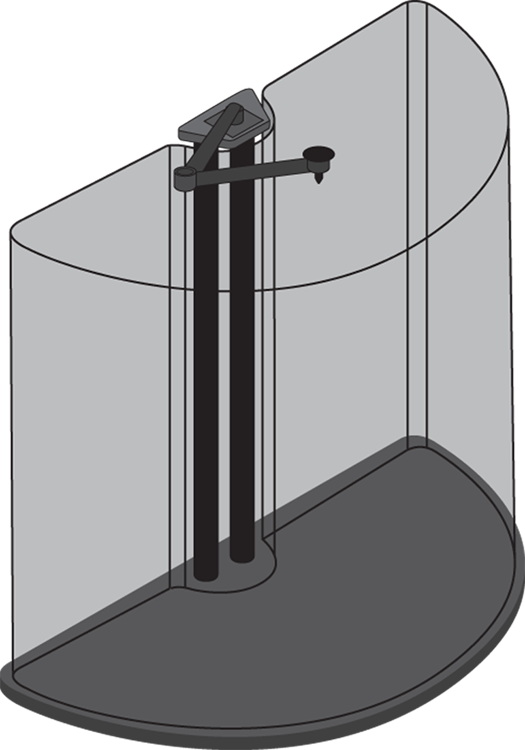
FIGURE 10-11: Possible build volume for a SCARA-polar 3D printer.
We anticipate that many more SCARA-based positioning systems will be used for 3D printing and various forms of additive manufacturing in the future. The SCARA system is ideal for applications such as food printing (see “Sampling 3D Food Printers” later in this chapter). The arm can extend from a wall or machine to a plate or other container. A camera vision system allows accurate printing of food or sauces on the plate or container, which can be in any position with any rotation.
Building Emerging Alternatives
In addition to FFF/FDM variations on the popular open-source RepRap printer, many affordable consumer-grade alternatives are available, from the open-source Fab@Home paste- or gel-extrusion design to the proprietary Form1 SLA system. Community-designed open-source hardware and software designs have become part of many consumer-level designs, as we discuss in Chapter 11.
As more patents on the fundamental intellectual property for additive manufacturing expire, many alternatives will be developed. Legions of hobbyist designers are following the example of the founder of the first open-source 3D Printer (RepRap) design, Dr. Adrian Bowyer, an engineer, mathematician, and former academic lecturer at the University of Bath in the United Kingdom. Whereas fundamental laser-sintering patents are set to expire soon, open-source alternatives to other, more proprietary designs that use granular binding are already being explored, such as the Pwdr 1 printer (see Figure 10-12).

FIGURE 10-12: A rendering of the open-source Pwdr granular-binding 3D printer in development.
The Pwdr’s open-source design is based on common inkjet printers. The machine applies a liquid binder to fine granular powder held in one hopper and transferred via a roller to create successive layers in the build chamber on the other side. Because the patents for this design are still protected intellectual property, a Pwdr kit or printer can’t yet be sold to consumers, but its designers are working on a design that individual hobbyists can use as soon as the patents expire.
Some early signs point to a faster fabrication process enabled by advanced chemical research. Liquid resin-based formulations can be manipulated by the introduction of gases such as oxygen through permeable membranes to speed the reaction from liquid to solid. Removing heat from this faster process is a challenge, as is the tendency for a rapidly cured material to stick to the membrane rather than to the previously cured resin layer. These advancements and others like it will improve the next generation of 3D printing systems.
New materials and methods allow the use of alternative technologies for 3D printing. One exciting development is the use of daylight-sensitive liquid resins. (Daylight sensitive is almost any wavelength of light that does not need to be ultra violet — so the sun, an LED torch or lightbulb, even your smartphone screen) — Existing SLA printers use an ultraviolet (UV) laser or reflected Digital Light Processing (DLP) projection system to cure UV-sensitive liquid resin, layer after layer. Many advancements are speeding this process, so high-resolution models can be manufactured quickly and in a range of materials.
As an alternative to UV resins, daylight-cured materials allow a tablet or smartphone screen to be directly used to cure the resin. The screen displays a slice of a 3D object. After each layer is exposed, the screen is positioned slightly farther away. A 3D object appears to grow out of the liquid. These machines are a little tricky to set up, as you must not accidentally expose the liquid resin to a source of daylight. Also, if your smartphone or tablet is set to low-energy illumination, you may have to wait hours for the printing process to finish. Still, this process is likely to be a handy way for more people to experience 3D printing, and it may spark mobile use of 3D printers.
Challenges remain before these materials can be easily handled and used in small compact machines. Resins often heat during the curing reaction process, for example. With some daylight resin formulations, quite a fast thermal reaction can occur in direct sunlight. The more this reaction is slowed, the longer it takes to produce a 3D object from resins.
Another challenge is that almost every display device produces a different level of light. Depending on screen size, you may not get the 1:1 scale model you expect. The size of an image layer on the screen can be calibrated as part of the setup process so you achieve the correct dimensioned part, but calibration is another hurdle for a device that’s often sold as a simple-to-use alternative to existing 3D printing methods.
Open innovation and community designs
3D printers tend to get significantly more expensive with larger print-size capability. They also take up much more space. One innovative open-source RepRap design allows for giant 3D prints at a lower cost than most common desktop 3D printer kits can produce.
One example is the Hangprinter (see Figure 10-13), designed by Torbjørn Ludvigsen. This floating 3D printer is suspended in midair as the print motion is driven by winding and unwinding fishing line. The print surface can be almost anything that fits on the floor. Maximum dimensions are limited by how far you can run the cables to hang the machine. The design consists of mostly 3D-printed components, so if you already have a 3D printer, you can fabricate this project to make occasional giant prints. All the files and information you need to build this printer are at https://github.com/tobbelobb/hangprinter.

Image courtesy of Torbjørn_Ludvigsen
FIGURE 10-13: The RepRap Hangprinter allows large-scale 3D printing without the need for a structural outer frame.
New 3D-printing technologies are being presented for sale on crowdfunding sites or as preorders for products being developed. These crowdfunding sites are just what inventors and startup companies need to get their products introduced to a wide, eager market. However, using these sites can also be a roller-coaster ride for both backers and creators. Many successful crowdfunded 3D-printing projects have occurred over the past few years, but the results are often disappointing. In some cases, no product is ever shipped to waiting backers or the product is ready years after the expected completion date.
 Be careful about what you’re funding, backing, or investing in. Supporting new development is good, but don’t think of this support as ordering a product with an exact specification or firm delivery date. If you need a 3D printer to be productive right away, you’ll be better served by selecting one that already exists and has been reviewed well by seasoned members of the global 3D-printing community.
Examining Printers for Flexible Materials
To highlight some recent material and device innovations and the limits of current desktop 3D printers, this section takes a deeper look at the tricky aspects of flexible plastic printing.
Printing with flexible filament materials is one of the trickiest things to do with a desktop 3D printer.
Understanding Shore ratings
Material manufacturers and suppliers try to inform customers about the properties of a material. For many of the flexible materials now available (such as soft elastic, rubber, urethane, and nylon materials), you may see Shore Durometer numbers. A Shore value describes the hardness of a material.
The Shore Durometer hardness scale is most often classified as Shore A or D. Just be aware that there is more than one classification of elastic material.
 Different classifications have no direct relation, so make sure that you’re talking about the same A or D scale if you’re trying to compare materials between suppliers.
An elastic band, for example, is likely to have a Shore 30A rating, meaning that it’s very soft and likely to stretch many times before breaking. A gel saddle seat for a bicycle often has a Shore rating lower than 15A, meaning that it’s extremely soft and highly deforming — gel-like indeed. The tread on your car has a Shore rating of 70A or higher. A solid plastic product, such as a high-density polyethylene hard hat, has a Shore rating around 75D.
The Shore rating is a good way to understand whether you’re buying a stiff or flexible filament, which helps you understand what type of compatible extruder you need to push flexible material into your printer’s hot-end.
Flexible 3D printing filaments from manufacturers such as Ninjaflex and Filaflex provide a Shore rating for their materials, which gives you some indication of the materials’ capability.
Printing with soft filaments
Flexible filaments don’t like to be pushed down a feeder tube or squashed by a metal drive gear into an idler bearing; they tend to buckle and compress. When melted, they ooze and expand. For this reason, many new extruder and hot-end designs have been developed with flexible materials in mind. The key thing to look out for is a constrained path all along the drive mechanism.
The DyzeXtruder design (see Figure 10-14) supports soft filament along its entire length. A set of two drive gears grips and firmly pushes the filament, and the slippery PTFE tube goes all the way down to the nozzle, allowing flexible materials to slide down with less tendency to compress or buckle.

FIGURE 10-14: The DyzeXtruder has dual gears that grip soft filaments and guide them straight down into the hot-end.
The speed at which you can print softer materials may be limited. The time it takes depends on the setup and type of your extruder and hot-end, but expect printing to take half the time (or less) of printing with solid materials such as polylactic acid (PLA) and acrylonitrile butadiene styrene (ABS). One common reason why people fail in printing with flexible materials is that they attempt to print too fast. Start at 25mm per second. Make sure that everything is working reliably and doesn’t fail halfway into a print at low speed. Then experiment with speeding up, if your extruder can handle higher speed.
If your hot-end has a Teflon tube that extends all the way into the heating zone, make sure that you never exceed the manufacturer’s recommended temperature limits for the hot-end — often, 250 degrees C. A slippery Teflon tube can be a benefit for some materials, but it imposes a temperature limit. Often, you see all-metal hot-ends that don’t use Teflon tubes; instead, they have highly polished stainless steel tubes. What’s most appropriate depends on the type of materials you use and the speeds you want to achieve.
3D printing with flexible materials is a tricky process to master. If you want to do this on a regular basis, ask the manufacturer of your 3D printer for advice. The manufacturer may recommend specific settings or upgrades (such as a different extrusion system) to help you to get the best results from the material and finished 3D print.
Flexible materials are widely used in prosthetic and robotics industries. The ability to 3D-print soft and flexible parts makes individual customization quicker and more repeatable than is possible in traditional processes. Figure 10-15 shows a 3D-printed soft insole.
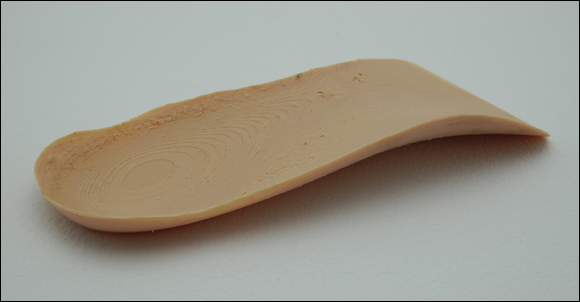
FIGURE 10-15: 3D-printed soft insole.
 Online 3D applications such as Gensole (
www.gensole.com) enable you to create a custom-fit 3D model of an insole for home printing with flexible filaments.
Sampling 3D Food Printers
Significant and fun advancements have occurred in 3D food printing in recent years as more food-based 3D printing systems are developed and used. 3D food printing has become a real alternative to manual cake decoration and precise food plating, as well as many other artistic food presentation tasks previously performed by hand. See Figure 10-16.

FIGURE 10-16: Some 3D printers use filled tubes or syringes of flavored pastes to print fun, edible shapes.
The food industry is nowhere near the point of atomic-level replication in 3D printing, so current food printing consists of little more than squirting pastes into shapes. A seemingly endless variety of materials can be extruded, from chocolate to horseradish.
Why does anyone need or want 3D food printing? Processing a carrot into mush and then forming it back into the shape of a carrot via 3D printing may sound like a complete waste of time and energy. It’s easy to dismiss current attempts at 3D food printing as being pointless. But when you consider that food processing is already a common manufacturing procedure, 3D-printing food makes more sense.
One very good reason to 3D-print food is that some people find it difficult to eat the original/solid form of certain foods. Also, hospitals, nursing homes, and even top restaurants could benefit from 3D printed food, because fresh ingredients, vitamin and mineral supplements, texture, shape, and size could be customized for every meal, taste, or dietary requirement. Realizing this vision is going to take considerable time and effort, but it may be one of the only ways to feed and care for the generations to come.
3D printing doesn’t mean making food out of thin air. The base materials still have to be grown, processed, and transported. Final design, preparation, and cooking could be performed by an advanced cooker/3D-printer hybrid system. And … there will probably be an app for it!
3D food printing won’t replace regular cooking, just as other types of 3D printing won’t be used for all manufacturing. It’s simply another way to process and deliver a customized product.
Top chefs and restaurants are experimenting with 3D-printed food (see Figure 10-17). Some like being able to ensure perfect placement of sauce or puree on every plate. Others use it for presentation and to produce foods that would be almost impossible to make by hand (or it would be too time-consuming to do it).

FIGURE 10-17: Restaurants are producing 3D-printed foods such as this chickpea appetizer.
If you want to experiment with 3D food printing at home, the Discov3ry paste extruder system (see Figure 10-18) may be for you. It replaces your thermoplastic extruder with a remote syringe-based paste pressure extrusion system. This system doesn’t require compressed air or a complex apparatus. You simply connect the stepper-motor-driven box to push whatever paste is in the syringe and tube-based nozzle.

Image courtesy of Structur3D
FIGURE 10-18: The Discov3ry paste extruder allows 3D printing almost any paste.
These types of paste extrusion systems provide a great way to experiment with various paste materials. It’s a separate syringe-based design that only requires a silicone tube and nozzle to be connected to the moving carriage in place of your normal thermoplastic hot-end extruder. This makes it lightweight so should be possible to fit onto many different types of 3D printers.
Because the main syringe, tube, and nozzle system can be replaced, you can easily try printing with many types of food and almost any other substance that can be forced through a tube system.
The Discov3ry syringe has a 60ml capacity and a wide range of nozzles, so it allows bigger prints and longer runs between material changes. With many 3D printers you can also pause a print, refill or exchange the syringe, and continue printing. There may also be a point where previously deposited layers need to dry or cure before more can be added. This will be true for wetter pastes and silicone gels and some types of food.
The 3D-printed basket shown in Figure 10-19 was originally a full heart-shaped voronoi style model designed by Roman Hegglin (Creative Commons license, Thingiverse model 246864). Richard cut this model in half and scaled it up so it could be used as an experimental banneton for baking bread. As the bread proofs, it expands and forms the shape of the 3D-printed basket. After baking, the features of the 3D-printed basket are visible in the finished heart-shaped loaf. This is an interesting experiment that shows how 3D-printed tools can work with traditional methods to allow more unique artisan results with minimal effort.

Photo courtesy of The Green Bakery
FIGURE 10-19: Sourdough bread allowed to proof in a heart-shaped 3D printed banneton mold.
Another use for 3D food printing is for treats like cakes and candy that are often gift items that can be enhanced with personalization. Mini-figure cake topper decorations to bespoke sweets can be 3D printed using a number of different processes. (See Figure 10-20.) Some use gels that start as liquids and transform into gummy candy, whereas others are made from powdered sugar that has undergone binding.
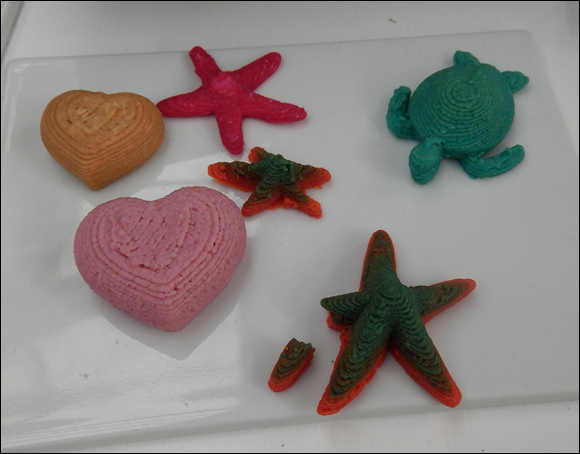
FIGURE 10-20: Confectioners can produce sweets in custom designs.
Going beyond RepRap
The RepRap project continues to bring innovation to art, design, and manufacturing. In this section, we look at how some companies have evolved the RepRap idea into successful products and 3D printers.
Many of these machines employ traditional manufacturing techniques and custom parts to achieve the demands of mass-volume production, but they all have roots in the RepRap project.
As the fundamental idea of a low-cost desktop 3D printer evolves it allows more and more people to experience and own this technology for themselves. We see more and more sources of machines, add-ons, and upgrades. Many now do not come directly from the community of users but from companies set up to meet the increasing demand for supply. The following sections take a look at how things are evolving beyond RepRap with machines, software, materials, and components.
Prusa i3 MK2
The Prusa i3 MK2 (see Figure 10-21) is one of the world’s most popular desktop 3D printers, available both as a kit and as a ready-assembled machine. It also has one of the strongest links to the RepRap project, and Prusa Chief Executive Officer Josef Prusa is one of the core RepRap developers. We look at the assembly of a Prusa i3 in Part 5. The MK2 version introduces some enhancements for ease of use and construction and for improved print quality.
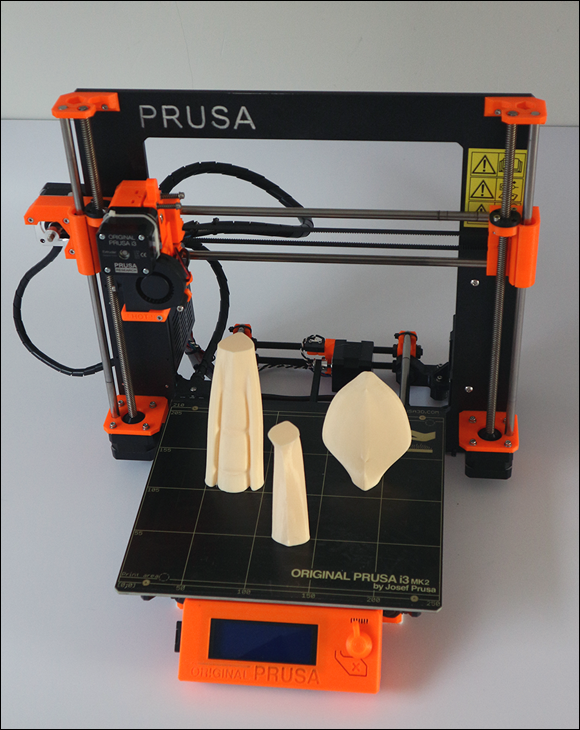
FIGURE 10-21: The Prusa i3 MK2 3D printer is one of the world’s most imitated RepRap 3D printers.
Sigma
BCN3D Technologies in Spain (formerly RepRap Barcelona) offers several RepRap designs as production kits and assembled machines. The company’s current 3D printing system is the Sigma R17, which has a small number of 3D-printed parts but is an open-source machine.
The Sigma has dual independent print heads (see Figure 10-22), which allows two materials or colors to be printed in turn and combined into one model. A support material fitted into one of the two available print heads could be used as a scaffold to enable printing of more complex 3D models. Two independent print heads mean that one can be parked while the second head applies a different color or material to the model. This arrangement minimizes oozing of material from the inactive head and eliminates the chance that an unused head will knock over or damage previously printed features.

FIGURE 10-22: The Sigma 3D printer, with dual independent printing heads.
Printrbot Simple Metal
Printrbot is another company born from the early RepRap ecosystem. Brook Drumm started the company as a crowdfunded project, using 3D-printed parts and a kit of mechanical components for self-assembly. The original Printrbot is similar to the RepRap Wallace, which we discuss in Chapter 11.
Printrbot has evolved from using 3D-printed parts and invested in metal frames and tooled components. This was due to demand for the printer and an inability to be able to 3D print enough plastic components for kits.
LulzBot Taz 6
The LulzBot brand from Aleph Objects, Inc. serves the desktop and semiprofessional 3D printing market. The Taz 6, shown in Figure 10-23, is a highly evolved RepRap with a metal plate and extruded aluminum sections, as well as a significant number of 3D-printed parts. Features include a large print platform with exchangeable print heads, enclosed electronics and power supply, and LCD screen and SD card slot.

FIGURE 10-23: The LulzBot Tax 6 3D printer.
Aleph Objects and the LulzBot team have one of the world’s largest 3D print farms, with more than 100 of their own 3D printers running every day to produce parts for their expanding user base worldwide. LulzBot often collaborates with its customers and 3D-printing community to improve, build, and innovate on existing and future developments.
Ultimaker 3
The team behind Ultimaker has a long history with RepRap and open-source collaboration. Initially, the original Ultimaker was released as a laser-cut wooden frame, 3D-printed parts, and a self-assembly kit.
Versions 2 and 3 have moved away from 3D-printed parts. Injection-molded, tooled parts and custom machined components make up significantly more of these later models.
The Ultimaker 3 has a print cartridge head, allowing users to switch materials and nozzles. The two print heads can use support materials or different types or colors of material in a single 3D-printing process.
MakerBot
MakerBot is another well-known brand in the 3D-printing market.
The company, which introduced the Replicator range of 3D printers in 2012, was purchased by Stratasys in 2013. At that time, manufacturing shifted to assembled 3D printers rather than kits. Current MakerBot 3D printers are no longer open-source; they’re manufactured in a range of sizes and capabilities for a variety of applications in business, education, and the desktop market.