
Chapter 11
Deciding on a RepRap of Your Own
IN THIS CHAPTER
![]() Evaluating your needs
Evaluating your needs
![]() Selecting a design
Selecting a design
![]() Choosing print materials
Choosing print materials
![]() Identifying key components and software
Identifying key components and software
RepRap is a wonderful machine that can replicate itself. It’s an inexpensive 3D printer that can reproduce many of its own components. If you decide that building your own 3D printer is something you want to do, then RepRap is a great place to start. Over the course of the next few chapters, we show you how to select and then build your own RepRap 3D printer.
The first step in making your own RepRap 3D printer is selecting a design. For anyone new to the wonderful world of self-manufacturing, this step can be one of the hardest. The RepRap family of 3D printers has hundreds of machines and many bewildering variations on designs, so where do you start, and what’s the best design for you?
In this chapter, we first explore available RepRap 3D printers so you can attempt to work out what machine design is right for you.
We also explore the materials you can use in a home 3D printer and discuss the parts of a 3D printer, which is essential knowledge if you decide to build a machine from a kit.
Evaluating Your 3D Printing Needs
When selecting a design for a 3D printer, it’s good to first determine what you plan to do with it. Ask yourself, “What do I need a 3D printer for, and what am I expecting a 3D printer to do for me?” Often, the reply is “I don’t need it for anything in particular; I just want one.” This answer is absolutely fine. Let’s face it — 3D printers are exciting technology and well worth exploring just for the fun of it.
Another common reply is “I want to print 3D printer parts and sell them.” This answer is one that a lot of people use to justify investing the time and money in a machine that can naturally make more machines. One word of caution here: It takes a little time to achieve results good enough to sell, but this goal is a fine one that can drive you forward and the very one that’s already helped spread RepRap to every part of the world.
Do you want a RepRap or another 3D printer?
Next, you should work out whether you want just any 3D printer or specifically a RepRap. This distinction is important. Due to the demand for 3D printers, many companies have used the RepRap technology to produce machine designs that can be traditionally mass-manufactured. It’s ironic that the success of a low-cost self-replicating machine now makes it so hard for manufacturers to keep up with demand that some companies choose to mass-produce parts. This situation leads to a few issues for customers. One problem is that if you can’t always reprint some of the parts for your machine, it’s harder to upgrade, repair, or self-replicate.
These issues aren’t problems, however, if all you want is a 3D printer and have little interest in RepRap’s self-replicating or sharing nature. Many machines can fill the bill, and almost all of them started from a RepRap branch or use its core technology. Some machines’ manufacturers still class the machines as RepRaps, whereas others aim to hide those origins.
The one thing that keeps RepRap on top is the fact it can upgrade itself. Other printers that are made up of mostly laser-cut parts, prefabricated frames, or custom injection-molded parts can print the parts for a RepRap, even if they can’t print parts to replicate themselves. In this respect, RepRap technology becomes ever more fertile, and other machines become sterile and risk constant obsolescence. So it’s easy to see that every 3D printer manufactured during the past 30 years or so can help RepRap grow bigger and better; even the mass-manufactured machines of recent years contribute to the overall goals of the project. We aren’t going to tell you not to buy a non-RepRap machine, but we do advise you to think about what you need a 3D printer for and whether the benefits of RepRap outweigh those of the other options.
RepRap is an open-community project, and its technology forms the basis for almost all new home 3D printers. But RepRap stays vibrant and ahead of the game because of its diversity and the sheer number of dedicated, loyal users and developers in its worldwide community.
One of the core benefits of RepRap is the total control you have over making changes and enhancements to your printer. People and companies around the world make changes, upgrades, and enhancements of RepRap on a daily basis, so almost any improvement or enhancement you can imagine has already been implemented by one developer or another — someone who has probably made that improvement available to you.
This open-source concept isn’t just for machine-based improvements. You can also find upgrades for software, print material settings, and machine firmware (software running on the electronics of the printer), all of which can help you avoid a lot of frustrations. The print material settings in particular are becoming important areas for adjustment and tuning (see Chapter 15). Many consumer printer manufacturers, for example, lock down the settings of their printers so that you can print only with a specified material or at specified speed and quality settings. With a RepRap printer, however, you can print with simple settings or alter virtually any aspect of the machine. This flexibility becomes really important when you’re trying to create adventurous objects or want to print with new or unusual materials.
Not everyone will want this much control, of course, but pretty much anyone can appreciate the freedom that this flexibility offers. With RepRap, you’re not limited by arbitrary manufacturer settings. You’re limited only by your own imagination.
Do you buy a ready-built 3D printer or use a kit?
Should you buy a 3D printer or a kit? To answer this question, go back to your reasons for wanting a 3D printer in the first place. If you want to use it as a tool, and the physical output of a model is the only important factor, a fully built commercial machine with backup, support, and training available may be the way to go, but this route is more costly and (as we mention earlier in this chapter) somewhat limits what you can do with the machine. It’s also harder to get online community support, because the commercial models are not always the machines most people in the wider community are using, upgrading, and tinkering with. Thus, fewer people will have a desire to assist you, and to be fair, assisting you with problems is the job of the company that sold you the commercial closed-source machine.
We always recommend building from a kit or (if you’re feeling more adventurous) sourcing all the parts yourself. Building a printer yourself is still one of the best options in this phase in the evolution of desktop 3D printing. These machines are still highly mechanical, so parts will wear out; components will require careful calibration; and over the life of your 3D printer, you’ll run into all sorts of problems that interfere with your printing. Consider, however, that these same issues will occur with any 3D printer, no matter the cost; that’s the nature of the technology. For this reason, it’s often better to build your own machine and understand exactly how these parts work together to function as a 3D printer. When you’ve built your machine, you’re in a much better position to repair and maintain it.
 Don’t be too worried. Building a 3D printer from a kit really isn’t as difficult as it may sound. Almost all kits have ready-built electronics and wiring, so your main job is to assemble the mechanical framework, measure and mount parts with nuts and bolts, and then plug all the connections into the electronics control board. If you do all these things carefully and according to the instructions, building a 3D printer can be a highly rewarding experience.
 The RepRap community extends to every part of the world, and its members come together in many ways. For anyone seeking advice, the best way to get it is to join a local group of like-minded individuals. Learning how to 3D print and use the many available tools, settings, and programs is a lot to take in; it can be a steep curve, but it’s well worth the effort. In no time at all, you’ll be confident with the technology and could be contributing your own modifications to the RepRap community.
Licensing and Attribution
RepRap is an open-source project. From the start, it had to be, because trying to limit or stop a machine that can duplicate a significant proportion of itself is an almost-impossible task. The open nature of RepRap provides huge benefits for sharing in the wider community of makers, designers, and users. This open aspect doesn’t limit the project to hobbyists or impair its use with to closed-source machines; it does the exact opposite thing as long as you pay attention to the licenses used.
Despite the fact that RepRap is open-source, almost all RepRap technology is provided to you under a license. This fact is worth keeping in mind; it could be highly important if you intend to make a business of 3D printing or building on other people’s work in this field.
A typical hardware or software license details what you’re allowed to do with the files (designs, source code, assembly instructions, and so on) that are made available to you. The core of the RepRap project falls under the GNU General Public License. On the whole, this license means that the files are free and anyone can use them.
You can find the GPL license can be found at https://www.gnu.org/licenses/gpl.html.
The GNU license was designed for open-source software; using GNU for hardware projects is possible but not ideal. This limitation is due to the fact that hardware projects have a physical presence that can be shown out of context from the original project or reused without obvious acknowledgment of the original.
Therefore, many of the hardware elements for RepRap, as well as the associated 3D designs or supporting electronics, are licensed under a Creative Commons license. The brain of most RepRap 3D printers, for example, is an Arduino electronics control board, a modular set of electronics used for all sorts of control projects and industrial tasks around the world.
Arduino controllers are open-source hardware and software, licensed for use with the Creative Commons Attribution-ShareAlike license. This arrangement allows both personal and commercial use, but you must share the files the same way that Arduino does and also credit Arduino in the documentation of your design or changes.
A typical Creative Commons license uses a simple set of icons as a logo to indicate what type of license it is and what you can or can’t do with it legally. The license shown in Figure 11-1, for example, allows you to copy, distribute, or transmit the work; adapt the work; and make commercial use of the work it covers.

FIGURE 11-1: A typical Creative Commons license icon.
In the logo, the icon of the little person in a circle means that this license is provided on the condition that you attribute the work in the manner specified by the author or licensor, and that you do not do this attribution in a way that suggests or implies that the author has endorsed you or the use of your work.
The SA icon means share alike, so all derivative work must be shared under the same license. In this case, the derivative work can also be used commercially. You wouldn’t be allowed to build onto this work and then change it to a noncommercial license to stop other people from building on it, for example.
Another common example is the original design of a 3D model. The designer may want to make the files available for individuals to use but may also want to restrict the model’s use for commercial benefit and may not allow derivative work based on the design. This arrangement still allows you to download the 3D model, print it, and use it, but it’s licensed only for your own personal use.
The logo in Figure 11-2 specifies that work can be shared but isn’t licensed for commercial use (NC) and doesn’t allow derivatives (ND). You’re still required to attribute the work to the creator or licensor when you share it.

FIGURE 11-2: Icon of a Creative Commons license with more restrictions on commercial use.
If you obtain a 3D model under this license, you’re not allowed to sell a 3D-printed version of the model, publish modified versions of the design, or sell the model’s design files.
You can print and display the model as long as you get permission from the author and make the author aware whether the design or print of the model is helping you sell something else, such as a 3D printer that printed the licensed model. When you do so, it’s of the utmost importance to provide attribution to the designer, display the licensed name of the model, and show the license. Then you’re complying with the license terms, and the designer gets credit for the design, which is visible to anyone who sees the printed object on display.
When you don’t provide attribution, the license system breaks down, and the designer whose work you used this way will be less likely to share the next design (or to be very happy) with you.
It’s good to be aware of how anything you use or share is licensed, regardless of whether you’ve paid for it. Even if an item is being given away, there may still be legal restrictions on how you may use it.
You can find the Creative Commons licenses at https://creativecommons.org/licenses/.
Selecting a 3D Printer Design
When selecting a 3D printer design, don’t disregard some common RepRap 3D printers. You shouldn’t consider these established designs to be considered old or out of date just because they’re not on the cutting edge; consider them to be stable ways to get started, sensible choices, and springboards to further adventures in the new Industrial Revolution. All the 3D printers discussed in this section are based on established technology and are widely used in the community. Any of them would be an excellent choice for your first 3D printer.
RepRap designs
The evolutionary nature of RepRap is based on survival of the fittest, so many designs, modifications, and upgrades fall out of use or are superseded by newer designs as users and other developers adopt them. Watching a RepRap design grow and change, and even sometimes die out, is one of the joys of an open-source hardware platform.
The following list describes the most common designs for RepRap 3D printers, in approximate chronological order (subject to innovation):
- Mendel: The original Mendel printer was designed by Ed Sells at the University of Bath in the United Kingdom. After the original design named Darwin (after the biologist Charles Darwin who developed the theory of evolution to explain biological change) started replicating at various universities around the world, Mendel set a new standard for RepRap printers that’s still strong and used today in many derivative machines. The Mendel concept is Cartesian, much like existing 2D printers or plotters in its operation. As described in Chapter 10, most Cartesian-based machines move the print bed back and forth along the Y axis, move the printer carriage from side to side on the X axis, and lift or lower the entire X axis and printing carriage on the Z axis (usually with two motors, one on each side). The original Mendel printer is now considered to be overly complex to build, but modern versions of the Mendel have become popular and account for a high proportion of the RepRap 3D printers built by users.
- Prusa Mendel: The most widely constructed and widely used RepRap 3D printers are the Prusa Mendel and its many derivatives. (A modified Prusa Mendel is shown in Figure 11-3.) This machine, designed by Josef Prusa, is a simplified version of the original Mendel design that proved to be highly popular. Version 2 of the Prusa Mendel is still built today and is highly recommended as a first machine.
- Mendel90: This machine (see Figure 11-4) is a variant on the Mendel design that has a rigid frame (usually made of laser-cut wood) and plastic acrylic sheet or laminated DIBOND material as the main structural elements rather than the traditional RepRap threaded rods used in the Prusa machines. It uses almost all 3D-printed parts apart from the main structural frame, which is often manufactured from an aluminum-and-plastic DIBOND laminate. Mendel90 was designed by Chris Palmer (also known as Nophead), one of the original RepRap team members. He shares a vast amount of RepRap and 3D printing information on his Hydraraptor Blog (at
http://hydraraptor.blogspot.com). This blog is an essential read for anyone who wants to understand the history, challenges, success, and failures of 3D printing at home.

Image courtesy of Adrian Bowyer
FIGURE 11-3: Prusa RepRap 3D printer, Version 2.

Image courtesy of Alan Ryder
FIGURE 11-4: A Mendel90 RepRap 3D printer.
- Prusa i3: The Prusa i3 has a hybrid design that combines elements from Mendel90, Wallace, and other machines to make a simple-to-build, high-quality home 3D printer. Version 3, known as i3, is a revised version of Mendel, similar in concept to Mendel90 but with a rigid central wooden, acrylic, or aluminum frame and threaded rods that support the moving bed on the Y axis. (See Figure 11-5.) The Z motors are also positioned at the base as in the Mendel90, which provides Z-axis movement with a flexible coupler to create smooth print sides. Overconstraint on the Z-axis vertical movement in previous designs often produced Z-wobble, which appeared as bands or grooves on the side of a printed object. The Prusa i3 continues to be updated and improved. Chapter 12 examines the Prusa i3 in detail.
- Huxley: Huxley is a miniature version of the Mendel that uses smaller components, such as 6mm rods for the frame rather than 8mm and smaller printed parts. The build area is smaller than the Mendel’s but large enough for many applications. The machine is also wonderfully portable. Like the original Mendel, the first Huxley machine was designed by Ed Sells at the University of Bath. Huxley was an unofficial project until it was unveiled to Adrian Bowyer and then published as an official RepRap printer. The Huxley wasn’t as popular to start with as its bigger brother Mendel, mainly because many people were trying to build their first 3D printers and opted for the more mature Prusa Mendel design. The Huxley was redesigned by Jean-Marc Giacalone as the eMaker Huxley and sold fast, quickly becoming one of the most popular kits available.
-
Wallace/Printrbot: The Wallace (see Figure 11-6) and the Printrbot have similar configurations. Only the Wallace can be considered to be a true RepRap, however, because its parts are still produced by printing. The Printrbot’s ability to self-replicate has become increasingly more limited because it initially required the use of a wooden laser-cut framework and further variations now use fully stamped and folded sheet metal structures. This approach allowed the production of very low-cost kits and ready-built machines, some specifically designed for educational purposes.
Version 2 of the open-source Printrbot Jr printer, designed by Brook Drumm (see Figure 11-7), is built on RepRap technology and constructed of laser-cut plywood. Due to its mass-manufactured, laser-cut frame, it’s one of the least expensive ways to get a home 3D printer. Its motion elements improve its printed output.
The Printrbot can’t print another Printrbot. Its intricate, interlocking framework is designed to be cut by a computer numerical control router (CNC) machine or a laser cutter; it can’t be easily reproduced by hand. Wallace, on the other hand, can replicate much of its own structural framework and requires only a simple bed-cut square. A RepRap, however, is designed to allow the 3D printer to manufacture the complex parts and all other components can be sourced locally or be easily produced by hand using standard tools or materials. You should not require a tool-shop or manufacturing facility to produce RepRap 3D printers.

FIGURE 11-5: The Prusa i3 3D printer.

FIGURE 11-6: A RepRap Wallace printer, designed by Rich Cameron as a RepRap 3D-printable version of the Printrbot style of minimal design.
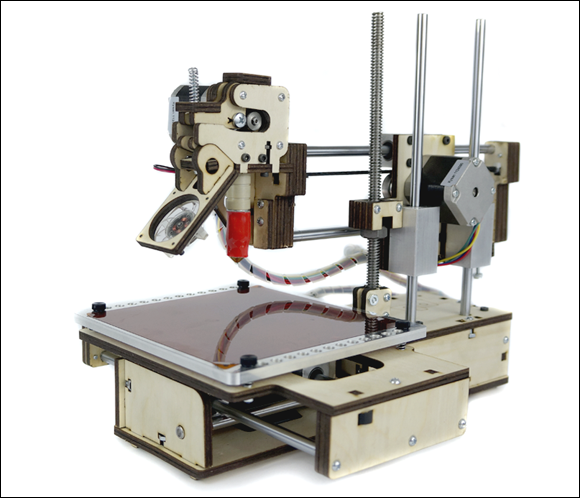
FIGURE 11-7: The open-source Printrbot Jr V2 printer.
Home 3D printer kits and self-sourcing
If RepRap 3D printers aren’t to your liking, a host of home 3D printer kits are available. Many kits, like the Printrbot, replace 3D-printed parts with machined, laser-cut, or stamped-out parts. Whether you want a kit with a lot of ready-made 3D-printer parts or a kit with few of them comes down to budget and personal preference. All the kits use RepRap electronics, firmware, and software slicing programs; all can achieve similarly high-quality print results with a little care and tuning.
In Chapter 13, we look at RepRap-based printers that use both 3D-printed parts and threaded rods along with those that also incorporate laser-cut or machined frames. We also cover Cartesian with MendelMax and Prusa i3 printers, as well as delta models with the RostockMax and 3DR designs.
Endless variants of Cartesian-based 3D printers are available. All the 3D printers in the following list can provide excellent printed objects; all are available in kit form or individual components can be self-sourced using guides and construction manuals for advice.
- MendelMax: This machine has evolved through several versions, originally using many 3D-printed parts and now having many laser-cut or machined parts. We cover the Version 2 model in Chapter 12.
-
Ultimaker: This 3D printer (see Figure 11-8), based on RepRap technology, was one of the first kit machines to be sold. It uses laser-cut wooden panels to make a box frame and has a configuration similar to the early RepRap Darwin. The print bed moves only up and down, and a lightweight print head moves on the X and Y axes. The Ultimaker is no Darwin, however, but a fast printer that introduces a Bowden fed extruder. This method of plastic extrusion moves the mass of the motor and filament-drive system to a static position on the machine; then the filament being extruded enters a slippery PTFE (Teflon)-based tube that doesn’t allow the filament to bend, buckle, or compress. At the other end of this tube (usually, about 500mm long) are the moving print head and the hot-end that melts the incoming filament being pushed by the remote extruder. This setup allows the very light print head to move very fast indeed to achieve faster printing and potentially higher accuracy compared to a heavier print head and extruder that can’t move as fast. We explore Bowden fed extruders in more detail in the sections that follow.
The Ultimaker Version 3 is no longer a RepRap. Success and increased global sales allow for traditional manufacturing methods of injection-molded parts and laser-cut plastic panels. It is, however, one of the highest quality and fastest 3D printers available for the desktop market. Ultimaker 3 also introduces a new concept in removable cartridge-style print heads, which allows for quick swapping of nozzle sizes and different print materials. Version 2 and Version 3 printers are also now fully assembled machines and no longer available in kit form.
- Prusa i3 MK2: This 3D printer (see Figure 11-9) is one of the last commercially available kits with significant global sales. It’s a great way to get into 3D printing because the assembly experience is enjoyable and educational. Many of the tricky parts are simplified in the MK2 model. We look at the detailed construction of a Prusa i3 style printer in Chapter 13. When buying a 3D printer kit today you should receive a highly detailed manual, and you’re usually not expected to solder or crimp connections. Simply assemble the mechanical parts and wire-up cables to matching connectors and set up software on a PC.
- Tantillus: This 3D printer (see Figure 11-10) was originally designed to be a fully printable machine. Tantillus is a lot like a miniature Ultimaker. Original versions that don’t have the laser-cut frame have the highest percentage of printed components used in any RepRap printer. The case frame construction was originally fully 3D printed. Another version, with a laser-cut acrylic case, was designed as an easier do-it-yourself kit in a successful crowdfunding campaign by Sublime. One unique feature is the use of high-strength fishing line instead of belts to provide the X and Y motion, resulting in a fast-moving machine and high-quality prints.

FIGURE 11-8: The Ultimaker 3D printer.
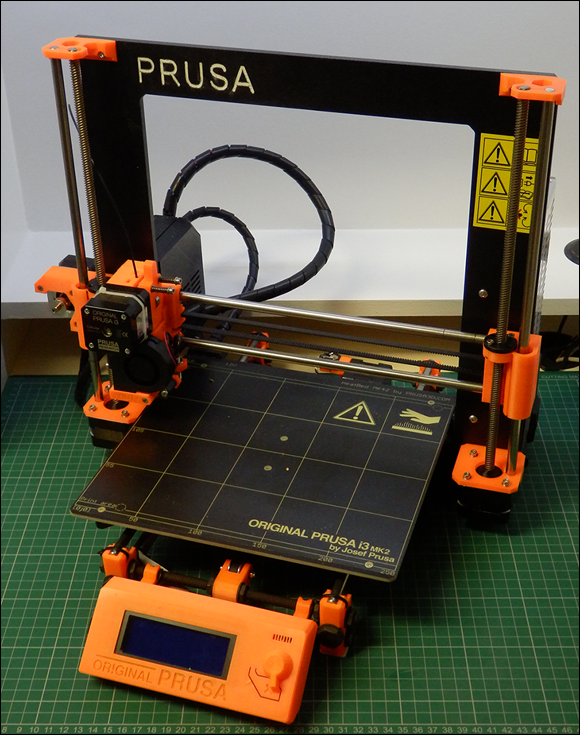
FIGURE 11-9: The Prusa i3 MK2 3D printer.

FIGURE 11-10: The Tantillus 3D printer.
Almost all home 3D printers have about the same level of quality and speed, so don’t get too hung up on the exact model to choose for your first machine. Especially with a RepRap, you’ll be able to upgrade and evolve the design or print most parts for a future model.
Experimental designs
At any given time, the RepRap community has thousands of experimental modifications going on all around the world. Every now and again, a new branch sprouts. New or vastly different machines usually attract a lot of attention, and other developers may have to help refine them into something that can be used across the community.
Open innovation and the development of ideas into physical parts that enhance operation can be one of the most exciting aspects of the RepRap community. The aim in RepRap isn’t always to keep making things faster and more accurately; some of the most challenging design improvements come from thinking about lower-cost materials that are more accessible to more people. Other developers seek a new design that occupies less desk space but still prints large objects.
All the designs we’ve looked at so far in this chapter use the Cartesian coordinate positioning system. The next wave of popular home 3D printers use the delta triangulation-based coordinate system, as described in Chapter 10.
Many of the most successful branches of delta 3D printer designs come from a concept machine called the Rostock and advanced design called the Kossel, designed by Johann C. Rocholl, who also further developed the delta firmware branch of Marlin that is used in many RepRap delta printers.
Following are the most popular delta 3D printer designs:
- Rostock Max: This design (see Figure 11-11) is inspired by the original Rostock but has a laser-cut frame and makes innovative use of bearings that run on aluminum extrusions to provide the linear motion of the machine. It’s also one of the biggest machines, capable of printing models of significant size. We look at the Rostock Max kit in detail in Chapter 12.
- 3DR: Richard designed an alternative delta printer, which uses mainly 3D printed parts for the structure of the machine. We compare the assembly of the 3DR and the Rostock Max 3D delta printers in Chapter 12.
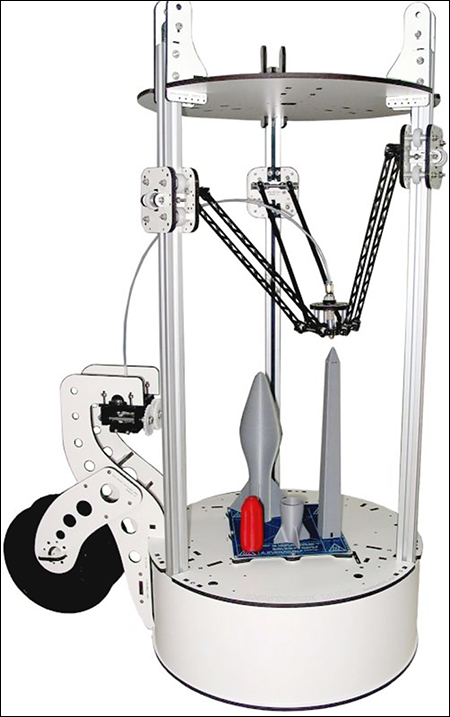
FIGURE 11-11: A Rostock Max 3D delta printer, designed by SeeMeCNC.
Most RepRap printers can be scaled to different sizes, so don’t assume that the stated build area of a machine is the maximum build area. Typically, a building envelope of 200 cubic millimeters is standard, but RepRap machines can be scaled up to many times this size. Non-RepRap printers are usually limited by the size of the laser-cut frame, which isn’t so easy for the individual builder to scale.
Choosing Print Media
With most desktop 3D printers, you have a wide choice of materials you can use for the build process. There is an even wider range you can use in paste form if you use the appropriate style of material extruder system.
Thermoplastic
Desktop 3D printers mainly use thermoplastics as the materials of choice for manufacturing objects.
 It’s possible to use almost all types of thermoplastics, but melt temperature and toxicity are critical factors in material choice. Make sure that your work area is set up with all necessary safety precautions. Use good ventilation for all 3D printing, especially in a home environment. Charcoal-filtered fans like those used with soldering stations are good additions.
This section lists some common types of thermoplastics. A 3D printer normally uses polylactic acid (PLA), acrylonitrile butadiene styrene (ABS), or polyethylene terephthalate (PET), but developers are experimenting with many other interesting materials. Some of the materials are designed for a specific purpose or aspect, such as temperature, strength, flexibility, optical clarity, or impact resistance. Other materials are simply designed to look good when they’re polished after printing.
When a thermoplastic is processed for use in a 3D printer, it’s usually produced in a factory with specialized plastic extruding equipment and new material. The material, when extruded as a tightly controlled plastic wire (round in cross-section), is called filament. 3D printing filament is commonly available in standard diameters of 2.85mm and 1.75mm. 3D-printing filament originated in the automotive plastic welding industry. In the early days of home 3D printing, standard spools of 3mm plastic welding wire were used. Today, plastic extrusion companies all over the world manufacture dedicated filament for the 3D printing industry in two standard sizes of 1.75mm and 2.85mm with a tight tolerance (+/-0.1mm diameter), and true concentricity of the filament ensures high-quality printed parts.
Although many suppliers use new materials in their filaments, the use of recycled plastic, or regrind, is a fine goal for 3D printing. One day, you’ll be able to recycle plastic milk cartons and packaging to use in 3D printers. Many projects have been started with the aim of producing a system that can manufacture filament at home. Presently, however, creating regrind is a slow and complicated process. At the moment, it’s easier and less expensive to buy ready-made filament on the roll.
Other, less common thermoplastic materials include nylon and laybrick, a plastic- and chalk-filled material useful for architectural models. Another option is laywood, which is PLA blended with 40 percent wood fiber (which we cover in more detail in the composite section later in this chapter). Laywood can be painted, drilled, tapped, and sanded much the same way as woods such as Medium Density Fiberboard (MDF). Figure 11-12 shows laybrick, and Figure 11-13 shows laywood.
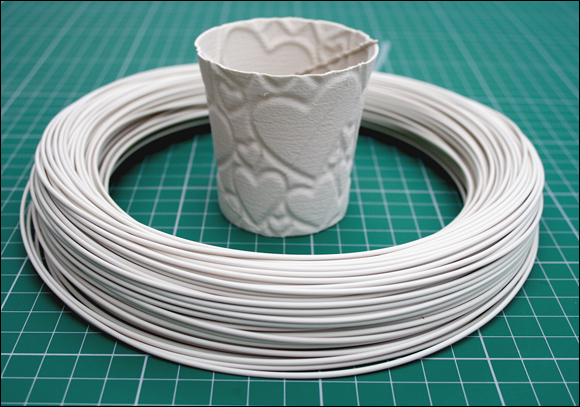
FIGURE 11-12: Laybrick is quite soft when first printed, like chewing gum, but hardens like chalk.

FIGURE 11-13: Temperature can alter the color of laywood, giving it a lighter or darker shade or even a woodgrain effect.
PLA/PHA plastic
PLA is one of the most common types of 3D printing filament. PLA plastic is manufactured from cornstarch; during the process, the lactic acid is polymerized. The resulting thermoplastic has been used in industry for many years. PLA is used for candy wrappers, coffee-jar lids, and many other products.
PLA can be recycled and starts to break down when exposed to industrial composting facilities. Because PLA is a nonpetrochemical plastic (not formed from oil), it’s regarded as an eco-friendly choice.
PLA has a low glass transition temperature of 60 degrees C, which is the point at which the material starts to turn from a solid to a liquid. The glass transition point is also the temperature used by a 3D printer’s heated bed to hold a model in a stable state while it’s being printed. Matching the glass transition point of a material is often critical to keep the part securely attached to the build platform during a print and also to minimize the warping effect caused by accumulated layers of melted plastic (see Figure 11-14).

FIGURE 11-14: Large objects like this vase can be produced in PLA plastic without significant warping.
Another critical temperature to know in 3D printing is the useful melting point. For PLA, that temperature is around 160 degrees C. A temperature between 160 and 210 degrees C is often used for 3D printing with PLA. At a higher temperature, the plastic is too flexible for 3D printing and also starts to break down.
Fans are often used to cool the print layers during printing with PLA. This arrangement may sound like a bad idea, but for small prints being done very quickly, it’s usually the only way to ensure that a layer is cool enough to allow the next layer to be added. Otherwise, you end up with a plastic blob rather than the object you had in mind. Also, using fans can minimize the curling of an object’s printed edges and the result in better overall surface quality.
Melting PLA produces a sweet smell something like cotton candy or popcorn, which makes it well suited to printing in a home environment. Polyhydroxyalkanoate (PHA) is similar to PLA but is made from fermented sugar rather than the cornstarch used in PLA. The formation of lactic acid isn’t required, so the manufacturing process is more straightforward. PHA is still in the early stages of use in industry and has one unfortunate side effect: It can smell like manure when breaking down.
PLA and PHA plastics in natural form are semitranslucent but can be altered with pigments into a wide range of translucent and opaque colors.
Some color pigments have various effects on the extrusion temperature and may prevent the object being printed from sticking to the 3D printer’s build surface. It’s a good idea to use uncolored natural or white material when you first use your 3D printer.
A heated build platform isn’t essential for using PLA. If you expect to do your print jobs at room temperature, you can use a cast acrylic platform or various types of tapes and adhesives to print smaller parts successfully. For objects measuring 130mm or more, however, a heated platform is recommended.
Some sources of materials used in low-cost 3D-printing filaments have been known to contains materials other than the plastic you were expecting. If this material is an additive or another type of thermoplastic, the resulting filament can be unpleasant or difficult to work with. If the other material can’t be melted or won’t pass through the extruder nozzle, however, it can jam your 3D printer. Be extra careful when using low-cost filaments, especially black material, because contaminants, rejected batches, other colors, and alternative materials can be hidden due to the dark color. Always buy from a high-quality branded source.
ABS
ABS is another common choice for 3D printing. Being oil-based, it’s not eco-friendly like PLA, but it has the advantage of a much higher glass transition temperature. For parts and objects that are going to be subject to temperatures up to 100 degrees C, ABS is an ideal choice.
A heated build platform is essential for printing with ABS. A minimum temperature of 100 degrees C is required for the platform, and a temperature around 240 degrees C is required for the extruding nozzle.
Natural ABS is off-white but can be processed as clear or colored during manufacture via techniques similar to those used for PLA.
Avoid fan cooling if you’re working with ABS. A fan or even a breeze that cools ABS too fast will make the plastic layers warp upward, knocking the printed object off the print bed before the process is finished. Result: an awful mess.
 Not all ABS is the same. The substance is manufactured from three chemicals, mixed in varying proportions to affect the properties of the finished plastic. Also, ABS from different suppliers can act very differently, requiring more or less heat to extrude or being harder, softer, or more brittle than other suppliers’ products. ABS has much more variation than PLA does.
PET
PET is quickly becoming the go-to material for many 3D print users. It can be a very good alternative to ABS and PLA because it has similar impact resistance to ABS and higher temperature resistance than PLA. It usually has less odor during printing and warps significantly less than ABS. PET plastic is used for many types of plastic packaging, especially food and drink containers. PET can be produced in different forms; the most common types are PETT and PETG. For PET materials used by 3D printers, the generic term polyester is often used. Look for brand names such as nGen from ColorFabb, which uses Eastman Amphora co-polyester. nGen filaments are specifically formulated for 3D printing.
Another popular PETT polyester is t-glase from Taulman3D. This material is designed specifically for 3D printing. Generic polyester filament is often based on PETG, a glycol modified polyester. Although this material is often great to use for large models for which PLA may be too brittle, it can exhibit more warping issues and even damage some build platform surfaces.
A heated build platform running at around 85 degrees C is ideal for printing with polyester or co-polyester based materials. Fans can be used for cooling the extruded material in a similar way to cooling PLA.
Natural polyester is usually supplied as a clear filament but can be tinted or colored opaque during manufacture. PET bottles with the recycling symbol 1 can be ground and melted to produce recycled materials for 3D printing. As polyester is the world’s third-most-produced polymer material, it causes significant environmental problems in places where many plastic tubs and bottles wash up from the sea. Several not-for-profit companies seek to recycle these waste plastic containers into 3D printing filaments or other plastic products.
Some polyester-based filaments crack, shatter, or even lift out sections of glass from a heated build platform. We recommend that you use a coating on the build platform to minimize damage. This coating can be a layer of generic Poly vinyl acrylic (PVA) glue stick or a specifically formulated adhesive for 3D printing, such as Magigoo.
Composite or filled materials
You now also have a choice of more exotic 3D printing materials, which often have a PLA or polyester base material and some solid fiber material (usually, less than 20 percent) mixed in. The most common composite material uses added wood particle fibers. The wood can be cherry, oak, bamboo, cork, or recovered waste wood. 3D models printed with wood filament are mostly plastic but create a wood effect and can be sanded, drilled, and even varnished.
The next-most-popular composite filament contains metal particles — anything from iron (which can be rusted after printing) to stainless steel and brass (which can be polished after printing to simulate solid shining metal). Copper, aluminum, bronze, and other metals are also available, often supplied on smaller rolls of filament; they cost significantly more than standard plastic filament does.
Metal filaments behave much like thermoplastic when printed. They may be much heavier and more expensive than plastic due to the metal content, but they’re not as durable as real metal objects. Sanding and polishing of the surface needs to be done by hand (or with a small rock tumbler) very carefully, so that the base plastic doesn’t melt. After some significant manual effort, you can achieve great results with metal-filled materials. Unless you plan to polish, rust, or smooth the materials, however, using them may not be worth the extra cost if you’re only looking for a metallic color.
Carbon fiber is another popular composite filament. The short carbon fibers add strength, resulting in a ridged matte finish on the printed part, but the object won’t be nearly as strong as a traditional molded or layered carbon fiber object. Developers are experimenting with other filler materials and even with fragrances, such as coffee, pine, and strawberry.
Filled materials may require a heated build platform. Ask the manufacturer what base material was used for the composite filament you’re using. If the base material is PLA or PHA, a temperature of around 60 degrees C is a good starting point. For polyester-based composites, start at around 85 degrees C.
Most filled composite materials produce a slightly rough finish. Composite materials often can’t reproduce fine features that a non-composite filament can achieve. Composite filaments also have a greater tendency to ooze or string during printing.
Some composite materials are very expensive, so if you’re printing with metal-filled filament that you intend to polish (such as BrassFill), consider printing with no bottom layers and a perimeter outline with low or no infill. After printing, you can fill the object with polyester resin or plaster of Paris to add weight and strength. When the plaster or resin hardens, it takes away any heat generated in the polishing process and limits damage caused by pressure applied to the thin walls of material. Because this hollow print method uses much less material than a solid print, you can print more objects at a lower cost per print. If you really need a metal-looking bottom, you can print that part later and glue it to the base of the object after filling.
Almost all filled materials, including glow-in-the-dark materials, have an abrasive action on your 3D printer’s nozzle. Carbon fiber filament can destroy a brass nozzle after printing just 500 grams. We recommend that you use a specially hardened or stainless steel nozzle for composite materials. Otherwise, be prepared to replace the nozzle after processing a few rolls of filled materials.
Paste
Paste materials can be used in 3D printers that have a modified extruder — usually, a syringe or other type of cylinder. Such extruders press out the paste material in much the same way that you press cake icing from a piping bag. Syringes are often chosen for being food-safe, but don’t reuse these syringes for different materials or try to use a normal thermoplastic extruder.
All sorts of food-based materials can be used in a 3D printer with an appropriate extruder, but the paste must have the consistency of toothpaste so that layers can be built up on top of one another. Frosting, marzipan, cookie-dough mix, and masa (Spanish dough used to make tortillas) are ideal candidates for 3D printing. Chocolate is a much more complex material for 3D printing, but you can print chocolate items at home. If you pay close attention to temperature and cooling methods, you can provide some wonderful possibilities for decoration and customize cakes and treats for loved ones and friends.
In addition to foods, almost any other material in paste form can be used as a 3D-printing material. Cements, fast-setting resins, ceramics, and even precious-metal clays can allow you to produce traditional artistic objects from solid materials (see Figure 11-15). We look at the paste extruder in greater detail in Chapter 14.
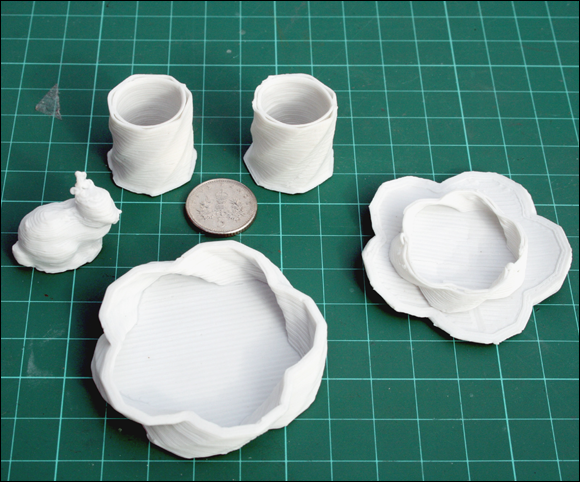
FIGURE 11-15: Fine porcelain clay can be printed with a paste extruder and then fired in a normal kiln to produce ceramic.
Identifying Components
Like the very early home computers, many home 3D printers are available in kit form. Although assembling the parts is relatively straightforward, the build can be a little daunting unless you visualize how all the components come together to produce a working 3D printer.
Structural framework
The framework of a RepRap 3D printer is usually a material that’s commonly available in many countries, which is one of the ways that RepRap makes 3D printing accessible to many people. Common threaded rods, such as M8 and M10 size, are often used as the framework. Some printer kits use laser-cut wooden or aluminum plates for the entire frame structure. Extruded aluminum tubes (often used for industrial racks or production equipment) can also provide a strong and lightweight framework for a 3D printer.
Extruder
The extruder and hot-end of a 3D printer are the most critical parts to ensure good quality and reliable printing. The last thing you want, after seven hours of an eight-hour print, is for the extruder drive to strip the filament or the hot-end nozzle to jam. These issues stop the flow of plastic and ruin your printed object. If you have too many of these problems, your new 3D printer will spend most of its time turned off or in a constant state of being fixed.
The most common style of hot-end has an aluminum heat sink and a brass nozzle with a small hole (typically, 0.4mm or 0.5mm). The small nozzle is where a stream of molten plastic is extruded onto your build platform layer after layer. Brass is often used, as it’s easy to machine, wears well, and provides adequate heat conduction. Brass is also forgiving: If a separate screw-in nozzle end is brass, you’re not likely to damage it. A stainless steel or high-temperature plastic section separates the heated nozzle from an aluminum heat sink, which is usually cooled to prevent the plastic filament from swelling and jamming before reaching the hot nozzle and melting into a controlled bead of molten plastic extrudate. Aluminum transfers heat quickly and can improve print speed, but aluminum hot-ends are rare.
Although 0.5mm nozzle holes are common, smaller holes (down to around 0.2mm) allow for a finer level of detail. The smaller nozzle holes, however, increase print times dramatically — often up to 10 hours, even for small objects. On the other hand, a 0.6mm or 0.8mm nozzle hole size allows much faster print times, usually with only a small loss of overall detail, for most types of 3D printing. You can retain a good level of vertical detail, even with a bigger nozzle hole, by printing lower layer heights. Models that are printed as a single outside wall, such as a cup or a pot, often benefit from a bigger nozzle that adds strength and wall thickness to the object.
The extruder nozzle can be screwed into a heating block, or these two parts may be integrated and machined as one part. The heating block contains a heating element, which can be a vitreous enamel resistor, a length of nichrome wire, or a cartridge heater. A cartridge heater is usually the safest way to heat plastic. A temperature sensor (usually, a thermistor) is also required to provide a closed-loop sensing system. The electronics can control the heating of the material being extruded to within a few degrees.
Another feature that every hot-end needs is a way to isolate the heating block from the incoming filament feed. This feature is fundamental, and if it’s not carefully designed and accurately crafted, materials will jam. This section of the hot-end is called the thermal break. Commonly, the thermal break is made from stainless steel or a high-temperature plastic such as PTFE (Teflon) and PEEK. PTFE has low friction against the incoming filament, which is important because as soon as the filament starts to reach its glass transition temperature, it acts more like rubber, gripping the walls of the cold-end. The cold-end holds the heating block in place and serves as an insulator, impeding the transfer of heat. Keeping the cold-end as cool as possible is critical. One common technique is to use a small fan to blow cool air against the cold-end and help maintain good thermal isolation between cold-end and hot-end.
Many types of RepRap hot-ends are available. Each type performs much the same job, but some designs are best suited to particular machines. The most common hot-ends include the following (see Figure 11-16):
- E3D: This nozzle is designed for high-temperature materials and a very low degree of ooze, so it’s excellent for accurate and fine printing.
- J-head: This good all-around design is limited to temperatures below 250 degrees C because of the materials used. The J-head nozzle has more parts than the newer stainless steel designs but is easy to use and service. Figure 11-17 shows assembled and exploded views of this nozzle.
- eMaker Bowden: This hot-end is used in the small Huxley printer.
- Prusa V2: This nozzle uses a stainless steel barrel with aluminum cooling fins and can reach extremely high temperatures.
- Early RepRap hot-end design: This hot-end is rarely used these days because its white PTFE thermal break often fails due to jamming or to operating at too high a temperature.
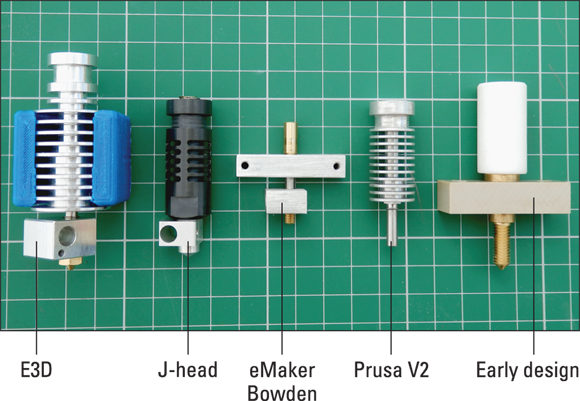
FIGURE 11-16: RepRap hot-ends.
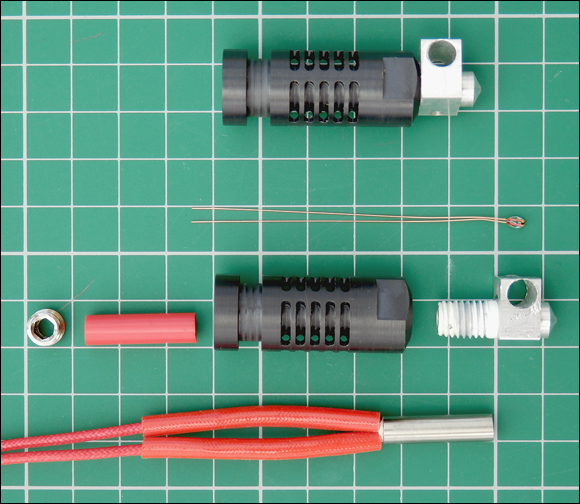
FIGURE 11-17: The J-head nozzle is a great all-around choice.
Stainless steel is increasingly popular as the cold-end isolation material for hot-ends. Stainless steel can withstand much higher temperatures than PEEK and PTFE, so it can extrude thermoplastic materials with melting points higher than 250 degrees C, such as polycarbonate (used in bulletproof glass). Even PEEK can be extruded, allowing you to print the cold-end insulator for another hot-end.
Advanced hot-end designs and interchangeable nozzle sizes (see Figure 11-18), including multiple nozzles and material mixing systems, are becoming more popular and reliable. The following designs will become common as more complex desktop 3D printers are developed:
- E3D Cyclops: This nozzle is designed to accept two separate material feeds and allow rapid switching between them. Because it has a single output nozzle, you need to be concerned about only one point of extrusion. The nozzle does have one small disadvantage: During switching from one material to the other, a small amount of mixing occurs. If you’re using red plastic on one side and yellow on the other, for example, you see a section of orange as you switch from one to the other. This problem is usually solved by using a material dump area or a prime pillar that uses (purges) the mixed material so that clean color or material changes can happen. Another limitation of this nozzle is that both materials need to have compatible temperatures to function together in a single heating system. You couldn’t use PLA on one side and ABS on the other, for example.
- E3D Chimera: This dual-nozzle and dual-heating system allows for a wider choice of dissimilar materials, which can have different temperatures and extrusion profiles. You can also use two different sizes of nozzles, which can be useful if you want to speed the infill by using a large nozzle hole while keeping the outline high-quality by using a smaller nozzle. The main disadvantage of a dual-nozzle system is that you need to carefully calibrate and align the two nozzles so that the extrusions line up. Also, the inactive nozzle may ooze plastic or accidentally knock into a previously printed feature, causing misalignment.
- E3D Volcano: The Volcano hot-end allows a high deposition rate of plastic flow so that parts can be built quickly, often with an increased nozzle size (around 0.6mm to 1.2mm, compared with the standard 0.4mm). The main drawback of the Volcano is a tendency to ooze plastic, as you have a reservoir of ready-melted plastic at any time. This drawback can be balanced by faster printing and increased extruder retraction. This design is excellent for printing large parts in which fine details aren’t critical and print time is important.
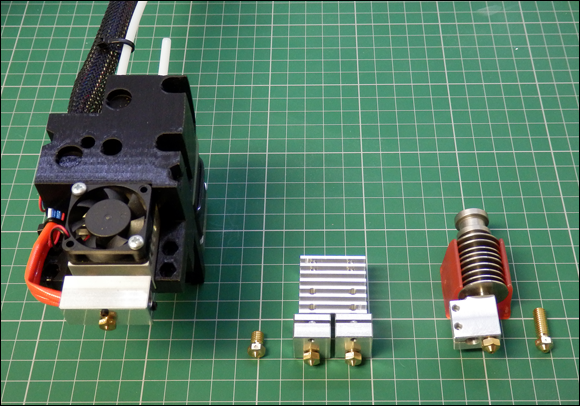
FIGURE 11-18: Specialist and multiple-nozzle RepRap hot-ends: Cyclops (left), Chimera (middle), and Volcano (right).
Hot-end and nozzle design is a lively area of 3D printer development, from tiny-geometry nozzles to specialist materials that reduce wear and improve performance, and a significant design trend to keep up with.
Build plate
The build plate of your 3D printer can be made from various materials. Because many 3D printers move the build plate backward and forward on the Y axis, it’s desirable to make the build plate and any heating elements as lightweight as possible so that the Y axis can move and accelerate quickly.
The build plate is normally a flat surface of wood or aluminum, often with a printed circuit board (PCB) fixed on top. The PCB acts as a heating element when powered by the 3D printer’s electronics. Also required are thermal insulation and a way to level the build plate mechanically. With a heated build plate, you can print with a wider range of materials, but heating the build plate adds a level of complexity to the printing process, and the electronics require a much more powerful power supply.
Many 3D printers allow you to print PLA without a heated build surface. This lower temperature keeps down the overall cost and power requirements of a 3D printer but limits you to printing with a smaller range of materials. You can almost always add a heated bed later if you find that your project requires one.
Instead of printing objects directly to the heating PCB, have a smooth surface to print to, such as a sheet of glass. PLA, for example, sticks to clean glass when heated to 60 degrees C and pops off the glass when it cools.
If you’re not using a heated surface with PLA, one of the best materials to use is 3M Blue Painter’s Tape for Multi-Surfaces (part number 2090). Covering the printing area with this tape allows many prints to be completed before you have to cover the build plate with new tape. The surface finish of the side touching the tape takes on the mottled appearance of the tape, however.
A plain cast-acrylic build surface can also be used for PLA, but be very careful that you fully calibrate the hot-end nozzle’s distance from the acrylic. If the nozzle is too close, the printed object will be almost impossible to remove from the surface after printing.
ABS has the opposite problem: It can have trouble sticking to the build plate. For successful ABS printing, heat the surface to 100 degrees C. In addition, you have to add a layer (usually, Kapton or PET tape) to the heated glass plate to control how the ABS object sticks to the build plate. If you still have problems getting your ABS parts to stick, painting a thinned solution of ABS and acetone on the extra layer (glass, Kapton, or PET) adds bonding strength.
Finding good materials for the print surface is an ongoing quest in home 3D printing. So far, the best material for a 3D printer’s build platform is a sheet of PEI (polyethylenimine) stuck to high-temperature borosilicate glass or the PCB heater plate. This build platform is the most costly type and must be replaced after several hundred models have been printed. No other single surface has been found to be suitable for all thermoplastic filaments. Thus, as a lower-cost alternative, many users opt to fix the glass plate to the PCB heater plate with office binder clips (see Figure 11-19). This method allows quick removal of build-plate surfaces and exchange with other materials if necessary.

FIGURE 11-19: Binder clips allow for quick removal and secure the mirror-glass plate to the heating PCB while printing.
Printing with nylon requires the use of a cellulose-based printing surface. Tufnol (a solid laminated sheet of resin and cloth), wood, or cardboard is often used successfully.
Control electronics
The electronics of your 3D printer are likely to be based on the open-source Arduino platform. Rapid advances in low-cost control electronics have started to filter into use with 3D printers, including the use of 32-bit processors, wireless control and connection to networks, and web-based control and monitoring of print jobs. We look at various RepRap electronics, including their modular parts and connections, in Chapter 13.
The embedded program running on the electronics control board for a 3D printer is called the firmware. It’s quite normal for you to be required to change key settings in this firmware and upload these changes to the electronics.
Software
Another critical part of 3D printing is the software used to design, output (or convert), repair, and then process 3D models into code that the printer understands.
In Chapter 15, we look at the software required for producing 3D objects and explore the software used to process and manipulate 3D models for your RepRap 3D printer. In the following sections, however, we describe a few basic 3D printing applications.
Slic3r
Slic3r (see Figure 11-20), designed by Alessandro Ranellucci, is an open-source conversion tool for 3D model processing for printing. The Slic3r software is available for Windows, Mac, and Linux at http://slic3r.org. This tool is upgraded regularly, which makes it a good choice for the rapid developments in 3D printing. Check the website often to find out what’s new or improved.

FIGURE 11-20: Slic3r.
The main task of any 3D print-slicing program is to slice a model into fine layers and plan paths for the extruder to travel as it deposits the material used on each layer. When the print-slicing program does its job correctly, the 3D printer’s firmware processes this data and controls the movement of the printer’s components to print the finished model.
The slicing program also analyzes the model for printability and then determines whether additional commands are needed — whether to print extra material to help support a bridge, for example. Further, if you elect to use support material, the slicer does its best to add the required breakaway support material automatically, so that you don’t have to change the original model. Thus, a slicing program must apply some intelligence to processing a model for 3D printing. Any overhangs of material, features, and holes that make plastic span sections of bridging may require alterations to the path of the nozzle. This can be done by changing the perimeter outlines of the object or detecting when solid layers that go in a specific direction must bridge a gap (span across back and forth) in an object to keep the print strong and appealing in its final appearance.
Simplify3D
Simplify3D (see Figure 11-21) is a Slic3r alternative. It’s not open-source and requires the purchase of a user license, but it’s very well supported in the 3D-printing community. Many machine, print, and material profiles are available and shared by users and manufacturers of desktop 3D printers. Regular updates and improvements ensure that Simplify3D keeps up with trends and advancements in 3D printer design (www.simplify3d.com).

FIGURE 11-21: Simplify3D user interface.
Cura
Cura (see Figure 11-22) is another option for processing and slicing 3D models. Cura is an open-source program developed and maintained by Ultimaker and David Bramm along with many members of the 3D-printing community. Custom versions of Cura are included with many 3D printers as a starting point for model processing. Ultimaker is the primary supporter and user of Cura, which ensures that the software receives ongoing development and is shared with anyone who wants to use the platform. Like Simplify3D and Slic3r, Cura can store profiles of machines, materials, and common print configurations to make choosing easier; go to https://github.com/Ultimaker/Cura.

FIGURE 11-22: Cura slicing software.
RepRap 3D printers use a control language called G-code, as do commercial 3D printers that cost upward of $50,000. G-code is an industry-standard set of commands and codes used to script the path that a 3D printer (or even a CNC milling machine) uses to produce a 3D object. Thus, all the software tools used for RepRap can also be used for high-end machines. The difference with RepRap is that the further development of G-code is highly dynamic; new codes and commands can be added to the G-code set as the technology develops. Many slicing programs exist for 3D printing, but Slic3r is a favorite among RepRap users all over the world. Other slicing programs that you may want to investigate include Repetier host and Kisslicer.
Netfabb
Netfabb is a powerful commercial software package for many aspects of 3D file manipulation. It’s not open-source, but a basic version that’s still amazingly functional is available for free download at https://www.netfabb.com.
RepRap users favor Netfabb Basic for checking model files before sending them to the slicing program. Netfabb allows you to rotate, scale, and modify (or fix) your object models. Loading a model into Netfabb before loading it into Slic3r enables you to ensure that the model looks 3D-printable, that it’s in the correct orientation, and that it prints at the size you expect and require.
Netfabb Basic is available for Windows, Mac, and Linux. A cloud-based version is available and is often even better at fixing issues with 3D model meshes that contain errors or refuse to slice correctly.
Professional versions along with specific packages of Netfabb tailored to certain 3D printers (including the Ultimaker) are available to buy.
Pronterface
Pronterface is an open-source RepRap user interface for controlling your 3D printer and sending G-code files off to print. The complete Printrun package of software was developed by Kliment Yanev and is widely used in the RepRap home 3D-printing community.
The Printrun package is available for Windows, Mac, and Linux at http://koti.kapsi.fi/~kliment/printrun.
Pronterface is an essential program for easy use of your 3D printer. In Chapter 15, we use Pronterface to control, set up, and calibrate a 3D printer, so it’s well worth downloading in preparation.
Pronterface is a user interface for control of your 3D printer. You can link Slic3r into Pronterface, which allows you to load models, slice them, and immediately transfer the data to your 3D printer and start a print sequence.
Repetier-Host
Repetier-Host is a free alternative to Pronterface that provides a control panel for your 3D printer. It can also be linked to Slic3r.
Repetier-Host is available for Windows, Mac, and Linux, and can be downloaded at https://www.repetier.com/downloads.
ReplicatorG
ReplicatorG is another well-established open-source package for both model slicing and 3D printer control. It’s widely used by some closed-source manufacturers of 3D printers but has yet to attain wide popularity among RepRap users and developers.
ReplicatorG is available for Windows, Mac, and Linux at http://replicat.org.