CHAPTER 5
Capture It! with 123D Catch
MODELING ISN’T LIMITED TO conventional programs with drawing and editing tools. Modeling can also be done with photographs. In this chapter our tools will be a camera and on-line reality capture software. The result is called a “capture” or “photoscene.” What it is, is a photorealistic or phototextured model, a mesh model covered with photos to make it closely resemble the subject. If you want to make a model that’s easily recognized as a specific person or object, as shown in Figure 5-1, Autodesk’s 123D Catch apps are for you.

Figure 5-1 A capture of a sculpture at the Asian Art Museum in San Francisco. Courtesy Christian Pramuk, Autodesk.
The technical name for reality capture is photogrammetry, a technique that takes multiple, overlapping photos of a subject and uploads them to a server. Processing software stitches them together by finding and matching the photos’ common features and calculating spatial distances between them. The result is a colored, textured mesh model that you can download as a .3dp or .obj file (the latter being 3D-printable). Think of this as 3D scanning.
Reality capture is the most efficient way to model whole environments, such as a room, backyard, or city. It enables you to start with an existing product instead of a blank slate, making the design process faster and more efficient. Professional-level software such as Autodesk Recap is used in diverse fields. Real estate agents capture homes for client presentations. Archeologists duplicate artifacts by capturing them, which avoids the damage caused by physical molds. Museums upload captures of their collections for the online world to admire. Town planners capture whole neighborhoods to study. Cartographers capture terrain to make maps. Such projects may use sophisticated methods such as attaching a GoPro camera to a quadcopter (drone) to take thousands of photos. Entrepreneurs have used reality capture software to produce whimsical products such as a chocolate mold of a head, a family’s faces on chess pieces, a pet’s likeness on a candy tablet dispenser, the bride and groom on a cake topper, and assets for video games. All of these tasks would be difficult or impossible to do with conventional modeling programs.
What Is 123D Catch?
123D Catch is an entry-level reality capture program that lets you explore the potential of this modeling method. It has three steps: capture, process, and share. Capture is photo-taking, and is done with a smartphone, iPad, or digital camera. Process is the online stitching into a photo scene. An Internet connection is required to upload the photos (collectively called the photoset), but the processing is done on Autodesk’s servers. Share is sending the finished file to My Models, where you can post it in the 123D Gallery or keep it private. You also download the .3dp and .obj files from there.
You can access Catch at www.123dapp.com/catch. It has three platforms: one for the iPhone, iPad, or Android devices (with links to the App Store or Google Play); one for the web; and one for a PC.
![]() iPhone/iPad/Android app This app captures the subject with the phone or tablet’s built-in camera, and directly uploads the photoset to Autodesk’s servers for processing. When the process is finished, you have the option to save the file to My Models or delete it. This app has no tools for working on a file.
iPhone/iPad/Android app This app captures the subject with the phone or tablet’s built-in camera, and directly uploads the photoset to Autodesk’s servers for processing. When the process is finished, you have the option to save the file to My Models or delete it. This app has no tools for working on a file.
![]() Web app This app makes captures by uploading photos from your computer to the cloud, or 123D Catch servers. It can import small Catch .3dp files and has tools for making simple edits and repairs. Use Google’s Chrome browser to run the web app because other browsers either won’t work or won’t work optimally (some tools may not function properly). Chrome will prompt you to download a plugin for repair functionality.
Web app This app makes captures by uploading photos from your computer to the cloud, or 123D Catch servers. It can import small Catch .3dp files and has tools for making simple edits and repairs. Use Google’s Chrome browser to run the web app because other browsers either won’t work or won’t work optimally (some tools may not function properly). Chrome will prompt you to download a plugin for repair functionality.
![]() Desktop app This app is installed on your computer. It makes captures by uploading stored photos to Autodesk’s servers. It can import larger Catch .3dp files than the web app can. It has different tools than the web app, too; it can scale the capture to its actual dimensions (captures have no scale when made), change its mesh density, manually stitch more photos in, create an animation file, and more. You can bounce a small file between the web and desktop apps to utilize both their features.
Desktop app This app is installed on your computer. It makes captures by uploading stored photos to Autodesk’s servers. It can import larger Catch .3dp files than the web app can. It has different tools than the web app, too; it can scale the capture to its actual dimensions (captures have no scale when made), change its mesh density, manually stitch more photos in, create an animation file, and more. You can bounce a small file between the web and desktop apps to utilize both their features.
We’ll explore these apps in the following sections.
Catch on the iPhone/iPad

To begin, launch the app. We’ll use an iPad to make the capture for this example.
You don’t have to sign in yet, but if you do, the middle part of Figure 5-2 shows what you’ll see. It’s your feed, and the models of Catchers you follow will appear there. When you’re not logged in, featured models appear. Tap the bars on the left to open the screen shown on the left. Read its options. The Home option takes you to your 123D account online. Tap the plus sign on the right to open the screen on the right. The large white plus sign starts a new capture. Tap it to do just that. Your iPad screen will look like Figure 5-3.

Figure 5-2 The iPad screen when Catch is launched and you’re logged in to your 123D account. Tap the bars to open the left screen; tap the plus sign to open the right screen. Tap the large white plus sign to start a capture.

Figure 5-3 The Catch screen
The large white circle is the camera button. The wheel in the lower-left corner shows your movement around the subject, which can help you maintain a consistent distance between shots. Toggle it off, if you want, by tapping the smaller wheel. The check mark at the top finishes the catch.
Our subject for this example is the little cottage shown in Figure 5-4. It’s on a table whose location enables movement in a complete circle around it. The surface under the cottage is gift paper that was selected for its color/pattern contrast with the cottage. Figure 5-5 shows it as seen through the iPad.
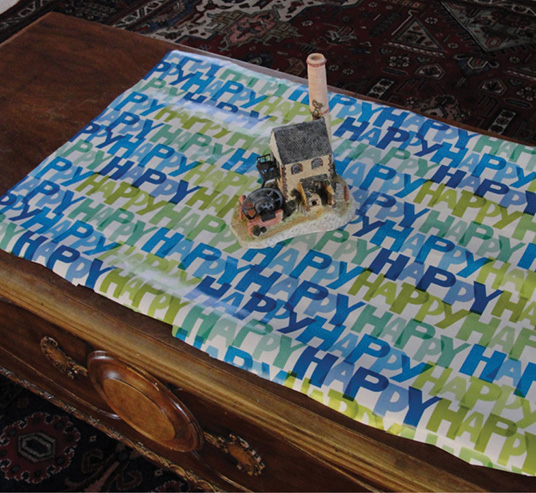
Figure 5-4 This cottage is the subject of our capture. The paper under it was chosen for its contrast with the cottage’s colors.

Figure 5-5 The cottage seen though an iPad.
The app gives feedback during the process to help you shoot good photos. For instance, it tells you if a photo is badly exposed and asks if you want to delete or reshoot. Reshooting superimposes the existing photo on the frame so you can reshoot from the same location. When you’re finished capturing the subject, tap the check mark in the upper-right corner. The photoset will appear (see Figure 5-6). Review the thumbnails for overall lighting consistency, and then review each one for focus and lighting. Delete or reshoot any photos that are blurry, too dark, or too light. Also delete ones with large glare spots, even if the spots are in the background. Keep the number of photos to 70 or fewer. Tips for photographing the subject are at the end of this chapter.

Figure 5-6 The photoset appears after you click the check mark. Review it for lighting and focus.
Submit the Photoset
When the photoset is in order, tap Submit in the upper-right corner. You’ll be prompted to sign in to your Autodesk account, if you aren’t already. The app will search for a Wi-Fi connection. If it can’t find one, it won’t use your data plan until you tap the Go Ahead button. If you’re worried about inadvertently using the data plan, you can disable it in the iPad’s settings menu (see Figure 5-7).

Figure 5-7 Catch’s access to your data plan can be disabled in the iPad’s settings.
Processing generally takes less than 30 minutes, depending on how busy the servers are and where in line your capture is. The iPad’s inactivity lock mode doesn’t affect transmission. You’ll get status updates, as shown in Figure 5-8, and a message will appear on the app (and on the other Catch apps as well) when the processing is finished (see Figure 5-9). Open the message to see the capture. It will display in a 3D viewer and may be upside down, at a weird angle, and with bits (or lots) of background floating around it. That background can be removed in Catch’s web or desktop app. Straighten out the capture by pinching and dragging it. Ideally, it will be clean, hollow, complete on all sides, and look like the subject.

Figure 5-8 Updates keep you informed of the processing status.

Figure 5-9 A notice appears when the capture is finished.
At the bottom of the screen is a graphic for messaging or e-mailing a link to the capture, as shown in Figure 5-10, and a dialog box asking if you want to keep or discard it. If you tap “keep” (the check mark), you’ll be asked to frame the capture (pinch and drag until it looks suitable for display). Tap Publish, and off it goes to your 123D account (see Figure 5-11). When your capture gets there, you’ll be asked to name, describe, and tag it (see Figure 5-12). You can also e-mail yourself a link to it. Finally, tap Share. Despite its name, Share just saves the capture to My Models, where you can opt to display it in the 123D Gallery or keep it private.

Figure 5-10 You can e-mail or message a link to the capture here, as well as keep or discard it.

Figure 5-11 Tap “Publish” to send the capture to My Models in your 123D account.

Figure 5-12 Name, label, and share the model. E-mail yourself a link to it, if you wish.
Know that you can go to the feed screen at any time. Tap the bars to access the left menu, tap Home to view your saved capture, and then tap the capture (or any other one there) to load it (see Figure 5-13).
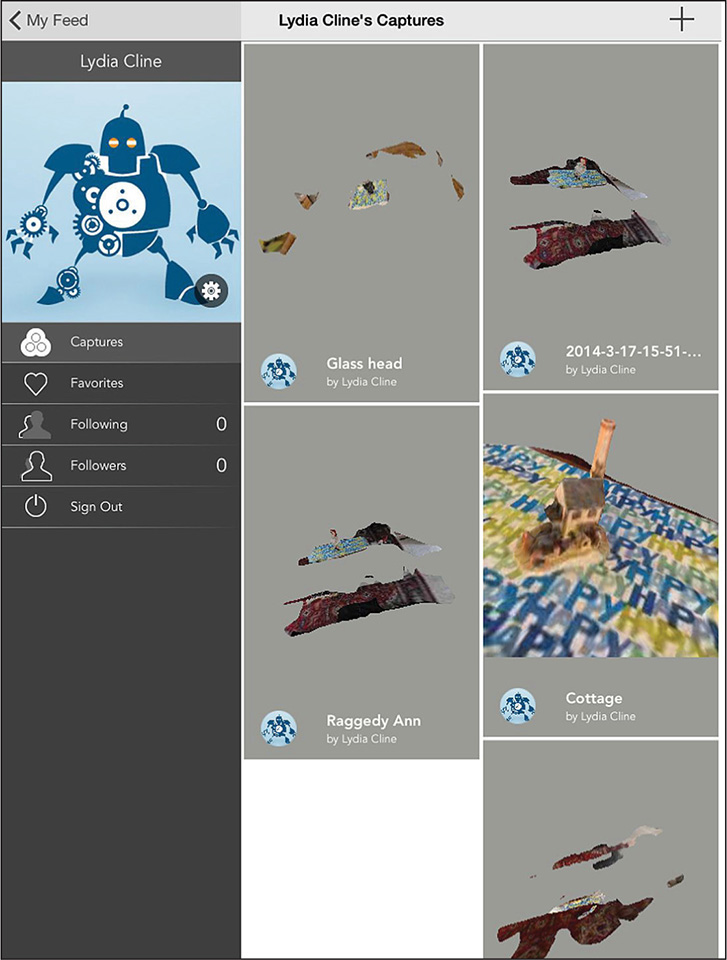
Figure 5-13 Access all captures through the left menu bar.
Download the Capture
To download the capture, go to 123Dapp.com, sign in to your account, and click My Models. Find the model, click the Edit/Download button (see Figure 5-14), and select Download 3D Models. You’ll get a ZIP file containing the model in .obj and .3dp formats (see Figure 5-15a). Extract the contents and then rename the .obj and .3dp filenames with more descriptive ones. You’ll see some other files in the folder; keep everything because Catch references these files when opening the capture. The photoset doesn’t download, because Autodesk stores it on their servers and Catch references it there. Sharing the .3dp file with others requires them to have Catch installed, too, and their app will reference the stored photoset.
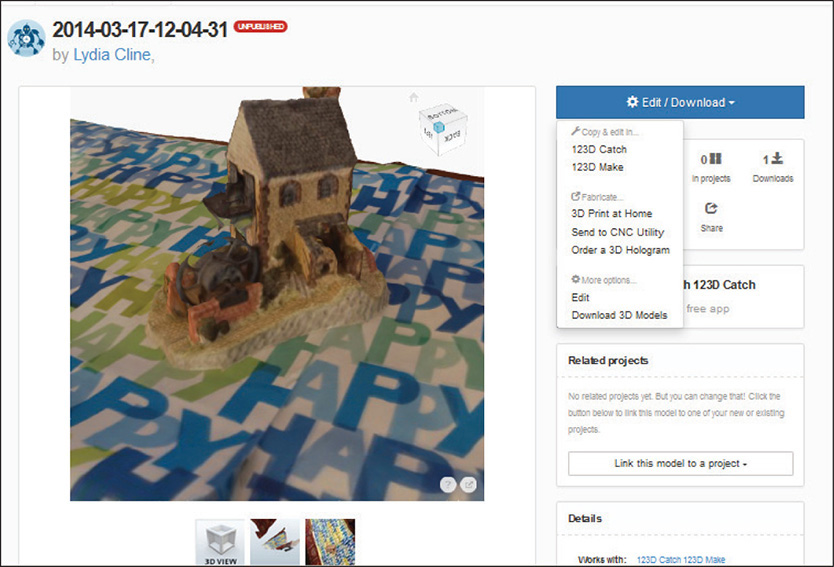
Figure 5-14 At My Models, click the model and then click Edit/Download.
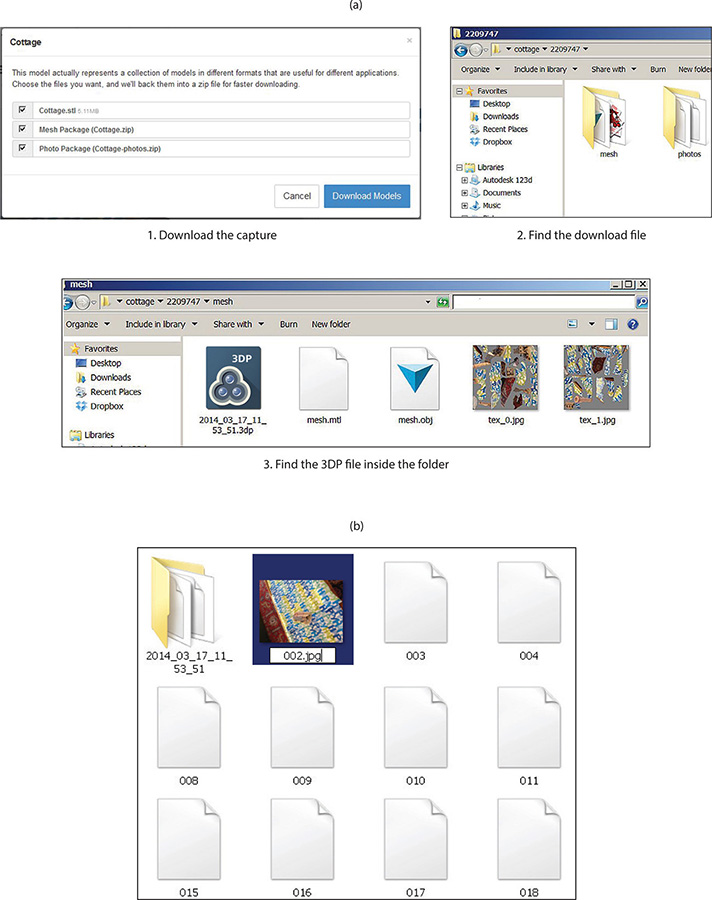
Figure 5-15 (a) The model downloads as a ZIP package containing .stl and .3dp files, which you can find in the “mesh” folder. (b) The obj folder contains the JPG files, but you may have to restore the extension.
Check “Photo Package” to see the downloaded photos. Sometimes the file extension gets stripped off during the download (a glitch), and the JPGs will look like Figure 5-15b. If you want to restore the extension so that you can open a file, click the filename, type .jpg at the end (include the period), and the file will appear correctly.
Troubleshoot the iPhone/iPad App
You may encounter some problems with the mobile app. A common one is the photoset getting stuck in transmission. If over two hours have passed and the capture is still uploading, it will probably never upload, even if it still says “transmitting.” Here are some suggestions:
![]() Tap the Submit button again.
Tap the Submit button again.
![]() Do a small catch of 10 photos and submit them. This might prompt the first one to resume uploading.
Do a small catch of 10 photos and submit them. This might prompt the first one to resume uploading.
![]() Log out and then back in to your 123D account.
Log out and then back in to your 123D account.
![]() Do a hard reboot of the iPad/iPhone.
Do a hard reboot of the iPad/iPhone.
![]() Restart or reinstall the app.
Restart or reinstall the app.
![]() If you’re on cellular data, switch to Wi-Fi.
If you’re on cellular data, switch to Wi-Fi.
![]() Upload the photoset through the web or desktop app.
Upload the photoset through the web or desktop app.
![]() If you get an error message when trying to download the capture from My Models, launch the Catch web app and download the model from inside it.
If you get an error message when trying to download the capture from My Models, launch the Catch web app and download the model from inside it.
If you have to reboot, restart, or reinstall, you can find your images in your device’s My Photo Stream. You won’t be able to resubmit them through the mobile app, but you can do so through the web or desktop app.
The Catch Web App
If you need to clean, repair, or change the model, you can so in Catch’s web or desktop app, in Meshmixer, or in another modeling program such as Autodesk Mudbox, Maya, or 3ds Max.
To access the Catch web app, point the Google Chrome browser to www.123dapp.com/catch and click Launch 123D Catch online (see Figure 5-16a). A splash screen will appear (see Figure 5-16b); if you don’t see everything shown in Figure 5-16b, maximize the screen. You can make a new capture by clicking the Start a New Project button to upload photos from your computer. However, we’re not making a new capture, so just click the X in the splash screen’s upper-right corner to expose the web app behind it (see Figure 5-16c).
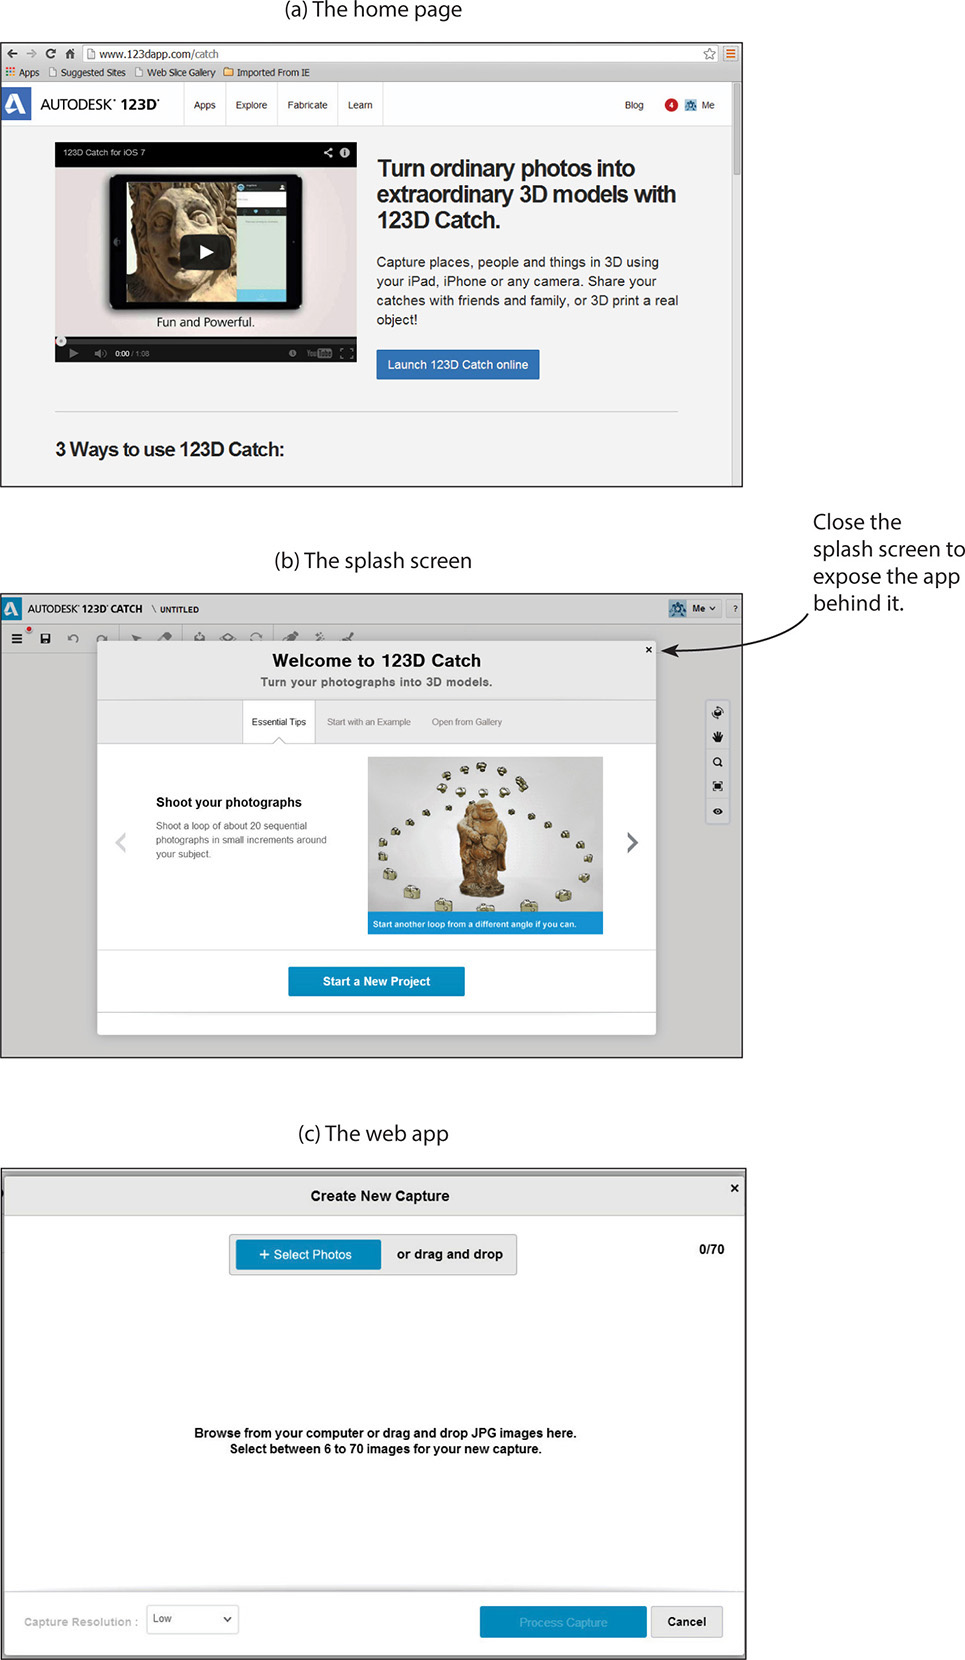
Figure 5-16 With Catch’s Web app you can submit a new capture or work on an existing one.
The Web App Interface
Figure 5-17 shows the workspace in the web app’s interface. It contains Sign In and Help menus as well as a menu bar, work canvas, and navigation panel.
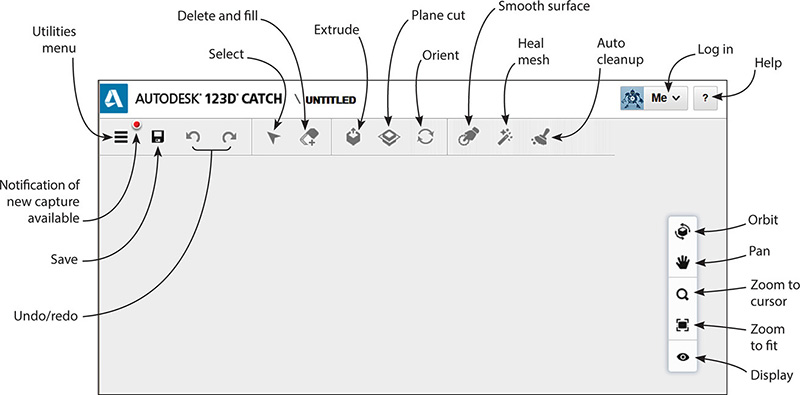
Figure 5-17 The Catch Web app interface
Sign In and Help
The Sign In and Help menus appear in the upper-right corner (see Figure 5-18). Signing in accesses your 123D account. You need to be online to utilize Help because there is no local Help.

Figure 5-18 The Sign In and Help menus
Menu Bar
The menu bar contains the Utilities menu (see Figure 5-19) and tools. The red dot means that new captures await in My Projects. Click the bars to open the utility menu. It contains the following items:
![]() New This item creates a new model (the same thing you could have done from the splash screen).
New This item creates a new model (the same thing you could have done from the splash screen).
![]() Open This item brings up a browser (see Figure 5-20) from which you can perform the following tasks:
Open This item brings up a browser (see Figure 5-20) from which you can perform the following tasks:
• Import an existing capture from your online 123D account to work on. After it loads, you’ll be asked to name it as a separate file.
• Open a capture from the 123D gallery to work on.
• Open a sample project made by the 123D team to work on.
• Import an existing capture from your computer.
![]() Edit This item lets you add or subtract pictures from the capture’s photoset. A new capture is then created, which you’ll name separately, as shown in Figure 5-21. As an aside, note all the background that got captured with the subject.
Edit This item lets you add or subtract pictures from the capture’s photoset. A new capture is then created, which you’ll name separately, as shown in Figure 5-21. As an aside, note all the background that got captured with the subject.
![]() Save This item preserves all work done on the open copy.
Save This item preserves all work done on the open copy.
![]() Save a Copy This item creates a separate, differently named copy of the file, and makes it the open file.
Save a Copy This item creates a separate, differently named copy of the file, and makes it the open file.
![]() 3D Print This item sends the capture to a home 3D printer or an online 3D printing service.
3D Print This item sends the capture to a home 3D printer or an online 3D printing service.
![]() Send To This item sends the capture to 123D Make or to the 123D CNC utility.
Send To This item sends the capture to 123D Make or to the 123D CNC utility.
![]() Place an Order This item sends the capture to third-party service.
Place an Order This item sends the capture to third-party service.
![]() Export STL This item turns the capture into an .stl file and saves it on your computer.
Export STL This item turns the capture into an .stl file and saves it on your computer.
![]() Export OBJ This item turns the capture into an .obj file and saves it on your computer.
Export OBJ This item turns the capture into an .obj file and saves it on your computer.
![]() Project Info This item lets you save the capture to My Projects in your 123D account, where you’ll describe it, tag it, and set it as public or private.
Project Info This item lets you save the capture to My Projects in your 123D account, where you’ll describe it, tag it, and set it as public or private.
![]() Share Project This item publishes the capture to the 123D Gallery.
Share Project This item publishes the capture to the 123D Gallery.
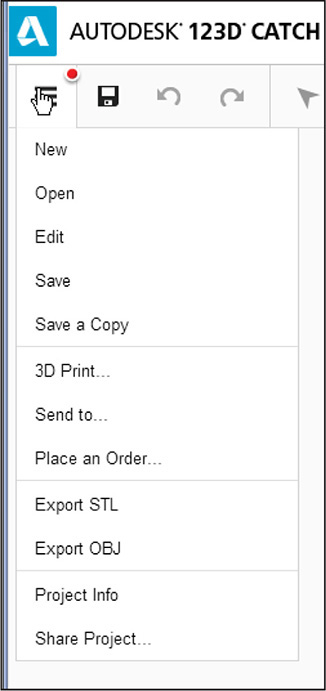
Figure 5-19 The Utilities menu

Figure 5-20 Options on the Open submenu

Figure 5-21 Click Edit on the Utilities menu to add or subtract photos to/from an existing capture. This results in a new, separately named capture.
Work Canvas
The work canvas is the large gray space where the capture appears and is viewed and edited. At its top is a tool bar, which we’ll discuss shortly, and on the right side is a navigation panel.
Navigation Panel
The navigation panel, shown in Figure 5-22, appears on the right side of the work canvas. It contains the following tools, which let you view and display the model in different ways:
![]() Orbit This tool rotates you, the viewer, around the capture at all angles and heights. You can also orbit by holding the right mouse button down and dragging the mouse.
Orbit This tool rotates you, the viewer, around the capture at all angles and heights. You can also orbit by holding the right mouse button down and dragging the mouse.
![]() Pan This tool slides the capture around the workspace. You can also pan by holding the mouse’s scroll wheel down.
Pan This tool slides the capture around the workspace. You can also pan by holding the mouse’s scroll wheel down.
![]() Zoom to Cursor This tool enlarges your view of the model and centers it on the cursor. Zoom in and out (that is, make the model appear larger and smaller) by rotating the mouse’s scroll wheel.
Zoom to Cursor This tool enlarges your view of the model and centers it on the cursor. Zoom in and out (that is, make the model appear larger and smaller) by rotating the mouse’s scroll wheel.
![]() Zoom to Fit This tool fills the screen with the whole capture.
Zoom to Fit This tool fills the screen with the whole capture.
![]() Display This tool lets you view the capture as “material only” or “material and outlines.” You can also view it in Orthographic mode, meaning parallel lines don’t converge like in the default perspective mode.
Display This tool lets you view the capture as “material only” or “material and outlines.” You can also view it in Orthographic mode, meaning parallel lines don’t converge like in the default perspective mode.

Figure 5-22 The navigation panel, with the Display icon’s options shown
When a capture is loaded, a ViewCube appears (the box on top of the panel). This shows the capture’s orientation on the work plane. Click the left mouse button on the ViewCube and drag to rotate it; you’ll see that the capture rotates as well. Clicking the ViewCube’s planes displays the capture from the six sides (top, bottom, front, back, left, and right). These are perspective views, though (that is, they’re 3D drawings with line convergence). Set the Display icon to Orthographic Mode to make these views true orthographic ones (2D drawings with no line convergence). This setting will remain until you change it back.
Import the Cottage .3dp File
Let’s import the .3dp file of the cottage from our computer and work on it. At the Utility menu, click Open/Import and then navigate to the .3dp file, as shown in Figure 5-23a.

Figure 5-23 (a) Navigate to the .3dp file of the cottage that was downloaded to the computer, and import it into the web app. (b) The capture displayed with the Materials and Outlines option, showing its standard density mesh.
I’ve temporarily chosen the Materials and Outlines option to show the mesh (see Figure 5-23b). There are three densities, which we’ll talk about later; this is the middle one, called “standard.” It’s likely there will be numerous holes in the mesh that will need repairing before the capture can be 3D-printed.
Edit and Repair with the Web App
In order to edit and repair the capture, we need to know what the menu bar’s tools can do. Hover over each one to see an info tip describing it. When a tool is selected, it turns black and a bar with relevant adjustment options appears at the bottom of the screen.
The Select Tool

This tool highlights the mesh for editing. It can be applied as a paint spot or lasso (see Figure 5-24). Click the mouse onto the capture to paint-select; click off the model to lasso-select. You can also move the slider on the bottom bar all the way to the left to make a lasso. Moving it to the right enlarges the paint spot. To deselect a spot, hold the SHIFT key down and click the Select tool on it. Press ESC to deselect everything.

Figure 5-24 With everything inside the lasso or paint spot selected, click the Invert Selection icon to select everything outside the lasso or paint spot.
Everything inside the lasso or paint spot will be edited. Delete the selection by clicking the Delete button on the adjustments bar. Click the Invert icon to select everything outside the lasso or paint spot. This enables you to quickly remove most extraneous material. The Delete button doesn’t appear in Orbit mode, only in Select mode (this is when the arrow icon is highlighted). Sometimes a selection takes some time to apply (maybe five or ten seconds).
You can’t perform fine selecting in this app. Zooming in closely to select background often results in part of the capture getting selected with it (see Figure 5-25). The paint spot finesses better than the lasso, but it, too, may select more than you want. The Smooth Selection Boundary icon next to the Invert Selection icon smooths the boundary of the selection.
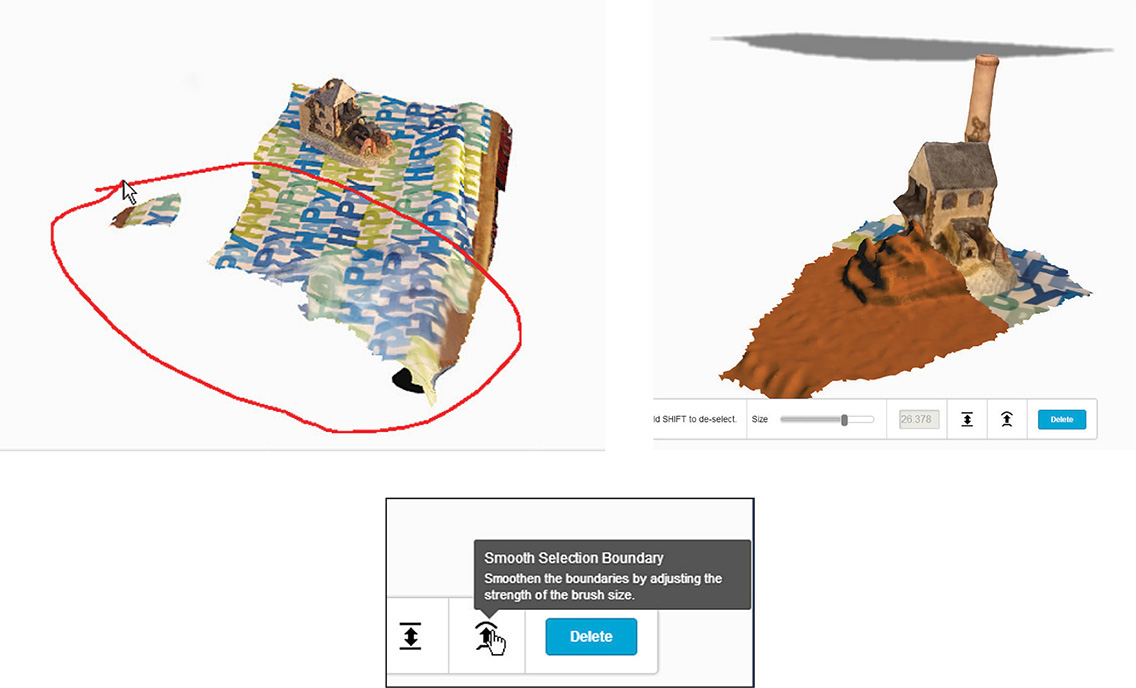
Figure 5-25 After you remove most of the surface or background, fine-tuning with the Select tool becomes difficult, due to it selecting more than you may have wanted.
The Delete and Fill Tool

This tool deletes a selected part of the mesh and then fills it with a generic, smoothed mesh. This is useful to remove, or “brush away,” an unwanted part of the catch.
The Extrude Tool
This tool gives volume to a selected surface (see Figure 5-26). Select the surface and then click the tool. The extrusion will automatically occur. Adjust the extrusion length with the slider or by typing a number. Click the direction icon in the bar for options to extrude along a specific axis.
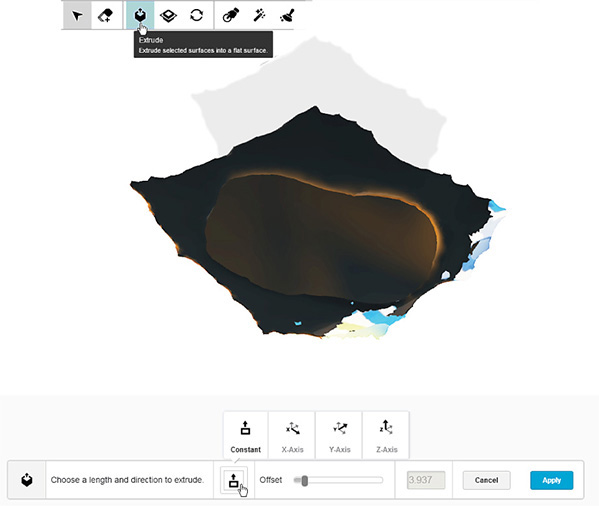
Figure 5-26 The Extrude tool pulls a selected surface out.
The Plane Cut Tool

This tool cuts through the whole capture at a location of your choice and removes a portion. When you click the Plane Cut tool onto the capture, the cutting plane, an arrow, and round button appear (see Figure 5-27). Drag the arrow up and down to move the plane up and down. Drag the button to rotate the plane. You can orient the plane horizontally, vertically, or any angle in between. When the arrow points up, everything below the cutting plane will be removed. When the arrow points down, everything above the cutting plane will be removed. When the arrow is angled, the cutting plane follows the contours of the capture. The spot above the cottage in the third graphic is a glitchy shadow (it’s supposed to define the floor of the model space, but is inverted).

Figure 5-27 The Plane Cut tool cuts through the capture and removes the portion opposite the arrowhead.
The Orient Tool

This tool rotates the capture. One of Catch’s built-in examples is demonstrated in Figure 5-28. Click the Orient tool. The whole capture selects (note the thick line outline), and a plane and handle appear. Click the mouse on the handle to select it (it will turn yellow). Then use that handle to rotate the model. Click anywhere on the work canvas to set the new position.

Figure 5-28 The Orient tool rotates the model.
The Smooth Surface Tool
Select a size for this tool and then slide it over a ripply mesh to smooth it (see Figure 5-29). This is useful when you want to extrude that portion of the mesh to create a smooth pedestal base.

Figure 5-29 The ripply mesh on the left was smoothed by rubbing the Smooth Surface tool over it.
The Heal Mesh Tool
Select the whole capture and then click this tool onto it. Heal Mesh will automatically searches for holes. Pins appear at small holes so you can heal them individually (see Figure 5-30a). You can also fill all holes at once, as the second graphic in Figure 5-30b shows. Remember to select the capture before selecting the tool.

Figure 5-30 The Heal Mesh tool searches for holes and lets you fix them individually or all at once.
The Auto Clean-Up Tool

Select the whole capture or a portion of it and then click this tool. It removes disconnected vertices and edges of the mesh that are in the selection.
When you are finished with editing and repairing your capture, save it to My Projects.
Troubleshoot the Web App
Being new and constantly under development, the web app can be glitchy. You may have problems loading it or importing the capture. Here are some common problems and possible solutions:
Problem:
![]() The web app won’t load.
The web app won’t load.
Possible solutions:
![]() There are many hardware, browser, and operating system combinations; yours may not be supported. Catch uses Windows and Mac platforms and needs a browser that supports WebGL. Check whether WebGL is turned on by typing chrome://gpu/ in your Chrome browser. If WebGL is reported as unavailable, check the “Problems Detected” section for why.
There are many hardware, browser, and operating system combinations; yours may not be supported. Catch uses Windows and Mac platforms and needs a browser that supports WebGL. Check whether WebGL is turned on by typing chrome://gpu/ in your Chrome browser. If WebGL is reported as unavailable, check the “Problems Detected” section for why.
![]() The graphics card driver and operating system are not up to date. When you update the operating system, update the app (reinstall it).
The graphics card driver and operating system are not up to date. When you update the operating system, update the app (reinstall it).
![]() Catch uses the Chrome, Safari, and Firefox browsers, but Chrome works the best. However, when it (or another browser) is updated, sometimes a piece of code that’s needed to run the app gets inadvertently changed or deleted. Try a different browser.
Catch uses the Chrome, Safari, and Firefox browsers, but Chrome works the best. However, when it (or another browser) is updated, sometimes a piece of code that’s needed to run the app gets inadvertently changed or deleted. Try a different browser.
Problem:
![]() The capture doesn’t load (see Figure 5-31).
The capture doesn’t load (see Figure 5-31).
![]() The capture loads, but crashes shortly after.
The capture loads, but crashes shortly after.
![]() The plugin crashes.
The plugin crashes.
![]() The page becomes unresponsive.
The page becomes unresponsive.
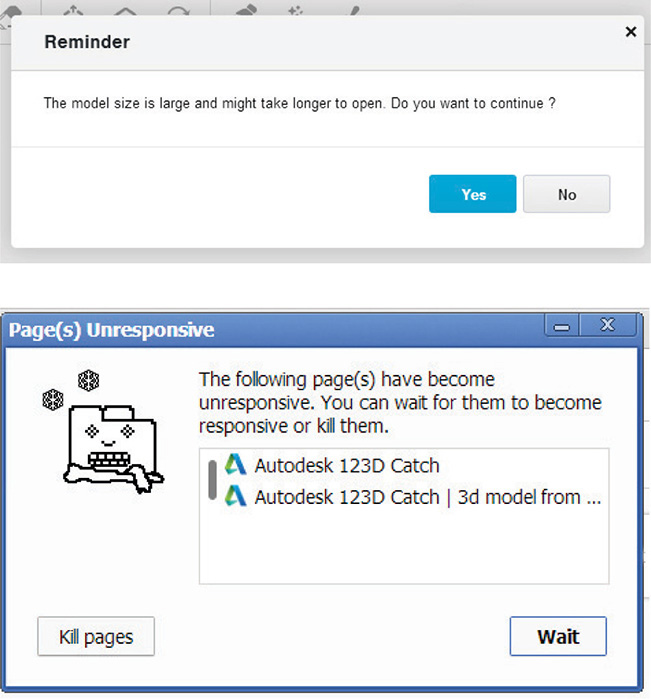
Figure 5-31 Error messages that may appear.
Possible solutions:
![]() Work on the capture in 123D Meshmixer instead.
Work on the capture in 123D Meshmixer instead.
![]() The web app works well on small files (“small” being arbitrary, depending on the number of photos, resolution, and even the subject). Remove photos from the photoset to make the capture smaller. However, know that this does affect its quality.
The web app works well on small files (“small” being arbitrary, depending on the number of photos, resolution, and even the subject). Remove photos from the photoset to make the capture smaller. However, know that this does affect its quality.
![]() Open one of the sample captures (Utility menu | Open | Open an Example), and practice on it if your goal is just to learn how the app works.
Open one of the sample captures (Utility menu | Open | Open an Example), and practice on it if your goal is just to learn how the app works.
The Catch Desktop App
The desktop app’s functions are different from the web app’s functions. It is also more stable and can handle larger files. That said, be aware that like the other apps, it iterates frequently, glitches are fixed as they’re brought to the developers’ attention, and some legacy functions hang around from the original Photofly beta even though they no longer work (such as “splats” in the View/Display menu).

We’ll make a new capture with this app, delete the background, scale it, stitch photos change the origin, make an animation, and export the capture into a different format. To begin, download the desktop app at www.123dapp.com/catch. Install and click the icon to launch the app.
The subject of our new capture is the glass mannequin head shown in Figure 5-32. Glass must be covered with an opaque material in order to capture it. I dampened the head and patted flour all over it. Then I took 40 photos with a digital camera (see Figure 5-33) and copied them to a desktop computer.

Figure 5-32 On the left is the glass mannequin head; on the right, it’s covered in flour to make it opaque enough to capture.
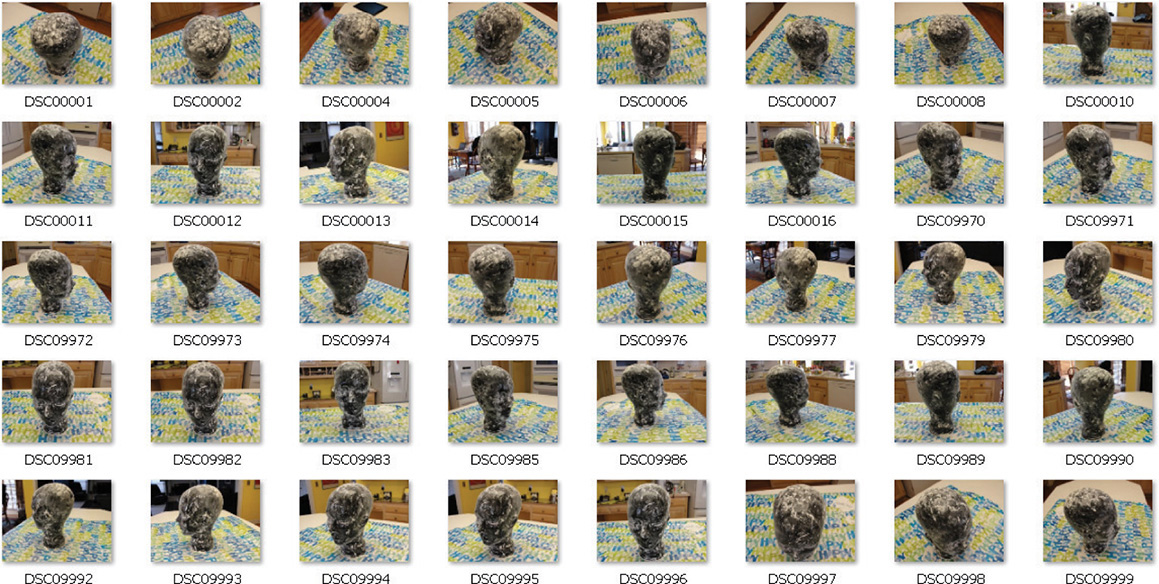
Figure 5-33 The photoset of the glass head
Click Get Started. You’ll be prompted to log into your 123D account. Log in and then navigate to the photoset. Drag a window around the photos to select them, and click Open (see Figure 5-34).
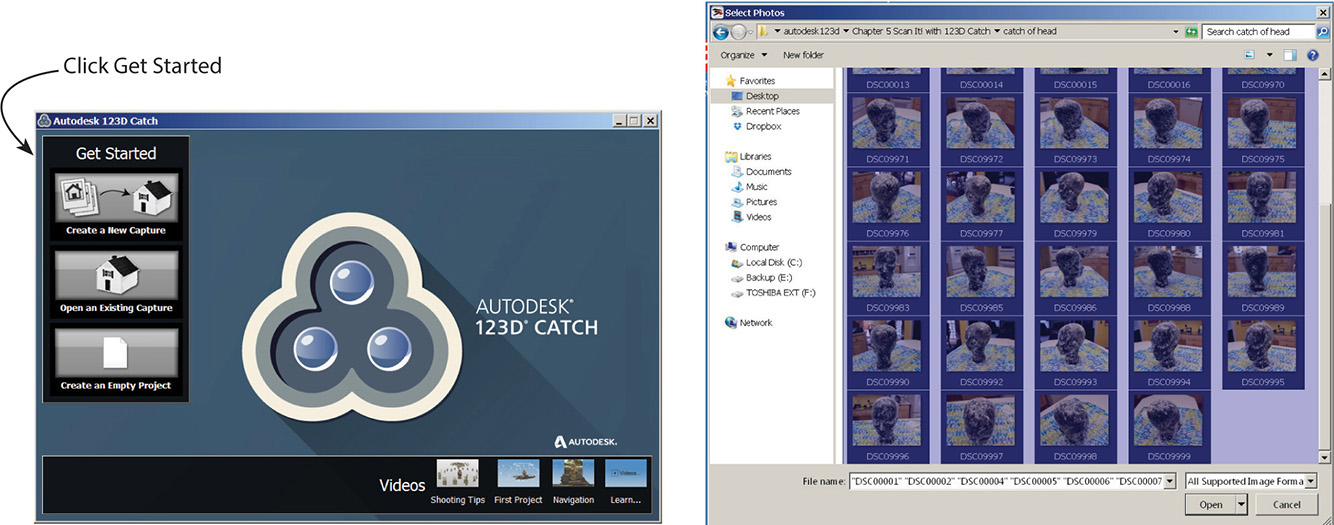
Figure 5-34 Launch Catch, click Get Started, browse to the glass head photoset, and select and import it.
Name and describe the capture. You’ll be asked if you want to wait for it or be e-mailed when it’s ready. If you choose e-mail, the app will quit and you’ll be sent a download link to the .3dp file when it’s finished. If you choose to wait, you’ll stay online. The capture will appear in a viewer when finished, and the .3dp file will be saved in the same folder as the photoset. Make your choice, click the green check mark, agree to the terms of service, and you’re off (see Figure 5-35). If you want an .stl file of it, go to your online 123D account, click My Models and find the capture. Open it and click the Edit/Download button to download an .stl, as well as .obj and .3dp files.

Figure 5-35 Name and describe the glass head capture. Then click the green check mark to start processing it.
Preserve a local copy of the .3dp file because there are no undo and redo functions in the desktop app. Then click it to open it in the Catch desktop app (see Figure 5-36). The next time you launch the app, recently opened files will appear as thumbnails at the bottom of the screen. You can click them to quickly open the file.
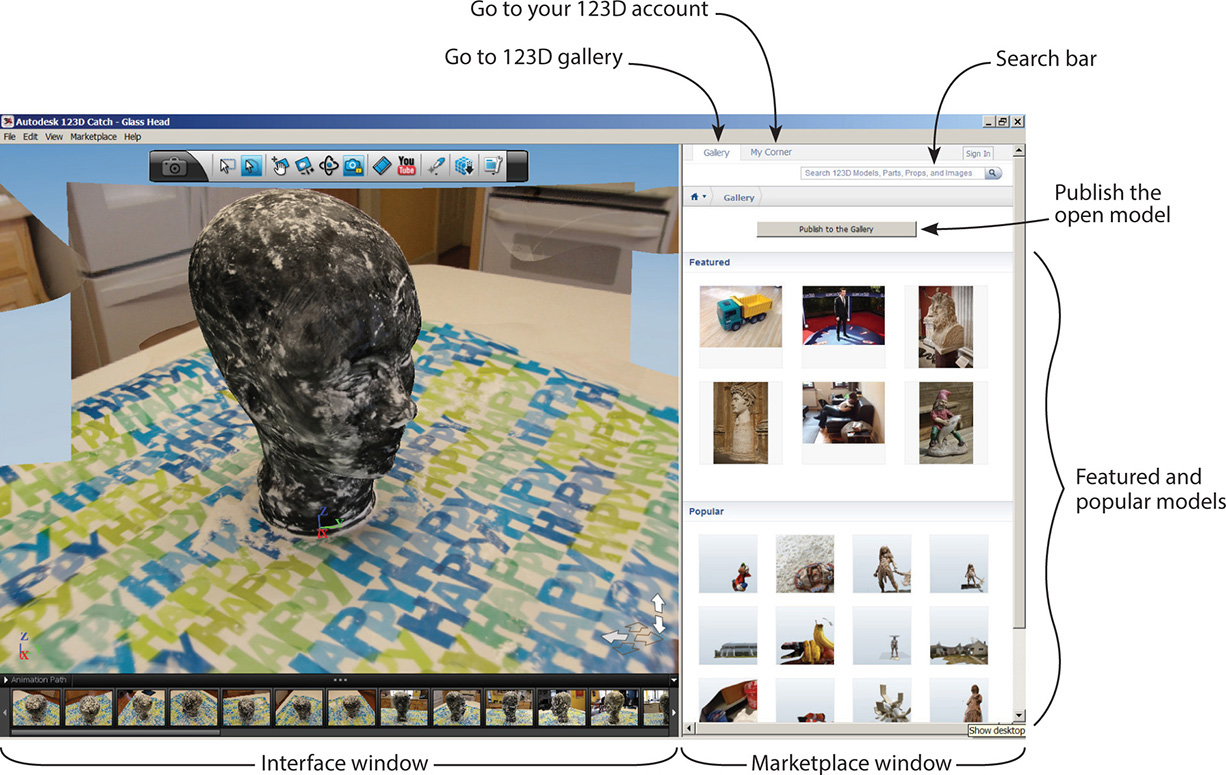
Figure 5-36 The glass head capture loaded into the Catch desktop app
Note that there are two windows. The left is the interface. The right is the Marketplace, a collection of online materials.
The Marketplace
The Marketplace shows featured and popular captures. Clicking one closes the current file in the interface and loads the one you clicked. At the top of the screen is My Projects, where you can access your 123D account. Click to see thumbnails of all your captures; again, clicking one closes the current file and opens the one you clicked. However, you can run multiple instances of the app, if you want, by clicking the Catch icon on your computer’s desktop. If you have difficulty loading one of your captures from the desktop, try loading it from My Projects.
The Publish to the Gallery button uploads and publishes the current file after asking you to describe and tag it. You can make the Marketplace window smaller by dragging its left border, or you can toggle it off from the interface window (File | Marketplace | Toggle).
The Desktop App Interface
The desktop app’s interface has a work canvas, menu bar, toolbar, and World Coordinate System (WCS) icon (see Figure 5-37). There’s a lot here; we’ll look at the most commonly used features and do some small projects with them.
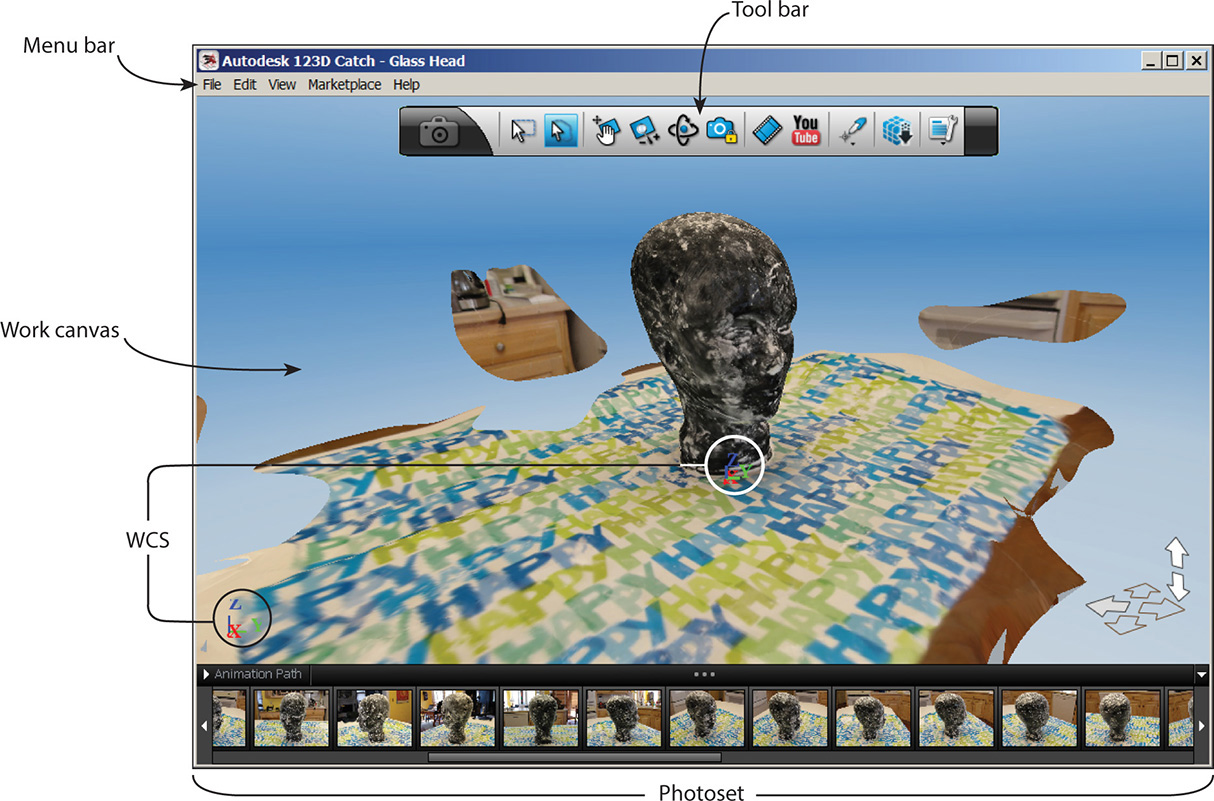
Figure 5-37 The desktop app’s interface
Work Canvas
The work canvas is the gray space the model occupies. The photoset strip (photos from which the photoscene was made) appears at the bottom of the canvas.
Menu Bar
The menu bar appears at the top of the work canvas. Its categories are as follows:
![]() File This item includes standard utilities, such as Open, Save, Export, Quit, and 3D Print. There’s also a Preferences submenu that has settings and shortcut options. One option is the ability to change Catch’s navigation system to match that of some popular Autodesk programs (see Figure 5-38).
File This item includes standard utilities, such as Open, Save, Export, Quit, and 3D Print. There’s also a Preferences submenu that has settings and shortcut options. One option is the ability to change Catch’s navigation system to match that of some popular Autodesk programs (see Figure 5-38).
![]() Edit This item includes tools for selecting, scaling, changing the origin, and adding more photos to the capture.
Edit This item includes tools for selecting, scaling, changing the origin, and adding more photos to the capture.
![]() View This item includes display settings and navigation tools (see Figure 5-39). Display settings control features visible on the screen, such as cameras, dimensions, and gridlines. Navigation tools move you around the work canvas.
View This item includes display settings and navigation tools (see Figure 5-39). Display settings control features visible on the screen, such as cameras, dimensions, and gridlines. Navigation tools move you around the work canvas.
![]() Marketplace This item lets you toggle the Marketplace window on and off.
Marketplace This item lets you toggle the Marketplace window on and off.
![]() Help This item includes information about your capture and a link to the Catch website.
Help This item includes information about your capture and a link to the Catch website.
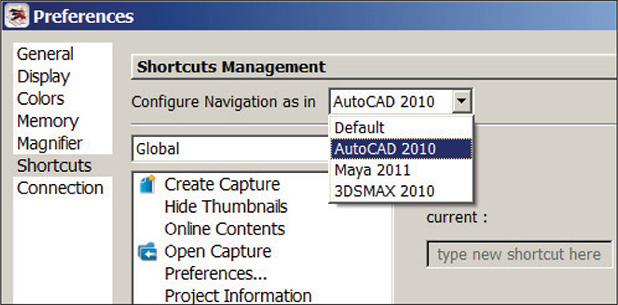
Figure 5-38 By selecting File | Preferences | Shortcuts, you can change Catch’s navigation system to match that of some other Autodesk programs.
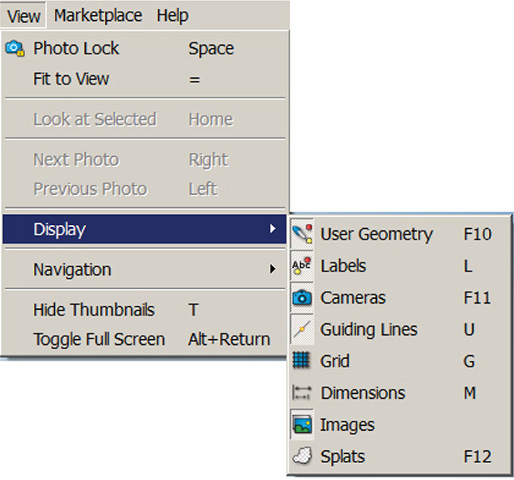
Figure 5-39 The View menu contains display settings and navigation tools.

Figure 5-40 The toolbar
Toolbar
The toolbar is the horizontal bar at the top of the work canvas (see Figure 5-40). Relocate it by dragging its ends. Activate its tools by clicking them; an activated tool has a blue background. The tools in the toolbar are described next:
Rectangular Selection Click this tool on the canvas, drag a rectangle around unwanted pieces, and release. It works well on pieces that have plenty of room between them and the parts you want to preserve.

Lasso Selection Click this tool on the canvas, drag a lasso around unwanted pieces, and release (see Figure 5-41). This works well on pieces that are close to parts you want to keep. The lasso’s dashed line is a selection boundary.

Figure 5-41 Drag the Rectangle and Lasso tools around areas and then release. The selection turns red.
Hold the SHIFT key down to select multiple pieces in one operation. Then delete them by pressing the DELETE key or by going to the Edit menu and choosing Delete. Deselect by clicking twice or pressing the ESC key. Using these tools is easiest when you’re in 3D navigation mode (discussed shortly), and the cameras are turned off (select View menu | Display | Cameras). As mentioned earlier, there are no undo and redo functions, so use the Edit/Save As option frequently because the only way to undo a selection is to quit without saving.
Pan This tool slides the model around the screen. Alternatively, press and hold the mouse’s scroll wheel down.

Dolly With this tool, you, the viewer, move through space to get closer to, or farther from, the model.
Dolly isn’t the same as zoom. Dolly moves you, the viewer, closer to the model, passing other items on the way. It gives you a close-up view like zooming in does, but you, the viewer, are moving through space. Movie makers use a dolly for special effects. For instance, they can film a subject that is moving toward or away from them while maintaining the same distance from it. Zoom is when you, the viewer, remain at a constant position, but the camera makes the model look bigger or smaller. Zooming in is like a telephoto lens; zooming out is like a wide-angle lens. You can zoom in the Catch desktop app even though there isn’t an tool icon for it; just rotate the mouse’s scroll wheel up and down.

Orbit This is the 3D navigation mode. You, the viewer, rotate around the model at any height or angle. A circle appears on the work canvas; left-click the mouse inside it and drag to orbit. Left-click the mouse outside it and drag to roll. Rolling is useful to straighten out a skewed model. Another way to orbit is to hold the ALT key and left mouse button while dragging the mouse (press ALT first and the left mouse button second; don’t press both at the same time). To get out of Orbit mode, right-click anywhere on the canvas and select Exit Navigation Tool (see Figure 5-42). If you’re having trouble orbiting, check whether the Photo lock icon in the toolbar has a blue background (meaning it’s active).

Figure 5-42 Orbit mode. Click inside the circle to orbit, and click outside it to roll. Right-click to exit.
Photo Lock This is the 2D navigation mode (see Figure 5-43). You, the viewer, move around the capture by jumping from photo to photo (camera view to camera view). This mode is used to study the relationship between the capture and the camera photos. Turn the cameras on at View | Display | Cameras. You can review the locations from which you took the photoset as well as look for outliers and other issues to fix before resubmitting the photoset for a new capture. The green camera represents the first shot taken, and the line connecting all the cameras shows the order in which the subsequent shots were taken.
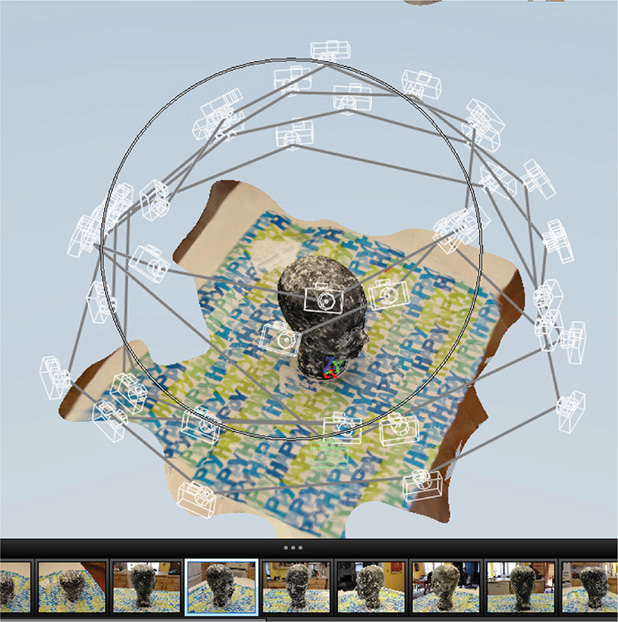
Figure 5-43 In Photo Lock Mode, the cameras show the location each photo was taken from, and the line connecting them shows the order in which the shots were taken. The highlighted picture in the photoset is the current view.
You can navigate three ways in Photo Lock mode: click each thumbnail, press the left and right keyboard arrows, or click each camera. Hover the mouse over each camera to display the photo it took. That photo will appear behind the model (see Figure 5-44), and the corresponding photo in the photoset bar will highlight. If just an outline displays behind the model, you’re looking at the back side of the photo (opposite the camera). You can turn the photos off by unchecking Images in the toolbar’s Display Settings.

Figure 5-44 Hover the mouse over each camera to display the photo it took. An outline means you’re looking behind the photo.
You can temporarily 3D-orbit in Photo Lock mode by clicking the opaque arrows in the lower-right corner to move through the photoset (see Figure 5-45). Outlined arrows mean there’s no adjacent photo to move to. Another way is to press ALT and the left mouse button (remember to press ALT first). Images that are turned on will orbit along with the model. You can toggle from Photo Lock to 3D Navigation mode in three ways: press the keyboard’s spacebar, deselect the Photo Lock icon in the toolbar, or right-click the work canvas and choose Photo Lock.

Figure 5-45 In Photo Lock mode you can toggle the camera photos (images) on and off. Orbit by clicking the opaque navigation arrows. The outlined arrows mean there is no adjacent photo to click.

Export Video Make a video in .avi format of the whole photoset or of selected keyframes (photos) from it. Catch interpolates between the keyframes to make a smooth video.

Upload to YouTube Log in to your YouTube account if you have one, and share your .avi file with the world.

Creation Tools Here you can, among other things, make reference points (see Figure 5-46). These let you scale the capture to a real-world dimension and display dimensions. When working inside another program, such as AutoCAD, you can snap 3D primitives to those reference points. One use for that is to quickly model a building shell.

Figure 5-46 Creation Tools

Generate Mesh The three densities of mesh are mobile (lowest; suitable for viewing on a phone), standard, and maximum (highest). The first processing on all three apps is standard density. This tool lets you regenerate a mesh to another density. You might want to do this to make the model more or less detailed.

Display Settings Here, you can toggle the cameras, grid, guidelines, animation path, dimensions, and other features on and off (see Figure 5-47). You can also display the capture three ways: phototextured, wireframe (mesh) and phototextured, or just wireframe. Activate the Photo Lock mode and click the respective icons (see Figure 5-48). The slider underneath them changes the transparency. Viewing phototexture superimposed over mesh is useful to check the camera views because poorly stitched ones become more apparent. The model will continue to display your new choice in orbit mode, but you’ll need to return to Photo Lock to change the display again.
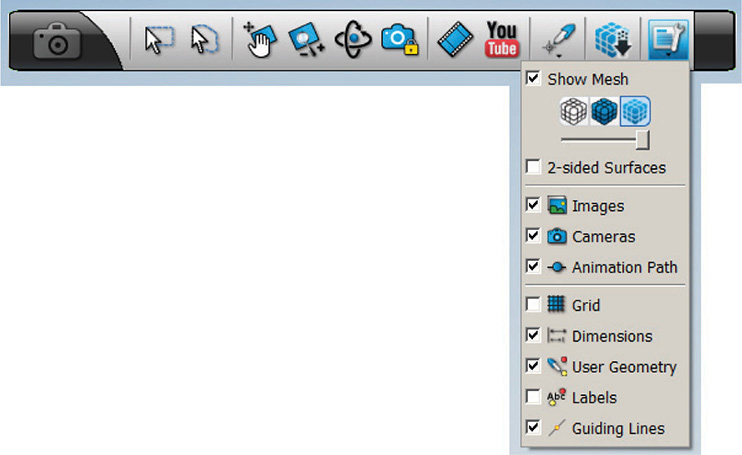
Figure 5-47 Display Settings

Figure 5-48 View the capture as a phototexture, phototexture and wireframe (mesh), or just as a wireframe.
If you’d like a grid on the work canvas, toggle it on from the toolbar’s Display Settings icon (see Figure 5-49). The squares will appear larger and smaller in tandem with the model.

Figure 5-49 Toggle a grid on through the Display Settings tool.
World Coordinate System
This is the capture’s (0, 0, 0) point. Its x, y, and z axes use numbers (coordinates) to uniquely describe a point’s location in space. By default, Catch calculates a coordinate system based on your photos, and it’s rarely aligned with the capture. You can change the WCS’s position by selecting Edit | Define World Coordinate System (see Figure 5-50) and aligning the origin and axes with reference points. This is useful in situations such as aligning a skewed building capture with the WCS to enable displaying it orthogonally. A 123D Catch channel YouTube video called “Custom Coordinate System” shows how to do just that (www.youtube.com/watch?v=yD1FV-cFzYE&list=PLC04311A173548A12).

Figure 5-50 The WCS is the capture’s origin point and axes. It can be aligned with the capture by reorienting its origin and axes with reference points.
Note that there are two WCS icons. One is in the corner and one is in the scene. The corner icon is for reference as you orbit around; the scene icon is for reference within the model (which might not always be visible). You can turn off the one in the scene at File | Preferences | Display | Draw Axis.
Make an Animation
Here are the steps for making an animation (movie):
1. Choose how to display the capture. You can change the background color at File | Preferences | Colors. From the toolbar’s Display settings, you can make the capture a wireframe, a wireframe and phototexture, or a phototexture only.
2. Click Create Default Animation Path to choose the whole photoset (see Figure 5-51). The animation path will appear. Clicking the arrow in front of Animation Path toggles it between “show” and “hide”.
3. When the animation path is shown, a blue line connecting each camera in the capture appears, showing the order of views. Clicking on the “2s” (two seconds) between each frame brings up a box to change the time between each view (see Figure 5-52). Click the arrow after Animation Path to watch the video. Click it again to stop.
4. Render the animation—that is, turn it into a movie (see Figure 5-53). Click the Export Video tool. Enter the settings you want, click Render, and all those keyframes will be turned into an .avi file. Find the file in the same folder as the .3dp file. It will have the same name plus “movie.”

Figure 5-51 Create the default animation path (all keyframes are automatically selected).

Figure 5-52 The line connecting the cameras shows the order of views. The time between each view can be changed.
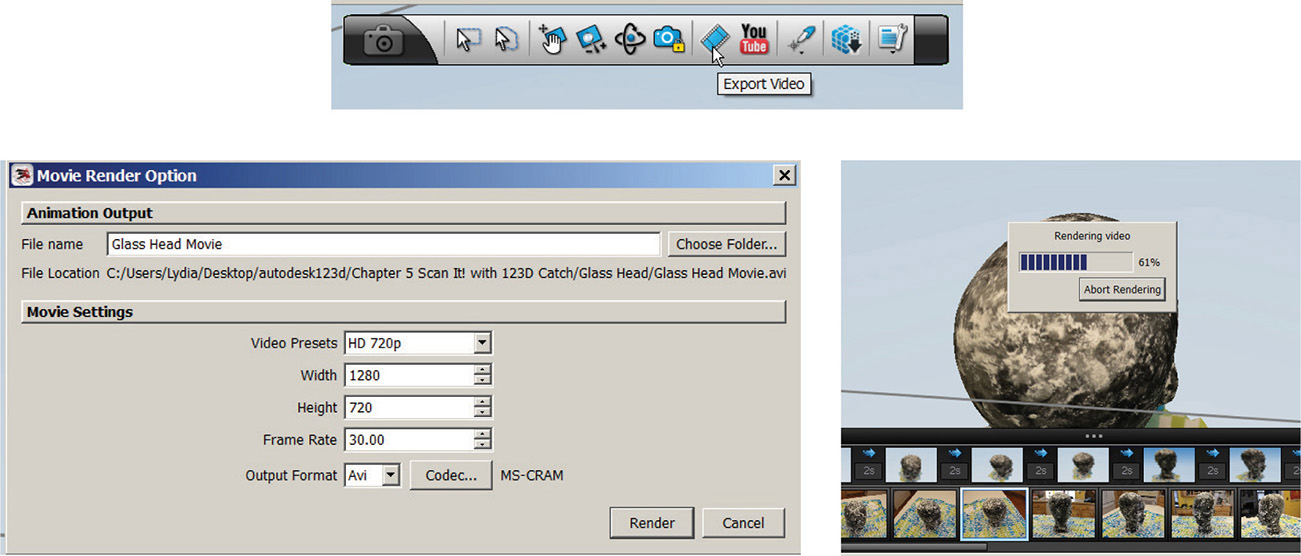
Figure 5-53 Render the animation.
Customize an Animation
We made a default animation, which uses the whole photoset. Maybe you want to remove some photos or add new ones. Add a keyframe by highlighting it and clicking the plus sign. Delete a keyframe by highlighting it and clicking the X. Import a keyframe via the context menu that appears when right-clicking (see Figure 5-54), choose Add Photos to Capture, and navigate to those photos. Notice that the blue line in the work canvas changes to reflect the new animation path (see Figure 5-55).
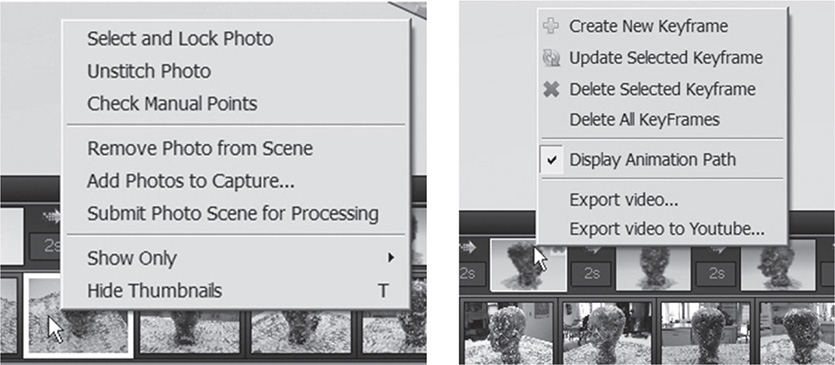
Figure 5-54 Right-click on keyframes to bring up context menus.
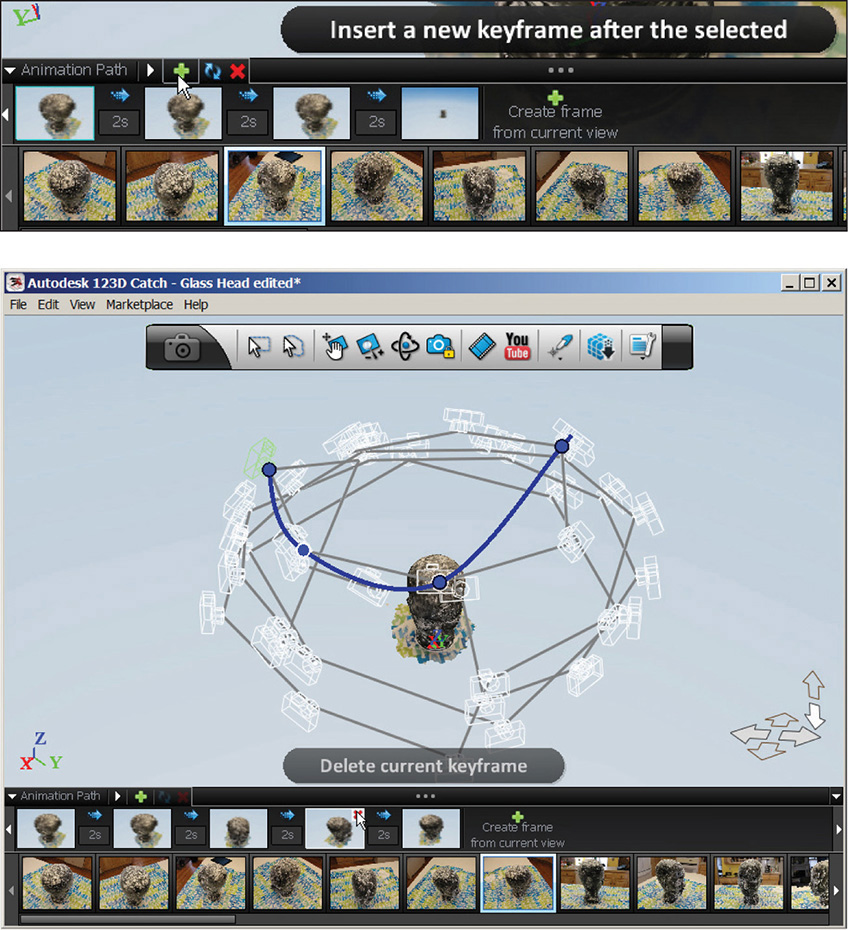
Figure 5-55 The animation path changes with the keyframes.
Because the processing software needs overlapping points to do its job, you’ll need to resubmit the catch with the new photos. Alternatively, you can manually stitch them for greater control. You may have also found that some of your existing photos didn’t get stitched into the photoscene because Catch couldn’t find common features between them and other photos (perhaps they were outliers, or too dark, or just didn’t have enough matching points with other photos). Unstitched photos appear darker and have a warning triangle (see Figure 5-56). You can manually stitch those, too, if you want them included.

Figure 5-56 Photos that didn’t get stitched into the photoscene are dark and show a warning triangle.
Manually Stitch Photos into the Photoscene
Manual stitching means connecting new photos to ones already stitched into the photoscene (see Figure 5-57). Double-click the photo you want to stitch; it, plus two adjacent views, will appear. Click the wand and then click a specific feature in the unstitched photo. Ideally, this feature will contrast with the background and be easily identifiable, such as a corner. When you click the feature, a yellow circle appears, along with a magnifier to enable more accurate placement. After you click one or two points, an automatic matching process tries to find the same feature in at least one other stitched photo; when it does, a yellow square appears. Click that square to accept its suggestion or relocate it, and (hopefully) all three points will turn into green circles, meaning they match. Then do this three more times.
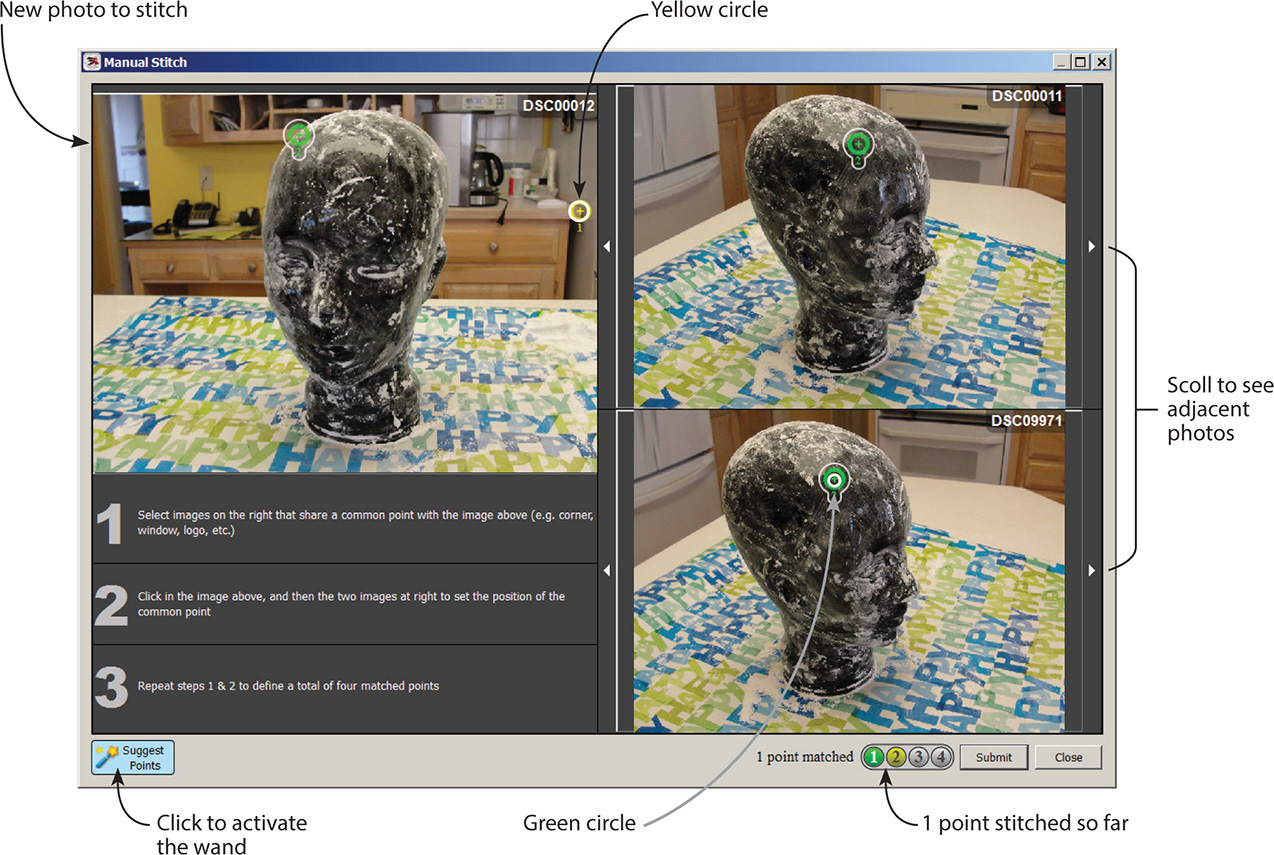
Figure 5-57 Manually stitch a photo by finding the same point on it in different views.
If the point remains yellow in all three windows, there isn’t enough parallax yet (the effect of an object appearing differently when viewed from different angles). Hence, you’ll need to select that point in another view; bring one up by clicking the white arrow on either side of the photos. When the point is adequately defined from different photograph viewpoints, the yellow circles will turn green. If the software detects that the points don’t match, you’ll get a message saying so, and the point will appear as a red square (see Figure 5-58). Right-click the red square to delete it. Ultimately, you need four green points across three photos (see Figure 5-59). Finally, click Submit to reprocess the photoscene.
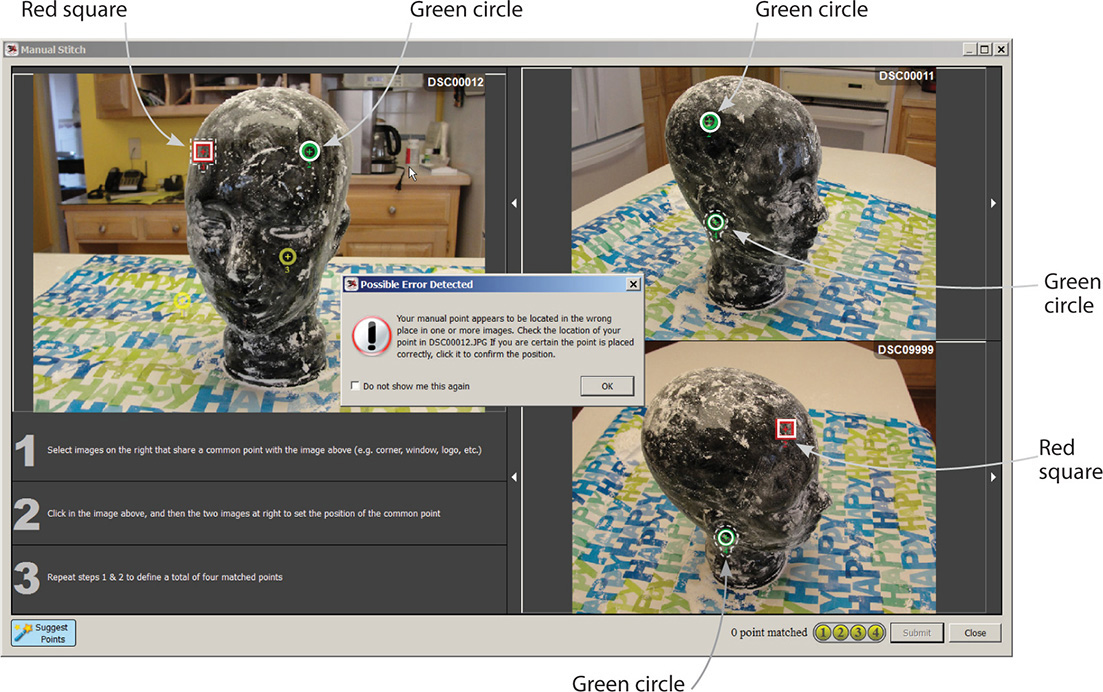
Figure 5-58 Points that don’t match are flagged with red squares. Points that match in all views appear as green circles.

Figure 5-59 This graphic in the screen’s lower-right corner means the photo has been successfully stitched into the photoscene.
TIP If too many images have warning triangles, or if you want to add too many new photos, it may be easier just to reshoot the whole photoscene. Alternatively, just reshoot the ones that didn’t get stitched, using the same locations (turn on the cameras to see those locations).
Let’s now use some of the tools discussed earlier. We’ll use the Creation tools to make some reference points on the glass head capture, scale it, and add a dimension line. Then we’ll use the Generate Mesh tool to change its density.
Make and Delete Reference Points
Reference points are 3D points made by clicking a 2D image. Activate the Photo Lock mode and display the phototexture only, not the mesh. Click open an image from the photostrip thumbnails, and then click somewhere on the image to set the first reference point (again, a magnifier will appear for more accurate placement). Note that a green pushpin appears on the photostrip thumbnail, and green points appear in every other thumbnail (see Figure 5-60). They’re all the same point. If you wanted, you could click any of those thumbnails to finesse the location of the reference point you just made.
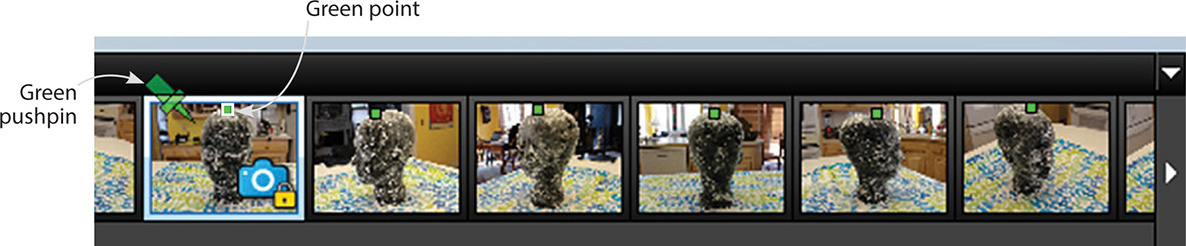
Figure 5-60 A pushpin appears in the thumbnail image chosen, and the reference point appears as a green square in all other views.
You can click the second reference point on the same image or choose a different image. I chose a side view so as to make it easier to visually line up the second point with the first. Click the second reference point (see Figure 5-61).
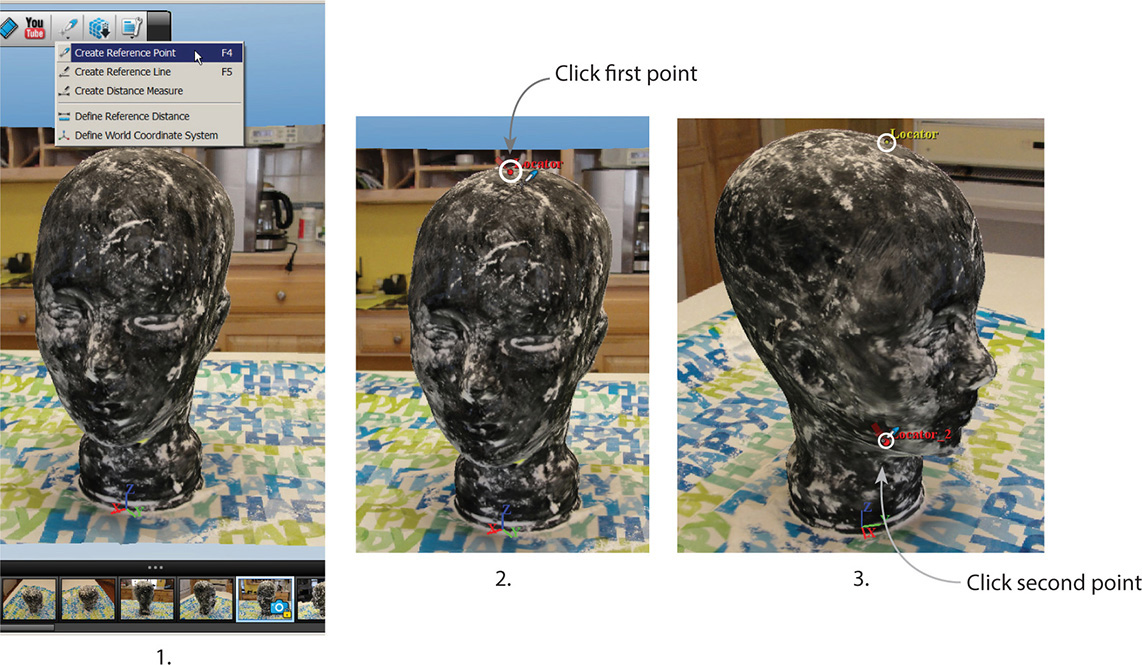
Figure 5-61 The second reference point was placed on a different photo than the first. This made visually lining them up easier.
To delete reference points, activate the rectangle selection tool and then click each one individually (see Figure 5-62). Don’t drag a window, because that selects mesh. When a reference point is selected, it will turn red and a pushpin will appear. Right-click and select Delete or just press the DELETE key.
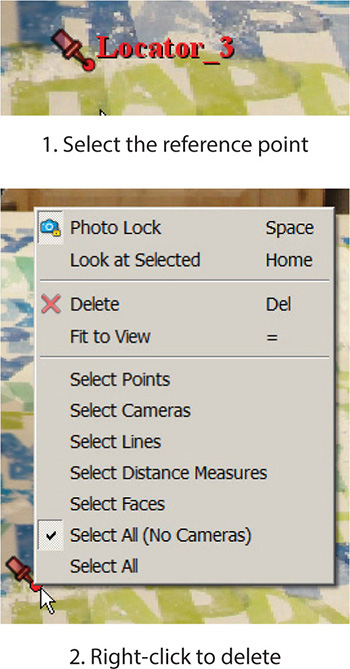
Figure 5-62 When a reference point is selected, it is red and a pushpin appears.
Scale the Capture
Now that we’ve got two reference points, go back to the Creation Tools menu and choose Define Reference Distance (see Figure 5-63). Click the first reference point and then click the second. A dialog box will appear in which you can overtype the size you know the distance to be. Then click OK to scale the whole photoscene. Catch is unitless, so the “8” I entered is intended to represent inches, but may also represent feet, meters, Bullwinkles, or whatever you want. After scaling, any distance measured between reference points will be the same unit you intended the resize to be. If you import this file into AutoCAD, you’ll need to define the units.
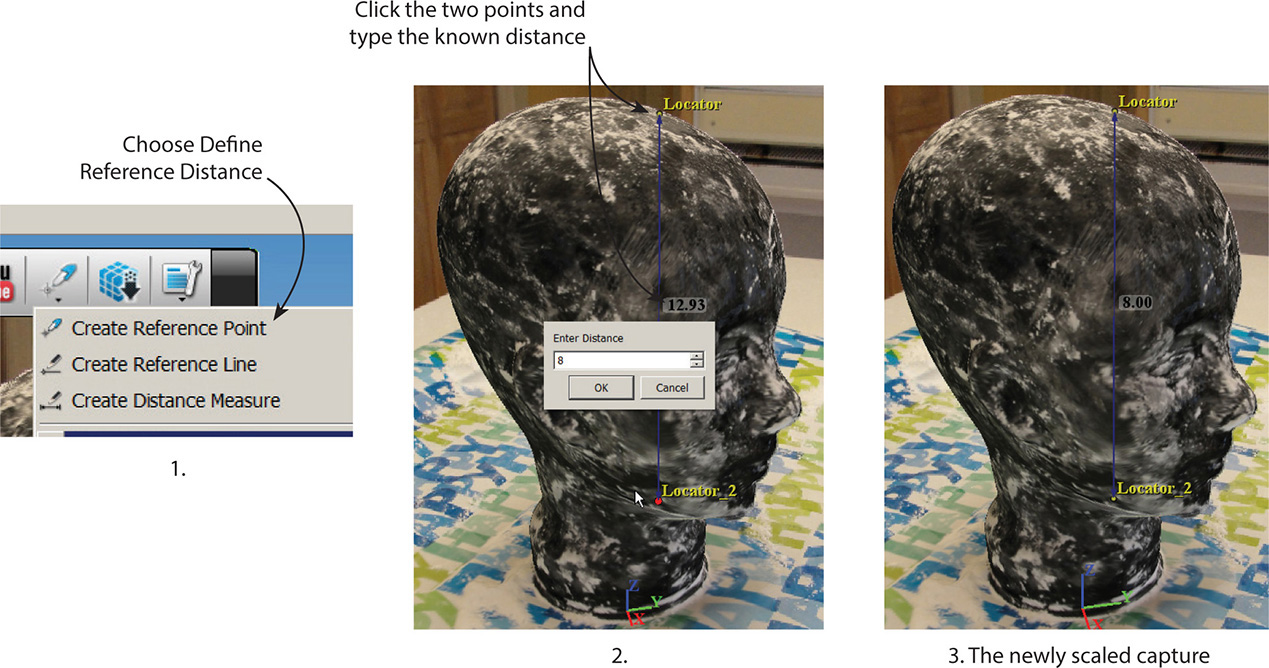
Figure 5-63 Use reference points to scale the capture.
If you want to scale the image again later, choose Create Reference Distance again. A dialog box will appear, confirming that you want to rescale. Click OK and then repeat the scaling process.
Add a Dimension Line
Click two reference points at the endpoints of a length you want to dimension. From the Creation Tools menu, choose Create Distance Measure. Then click the reference points. The distance between them will appear on a dimension line (see Figure 5-64).

Figure 5-64 Create, and then click, two reference points to place a dimension line between them.
Generate Mesh
To get a different mesh, resubmit the capture for reprocessing (see Figure 5-65). You’ll need to log in to your 123D account (sign in through the Marketplace window). The photoset isn’t uploaded again because Autodesk saved it on its servers. As with the first capture, you’ll be asked if you want to wait or be e-mailed a link. You’ll probably want to choose e-mail when requesting the maximum density option. If you wait, the new capture will open in the app when it’s finished processing. Generate the density you want before making any edits because you’ll lose those edits in the reprocess. You can also select just a portion of the mesh for reprocessing. Highlight what you want with the square or lasso tool and start the upload. Catch will reprocess the highlighted part and delete everything else. Figure 5-66 shows the glass head with mobile and maximum densities.
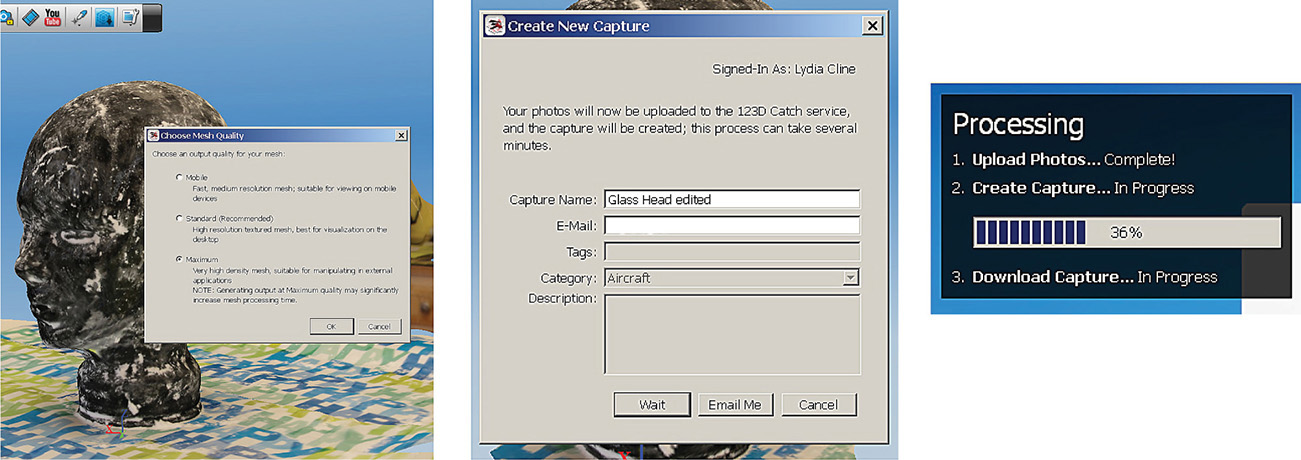
Figure 5-65 Reprocess the capture to change the mesh density.
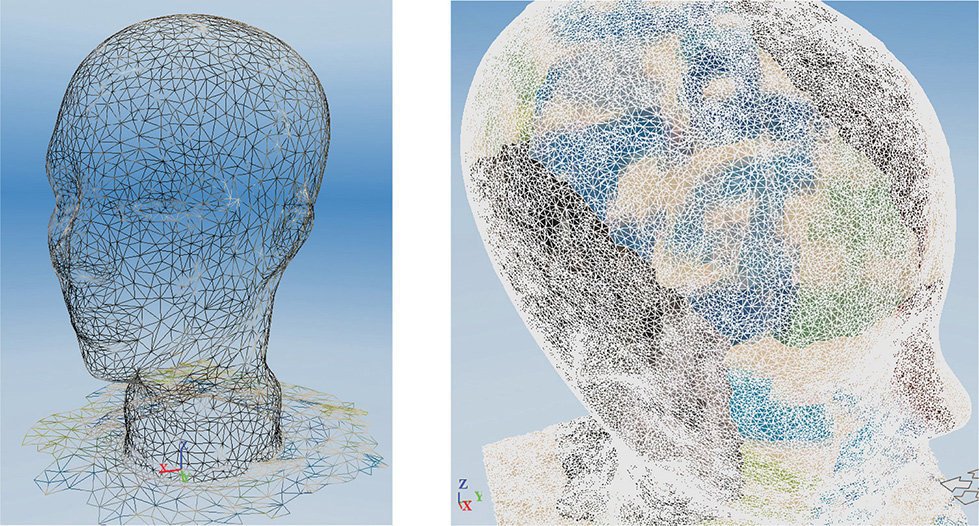
Figure 5-66 Standard and maximum mesh densities
Troubleshoot the Desktop App
You may experience some problems while working in the desktop app. Here are common ones and possible solutions:
Problem:
![]() The toolbar doesn’t appear.
The toolbar doesn’t appear.
Possible solution:
![]() Go to View | Navigation and choose a tool. That may bring the toolbar back up.
Go to View | Navigation and choose a tool. That may bring the toolbar back up.
Problem:
![]() The photoset gets stuck in transmission.
The photoset gets stuck in transmission.
Possible solutions:
![]() Check for foreign characters in the directory path.
Check for foreign characters in the directory path.
![]() Try putting the photoset in a different location.
Try putting the photoset in a different location.
![]() Downsize the resolution of the photos.
Downsize the resolution of the photos.
![]() Ensure there’s no firewall blocking 123D Catch.
Ensure there’s no firewall blocking 123D Catch.
Problem:
![]() You get a connectivity error message even though you know you’re connected to the Internet.
You get a connectivity error message even though you know you’re connected to the Internet.
Possible solution:
![]() Create a new project and log in to your account again.
Create a new project and log in to your account again.
![]() Reinstall the app.
Reinstall the app.
Problem:
![]() The desktop app doesn’t work.
The desktop app doesn’t work.
![]() The desktop app gives error messages about being in offline mode.
The desktop app gives error messages about being in offline mode.
![]() The desktop app won’t load the photoset.
The desktop app won’t load the photoset.
![]() The desktop app won’t let you log in.
The desktop app won’t let you log in.
![]() The version you have may have expired. Download the latest from 123dapp.com/catch and reinstall it.
The version you have may have expired. Download the latest from 123dapp.com/catch and reinstall it.
![]() Try logging in through the web app.
Try logging in through the web app.
Problem:
![]() The capture appears small, with too much background.
The capture appears small, with too much background.
Possible solutions:
![]() Examine the cameras for outliers. Click an outlier to highlight the corresponding photostrip image and then delete it. Save, close, and then reopen the file.
Examine the cameras for outliers. Click an outlier to highlight the corresponding photostrip image and then delete it. Save, close, and then reopen the file.
Export the Catch
Now let’s turn the catch into something besides a .3dp file. You need to be logged into your 123D account to do this. Go to File | Export Capture As. Both free and Premium members have all the choices shown in Figure 5-67. OBJ, DWG and FBX files can be imported into other programs, such as AutoCAD, Rhino, and Maya, for further development (be aware that the DWG format only exports lines and reference points). RZI, LAS, and IPM files are less useful for our purposes because they mostly enable the viewing or exchange of files and 3D point cloud data.

Figure 5-67 You can export a scene into any of the formats shown here.
Export the capture as an .obj, which is a 3D-printable file. Look for it in the same folder as the .3dp file (it will also have the same name). Note that . mtl and .jpg files of its textures were created at the same time (see Figure 5-68). Keep them in the same folder as the .obj file—they will be needed if you plan to import and color-render the .obj in another program, such as Autodesk Maya or 3ds Max.

Figure 5-68 Exported files will be placed in the same folder as the .3dp file. Keep all files that are created because they’ll be needed to import the model’s colors into another program.
Just for fun, launch 123D Design and import the .obj into it via 123D’s Open menu. Figure 5-69 shows what it will look like. To see its form a bit better, select it and then paint a material onto it.

Figure 5-69 The capture imported into 123 Design.
Tips on Photographing a Subject
The most skillful use of Catch’s tools can’t compensate for a poor photoset. Great captures are made from great photos, so let’s now discuss how to take those photos.
When using consumer-grade cameras and entry-level reality capture software, small subjects are easier to successfully model than large ones because they need fewer photos, less processing time, and less manual repair. However, whether you’re using entry-level or professional software, reality capture can only be done on subjects that have a matte, patterned, or textured surface. Reflective, shiny, and transparent subjects—mirrors, glass, and polished metal—don’t give the processing software the information it needs. Ambiguous features such as hair, fur, and large swathes of plain fabric, or even symmetrical surfaces, may also pose problems. They often appear in the file as holes or bad mesh. If a large part of the subject is plain, place colored sticky notes with black marker scribbles in the corners of that part. That will help the processor find the common points it needs to correctly stitch the model together. Glass and other reflective subjects can be captured when covered with flour, talcum powder, or tempera paint (suggested because it washes off easily).
A successful catch requires methodical photographing. Here’s how:
![]() Place the subject where there is space to move completely around it. Remove anything blocking your view.
Place the subject where there is space to move completely around it. Remove anything blocking your view.
![]() Place the subject on an appropriate surface. Just like the subject, the surface shouldn’t be reflective, transparent, or shiny. Choose a surface whose color and pattern contrasts with the subject. Gift wrap, newspaper, magazines, and cotton fabric work well. If Catch mixes your subject and surface up, change the surface or put small items under the subject to raise it a bit above the surface.
Place the subject on an appropriate surface. Just like the subject, the surface shouldn’t be reflective, transparent, or shiny. Choose a surface whose color and pattern contrasts with the subject. Gift wrap, newspaper, magazines, and cotton fabric work well. If Catch mixes your subject and surface up, change the surface or put small items under the subject to raise it a bit above the surface.
![]() Illuminate the subject with diffused light. Consistent, even lighting all around the subject is critical. Best results come from shooting the subject in full shade, or on an overcast day, or indoors. Avoid stark shadows, spotlights, strong backlighting, and direct sunlight on the subject, because all this results in under- or overexposed photos. Also avoid highlights, because they move around the subject as you move around it. Outdoor lighting conditions vary with time of day and year; the middle of a bright summer day probably won’t work, but early evening may.
Illuminate the subject with diffused light. Consistent, even lighting all around the subject is critical. Best results come from shooting the subject in full shade, or on an overcast day, or indoors. Avoid stark shadows, spotlights, strong backlighting, and direct sunlight on the subject, because all this results in under- or overexposed photos. Also avoid highlights, because they move around the subject as you move around it. Outdoor lighting conditions vary with time of day and year; the middle of a bright summer day probably won’t work, but early evening may.
![]() All photos must be identically lit. Don’t use a flash, because it exposes (illuminates) each photo differently. Camera phones have an automatic exposure feature, making their flash photos especially bad.
All photos must be identically lit. Don’t use a flash, because it exposes (illuminates) each photo differently. Camera phones have an automatic exposure feature, making their flash photos especially bad.
![]() Move 360° sequentially around the subject (see Figure 5-70). Don’t stand in one place and just turn the camera. Fill each frame with the whole subject. Take 15 to 20 shots every 20° or so, maintaining the same distance from the subject, and the same distance between shots. Shoot a second sequential circle at a different height—ideally, top-angled down. Again, maintain a consistent distance from the subject and between shots. If needed, crouch down and shoot a third circle at a lower height. Then move in for any detail shots needed, such as of features blocked by other features, or very complex features. Fill the frame with the whole subject on those shots, too. If the capture has more background than subject, you didn’t shoot the subject closely enough.
Move 360° sequentially around the subject (see Figure 5-70). Don’t stand in one place and just turn the camera. Fill each frame with the whole subject. Take 15 to 20 shots every 20° or so, maintaining the same distance from the subject, and the same distance between shots. Shoot a second sequential circle at a different height—ideally, top-angled down. Again, maintain a consistent distance from the subject and between shots. If needed, crouch down and shoot a third circle at a lower height. Then move in for any detail shots needed, such as of features blocked by other features, or very complex features. Fill the frame with the whole subject on those shots, too. If the capture has more background than subject, you didn’t shoot the subject closely enough.
![]() Keep the subject still. All features need to be in the same place for good stitching. Don’t move or lift it to photograph hidden areas or underneath it. If the subject moves even a little, start over.
Keep the subject still. All features need to be in the same place for good stitching. Don’t move or lift it to photograph hidden areas or underneath it. If the subject moves even a little, start over.
![]() Overlap the photos. Every feature should appear in at least three or four different photos taken at varying angles. Missed spots will appear as holes in the model.
Overlap the photos. Every feature should appear in at least three or four different photos taken at varying angles. Missed spots will appear as holes in the model.
![]() Use a good quality camera. Good cameras take better photos than bad ones, especially in low lighting. The results definitely show in the capture.
Use a good quality camera. Good cameras take better photos than bad ones, especially in low lighting. The results definitely show in the capture.
![]() Take raw images. Turn off camera features such as sharpness enhancement, image stabilization, and anything else that artificially modifies the photo. Such “interpreted” photos don’t stitch as well.
Take raw images. Turn off camera features such as sharpness enhancement, image stabilization, and anything else that artificially modifies the photo. Such “interpreted” photos don’t stitch as well.
![]() Focus. Sharp images are critical because blurry ones don’t provide the feature information needed. If you change the aperture setting to blur the background via depth of field, do that in all the photos. An 18 mm focal length is a good setting. Hold the camera against your body for extra stabilization.
Focus. Sharp images are critical because blurry ones don’t provide the feature information needed. If you change the aperture setting to blur the background via depth of field, do that in all the photos. An 18 mm focal length is a good setting. Hold the camera against your body for extra stabilization.
![]() Resolution. Resolution is the number of pixels per inch. A higher resolution provides more detail in the model. However, Catch will resize anything larger than five megapixels.
Resolution. Resolution is the number of pixels per inch. A higher resolution provides more detail in the model. However, Catch will resize anything larger than five megapixels.
![]() Orient all photos similarly. The photos need to be either all portrait or all landscape.
Orient all photos similarly. The photos need to be either all portrait or all landscape.
![]() Upload the photos as is. Don’t crop or edit. You can downsize their resolution to speed up processing, but that will affect the model’s detail and quality.
Upload the photos as is. Don’t crop or edit. You can downsize their resolution to speed up processing, but that will affect the model’s detail and quality.
![]() Upload the proper number of photos. Between 70 and 100 photos gives best result; more freezes the software. Don’t upload more than 70 in the iPad/iPhone and web apps, or over 100 in the desktop app.
Upload the proper number of photos. Between 70 and 100 photos gives best result; more freezes the software. Don’t upload more than 70 in the iPad/iPhone and web apps, or over 100 in the desktop app.
![]() Delete bad photos before uploading. Blurry, overexposed, or underexposed photos mess up the stitching process.
Delete bad photos before uploading. Blurry, overexposed, or underexposed photos mess up the stitching process.
![]() Get best results when photographing a person by seating them and telling them to avoid small facial movements by looking forward, blinking between shots, and closing their mouth.
Get best results when photographing a person by seating them and telling them to avoid small facial movements by looking forward, blinking between shots, and closing their mouth.
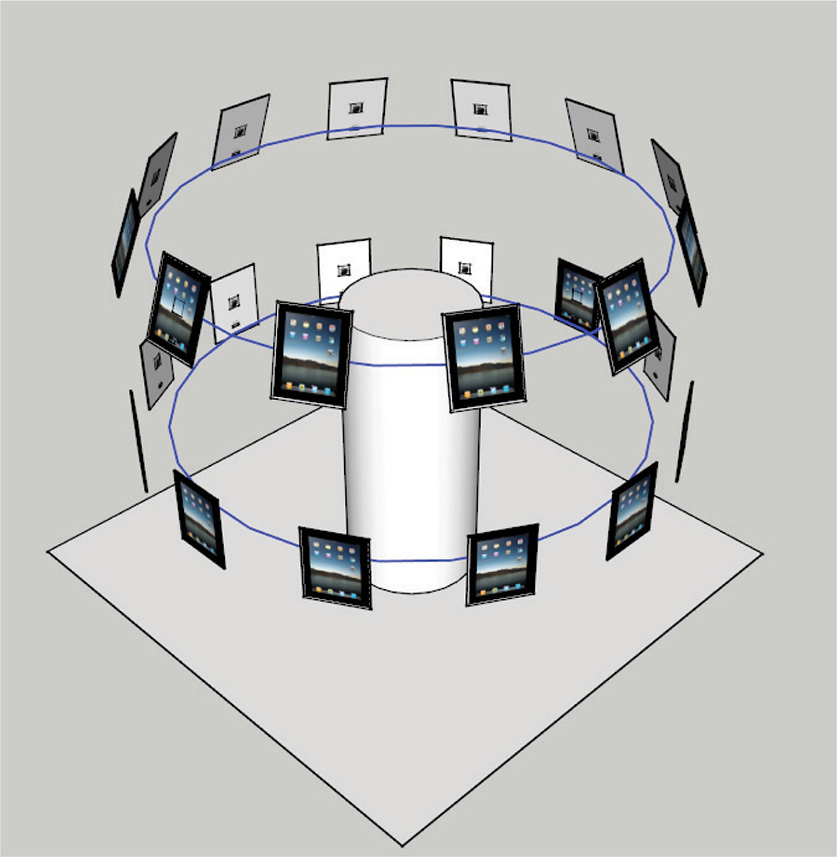
Figure 5-70 Move sequentially around the subject, taking photos at regular intervals.
Finally, study models in the 123D Gallery. What subjects make the best models? Do some look light on one side and dark on another? That’s the result of uneven lighting. Are there holes or messed-up areas? That’s due to features that were unclear, not captured enough, or not captured at all. When surfaces are included, note what was used. After your own model is generated, study the photoset for clues on what to do differently.
Summary
In this chapter, we used 123D Catch’s mobile, web, and desktop apps to create and edit a photorealistic model called a capture. We made one capture with an iPad and one with a digital camera. Then we made an animation and .obj file of a capture and discussed how to scale it. Captures jump-start the design process because they enable you to start a project with existing data, instead of having to create it all from scratch.
Sites to Check Out
![]() The 123D Catch YouTube channel www.youtube.com/user/123DCatch. Includes lots of tutorials.
The 123D Catch YouTube channel www.youtube.com/user/123DCatch. Includes lots of tutorials.
![]() Smithsonian X 3D Project http://3d.si.edu/
Smithsonian X 3D Project http://3d.si.edu/
![]() Zebra Imaging’s holographic images www.youtube.com/watch?v=Xp7BP00LuA4. These images are created from 3D models.
Zebra Imaging’s holographic images www.youtube.com/watch?v=Xp7BP00LuA4. These images are created from 3D models.
![]() NASA’s downloadable 3D models www.nasa.gov/multimedia/3d_resources/assets/helmet.html.
NASA’s downloadable 3D models www.nasa.gov/multimedia/3d_resources/assets/helmet.html.
![]() Capture and 3D-print a bobble head doll of yourself www.instructables.com/id/3D-Printing-your-own-full-color-bobblehead-using-1/.
Capture and 3D-print a bobble head doll of yourself www.instructables.com/id/3D-Printing-your-own-full-color-bobblehead-using-1/.
![]() Short movie made via reality capture www.youtube.com/watch?v=TSOJl8SNZLM.
Short movie made via reality capture www.youtube.com/watch?v=TSOJl8SNZLM.
![]() Meshlab www.meshlab.net. A website that processes and edits reality capture photosets for free.
Meshlab www.meshlab.net. A website that processes and edits reality capture photosets for free.
![]() Photosynth www.photosynth.net. A free reality capture program by Microsoft.
Photosynth www.photosynth.net. A free reality capture program by Microsoft.