9
Creating Advanced CI/CD Tasks
In the previous chapter, we managed to simulate an AWS environment locally through a Compose application. We mocked AWS services such as DynamoDB, S3, and SQS. Also, we simulated the invocation of Lambda functions through Docker containers and came up with a workaround to simulate traffic toward SQS-based Lambda services by introducing an extra service in the Compose installation.
This enabled us to be focused on developing our application without the need to interact with the AWS console, provision any AWS infrastructure, and deal with the needs of a cloud-hosted environment. From the beginning, we were focused on developing the application locally and simulating the components needed.
Since we have been productive so far in developing the application, the next logical step is to introduce some CI/CD to our current application. Throughout the development life cycle, we want our application to build, test, and deploy automatically.
Our Lambda-based application is a good example of how we can benefit from Compose and simulate a complex application on the chosen CI/CD solution. The Lambda application requires more than one component to operate in order to test. Compose can assist in spinning up this environment in the CI/CD solution of our choice.
In this chapter, the focus will be on enabling Docker Compose in a CI/CD solution. When it comes to CI/CD, there are various vendors and software packages out there. Therefore, we will examine more than one CI/CD solution.
In this chapter, we will cover the following topics:
- Introduction to CI/CD
- Using Docker Compose with GitHub Actions
- Using Docker Compose with Bitbucket pipelines
- Using Docker Compose with Travis
Technical requirements
The code for this book is hosted on the GitHub repository at https://github.com/PacktPublishing/A-Developer-s-Essential-Guide-to-Docker-Compose. In the case of an update to the code, it will be updated to the GitHub repository.
Introduction to CI/CD
CI/CD stands for continuous integration and continuous delivery. It is a combination of practices that facilitate continuous integration, continuous delivery, and continuous deployment. Part of its scope is the automation of building, testing, and deploying applications.
For example, let’s take our Lambda application. It is a complex environment consisting of two Lambda-based applications and three different AWS services.
For our use case, we assume that we have a team that follows trunk-based development, a practice that facilitates CI. Our team will contribute small commits to the trunk-main branch every time. This can be done with short-lived feature branches. Pull requests will be raised in order to merge changes from those branches to the trunk-master branch. A pull request should be reviewed by the development team, in parallel, a CI/CD automated process that builds and tests the newly introduced code should take place and be part of the merge check. Once the merge checks have been passed, our branch is ready to be merged and a deployment of the component should happen.
Regardless of the component that we change, whether it is a REST-based Lambda function or an SQS-based Lambda function, we need to make sure that the changes on that function will not break our code base and the applications that interact with that component.
Once a merge takes place, the component that we have merged should be built and then pushed to a live environment. Deploying code to a live environment can vary based on where the workloads are getting deployed. For example, a Lambda function deployment requires a new Docker image and an invocation of the AWS API to point to the Docker image we have built. This would also require some extra configuration based on the environment that an AWS Lambda function can have. If, in the future, we switch to Kubernetes for deploying the application, a Helm chart can be deployed manually, or a GitOps solution such as Argo CD can be adopted. A GitOps solution will poll for changes that took place on the trunk branch, pick the latest build artifact, and deploy it to the live environment without any user intervention.
We want to be feasible for our application to use Compose in CI/CD tasks. The deployment canary can either be the Go binary deployed to the Lambda function or a Docker image. Also, in the case of changing the code base in the future, another environment might require a different deployment. Therefore, we will ignore the deployment and focus on enabling the execution of Compose commands for the required CI/CD jobs.
For every commit that happens on our main branch, we will spin up the Compose application on the CI/CD job that will be triggered. Our goal is to make the entire Compose application run on a CI/CD build and test the application before we proceed to deployment.
We have an overview of CI/CD and what we want to achieve in terms of our Lambda-based application. Since the source code is hosted on GitHub, we will proceed with implementing CI/CD jobs for our application using GitHub Actions.
Using Docker Compose with GitHub Actions
If your code base is hosted on GitHub, it is highly like that you are aware of GitHub Actions. GitHub Actions is the CI/CD platform provided by GitHub. By using GitHub Actions, we can add workflows that build and test our code base. This can be adapted for each branch and pull request or be used to add custom workflows and deploy our code base through GitHub.
Creating your first GitHub Action
In order to add a GitHub workflow, you need to place YAML files along with workflow instructions inside the .github/workflows directory. Multiple files can be added, and they should be executed by GitHub independently.
For now, we will focus our app to execute on the main branch.
This is the base of our workflow:
name: subscription-service

on:
  push:
    branches:
    - main
jobs:
  build:
    timeout-minutes: 10
    runs-on: ubuntu-latest
    steps:
    - name: Checkout
      uses: actions/checkout@v2
The name of our workflow is subscription-service, and the workflow will be executed once there is a push on the main branch.
The virtual environment to use is ubuntu-latest, which is provided by GitHub Actions. The benefit of using this environment is that Compose comes preloaded with it.
Then, we add a step to check out the repository. Since each job will take place on a new instance of a virtual environment, we should be concerned about the dependencies and the artifacts that get produced in each step. For this case, a cache mechanism is provided by GitHub so that we can speed up the time it takes to load these dependencies.
Caching built images
Building images can be time-consuming. This is something we want to avoid in CI/CD since we want our jobs to be fast and as smooth as possible.
Long-running jobs can have a negative impact on the automation process:
- The job can time out, thus making it impossible to be invoked.
- The development process gets slower.
- CI/CD becomes painful for developers.
For this reason, we will use the caching capabilities provided by GitHub Actions:
...
    - name: Cache Local Images
      id: local-images
      uses: actions/cache@v3
      with:
        path: /var/lib/docker/
        key: local-docker-directory
...
By adding this step, we instruct actions to cache the /var/lib/docker directory. This is the directory where images are stored. By doing so, the steps that will interact with this directory will have the content-generated cache; therefore, the next jobs will be able to pick up the artefacts that have already been downloaded from the previous steps.
Building application images
We are ready to add our next step, which will be to build the application images. As we saw in Chapter 4, Executing Docker Compose Commands, we can use Compose to build the application images.
The action step should be the following:
...
    - name: Build Images
      working-directory: ./Chapter8
      run: |
        docker compose -f docker-compose.yaml -f newsletter-lambda/docker-compose.yaml -f s3store-lambda/docker-compose.yaml -f sqs-to-lambda/docker-compose.yaml build
...
Since we focused on the application we developed in Chapter 8, Simulating Production Locally, we should switch the working directory to the corresponding directory. We will use the working-directory section pointing to the Chapter8 directory.
In the run section, we specify the build command that we used previously. This can be any bash command available through the virtual environment chosen.
The outcome of this action will be the application’s Docker images to be built.
Since we have built the images, we are ready to proceed with making a proof-of-concept test for our application.
Testing your Compose application
It’s time to add our next Compose step, which will be a proof-of-concept test. We will spin up the entire Compose application and then run a curl command, as we did earlier, and check the results.
The step we are going to add is the following:
...
    - name: Test application
      working-directory: ./Chapter8
      run: |
        docker compose -f docker-compose.yaml -f newsletter-lambda/docker-compose.yaml -f s3store-lambda/docker-compose.yaml -f sqs-to-lambda/docker-compose.yaml up -d
        sleep 20
        curl -XPOST "http://localhost:8080/2015-03-31/functions/function/invocations" -d '{"email":"[email protected]","topic":"Books"}'
        sleep 20
        docker compose logs --tail="all"
...
We set up Chapter8 as the working directory. Then, we spin up the Compose application in daemon mode. Daemon mode gives us the ability to continue to use the Terminal session while the application is running.
By sleeping for 20 seconds, we can make sure every service is running. Then, a curl command will invoke the Lambda function serving as an entry point.
Since the actions are async, we will wait for some seconds.
Provided our command is successful, we can then check for the logs using the Compose logs command with the –tail option.
Overall, we managed to run the entire Compose application in a pipeline. Also, we did manage to run a test. This will make our automation efforts more efficient since we can use Compose to simulate a prod-like infrastructure in CI/CD, interact with it, and apply automated checks during the development process. Onward, we will implement the same job on Bitbucket pipelines.
Using Docker Compose with Bitbucket pipelines
Bitbucket pipelines are a CI/CD solution for the repositories hosted on Bitbucket. By having a repository hosted on Bitbucket instead of using an external solution for CI/CD purposes, Bitbucket pipelines can be very useful since they are readily available and seamlessly integrated. As with the previous case in GitHub Actions, we will follow the same process.
Creating your first Bitbucket pipeline
In order to enable Bitbucket pipelines, you need to create a bitbucket-pipelines.yml file in the root directory of your project. Then, you can enable the pipelines in your repository through the settings:
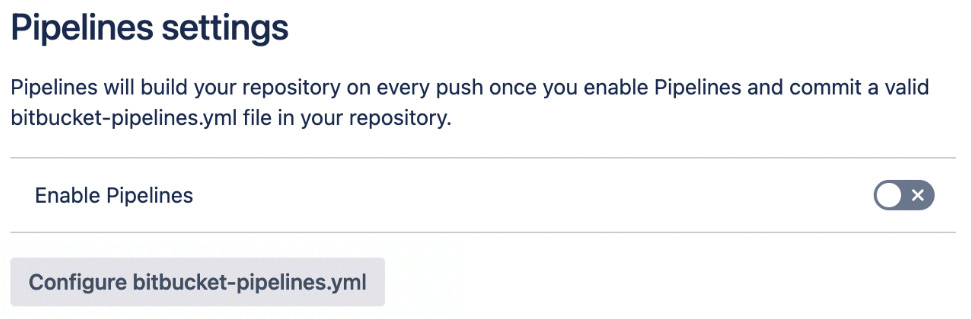
Figure 9.1 – Bitbucket pipelines enabled
Once the pipelines are enabled, Bitbucket will proceed with executing the instructions specified in the bitbucket-pipelines.yml file.
The bitbucket-pipelines.yml base will be the following:
image: atlassian/default-image:3
options:
  docker: true
definitions:
  caches:
    compose: ~/.docker/cli-plugins

pipelines:
  default:
    - step:
        name: "Install Compose"
        caches:
          - compose
        script:
          - mkdir -p ~/.docker/cli-plugins/
          - curl -SL https://github.com/docker/compose/releases/download/v2.2.3/docker-compose-linux-x86_64 -o ~/.docker/cli-plugins/docker-compose
          - chmod +x ~/.docker/cli-plugins/docker-compose
          - docker compose version
In the image section, we specify the Docker image that we should use throughout the execution of the CI/CD tasks. The atlassian/default-image:3 image is based on a Linux distribution that is more specific to Ubuntu 20.04 LTS. By default, this image does not have Compose support; therefore, we will have to install Compose in a Linux environment. We follow the same step that we followed in Chapter 1, Introduction to Docker Compose, in order to install Compose on a Linux distribution.
Also, as we can see, in the pipeline, we enable the Docker services. This is crucial to enable access to the Docker daemon and, thus, be able to interact through Docker commands. By enabling Docker services through these options, we enable their Docker capabilities for all of the pipeline steps.
Caching Compose and Docker images
Our first step was to add support for Compose to the Docker image used. Since in every step, a new Docker container is being created, we need to execute the same commands for each pipeline step. To prevent this, we will cache the Docker plugin directory. Once the next step takes place, the directory and its contents will be present through the cache, making it feasible to use Compose.
So, what we did in the caches section is to add a custom cache for Bitbucket pipelines, pointing to a directory.
Take note that although this is a workaround for the current pipelines, there is a more efficient workaround for building an image based on atlassian/default-image:3, which will have the Compose installation instructions executed.
Instead of creating custom caches, we can use existing implementations. Bitbucket comes with various caches predefined, and one of them is for Docker. By having Docker caching enabled on a pipeline step, we can make sure that the images that are already downloaded and the images built will be cached and ready to be used for the next steps.
The caches to be used in each step are specified using the caches section:
...
    - step:
        name: "Hello world"
        caches:
          - docker
        script:
          - docker run --rm hello-world
...
In this case, the image for hello-world will be downloaded and cached.
By having caching enabled for Compose and Docker, we can speed up the process of the pipeline steps without the need to retrieve the dependencies needed in each step. Therefore, we will proceed to the next step, which is building the images.
Building application images
We have been able to execute Compose commands in a Bitbucket pipeline environment. Now, we can proceed with interacting with our Compose application using Compose commands.
We will add a step in the pipeline that builds the images:
...
    - step:
        name: "Chapter 8 Build Images"
        caches:
          - docker
          - compose
        script:
          - cd Chapter8
          - docker compose -f docker-compose.yaml -f newsletter-lambda/docker-compose.yaml -f s3store-lambda/docker-compose.yaml -f sqs-to-lambda/docker-compose.yaml build
...
There is not much difference compared to the previous GitHub Actions example; we switched to the directory manually and issued the same build command.
As we can see, we have the docker and compose caches enabled. Therefore, there is no need to install Compose again. Also, the images that we built will be available for the next pipeline step. By having the images built, we can proceed with executing a test for our application.
Testing your Compose application
The images have been built, so now we can test the Compose application as we did earlier.
The step for testing the application is as follows:
...
    - step:
        name: "Chatper 8 Test Application"
        caches:
          - docker
          - compose
        script:
          - cd Chapter8
          - docker compose -f docker-compose.yaml -f newsletter-lambda/docker-compose.yaml -f s3store-lambda/docker-compose.yaml -f sqs-to-lambda/docker-compose.yaml up -d
          - sleep 20
          - curl -XPOST "http://localhost:8080/2015-03-31/functions/function/invocations" -d '{"email":"[email protected]","topic":"Books"}'
          - sleep 20
          - docker compose logs --tail="all"
...
We will have the same outcome that we had with GitHub Actions. Docker Compose is set up in Bitbucket pipelines. This enables us to proceed with more advanced CI/CD tasks in Compose that utilize Compose. Now we can proceed with implementing this logic on another popular CI/CD provider, Travis CI.
Using Docker Compose with Travis
Travis is a YAML-based CI/CD solution. It does provide source code hosting, but it is very well integrated with GitHub. Travis used to provide free CI/CD for open source projects, so it is very common to work on an open source project that uses Travis. The same steps we followed in the previous CI/CD vendors will also be applied to Travis.
Creating your first Travis job
Travis is YAML-based just like the previous CI/CD tools we examined. Once we enabled Travis integration with a GitHub project, a file named .travis.yml containing the job instructions needs to be present at the root location of the project.
Our.travis.yml base should be the following:
services:
  - docker

cache:
  directories:
    - $HOME/.docker/cli-plugins

jobs:
  include:
    - stage: "Install Compose"
      script:
      - mkdir -p /home/travis/.docker/cli-plugins/
      - curl -SL https://github.com/docker/compose/releases/download/v2.2.3/docker-compose-linux-x86_64 -o ~/.docker/cli-plugins/docker-compose
      - chmod +x ~/.docker/cli-plugins/docker-compose
      - docker compose version
The job specification seems familiar. As we did with the Bitbucket pipelines, here, we also installed the Compose binary for the Linux distribution. Therefore, caching this step is as essential as before.
Caching Compose
Travis has caching capabilities. As we can see, we cached the directory where Compose is installed. By specifying the cache, it will take effect for all the jobs included in our configuration.
From the online documentation, Travis CI discourages the caching of Docker images. Therefore, we won’t proceed in this direction. However, if caching is needed, certain images can be cached by saving and loading the images through a cached directory.
Building application images
By being able to execute Compose commands on Travis, we can now proceed with building the images.
Here is the job that will build the images:
...
    - stage: "Build Images"
      script:
      - cd Chapter8
      - docker compose -f docker-compose.yaml -f newsletter-lambda/docker-compose.yaml -f s3store-lambda/docker-compose.yaml -f sqs-to-lambda/docker-compose.yaml build
...
Since the job is successful the next step is to test the application.
Testing your Compose application
Our testing stage will not have any significant difference from the ones we implemented earlier apart from the syntax used.
The test section will be the following:
...
    - stage: "Test application"
      script:
        - cd Chapter8
        - docker compose -f docker-compose.yaml -f newsletter-lambda/docker-compose.yaml -f s3store-lambda/docker-compose.yaml -f sqs-to-lambda/docker-compose.yaml up -d
        - sleep 20
        - curl -XPOST "http://localhost:8080/2015-03-31/functions/function/invocations" -d '{"email":"[email protected]","topic":"Books"}'
        - sleep 20
        - docker compose logs --tail="all"
...
As expected, the images have been built and tested successfully. So, we are able to use Compose on multiple CI/CD providers and enhance our automation pipeline.
Summary
We did it! We managed to run CI/CD tasks that utilized the functionalities of Compose. This way, complex production environments could be simulated through CI/CD allowing us to have a fine-grained way of integrating the code base and a sufficient amount of merge checks.
In the next chapter, we will check how we can use Compose to deploy to a remote host.