13
Migrating to Kubernetes Configuration Using Compose
In the last few chapters, we deployed a Compose application to production using two cloud providers: AWS and Azure. We provisioned container registries and VPCs, as well as other cloud components such as load balancers. We created cloud-native applications and took advantage of the features provided by the cloud such as autoscaling, as well as load balancing.
In this chapter, we will focus on migrating our Compose application to a popular container orchestration engine: Kubernetes. Over the last few years, Kubernetes has grown a lot in popularity and it has a rich ecosystem of utilities and tools. There are many reasons nowadays for an engineer to choose Kubernetes as a container orchestration engine. This does not conflict with using Compose and Kubernetes. Compose can be the lightweight tool that can assist during local development, while Kubernetes can be the choice for production. In this chapter, we will make a transition from Compose to Kubernetes. We will identify the corresponding Kubernetes components to the Compose ones and we will generate the Kubernetes deployment configurations.
In this chapter, we will cover the following topics:
- Introduction to Kubernetes
- Kubernetes components and Compose
- Using Kompose to convert files
- Introduction to Minikube
- Deploying your application to Kubernetes
Technical requirements
The code for this book is hosted in this book’s GitHub repository at https://github.com/PacktPublishing/A-Developer-s-Essential-Guide-to-Docker-Compose. If updates are made to the code, they will be reflected in this GitHub repository.
Introduction to Kubernetes
Kubernetes is a container orchestration engine. By using Kubernetes, we can automate the deployment, scaling, and management of container-based applications. Since it is open source, a Kubernetes cluster can be set up from scratch in your data center, whether it is an on-premise data center or in the cloud. Also, there is the option of using a managed Kubernetes cluster. Due to its growing popularity, every major cloud provider, such as AWS, Google Cloud, and Azure, has a managed Kubernetes offering.
When we deploy an application on Kubernetes, we deploy the application to an environment that has various capabilities that assist in provisioning, scaling, and monitoring that application.
Kubernetes provides a distributed and robust way to store application secrets and configurations. It offers a health check and readiness system for a deployed application. It can scale the application that’s been provisioned as well as load balance the traffic. It also provides the necessary tools to monitor as well as debug an application. Finally, it provides a layer of service communication through naming a service discovery.
Considering these points, by deploying an application to Kubernetes, we expect the following to happen:
- The application is scheduled to be deployed and run on the node of the Kubernetes cluster.
- The application will use the configuration, secrets, and environment variables that are defined when deploying.
- Kubernetes will scale the application to the number of application instances we defined.
- Kubernetes will monitor the health and readiness of the application and will replace unresponsive containers.
- Kubernetes will load balance the traffic toward our application to the multiple instances that are running inside the cluster.
- Kubernetes will provide an extra layer of security by enabling and disabling traffic between applications.
- Kubernetes will provide a service discovery so that our applications will be able to seamlessly connect to other applications through the cluster without any manual intervention.
Now that we know more about Kubernetes and how this works for our applications, let’s see how the Compose components of Kubernetes match with the ones we use for Compose and how we can make a migration feasible.
Kubernetes components and Compose
Our Compose applications are simplistic, but if we look carefully, they do have certain components in place. Those components have their corresponding Kubernetes components.
Compose applications versus namespaces
As we saw in Chapter 11, Deploying Docker Compose to AWS, an ECS cluster can host multiple Compose applications. Our Compose application, in a way, provides a way to group the resources that we provision on an ECS cluster. In Kubernetes, this is done through namespaces. Namespaces can help different applications share a cluster while being logically isolated from each other.
Compose services versus Kubernetes services
In the Compose specification, service represents the context of a service that is backed by one or more containers. As we know, when we define the service, we can configure the name of the underlying containers.
The equivalent of this on Kubernetes is the combination of Kubernetes Pods, Deployments, and Services. A Pod on Kubernetes is the smallest deployable unit of computing that can be deployed to Kubernetes. When deploying a Pod to Kubernetes, a singular container will be deployed to a Node in Kubernetes with the configuration specified. It is a single instance of the deployment we made, which leads us to Deployments.
Deployments on Kubernetes are a declarative way to define an application and specify the Pods that comprise that application, as well as the number of replicas that the Pod will have. Since we introduced the concept of replicas, load balancing is the next logical step to identify.
Services on Kubernetes provide an abstract way to access the Pods of a Deployment. In Compose, we can access a service directly by using the service name as a DNS. In Kubernetes, we need to define a Service that provides this abstraction inside the Kubernetes cluster. The Service will provide a single DNS name under which we shall be able to interact with the Pods of an application. Also, by using the Service, the traffic will be load balanced across the Pods of the Deployment.
Labels
In Compose, we can use labels – that is, key/value pairs that are attached to Compose components. Labels can be added to services, images, and every resource defined in the Compose application. With labels, we have a way to attach metadata to the Compose components. Kubernetes takes the same concept of labels and takes it one step further. In Kubernetes, labels are not limited only to some type of metadata information.
Labels can be attached to every component in Kubernetes. What makes Kubernetes labels important is their usage. Through labels, a Service can identify the Pods it should direct traffic to. Through labels, we can define rules that enable ingress and egress between Kubernetes Pods.
Compose networks versus network policies
In Compose, we have networks, which represent communication links between services. If we create a Compose application without a network defined, all the services will reside on the same network. This way, all the services can communicate with each other. If we define networks on Compose, for the services to communicate, they need to be on the same network. In Kubernetes, this is done with the help of NetworkPolicy. By defining a network policy, we can specify ingress and egress rules by using IP blocks, namespace matchers, or Pod selectors.
Labels have a key role in this since we can route traffic between Pods by using just labels. On the other hand, since we might want to be able to establish communication between multiple applications on a Kubernetes cluster located on different namespaces, traffic routing can also be defined using namespace selectors.
Now that we’ve provided an overview of the Compose components and their equivalent in Kubernetes, let’s convert our existing Compose application into a Kubernetes one.
Using Kompose to convert files
Converting an existing Compose application into Kubernetes should not be difficult. A Compose application has a much simpler structure, whereas a Kubernetes deployment can get much more complex as Kubernetes comes with many features and capabilities.
As a use case, we will pick the application we built in Chapter 5, Connecting Microservices. We will just use the Compose file with some adaptations.
There is the option to convert a Compose application into the equivalent Kubernetes resources manually. Alternatively, a tool such as Kompose can be used. By using Kompose, we can convert our Compose application into the equivalent Kubernetes resources needed for our application.
Installing Kompose should be easy – we can just follow the instructions at https://kompose.io/installation/.
Before we jump into conversion, we need to make some adaptations to our application.
One of the things that Kompose needs is the version of our Compose file:
version: '3'
Another important part of the Compose service is to expose the ports. By exposing the ports, we make it feasible for Kompose to identify a port that needs to be exposed on a deployment.
In Compose, when exposing a port, it will translate into a public port so that it can be deployed to ECS and Azure.
In Kubernetes, exposing a port on a deployment serves documentation, just like EXPOSE on a Dockerfile. To expose a Pod in Kubernetes in a load-balanced form internally, a Service is needed.
Let’s add the port on Redis:
services:
  redis:
    image: redis
    networks:
      - redis-network
    ports:
      - 6379: 6379
...
Now, let’s add the port to the location service:
services:
  location-service:
  ...
    ports:
      - 8080:8080
   ...
Another adaptation we need to do has to do with health checks’ start_period. In Kubernetes, there is the context of health checks but also the context of readiness prompts. Instead of waiting for when the health checks should start, a readiness prompt is provided to identify when the application is ready, and when the health checks should take effect.
Therefore, the applications with health checks should be adapted to this:
    healthcheck:
      test: ["CMD", "curl", "-f", "http://localhost:8080/ping"]
      interval: 10s
      timeout: 5s
      retries: 5
      start_period: 5s
We are now ready to generate the files:
$ kompose convert
Provided we run on the same directory where the Compose file exists, we shall see the files being generated.
If we examine these files, we shall see three distinct types:
- Deployment
- Services
- Network policies
The content of our application and configuration resides in the deployment file.
If we inspect the task-manager-deployment.yaml file, we will see that the environment variables and their corresponding health checks are there. Also, take note that the port is exposed.
The next file to inspect is the service. Unlike Compose, where the application can be reached under the service name without any adaptation, in Kubernetes, we need to place a Service in front of it so that rooting traffic through a DNS name takes effect.
Then, we can see the network policies. Provided a network plugin is installed in Kubernetes, we allow traffic ingress from other Pods based on their labels.
In both Redis and the location network policies, the ingress between the Pods is routed by using the Pod labels.
Now, let’s deploy the application to a Kubernetes cluster.
Introduction to Minikube
A way to run and test your Kubernetes deployments locally is through Minikube. Minikube is a local Kubernetes engine that we can deploy and test our Kubernetes application on.
Since Minikube is not a fully operational Kubernetes cluster, in the context of having some highly available master nodes and some node groups attached, we are limited to what we can test. For example, we cannot scale the underlying node group based on the increase of our workloads or spread the deployment of our applications to different availability zones. However, for our usage, it covers all the aspects of our application.
Based on your workstation instance, you can find the corresponding installation instructions (https://minikube.sigs.k8s.io/docs/start/).
If you have Minikube installed and want to start fresh, you can delete the previous container and start a new one:
$ minikube stop && minikube delete
A network policy requires a network plugin. This way, the rules will take effect and we can enable the service to communicate together or prevent them. By default, Minikube does not have a network plugin enabled. We shall use Calligo for our network policies to take effect.
Let’s start Minikube:
$ minikube start --network-plugin=cni --cni=calico
If a failure occurs on macOS, you will see an error message similar to the following:
You might also need to resize the docker driver desktop.
In this case, resizing the disk image size of your Docker Desktop configuration can help:
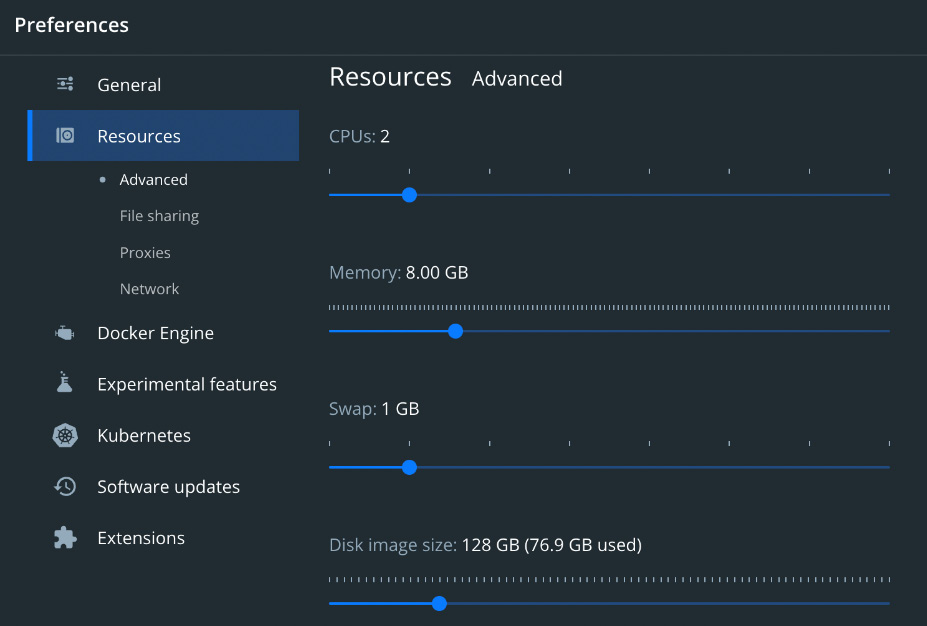
Figure 13.1 – Disk image resize
Let’s test Minikube by applying a deployment:
$ kubectl create deployment nginx --image=nginx
deployment.apps/nginx created
$ kubectl get pod
NAME READY STATUS RESTARTS AGE
nginx-8f458dc5b-z2ctk 1/1 Running 0 55s
Now, we can install the files that have been generated. The next step is to have Task Manager fully working on Kubernetes.
Deploying to Kubernetes
With this Kubernetes Deployment, we are closer to the goal of migrating our application. However, there is one thing we need to take care of and this has to do with pulling the images from a registry. As we have seen on ECS and ACI, it is essential to have a way for the container orchestration engine to be able to access the images from a registry. Since we are using Minikube, there is no need for us to provision a registry.
We can build our images and deploy them to the local Minikube registry. To achieve this, we shall point our build operations to the Minikube local registry.
We shall do this through the docker-env command of Minikube:
$ eval $(minikube docker-env)
Now, let’s build and deploy those images toward that registry:
$ docker compose build
Applying the files we’ve generated previously should now be streamlined.
Let’s start with the Redis deployments:
kubectl apply -f redis-deployment.yaml
kubectl apply -f redis-service.yaml
kubectl apply -f redis-network-networkpolicy.yaml
Since Redis is up and running, the next component we will cover is the Event Service. The only dependency the Event Service has is Redis:
kubectl apply -f event-service-deployment.yaml
The next Service that is also dependent on Redis is the location service:
kubectl apply -f location-service-deployment.yaml
kubectl apply -f location-service-service.yaml
kubectl apply -f location-network-networkpolicy.yaml
Last but not least, let’s deploy Task Manager:
kubectl apply -f task-manager-deployment.yaml
kubectl apply -f task-manager-service.yaml
At this point, our application should have been fully deployed to Kubernetes.
Let’s port-forward Task Manager:
$ kubectl port-forward svc/task-manager 8080:8080
Since our application is up and running, let’s create a task by executing a request using curl:
$ curl --location --request POST '127.0.0.1:8080/task/'
--header 'Content-Type: application/json'
--data-raw '{
"id": "8b171ce0-6f7b-4c22-aa6f-8b110c19f83a",
"name": "A task",
"description": "A task that need to be executed at the timestamp specified",
"timestamp": 1645275972000,
"location": {
"id": "1c2e2081-075d-443a-ac20-40bf3b320a6f",
"name": "Liverpoll Street Station",
"description": "Station for Tube and National Rail",
"longitude": -0.081966,
"latitude": 51.517336
}
}'
{"created":true,"message":"Task Created Successfully","task":{"id":"8b171ce0-6f7b-4c22-aa6f-8b110c19f83a","name":"A task","description":"A task that need to be executed at the timestamp specified","timestamp":1645275972000,"location":{"id":"1c2e2081-075d-443a-ac20-40bf3b320a6f","name":"Liverpoll Street Station","description":"Station for Tube and National Rail","longitude":-0.081966,"latitude":51.517336}}}
We can check that the network policies work by tweaking the configurations.
Now, let’s apply a deny-all network policy:
$ kubectl create -f - <<EOF
kind: NetworkPolicy
apiVersion: networking.k8s.io/v1
metadata:
name: deny-all
spec:
podSelector:
matchLabels: {}
EOF
If we delete the Redis network policy, we won’t be able to access the Redis database from the Pods anymore:
$ kubectl delete –f ./redis-network-networkpolicy.yaml
We did it! We just migrated our application to Kubernetes! The Compose services are running as deployments with a Kubernetes Service in front of them and we have our network policy rules taking effect.
Summary
In this chapter, we were introduced to Kubernetes, some of its basic components, and the corresponding Kubernetes components for our Compose application’s components. Then, we migrated the Compose application to the necessary Kubernetes resources that are required to make our application operational. To do so, we used Kompose to streamline the generation of Kubernetes files. Then, we installed Minikube, including the network plugin Calico. By having Minikube up and running, we managed to deploy our application and test it.
So far, we have used Compose extensively for different occasions. We used it for day-to-day development, testing production deployments, and also to implement a Kubernetes deployment. At this point, you should be able to confidently use Compose for your day-to-day work productively.
I would like to thank you for choosing this book. Now, it is your choice where and how you will apply this recently acquired knowledge. Whether it will be your new cloud-native application, an environment for CI/CD tasks, or a local environment for your team, it is your choice.
That’s it! This is the end of this book. Go ahead and build amazing things.