10
Deploying Docker Compose Using Remote Hosts
In the previous chapter, we created CI/CD tasks by using Docker Compose. We also created various environments that we can use and utilize regarding the scenario presented.
In this chapter, we will focus on deploying our Docker applications to a remote host. While developing an application, there are various reasons why you may not want to deploy your application to another host: the application can be resource-intensive, you may want to share the progress with a colleague or the host, the application is getting deployed to, may have access to resources through the network that your workstation doesn’t. A remote host could be a solution to those issues since it allows us to deploy a Docker application to another workstation and thus make it available externally.
In this chapter, we will cover the following topics:
- Docker remote hosts
- Creating a remote Docker host
- Docker Contexts
- Deploying Compose to remote hosts
- Executing remote host deployments through your IDE
Technical requirements
The code for this book can be found in the following GitHub repository: https://github.com/PacktPublishing/A-Developer-s-Essential-Guide-to-Docker-Compose. If any updates are made to the code, they will be reflected in the GitHub repository.
Docker remote hosts
Imagine an application running locally on a machine and you want it to be accessible by another individual through a Linux machine located on the cloud for general usage. If this application is based on Docker Compose, the application can be deployed manually to the VM through shell commands. However, there is a more streamlined way to deploy this application to the target VM. Provided a server has Docker installed, it is eligible to become a Docker host. Docker gives you the ability to use the Docker capabilities of another machine, provided it has Docker installed and access to that machine has been set up.
An example of a remote host is the Docker installation on Windows and macOS. They both require a Linux VM to run Docker. The Linux VM is the remote host that the Docker CLI uses to interact with.
Now, let’s learn how to create a remote host.
Creating a remote Docker host
To create a Docker host, we need a Linux machine. This can even be a spare laptop or a spare VM that runs a Linux distribution. The provisioning commands are the same commands we followed in Chapter 1, Introduction to Docker Compose. Since a spare Linux workstation may not be available, we shall create a Docker host using AWS EC2.
Creating a Docker host on AWS EC2
In this section, we shall spin up a machine on AWS using EC2. This instance will become our remote host. These steps apply to any available Linux-based server, so the EC2 part can be skipped if you have a Linux workstation available.
By navigating to the IAM section of the AWS console, we should retrieve a key and a secret. This key and secret need to belong to a user that can provision an EC2 machine:
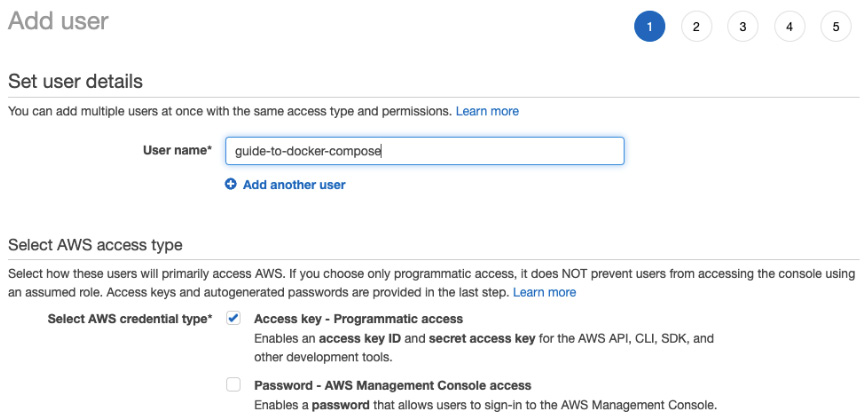
Figure 10.1 – AWS user
Once we’ve retrieved the credentials, we can proceed to the VPC section to find the default VPC for the region selected:

Figure 10.2 – VPC network
Copy that VPC ID since we’ll need it later.
To streamline the provisioning of EC2, we shall use Terraform.
Installing Terraform
Terraform is a modern Infrastructure as Code (IaC) solution. Infrastructure and resources on the cloud can be defined by using a declarative configuration language.
To install Terraform on your system, you can follow the instructions in the official documentation (https://learn.hashicorp.com/tutorials/terraform/install-cli).
Once the Terraform binary is present in the command line, we can check its version, as follows:
$ terraform version
Terraform v1.2.3
on darwin_arm64
Terraform provisions your infrastructure and keeps track of the changes in the Terraform state. The Terraform state can be a local file, a file hosted on AWS S3 with the equivalent blob solutions of other cloud providers, or it can be customized provided the user creates a plugin for it. For example, it is possible to store the state in a database such as RavenDB, provided you develop a plugin for it. In our case, we will just use the local filesystem to store the state.
When running Terraform, it will pick up the cloud provider used and download the binaries needed. For example, if we provision code for AWS using Terraform, Terraform will download the AWS plugins without us having to do any extra installation work.
Setting up an EC2 machine with SSH enabled
The goal is to set up an EC2 instance that we can use to log in using SSH. This instance needs to have Docker and Docker Compose installed.
We would like this machine to only be accessible from our workstation’s IP. Thus, we should provide our IP when provisioning the infrastructure. Also, the EC2 machine will be in a virtual private network. In our case, we want to use the default VPC. To do so, we shall use the ID of the default VPC – the one that we copied previously.
We should specify the IP and the VPC ID, as variables so that we can use them when we provision the infrastructure:
variable "myvpc" {
}
variable "myip" {
}
Now, let’s generate those SSH keys that we will use for the EC2 machine.
Once the keys have been generated, the private key should be added to the OpenSSH authentication agent.
The command to generate the keys and add them to the OpenSSH authentication agent:
// Chapter10/generate-key.sh
$ ssh-keygen -t rsa -b 2048 -f $(pwd)/ssh.key -N ""
$ ssh-add ssh.key
We need to execute this step before provisioning the EC2 instance to provision the EC2 machine using an existing key. Also, by adding this key to the SSH authentication agent, we streamline the process of connecting to the server we will be provisioning.
The next step is defining the infrastructure. Since we will SSH to that machine, we need a security group that will allow ingress to the instance from our workstation.
The ingress rule for this is as follows:
resource "aws_security_group" "remote_docker_host_security_group" {
  ...
  ingress {
    description      = "SSH from workstation"
    from_port        = 22
    to_port          = 22
    protocol         = "tcp"
    cidr_blocks      = ["${var.myip}/32"]
  }
  ...
}
As you can see, we use the ip variable we specified previously.
We also need to enable egress. If we are going to have a remote host on that machine, we need to be able to interact with external Docker registries:
resource "aws_security_group" "remote_docker_host_security_group" {
  ...
  egress = [
    {
      cidr_blocks      = [ "0.0.0.0/0", ]
      description      = ""
      from_port        = 0
      ipv6_cidr_blocks = []
      prefix_list_ids  = []
      protocol         = "-1"
      security_groups  = []
      self             = false
      to_port          = 0
    }
  ]
  ...
}
Having generated the keys, AWS gives us the option to upload the public key as a resource. This can make the procedure involve more bootstrapping and will add the SSH key to multiple machines, which may act as Docker hosts.
The SSH key resource is as follows:
resource "aws_key_pair" "docker_remote_host_key" {
  key_name   = "docker-remote-host-key"
  public_key = file("${path.module}/ssh.key.pub")
}
An EC2 machine will be created and will use the key we created previously.
Finally, we must create the EC2 instance:
resource "aws_instance" "remote_docker_host" {
    ami = "ami-078a289ddf4b09ae0"
    instance_type = "t2.micro"

    key_name = aws_key_pair.docker_remote_host_key.key_name


    vpc_security_group_ids = [
        aws_security_group.remote_docker_host_security_group.id
     ]
  }
This EC2 instance will be provisioned. It will allow traffic from our workstation, and we will be able to have access from the outside.
However, this will require us to install Docker on the machine that’s running. Instead, we can use the user-data functionality of an EC2 machine. user-data is the script that runs once an EC2 machine has been provisioned.
By utilizing this functionality, we can set up Docker Compose on the EC2 machine:
resource "aws_instance" "remote_docker_host" {
...
  user_data = <<-EOF
    #!/bin/bash
    yum install docker -y
    usermod -aG docker ec2-user
    systemctl start docker
    su ec2-user
    mkdir -p /home/ec2-user/.docker/cli-plugins
    curl -SL https://github.com/docker/compose/releases/download/v2.2.3/docker-compose-linux-x86_64 -o /home/ec2-user/.docker/cli-plugins/docker-compose
    chmod +x /home/ec2-user/.docker/cli-plugins/docker-compose
  EOF
...
}
The preceding commands should seem familiar to you; we ran them in Chapter 1, Introduction to Docker Compose. Since we picked up a Red Hat-based VM image, we used yum.
Since we’ll be connecting to that machine, let’s also print the EC2 machine’s IP address:
output "instance_ip" {
  description = "Remote host ip"
  value       = aws_instance.remote_docker_host.public_ip
}
Now, we have everything we need to provision the infrastructure.
To execute the necessary Terraform commands, we can pass the credentials needed for AWS through the AWS_ACCESS_KEY_ID and AWS_SECRET_ACCESS_KEY environment variables. We must also specify the region we will operate in via AWS_REGION. These variables can be exported or passed directly to the Terraform command. You can also use them indirectly by using the credentials files and configuration that was generated when configuring aws-cli.
First, let’s initialize Terraform:
AWS_ACCESS_KEY_ID=key-id AWS_SECRET_ACCESS_KEY=access-key AWS_REGION="eu-west-2" terraform init
This will provide our state in a file.
Now, run the following command:
AWS_ACCESS_KEY_ID=*** AWS_SECRET_ACCESS_KEY=*** AWS_REGION="eu-west-2" terraform apply -var myip=51.241.***.182 -var myvpc=vpc-a8d1b***
By doing this, the infrastructure will be provisioned. Based on the output, we shall get the IP needed to SSH:
instance_ip = "18.133.27.148"
Now, we can SSH using the key we created previously and check that Docker Compose exists:
$ ssh [email protected]
[ec2-user@ip-172-31-37-105 ~]$ docker compose version
Docker Compose version v2.2.3
As expected, the user data script runs successfully. We were also able to ssh to the instance since the keys have been set up.
Using the remote Docker host
Now that the remote host is available, let’s see how we can make it execute a Docker command using the host.
Let’s try to run Redis using the host:
DOCKER_HOST="ssh://[email protected]" docker run -it --rm redis
If we log into the EC2 instance and execute docker ps, we shall see that redis is running on that machine:
$ ssh [email protected] docker ps
CONTAINER ID IMAGE COMMAND CREATED STATUS PORTS NAMES
e44e3bd3a41d redis "docker-entrypoint.s…" 10 seconds ago Up 9 seconds 6379/tcp nifty_aryabhata
By creating a Docker remote host, we can create Docker containers on that host by using our local workstation. This opens new possibilities since more than one host can be used. Managing hosts can be demanding. Therefore, in the next section, we’ll learn how to achieve this using Docker Contexts.
Docker Contexts
Using the host on each command that we use is redundant and error-prone. For example, a deployment may fail due to it reaching a different host because we omitted to specify the host when running the command and we executed a different command on our local host.
For this case, Docker Contexts can be of help.
By creating contexts, we can switch our Docker configuration to multiple contexts and pick the right context per case.
So, let’s create a context for our EC2 host:
$ docker context create ec2-remote --docker host=ssh://[email protected]
Although we have created the context, we are still in the default context. Let’s switch to the recently created context:
$ docker context use ec2-remote
Run the following command:
$ docker run -it --rm redis
Check the results on the server:
ssh [email protected] docker ps
CONTAINER ID IMAGE COMMAND CREATED STATUS PORTS NAMES
1b5b0459bf48 redis "docker-entrypoint.s…" 15 seconds ago Up 13 seconds 6379/tcp peaceful_feynman
However, there is no need to run this command on the server. Thanks to using the context of EC2-remote, we can use the docker ps command locally and the results will be the same. The context will take effect until we switch contexts again:
$ docker ps
CONTAINER ID IMAGE COMMAND CREATED STATUS PORTS NAMES
1b5b0459bf48 redis "docker-entrypoint.s…" 3 minutes ago Up 3 minutes 6379/tcp peaceful_feynman
By, having Docker Contexts enabled, we can use Docker Compose on a remote host.
Deploying Compose to remote hosts
Let’s move the Redis example we run previously into a Compose file:
services:
  redis:
    image: redis
The following command will have to be adjusted with regards to the DOCKER_HOST variable, since a different IP will be allocated to the EC2 instance. The outcome should be the same on another host:
$ DOCKER_HOST="ssh://[email protected]" docker compose up
[+] Running 2/2
Network chapter10_default Created 0.1s
Container chapter10-redis-1 Created 0.1s
Attaching to chapter10-redis-1
chapter10-redis-1 | 1:C 22 Jun 2022 22:50:52.725 # oO0OoO0OoO0Oo Redis is starting oO0OoO0OoO0Oo
By checking the host, we should see that a Redis instance is running.
Since we just used Docker Contexts, we don’t need to specify the host. So, let’s try one more time without the DOCKER_HOST environment:
$ docker context use ec2-remote
$ docker compose up
[+] Running 2/2
...
Here, we ran our application using a remote host on an EC2 machine. Now, we need to clean up the infrastructure we provisioned and keep the costs minimized. We can destroy the infrastructure manually through the AWS console, but since we provisioned the infrastructure using Terraform, we can use the destroy command it provides.
Let’s clean up our infrastructure:
AWS_ACCESS_KEY_ID=*** AWS_SECRET_ACCESS_KEY=*** AWS_REGION="eu-west-2" terraform destroy -var myip=51.241.***.182 -var myvpc=vpc-a8d1b***
The use cases we’ve covered so far can provide a solid developer experience. The necessary code is being developed, environments are being provisioned and deployed through Compose, and we can deploy the application to a remote host, making it accessible to other users. The next step will be to enhance our development efforts by deploying to a Docker host straight from our IDE.
Executing remote host deployments through your IDE
When developing an application, an integrated development environment (IDE) has a crucial role in making us more productive. By using Compose, we can deploy and simulate environments, which is why it has become part of our day-to-day development. In this section, we shall combine the usage of an IDE and Compose.
In this section, we will use IntelliJ IDEA Ultimate Edition (https://www.jetbrains.com/idea/download/#section=mac) as our IDE. Ultimate Edition comes with the option of a free trial.
Let’s configure the Docker host. First, go through the Preferences section, then the Build, Execution, Deployment, and Docker sections. Now, a new Docker configuration can be added:
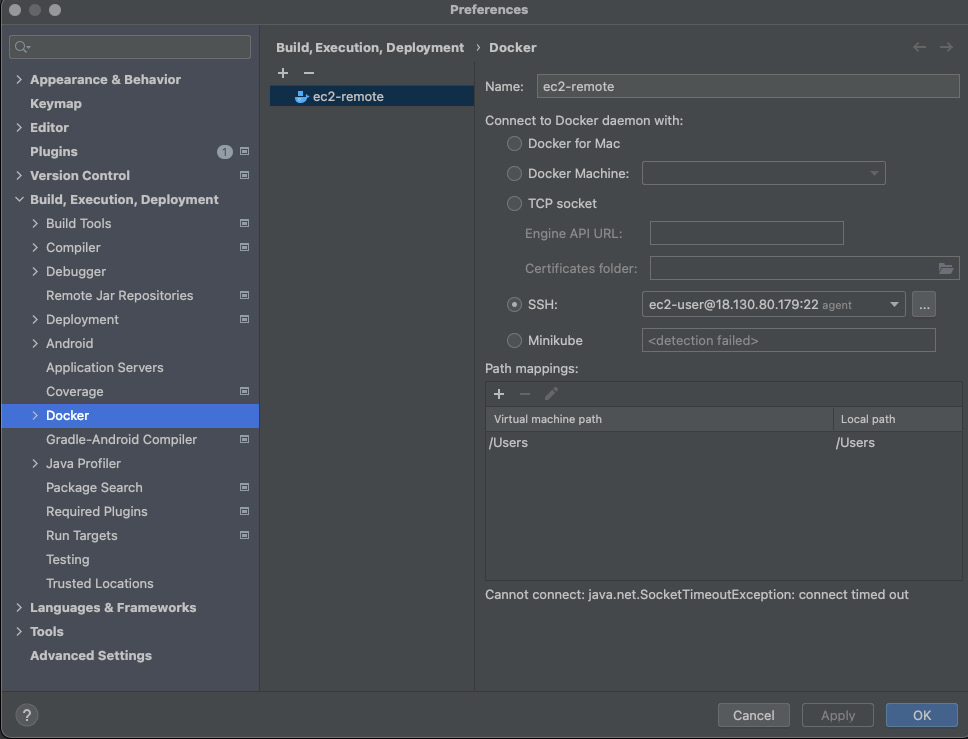
Figure 10.3 – Docker configuration
Then, provided we have docker-compose.yaml, we can run it locally:
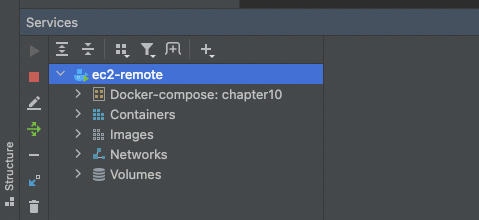
Figure 10.4 – Running Compose
As a result, when we run the Compose file from our IDE, it will use the remote host:

Figure 10.5 – Logs
So, apart from developing our application locally, we managed to deploy it to a remote host and make it feasible for other individuals to check out our progress.
Summary
In this chapter, we deployed our Compose applications to a remote server. This helped us utilize remote server resources and share our application through a remote server. By doing so, we deployed an application to a server. However, this is not a suitable way to deploy a Compose application to production.
In the next chapter, we will learn how to deploy Compose applications to the cloud using the necessary tools and make them production-ready.