
Chapter 12: Working with the Puppeteer Framework
As highlighted in Chapter 3, Top Web Test Automation Frameworks, Google Puppeteer is the baseline framework that was built by the Microsoft team that is now responsible for Playwright. Both frameworks are node libraries based on the CDP, and that obviously allows the Puppeteer framework to acquire deep coverage and testing abilities for any web application. Unlike the Playwright framework, which supports most web browsers as well as other language bindings, Google's Puppeteer framework only works on Chromium-based browsers and only supports JavaScript.
The framework runs by default in Headless mode, but can also be run with the browser UI (in Headed mode). With rich built-in capabilities that support the generation of screenshots and PDFs from web pages, network HAR file creation, and the automation of complex web applications, including keyboard inputs, UI, capturing timeline traces of the website under test, and much more, this framework is a great option for frontend web application developers.
In this chapter, you will get a technical overview of the framework, with a focus on the advanced capabilities with some code-based examples that can be used out of the box. In addition, and since this framework is older than Playwright, but was the foundation of that framework, we will also uncover some core differences between Puppeteer and Playwright.
The chapter is designed to cover the following topics:
- Getting started with Puppeteer
- Learning about Puppeteer's advanced test automation capabilities
- The future of the Puppeteer framework
The goal of the chapter is to help frontend developers enrich their test automation coverage with more advanced capabilities of the framework, whether these are built-in features or plugins.
Technical requirements
The code files for this chapter can be found here: https://github.com/PacktPublishing/A-Frontend-Web-Developers-Guide-to-Testing.
Getting started with Puppeteer
As explained in Chapter 3, Top Web Test Automation Frameworks, to get started with the Puppeteer framework, you need to install the node package through the following command line:
npm install puppeteer
Once the preceding package, together with its dependencies, is installed, you are ready to start writing and running your first test locally in either Headed or Headless mode.
To see the full documentation of the Puppeteer framework along with code samples, API descriptions, release notes, and more, please see https://pptr.dev/.
Like the Playwright framework, Puppeteer also drives its automation through the Browser object, which then drills down into the multiple browserContext sessions that can operate on multiple pages, extensions (https://pptr.dev/#?product=Puppeteer&version=v13.1.0&show=api-working-with-chrome-extensions), and frames.

Figure 12.1 – Google Puppeteer high-level architecture diagram
Since Google is the leader in progressive web applications (PWAs) and was the first technology provider to launch such application types, within this framework, you will be able to use built-in methods to test such application types. In the preceding architecture diagram, you can see the Service Workers support under the BrowserContext component within the web applications.
In this chapter, we will expand on the Puppeteer JavaScript class from Chapter 3, Top Web Test Automation Frameworks, so here is the code for it again (note that to run this code, you will also need to install the puppeteer-har node module):
npm install puppeteer-har
const puppeteer = require('puppeteer');
const PuppeteerHar = require('puppeteer-har');
(async () => {
const browser = await puppeteer.launch();
const page = await browser.newPage();
const har = new PuppeteerHar(page);
await har.start({ path: 'book_demo.har' });
await page.goto('https://www.packtpub.com/');
await har.stop();
await browser.close();
})();
The preceding code snippet, as explained previously, navigates to the Packt website and generates an HAR file for frontend developer review.
After running the preceding test code using the following command, a new HAR file under the name book_demo.har is generated:
node [filename.js] //depends on the JavaScript file name given above
The default Puppeteer node library that Google provides comes built-in with Chromium's latest browser locally installed. However, with this technology, frontend developers can also install the puppeteer-core package, which is mostly the same as the default Puppeteer framework, just without the installation of the browser on your local machine.
As with the default Puppeteer installation, to get the core package, simply run this command:
npm install puppeteer-core
With the preceding installation, also make sure to replace the first line in your source code with this code:
const puppeteer = require('puppeteer-core');
Since JavaScript and the tests written in that language within Puppeteer are asynchronous when we write our tests across all frameworks, we need to make sure that all actions and promises are resolved as a condition to move to the next step in the code (https://web.dev/promises/?gclid=Cj0KCQiAraSPBhDuARIsAM3Js4orqfiLBv1p_jh76YWTW40rTL1yf6HNgeR31knsv7WlAWVJio06XZgaAkjqEALw_wcB).
Promise
Promise in JavaScript is an object and a way to manage the asynchronous nature of the language within the frameworks that use it. To ensure that code can move from one action or a step to the next, promises ought to be resolved by returning a value, or if not resolved, throw an error. Only after they have been resolved can the next block of code be executed. Promises consist of three possible states: Fulfilled, Rejected, or Pending.
Let's better understand this important concept through a short JavaScript example.
In the following code snippet, we are using a web application with a file chooser button that allows users to upload files to the website. We are using the Promise.all() method to ensure that all of the code is running properly and in sequence. We can see that only after the file chooser button has been clicked is the promise code block closed and then the file upload operation will take place, followed by the browser closing.
To run the following code, please make sure to also install the selenium-webdriver module through the following command:
npm install selenium-webdriver
const puppeteer = require('puppeteer');
const { waitForUrl } =
require('selenium-webdriver/http/util');
(async () => {
const browser = await puppeteer.launch({headless:false,
args: ['--window-size=1920,1080']});
const page = await browser.newPage();
await page.goto('https://uppy.io/examples/xhrupload/',
{"waitUntil": 'networkidle2'});
const [fileChooser] = await Promise.all([
page.waitForFileChooser(),
page.click('.uppy-FileInput-btn')
])
await fileChooser.accept(['Packtpub.png']);
await page.screenshot({ path: 'FileChooser.png' });
await browser.close();
})();
After running the preceding code on the XHR file and uploading a screenshot of the Packt Publishing home page, this is what the website looks like:
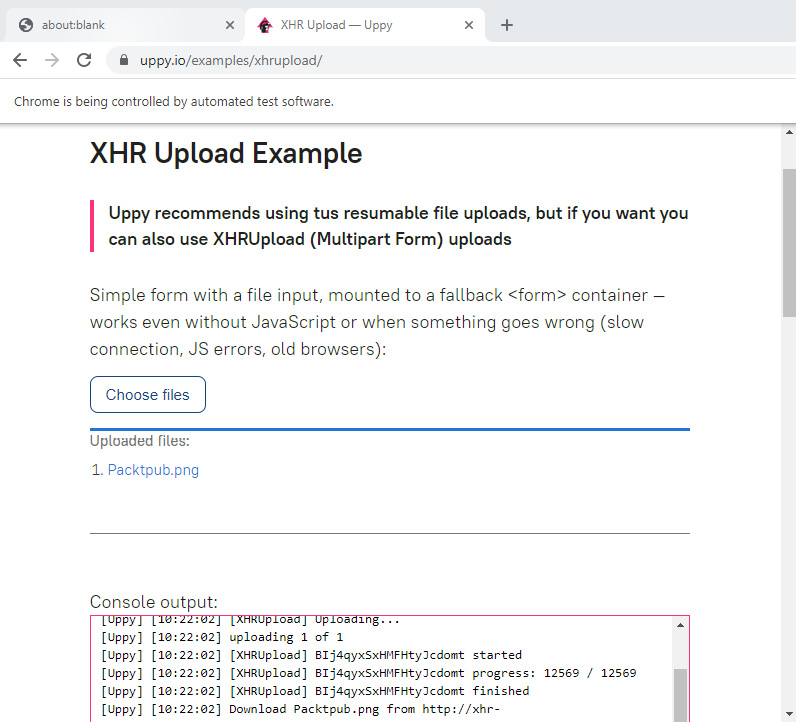
Figure 12.2 – Example of Puppeteer with Promise and the FileChooser method
As highlighted with the other test automation frameworks in this book, Puppeteer also supports common JavaScript test runners such as Jest and Mocha (https://www.npmjs.com/package/mocha-puppeteer). Such frameworks extend the richness of the test scenarios with methods such as expect(), assert(), and much more, which allow improved coding flexibility.
To install both Mocha and Jest (https://jestjs.io/docs/puppeteer) and work with them in Puppeteer, simply install the node library accordingly:
npm install jest-puppeteer
npm install mocha-puppeteer
In the next section of this chapter, we will dive deeper into the core features and some of the advanced capabilities of the Puppeteer framework.
Learning about Puppeteer's advanced test automation capabilities
Following Chapter 11, Working with the Playwright Framework, we will cover the advanced capabilities of Google Puppeteer.
Note that measuring code coverage (https://pptr.dev/#?product=Puppeteer&version=v13.1.0&show=api-class-coverage) is also considered a powerful capability within software test automation; however, since we covered the abilities of code coverage with Istanbul and Babel in Chapter 8, Measuring Test Coverage of the Web Application, we will not repeat it here. Keep in mind that, like Playwright, Puppeteer JavaScript and CSS code coverage with Istanbul (https://github.com/istanbuljs/puppeteer-to-istanbul) is only supported on Chromium-based browsers.
Puppeteer namespaces
Within the Puppeteer framework, frontend web application developers can utilize the device's methods, network conditions, and error-handling capabilities.
To perform web application testing on specific devices, including mobile viewports, you can utilize the puppeteer.devices['DEVICE NAME'], page.emulateNetworkConditions(), and page.emulate() methods (https://pptr.dev/#?product=Puppeteer&version=v13.1.0&show=api-pageemulateoptions). From the preceding URL, you can find all of the supported page.emulate() APIs with code samples and useful documentation.
Now, let's try navigating to the Packt website using the following code:
const puppeteer = require('puppeteer');
const iPhone = puppeteer.devices['iPhone 11'];
(async () => {
const browser =
await puppeteer.launch({headless: false});
const page = await browser.newPage();
await page.emulate(iPhone);
await page.goto('https://www.packtpub.com');
await page.screenshot({path: 'packtpub.png'});
await browser.close();
})();
The preceding code snippet simply navigates to the Packt Publishing website and emulates it on an iPhone 11 device through a slow 3G network profile specified within the Puppeteer framework. Here is the 3G network profile spec used in the test:
'Slow 3g' {
Download: ((500 * 1000) /8) *0.8,
Upload: ((500 * 1000) / 8) * 0.8,
Latency: 400 *5,
},
Prior to closing the browser session, the code for navigating to the Packt website performs a screen capture that is saved under Packtpub.png:
'Slow 3g' {
Download: ((500 * 1000) /8) *0.8,
Upload: ((500 * 1000) / 8) * 0.8,
Latency: 400 *5,
},
In the context of mobile testing, you can use the page.setViewport() methods and specify a screen resolution using the width and height as required. From the following device descriptor page, you can see the built-in mobile device specifications: https://github.com/puppeteer/puppeteer/blob/main/src/common/DeviceDescriptors.ts. For example, for the iPhone 11 used in the preceding code snippet, the test uses the specification for that iPhone platform from the preceding descriptor to virtualize a slow 3G network connection.
Puppeteer working with elements
To interact with web page elements, Puppeteer uses the page APIs to type text, click, scroll, and conduct other events on the web application under test.
In the following code sample, still on the Packt website, we are clicking on the book search box and performing a search of JavaScript books together with a screenshot of the JavaScript books landing page. We are using both the type method and waitForNavigation to ensure that the landing page is loaded prior to taking a screenshot (refer to the next page):
const puppeteer = require('puppeteer');
const { waitForUrl } =
require('selenium-webdriver/http/util');
(async () => {
const browser = await puppeteer.launch({headless:false});
const page = await browser.newPage();
await page.goto('https://www.packtpub.com');
const searchElement = await page.$('#search');
await searchElement.type("JavaScript");
await page.type('#search',String.fromCharCode(13));
await Promise.all([
await page.waitForNavigation({waitUntil: 'load'})
]);
await page.screenshot({ path: 'Packtpub.png' });
await browser.close();
})();
The following is the screenshot taken from the JavaScript landing page on the Packt website:
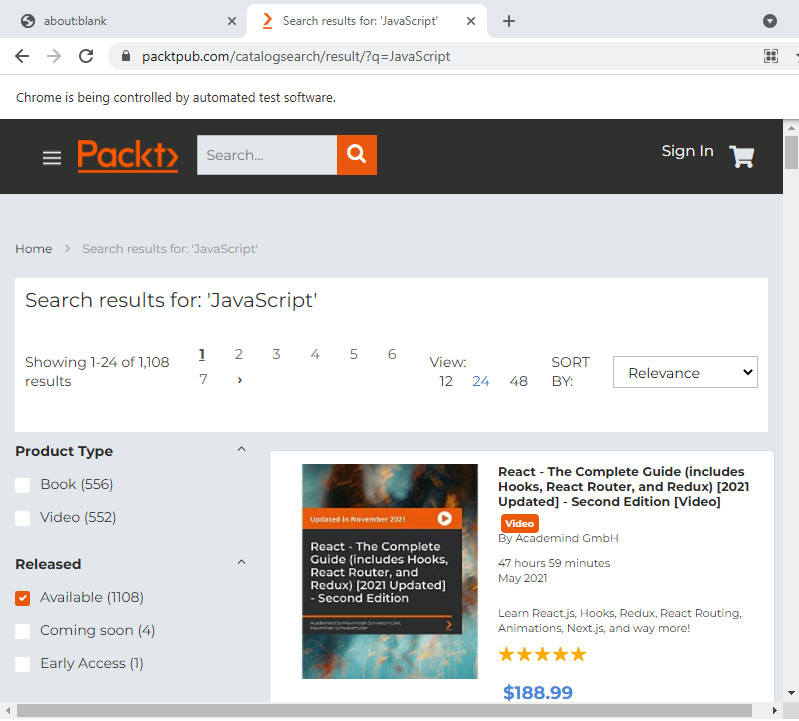
Figure 12.3 – Packt JavaScript books landing page screenshot taken by Puppeteer at the end of the preceding test
To take Puppeteer to a new level, please refer to this elegant and free demo code provided by Google to test their online PacMan game:
const readline = require('readline');
const puppeteer = require('puppeteer');
(async() => {
const browser = await puppeteer.launch({
headless: false,
args: ['--window-size=800,500']
});
const page = await browser.newPage();
await page.setViewport({width: 800, height: 500,
deviceScaleFactor: 2});
await page.goto(
'https://www.google.com/logos/2010/pacman10-i.html');
process.stdin.on('keypress', async (str, key) => {
// In "raw" mode, so create own kill switch.
if (key.sequence === 'u0003') {
await browser.close();
process.exit();
}
if (['up', 'down', 'left', 'right'].includes(key.name)) {
const capitalized =
key.name[0].toUpperCase() + key.name.slice(1);
const keyName = 'Arrow${capitalized}';
console.log('page.keyboard.down('${keyName}')');
await page.keyboard.down(keyName);
}
});
readline.emitKeypressEvents(process.stdin);
process.stdin.setRawMode(true);
})();
As you can see in the preceding JavaScript code sample, the code navigates to the Google PacMan game site and, once loaded in its set viewport sizes, a user can play the game via the keyboard's arrow keys.
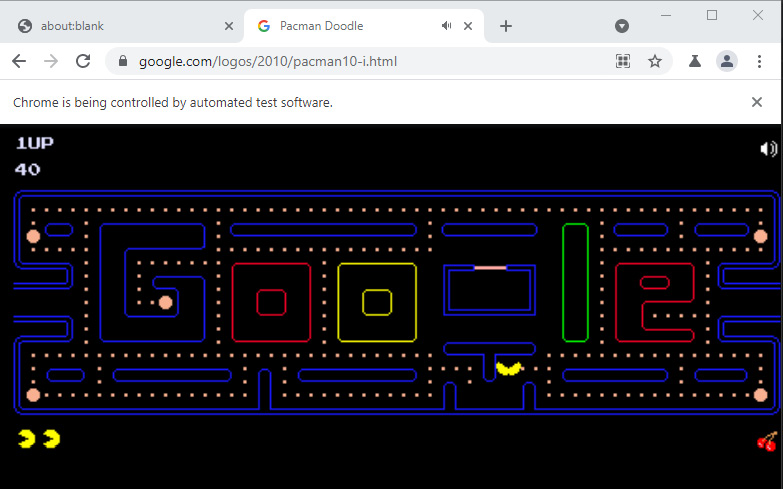
Figure 12.4 – Google PacMan game being executed within a browser through keyboard arrows driven by Puppeteer test code
To perform more actions using elements through the keyboard APIs, you can also refer to some nice code samples provided by the Tabnine website (https://www.tabnine.com/code/javascript/functions/puppeteer/Page/keyboard).
Puppeteer load test option
Google Puppeteer offers a powerful node library that can be installed and used to run multiple instances in parallel on any JavaScript test against your web application and perform load testing (https://github.com/svenkatreddy/puppeteer-loadtest).
Simply install that package using this command:
npm install -g puppeteer-loadtest
Once installed, you should include the package as required within the JavaScript test code:
const startPuppeteerLoadTest =
require('puppeteer-loadtest');
Running a specific test is possible through various command-line options as follows:
- --file – Provides a path to your JavaScript test file.
- --s and --c – This is the sample size configuration for the load (such as --s=100 --c=25 will run a total of 100 specified scripts across 25 concurrent Chrome headless instances).
Running a load test using the preceding command-line option can be triggered through the following:
npx puppeteer-loadtest –-file=./test/sample.js --s=100 --c=25
To view a generated JSON performance test report, please refer to this GitHub repository: https://github.com/svenkatreddy/puppeteer-loadtest/blob/master/test/performance.json.
Puppeteer and Cucumber BDD
As with Cypress and Selenium, you can also implement BDD testing with Puppeteer through a feature file written in Gherkin and step-definition functions in JavaScript.
To use Cucumber BDD with Puppeteer, please install the node library for cucumber-js by means of the following command:
npm install @cucumber/cucumber
Following the installation, you should be able to use a folder structure that includes both step-definition files as well as Gherkin feature files.
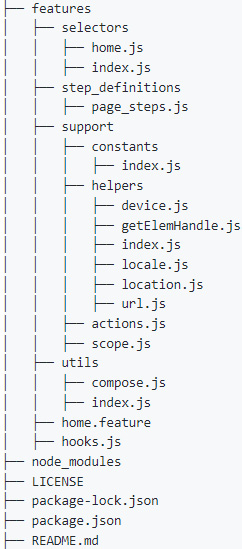
Figure 12.5 – Puppeteer and Cucumber BDD directory structure example (source: https://github.com/mlampedx/cucumber-puppeteer-example)
A full open source project that showcases BDD and Puppeteer can be obtained from the following GitHub repository: https://github.com/mlampedx/cucumber-puppeteer-example.
With the help of the preceding code samples, you can easily get started with this agile testing method.
Puppeteer accessibility testing
You can create accessibility testing with Puppeteer and the common Deque axe (https://www.deque.com/axe/) open source accessibility analyzer library. To do so, simply install the axe-puppeteer node library and add it to your source code using the following command. It will allow you to utilize the AxePuppeteer.analyze APIs and report back to the console and create an output file with the accessibility results and issues identified:
npm install axe-puppeteer
Running the short code sample on the Packt Publishing website will report accessibility issues back to the console using the following code:
const puppeteer = require('puppeteer');
const { waitForUrl } =
require('selenium-webdriver/http/util');
const {AxePuppeteer} = require ('axe-puppeteer');
(async () => {
const browser = await puppeteer.launch({headless:false,
args: ['--window-size=1920,1080']});
const page = await browser.newPage();
await page.setBypassCSP(true);
await page.goto('https://www.packtpub.com');
const accessibilityResults =
await new AxePuppeteer(page).analyze();
console.log(accessibilityResults);
await page.close();
await browser.close();
})();
The preceding code execution output to the console will look as follows:
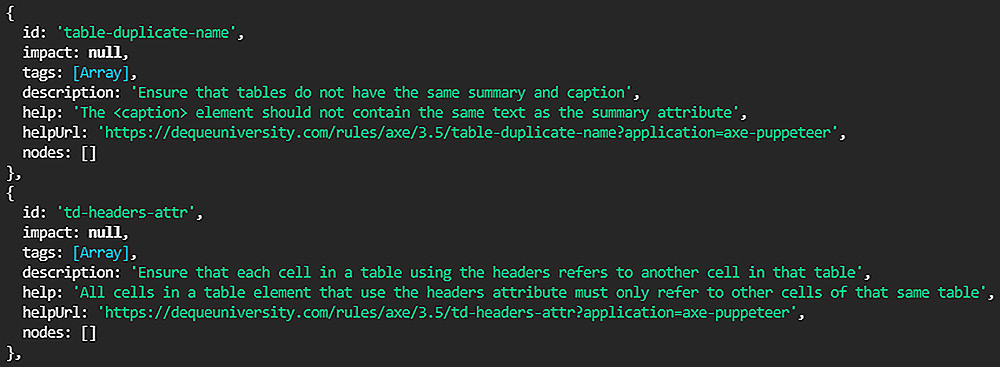
Figure 12.6 – Using Puppeteer with axe-puppeteer for an accessibility audit on the Packt website
Alternatively, you can also use basic accessibility APIs that are built into the Puppeteer framework, https://pptr.dev/#?product=Puppeteer&version=v13.1.0&show=api-class-accessibility, which will provide you with the accessibility.snapshot() capabilities on a given page on your website under testing; however, it will be much more basic than the axe tool coverage.
Puppeteer web app tracing
Within Puppeteer, we have already reviewed the ability to generate an HAR file through the har.start() and har.stop() capabilities. However, Puppeteer also provides the ability to generate JSON trace files from a web application under test through the tracing.start() and tracing.stop() APIs. Such an ability enables frontend developers to gain insights regarding page loading times, performance issues such as slow loading resources on the page, and more.
The following code will generate two output files, trace_demo.har and traceDemo.json, for frontend developers to analyze and debug their network traffic, its performance, and other traffic that is happening on their website:
const puppeteer = require('puppeteer');
const PuppeteerHar = require('puppeteer-har');
(async () => {
const browser = await puppeteer.launch({headless:false});
const page = await browser.newPage();
const har = new PuppeteerHar(page);
await har.start({ path: 'trace_demo.har' });
await page.tracing.start({path: 'traceDemo.json'});
await page.goto('https://www.packtpub.com/');
await har.stop();
await page.tracing.stop();
await browser.close();
})();
The preceding two output files can be opened in a GUI manner through the Google-provided URL: https://chromedevtools.github.io/timeline-viewer/.
Puppeteer for API testing
As we covered earlier in this book with Cypress in Chapter 10, Working with the Cypress Framework, and Playwright in Chapter 11, Working with the Playwright Framework, frontend web application developers can also create API tests within the Puppeteer built-in APIs. To do so, they can utilize the Puppeteer httpRequest() and httpResponse() set of methods. All options are well documented in the Google documentation portal (https://devdocs.io/puppeteer/index#class-httprequest). Advanced API calls for network interceptions and the mocking of responses are supported. In addition, retrieving page header-request methods, getting a response back from the website cache, and much more besides can be used within test code.
Puppeteer with Google DevTools
As we know, Google owns the Chrome browser DevTools, which enables users to debug their web applications, launch the Lighthouse tools, measure performance and accessibility, and much more. Within Puppeteer, users can easily integrate with DevTools (https://developers.google.com/web/tools/puppeteer/debugging) and maximize their testing activities. From the preceding URL, you can learn more about the debugging process that is enabled through DevTools and how to slow down the test execution for further analysis of the web application under test.
To use DevTools within your test code, simply call the puppeteer.launch() method, with devtools set to true accordingly:
const browser = await puppeteer.launch({ devtools: true });
The preceding settings will allow you to utilize the page.evaluate() method and leverage the DevTools debugger.
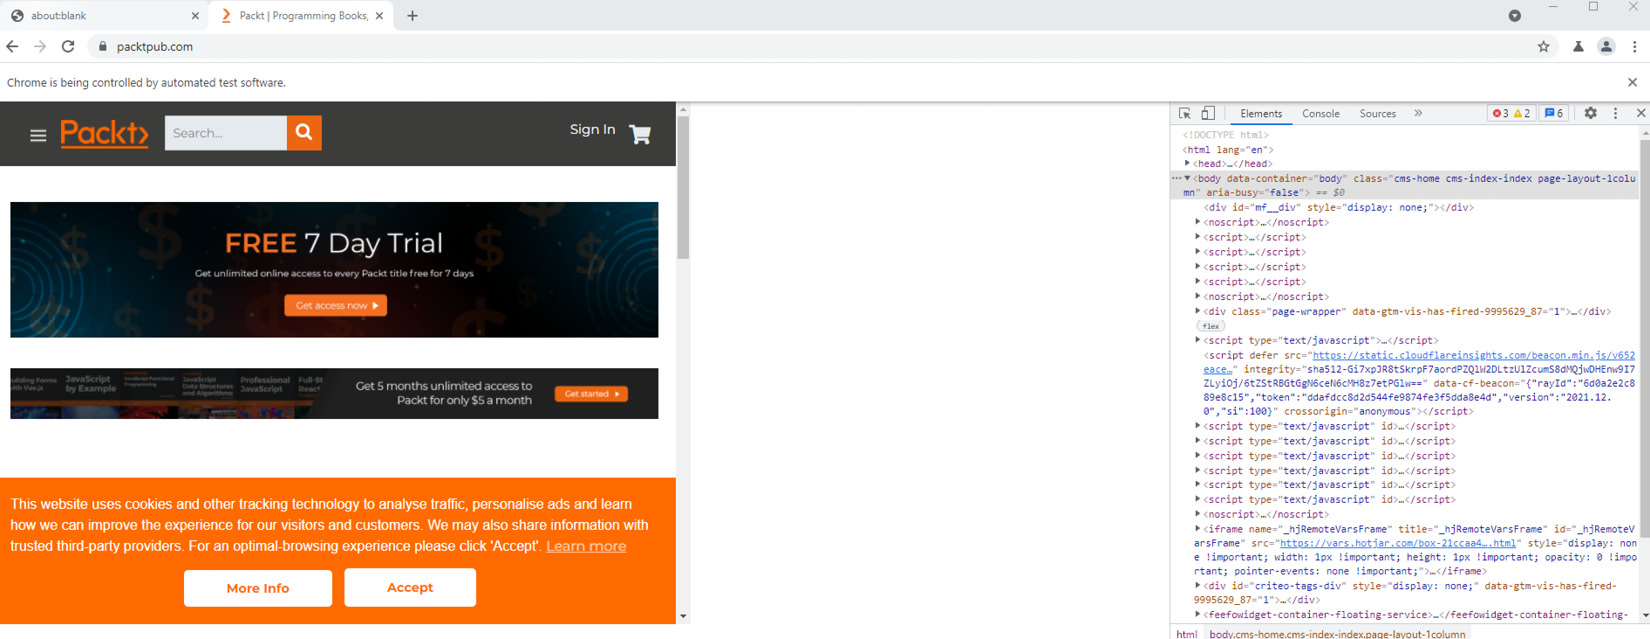
Figure 12.7 – Puppeteer test execution with the DevTools debugger enabled on the Packt home page
Within the aforementioned Chrome browser DevTools, there is a rich automated inspection tool called Lighthouse. Lighthouse is basically an open source automation tool that can be used either interactively or through test automation frameworks such as Puppeteer and others. With this tool, web application developers and testers can validate web application accessibility, performance, compliance with PWA guidance, network calls, and much more.
The Lighthouse tool can also be used from the command-line interface (https://developers.google.com/web/tools/lighthouse#cli). Using the command-line interface, frontend developers can launch the Google Lighthouse audit against their web application from any command-line interface. To install the tools for use within the command line, run the following command:
npm install -g lighthouse
To perform an audit on a web application once the tool is installed, run this command:
lighthouse <url>
To use Google DevTools with the Puppeteer framework, you may refer to this great documentation: https://github.com/GoogleChrome/lighthouse/blob/master/docs/puppeteer.md.
Puppeteer and CodeceptJS integration
A notable third-party integration that is available and worth considering is the one between Puppeteer and CodeceptJS. The CodeceptJS framework (https://codecept.io/) allows users to easily create end-to-end acceptance testing for web applications in JavaScript (https://codecept.io/puppeteer/#setup).
To add CodeceptJS to your testing environment, simply install the node library using these commands:
npm install codeceptjs
npx codeceptjs init
This library, together with Puppeteer, will allow you to build rich end-to-end testing with the unique and easy-to-understand code syntax of CodeceptJS.
Upon the Init command, you will need to specify your JavaScript test file path as well as the framework with which you want to work. In our case, we are selecting Puppeteer; however, as you can see in the following screenshot, CodeceptJS also works with the Playwright framework:
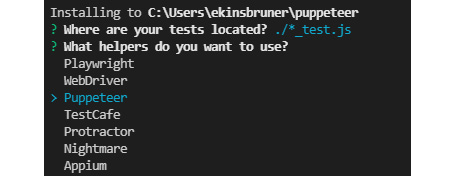
Figure 12.8 – The output from the CodeceptJS initialization process for Puppeteer framework selection
Upon completion of the initialization process of CodeceptJS, a simple JavaScript configuration file will be created together with sample JavaScript test code as a baseline for your development.
In the following code, we are performing a simple and invalid login process to the Dribble website using CodeceptJS syntax.
Note that this code must be saved with the file extension that is defined in codecept.conf.js. By default, that is the following:
tests: './*_test.js'
Feature('login');
Scenario('Login to dribble page', ({ I }) => {
I.amOnPage('https://dribbble.com/')
I.click('Sign in');
I.fillField('login', "[email protected]");
I.pressKey('Tab');
I.fillField('password', "pass12345");
pause();
I.pressKey('Enter');
I.see('We could not find an account matching');
});
As you can see, it uses plain and meaningful commands such as I.amOnPage() and I.see(). Running the preceding code is achieved through the following command:
npx codeceptjs run --steps
Upon running the preceding code sample, a Puppeteer browser is launched, and the test code gets executed.
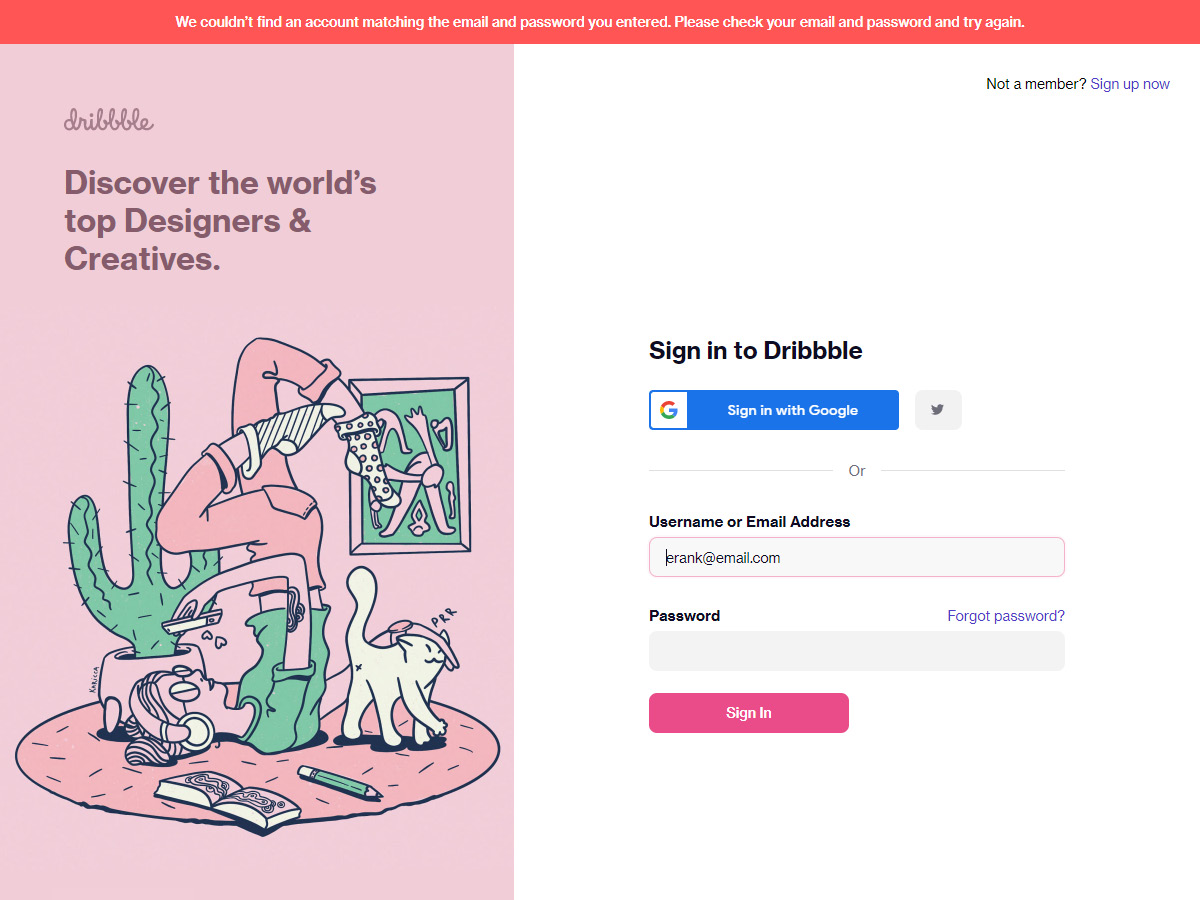
Figure 12.9 – CodeceptJS and Puppeteer code execution example on the Dribble website
Puppeteer testing within CI
You can integrate your Puppeteer JavaScript testing with many of the CI servers that are available on the market, including CircleCI, GitLab (https://touch4it.com/blog/ui-testing-with-puppeteer-and-gitlab-ci), GitHub Actions, Jenkins, and Azure DevOps. In this section, we will provide a single example of how to use Puppeteer with GitHub Actions.
I am using my own GitHub Puppeteer examples repository and will create a new action workflow with a Node.js type through the web UI from GitHub. This step will generate a .yml configuration file that will be used to run my Puppeteer tests upon a CI trigger or schedule.
Upon committing the new GitHub action, a new .YML file with the selected name will be generated and placed under the .github/workflows directory in my repository.
As you can see in the screenshot from the creation of the GitHub action file in Figure 12.10, there is a list of generated steps that will define this specific workflow and sequence of actions:
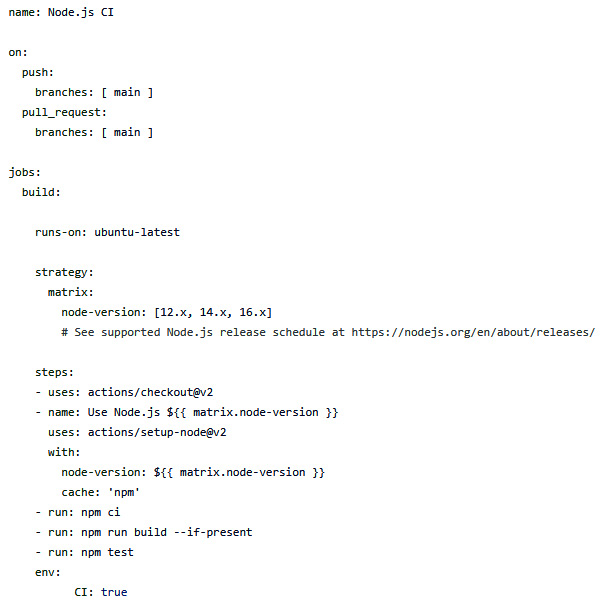
Figure 12.10 – Screenshot of the GitHub Actions .YML file created on the Puppeteer repository (source: https://github.com/ek121268/PuppeteerExamples)
With this new workflow, in the event of any change to the repository, such as merging a branch into the master, this will trigger the execution of GitHub Actions (https://docs.github.com/en/actions/quickstart), as you can see in the following screenshot, which was taken in the event of a source code change.
From the preceding Quickstart guide provided by GitHub, you can learn how to create and customize actions to your CI process, create new workflows, and analyze the workflow results.
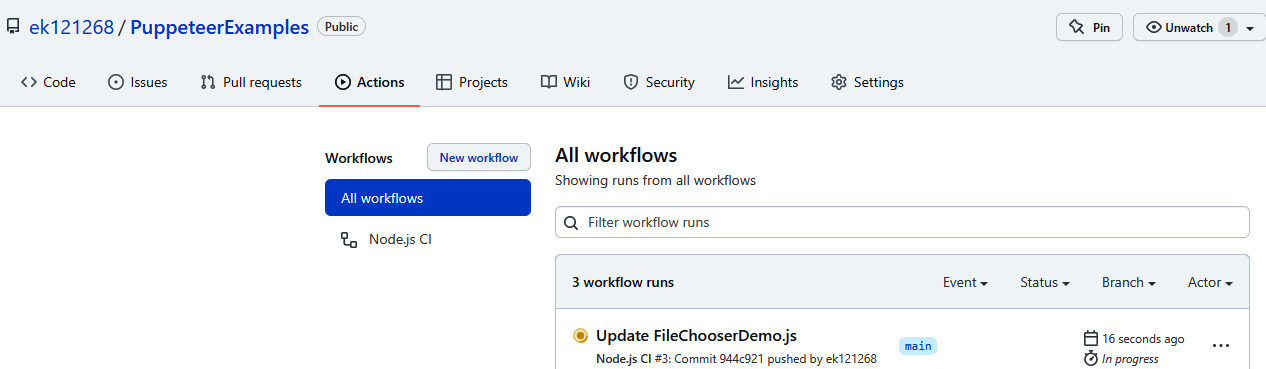
Figure 12.11 – GitHub Actions workflow execution example
Successful DevOps teams typically shift their test automation activities into their CI/CD processes. By doing it right and using tools such as GitHub, Jenkins, and others, teams are able to expedite feedback and identify issues as early as they commit their code changes. In addition, such a method of shifting testing left allows more frequent releases of new functionality and innovation.
With the preceding section, we have wrapped up the Puppeteer features overview. The framework has, of course, a wider range of APIs and other capabilities and integrations that can be reviewed through the Puppeteer documentation page (https://pptr.dev/).
We will now look at the opportunities and the future of the Puppeteer framework while considering the other mature and advanced frameworks that we've covered in this book.
The future of the Puppeteer framework
Google's Puppeteer framework is quite mature and has been on the market since January 2018 (https://github.com/puppeteer/puppeteer/releases/tag/v1.0.0). As mentioned earlier in this chapter, it is the baseline for the Playwright framework. The fact that this framework has been on the market longer than Playwright and Cypress is not well reflected in its maturity and capabilities. As we've learned in this chapter, there are some very useful and unique capabilities for this CDP-based framework, such as generating traces, HAR files, grabbing screenshots, working seamlessly with the DevTools APIs, performing advanced audits of websites through Lighthouse tool integration, working with BDD, integrating with CI tools and third-party frameworks such as CodeceptJS, and more. While these are very great features that allow frontend web application developers to test and debug their websites, this framework lacks some important capabilities that, unless implemented by Google, will position this framework lower in the marketplace.
Features that are missing in Puppeteer as this book is being developed consist of the following:
- Cross-browser testing support: Puppeteer only supports Chromium browsers, which includes Chrome and Edge. Without supporting all other browsers, such as Firefox and Safari, developers will have to utilize other tools.
- Limited language bindings: While JavaScript is the dominant language for web application development, testers' skillsets vary, and they often seek alternatives, such as Java, Python, and C#. Playwright and Selenium in that regard cover more language bindings and provide more flexibility for testers.
- Mobile testing: Testing web applications and network conditions across many mobile platforms is possible through Appium, which is built on top of Selenium. With Puppeteer, users can emulate basic network conditions and a very limited number of mobile platforms. With Google behind Flutter and PWA, the expectation is for better mobile landscape coverage within the testing tool stack.
- Low-code support: Most test frameworks have built-in test code generation. Selenium has its Selenium IDE, Cypress has its Cypress Studio, and Playwright has its codegen within Inspector. Puppeteer does not have a built-in capability other than automated audits through DevTools and Lighthouse.
- Test reporting: The ability to generate actionable and meaningful test reports is a weakness of this framework, especially when compared to the Cypress dashboards, and Selenium with Allure integration. Puppeteer will need to find a better and easier way to report test results with richer artifacts if it wishes to compete in this space with the other frameworks.
From a future standpoint, Puppeteer will have to make a few investments in its framework to close some of the aforementioned gaps and provide new cutting-edge features that will convince developers to continue using it over the other options.
An impressive opportunity from a codeless and intelligent testing perspective has emerged through a project called Puppetry (https://puppetry.app/). This project facilitates the creation of codeless, end-to-end Puppeteer-based test automation without the need to write any lines of JavaScript code. With such a tool incorporated into the Puppeteer project, this solution can close one of Puppeteer's gaps and provide a nice alternative to both developers and non-developers who wish to develop test automation. Getting started with this project can be done through the following GitHub repository: https://github.com/dsheiko/puppetry/releases. This project also extends support to the Firefox browser. In the case of code generation, users can export the recorded tests to Jest JavaScript code.
With these suggestions and opportunities for enhancement, we will conclude this section and provide a summary for this chapter.
Summary
In this chapter, we covered the fundamentals of the Puppeteer framework and learned how to get started and run a JavaScript Puppeteer test. We reviewed Puppeteer's core capabilities; both the basic ones as well as the advanced ones, such as API testing, network mocking, BDD, accessibility, DevTools, CI integrations, working with elements, emulating mobile platforms, and more.
We then concluded the chapter by looking into the future of Puppeteer, while covering the framework's currently missing, and very much needed, features, along with emerging opportunities, such as the codeless solution, complementing web testing with support for PWA and Flutter within Puppeteer, reporting, and more.
With the core skills that were introduced in this chapter, you can now get started with your own Puppeteer project in JavaScript, create web application assertions, including monitoring network traces, run Lighthouse audits, create performance testing from your own workstation, and be more familiar with the rich set of Puppeteer APIs that Google provides.
In the following chapter, we will focus solely on the intelligent cross-browser test automation landscape and learn what is supported within the top four test automation frameworks, and what can be extended through other commercial low-code and AI-based tools.