
Chapter 8: Interacting with the Database with Dapper
It's time to start working on the backend of our Q&A app. In this chapter, we are going to build the database for the app and interact with it from ASP.NET Core with a library called Dapper.
We'll start by understanding what Dapper is and the benefits it brings over the Entity Framework. We'll create the data access layer in our app by learning how to read data from the database into model classes using Dapper. We'll then move on to writing data to the database from model classes.
Deploying database changes during releases of our app is an important and non-trivial task. So, we'll set up the management of database migrations using a library called DbUp toward the end of this chapter.
In this chapter, we'll cover the following topics:
- Implementing the database
- Understanding what Dapper is and its benefits
- Installing and configuring Dapper
- Reading data using Dapper
- Writing data using Dapper
- Managing migrations with DbUp
By the end of this chapter, we will have created a SQL Server database that stores questions and answers and the implemented performant data layer that interacts with it.
Technical requirements
We will need to use the following tools in this chapter:
- Visual Studio 2019: We'll use this to edit our ASP.NET Core code. This can be downloaded and installed from https://visualstudio.microsoft.com/vs/.
- .NET 5.0: This can be downloaded from https://dotnet.microsoft.com/download/dotnet/5.0.
- SQL Server 2019 Express Edition: We'll use this for our database. This can be downloaded and installed from https://www.microsoft.com/en-gb/sql-server/sql-server-editions-express.
- SQL Server Management Studio: We'll use this to create our database. This can be downloaded and installed from https://docs.microsoft.com/en-us/sql/ssms/download-sql-server-management-studio-ssms.
- Q and A: We'll start with the QandA backend project we created and finished in Chapter 2, Creating Decoupled React and ASP.NET 5 Apps. This is available on GitHub at https://github.com/PacktPublishing/ASP.NET-Core-5-and-React-Second-Edition.
All of the code snippets in this chapter can be found online at https://github.com/PacktPublishing/ASP.NET-Core-5-and-React-Second-Edition. To restore code from a chapter, you can download the necessary source code repository and open the relevant folder in the relevant editor. If the code is frontend code, then npm install can be entered in the Terminal to restore any dependencies.
Check out the following video to see the code in action: http://bit.ly/2EVDsv6.
Implementing the database
In this section, we are going to create a SQL Server database for our Q&A app. We will then create tables in the database that will store questions and answers. After that, we will create stored procedures that read and write records in these tables.
Creating the database
We are going to create the database using SQL Server Management Studio (SSMS) by carrying out the following steps:
- Open SSMS and connect to the SQL Server instance:

Figure 8.1 – Connecting to SQL Server Express
- In Object Explorer, right-click on Databases and click on the New Database... option.
- Enter QandA for the name of the database and click OK:

Figure 8.2 – Creating the Q&A database
- Once the database has been created, we'll see it listed in Object Explorer:
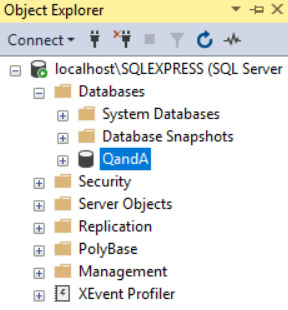
Figure 8.3 – The Q&A database in Object Explorer
Nice and easy! We are going to create database tables for the questions and answers in the following section.
Creating database tables
Let's create some tables for the users, questions, and answers in our new database in SSMS:
- Copy the contents of the SQL Script at https://github.com/PacktPublishing/ASP.NET-Core-5-and-React-Second-Edition/blob/master/chapter-08/start/backend/SQLScripts/01-Tables.sql.
- In SSMS, with the QandA database highlighted, click New Query on the toolbar to create a new SQL query and paste in the contents from the copied script.
- Click the Execute option on the toolbar or press F5 to execute the query.
- If we look under Tables in Object Explorer, we should see that several tables have been created:
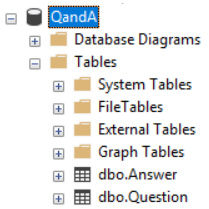
Figure 8.4 – The Q&A database in Object Explorer
Here, a Question table has been created. This holds questions that have been asked and contains the following fields:
- An integer-based field called QuestionId, which is the primary key Unicode-based Title and Content fields.
- UserId and UserName fields, which reference the user who asked the question.
- A field called Created, which will hold the date and time the question was asked.
An Answer table has also been created. This holds answers to the questions and contains the following fields:
- An integer-based AnswerId field, which is the primary key.
- An integer-based QuestionId field, which references the question being answered.
- A Unicode-based Content field.
- UserId and UserName fields, which reference the user who answered the question.
- A field called Created, which will hold the date and time the answer was submitted.
The SQL Script has added some example data. If we right-click on the Question table in Object Explorer and choose the Edit Top 200 rows option, we'll see the data in our table:

Figure 8.5 – Questions in the Q&A database
So, we now have a database that contains our tables and have some nice data to work with.
Creating stored procedures
Let's create some stored procedures that our app will use to interact with the database tables.
Copy the contents of the SQL Script at https://github.com/PacktPublishing/ASP.NET-Core-5-and-React-Second-Edition/blob/master/chapter-08/start/backend/SQLScripts/02-Sprocs.sql. Now, follow these steps:
- Click New Query to create a new SQL query and paste in the contents from the copied script.
- Click the Execute option on the toolbar.
- If we look under Stored Procedures under Programmability in Object Explorer, we should see that several stored procedures have been created:
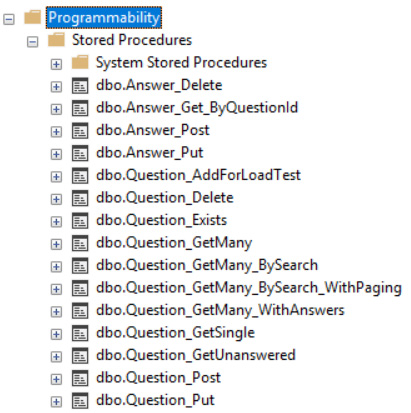
Figure 8.6 – Stored procedures in the Q&A database
We'll be using these stored procedures to interact with the database from the ASP.NET Core app.
- Before we finish this section, let's try to run one of the stored procedures. Click New Query to create a new SQL query and enter the following:
EXEC dbo.Question_GetMany_BySearch @Search = 'type'
So, this SQL command will execute the Question_GetMany_BySearch stored procedure by passing in the @Search parameter with a type value. This stored procedure returns questions that have the value of the @Search parameter in the title of its content.
- Click the Execute option on the toolbar. We should get the following results:

Figure 8.7 – Results from running the stored procedure
With our SQL Server database in place, we can now turn our attention to Dapper.
Understanding what Dapper is and its benefits
Dapper is a performance-focused simple object mapper for .NET that helps map SQL query output to instances of a C# class. It is built and maintained by the Stack Overflow team, has been released as open source, and is a popular alternative to Microsoft's Entity Framework.
So, why use Dapper rather than Entity Framework? The goal of Entity Framework is to abstract away the database, so it trades learning SQL for Entity Framework-specific objects such as DBSet and DataContext. We generally don't write SQL with Entity Framework – instead, we write LINQ queries, which are translated into SQL by Entity Framework.
If we are implementing a large database that serves a large number of users, Entity Framework can be a challenge because the queries it generates can be inefficient. We need to understand Entity Framework well to make it scale, which can be a significant investment. When we find Entity Framework queries that are slow, we need to understand SQL to properly understand the root cause. So, it makes sense to invest time in learning SQL really well rather than the abstraction that the Entity Framework provides. Also, if we have a team with good database and SQL skills, it doesn't make sense to not use these.
Dapper is much simplier than Entity Framework. Later in this chapter, we'll see that we can read and write data from a SQL database with just a few lines of C# code. This allows us to interact with stored procedures in the database, thus automatically mapping C# class instances to SQL parameters, along with the results of the query. In the next section, we will install and start using Dapper to access our data.
Installing and configuring Dapper
In this section, we are going to install and configure Dapper. We will also install the Microsoft SQL Server client package that Dapper uses. Let's carry out the following steps:
- Let's open the backend project in Visual Studio. Go to the Tools menu and then NuGet Package Manager and choose Manage NuGet Packages for Solution....
Important Note
NuGet is a tool that downloads third-party and Microsoft libraries and manages the references to them so that the libraries can easily be updated.
- On the Browse tab, enter Dapper into the search box.
- Select the Dapper package by Sam Saffron, Marc Gravell, and Nick Craver. Tick our project and click the Install button with the latest stable version selected. Refer to the following screenshot:
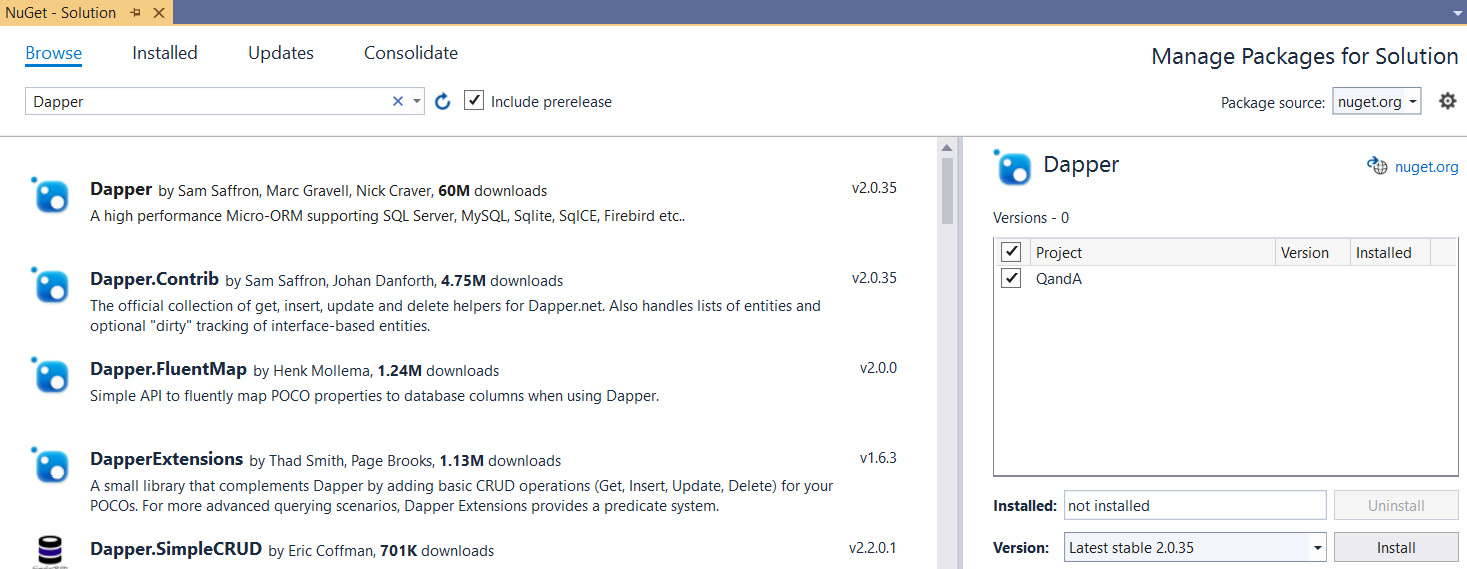
Figure 8.8 – Installing Dapper in the NuGet manager
We may be asked to accept a licensing agreement before Dapper can be downloaded and installed into our project.
- Still in the NuGet package manager, search for the Microsoft.Data.SqlClient package and install the latest stable version. Refer to the following screenshot:

Figure 8.9 – Installing Microsoft.Data.Client
- Next, we are going to define a connection string in our ASP.NET Core project that goes to our database. In Solution Explorer, open up a file called appsettings.json to add a ConnectionStrings field that contains our connection string:
{
"ConnectionStrings": {
"DefaultConnection":
"Server=localhost\SQLEXPRESS;Database=QandA;
Trusted_Connection=True;"
},
...
}
Important Note
The appsettings.json file is a JSON-formatted file that contains various configuration settings for an ASP.NET Core app.
Obviously, change the connection string so that it references your SQL Server and database.
So, that's Dapper installed, along with a connection string to our database in place. Next, we will learn how to read data from the database using Dapper.
Reading data using Dapper
In this section, we are going to write some C# code that reads data from the database.
We are going to use the popular repository design pattern to structure our data access code. This will allow us to provide a nice, centralized abstraction of the data layer.
We are going to start by creating a data repository class that will hold all of the queries we are going to make to the data. We are going to create C# classes that hold the data we get from the database, called models.
We will implement methods for getting all the questions, getting questions from a search, getting unanswered questions, getting a single question, getting information stating whether a question exists, and getting an answer.
Creating the repository class
Let's create a class that will hold all of the methods for interacting with the database:
- In Solution Explorer, right-click on our project, select the Add menu, and then choose the New Folder option.
- A new folder will be created in the solution tree. Name the folder Data.
- Right-click on the Data folder and select the Add menu. Then, choose the Class... option.
- In the dialog box that appears, enter DataRepository for the name of the file and click the Add button.
- A skeleton DataRepository class will be created:

Figure 8.10 – Skeleton DataRepository class
- Now, we are going to create an interface for the data repository so that it can be mocked when we write unit tests. Right-click on the Data folder and select the Add menu. Then, choose the Class... option.
- This time, choose the Interface option in the dialog box that appears and name it IDataRepository before pressing the Add button.
- Change the modifier for the interface to public and add the following methods:
public interface IDataRepository
{
IEnumerable<QuestionGetManyResponse> GetQuestions();
IEnumerable<QuestionGetManyResponse>
GetQuestionsBySearch(string search);
IEnumerable<QuestionGetManyResponse>
GetUnansweredQuestions();
QuestionGetSingleResponse
GetQuestion(int questionId);
bool QuestionExists(int questionId);
AnswerGetResponse GetAnswer(int answerId);
}
Here, we are going to have six methods in the data repository that will read different bits of data from our database. Note that this won't compile yet because we are referencing classes that don't exist.
- Moving back to DataRepository.cs, specify that the class must implement the interface we just created:
public class DataRepository: IDataRepository
{
}
- If we click on the class name, a light bulb icon will appear. Click on the light bulb menu and choose Implement interface:

Figure 8.11 – Automatically implementing the IDataRepository interface
Skeleton methods will be added to the repository class that satisfy the interface.
- Create a class-level private variable called _connectionString that will store the database connection string:
public class DataRepository : IDataRepository
{
private readonly string _connectionString;
...
}
Important Note
The readonly keyword prevents the variable from being changed outside of the class constructor, which is what we want in this case.
- Let's create a constructor for the repository class that will set the value of the connection string from the appsettings.json file:
public class DataRepository : IDataRepository
{
private readonly string _connectionString;
public DataRepository(IConfiguration configuration)
{
_connectionString =
configuration["ConnectionStrings:DefaultConnection"];
}
...
}
The configuration parameter in the constructor gives us access to items within the appsettings.json file. The key we use when accessing the configuration object is the path to the item we want from the appsettings.json file, with colons being used to navigate the fields in the JSON.
How does the configuration parameter get passed into the constructor? The answer is dependency injection, which we'll cover in the next chapter.
- Our class doesn't recognize IConfiguration yet, so, let's click on it, click on the light bulb menu that appears, and choose using Microsoft.Extensions.Configuration;:
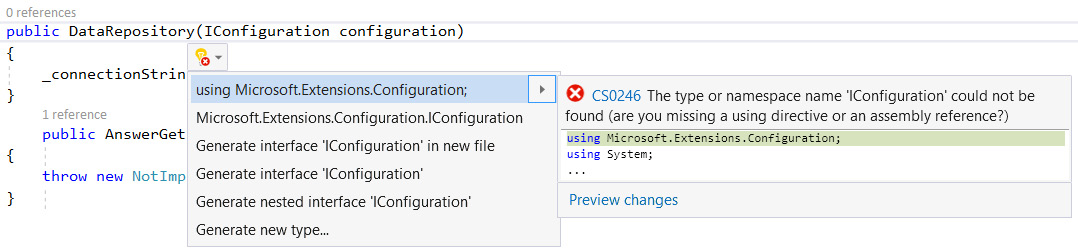
Figure 8.12 – Referencing the Microsoft.Extensions.Configuration namespace
We've made a good start on the repository class. We do have compile errors, but these will disappear as we fully implement the methods.
Creating a repository method to get questions
Let's implement the GetQuestions method first:
- Let's add a couple of using statements at the top of the file for the Microsoft SQL client library, as well as Dapper:
using Microsoft.Data.SqlClient;;
using Dapper;
- In the GetQuestions method, overwrite the statement that throws a NotImplementedException by declaring a new database connection:
public IEnumerable<QuestionGetManyResponse> GetQuestions()
{
using (var connection = new
SqlConnection(_connectionString))
{
}
}
Notice that we've used a using block to declare the database connection.
Important Note
A using block automatically disposes of the object defined in the block when the program exits the scope of the block. This includes whether a return statement is invoked within the block, as well as errors occurring within the block.
So, the using statement is a convenient way of ensuring the connection is disposed of. Notice that we are using a SqlConnection from the Microsoft SQL client library because this is what the Dapper library extends.
- Next, let's open the connection:
public IEnumerable<QuestionGetManyResponse> GetQuestions()
{
using (var connection = new
SqlConnection(_connectionString))
{
connection.Open();
}
}
- Now, we can execute the query:
public IEnumerable<QuestionGetManyResponse> GetQuestions()
{
using (var connection = new
SqlConnection(_connectionString))
{
connection.Open();
return connection.Query<QuestionGetManyResponse>(
@"EXEC dbo.Question_GetMany"
);
}
}
We've used a Query extension method from Dapper on the connection object to execute the Question_GetMany stored procedure. We then simply return the results of this query from our method. Nice and simple!
Notice how we pass in a class, QuestionGetManyResponse, into the generic parameter of the Query method. This defines the model class the query results should be stored in. We'll define QuestionGetManyResponse in the next step.
- In Solution Explorer, right-click on the Data folder, choose Add, and then choose the New Folder option. Enter Models as the name of the new folder. We are going to place all of our models here.
- In Solution Explorer, right-click on the Models folder and select Add. Then, choose the Class... option.
- In the dialog that appears, enter QuestionGetManyResponse for the name of the file that will be created and click the Add button. A skeleton class will be created for us.
- Add the following properties to the class:
public class QuestionGetManyResponse
{
public int QuestionId { get; set; }
public string Title { get; set; }
public string Content { get; set; }
public string UserName { get; set; }
public DateTime Created { get; set; }
}
The property names match the fields that have been output from the Question_GetMany stored procedure. This allows Dapper to automatically map the data from the database to this class. The property types have also been carefully chosen so that this Dapper mapping process works.
Important Note
Note that the class doesn't need to contain properties for all of the fields that are output from the stored procedure. Dapper will ignore fields that don't have the corresponding properties in the class.
- Moving back to DataRepository.cs, add a using statement so that the class can get access to the models:
using QandA.Data.Models;
- Let's also add this using statement to IDataRepository.cs:
using QandA.Data.Models;
Congratulations – we have implemented our first repository method! This consisted of just a few lines of code that opened a database connection and executed a query. This has shown us that writing data access code in Dapper is super simple.
Creating a repository method to get questions by a search
Let's implement the GetQuestionsBySearch method, which is similar to the GetQuestions method, but this time, the method and stored procedure have a parameter. Let's carry out the following steps:
- Start by creating and opening the connection in the same way as we did when we implemented the last method:
public IEnumerable<QuestionGetManyResponse> GetQuestionsBySearch(string search)
{
using (var connection = new
SqlConnection(_connectionString))
{
connection.Open();
// TODO - execute Question_GetMany_BySearch stored
// procedure
}
}
- Now, we can execute the Question_GetMany_BySearch stored procedure:
public IEnumerable<QuestionGetManyResponse> GetQuestionsBySearch(string search)
{
using (var connection = new SqlConnection(_connectionString))
{
connection.Open();
return connection.Query<QuestionGetManyResponse>(
@"EXEC dbo.Question_GetMany_BySearch @Search =
@Search",
new { Search = search }
);
}
}
Notice how we pass in the stored procedure parameter value.
Important Note
Parameter values are passed into a Dapper query using an object where its property names match the parameter names. Dapper will then create and execute a parameterized query.
In this case, we've used an anonymous object for the parameters to save us defining a class for the object.
Why do we have to pass a parameter to Dapper? Why can't we just do the following?
return connection.Query<QuestionGetManyResponse>($"EXEC dbo.Question_GetMany_BySearch '{search}'");
Well, there are several reasons, but the main one is that the preceding code is vulnerable to a SQL injection attack. So, it's always best to pass parameters into Dapper rather than trying to construct the SQL ourselves.
That's our second repository method complete. Nice and simple!
Creating a repository method to get unanswered questions
Let's implement the GetUnansweredQuestions method, which is very similar to the GetQuestions method:
public IEnumerable<QuestionGetManyResponse> GetUnansweredQuestions()
{
using (var connection = new
SqlConnection(_connectionString))
{
connection.Open();
return connection.Query<QuestionGetManyResponse>(
"EXEC dbo.Question_GetUnanswered"
);
}
}
Here, we opened the connection, executed the Question_GetUnanswered stored procedure, and returned the results in the QuestionGetManyResponse class we had already created.
Creating a repository method to get a single question
Let's implement the GetQuestion method now:
- Start by opening the connection and executing the Question_GetSingle stored procedure:
public QuestionGetSingleResponse GetQuestion(int questionId)
{
using (var connection = new
SqlConnection(_connectionString))
{
connection.Open();
var question =
connection.QueryFirstOrDefault<
QuestionGetSingleResponse>(
@"EXEC dbo.Question_GetSingle @QuestionId =
@QuestionId",
new { QuestionId = questionId }
);
// TODO - Get the answers for the question
return question;
}
}
This method is a little different from the previous methods because we are using the QueryFirstOrDefault Dapper method to return a single record (or null if the record isn't found) rather than a collection of records.
- We need to execute a second stored procedure to get the answers for the question, so let's do that now:
public QuestionGetSingleResponse GetQuestion(int questionId)
{
using (var connection = new
SqlConnection(_connectionString))
{
connection.Open();
var question =
connection.QueryFirstOrDefault<
QuestionGetSingleResponse>(
@"EXEC dbo.Question_GetSingle @QuestionId =
@QuestionId",
new { QuestionId = questionId }
);
question.Answers =
connection.Query<AnswerGetResponse>(
@"EXEC dbo.Answer_Get_ByQuestionId
@QuestionId = @QuestionId",
new { QuestionId = questionId }
);
return question;
}
}
- The question may not be found and return null, so let's handle this case and only add the answers if the question is found:
public QuestionGetSingleResponse GetQuestion(int questionId)
{
using (var connection = new
SqlConnection(_connectionString))
{
connection.Open();
var question =
connection.QueryFirstOrDefault<
QuestionGetSingleResponse>(
@"EXEC dbo.Question_GetSingle @QuestionId =
@QuestionId",
new { QuestionId = questionId }
);
if (question != null)
{
question.Answers =
connection.Query<AnswerGetResponse>(
@"EXEC dbo.Answer_Get_ByQuestionId
@QuestionId = @QuestionId",
new { QuestionId = questionId }
);
}
return question;
}
}
- Let's create the QuestionGetSingleResponse class we referenced in the method in a file called QuestionGetSingleResponse.cs in the Models folder:
public class QuestionGetSingleResponse
{
public int QuestionId { get; set; }
public string Title { get; set; }
public string Content { get; set; }
public string UserName { get; set; }
public string UserId { get; set; }
public DateTime Created { get; set; }
public IEnumerable<AnswerGetResponse> Answers { get; set; }
}
These properties match up with the data that was returned from the Question_GetSingle stored procedure.
- Let's also create the AnswerGetResponse class we referenced in the method in a file called AnswerGetResponse.cs in the Models folder:
public class AnswerGetResponse
{
public int AnswerId { get; set; }
public string Content { get; set; }
public string UserName { get; set; }
public DateTime Created { get; set; }
}
These properties match up with the data that was returned from the Answer_Get_ByQuestionId stored procedure.
The GetQuestion method should now compile fine.
Creating a repository method to check whether a question exists
Now, let's implement the QuestionExists method by following the same approach we followed for the previous methods:
public bool QuestionExists(int questionId)
{
using (var connection = new
SqlConnection(_connectionString))
{
connection.Open();
return connection.QueryFirst<bool>(
@"EXEC dbo.Question_Exists @QuestionId =
@QuestionId",
new { QuestionId = questionId }
);
}
}
We are using the Dapper QueryFirst method rather than QueryFirstOrDefault because the stored procedure will always return a single record.
Creating a repository method to get an answer
The last method we will implement in this section is GetAnswer:
public AnswerGetResponse GetAnswer(int answerId)
{
using (var connection = new
SqlConnection(_connectionString))
{
connection.Open();
return connection.QueryFirstOrDefault<
AnswerGetResponse>(
@"EXEC dbo.Answer_Get_ByAnswerId @AnswerId =
@AnswerId",
new { AnswerId = answerId }
);
}
}
There is nothing new here – the implementation follows the same pattern as the previous methods.
We have now implemented all of the methods in the data repository for reading data. In the next section, we'll turn our attention to writing data.
Writing data using Dapper
In this section, we are going to implement methods in our data repository that will write to the database. We will start by extending the interface for the repository and then do the actual implementation.
The stored procedures that perform the write operations are already in the database. We will be interacting with these stored procedures using Dapper.
Adding methods to write data to the repository interface
We'll start by adding the necessary methods to the repository interface:
public interface IDataRepository
{
...
QuestionGetSingleResponse
PostQuestion(QuestionPostRequest question);
QuestionGetSingleResponse
PutQuestion(int questionId, QuestionPutRequest
question);
void DeleteQuestion(int questionId);
AnswerGetResponse PostAnswer(AnswerPostRequest answer);
}
Here, we must implement some methods that will add, change, and delete questions, as well as adding an answer.
Creating a repository method to add a new question
Let's create the PostQuestion method in DataRepository.cs in order to add a new question:
public QuestionGetSingleResponse PostQuestion(QuestionPostRequest question)
{
using (var connection = new
SqlConnection(_connectionString))
{
connection.Open();
var questionId = connection.QueryFirst<int>(
@"EXEC dbo.Question_Post
@Title = @Title, @Content = @Content,
@UserId = @UserId, @UserName = @UserName,
@Created = @Created",
question
);
return GetQuestion(questionId);
}
}
This is a very similar implementation to the methods that read data. We are using the QueryFirst Dapper method because the stored procedure returns the ID of the new question after inserting it into the database table. Our method returns the saved question by calling the GetQuestion method with questionId, which was returned from the Question_Post stored procedure.
We've used a model class called QuestionPostRequest for Dapper to map to the SQL parameters. Let's create this class in the models folder:
public class QuestionPostRequest
{
public string Title { get; set; }
public string Content { get; set; }
public string UserId { get; set; }
public string UserName { get; set; }
public DateTime Created { get; set; }
}
Great stuff! That's our first write method created.
Creating a repository method to change a question
Let's create the PutQuestion method in DataRepository.cs to change a question. This is very similar to the PostQuestion method we have just implemented:
public QuestionGetSingleResponse PutQuestion(int questionId, QuestionPutRequest question)
{
using (var connection = new SqlConnection(_connectionString))
{
connection.Open();
connection.Execute(
@"EXEC dbo.Question_Put
@QuestionId = @QuestionId, @Title = @Title,
@Content = @Content",
new { QuestionId = questionId, question.Title,
question.Content }
);
return GetQuestion(questionId);
}
}
Notice that we are using the Dapper Execute method because we are simply executing a stored procedure and not returning anything.
We've created the SQL parameters from a model class called QuestionPutRequest and the questionId parameters that were passed into the method. Let's create the QuestionPutRequest class in the models folder:
public class QuestionPutRequest
{
public string Title { get; set; }
public string Content { get; set; }
}
That's another method implemented.
Creating a repository method to delete a question
Moving on, let's implement a method for deleting a question:
public void DeleteQuestion(int questionId)
{
using (var connection = new
SqlConnection(_connectionString))
{
connection.Open();
connection.Execute(
@"EXEC dbo.Question_Delete
@QuestionId = @QuestionId",
new { QuestionId = questionId }
);
}
}
Again, we are using the Dapper Execute method because nothing is returned from the stored procedure.
Creating a repository method to add an answer
The last method we are going to implement will allow us to add an answer to a question:
public AnswerGetResponse PostAnswer(AnswerPostRequest answer)
{
using (var connection = new
SqlConnection(_connectionString))
{
connection.Open();
return connection.QueryFirst<AnswerGetResponse>(
@"EXEC dbo.Answer_Post
@QuestionId = @QuestionId, @Content = @Content,
@UserId = @UserId, @UserName = @UserName,
@Created = @Created",
answer
);
}
}
As well as inserting the answer into the database table, the stored procedure returns the saved answer. Here, we are using the Dapper QueryFirst method to execute the stored procedure and return the saved answer.
We also need to create the AnswerPostRequest model class in the models folder:
public class AnswerPostRequest
{
public int QuestionId { get; set; }
public string Content { get; set; }
public string UserId { get; set; }
public string UserName { get; set; }
public DateTime Created { get; set; }
}
That completes our data repository. We've chosen to have a single method containing all of the methods that will read and write data. We can, of course, create multiple repositories for different areas of the database, which would be a good idea if the app was larger.
As we add features to our app that involve database changes, we'll need a mechanism for deploying these database changes. We'll look at this in the next section.
Managing migrations using DbUp
DbUp is an open source library that helps us deploy changes to SQL Server databases. It keeps track of SQL Scripts embedded within an ASP.NET Core project, along with which ones have been executed on the database. It contains methods that we can use to execute the SQL Scripts that haven't been executed yet on the database.
In this section, we are going to add DbUp to our project and configure it to do our database migrations when our app starts up.
Installing DbUp into our project
Let's start by installing DbUp by carrying out the following steps in our backend project, in Visual Studio:
- Go to the Tools menu and then NuGet Package Manager. Then, choose Manage NuGet Packages for Solution....
- On the Browse tab, enter DbUp into the search box.
- Select the dbup package by Paul Stovell, Jim Burger, Jake Ginnivan, and Damian Maclennan. Tick our project and click the Install button, with the latest stable version selected:
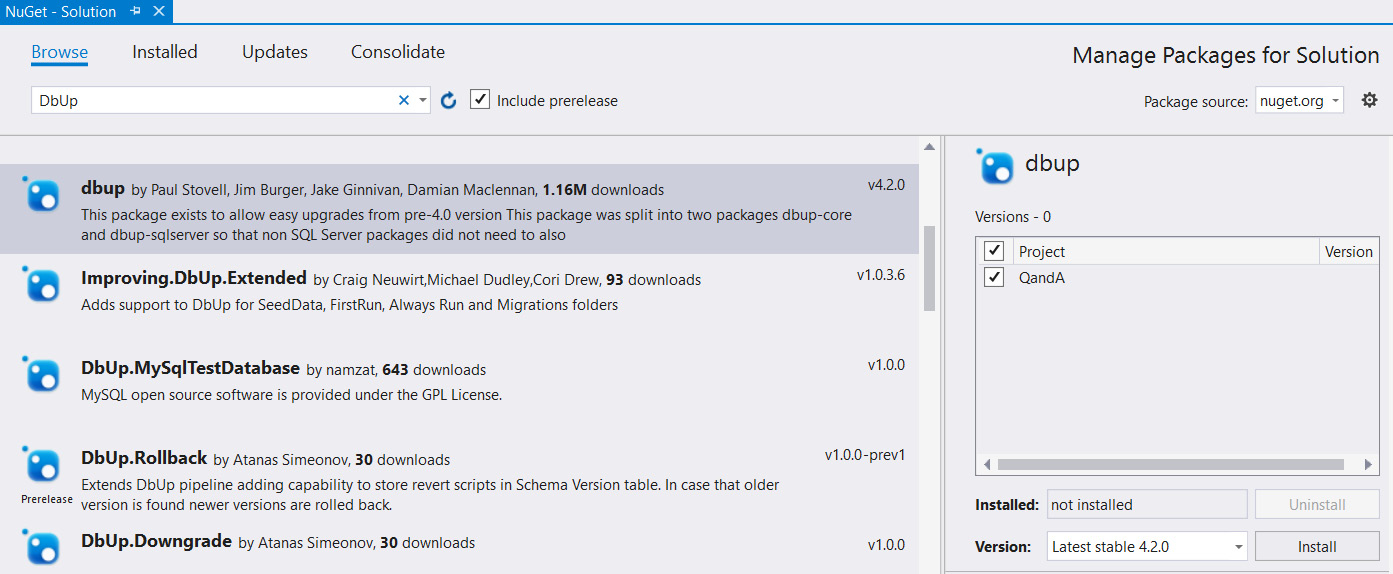
Figure 8.13 – Adding DbUp in NuGet Manager
We may be asked to accept a licensing agreement before DbUp can be downloaded and installed in our project.
Configuring DbUp to do migrations on app startup
Now that we have DbUp installed in our project, let's get it to do database migrations when the app starts up:
- Open up Startup.cs. We know from Chapter 1, Understanding the ASP.NET 5 React Template, that the code in this file executes when an ASP.NET Core app runs. We'll start by adding a using statement so that we can reference the DbUp library:
using DbUp;
- At the top of the ConfigureServices method, add the following two lines:
public void ConfigureServices(IServiceCollection services)
{
var connectionString =
Configuration.GetConnectionString("DefaultConnection");
EnsureDatabase.For.SqlDatabase(connectionString);
// TODO - Create and configure an instance of the
// DbUp upgrader
// TODO - Do a database migration if there are any
// pending SQL
//Scripts
...
}
This gets the database connection from the appsettings.json file and creates the database if it doesn't exist.
- Let's create and configure an instance of the DbUp upgrader:
public void ConfigureServices(IServiceCollection services)
{
var connectionString =
Configuration.GetConnectionString("DefaultConnection");
EnsureDatabase.For.SqlDatabase(connectionString);
var upgrader = DeployChanges.To
.SqlDatabase(connectionString, null)
.WithScriptsEmbeddedInAssembly(
System.Reflection.Assembly.GetExecutingAssembly()
)
.WithTransaction()
.Build();
// TODO - Do a database migration if there are any pending SQL
//Scripts
...
}
We've told DbUp where the database is and to look for SQL Scripts that have been embedded in our project. We've also told DbUp to do the database migrations in a transaction.
- The final step is to get DbUp to do a database migration if there are any pending SQL Scripts:
public void ConfigureServices(IServiceCollection services)
{
var connectionString =
Configuration.GetConnectionString("DefaultConnection");
EnsureDatabase.For.SqlDatabase(connectionString);
var upgrader = DeployChanges.To
.SqlDatabase(connectionString, null)
.WithScriptsEmbeddedInAssembly(
System.Reflection.Assembly.GetExecutingAssembly()
)
.WithTransaction()
.LogToConsole()
.Build();
if (upgrader.IsUpgradeRequired())
{
upgrader.PerformUpgrade();
}
...
}
We are using the IsUpgradeRequired method in the DbUp upgrade to check whether there are any pending SQL Scripts, and using the PerformUpgrade method to do the actual migration.
Embedding SQL Scripts in our project
In the previous subsection, we told DbUp to look for SQL Scripts that have been embedded in our project. Now, we are going to embed SQL Scripts for the tables and stored procedures in our project so that DbUp will execute them if they haven't already been executed when our app loads:
- In Solution Explorer, right-click on the project and choose Add | New Folder. Enter SQLScripts as the folder name.
- Right-click on the SQLScripts folder and choose Add | New Item....
- In the dialog box that appears, select the General tab and then Text File and enter 01-Tables.sql as the filename:
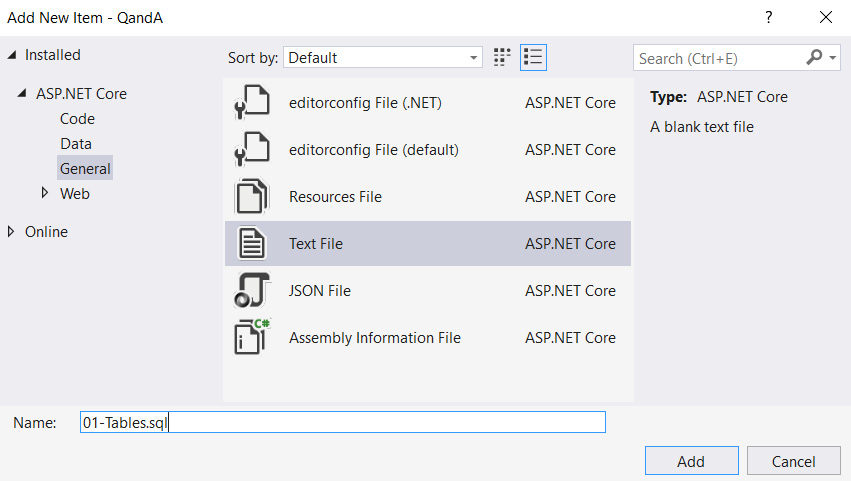
Figure 8.14 – Adding a SQL file to a Visual Studio project
- Copy the contents of the script from https://github.com/PacktPublishing/ASP.NET-Core-5-and-React-Second-Edition/blob/master/chapter-08/start/backend/SQLScripts/01-Tables.sql and paste it into the file we just created.
- Right-click on 01-Tables.sql in Solution Explorer and choose Properties to view the properties of this file.
- Change the Build Action property to Embedded resource:
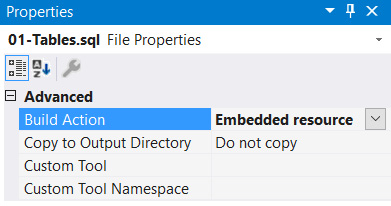
Figure 8.15 – Changing a file to an embedded resource
This embeds the SQL Script in our project so that DbUp can find it.
- Let's repeat this process for the stored procedures by creating a file called 02-Sprocs.sql in the SQLScripts folder with the content from https://github.com/PacktPublishing/ASP.NET-Core-5-and-React-Second-Edition/blob/master/chapter-08/start/backend/SQLScripts/02-Sprocs.sql. Let's not forget to embed this file as a project resource.
Important Note
DbUp will run SQL Scripts in name order, so it's important to have a script naming convention that caters to this. In our example, we are prefixing the script name with a two-digit number.
So, those are the SQL Scripts that make up our database. They have been saved within our project.
Performing a database migration
Now that the database migration code is in place, it is time to test a migration. To do this, we will remove the database tables and stored procedures and expect them to be recreated when our API runs.
Let's carrying out the following steps:
- The database that we are working with already contains the tables and stored procedures in our scripts, so we are going to be brave and delete our database. In SSMS, in Object Explorer, right-click the database and choose Delete:
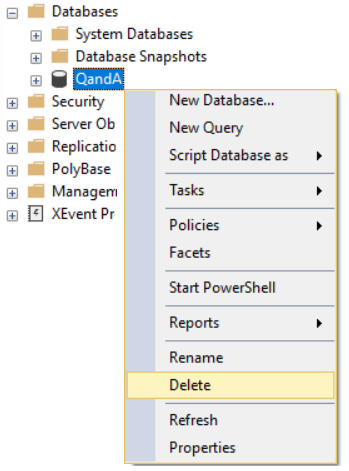
Figure 8.16 – Deleting a database
- We are going to create the database again with the same name. So, in Object Explorer, right-click on Databases and click on the New Database... option. Enter QandA for the name of the database and click OK:
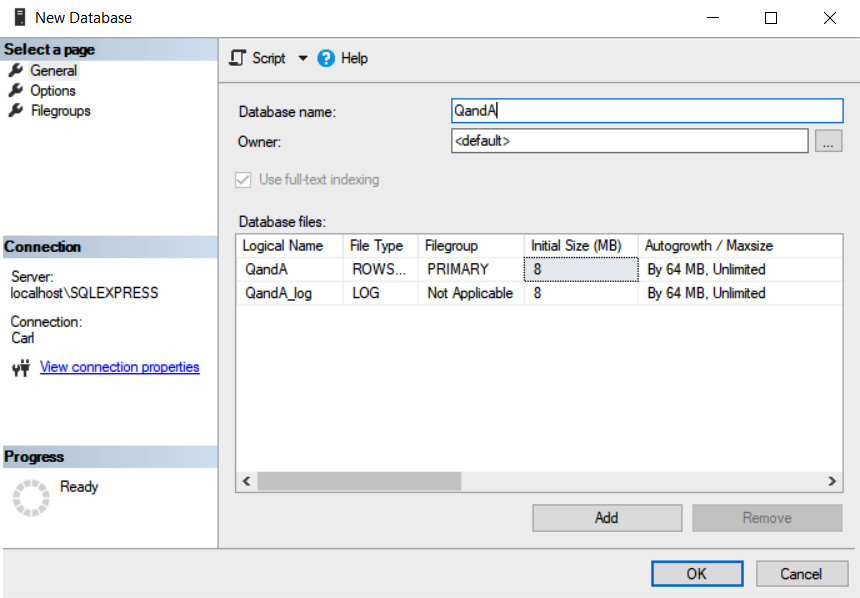
Figure 8.17 – Adding a database
- Back in Visual Studio, press F5 to run the app.
- Once the app has started, go to SSMS. In Object Explorer, we'll see that the tables and stored procedures have been created. We'll also see a table called SchemaVersions:

Figure 8.18 – The SchemaVersions table in Object Explorer
- Right-click on dbo.SchemaVersions and choose Edit Top 200 Rows:
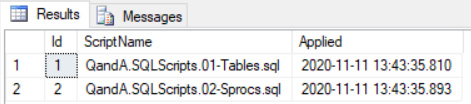
Figure 8.19 – SchemaVersions data
This is a table that DbUp uses to manage what scripts have been executed. So, we'll see our two scripts listed in this table.
- Back in Visual Studio, stop the app by pressing Shift + F5.
- Run the app again. The app will run up just fine.
- Inspect the database objects in Object Explorer in SSMS. The objects will be unchanged.
- Examine the contents of the SchemaVersions table. We'll find that no new scripts have been added.
- We can now stop the app again in Visual Studio.
With that, our project has been set up to handle database migrations. All we need to do is add the necessary SQL Script files in the SQLScripts folder, remembering to embed them as a resource. DbUp will then perform the migration when the app runs again.
Summary
We now understand that Dapper is a simple way of interacting with a database in a performant manner. It's a great choice when our team already has SQL Server skills because it doesn't abstract the database away from us.
In this chapter, we learned that Dapper adds various extension methods to the Microsoft SqlConnection object for reading and writing to the database. Dapper maps the results of a query to instances of a C# class automatically by matching the field names in the query result to the class properties. Query parameters can be passed in using a C# class, with Dapper automatically mapping properties in the C# class to the SQL parameters.
We then discovered that DbUp is a simple open source tool that can be used to manage database migrations. We can embed SQL Scripts within our project and write code that is executed when our app loads to instruct DbUp to check and perform any necessary migrations.
In the next chapter, we are going to create the RESTful API for our app by leveraging the data access code we have written in this chapter.
Questions
Answer the following questions to test the knowledge you have gained from this chapter:
- What Dapper method can be used to execute a stored procedure that returns no results?
- What Dapper method can be used to read a single record of data, where the record is guaranteed to exist?
- What Dapper method can be used to read a collection of records?
- What is wrong with the following statement, which calls the Dapper Query method?
return connection.Query<BuildingGetManyResponse>(
@"EXEC dbo.Building_GetMany_BySearch
@Search = @Search",
new { Criteria = "Fred"}
);
- We have the following stored procedure:
CREATE PROC dbo.Building_GetMany
AS
BEGIN
SET NOCOUNT ON
SELECT BuildingId, Name
FROM dbo.Building
END
We have the following statement, which calls the Dapper Query method:
return connection.Query<BuildingGetManyResponse>(
"EXEC dbo.Building_GetMany"
);
We also have the following model, which is referenced in the preceding statement:
public class BuildingGetManyResponse
{
public int Id{ get; set; }
public string Name { get; set; }
}
When our app is run, we find that the Id property within the BuildingGetManyResponse class instance is not populated. Can you spot the problem?
- Can DbUp be used to deploy new reference data within a table?
Answers
- Execute is the Dapper method that executes a stored procedure, returning no results.
- QueryFirst is the Dapper method for reading a single record of data where the record is guaranteed to exist.
- Query is the Dapper method for reading a collection of records.
- The problem with the query is that it expects a parameter called Search but we have passed it a parameter called Criteria. So, Dapper won't be able to map the SQL parameter.
- The problem is that the stored procedure returns a field called BuildingId, which won't automatically get mapped to the Id property in the class because the names are different.
- Yes! DbUp can execute any SQL script, and can also deploy new reference data for a table.
Further reading
Here are some useful links if you wish to learn more about the topics that were covered in this chapter:
- Creating a SQL Server database: https://docs.microsoft.com/en-us/sql/relational-databases/databases/create-a-database
- Creating SQL Server tables: https://docs.microsoft.com/en-us/sql/t-sql/statements/create-table-transact-sql
- Creating SQL Server stored procedures: https://docs.microsoft.com/en-us/sql/relational-databases/stored-procedures/create-a-stored-procedure
- The C# using statement: https://docs.microsoft.com/en-us/dotnet/csharp/language-reference/keywords/using-statement
- Dapper: https://github.com/StackExchange/Dapper
- DbUp: https://dbup.readthedocs.io/en/latest/