
Chapter 14: Configuring and Deploying to Azure
In this chapter, we'll deploy our app into production in Microsoft Azure so that all of our users can start to use it. We will focus on the backend to start with, making the necessary changes to our code so that it can work in production and staging environments in Azure. We will then deploy our backend application programming interfaces (APIs), along with the Structured Query Language (SQL) database, to both staging and production from within Visual Studio. After the first deploy, subsequent deploys will be able to be done with the click of a button in Visual Studio.
We will then turn our attention to the frontend, again making changes to our code to support development, staging, and production environments. We will then deploy our frontend to Azure to both the staging and production environments.
In this chapter, we'll cover the following topics:
- Getting started with Azure
- Configuring the ASP.NET Core backend for staging and production
- Publishing our ASP.NET Core backend to Azure
- Configuring the React frontend for staging and production
- Publishing the React frontend to Azure
Technical requirements
We'll use the following tools and services in this chapter:
- Visual Studio 2019: We'll use this to edit our ASP.NET Core code. This can be downloaded and installed from https://visualstudio.microsoft.com/vs/.
- .NET 5: This can be downloaded from https://dotnet.microsoft.com/download/dotnet/5.0.
- Visual Studio Code: We'll use this to edit our React code. This can be downloaded and installed from https://code.visualstudio.com/.
- Node.js and npm: These can be downloaded from https://nodejs.org/. If you already have these installed, make sure that Node.js is at least version 8.2 and that npm is at least version 5.2.
- Microsoft Azure: We will use several Azure app services and SQL databases for our app. An account can be created at https://azure.microsoft.com/en-us/free/.
- Q and A: We'll start with the Q and A frontend and backend projects we finished in the last chapter, which are available at https://github.com/PacktPublishing/ASP.NET-Core-5-and-React-Second-Edition in the chapter-14/start folder.
All of the code snippets in this chapter can be found online at https://github.com/PacktPublishing/ASP.NET-Core-5-and-React-Second-Edition. To restore code from a chapter, the source code repository can be downloaded and the relevant folder opened in the relevant editor. If the code is frontend code, then npm install can be entered in the Terminal to restore the dependencies.
Check out the following video to see the Code in Action: https://bit.ly/34u28bd
Getting started with Azure
In this section, we are going to sign up for Azure if we haven't already got an account. We'll then have a quick look around the Azure portal and understand the services we are going to use to run our app.
Signing up to Azure
If you already have an Azure account, there's never been a better time to sign up and give Azure a try. At the time of writing this book, you can sign up to Azure and get 12 months of free services at the following link: https://azure.microsoft.com/en-us/free/.
We'll need a Microsoft account to sign up for Azure, which is free to create if you haven't already got one. You are then required to complete a sign-up form that contains the following personal information:
- Country of origin
- Name
- Email address
- Phone number
You then need to go through two different verification processes. The first is verification via a text message or a call on your phone. The second is to verify your credit card details.
Important Note
Note that your credit card won't be charged unless you upgrade from the free trial.
The last step in the sign-up process is to agree to the terms and conditions.
Understanding the Azure services we are going to use
After we have an Azure account, we can sign in to the Azure portal using our Microsoft account. The Uniform Resource Locator (URL) for the portal is https://portal.azure.com.
When we log in to the Azure portal, we'll see that it contains a wide variety of services, as illustrated in the following screenshot:

Figure 14.1 – Azure home page
We are going to use just a couple of these fantastic services, as follows:
- App Services: We will use this service to host our ASP.NET Core backend API as well as our React frontend.
- SQL databases: We will use this service to host our SQL Server database.
We are going to put all of these resources into what's called a resource group. Let's create the resource group now, as follows:
- Click on the Resource groups option. A list of resource groups appears, which of course will be empty if we have just signed up to Azure. Click on the Add option, as illustrated in the following screenshot:
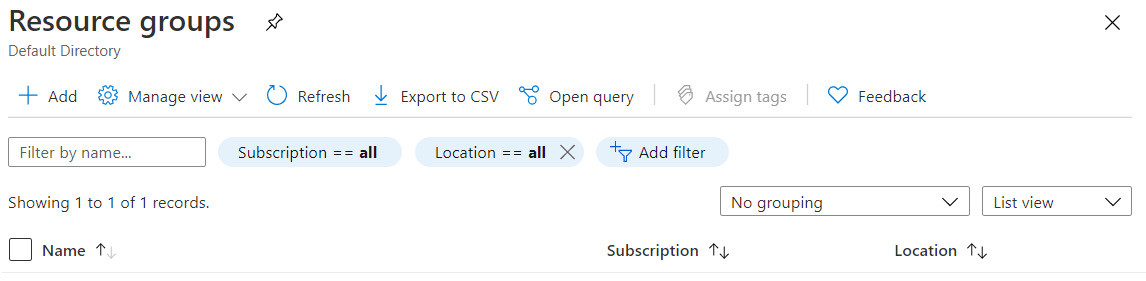
Figure 14.2 – Resource groups page
- Fill in the form that opens. Choose an appropriate name for the resource group. We'll need to use this name later in this chapter, so make sure you remember it. Click the Review + create button, as illustrated in the following screenshot:

Figure 14.3 – Creating a resource group
- Click on the Create button on the review screen that opens. Our resource group will eventually be shown in the resource group list, as can be seen in the following screenshot:

Figure 14.4 – Resource groups list with our new resource group
Important Note
If the resource group doesn't show after a few seconds, click the Refresh option to refresh the resource groups.
Our resource group is now ready for the other services to be provisioned. Before we provision any other services, we'll configure our backend for production in the next section.
Configuring the ASP.NET Core backend for staging and production
In this section, we are going to create separate appsettings.json files for staging and production as well as for working locally in development. Let's open our backend project in Visual Studio and carry out the following steps:
- Let's now go to Solution Explorer, as illustrated in the following screenshot:
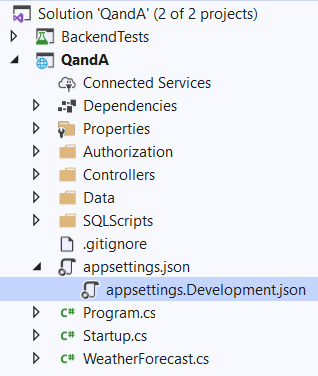
Figure 14.5 – The appsettings files in Solution Explorer
Notice that two settings files start with the word appsettings.
Important Note
We can have different settings files for different environments. The appsettings.json file is the default settings file and can contain settings common to all environments. appsettings.Development.json is used during development when we run the backend in Visual Studio and overrides any duplicate settings that are in the appsettings.json file. The middle part of the filename needs to match an environment variable called ASPNETCORE_ENVIRONMENT, which is set to Development in Visual Studio by default and Production by default in Azure. So, appsettings.Production.json can be used for settings specific to the production environment in Azure.
- At the moment, all of our settings are in the default appsettings.json file. Let's add our ConnectionStrings setting and also a frontend setting to the appsettings.Development.json file, as follows:
{
"ConnectionStrings": {
"DefaultConnection":
"Server=localhost\SQLEXPRESS;Database=
QandA;Trusted_Connection=True;"
},
"Frontend": "http://localhost:3000"
}
We will leave the Auth0 settings in the default appsettings.json file because these will apply to all environments.
- Remove the ConnectionStrings setting from the default appsettings.json file.
- Let's add an appsettings.Production.json file now by right-clicking the QandA project in Solution Explorer, choosing Add | New Item..., selecting the App Settings File item, naming the file appsettings.Production.json, and then clicking the Add button, as illustrated in the following screenshot:
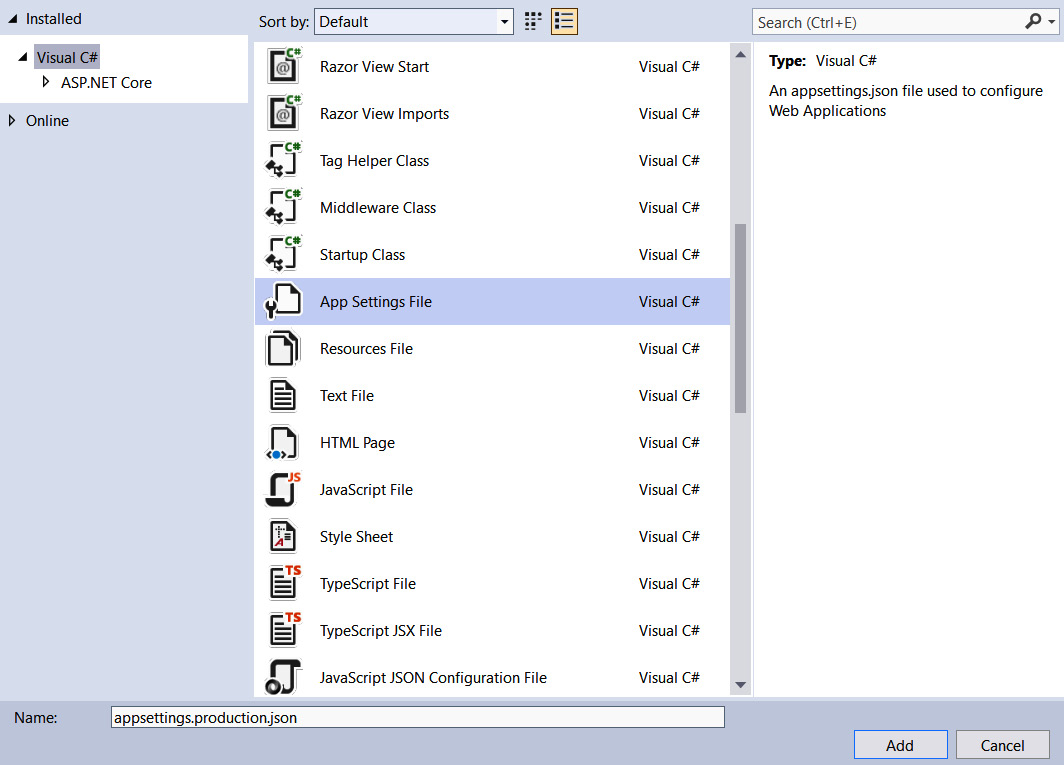
Figure 14.6 – Adding an appsettings file for production
- Replace the content in the appsettings.Production.json file with the following:
{
"Frontend": "https://your-
frontend.azurewebsites.net"
}
So, this contains the production frontend URL that we will create in Azure. Take note of this setting because we will need it when we provision the frontend in Azure.
- Similarly, let's add an appsettings.Staging.json file with the following content:
{
"Frontend": "https://your-frontend-
staging.azurewebsites.net"
}
We haven't specified the production or staging connection strings because we will store these in Azure. This is because these connection strings store secret usernames and passwords, which are more secure in Azure than our source code.
We are now ready to start to create Azure services and deploy our backend. We'll do this in the next section.
Publishing our ASP.NET Core backend to Azure
In this section, we are going to deploy our database and backend API to Azure using Visual Studio. We will create publish profiles for deployment to a production environment as well as a staging environment. During the process of creating the profiles, we will create the required Azure app services and SQL databases. At the end of this section, we will have two profiles that we can use to quickly deploy to our staging and production environments.
Publishing to production
Let's carry out the following steps to create a production deployment profile and use it to deploy our backend to production:
- In Solution Explorer, right-click on the QandA project and select Publish....
- The Publish dialog opens, which asks us to choose a publish target. Choose Azure and click Next, as illustrated in the following screenshot:
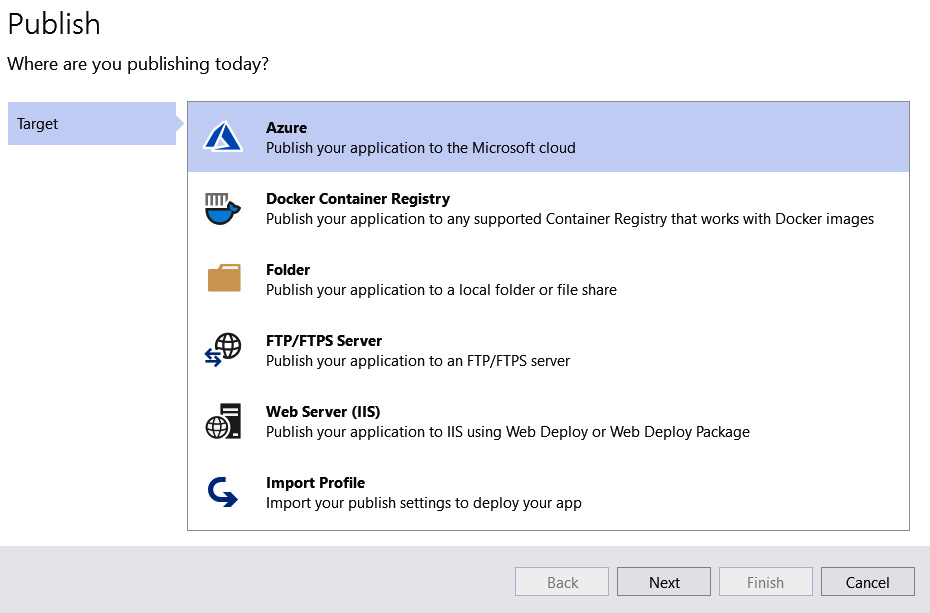
Figure 14.7 – Selecting Azure as the publish target
- We are then asked which service we want to deploy to in Azure. Select the Azure App Service (Windows) option and click Next, as illustrated in the following screenshot:

Figure 14.8 – Selecting Azure App Service as the publish specific target
- The next step is to specify our Microsoft account. We could then search for and select an existing app service to deploy to. However, we are going to create a new app service, so click the green plus icon, as illustrated in the following screenshot:

Figure 14.9 – Selecting or creating a new app service
- Fill in the name for the production app service. This name will form part of the URL to the REpresentational State Transfer (REST) API, so the name will need to be globally unique. In the example in the following screenshot, the URL will be https://qanda2021.azurewebsite.net. Note down the name you choose, because we'll eventually reference this in the frontend project:

Figure 14.10 – Creating the app service
- You can choose the default hosting plan for the app service. Alternatively, you can associate it with a new one by clicking the New… option.
- Click Create to create the app service—this will take a few minutes to complete.
- After the app service has been created, the Create New App Service dialog will close and we will see the app service in the App Service instances list on the Publish dialog. Select the new app service and click Next, as illustrated in the following screenshot:
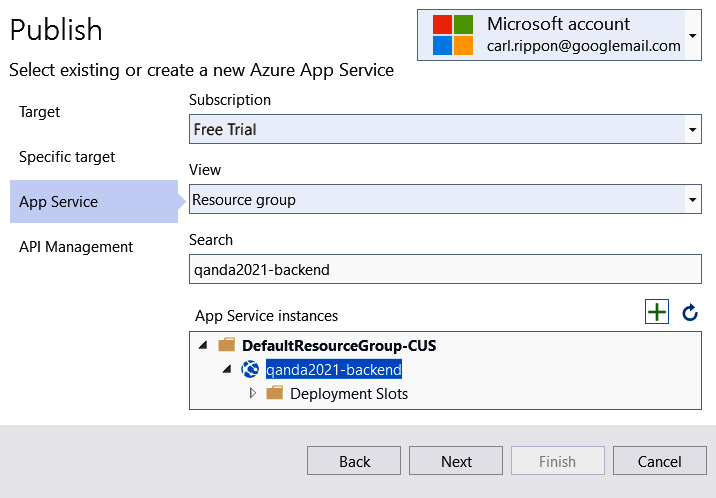
Figure 14.11 – Selecting the app service to deploy to
- We will skip the next step for API Management. Check the Skip this step checkbox and click Finish. The profile for our production deployment is now saved and we are taken to a screen that summarizes it, as illustrated in the following screenshot:

Figure 14.12 – Summary of publish configuration
- Our app service is created but our backend still isn't deployed. We can confirm this by browsing to the link to the right of Site URL, which results in the following screen:
Figure 14.13 – App Service URL with a site that isn't deployed
- We haven't provisioned anything to host our SQL database yet. We are going to do this now by clicking the Add option in the Service Dependencies section in the profile summary, back in Visual Studio.
- The Add dependency dialog opens. Choose Azure SQL Database and click Next, as illustrated in the following screenshot:
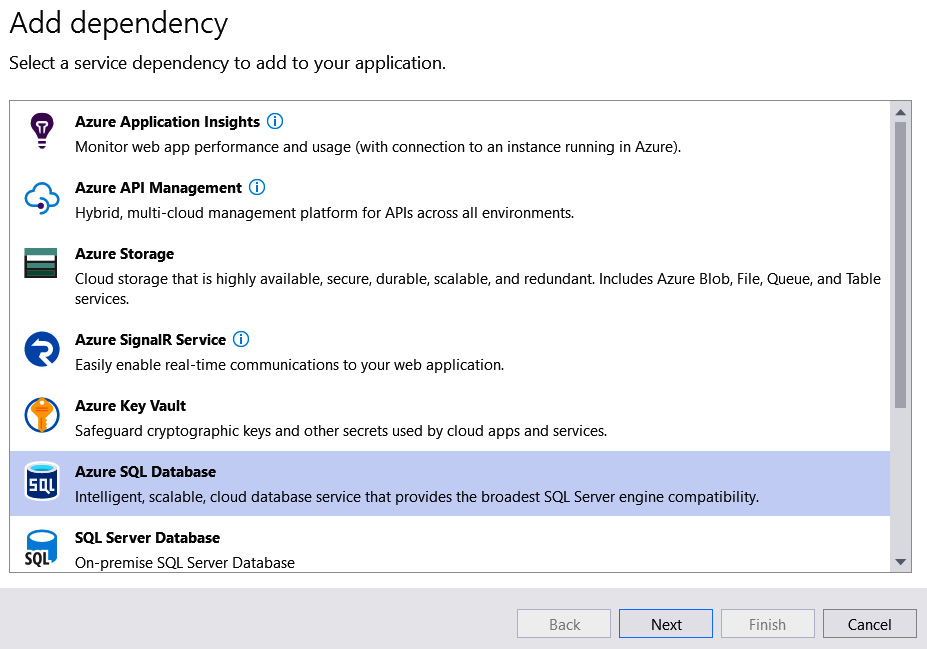
Figure 14.14 – Selecting Azure SQL Database
- The dialog then shows the SQL databases in our Azure subscription. Click the green plus icon to create a new SQL database, as illustrated in the following screenshot:

Figure 14.15 – Option to create a new SQL database
- In the dialog that opens, enter your choice of database name. We will need this later, so keep a note of it.
- We need to create a new database server, so click the New... option to the right of the Database server field.
- Fill in the server details in the dialog that appears. Choose your own server name, username, and password. Take note of these details because we will need these again in a later step. Click the OK button to confirm the server details, as illustrated in the following screenshot:

Figure 14.16 – New SQL Server dialog
- Click the Create button on the Azure SQL Database dialog, as illustrated in the following screenshot. This will create the database in Azure, so it may take a few minutes to complete:
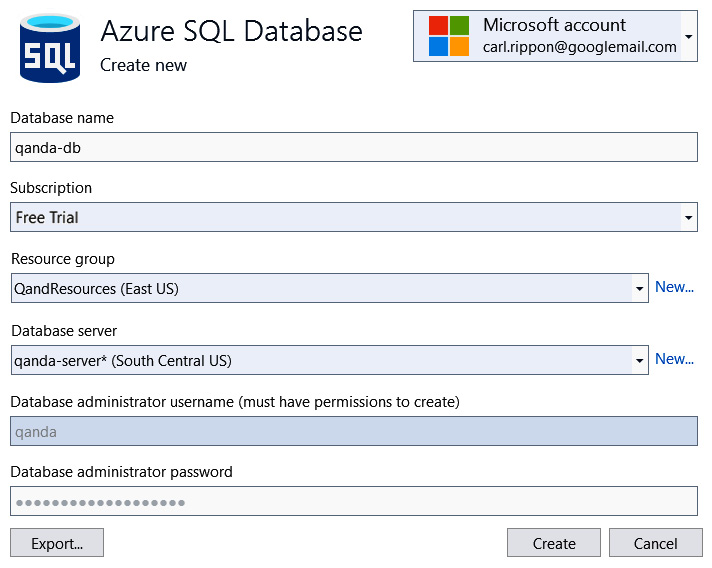
Figure 14.17 – New SQL Database dialog
- After the database has been created, the Azure SQL Database dialog will close. The database will appear in the SQL databases list in the Configure Azure SQL Database dialog. Click on the database we have just created to select it, and click Next, as illustrated in the following screenshot:
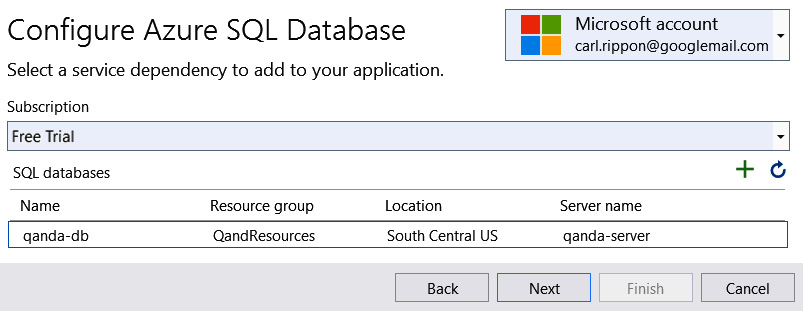
Figure 14.18 – SQL database list
- Next, we are asked to define our database connection string. Make sure the connection name is DefaultConnection, and fill in the username and password we entered earlier when creating our database. Select Azure App Settings for where to save the connection string, and click Next, as illustrated in the following screenshot:
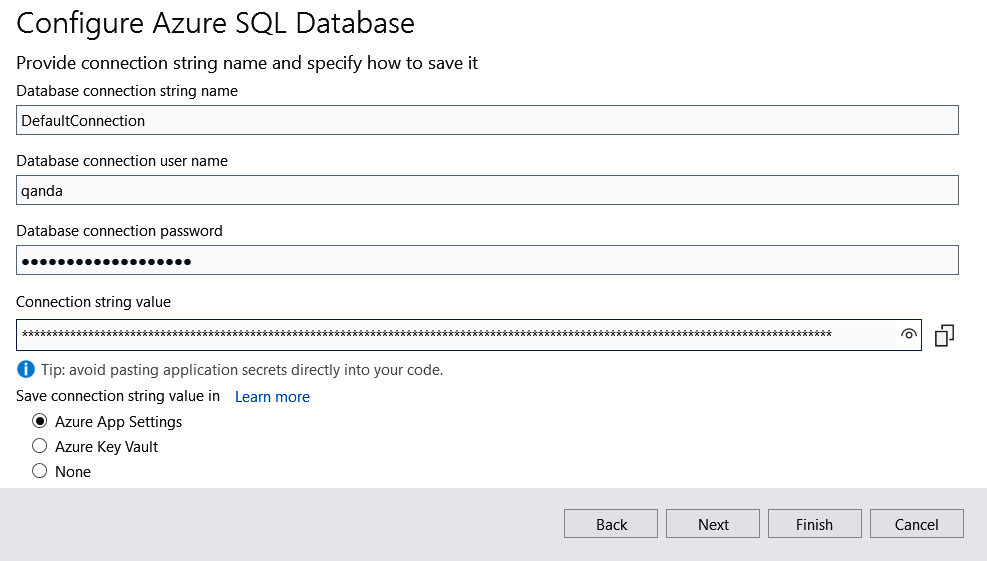
Figure 14.19 – Connection string configuration
This connection string will now be stored in the Application Settings section in our Azure App Service.
- Press Finish on the summary dialog that appears, and then press Close.
- We are taken back to the summary of the publish configuration, with confirmation that the SQL database has been configured, as illustrated in the following screenshot:
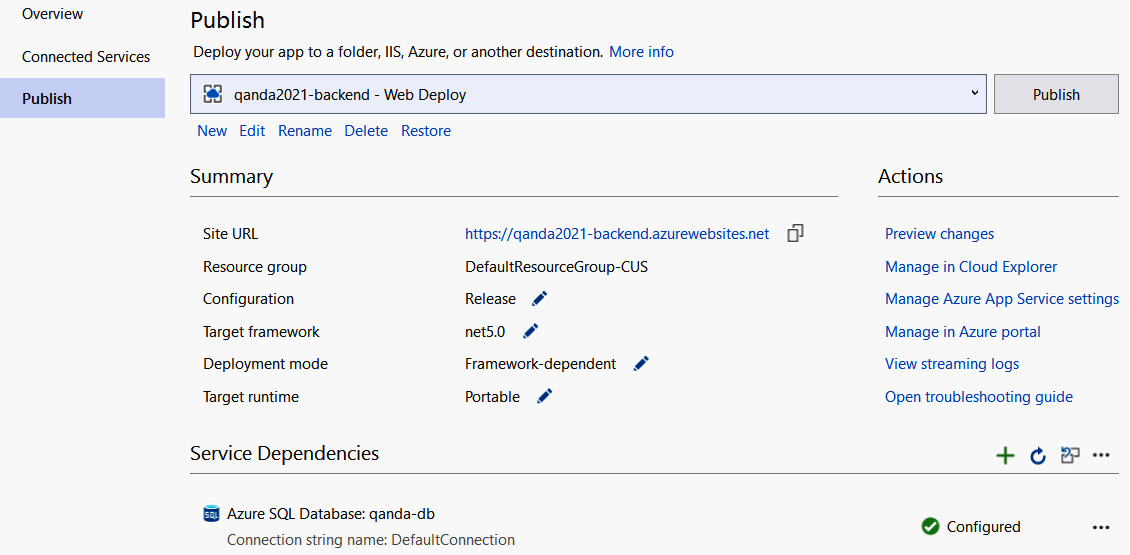
Figure 14.20 – Summary of publish configuration
- The last thing to do before we deploy is to configure the deployment so that the .NET Core runtime and libraries are included in the deployment. We do this by clicking the pencil icon against Deployment mode, setting Deployment Mode to be Self-Contained in the dialog that appears, and clicking Save, as illustrated in the following screenshot:
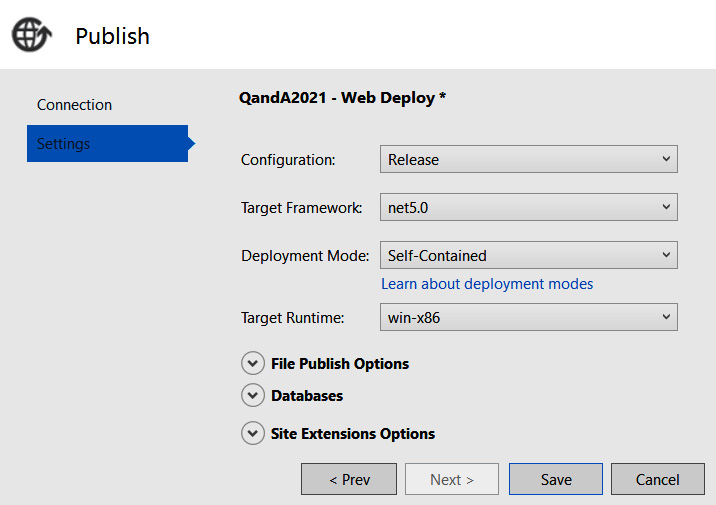
Figure 14.21 – Setting deployment mode to Self-Contained
- Click the Publish button to deploy our code to Azure. This will take a few minutes to complete.
- Eventually, a browser window will open, containing the path to our deployed backend. Add /api/questions to the path in the browser, as illustrated in the following screenshot:

Figure 14.22 – Our REST API in Azure
We will see the default questions from our database. Congratulations! We have just deployed our first SQL database and ASP.NET Core app in Azure!
Let's go to the Azure portal by navigating to https://portal.azure.com. Select the All resources option, which results in the following screen:

Figure 14.23 – Provisioned services in Azure
As expected, we see the services that we have just provisioned.
Excellent! We have just successfully deployed our backend in Azure!
As our backend is further developed, we can return to this profile and use the Publish button to quickly deploy our updated backend.
Next, let's follow a similar process to deploy to a staging environment.
Publishing to staging
Let's carry out the following steps to deploy our backend to a staging environment:
- In Solution Explorer, right-click on the QandA project and select Publish.... This will open the publish screen, where we will see our production publish profile.
- Select the New option to create a new publish profile.
- Select Azure as the target and click Next.
- Select Azure App Service (Windows) as the specific target and click Next.
- Click the green plus icon to add a new Azure app service.
- In the dialog that appears, enter the name for the new app service. This is going to be the service to host our backend in the staging environment. Note down the name you choose because we'll eventually reference this in the frontend project. Use the same resource group and hosting plan as we used for the production environment. Click Create to create the app service in Azure—this will take a few minutes.
- When the App Service dialog has closed, we are taken back to the Publish dialog. Make sure our staging app service is selected in the App Service Instances list, and click Next.
- Skip the API Management step by checking the Skip this step checkbox.
- Press Finish to save the publish profile.
- We want to create our staging database, so click on the Configure option in the Service Dependencies section.
- Select Azure SQL Database in the dialog that appears, and click Next.
- Click the green plus icon to create a database. The Azure SQL Database dialog opens.
- Enter your choice of database name. We will need this later, so keep a note of it.
- We will create a new database server for the staging environment, so click the New... option to the right of the Database server field.
- Fill in the server details in the dialog that appears. Choose your own server name, username, and password. Take note of these details because we will need these again in a later step. Click the OK button to confirm these details.
- Click the Create button on the Azure SQL Database dialog. This will create the database in Azure, so it may take a few minutes to complete.
- When the Azure SQL Database dialog has closed, we are taken back to the Configure Azure SQL Database dialog. Make sure our staging database is selected, and click Next.
- Next, we are asked to define our database connection string. Leave the connection name as DefaultConnection, and fill in the username and password we entered earlier when creating our staging database. Select Azure App Settings and click Next.
- Press Finish on the summary dialog that appears, and then press Close.
- In the publish summary, click the pencil icon against Deployment mode, and set Deployment Mode to be Self-Contained in the dialog that appears. Click Save.
- We can then publish our code to the Azure services by clicking the Publish button. Again, this will take a few minutes to complete.
- A browser window will eventually open, pointing to the new staging app service. If we add /api/questions to the path in the browser, we will see data returned from our staging database.
- We need to tell our new app service that it is the staging environment rather than a production environment. This is so that it uses the appsettings.Staging.json file, which contains the Frontend setting for Cross-Origin Resource Sharing (CORS). By default, Azure assumes the environment is production, which means the appsettings.Production.json file is being used at the moment. Let's go to the Azure portal and select the staging app service in the App Services area.
- In the Settings area, select Configuration and go to the Application settings tab.
- Under Application settings, click the New application setting option and enter ASPNETCORE_ENVIRONMENT as the name and Staging as the value, and then click the OK button followed by the Save button. This creates an environment variable called ASPNETCORE_ENVIRONMENT with a Staging value. ASP.NET Core will look at this variable and then use the appsettings.Staging.json file for its configuration settings, as illustrated in the following screenshot:

Figure 14.24 – Azure App Service application settings
That completes the deployment of our app to a staging environment.
That's great progress! Azure works beautifully with Visual Studio. In the next section, we are going to turn our attention to the frontend and make changes so that it will work in the Azure staging and production environments, as well as in development.
Configuring the React frontend for staging and production
In this section, we are going to change our frontend so that it makes requests to the correct backend APIs in staging and production. At the moment, the REST API has a hardcoded path set to the localhost. We are going to make use of environment variables as we did in our backend, to differentiate between the different environments. Let's open our frontend project in Visual Studio Code and carry out the following steps:
- First, we are going to install a library called cross-env that will allow us to set environment variables. Let's execute the following command in the Terminal:
> npm install cross-env --save-dev
- Let's add the following scripts in package.json to execute staging and production builds:
"scripts": {
...,
"build": "react-scripts build",
"build:production": "cross-env
REACT_APP_ENV=production npm run build",
"build:staging": "cross-env REACT_APP_ENV=staging
npm run build",
...
},
- These scripts use the cross-env library to set an environment variable called REACT_APP_ENV to staging and production before doing an optimized build.
So, npm run build:staging will execute a staging build and npm run build:production will execute a production build.
- Let's make use of the REACT_APP_ENV environment variable when setting the server variable in the AppSettings.ts file. Open up AppSettings.ts and make the following changes:
export const server =
process.env.REACT_APP_ENV === 'production'
? 'https://your-backend.azurewebsites.net'
: process.env.REACT_APP_ENV === 'staging'
? 'https://your-backend-staging.azurewebsites.net'
: 'http://localhost:17525';
We use a ternary expression to set the correct backend location, depending on the environment the app is running in. The production server is set to https://your-backend.azurewebsites.net, and the staging server is set to https://your-backend-staging.azurewebsites.net.
Make sure the staging and production locations you enter match the location of your deployed backends:
- For deep links to work in Azure, we need to specify a URL rewrite rule to redirect all requests to the frontend to our index.html file. We can do this by adding a web.config file to the public folder with the following content:
<?xml version="1.0" encoding="utf-8"?>
<configuration>
<system.webServer>
<rewrite>
<rules>
<rule name="React Routes"
stopProcessing="true">
<match url=".*" />
<conditions logicalGrouping="MatchAll">
<add input="{REQUEST_FILENAME}"
matchType="IsFile" negate="true" />
</conditions>
<action type="Rewrite" url="/"
appendQueryString="true" />
</rule>
</rules>
</rewrite>
</system.webServer>
</configuration>
- Now, let's do one final thing in preparation for deploying our frontend. Let's change the app to render the environment we are in. Let's open Header.tsx and add the environment name after the app name in the link to the home page, like this:
<Link
to="/"
css={ ... }
>
Q & A
<span
css={css`
margin-left: 5px;
font-size: 14px;
font-weight: normal;
`}
>
{process.env.REACT_APP_ENV || 'dev'}
</span>
</Link>
If the environment variable isn't populated, we assume we are in the development environment.
That completes the changes we need to make to our frontend. In the next section, we are going to deploy the frontend to Azure.
Publishing the React frontend to Azure
In this section, we are going to deploy our React frontend to Azure, to both staging and production environments.
Publishing to production
Let's carry out the following steps to publish our frontend to a production environment:
- We'll start by provisioning an Azure app service. So, let's go to the Azure portal in a browser and go to the App Services area, and click the Add option.
- Complete the form that opens by choosing the existing resource group, choosing an app name, and selecting .NET 5 as the runtime stack and Windows as the operating system. Note that the app name we choose needs to be reflected in the Frontend setting in the appsettings.Production.json file in our backend project. Click the Review + create button and then the Create button to create the app service.
- Let's move to Visual Studio Code now and create a production build by running the following command in the Terminal:
> npm run build:production
After the build has finished, the production build will consist of all of the files in the build folder.
- We are going to use the Azure App Service extension to perform the Azure deployment. So, go to the Extensions area in Visual Studio Code (Ctrl + Shift + X), search Azure App Service, and install the extension shown in the following screenshot:
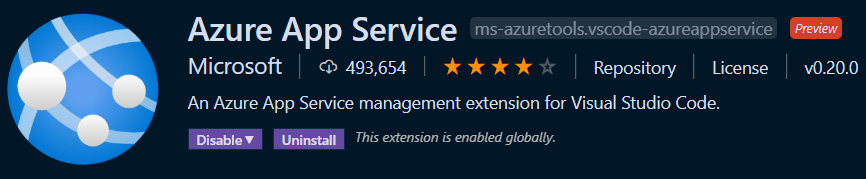
Figure 14.25 – Azure App Service extension in Visual Studio Code
- Click the Azure icon in the left-hand navigation options to open the Azure App Service panel, as illustrated in the following screenshot:
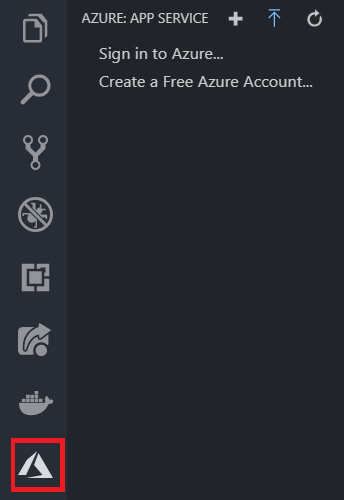
Figure 14.26 – Azure App Service panel
- Click on the Sign in to Azure... option. We are prompted to enter our Microsoft account credentials, so let's enter these.
- We should see the frontend app service listed in the tree. Right-click on this and choose the Deploy to Web App... option, as illustrated in the following screenshot:

Figure 14.27 – Deploying an app to an Azure app service
- We should select our build folder when prompted for the folder to deploy.
- We are then asked to confirm the deployment, which we do by clicking the Deploy button, as illustrated in the following screenshot:
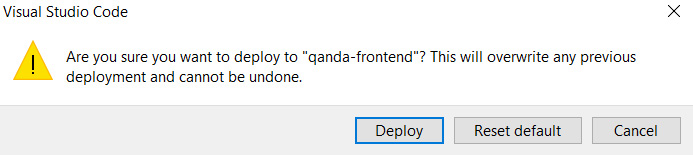
Figure 14.28 – Deployment confirmation
- Deployment will take a minute or so before we get confirmation that it is complete, as illustrated in the following screenshot:

Figure 14.29 – Confirmation of deployment completion
- If we click on the Browse Website option, our frontend in Azure will display in a browser, as illustrated in the following screenshot:

Figure 14.30 – Q&A app running in production
Our frontend is now deployed nicely to the production environment. We won't be able to sign in successfully yet—we'll resolve this after we have published our frontend to the staging environment.
Publishing to staging
Let's carry out the following steps to deploy our frontend to a staging environment:
- We'll start by provisioning another Azure app service. So, let's go to the Azure portal in a browser and go to the App Services area, and click the Add option.
- Enter an app name and choose the existing resource group. Remember that the app name we choose needs to be reflected in the Frontend setting of the appsettings.Staging.json file in our backend project. Remember also that the runtime stack should be .NET 5 and that Windows should be the operating system. Click the Review + create button and then the Create button to create the app service.
- Let's move to Visual Studio Code now and create a staging build by running the following command in the Terminal:
> npm run build:staging
After the build has finished, the staging build will consist of all of the files in the build folder overwriting the production build.
- In the Azure App Service section in Visual Studio Code, we should see the frontend staging app service listed in the tree. Note that we might need to click the Refresh toolbar option for it to appear. Right-click on the frontend staging app service and choose the Deploy to Web App... option.
- We should select our build folder when prompted for the folder to deploy, and then confirm the deployment when prompted.
- After a minute or so, we'll get confirmation that the deployment is complete. If we click on the Browse Website option, our staging frontend in Azure will show in a browser, as illustrated in the following screenshot:
Figure 14.31 – Q&A app running in staging
- Next, let's tell Auth0 about the Azure staging and production URLs it should trust. In Auth0, we need to update the following settings against our Q&A application. Refer to Chapter 11, Securing the Backend, if you can't remember how to do this.
Allowed Callback URLs—This is shown in the following screenshot:
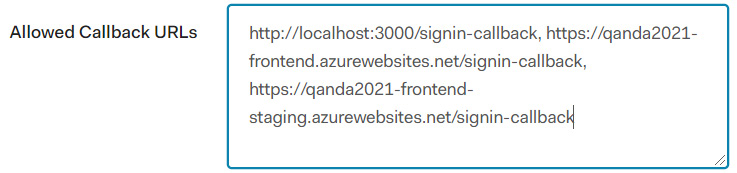
Figure 14.32 – Auth0 allowed callback URLs
Allowed Web Origins—This is shown in the following screenshot:

Figure 14.33 – Auth0 allowed web origins
Allowed Logout URLs—This is shown in the following screenshot:
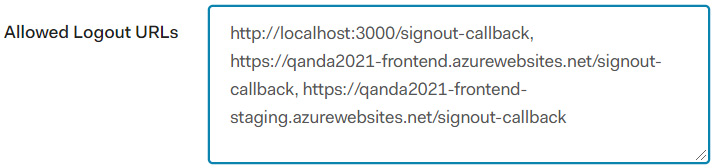
Figure 14.34 – Auth0 allowed logout URLs
We can find these settings by clicking on the Applications item in the left-hand navigation menu and then clicking on the Q and A application. We add the additional URLs for both the staging and production environments after the development environment URLs. The URLs for the different environments need to be separated by a comma.
We should now be able to sign in to our production and staging Q&A apps successfully.
That completes the deployment of our frontend to both production and staging environments.
Summary
Azure works beautifully with both React and ASP.NET Core apps. In ASP.NET Core, we can have different appsettings.json files to store the different settings for the different environments, such as the frontend location for CORS. In our React code, we can use an environment variable to make requests to the appropriate backend. We also need to include a web.config file in our React app so that deep links are redirected to the index.html page and then handled by React Router. The environment variable can be set in specific build npm scripts for each environment. We used three environments in this chapter, but both the frontend and backend could easily be configured to support more environments.
Azure has integration from both Visual Studio and Visual Studio Code that makes deploying React and ASP.NET Core apps a breeze. We use the built-in Publish... option in Visual Studio to provision the SQL database with app services and then perform the deployment. We can also provision app services in the Azure portal, which we did for our frontend. We can then use the Azure App Service Visual Studio Code extension to deploy the frontend to an app service.
Although deploying our app to Azure was super-easy, we can make it even easier by automating the deployment when we check code into source control. We'll do this in the next chapter.
Questions
The following questions will test what we have learned in this chapter:
- In ASP.NET Core, what is the name of the file where we store any settings specific to the production environment?
- What is the reason for our ASP.NET Core backend needing the Frontend setting?
- Let's pretend we have introduced a QA environment and have created the following npm script to execute a build for this environment:
"build:qa": "cross-env REACT_APP_ENV=qa npm run build"
Which npm command would we use to produce a QA build?
- What would be broken if we didn't include the web.config file with our React frontend?
- Why didn't we store the production and staging connection strings in the appsettings.Product.json or appsettings.Staging.json files?
Answers
- In ASP.NET Core, the name of the file where we store any settings specific to the production environment is called appsettings.Production.json.
- The reason for our ASP.NET Core backend needing the Frontend setting is to set up the allowed origin in a CORS policy.
- We would use npm run build:qa to produce a QA build.
- If we didn't include the web.config file with our React frontend, we wouldn't be able to deep-link into our app—for example, putting the path to a question (such as https://qandafrontend.z19.web.core.windows.net/questions/1) directly in the browser's address bar and pressing Enter will result in a Page not found error being returned.
- Connection strings contain a secret username and password. It is safer to store these in Azure rather than in our source code.
Further reading
The following resources are useful for finding more information on deploying ASP.NET Core and React apps to Azure:
- Using multiple environments in ASP.NET Core: https://docs.microsoft.com/en-us/aspnet/core/fundamentals/environments
- Deploying ASP.NET Core apps to Azure App Service: https://docs.microsoft.com/en-us/aspnet/core/host-and-deploy/azure-apps
- Deploying a static website to Azure from VS Code: https://code.visualstudio.com/tutorials/static-website/getting-started