
Chapter 11: Securing the Backend
In this chapter, we'll implement authentication and authorization in our Q&A app. We will use a popular service called Auth0, which implements OpenID Connect (OIDC), to help us to do this. We will start by understanding what OIDC is and why it is a good choice, before getting our app to interact with Auth0.
At the moment, our web API is accessible by unauthenticated users, which is a security vulnerability. We will resolve this vulnerability by protecting the necessary endpoints with simple authorization. This will mean that only authenticated users can access protected resources.
Authenticated users shouldn't have access to everything, though. We will learn how to ensure authenticated users only get access to what they are allowed to by using custom authorization policies.
We'll also learn how to get details about authenticated users so that we can include them when questions and answers are saved to the database.
We will end the chapter by enabling cross-origin requests in preparation for allowing our frontend to access the REST API.
In this chapter, we'll cover the following topics:
- Understanding OIDC
- Setting up Auth0 with our ASP.NET backend
- Protecting endpoints
- Using the authenticated user when posting questions and answers
- Adding CORS
Technical requirements
We'll use the following tools and services in this chapter:
- Visual Studio 2019: We'll use this to edit our ASP.NET code. This can be downloaded and installed from https://visualstudio.microsoft.com/vs/.
- .NET 5: This can be downloaded from https://dotnet.microsoft.com/download/dotnet/5.0.
- Auth0: We will use this to authenticate and manage users. The service is free to try and do some testing with, and an account can be created at https://auth0.com/signup.
- Postman: We'll use this to try out the changes to our REST API in this chapter. This can be downloaded from https://www.getpostman.com/downloads/.
- Q&A: We'll start with the Q&A starter project for this chapter. This is the backend project we finished in the previous chapter with all the controller methods asynchronous. This is available on GitHub at https://github.com/PacktPublishing/ASP.NET-Core-5-and-React-Second-Edition in the chapter-11/start folder.
All of the code snippets in this chapter can be found online at https://github.com/PacktPublishing/ASP.NET-Core-5-and-React-Second-Edition. To restore code from a chapter, the source code repository can be downloaded and the relevant folder opened in the relevant editor. If the code is frontend code, then npm install can be entered in the terminal to restore the dependencies.
Check out the following video to see the Code in Action: http://bit.ly/2EPQ8DY
Understanding OIDC
Before we cover OIDC, let's make sure we understand authentication and authorization. Authentication verifies that the user is who they say they are. In our app, the user will enter their email and password to prove who they are. Authorization decides whether a user has permission to access a resource. In our app, some of the REST API endpoints, such as posting a question, will eventually be protected by authorization checks.
OIDC is an industry-standard way of handling both authentication and authorization as well as other user-related operations. This works well for a wide variety of architectures, including single-page applications (SPAs) such as ours where there is a JavaScript client and a server-side REST API that need to be secured.
The following diagram shows the high-level flow of a user of our app being authenticated and then gaining access to protected resources in the REST API:

Figure 11.1 – OIDC authentication flow
Here are some more details of the steps that take place:
- The client makes an authorization request to an identity provider because it wants to get access to a protected resource in the REST API.
- The client is redirected to the identity provider so that the user can enter their credentials to prove who they are.
- The identity provider then generates a code and redirects back to the client with the code.
- The client then makes a web API request containing the generated code to get an access code. The identity provider validates the code and responds with an access token.
- The client can then access protected resources in the REST API by including the access token in the requests.
Notice that our app never handles user credentials. When user authentication is required, the user will be redirected to the identity provider to carry out this process. Our app only ever deals with a secure token, which is referred to as an access token, which is a long-encoded string. This token is in JSON Web Token (JWT) format, which again is industry-standard.
The content of a JWT can be inspected using the https://jwt.io/ website. We can paste a JWT into the Encoded box and then the site puts the decoded JWT in the Decoded box, as shown in the following screenshot:
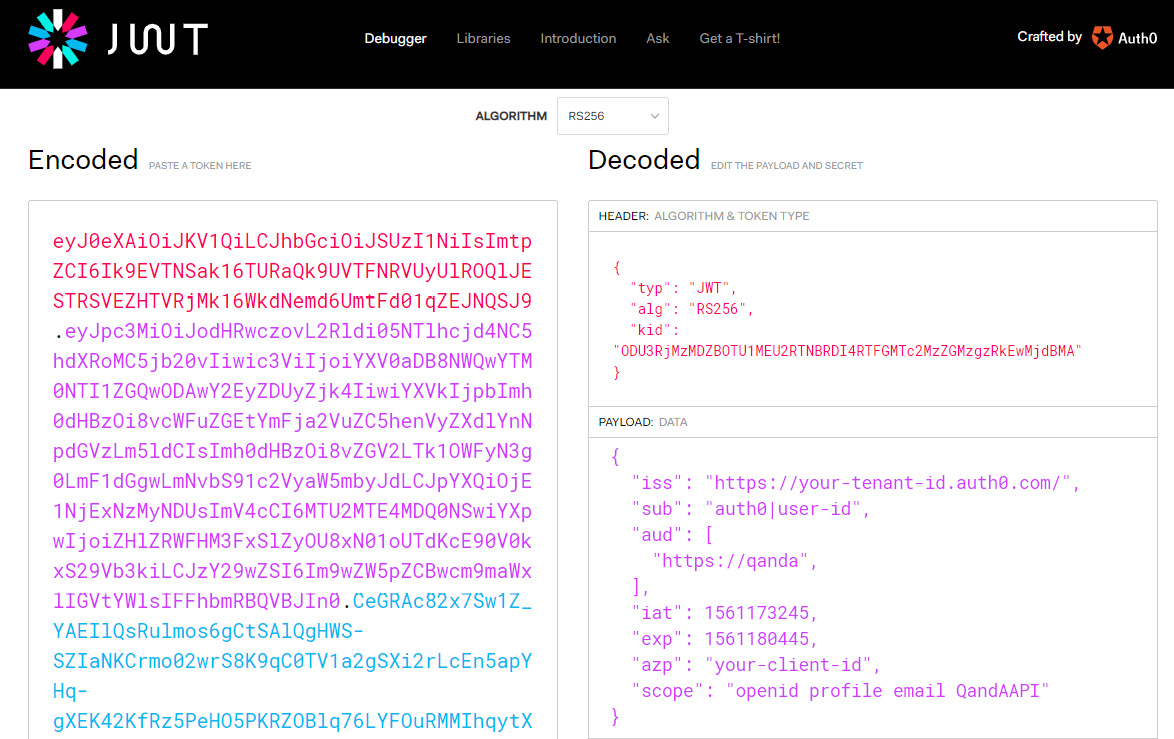
Figure 11.2 – JWT in jwt.io
There are three parts to a JWT, separated by dots, and they appear as different colors in jwt.io:
- HEADER
- PAYLOAD
- SIGNATURE
The header usually contains the type of the token in a typ field and the signing algorithm being used in an alg field. So, the preceding token is a JWT that uses an RSA signature with the SHA-256 asymmetric algorithm. There is also a kid field in the header, which is an opaque identifier that can be used to identify the key that was used to sign the JWT.
The payload of JWTs vary but the following fields are often included:
- iss: This is the identity provider that issued the token.
- sub: This is short for subject and is the user's identifier. This will be UserId for our app.
- aud: This is the intended audience. For our app, this will contain the name of our REST API.
- iat: This is when the JWT was issued. This is in Unix epoch time format, which is the seconds that have passed since January 1, 1970.
- exp: This is when the token expires and again is in Unix epoch time format.
- azp: This is the party to which the token was issued, which is a unique identifier for the client using the JWT. This will be the client ID of our React app in our case.
- scope: This is what the client can get access to. For our app, this is the REST API, as well as user profile information and their email address.
- The openid scope allows the client to verify a user's identity.
OIDC deals with securely storing passwords, authenticating users, generating access tokens, and much more. Being able to leverage an industry-standard technology such as OIDC not only saves us lots of time but also gives us the peace of mind that the implementation is very secure and will receive updates as attackers get smarter.
What we have just learned is implemented by Auth0. We'll start to use Auth0 in the next section.
Setting up Auth0 with our ASP.NET backend
We are going to use a ready-made identity service called Auth0 in our app. Auth0 implements OIDC and is also free for a low number of users. Using Auth0 will allow us to focus on integrating with an identity service rather than spending time building our own.
In this section, we are going to set up Auth0 and integrate it into our ASP.NET backend.
Setting up Auth0
Let's carry out the following steps to set up Auth0 as our identity provider:
- If you haven't already got an Auth0 account, sign up at https://auth0.com/signup.
- Once we have an Auth0 account and have logged in, we need to change the default audience in our tenant settings. To get to your tenant settings, click on the user avatar and choose Settings:
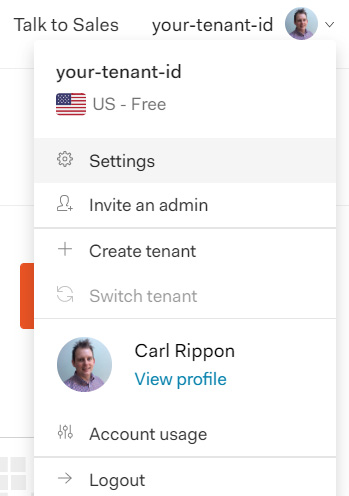
Figure 11.3 – Auth0 tenant settings option
The Default Audience option is in the API Authorization Settings section. Change this to https://qanda:

Figure 11.4 – Auth0 Default Audience setting
This tells Auth0 to add https://qanda to the aud payload field in the JWT it generates. This setting triggers Auth0 to generate access tokens in JWT format. Our ASP.NET backend will also check that access tokens contain this data before granting access to protected resources.
- Next, we are going to tell Auth0 about our React frontend. On the left-hand navigation menu, click Applications and then click the Create Application button.
- Select the Single Page Web Applications application type and click the CREATE button:

Figure 11.5 – Creating a SPA Auth0 client
- We need to change a few settings in the SPA client configuration, so select the Settings tab and set the following settings.
- The name will appear on the login screen, so change it to QandA.
- Specify the origin of the frontend in the Allowed Web Origins setting. So, let's set this to http://localhost:3000.
- We need to specify the page Auth0 will redirect back to after a successful login in the Allowed Callback URLs setting. So, set this to http://localhost:3000/signin-callback. We will implement the signin-callback page in our frontend in Chapter 12, Interacting with RESTful APIs.
- Similarly, we need to specify the page Auth0 will redirect back to after a successful logout in the Allowed Logout URLs setting. So, set this to http://localhost:3000/signout-callback. We will implement the signout-callback page in our frontend in Chapter 12, Interacting with RESTful APIs.
- Don't forget to scroll to the bottom of the page and click the Save Changes button after entering these settings.
- We now need to tell Auth0 about our ASP.NET backend. On the left-hand navigation menu, click APIs and then click the Create API button:

Figure 11.6 – Creating an API Auth0 client
The name can be anything we choose, but the Identifier setting must match the default audience we set on the tenant. Make sure Signing Algorithm is set to RS256 and then click the CREATE button.
That completes the setup of Auth0.
Next, we will integrate our ASP.NET backend with Auth0.
Configuring our ASP.NET backend to authenticate with Auth0
We can now change our ASP.NET backend to authenticate with Auth0. Let's open the backend project in Visual Studio and carry out the following steps:
- Install the following NuGet package:
Microsoft.AspNetCore.Authentication.JwtBearer
Important Note
Make sure the version of the package you select is supported by the version of .NET you are using. So, for example, if you are targeting .NET 5.0, then select package version 5.0.*.
- Add the following using statement to the Startup class:
using Microsoft.AspNetCore.Authentication.JwtBearer;
Add the following lines to the ConfigureServices method in the Startup class:
public void ConfigureServices(IServiceCollection services)
{
...
services.AddAuthentication(options =>
{
options.DefaultAuthenticateScheme =
JwtBearerDefaults.AuthenticationScheme;
options.DefaultChallengeScheme =
JwtBearerDefaults.AuthenticationScheme;
}).AddJwtBearer(options =>
{
options.Authority =
Configuration["Auth0:Authority"];
options.Audience =
Configuration["Auth0:Audience"];
});
}
This adds JWT-based authentication specifying the authority and expected audience as the appsettings.json settings.
- Let's add the authentication middleware to the Configure method. It needs to be placed between the routing and authorization middleware:
public void Configure(IApplicationBuilder app, IWebHostEnvironment env)
{
...
app.UseRouting();
app.UseAuthentication();
app.UseAuthorization();
...
}
This will validate the access token in each request if one exists. If the check succeeds, the user on the request context will be set.
- The final step is to add the settings in appsettings.json, which we have referenced:
{
...,
"Auth0": {
"Authority": "https://your-tentant-id.auth0.com/",
"Audience": "https://qanda"
}
}
We will need to substitute our Auth0 tenant ID into the Authority field. The tenant ID can be found in Auth0 to the left of the user avatar:
Figure 11.7 – Auth0 user avatar
So, Authority for the preceding tenant is https://your-tenant-id.auth0.com/. The Audience field needs to match the audience we specified in Auth0.
Our web API is now validating access tokens in the requests.
Let's quickly recap what we have done in this section. We told our identity provider the path to our frontend and the paths for signing in and out. Identity providers often provide an administration page for us to supply this information. We also told ASP.NET to validate the bearer token in a request using the UseAuthentication method in the Configure method in the Startup class. The validation is configured using the AddAuthentication method in ConfigureServices.
We are going to start protecting some endpoints in the next section.
Protecting endpoints
We are going to start this section by protecting the questions endpoint for adding, updating, and deleting questions as well as posting answers so that only authenticated users can do these operations. We will then move on to implement and use a custom authorization policy so that only the author of the question can update or delete it.
Protecting endpoints with simple authorization
Let's protect the questions endpoint for the POST, PUT, and DELETE HTTP methods by carrying out these steps:
- Open QuestionsController and add the following using statement:
using Microsoft.AspNetCore.Authorization;
- To secure the actions, we decorate them with an Authorize attribute. Add this attribute to the PostQuestion, PutQuestion, DeleteQuestion, and PostAnswer methods:
[Authorize]
[HttpPost]
public async ... PostQuestion(QuestionPostRequest questionPostRequest)
...
[Authorize]
[HttpPut("{questionId}")]
public async ... PutQuestion(int questionId, QuestionPutRequest questionPutRequest)
...
[Authorize]
[HttpDelete("{questionId}")]
public async ... DeleteQuestion(int questionId)
...
[Authorize]
[HttpPost("answer")]
public async ... PostAnswer(AnswerPostRequest answerPostRequest)
...
- Run the Visual Studio project by pressing F5. We'll notice, as the browser opens with the api/questions path, that the data is successfully returned. This means that the GetQuestions action method is unprotected, as we expected.
- Open Postman now and try to post a question:

Figure 11.8 – Accessing a protected endpoint in Postman without being authenticated
We receive a response with status code 401 Unauthorized. This shows that this action method is now protected.
- We can obtain a test access token from Auth0 to check that we can post a question with a valid token. In Auth0, click on APIs in the left-hand navigation menu and then our QandA API.
- Click on the Test tab and we will see a token that we can use for testing purposes.
- Click the COPY TOKEN option to copy the access token to the clipboard:

Figure 11.9 – Getting a test token from Auth0
- Back in Postman, we need to add this token to an Authorization HTTP header after the bearer word and a space:

Figure 11.10 – Adding the Auth0 bearer token to an Authorization HTTP header in Postman
- If we send the request, it will now be successful:

Figure 11.11 – Successfully accessing a protected endpoint in Postman
- Press Shift + F5 to stop the Visual Studio project from running so that we can add more code.
So, once the authentication middleware is in place, the Authorize attribute protects action methods. If a whole controller needs to be protected, the Authorize attribute can decorate the controller class:
[Authorize]
[Route("api/[controller]")]
[ApiController]
public class QuestionsController : ControllerBase
All of the action methods in the controller will then be protected without having to specify the Authorize attribute. We can also unprotect action methods in a protected controller by using the AllowAnonymous attribute:
[AllowAnonymous]
[HttpGet]
public IEnumerable<QuestionGetManyResponse> GetQuestions(string search, bool includeAnswers, int page = 1, int pageSize = 20)
So, in our example, we could have protected the whole controller using the Authorize attribute and unprotected the GetQuestions, GetUnansweredQuestions, and GetQuestion action methods with the AllowAnonymous attribute to achieve the behavior we want.
Next, we are going to learn how to implement a policy check with endpoint authorization.
Protecting endpoints with a custom authorization policy
At the moment, any authenticated user can update or delete questions. We are going to implement and use a custom authorization policy and use it to enforce that only the author of the question can do these operations. Let's carry out the following steps:
- In the Startup class, let's add the following using statements:
using Microsoft.AspNetCore.Http;
using Microsoft.AspNetCore.Authorization;
using QandA.Authorization;
Note that the reference to the QandA.Authorization namespace doesn't exist yet. We'll implement this in a later step.
- We'll need to eventually call an Auth0 web service, so let's make the HTTP client available in the ConfigureServices method:
public void ConfigureServices(IServiceCollection services)
{
...
services.AddHttpClient();
}
The authorization policy has its requirements defined in a class called MustBeQuestionAuthorRequirement, which we'll implement in a later step.
- Let's also add an authorization policy called MustBeQuestionAuthor:
public void ConfigureServices(IServiceCollection services)
{
...
services.AddHttpClient();
services.AddAuthorization(options =>
options.AddPolicy("MustBeQuestionAuthor", policy
=>
policy.Requirements
.Add(new MustBeQuestionAuthorRequirement())));
}
The authorization policy has its requirements defined in a class called MustBeQuestionAuthorRequirement, which we'll implement in a later step.
- We also need to have a handler for the requirement, so let's register this for dependency injection:
public void ConfigureServices(IServiceCollection services)
{
...
services.AddHttpClient();
services.AddAuthorization(...);
services.AddScoped<
IAuthorizationHandler,
MustBeQuestionAuthorHandler>();
}
So, the handler for MustBeQuestionAuthorRequirement will be implemented in a class called MustBeQuestionAuthorHandler.
- Our MustBeQuestionAuthorHandler class will need access to the HTTP requests to find out the question that is being requested. We need to register HttpContextAccessor for dependency injection to get access to the HTTP request information in a class. Let's do this now:
public void ConfigureServices(IServiceCollection services)
{
...
services.AddHttpClient();
services.AddAuthorization(...);
services.AddScoped<
IAuthorizationHandler,
MustBeQuestionAuthorHandler>();
services.AddHttpContextAccessor();
}
Note that AddHttpContextAccessor is a convenience method for AddSingleton<IHttpContextAccessor,HttpContextAccessor>.
- We are going to create the MustBeQuestionAuthorRequirement class now. Let's create a folder called Authorization in the root of the project and then create a class called MustBeQuestionAuthorRequirement containing the following:
using Microsoft.AspNetCore.Authorization;
namespace QandA.Authorization
{
public class MustBeQuestionAuthorRequirement:
IAuthorizationRequirement
{
public MustBeQuestionAuthorRequirement()
{
}
}
}
- Next, we'll create the handler class for this requirement. Create a class called MustBeQuestionAuthorHandler with the following content in the Authorization folder:
using System;
using System.Security.Claims;
using System.Threading.Tasks;
using Microsoft.AspNetCore.Authorization;
using Microsoft.AspNetCore.Http;
using QandA.Data;
namespace QandA.Authorization
{
public class MustBeQuestionAuthorHandler:
AuthorizationHandler<MustBeQuestionAuthorRequirement>
{
private readonly IDataRepository _dataRepository;
private readonly IHttpContextAccessor
_httpContextAccessor;
public MustBeQuestionAuthorHandler(
IDataRepository dataRepository,
IHttpContextAccessor httpContextAccessor)
{
_dataRepository = dataRepository;
_httpContextAccessor = httpContextAccessor;
}
protected async override Task
HandleRequirementAsync(
AuthorizationHandlerContext context,
MustBeQuestionAuthorRequirement requirement)
{
// TODO - check that the user is authenticated
// TODO - get the question id from the request
// TODO - get the user id from the name
// identifier claim
// TODO - get the question from the data
// repository
// TODO - if the question can't be found go to
// the next piece of middleware
// TODO - return failure if the user id in the
// question from the data repository is
// different to the user id in the request
// TODO - return success if we manage to get
// here
}
}
}
This inherits from the AuthorizationHandler class, which takes in the requirement it is handling as a generic parameter. We have injected the data repository and the HTTP context into the class.
- We now need to implement the HandleRequirementAsync method. The first task is to check that the user is authenticated:
protected async override Task
HandleRequirementAsync(
AuthorizationHandlerContext context,
MustBeQuestionAuthorRequirement requirement)
{
if (!context.User.Identity.IsAuthenticated)
{
context.Fail();
return;
}
// TODO - get the question id from the request
// TODO - get the user id from the name identifier
// claim
// TODO - get the question from the data repository
// TODO - if the question can't be found go to the
// next piece of middleware
// TODO - return failure if the user id in the
// question from the data repository is different
// to the user id in the request
// TODO - return success if we manage to get here
}
The context parameter in the method contains information about the user's identity in an Identity property. We use the IsAuthenticated property within the Identity object to determine whether the user is authenticated or not. We call the Fail method on the context argument to tell it that the requirement failed.
- Next, we need to get questionId from the request path:
protected async override Task
HandleRequirementAsync(
AuthorizationHandlerContext context,
MustBeQuestionAuthorRequirement requirement)
{
if (!context.User.Identity.IsAuthenticated)
{
context.Fail();
return;
}
var questionId =
_httpContextAccessor.HttpContext.Request
.RouteValues["questionId"];
int questionIdAsInt = Convert.ToInt32(questionId);
// TODO - get the user id from the name identifier
// claim
// TODO - get the question from the data repository
// TODO - if the question can't be found go to the
//next piece of middleware
// TODO - return failure if the user id in the
//question from the data repository is different
// to the user id in the request
// TODO - return success if we manage to get here
}
We use the RouteValues dictionary within the HTTP context request to get access to get the question ID. The RoutesValues dictionary contains the controller name, the action method name, as well as the parameters for the action method.
- Next, we need to get userId from the user's identity claims:
protected async override Task
HandleRequirementAsync(
AuthorizationHandlerContext context,
MustBeQuestionAuthorRequirement requirement)
{
...
var questionId =
_httpContextAccessor.HttpContext.Request
.RouteValues["questionId"];
int questionIdAsInt = Convert.ToInt32(questionId);
var userId =
context.User.FindFirst(ClaimTypes.NameIdentifier).
Value;
// TODO - get the question from the data repository
// TODO - if the question can't be found go to the
// next piece of middleware
// TODO - return failure if the user id in the
//question from the data repository is different
// to the user id in the request
// TODO - return success if we manage to get here
}
userId is stored in the name identifier claim.
Important Note
A claim is information about a user from a trusted source. A claim represents what the subject is, not what the subject can do. The ASP.NET authentication middleware automatically puts userId in a name identifier claim for us.
We have used the FindFirst method on the User object from the context parameter to get the value of the name identifier claim. The User object is populated with the claims by the authentication middleware earlier in the request pipeline after it has read the access token.
- We can now get the question from the data repository. If the question isn't found, we want to pass the requirement because we want to return HTTP status code 404 (not found) rather than 401 (unauthorized). The action method in the controller will then be able to execute and return the HTTP 404 status code:
protected async override Task
HandleRequirementAsync(
AuthorizationHandlerContext context,
MustBeQuestionAuthorRequirement requirement)
{
...
var userId =
context.User.FindFirst(ClaimTypes.NameIdentifier).Value;
var question =
await _dataRepository.GetQuestion(questionIdAsInt);
if (question == null)
{
// let it through so the controller can return a 404
context.Succeed(requirement);
return;
}
// TODO - return failure if the user id in the
//question from the data repository is different
// to the user id in the request
// TODO - return success if we manage to get here
}
- Now, check that userId in the request matches the question in the database and return Fail if not:
protected async override Task
HandleRequirementAsync(
AuthorizationHandlerContext context,
MustBeQuestionAuthorRequirement requirement)
{
...
var question =
await _dataRepository.GetQuestion(questionIdAsInt);
if (question == null)
{
// let it through so the controller can return
// a 404
context.Succeed(requirement);
return;
}
if (question.UserId != userId)
{
context.Fail();
return;
}
context.Succeed(requirement);
}
- The final task is to add the policy we have just created to the Authorize attribute on the relevant action methods in QuestionsController:
[Authorize(Policy = "MustBeQuestionAuthor")]
[HttpPut("{questionId}")]
public ... PutQuestion(int questionId, QuestionPutRequest questionPutRequest)
...
[Authorize(Policy = "MustBeQuestionAuthor")]
[HttpDelete("{questionId}")]
public ... DeleteQuestion(int questionId)
...
We have now applied our authorization policy to updating and deleting a question.
Unfortunately, we can't use the test access token that Auth0 gives us to try this out but we will circle back to this and confirm that it works in Chapter 12, Interacting with RESTful APIs.
Custom authorization policies give us lots of flexibility and power to implement complex authorization rules. As we have just experienced in our example, a single policy can be implemented centrally and used on different action methods.
Let's quickly recap what we have learned in this section:
- We protect endpoints or particular HTTP methods within an endpoint by decorating the controller class or the action methods with the Authorize attribute.
- We can reference a custom authorization policy in the Authorize attribute and implement its logic by extending the AuthorizationHandler class.
In the next section, we will learn how to reference information about the authenticated user in an API controller.
Using the authenticated user when posting questions and answers
Now that our REST API knows about the user interacting with it, we can use this to post the correct user against questions and answers. Let's carry out the following steps:
- We'll start by adding the following using statements in QuestionsController.cs:
using System.Security.Claims;
using Microsoft.Extensions.Configuration;
using System.Net.Http;
using System.Text.Json;
- Let's focus on posting a question first by posting it with the authenticated user's ID:
public async ...
PostQuestion(QuestionPostRequest
questionPostRequest)
{
var savedQuestion =
await _dataRepository.PostQuestion(new
QuestionPostFullRequest
{
Title = questionPostRequest.Title,
Content = questionPostRequest.Content,
UserId =
User.FindFirst(ClaimTypes.NameIdentifier).Value,
UserName = "[email protected]",
Created = DateTime.UtcNow
});
...
}
ControllerBase contains a User property that gives us information about the authenticated user, including the claims. So, we use the FindFirst method to get the value of the name identifier claim.
- Unfortunately, the username isn't in the JWT, so we are going to need to get this from Auth0. Let's create a model that will represent an Auth0 user. Create a new class called User in the Models folder with the following content:
namespace QandA.Data.Models
{
public class User
{
public string Name { get; set; }
}
}
Note that there is more user information that we can get from Auth0 but we are only interested in the username in our app.
- Now, inject the HTTP client as well as the path to get information about the user from Auth0 into QuestionsController:
...
private readonly IHttpClientFactory _clientFactory;
private readonly string _auth0UserInfo;
public QuestionsController(
...,
IHttpClientFactory clientFactory,
IConfiguration configuration)
{
...
_clientFactory = clientFactory;
_auth0UserInfo =
$"{configuration["Auth0:Authority"]}userinfo";
}
- Let's create a method that will call Auth0 to get the username. So, add the following method at the bottom of QuestionsController:
private async Task<string> GetUserName()
{
var request = new HttpRequestMessage(
HttpMethod.Get,
_auth0UserInfo);
request.Headers.Add(
"Authorization",
Request.Headers["Authorization"].First());
var client = _clientFactory.CreateClient();
var response = await client.SendAsync(request);
if (response.IsSuccessStatusCode)
{
var jsonContent =
await response.Content.ReadAsStringAsync();
var user =
JsonSerializer.Deserialize<User>(
jsonContent,
new JsonSerializerOptions
{
PropertyNameCaseInsensitive = true
});
return user.Name;
}
else
{
return "";
}
}
We make a GET HTTP request to the Auth0 user information endpoint with the Authorization HTTP header from the current request to the ASP.NET backend. This HTTP header will contain the access token that will give us access to the Auth0 endpoint.
If the request is successful, we parse the response body into our User model. Notice that we use the new JSON serializer in .NET. Notice also that we specify case-insensitive property mapping so that the camel case fields in the response map correctly to the title case properties in the class.
- Use the username in the PostQuestion method now:
public async ... PostQuestion(QuestionPostRequest questionPostRequest)
{
var savedQuestion = await
_dataRepository.PostQuestion(new
QuestionPostFullRequest
{
Title = questionPostRequest.Title,
Content = questionPostRequest.Content,
UserId =
User.FindFirst(ClaimTypes.NameIdentifier).Value,
UserName = await GetUserName(),
Created = DateTime.UtcNow
});
...
}
- Do the same in the PostAnswer action method:
[Authorize]
[HttpPost("answer")]
public ActionResult<AnswerGetResponse> PostAnswer(AnswerPostRequest answerPostRequest)
{
...
var savedAnswer = _dataRepository.PostAnswer(new
AnswerPostFullRequest
{
QuestionId = answerPostRequest.QuestionId.Value,
Content = answerPostRequest.Content,
UserId =
User.FindFirst(ClaimTypes.NameIdentifier).Value,
UserName = await GetUserName(),
Created = DateTime.UtcNow
});
...
}
Unfortunately, we can't use the test access token that Auth0 gives us to try this out because it doesn't have a user associated with it. However, we will circle back to this and confirm that it works in Chapter 12, Interacting with RESTful APIs.
Our question controller is interacting with the authenticated user nicely now.
To recap, information about the authenticated user is available in a User property within an API controller. The information in the User property is limited to the information contained in the JWT. Additional information can be obtained by requesting it from the relevant endpoint in the identity service provider.
Adding CORS
CORS stands for Cross-Origin Resource Sharing and is a mechanism that uses HTTP headers to tell a browser to let a web application run at certain origins (domains) so that it has permission to access certain resources on a server at a different origin.
In this section, we will start by trying to access our REST API from a browser application and discover that it isn't accessible. We will then add and configure CORS in the REST API and verify that it is accessible from a browser application.
Let's carry out the following steps:
- Run the backend project by pressing F5 in Visual Studio.
- In a browser, browse to https://resttesttest.com/ address. This is a browser application that we can use to check whether our REST API is accessible from a browser.
- Enter the path to the questions endpoint and press the Ajax request button. We see that the request is unsuccessful:

Figure 11.12 – CORS error when accessing the REST API from the browser
- Stop the backend from running by pressing Shift + F5 in Visual Studio and enter the following statement at the bottom of the ConfigureServices method in Startup.cs:
public void ConfigureServices(IServiceCollection services)
{
...
services.AddCors(options =>
options.AddPolicy("CorsPolicy", builder =>
builder
.AllowAnyMethod()
.AllowAnyHeader()
.WithOrigins(Configuration["Frontend"])));
}
This has defined a CORS policy that allows origins specified in appsettings.json to access the REST API. It also allows requests with any HTTP method and any HTTP header.
- Now, we can enable the use of this policy in the Configure method. Let's add the following statement between the routing and authentication in the Configure method:
public void Configure(IApplicationBuilder app, IHostingEnvironment env)
{
...
app.Routing();
app.UseCors("CorsPolicy");
app.UseAuthentication();
...
}
- In appsettings.json, add the following setting to allow the browser app access to the REST API:
{
...,
"Frontend": "https://resttesttest.com"
}
- Run the backend project again by pressing F5.
- In the browser app, press the Ajax request button again. We see that the request is successful this time:
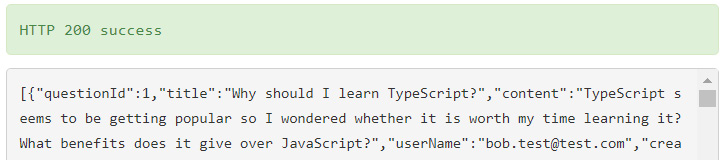
Figure 11.13 – Successful cross-origin request
- Stop the backend from running by pressing Shift + F5 in Visual Studio. In appsettings.json, change the Frontend setting to the local address of our frontend:
{
...,
"Frontend": "http://localhost:3000"
}
CORS is straightforward to add in ASP.NET. First, we create a policy and use this in the request pipeline. It is important that the UseCors method is placed between the UseRouting and UseEndpoint methods in the Configure method for it to function correctly.
Summary
Auth0 is an OIDC identity provider that we can leverage to authenticate and authorize clients. An access token in JWT format is available from an identity provider when a successful sign-in has been made. An access token can be used in requests to access protected resources.
ASP.NET can validate JWTs by first using the AddAuthentication method in the ConfigureServices method in the Startup class and then UseAuthentication in the Configure method.
Once authentication has been added to the request pipeline, REST API resources can be protected by decorating the controller and action methods using the Authorize attribute. Protected action methods can then be unprotected by using the AllowAnonymous attribute. We can access information about a user, such as their claims, via a controller's User property.
Custom policies are a powerful way to allow a certain set of users to get access to protected resources. Requirement and handler classes must be implemented that define the policy logic. The policy can be applied to an endpoint using the Authorize attribute by passing in the policy name as a parameter.
ASP.NET disallows cross-origin requests out of the box. We are required to add and enable a CORS policy for the web clients that require access to the REST API.
Our backend is close to completion now. In the next chapter, we'll turn our attention back to the frontend and start to interact with the backend we have built.
Questions
Let's answer the following questions to practice what we have learned in this chapter:
- In the Configure method in the Startup class, what is wrong with the following?
public void Configure(...)
{
...
app.UseEndpoints(...);
app.UseAuthentication();
}
- What attribute can be added to a protected action method to allow unauthenticated users to access it?
- We are building an app with an ASP.NET backend and using an identity provider to authenticate users. The default audience has been set to http://my-app in the identity provider, and we have configured the authentication service in our ASP.NET backend as follows:
services.AddAuthentication(options =>
{
options.DefaultAuthenticateScheme =
JwtBearerDefaults.AuthenticationScheme;
options.DefaultChallengeScheme =
JwtBearerDefaults.AuthenticationScheme;
}).AddJwtBearer(options =>
{
...
options.Audience = "https://myapp";
});
When we try to access protected resources in our ASP.NET backend, we receive an HTTP 401 status code. What is the problem here?
- A JWT has the following decoded payload data. On what date and time does it expire?
{
"nbf": 1609671475,
"auth_time": 1609671475,
"exp": 1609757875,
...
}
Tip: You can decode the Unix dates using this website: https://www.unixtimestamp.com/index.php.
- We have a valid access token from an identity provider and are using it to access a protected resource. We have set the following HTTP header in the request:
Authorisation: bearer some-access-token
We receive an HTTP 401 status code from the request, though. What is the problem?
- How can we access HTTP request information in a class outside of an API controller?
- In an API controller, how can we access an authenticated user ID?
Answers
- The problem is that authentication comes after the endpoints are handled in the request pipeline, which means that the user will always be unauthenticated in controller action methods even if the request has a valid access token. This means that protected resources will never be able to be accessed. UseAuthentication should come before UseEndpoints in the Configure method.
- An AllowAnonymous attribute can be added to a protected action method to allow unauthenticated users to access it.
- The problem is that the ASP.NET Core backend validates that the audience in the JWT is https://myapp, but the identity provider has been configured to set the audience to http://my-app. This results in the request being unauthorized.
- The exp field gives the expiry date, which is 1609757875 seconds after January 1, 1970, which, in turn, is January 4, 2021, 10:57:55 (GMT).
- The problem is that the HTTP header name needs to be Authorization – that is, we have spelled it with an s rather than a z.
- Request information can be accessed by injecting IHttpContextAccessor into a class as follows:
private readonly IHttpContextAccessor _httpContextAccessor;
public MyClass(IHttpContextAccessor httpContextAccessor)
{
_httpContextAccessor = httpContextAccessor;
}
public SomeMethod()
{
var request = _httpContextAccessor.HttpContext.Request;
}
The HttpContextAccessor service must be added to the ConfigureServices method in the Startup class, as follows:
services.AddSingleton<IHttpContextAccessor, HttpContextAccessor>();
- We can access the user ID in the controller's User property as follows:
User.FindFirst(ClaimTypes.NameIdentifier).Value
Further reading
Here are some useful links to learn more about the topics covered in this chapter:
- Open ID ConnectOIDC: https://openid.net/connect/
- ASP.NET Security and Identity: https://docs.microsoft.com/en-us/aspnet/core/security
- JSON Web Tokens: https://jwt.io/introduction/
- Auth0: https://auth0.com/docs