
Chapter 13: Adding Automated Tests
Now, it's time to get our QandA app ready for production. In this chapter, we are going to add automated tests to the frontend and backend of our app, which will give us the confidence to take the next step: moving our app into production.
First, we will focus on the backend and use xUnit to implement unit tests on pure functions with no dependencies. Then, we'll move on to testing our QuestionsController, which does have dependencies. We will also learn how to use Moq to replace our real implementation of dependencies with a fake implementation.
Next, we will turn our attention to testing the frontend of our app with the popular Jest tool. We will learn how to implement unit tests on pure functions and integration tests on React components by leveraging the fantastic React Testing Library.
Then, we will learn how to implement end-to-end tests with Cypress. We'll use this to test a key path through the app where the frontend and backend will be working together.
By the end of this chapter, our tests will give us more confidence that we are not breaking existing functionality when developing and shipping new versions of our app.
In this chapter, we'll cover the following topics:
- Understanding the different types of automated test
- Implementing .NET tests with xUnit
- Implementing React tests with Jest
- Testing React components
- Implementing end-to-end tests with Cypress
Let's get started!
Technical requirements
We will need the following tools and services in this chapter:
- Visual Studio 2019: We'll use this to write tests for our ASP.NET Core code backend. This can be downloaded and installed from https://visualstudio.microsoft.com/vs/.
- .NET 5: This can be downloaded from https://dotnet.microsoft.com/download/dotnet/5.0.
- Visual Studio Code: We'll use this to implement tests on our React code. This can be downloaded and installed from https://code.visualstudio.com/.
- Node.js and npm: These can be downloaded from https://nodejs.org/. If you already have these installed, make sure that Node.js is at least version 8.2 and that npm is at least version 5.2.
- Q and A: We'll start with the QandA frontend project that is available on GitHub at https://github.com/PacktPublishing/ASP.NET-Core-5-and-React-Second-Edition in the chapter-13/start folder.
All the code snippets in this chapter can be found online at https://github.com/PacktPublishing/ASP.NET-Core-5-and-React-Second-Edition. In order to restore code from a chapter, you can download the source code repository and open the relevant folder in the relevant editor. If the code is frontend code, then npm install can be entered into the Terminal to restore the dependencies. You will also need to substitute your Auth0 tenant ID and client ID in the appsettings.json file in the backend project, as well as the AppSettings.ts file in the frontend project.
Check out the following video to see the code in action: https://bit.ly/3h3Aib6.
Understanding the different types of automated test
A robust suite of automated tests helps us deliver software faster without sacrificing its quality. There are various types of test, though each type has its own benefits and challenges. In this section, we are going to understand the different types of test and the benefits they bring to a single-page application.
The following diagram shows the three different types of test:
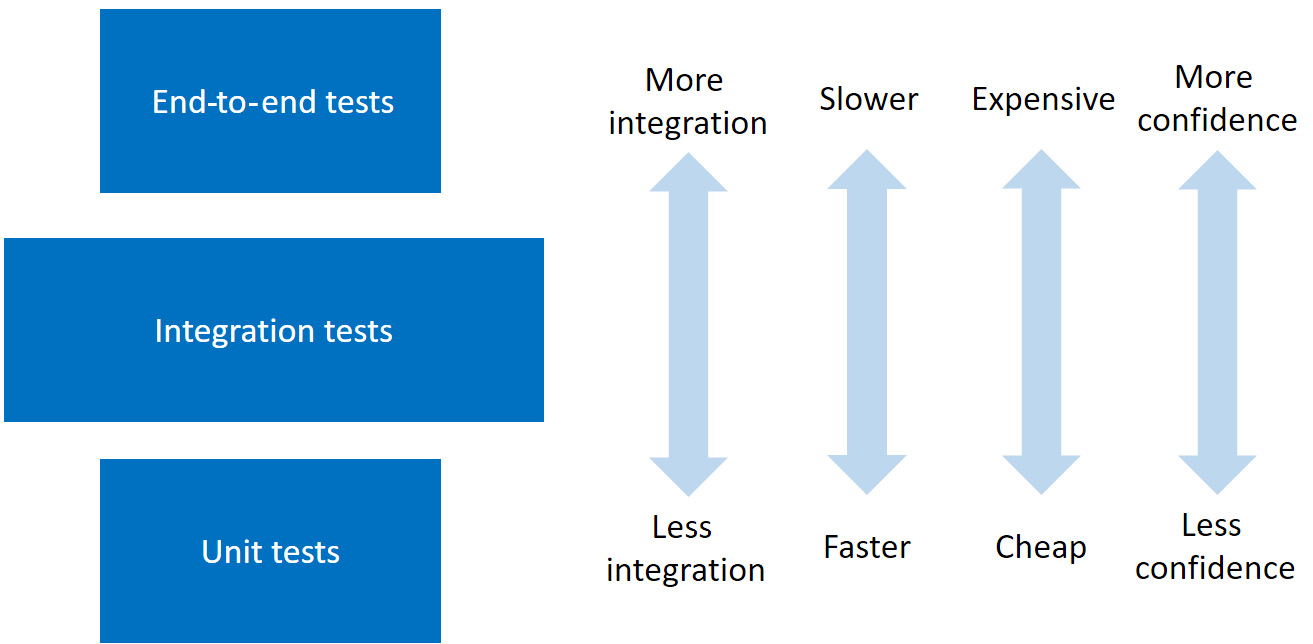
Figure 13.1 – Types of test
In the following subsections, we will examine each type of test, along with their pros and cons.
Unit tests
Unit tests verify that individual and isolated parts of an app work as expected. These tests generally execute very fast, thus giving us a very tight feedback loop so that we know the part of the app that we are developing is working correctly.
These tests can be quick to implement, but this is not necessarily the case if we need to mock out the dependencies of the unit we are testing. This is often the case when unit testing a React frontend, since a true unit test on a component needs to mock out any child components that are referenced in its JSX.
Perhaps the biggest downside of these tests is that they give us the least amount of confidence that the app as a whole is working correctly. We can have a large unit test suite that covers all the different parts of our app, but this is no guarantee that all the parts work together as expected.
The following is an example of a unit test being performed on the increment method of a Counter class:
[Fact]
public void Increment_WhenCurrentCountIs1_ShouldReturn2()
{
var counter = new Counter(1);
var result = counter.increment();
Assert.Equal(2, result);
}
There are no external dependencies on the Counter class or the increment method, so this is a great candidate for a unit test.
End-to-end tests
End-to-end tests verify that key paths work together as expected. No parts of the app are isolated and mocked away. These tests run a fully functioning app just like a user would, so this gives us the maximum amount of confidence that our app is functioning correctly.
These tests are slow to execute, though, which can delay the feedback loop during development; they're also the most expensive to write and maintain. This is because everything that the tests rely on, such as the data in the database, needs to be consistent each time the tests are executed, which is a challenge when we implement multiple tests that have different data requirements.
The following is a code snippet from an end-to-end test for capturing a subscription email address:
cy.findByLabelText('Email')
.type('[email protected]')
.should('have.value', '[email protected]');
cy.get('form').submit();
cy.contains('Thanks for subscribing!');
The statements drive interactions on the web page and check the content of the elements on the page, which are updated along the way.
Integration tests
Integration tests verify that several parts of an app work together correctly. They give us more confidence than unit tests in terms of ensuring that the app as a whole is working as expected. These tests provide the most scope in terms of what is tested because of the many app part combinations that we can choose to test.
These tests are generally quick to execute because slow components such as database and network requests are often mocked out. The time it takes to write and maintain these tests is also short.
For single-page applications, the Return on Investment (ROI) of integration tests is arguably greater than the other two testing types if we choose our tests wisely. This is why the relevant box in the preceding diagram is bigger than other testing types.
The following is an example of an integration test being performed on a React Card component:
test('When the Card component is rendered with a title
prop, it should contain the correct title', () => {
const { queryByText } = render(
<Card title="Title test" />
);
const titleText = queryByText('Title test');
expect(titleText).not.toBeNull();
});
The test verifies that passing the title prop results in the correct text being rendered. The Card component may contain child components, which will be executed and rendered in the test. This is why this is classed as an integration test rather than a unit test.
Now that we understand the different types of test, we are going to start implementing them on our QandA app. We'll start by unit testing the .NET backend.
Implementing .NET tests with xUnit
In this section, we are going to implement some backend unit tests on our question controller using a library called xUnit. Before we do this, we are going to become familiar with xUnit by implementing some unit tests on a class with no dependencies.
Getting started with xUnit
In this section, we are going to create a new project in our backend Visual Studio solution and start to implement simple unit tests to get comfortable with xUnit, which is the tool we are going to use to run our backend tests. So, let's open our backend project and carry out the following steps:
- Open up the Solution Explorer window, right-click on Solution, choose Add, and then choose New Project....
- Select xUnit Test Project from the dialog box that opens and click on the Next button:
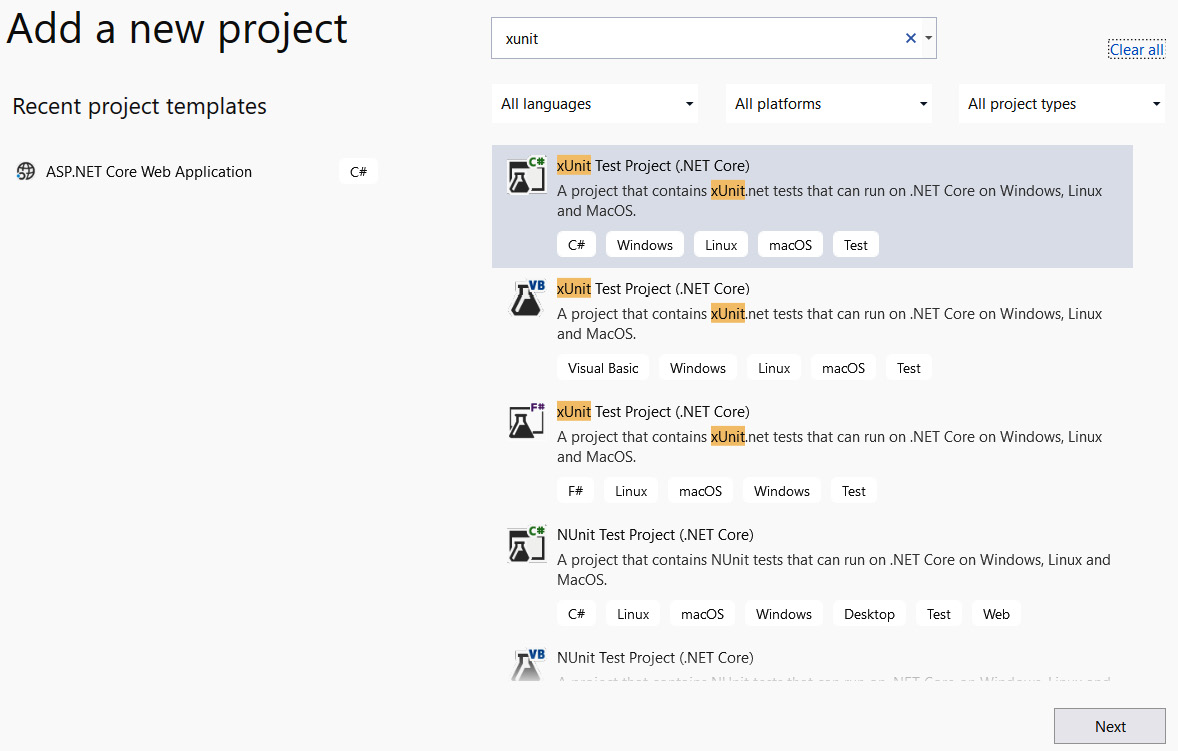
Figure 13.2 – Creating a new xUnit project
- Enter BackendTests as the project name and set Location to the folder that the solution is in. Click Create to create the project.
- In Solution Explorer, right-click on the BackendTests project and choose Edit Project File. Make sure the TargetFramework node in the XML is set to at least net5.0:
<Project Sdk="Microsoft.NET.Sdk">
<PropertyGroup>
<TargetFramework>net5.0</TargetFramework>
...
</PropertyGroup>
...
</Project>
- We are going to create a simple class so that we can write some unit tests for it. This will get us comfortable with xUnit. Create a static class in our unit test project called Calc with the following content:
using System;
namespace BackendTests
{
{
public static decimal Add(decimal a, decimal b)
{
return a + b;
}
}
}
The class contains a method called Add, which simply adds two numbers together that are passed in its parameters. Add is a pure function, which means the return value is always consistent for a given set of parameters and it doesn't give off any side effects. Pure functions are super easy to test, as we'll see next.
- We are going to create some unit tests for the Add method in the Calc class. Let's create a new class in the unit test project called CalcTests with the following content:
using Xunit;
namespace BackendTests
{
{
[Fact]
public void
Add_When2Integers_ShouldReturnCorrectInteger()
{
// TODO - call the Calc.Add method with 2
// integers
// TODO - check the result is as expected
}
}
}
We have named our test method Add_When2Integers_ShouldReturnCorrectInteger.
Important Information
It is useful to have a good naming convention for tests. When we look at a failed test report, we can start to get an understanding of the problem immediately if the name of the test describes what is being tested. In this case, the name starts with the method we are testing, followed by a brief description of the conditions for the test and what we expect to happen.
Note that the test method is decorated with the Fact attribute.
Important Information
The Fact attribute denotes that the method is a unit test for xUnit. Another attribute that denotes a unit test is called Theory. This can be used to feed the method a range of parameter values.
- Let's implement the unit test:
[Fact]
public void Add_When2Integers_ShouldReturnCorrectInteger()
{
var result = Calc.Add(1, 1);
Assert.Equal(2, result);
}
We call the method we are testing and put the return value in a result variable. Then, we use the Assert class from xUnit and its Equal method to check that the result is equal to 2.
- Let's run our test by right-clicking inside the test method and choosing Debug Test(s) from the menu:
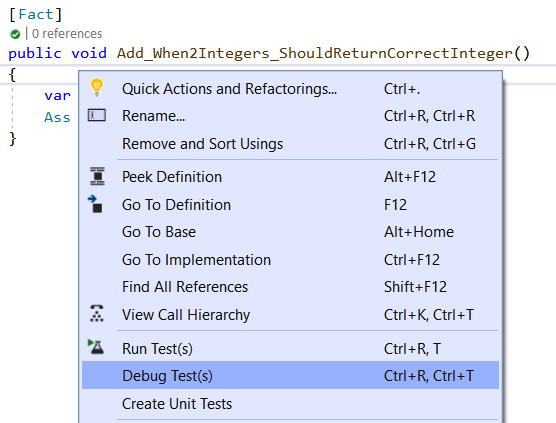
Figure 13.3 – Debugging a test
- After a few seconds, the test will run, and the result will appear in the Test Explorer window:

Figure 13.4 – Test result
As we expected, the test passes. Congratulations – you have just created your first unit test!
We used the Equal method in the Assert class in this test. The following are some other useful methods we can use in this class:
- True: Checks that a value is true
- NotNull: Checks that a value isn't null
- Contains: Checks that the value is in a string
- InRange: Checks that the value is within a range
- Throws: Checks that an exception has been raised
Now, we are starting to understand how to write unit tests. We haven't written any tests on our Q and A app yet, but we will do so next.
Testing controller action methods
In this section, we are going to create tests for some question controller actions.
Our API controller has dependencies for a cache and a data repository. We don't want our tests to execute the real cache and data repository because we require the data in the cache and data repository to be predicable. This helps us get predicable results that we can check. In addition, if the tests are running on the real database, the test execution will be much slower. So, we are going to use a library called Moq to help us replace the real cache and data repository with fake implementations that give predicable results.
Let's get started:
- First, we need to reference the QandA project from the BackendTests project. We can do this by right-clicking on the Dependencies node in Solution Explorer in the BackendTests project and choosing Add Project Reference...:

Figure 13.5 – Adding a project reference
- Then, we need to tick the QandA project and click the OK button:
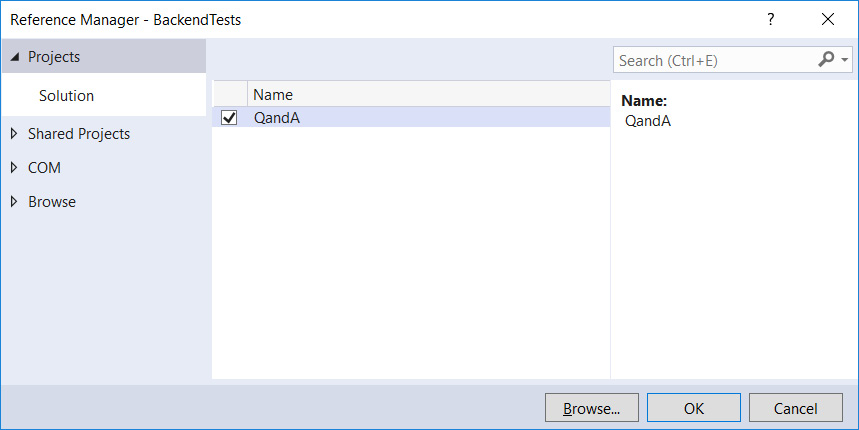
Figure 13.6 – Adding a reference to the QandA project
- Let's install Moq into our test project using NuGet Package Manager:

Figure 13.7 – Installing Moq
The BackendTests project is now set up, ready for our first test to be implemented.
Testing the action method for getting questions
Follow these steps to implement a couple of tests on the GetQuestions method:
- We'll start by creating a new class called QuestionsControllerTests in the BackendTests project with the following content:
using System.Collections.Generic;
using System.Linq;
using System.Threading.Tasks;
using Microsoft.AspNetCore.Mvc;
using Microsoft.Extensions.Configuration;
using Xunit;
using Moq;
using QandA.Controllers;
using QandA.Data;
using QandA.Data.Models;
namespace BackendTests
{
public class QuestionsControllerTests
{
}
}
- We are going to verify that calling GetQuestions with no parameters returns all the questions. Let's create the test method for this and 10 mock questions:
[Fact]
public async void GetQuestions_WhenNoParameters_ReturnsAllQuestions()
{
var mockQuestions = new
List<QuestionGetManyResponse>();
for (int i = 1; i <= 10; i++)
{
mockQuestions.Add(new QuestionGetManyResponse
{
QuestionId = 1,
Title = $"Test title {i}",
Content = $"Test content {i}",
UserName = "User1",
Answers = new List<AnswerGetResponse>()
});
}
}
Notice that the method is flagged as asynchronous with the async keyword because the action method we are testing is asynchronous.
- Let's create a mock data repository definition using Moq:
[Fact]
public async void GetQuestions_WhenNoParameters_ReturnsAllQuestions()
{
...
var mockDataRepository = new
Mock<IDataRepository>();
mockDataRepository
.Setup(repo => repo.GetQuestions())
.Returns(() => Task.FromResult(mockQuestions.
AsEnumerable()));
}
We can create a mock object from the IDataRepository interface using the Mock class from Moq. We can then use the Setup and Returns methods on the mock object to define that the GetQuestions method should return our mock questions. The method we are testing is asynchronous, so we need to wrap the mock questions with Task.FromResult in the mock result.
- We need to mock the configuration object that reads appsettings.json. This is what the controller depends on:
[Fact]
public async void GetQuestions_WhenNoParameters_ReturnsAllQuestions()
{
...
var mockConfigurationRoot = new
Mock<IConfigurationRoot>();
mockConfigurationRoot.SetupGet(config =>
config[It.IsAny<string>()]).Returns("some
setting");
}
The preceding code will return any string when appsettings.json is read, which is fine for our test.
- Next, we need to create an instance of the API controller by passing in an instance of the mock data repository and mock configuration settings:
[Fact]
public async void GetQuestions_WhenNoParameters_ReturnsAllQuestions()
{
...
var questionsController = new QuestionsController(
mockDataRepository.Object,
null,
null,
mockConfigurationRoot.Object
);
}
The Object property on the mock data repository definition gives us an instance of the mock data repository to use.
Notice that we can pass in null for cache and HTTP client factory dependencies. This is because they are not used in the action method implementation we are testing.
- Now, we can call the action method we are testing:
[Fact]
public async void GetQuestions_WhenNoParameters_ReturnsAllQuestions()
{
...
var result = await
questionsController.GetQuestions(null, false);
}
We pass null in as the search parameter and false as the includeAnswers parameter. The other parameters are optional, so we don't pass these in.
- Now, we can check the result is as expected:
[Fact]
public async void GetQuestions_WhenNoParameters_ReturnsAllQuestions()
{
...
Assert.Equal(10, result.Count());
mockDataRepository.Verify(
mock => mock.GetQuestions(),
Times.Once()
);
}
Here, we have checked that the 10 items are returned.
We have also checked that the GetQuestions method in the data repository is called once.
- Let's give this a try by right-clicking the test in Test Explorer and selecting Run Selected Tests:
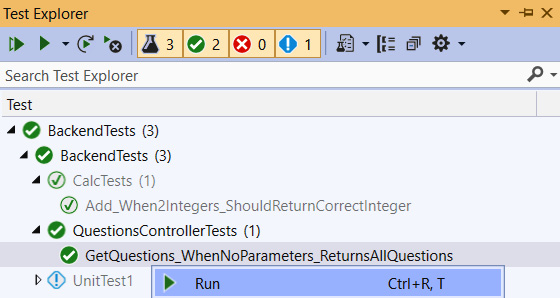
Figure 13.8 – Running a test in Test Explorer
The test passes, as we expected.
- Now, we are going to create a second test to verify that calling GetQuestions with a search parameter calls the GetQuestionsBySearchWithPaging method in the data repository. Add the following method to our QuestionsControllerTests class:
[Fact]
public async void GetQuestions_WhenHaveSearchParameter_ReturnsCorrectQue stions()
{
var mockQuestions = new List<QuestionGetManyResponse>();
mockQuestions.Add(new QuestionGetManyResponse
{
QuestionId = 1,
Title = "Test",
Content = "Test content",
UserName = "User1",
Answers = new List<AnswerGetResponse>()
});
var mockDataRepository = new
Mock<IDataRepository>();
mockDataRepository
.Setup(repo =>
repo.GetQuestionsBySearchWithPaging("Test", 1,
20))
.Returns(() =>
Task.FromResult(mockQuestions.AsEnumerable()));
var mockConfigurationRoot = new
Mock<IConfigurationRoot>();
mockConfigurationRoot.SetupGet(config =>
config[It.IsAny<string>()]).Returns("some
setting");
var questionsController = new QuestionsController(
mockDataRepository.Object,
null,
null,
mockConfigurationRoot.Object
);
var result = await questionsController.GetQuestions("Test", false);
Assert.Single(result);
mockDataRepository.Verify(mock =>
mock.GetQuestionsBySearchWithPaging("Test", 1,
20),
Times.Once());
}
This follows the same pattern as the previous test, but this time, we're mocking the GetQuestionsBySearchWithPaging method in the data repository and checking that this is called. If we run the test, it will pass as expected.
That completes the tests on the GetQuestions method.
Testing the action method to get a single question
Follow these steps to implement a couple of tests on the GetQuestion method:
- Let's add the following test to the QuestionsControllerTests class to verify that we get the correct result when the question isn't found:
[Fact]
public async void GetQuestion_WhenQuestionNotFound_Returns404()
{
var mockDataRepository = new
Mock<IDataRepository>();
mockDataRepository
.Setup(repo => repo.GetQuestion(1))
.Returns(() => Task.FromResult(default(QuestionGetSingleResponse)));
var mockQuestionCache = new Mock<IQuestionCache>();
mockQuestionCache
.Setup(cache => cache.Get(1))
.Returns(() => null);
var mockConfigurationRoot = new
Mock<IConfigurationRoot>();
mockConfigurationRoot.SetupGet(config =>
config[It.IsAny<string>()]).Returns("some
setting");
var questionsController = new QuestionsController(
mockDataRepository.Object,
mockQuestionCache.Object,
null,
mockConfigurationRoot.Object
);
var result = await
questionsController.GetQuestion(1);
var actionResult =
Assert.IsType<
ActionResult<QuestionGetSingleResponse>
>(result);
Assert.IsType<NotFoundResult>(actionResult.Result);
}
This follows the same pattern as the previous tests. A difference in this test is that we mock the cache in this test because this is used in the GetQuestion method. Our mock will return null from the fake cache, which is what we expect when the question isn't in the cache.
Here, we checked that the result is of the NotFoundResult type.
- Let's add another test to verify a question is returned when the one that's requested does exist:
[Fact]
public async void GetQuestion_WhenQuestionIsFound_ReturnsQuestion()
{
var mockQuestion = new QuestionGetSingleResponse
{
QuestionId = 1,
Title = "test"
};
var mockDataRepository = new
Mock<IDataRepository>();
mockDataRepository
.Setup(repo => repo.GetQuestion(1))
.Returns(() => Task.FromResult(mockQuestion));
var mockQuestionCache = new Mock<IQuestionCache>();
mockQuestionCache
.Setup(cache => cache.Get(1))
.Returns(() => mockQuestion);
var mockConfigurationRoot = new
Mock<IConfigurationRoot>();
mockConfigurationRoot.SetupGet(config =>
config[It.IsAny<string>()]).Returns("some
setting");
var questionsController = new QuestionsController(
mockDataRepository.Object,
mockQuestionCache.Object,
null,
mockConfigurationRoot.Object
);
var result = await
questionsController.GetQuestion(1);
var actionResult =
Assert.IsType<
ActionResult<QuestionGetSingleResponse>
>(result);
var questionResult =
Assert.IsType<QuestionGetSingleResponse>(actionResult.
Value);
Assert.Equal(1, questionResult.QuestionId);
}
This time, we checked that the result is of the QuestionGetSingleResponse type and that the correct question is returned by checking the question ID.
That completes the tests we are going to perform on our GetQuestion action method.
The same approach and pattern can be used to add tests for controller logic we haven't covered yet. We can do this using Moq, which mocks out any dependencies that the method relies on. In the next section, we'll start to implement tests on the frontend.
Implementing React tests with Jest
In this section, we are going to turn our attention to creating automated tests for the frontend with Jest. Jest is the de facto testing tool in the React community and is maintained by Facebook. Jest is included in Create React App (CRA) projects, which means that it has already been installed and configured in our project.
We are going to start by testing a simple function so that we can get familiar with Jest before moving on to testing a React component.
Getting started with Jest
We'll start to get familiar with Jest by adding some unit tests to the mapQuestionFromServer function in QuestionsData.ts. So, let's open our frontend project in Visual Studio Code and carry out the following steps:
- Remove the example test that was installed when the project was created with Create React App by removing the App.test.tsx file in the src folder.
- Create a new file called QuestionsData.test.ts in the src folder that contains the following content:
import { mapQuestionFromServer } from './QuestionsData';
test('When mapQuestionFromServer is called with question, created should be turned into a Date', () => {
});
Notice that the extension of the file is test.ts.
Important Information
The test.ts extension is important because Jest automatically looks for files with this extension when searching for tests to execute. Note that if our tests contained JSX, we would need to use the test.tsx extension.
The test function in Jest takes in two parameters:
- The first parameter is a description of the test that will be shown in the test output.
- The second parameter is an arrow function, which will contain our test.
The test is going to check that mapQuestionFromServer functions correctly and maps the created property to a question object.
- Let's call the mapQuestionFromServer function with a question and assign the returned object to a result variable:
test('When mapQuestionFromServer is called with question, created should be turned into a Date', () => {
const result = mapQuestionFromServer({
questionId: 1,
title: "test",
content: "test",
userName: "test",
created: "2021-01-01T00:00:00.000Z",
answers: []
});
});
- Add the following highlighted code to test that the result variable is as we expect:
test('When mapQuestionFromServer is called with question, created should be turned into a Date', () => {
const result = mapQuestionFromServer({
questionId: 1,
title: "test",
content: "test",
userName: "test",
created: "2021-01-01T00:00:00.000Z",
answers: []
});
expect(result).toEqual({
questionId: 1,
title: "test",
content: "test",
userName: "test",
created: new Date(Date.UTC(2021, 0, 1, 0, 0, 0,
0)),
answers: []
});
});
We pass the result variable we are checking into the Jest expect function. Then, we chain a toEqual matcher function onto this, which checks that the result object has the same property values as the object we passed into it.
toEqual is one of many Jest matcher functions we can use to check a variable's value. The full list of functions can be found at https://jestjs.io/docs/en/expect.
- Let's create another test on the mapQuestionFromServer function to check that the created property in answers is mapped correctly:
test('When mapQuestionFromServer is called with
question and answers, created should be turned into
a Date', () => {
const result = mapQuestionFromServer({
questionId: 1,
title: "test",
content: "test",
userName: "test",
created: "2021-01-01T00:00:00.000Z",
answers: [{
answerId: 1,
content: "test",
userName: "test",
created: "2021-01-01T00:00:00.000Z"
}]
});
expect(result).toEqual({
questionId: 1,
title: "test",
content: "test",
userName: "test",
created: new Date(Date.UTC(2021, 0, 1, 0, 0, 0,
0)),
answers: [{
answerId: 1,
content: "test",
userName: "test",
created: new Date(Date.UTC(2021, 0, 1, 0, 0, 0,
0)),
}]
});
});
- It's time to check that our tests pass. Enter the following command in the Terminal:
> npm test
Jest will run the tests that it finds in our project and output the results:

Figure 13.9 – Jest test results
So, Jest found our two tests and they both passed – that's great news!
The mapQuestionFromServer function is straightforward to test because it has no dependencies. But how do we test a React component that has lots of dependencies, such as the browser's DOM and React itself? We'll find out in the next section.
Testing React components
In this section, we are going to implement tests on the Page, Question, and HomePage components. React component tests can be challenging because they have dependencies, such as the browser's DOM and sometimes HTTP requests. Due to this, we are going to leverage the React Testing Library and Jest's mocking functionality to help us implement our tests.
Testing the Page component
Carry out the following steps to test that the Page component renders correctly:
- Create a file for the tests called Page.test.tsx with the following content:
import React from 'react';
import { render, cleanup } from '@testing-library/react';
import { Page } from './Page';
test('When the Page component is rendered, it should contain the correct title and content', () => {
});
We imported React with our Page component, along with some useful functions from the React Testing Library.
The React Testing Library was installed by Create React App when we created the frontend project. This library will help us select elements that we want to check, without using internal implementation details such as element IDs or CSS class names.
- Let's render the Page component in the test by adding the following highlighted lines of code:
test('When the Page component is rendered, it should contain the correct title and content', () => {
const { queryByText } = render(
<Page title="Title test">
<span>Test content</span>
</Page>,
);
});
We use the render function from React Testing Library to render the Page component by passing in JSX.
The render function returns various useful items. One of these items is the queryByText function, which will help us select elements that we'll use and understand in the next step.
- Now, we can check that the page title has been rendered:
test('When the Page component is rendered, it should contain the correct title and content', () => {
const { queryByText } = render(
<Page title="Title test">
<span>Test content</span>
</Page>,
);
const title = queryByText('Title test');
expect(title).not.toBeNull();
});
Here, we used the queryByText function from the React Testing Library, which was returned from the render function, to find the element that has "Title test" in the text's content. Notice how we are using something that the user can see (the element text) to locate the element rather than any implementation details. This means that our test won't break if implementation details such as the DOM structure or DOM IDs change.
Having located the title element, we then used Jest's expect function to check that the element was found by asserting that it is not null.
- We can do a similar check on the page content:
test('When the Page component is rendered, it should contain the correct title and content', () => {
const { queryByText } = render(
<Page title="Title test">
<span>Test content</span>
</Page>,
);
const title = queryByText('Title test');
expect(title).not.toBeNull();
const content = queryByText('Test content');
expect(content).not.toBeNull();
});
- The last thing we need to do is clean up the DOM once the test has been executed. We can do this for all the tests in a file by using the afterEach function from Jest and the cleanup function from the React Testing Library. Let's add this after the import statements:
afterEach(cleanup);
- If Jest is still running after we save the file, our new test will run. If we have killed Jest, then we can start it again by executing npm test in the Terminal:
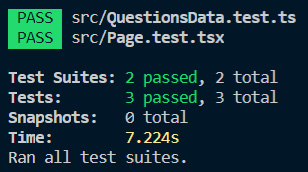
Figure 13.10 – Jest test results
Our tests pass as expected, which makes three passing tests in total.
Testing the Question component
Carry out the following steps to test that the Question component renders correctly:
- Let's start by creating a new file called Question.test.tsx with the following content:
import React from 'react';
import { render, cleanup } from '@testing-library/react';
import { QuestionData } from './QuestionsData';
import { Question } from './Question';
import { BrowserRouter } from 'react-router-dom';
afterEach(cleanup);
test('When the Question component is rendered, it should contain the correct data', () => {
});
This imports all the items we need for our test. We have also implemented the cleanup function, which will run after the test.
- Now, let's try to render the component:
test('When the Question component is rendered, it should contain the correct data', () => {
const question: QuestionData = {
questionId: 1,
title: 'Title test',
content: 'Content test',
userName: 'User1',
created: new Date(2019, 1, 1),
answers: [],
};
const { queryByText } = render(
<Question data={question} />,
);
});
We render the Question component using the render function by passing in a mocked data prop value.
There's a problem, though. If we run the test, we will receive an error message stating Error: useHref() may be used only in the context of a <Router> component. The problem here is that the Question component uses a Link component, which expects the Router component to be higher up in the component tree. However, it isn't present in our test.
- The solution is to include BrowserRouter in our test:
test('When the Question component is rendered, it should contain the correct data', () => {
...
const { queryByText } = render(
<BrowserRouter>
<Question data={question} />
</BrowserRouter>
);
});
- Now, we can assert that the correct data is being rendered by adding the following highlighted statements to our test:
test('When the Question component is rendered, it should contain the correct data', () => {
...
const titleText = queryByText('Title test');
expect(titleText).not.toBeNull();
const contentText = queryByText('Content test');
expect(contentText).not.toBeNull();
const userText = queryByText(/User1/);
expect(userText).not.toBeNull();
const dateText = queryByText(/2019/);
expect(dateText).not.toBeNull();
});
We are using the queryByText method again here to locate rendered elements and check that the element that's been found isn't null. Notice that, when finding the element that contains the username and date, we pass in a regular expression to do a partial match.
Testing the HomePage component
The final component we are going to implement tests for is the HomePage component. Carry out the following steps to do so:
- Let's create a file called HomePage.test.tsx with the following content:
import React from 'react';
import { render, cleanup } from '@testing-library/react';
import { HomePage } from './HomePage';
import { BrowserRouter } from 'react-router-dom';
afterEach(cleanup);
test('When HomePage first rendered, loading indicator should show', async () => {
const { findByText } = render(
<BrowserRouter>
<HomePage />
</BrowserRouter>,
);
const loading = await findByText('Loading...');
expect(loading).not.toBeNull();
});
The test verifies that a Loading... message appears in the HomePage component when it is first rendered. We use the findByText function to wait and find the element that contains the loading text.
- Let's implement another test to check that unanswered questions are rendered okay:
test('When HomePage data returned, it should render questions', async () => {
const { findByText } = render(
<BrowserRouter>
<HomePage />
</BrowserRouter>,
);
expect(await findByText('Title1
test')).toBeInTheDocument();
expect(await findByText('Title2
test')).toBeInTheDocument();
});
We use the findByText function again to wait for the questions to be rendered. We then use the toBeInTheDocument function to check that the found elements are in the document.
However, the test fails. This is because the HomePage component is making an HTTP request to get the data but there is no REST API to handle the request.
- We are going to mock the getUnansweredQuestions function with a Jest mock. Let's add the following code above our test:
jest.mock('./QuestionsData', () => ({
getUnansweredQuestions: () => {
return Promise.resolve([
{
questionId: 1,
title: 'Title1 test',
content: 'Content2 test',
userName: 'User1',
created: new Date(2019, 1, 1),
answers: [],
},
{
questionId: 2,
title: 'Title2 test',
content: 'Content2 test',
userName: 'User2',
created: new Date(2019, 1, 1),
answers: [],
},
]);
},
}));
test('When HomePage first rendered, loading indicator should show', async () => ...
The mock function returns two questions that we use in the test assertions.
Now, the test will pass when it runs.
That completes our component tests.
As we've seen, tests on components are more challenging to write than tests on pure functions, but the React Testing Library and Jest mocks make life fairly straightforward.
In the next section, we are going to complete our test suite by implementing an end-to-end test.
Implementing end-to-end tests with Cypress
Cypress is an end-to-end testing tool that works really well for single-page applications (SPAs) like ours. Cypress can run the whole application, simulate a user interacting with it, and check the state of the user interface along the way. So, Cypress is ideal for producing end-to-end tests on a SPA.
In this section, we are going to implement an end-to-end test for signing in and asking a question.
Getting started with Cypress
Cypress executes in our frontend, so let's carry out the following steps to install and configure Cypress in our frontend project:
- We'll start by installing cypress from the Terminal:
> npm install cypress --save-dev
- We are going to add an npm script to open Cypress by adding the following line to package.json:
"scripts": {
...,
"cy:open": "cypress open"
},
- Let's open Cypress by executing our npm script in the Terminal:
> npm run cy:open
After a few seconds, Cypress will open, showing a list of example test files that have just been installed:
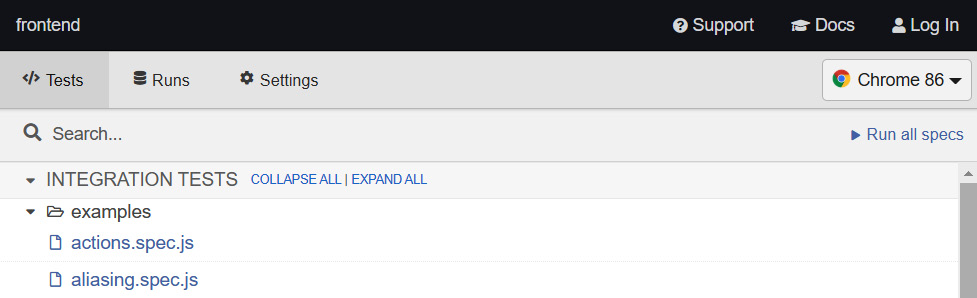
Figure 13.11 – Cypress example tests
These examples can be found in the cypress/integration/examples folder in our project. If we open one of these test files, we'll see that they are written in JavaScript. These examples are a great source of reference as we learn and get up to speed with Cypress.
- In the Cypress browser window, click the actions.spec.js item. This will open this test and execute it:

Figure 13.12 – Test output in Cypress
We can see the tests on the left and check whether they have passed or failed with the app that is being tested on the right.
- If we click the submit() - submit a form test, we'll see all the steps in the test. If we click on a step, we'll see the app on the right in the state it was in at that juncture:
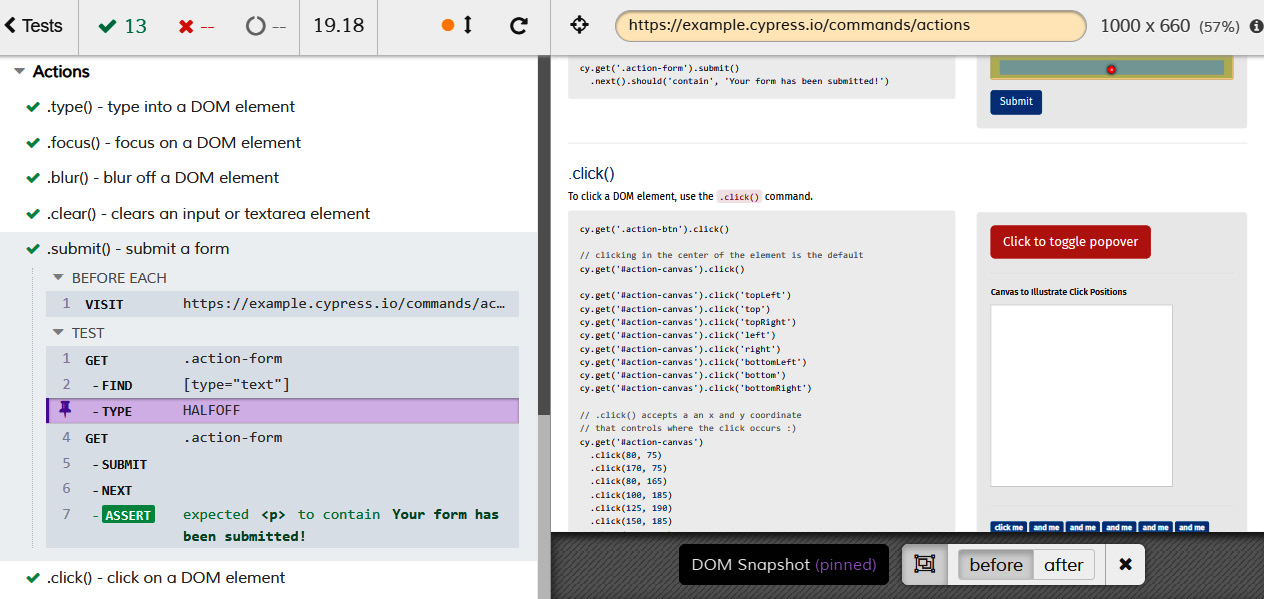
Figure 13.13 – Cypress test result step details
- Let's close Cypress for now and return to the Terminal to install the Cypress Testing Library:
> npm install @testing-library/cypress --save-dev
The Cypress Testing Library is similar to the React Testing Library in that it helps us select elements to check without using internal implementation details.
- To add Cypress Testing Library commands, we need to insert the following line at the top of the commands.js file, which can be found in the support folder of the cypress folder:
import '@testing-library/cypress/add-commands';
- Let's add some Cypress configuration settings by opening the cypress.json file in the root of the project and adding the following settings:
{
"baseUrl": "http://localhost:3000",
"chromeWebSecurity": false
}
The baseUrl setting is the root URL of the app we are testing.
Our test will be using Auth0 and our app, so it will be working on two different origins. We need to disable Chrome security using the chromeWebSecurity setting to allow the test to work across different origins.
Cypress runs our app and Auth0 in an IFrame. To prevent clickjacking attacks, running in an IFrame is disabled by default in Auth0.
- Disable clickjacking protection in Auth0 by selecting the Settings option under our user avatar menu and then selecting the Advanced tab. An option called Disable clickjacking protection for Classic Universal Login can be found toward the bottom of the Advanced tab. We need to turn this option on:

Figure 13.14 – Disable clickjacking protection option in Auth0
- When we write our tests, we will be accessing a global cy object from Cypress. Let's tell ESLint that cy is okay by adding the following to the .eslintrc.json file:
{
...,
"globals": {
"cy": true
}
}
Now, Cypress has been installed and configured so that we can implement a test on our Q and A app.
Testing asking a question
In this section, we are going to implement a test on our app using Cypress; the test signs in and then asks a question. Carry out the following steps to do so:
- Let's create a new file called qanda.js in the integration folder, which can be found in the cypress folder, with the following content:
describe('Ask question', () => {
beforeEach(() => {
cy.visit('/');
});
it('When signed in and ask a valid question, the
question should successfully save', () => {
});
});
The describe function allows us to group a collection of tests on a feature. The first parameter is the title for the group, while the second parameter is a function that contains the tests in the group.
The it function allows us to define the actual test. The first parameter is the title for the test, while the second parameter is a function that contains the steps in the test.
The beforeEach function allows us to define steps to be executed before each test runs. In our case, we are using the visit command to navigate to the root of the app. Remember that the root URL for the app is defined in the baseUrl setting in the cypress.json file.
- Let's add the following step to our test:
it('When signed in and ask a valid question, the
question should successfully save', () => {
cy.contains('Q & A');
});
Here, we are checking that the page contains the Q & A text using the contains Cypress command. We can access Cypress commands from the global cy object.
Cypress commands are built to fail if they don't find what they expect to find. Due to this, we don't need to add an assert statement. Neat!
- Let's give the test a try. We'll need to run our backend in our Visual Studio project. We'll also need to run our frontend by executing npm start in the Terminal. In an additional Terminal window, enter the following to open Cypress:
> npm run cy:open
- Cypress will detect our test and list it underneath the example tests:
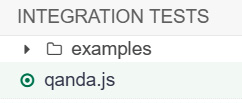
Figure 13.15 – QandA test in Cypress
- Click on the test to execute it:
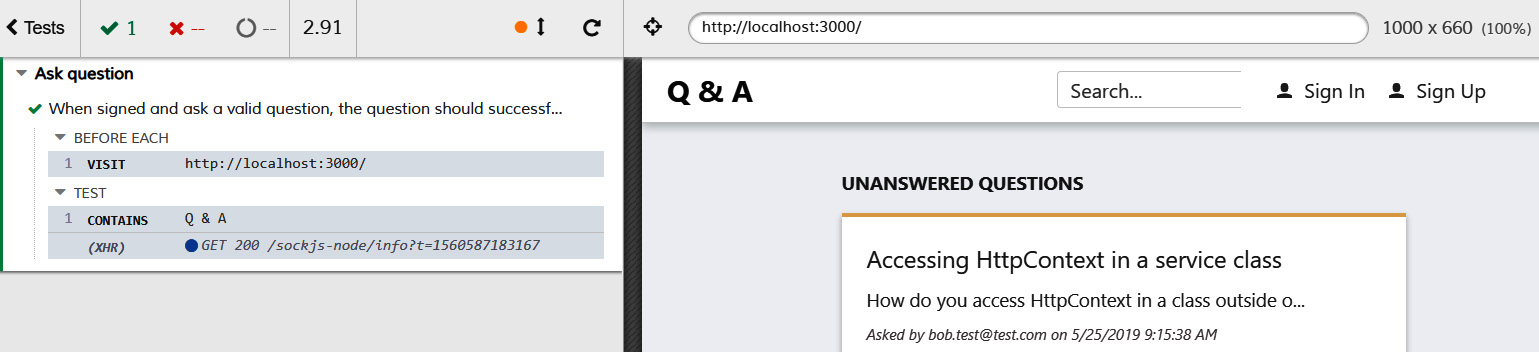
Figure 13.16 – Our test passing in Cypress
The test successfully executes and passes. We'll leave the test runner open because it will automatically rerun as we implement and save our test.
- Let's add the following additional step to our test:
cy.contains('UNANSWERED QUESTIONS');
Here, we are checking that the page contains the correct title. If we save the test and look at the test runner, we'll see that the test has failed:
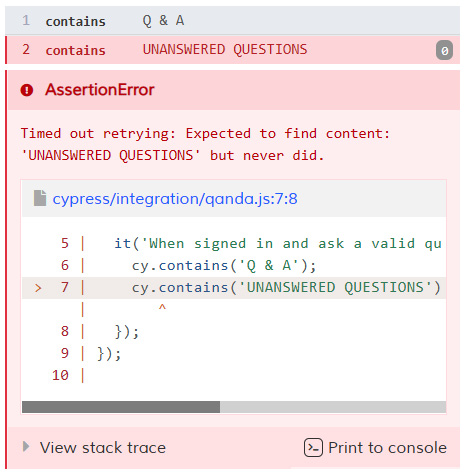
Figure 13.17 – Failing test in Cypress
This is because the title's text isn't actually in capitals – a CSS rule transformed the text into capitals.
Notice the message Cypress uses to inform us of the failing test: Timed out retrying. Cypress will keep trying commands until they pass or a timeout occurs. This behavior is really convenient for us because it allows us to write synchronous style code, even though the operations we are testing are asynchronous. Cypress abstracts this complexity from us.
- Let's correct this problematic test statement by changing it to check for the title in the correct case:
cy.contains('Unanswered Questions');
- Let's add some code for going to the sign-in page:
cy.contains('Sign In').click();
cy.url().should('include', 'auth0');
Here, we use the Cypress contains command to locate the Sign In button and chain a click command to this to click the button.
Then, we use the url command to get the browser's URL and chain a should command to this statement to verify that it contains the correct path.
If we look at the test runner, we'll see that the test managed to navigate to Auth0 correctly.
Let's think about these steps that Cypress is executing. The navigation to Auth0 is an asynchronous operation, but our test code doesn't appear to be asynchronous. We haven't added a special wait function to wait for the page navigation to complete. Cypress makes testing single-page apps that have asynchronous user interfaces a breeze because it deals with this complexity for us!
Next, we'll implement some steps so that we can fill in the sign-in form:
cy.findByLabelText('Email')
.type('your username')
.should('have.value', 'your username');
cy.findByLabelText('Password')
.type('your password')
.should('have.value', 'your password');
Here, we use the findByLabelText command from the Cypress Testing Library to locate our input. It does this by finding the label containing the text we specified and then finding the associated input (referenced in the label's for attribute). This is another neat function that frees the tests from implementation details such as element IDs and class names.
We chain the Cypress type command so that we can enter characters into input and the should command to verify that the input's value property has been set correctly.
Important Information
Substitute your test username and password appropriately.
- Let's submit the sign-in form and check that we are taken back to the Q and A app:
cy.get('form').submit();
cy.contains('Unanswered Questions');
We use the Cypress get command to locate the form and then submit it. Then, we check that the page contains the Unanswered Questions text to verify we are back in the Q and A app. Cypress takes care of the asynchronicity of these steps for us.
- Next, we'll click the Ask a question button to go to the ask page:
cy.contains('Ask a question').click();
cy.contains('Ask a question');
- Then, we'll fill in the ask form:
var title = 'title test';
var content = 'Lots and lots and lots and lots and lots of content test';
cy.findByLabelText('Title')
.type(title)
.should('have.value', title);
cy.findByLabelText('Content')
.type(content)
.should('have.value', content);
We fill in the title and content fields by using the same commands that we did on the sign-in form. The title must be at least 10 characters, and the content must be at least 50 characters, to satisfy the validation rules.
- Next, we'll submit the question and check that the submission is okay:
cy.contains('Submit Your Question').click();
cy.contains('Your question was successfully submitted');
- To complete the test, we are going to sign out and check we've been redirected to the correct page:
cy.contains('Sign Out').click();
cy.contains('You successfully signed out!');
If we look at the test runner, we'll discover that our test runs and passes successfully:

Figure 13.18 – Test run
If the test is failing, it may be because the user was signed into the browser session before the test started. If this is the case, click the Sign Out button and rerun the test.
That completes our end-to-end test and all the tests we are going to create in this chapter. Now that we've written the appropriate unit tests, integration tests, and end-to-end tests, we have a feel for the benefits and challenges of each type, as well as how to implement them.
Summary
End-to-end tests with Cypress allow us to quickly cover areas of our app. However, they require a fully operational frontend and backend, including a database. Cypress abstracts away the complexity of the asynchronous nature of single-page applications, making our tests nice and easy to write.
Unit tests can be written using xUnit in .NET and can be placed in a xUnit project, separate from the main app. xUnit test methods are decorated with the Fact attribute, and we can use the Assert class to carry out checks on the item that we are testing.
Unit tests can be written using Jest for React apps and are contained in files with test.ts or test.tsx extensions. Jest's expect function gives us many useful matcher functions, such as toBe, that we can use to make test assertions.
Unit tests often require dependencies to be mocked. Moq is a popular mocking tool in the .NET community and has a Mock class, which can be used to mock dependencies. On the frontend, Jest has a range of powerful mocking capabilities that we can use to mock out dependencies, such as REST API calls.
A page is often composed of several components and sometimes, it is convenient to just write integration tests on the page component without mocking the child components. We can implement these tests using Jest in exactly the same way as we can implement a unit test.
The React Testing Library and the Cypress Testing Library help us write robust tests by allowing us to locate elements in a way that doesn't depend on implementation details. This means that if the implementation changes while its features and the behavior remain the same, the test is unlikely to break. This approach reduces the maintenance cost of our test suite.
Now that our app has been built and we've covered automated tests, it's time to deploy it to Azure. We'll do this in the next chapter.
Questions
The following questions will test your knowledge of the topics that were covered in this chapter:
- We have the following xUnit test method, but it isn't being picked up by the test runner. What's wrong?
public void Minus_When2Integers_ShouldReturnCorrectInteger()
{
var result = Calc.Add(2, 1);
Assert.Equal(1, result);
}
- We have a string variable called successMessage in a xUnit test and we need to check that it contains the word "success". What method in the Assert class could we use?
- We have created some Jest unit tests on a List component in a file called ListTests.tsx. However, when the Jest test runner runs, the tests aren't picked up. Why is this happening?
- We are implementing a test in Jest and we have a variable called result that we want to check isn't null. Which Jest matcher function can we use?
- Let's say we have a variable called person that is of the Person type:
interface Person {
id: number;
firstName: string;
surname: string
}
We want to check that the person variable is { id: 1, firstName: "Tom", surname: "Smith" }. What Jest matcher function can we use?
- We are writing an end-to-end test using Cypress for a page. The page has a heading called Sign In. What Cypress command can we use to check that this has rendered okay?
- We are writing an end-to-end test using Cypress for a page that renders some text, Loading..., while data is being fetched. How can we assert that this text is being rendered and then disappears when the data has been fetched?
Answers
- The Fact attribute is missing from the test method.
- We would use the Assert.Contains method in the Assert class.
- The test filename needs to end with .test.tsx. So, if we rename the file List.test.tsx, then the test will get picked up.
- We can use the following code to check an object isn't null:
expect(result).not.toBeNull();
- We can use the toEqual Jest matcher function to compare objects:
expect(person).toEqual({
id: 1,
firstName: "Tom",
surname: "Smith"
});
- We can use the following Cypress command to check the page heading:
cy.contains('Sign In');
- We can use the following Cypress command to check that Loading… only appears while data is being fetched:
cy.contains('Loading...');
cy.contains('Loading...').should('not.exist');
The first command will check that the page renders Loading... on the initial render. The second command will wait until Loading... disappears – that is, the data has been fetched.
Further reading
The following resources are useful if you want to find out more about testing with xUnit and Jest:
- Unit testing in .NET Core: https://docs.microsoft.com/en-us/dotnet/core/testing/unit-testing-with-dotnet-test
- xUnit: https://xunit.net/
- Moq: https://github.com/moq/moq
- Jest: https://jestjs.io/
- React Testing Library: https://testing-library.com/docs/react-testing-library/intro
- Cypress: https://docs.cypress.io
- Cypress Testing Library: https://testing-library.com/docs/cypress-testing-library/intro