Chapter 6. Partial-page rendering with UpdatePanels
In this chapter:
- Partial page updates
- Triggers and modes
- Nesting and repeating UpdatePanels
- Creating a live GridView filter
One of the most fascinating controls in the ASP.NET AJAX framework is the UpdatePanel. This new control replaces the need for a page to refresh during a postback. Only portions of a page, designated by the UpdatePanel, are updated. This technique is known as partial-page rendering and can be highly effective in improving the user experience.
At the end of chapter 1 and in segments of chapter 4, you got a glimpse into how the UpdatePanel works and how simple it is to apply to existing ASP.NET applications. In this chapter, the first of two dedicated solely to the UpdatePanel, we’ll take you through a series of examples that demonstrate how to use the control effectively. In the process, you’ll gain some insight into how it works together with the ScriptManager control to manage and orchestrate partial-page updates. By the end of this chapter, you’ll have a solid understanding of how to apply the UpdatePanel correctly to enhance ASP.NET applications.
Just like any other powerful tool, the UpdatePanel requires care and knowledge to fully exploit its influence on a page’s performance and behavior. We begin this chapter with some thoughts on its power and responsibilities.
6.1. With great power comes great responsibility
The most amazing thing about the UpdatePanel is how easy it is to use. With a few lines of code, and no client script, the behavior of a page is instantly transformed by its presence. If it isn’t employed correctly, performance and the end-user experience can be diminished. Understanding how to use the UpdatePanel effectively, and how and why the control works the way it does, is a vital step toward creating superior and more engaging web pages.
After you become familiar with the UpdatePanel control, it will become one of those tools you can’t live without. We liken it to a Tivo or digital video recorder (DVR)—before they came along, most of us didn’t know what we were missing. Now that we own these appliances, we can’t imagine life without them. To fully appreciate this, let’s take a step back and see how the UpdatePanel came to be and why it was created.
6.1.1. Evolution of the UpdatePanel
For years, programming with the XMLHttpRequest object has been the most commonly used approach for communicating with the server from client-side script. The complexities involved in coding those types of applications scared away a lot of developers. To assist, the overall scripting model in ASP.NET 2.0 was significantly enhanced to introduce the idea of script callbacks—a way for server controls to communicate with client-side scripts between callbacks. This model was powerful because it offered access to the state of all the controls on the page during a callback. Unfortunately, many developers found the model difficult to work with, and numerous concerns were raised. The lack of support for passing complex types as parameters to the server (only strings were allowed) made the prototype too rigid and exposed its limitations. Developers began to look elsewhere for solutions.
In an effort to address these concerns, members of the ASP.NET team began work on a communication library built on top of the callbacks. The primary objective of the library was to simplify the use of callbacks and to provide a rich set of APIs for enabling the exchange of complex and simple types between the server and client. From this library came a control called the RefreshPanel. The purpose of the RefreshPanel was to offer a server control that refreshed the contents of a page without a page refresh. Out of this hard work, the UpdatePanel emerged, with deeper integration into the page lifecycle and a more transparent footprint on the page.
Note
A callback is a piece of code that is passed in as a parameter or argument to other code. The other piece of code can call the callback code (usually a function) at any time, even numerous times, in response to some processing.
With the history lesson out of the way, we can begin probing the UpdatePanel control by first looking at a simple example of its use. If you’ve used the control before or are familiar with its basics features, then skipping to section 6.2 will be the most logical step for you. If this is your first encounter with the UpdatePanel, read on to discover how you can use it to solve a common problem: the page refresh.
6.1.2. A simple example
Recently, a loyal and happy customer of yours requested that you develop an online poll feature for her company’s website. The idea was that users could fill out the weekly poll on the site, and the company could then collect the information to learn more about their customers. You decided to implement the feature as a user control, and you placed it on the right column of the home page. Figure 6.1 shows the page in a state where the user has yet to complete the online poll.
Figure 6.1. The online poll control in a state before any user interaction
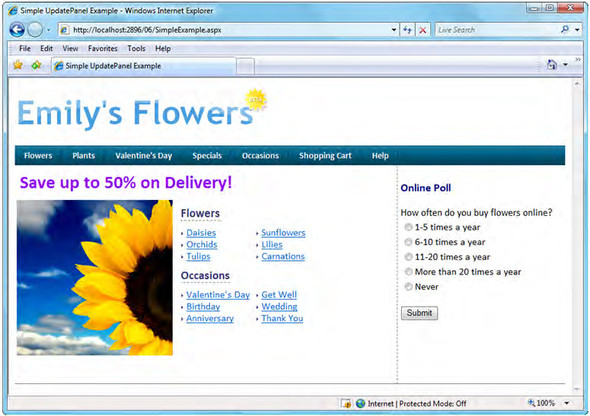
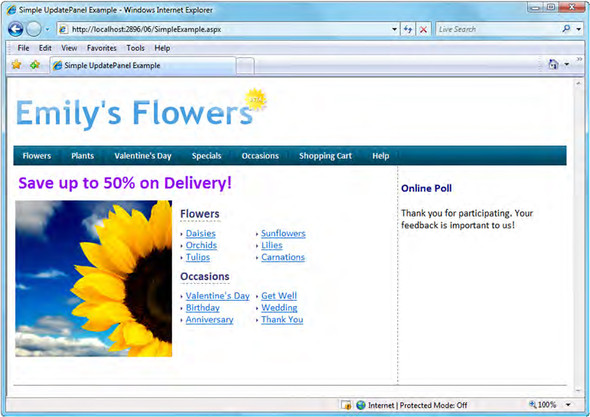
When a user completes the online poll and clicks the Submit button, a postback occurs; the page refreshes while the user selection is recorded by the server and a new page is served to the browser. Figure 6.2 shows the online poll after the user has completed it.
Figure 6.2. Feedback from the online poll after it has been completed
As the site’s traffic increases and weekly poll feature grows in popularity (man, you’re good!), the site begins to slow down considerably. After some research, it becomes apparent that limited bandwidth and the stress of loading the entire page after each online poll is submitted are the main causes of the site’s inadequate performance. This time, the company has approached you in search of suggestions for alleviating the stress recently placed on the site. They have made it clear that they would like to change the site as little as possible and are in search of a solution that is simple and easy to manage.
Your first thought is to use an IFRAME element. IFRAME stands for inline frame; this element is commonly used to include external objects such as HTML documents in a page. If you move the online poll feature to its own page and then host it in an IFRAME, only the contents in the frame will be posted back to the server. This solution lessens the strain put on the server, but it still causes that portion of the page to reload and flicker in the process. For aesthetic reasons, this solution isn’t acceptable to the customer.
With the IFRAME not returning pleasing results and the use of pop-up windows being out of the question, you decide to explore an Ajax solution by making a request to the server using the XMLHttpRequest object and then updating portions of the page dynamically from the client (with JavaScript). This approach requires you to abandon the user control and move most of the logic from the server to the client. It also introduces the effort of managing browsers that don’t support the XMLHttp protocol and writing the online poll logic in two areas to compensate (once in JavaScript, again on the server).
So far, this seems like the most reliable solution, but it leaves you wondering if there is a better option.
At last, you decide to give ASP.NET AJAX a try. You start by purchasing a copy of ASP.NET AJAX in Action (a wise choice). You realize that the solution you’re looking for is possible with the UpdatePanel control. Listing 6.1 shows a portion of the markup before adding the UpdatePanel to the page.
Listing 6.1. Markup for the home page before adding the UpdatePanel
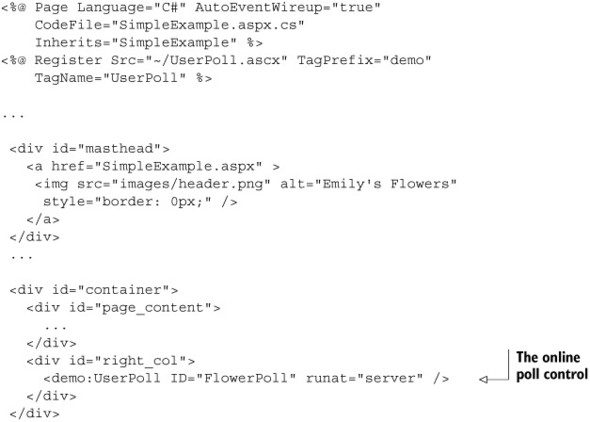
Listing 6.2 shows the same code with the addition of the ScriptManager and UpdatePanel controls. With these quick and minor updates, the next time the user fills out the online poll, the portion of the page encapsulated by the UpdatePanel is updated dynamically instead of a page refresh occurring.
Listing 6.2. Adding the ScriptManager and UpdatePanel to replace the page refresh with a partial-page update

Amazingly, that is all you needed to do to keep the page refresh from taking place. A postback still happens, but it takes place asynchronously (for more about asynchronous operations, see chapter 1). Best of all, the hard work needed to accomplish this was done for you.
Tip
A common misconception about the UpdatePanel is that it enables a section of a page to be partially rendered without a postback. The truth is, a postback still occurs, and the price of going through the entire page lifecycle comes with it. Without a postback, none of this would be possible, and the application logic would have to change. Instead, an asynchronous postback occurs, and the only action that is replaced from the user’s perspective is the full-page refresh. Throughout this book, we’ll make a conscious effort to distinguish between a page refresh and a postback. Before the UpdatePanel, the two were incorrectly considered to be the same thing.
This simple example should give you a glimpse into what the UpdatePanel can accomplish. Now, we’ll take a closer look at the control—its properties, methods, and limitations.
6.2. Getting to know the UpdatePanel
This section focuses on the basics of the UpdatePanel. Through a series of small and helpful examples, you’ll gain an understanding of its core components. This section also covers how the UpdatePanel works with the ASP.NET page lifecycle to perform partial-page updates. In order for partial-page updates to occur, you need content, which brings us to the first step in using the UpdatePanel: specifying which content to update.
6.2.1. Content for the UpdatePanel
All content that is added to the UpdatePanel is a candidate for partial-page rendering. When content is added to the panel, either declaratively or programmatically, that content can be rendered (updated) when an asynchronous postback occurs. To demonstrate, let’s walk through a few quick examples.
Listing 6.3 demonstrates how content is added declaratively to an UpdatePanel by placing it in a property called ContentTemplate.
Listing 6.3. Declaratively adding controls to the UpdatePanel

In this example, inline code is used to display the current time. An ASP.NET Button control is declared to demonstrate what happens when a postback occurs. The Button control, by default, raises a postback when it’s clicked. Because this control is placed in the ContentTemplate tag, it can be considered a child control of the UpdatePanel. When this example is executed and the button is clicked, the time displayed on the page is updated without a page refresh. Running the example produces the output shown in figure 6.3.
Figure 6.3. Simple ContentTemplate example
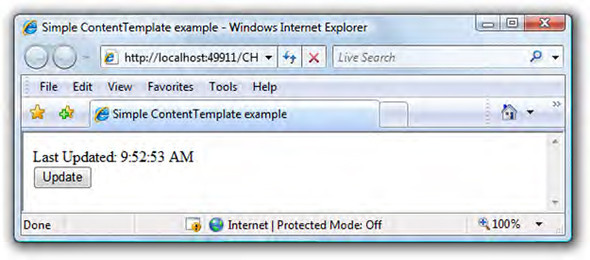
Subsequent clicks of the Button on the form continue to update the current time dynamically. This works by replacing the traditional postback with an asynchronous postback that the ScriptManager intercepts. During this type of postback, updates are applied to the page by injecting the necessary JavaScript that renders the contents in the UpdatePanel.
Note
The UpdatePanel class has a private property called ChildControls, which is the type of a privately sealed class called SingleChildControlCollection. When the page is loaded, the controls declared in the ContentTemplate tag are added to the collection of controls in the ChildControls property. Then, when an asynchronous postback occurs, the ScriptManager initializes the triggers on each UpdatePanel to invoke its rendering. Triggers will be covered later in the chapter.
As an alternative, you can add content added to an UpdatePanel programmatically. Listing 6.4 demonstrates how to programmatically add a control to the UpdatePanel.
Listing 6.4. Adding a control to the UpdatePanel programmatically
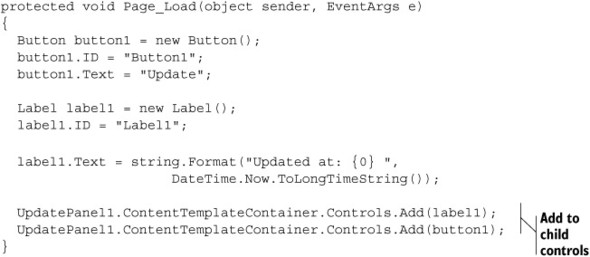
A Button and a Label control are both programmatically added to the UpdatePanel by means of a property called ContentTemplateContainer. This approach is ideal for controls that are added during runtime, as opposed to controls added declaratively through markup. Because controls added this way aren’t persisted, this is done on each Page_Load occurrence.
This should give you a grasp of how content is specified for partial updates with an UpdatePanel. Understanding this fundamental concept is extremely important. Once you’ve declared the content, you want some control over when it updates; so, you need to become familiar with the UpdateMode property.
6.2.2. Update modes
The UpdateMode property determines under what conditions the contents of an UpdatePanel are rendered. By default, this property is set to Always, which signifies that the contents are rendered on each and every postback, regardless of what control or UpdatePanel it originated from.
The preferred setting is Conditional, which indicates to the ScriptManager that the UpdatePanel should render its contents only if one of the following conditions are met:
- A child control of the UpdatePanel invokes a postback.
- A registered trigger, such as a button click outside the UpdatePanel, is invoked (we’ll explain this in more detail when we talk about triggers).
- The Update method for the UpdatePanel is called.
To demonstrate how this setting works, let’s extend the previous example by adding an additional UpdatePanel to the page with similar contents. In the second panel, you set the UpdateMode property to Conditional. The latest revision to the code is shown in listing 6.5.
Listing 6.5. Setting the UpdateMode property to Conditional

The results after clicking the button in the first UpdatePanel are shown in figure 6.4.
Figure 6.4. The results of an asynchronous postback invoked from the first UpdatePanel. The second UpdatePanel isn’t updated because its UpdateMode is set to Conditional and none of its conditions have been met.

Tip
Setting the UpdateMode property to Always should be considered the last option for updating a region dynamically. The point of the UpdatePanel is to reduce the amount of data being passed down from the server by passing in only the contents that need to be updated. Instead of setting the property to Always, you should make it a habit to initially set it to Conditional and let a case for Always present itself when applicable. The UpdateMode property is set to Always by default to provide an out-of-the-box development experience for the creator.
The next time you run the application and click the button in the first panel (the one set to Always), notice that only the contents for that panel are updated. Because you’ve set the UpdateMode for the second panel to Conditional, it doesn’t update because none of its conditions have been met.
If you click the button in the second panel (the one set to Conditional), notice that the contents of both panels are updated. This occurs because the postback was invoked by one of its child controls. Because the first panel’s mode is set to Always, it updates for every postback. If possible, take the time to manipulate these settings and become familiar with how they work.
You’re making good progress. Now that you’re applying partial-page updates, it would be beneficial for you to understand how those updates are initially applied.
6.2.3. Render modes
When an UpdatePanel initially renders its contents, it places it in a <div> or <span> HTML tag. Subsequent postbacks look for the ID of the UpdatePanel to apply additional rendering from JavaScript. The RenderMode property determines which HTML tag is used when the initial rendering occurs. The default setting is Block, which correlates to the <div> tag. The other setting is Inline, which is associated with a <span> tag. Based on the layout of the page and the location of the UpdatePanel, one setting may be more ideal than the other. To illustrate their differences, consider the example in listing 6.6.
Listing 6.6. Rendering the UpdatePanel’s contents as a <div> or <span> tag
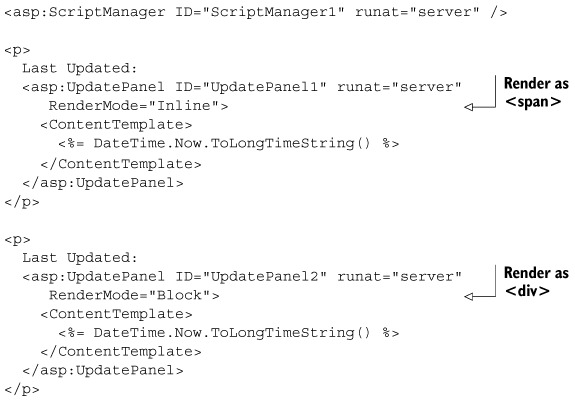
The contents of both UpdatePanel controls are nearly identical. They differ only in their settings of the RenderMode property. Figure 6.5 shows the difference between how each UpdatePanel renders its contents.
Figure 6.5. The results of two UpdatePanel controls with identical content but different RenderMode settings: the first set to Inline, the second to Block.
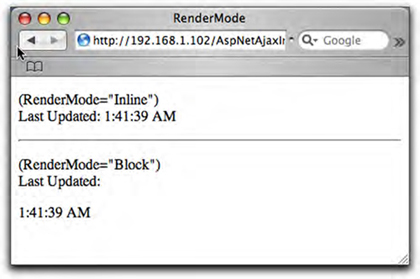
In the first panel, the <span> tag is used to render the contents of the panel inline. The second panel uses a <div> tag to define a division or section in a document, resulting in the UpdatePanel’s contents being placed below the previous contents.
As you learn how the UpdatePanel is used, it’s just as important to understand how it works. An essential piece of this puzzle is examining its relationship with the ASP.NET page lifecycle.
6.2.4. ASP.NET page lifecycle
In ASP.NET, when a request is made for a web page, an instance of the Page class is created. The class goes through a series of steps to process the request before it’s destroyed. These steps include initialization, instantiating controls, rendering the UI. The process of going through these steps and firing events along the way, is known as the page lifecycle.
It’s important for every ASP.NET developer to understand the events that occur in the page lifecycle. In the case of the UpdatePanel, being aware of when certain actions take place is critical to understanding how the control works. Table 6.1 shows the events in the page lifecycle that are closely tied to the UpdatePanel, and what measures the control takes to plug itself in to the page.
Table 6.1. Events in the ASP.NET page lifecycle that the UpdatePanel control interacts with
|
Page event |
Description |
UpdatePanel actions |
|---|---|---|
| Init | This is the first step in the lifecycle. It occurs when the page is initialized. | Each UpdatePanel on the page is registered with the ScriptManager control. |
| Load | After initialization is complete, this event is fired when the page is first loaded. | If the page is in an asynchronous postback, it initializes all the triggers for each UpdatePanel on the page. |
| PreRender | This occurs before the page is about to render. | Sanity checking is done here to ensure that all the settings for each UpdatePanel on the page are set correctly. For example, if the ChildrenAsTriggers property is set to True, the UpdateMode must be set to Conditional. |
| Unload | This event is fired after the page is removed from memory but hasn’t yet been disposed. | Each UpdatePanel responsibly unregisters itself with the ScriptManager. |
Tip
Custom control developers and page developers who wish to extend existing controls must be intimately familiar with the page lifecycle events in order to correctly initialize, maintain state, and execute control actions. For more information about the ASP.NET page lifecycle, see http://msdn2.microsoft.com/en-us/library/7949d756-1a79-464e-891f-904b1cfc7991.aspx.
You should have a general, high-level grasp of what goes on during the page lifecycle with the UpdatePanel. Examining the stages in the cycle should give you insight as to when certain actions are permitted. Speaking of events, you’ve built a solid foundation and will now learn about a important part of the UpdatePanel: triggers.
6.3. Triggers
A trigger is an event coming from a control that causes an UpdatePanel to refresh its contents. The following types of triggers can be associated with an UpdatePanel:
- AsyncPostBackTrigger— Invokes an asynchronous postback for the associated UpdatePanel and any other UpdatePanels on the form that have the UpdateMode property set to Always
- PostBackTrigger— Invokes a traditional postback to the page that causes the page to refresh
Similar to specifying content for an UpdatePanel, you can add triggers declaratively or programmatically. Let’s start by examining the most common trigger you’ll use: an asynchronous trigger.
6.3.1. Asynchronous triggers
Each child control of an UpdatePanel is by default an asynchronous trigger. This means postbacks resulting from interaction with these controls are replaced with asynchronous postbacks that invoke the UpdatePanel to render its contents. But what about controls that haven’t been specified as content in an UpdatePanel? For example, say you want to refresh the contents of an UpdatePanel based on the click event of a button that isn’t a child control.
This can be accomplished by registering the control as an asynchronous trigger. Listing 6.7 demonstrates how to achieve this programmatically when the UpdatePanel has its UpdateMode set to Conditional.
Listing 6.7. Programmatically registering a trigger with an UpdatePanel

If you go back to the page lifecycle in the previous section, you’ll notice that during the Load event, the ScriptManager initializes the triggers for each UpdatePanel on the page. This tells you that any triggers you
want to add to an UpdatePanel must be added before the Load event is fired. Registering a trigger in the ![]() Init event seems like the most logical place. To do so, you need to create a new
Init event seems like the most logical place. To do so, you need to create a new ![]() asynchronous trigger and add it to the triggers collection of that
asynchronous trigger and add it to the triggers collection of that ![]() UpdatePanel.
UpdatePanel.
An AsyncPostBackTrigger has two properties. The first is ControlID, which is the ID of the control that will raise the event. The second, optional, property is the EventName, which as you can guess, is the name of the event that the control raises for an asynchronous postback. If EventName isn’t initialized, it defaults to the event that the control is most known for (for example, the click event for a button).
This approach is used primarily for adding triggers to a panel that has UpdateMode set to Conditional. It also works for panels that have UpdateMode set to Always, but another approach is available for those situations that makes more sense:
ScriptManager1.RegisterAsyncPostBackControl(this.FindControl ("Button1"));
Calling the RegisterAsyncPostBackControl method of the ScriptManager registers the postback for all the UpdatePanel controls on the form that have UpdateMode set to Always. Panels that have the property set to Conditional aren’t rendered when this asynchronous postback occurs.
Adding triggers declaratively is even simpler; see listing 6.8.
Listing 6.8. Controls outside the UpdatePanel’s declaration invoking asynchronous postbacks
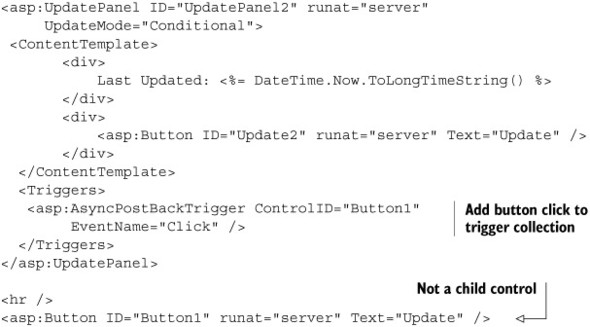
Adding a trigger declaratively is as easy as adding it to the Triggers collection of the UpdatePanel.
This should be straightforward so far; we’ve introduced the asynchronous trigger and how to add it programmatically and declaratively. But what about controls for which you want a normal postback? For example, what if you want a button that is a child of an UpdatePanel to perform a normal postback, resulting in a page refresh when it’s clicked? This brings us to the other type of trigger you can register with the panel: a postback trigger.
6.3.2. Postback triggers
Postback triggers work like traditional postbacks in ASP.NET. They cause the page to refresh and upload its contents to the server while a new page is eventually returned to the client. In some situations, you may want this behavior for controls that inherently become asynchronous triggers because of their association with an UpdatePanel. For example, when a control is a child of the UpdatePanel, by default it becomes an asynchronous trigger and thus replaces any traditional postbacks that would have occurred.
Registering a postback trigger is as easy as an asynchronous trigger. Listing 6.9 demonstrates how to register a child control as a postback trigger programmatically.
Listing 6.9. Declaring a child control as a postback trigger

During the Init event, an instance of a PostBackTrigger is created and initialized to a child in the UpdatePanel by setting its ControlID property. Next, you add it to the collection of UpdatePanelTrigger items in the panel’s trigger collection to inform the ScriptManager that this control performs traditional postbacks.
Note
Each UpdatePanel has a collection of triggers of a type called UpdatePanelTriggerCollection. This collection contains items of an abstract class called UpdatePanelTrigger. Because the class is abstract, which means you can’t create an instance of it, you can only add items that are of type PostBackTrigger or AsyncPostBackTrigger, because they both inherit from UpdatePanelTrigger.
Once more, adding the trigger declaratively is as easy as with an asynchronous trigger; see listing 6.10.
Listing 6.10. Registering a child control as a control that raises a normal postback

Excluding the EventName property, a PostBackTrigger is added programmatically and declaratively the same way as an AsyncPostBackTrigger. This covers how triggers are specified with an UpdatePanel.
What we have yet to cover is how to manually distinguish when triggers are fired. In some cases, you may not want the contents of an UpdatePanel to be rendered when an asynchronous postback occurs, even when one of its conditions has been met (see Conditional UpdateMode, earlier in the chapter). In addition, you may want to update the contents of another UpdatePanel on the page when a one panel is updated.
6.3.3. Manual triggers
The ChildrenAsTriggers property determines whether postbacks from a child control in an UpdatePanel result in its contents being refreshed. By default, this property is set to True and can be set to False only when the UpdateMode is set to Conditional. Attempting to do so without this condition results in an InvalidOperationException being thrown by the ScriptManager during the page’s PreRender event.
Setting the property to False allows asynchronous postbacks to occur, but the ScriptManager bypasses any updates to the UpdatePanel that are associated with the postback. Listing 6.11 shows how ChildrenAsTriggers is used declaratively.
Listing 6.11. Setting ChildrenAsTriggers to false so as not to initialize triggers

Programmatically, you can set this property after the Init event, giving you the luxury of waiting for other events in the page lifecycle to occur before determining if this property should be set:
UpdatePanel1.ChildrenAsTriggers = true;
Note
The ScriptManager is responsible for orchestrating the partial-page updates of each UpdatePanel on the page. When it comes time to update the page, it iteratively walks through the list of UpdatePanel controls on the page and invokes the triggers in each one to render its contents. In this case, the internal Initialize method that invokes a trigger isn’t called, and the contents for the UpdatePanel remain the same.
The Update method
This brings us to the Update method of the UpdatePanel. With the Update method, you can force the contents of an UpdatePanel to render during an asynchronous postback. This includes other UpdatePanel controls on the page, as well, but these panels must have their UpdateMode property set to Conditional in order to successfully update. Listing 6.12 demonstrates an event raised from one UpdatePanel updating itself and other panels on the page.
Listing 6.12. Manually updating a page by calling its Update method

The first Update method is called for the UpdatePanel that originated the asynchronous postback. Because the ChildrenAsTriggers property was set to False, the panel’s contents can be updated only when its Update method is called. The next few lines call the Update method for other panels on the page to render their contents.
The previous sections will serve as a core reference to how the UpdatePanel is used, when you read later chapters. It’s time to explore a few more advanced scenarios where you can apply the UpdatePanel.
6.4. Advanced techniques
So far, we’ve covered the basics of the UpdatePanel, including its properties, methods, and usage. Most of the time, using the UpdatePanel is as simple as applying some of the techniques demonstrated earlier. But sometimes, more complex situations arise where you can use the UpdatePanel in a more creative fashion.
6.4.1. Repeating UpdatePanels
When you’re working with repeatable data structures, such as a Repeater, DataList, or GridView, it’s usually best to place the entire control in an UpdatePanel instead of each repeated item. However, in some cases you may want a panel around the repeatable item instead. Let’s take, for example, a list of stocks in your portfolio. Next to each stock listing, you want a button that updates only that stock price. Listing 6.13 shows the markup listing of the portfolio application.
Listing 6.13. Repeating an UpdatePanel
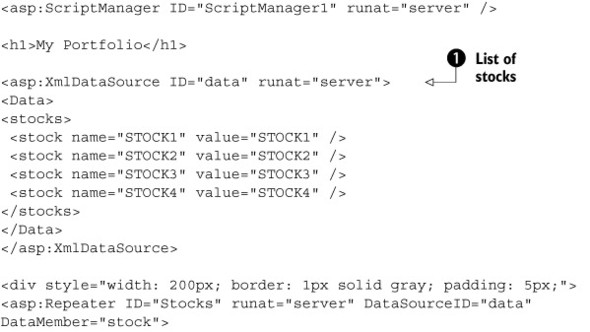
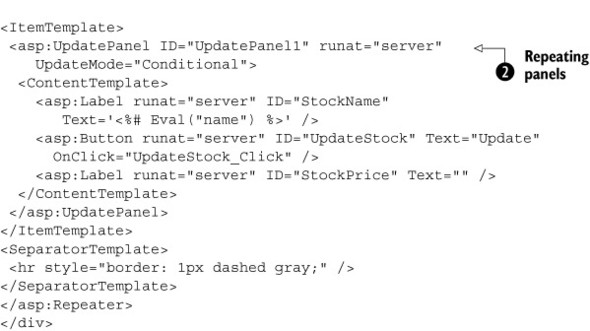
In this example, an ![]() XmlDataSource stores a simple list of stocks in the portfolio. In the ItemTemplate of the Repeater is the
XmlDataSource stores a simple list of stocks in the portfolio. In the ItemTemplate of the Repeater is the ![]() UpdatePanel control. The panel contains a label for the stock name, a button to update the price, and another label to display
the price. The server-side code that updates the price is shown in listing 6.14.
UpdatePanel control. The panel contains a label for the stock name, a button to update the price, and another label to display
the price. The server-side code that updates the price is shown in listing 6.14.
Listing 6.14. Updating the stock price
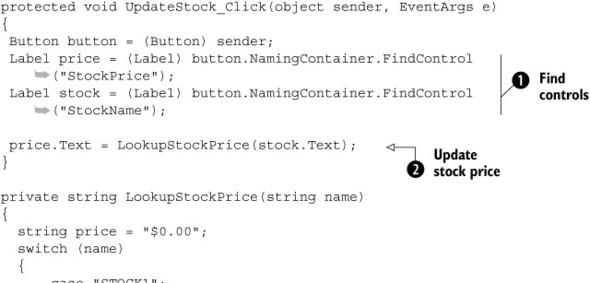

The server-side implementation ![]() finds the controls in the repeated item, then
finds the controls in the repeated item, then ![]() calls a private method to look up the stock price and update the label accordingly. For simplicity, you hard-code the values
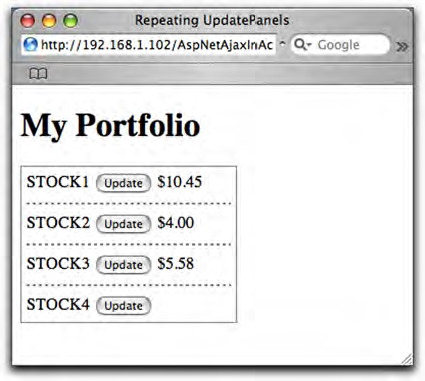
returned from the lookup method. When you run the application and select the first three stocks, you get the results shown
in figure 6.6.
calls a private method to look up the stock price and update the label accordingly. For simplicity, you hard-code the values
returned from the lookup method. When you run the application and select the first three stocks, you get the results shown
in figure 6.6.
Figure 6.6. Repeating UpdatePanel controls
Again, normally it’s best to place an UpdatePanel around a single repeatable control. In the cases where you want to place it around a repeated item, be conscious of the number of items that will be rendered: A strain on performance may occur after some time with a large number of items in a repeatable control. Section 7.3.1 provides more insight into why this happens.
6.4.2. Nesting UpdatePanels
In addition to being able to repeat UpdatePanel controls, you can also nest them. This makes sense only if the UpdateMode property of the outer panel is set to Conditional. For example, consider the nested panel implementation in listing 6.15.
Listing 6.15. Nesting UpdatePanel controls
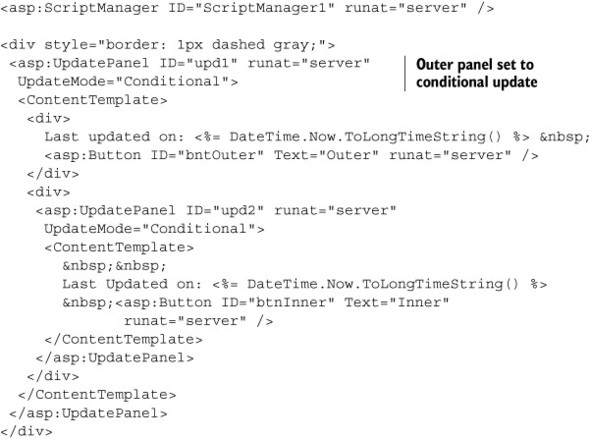
In this example, the outer UpdatePanel is appropriately set to conditionally update. If the UpdateMode property were set to Always instead, there would be no need for the nested panel, because any updates to the inner panel would also invoke an update to the outer panel. Take a moment to run the sample and experiment with setting the outer panel UpdateMode property to Always and back to Conditional.
6.5. Live GridView filter
You should have an overall sense of how the UpdatePanel is used. The examples you’ve worked through so far demonstrated the simplest cases for each property and method the UpdatePanel offers. Now that you’ve established this foundation, let’s have some fun by putting together something a little more useful: a GridView that you can sort, page, and filter without normal postbacks (page refreshes).
6.5.1. Live GridView filter goals
In ASP.NET 2.0, the GridView is the successor to the frequently used DataGrid control in ASP.NET 1.1. The GridView is powerful because it comes with built-in support for paging, sorting, and editing. But with this feature comes a cost—each of these functions performs a postback to the server. Every time the user sorts a column or pages through results, he loses his connection with the application as he’s left waiting for it to be processed.
The first objective is obviously to stop the page from refreshing each time the user interacts with it. As you can guess, the solution is trivial with the UpdatePanel. But what makes this application unique is that it also allows the user to filter the results of a selected column. This brings us to the second goal. Currently, a user can filter a column in the GridView by entering text and clicking the Filter button on the form. Instead of requiring the user to click the Filter button, let’s make the application more responsive by countering the user’s keystrokes with on-the-fly filtering. In other words, you’ll bring the GridView filtering to life by making it more intuitive and receptive to user actions instead of requiring them to click the Filter button.
Let’s look at the application. Figure 6.7 shows the site in its initial state—before any filter has been applied.
Figure 6.7. The GridView in its initial state shows the contents of the Contact table in the AdventureWorks database.

If the user enters in some criteria and then clicks the button to invoke the filter, the column that is currently used for sorting (FirstName by default) is updated with the filtered results. Figure 6.8 illustrates this effect.
Figure 6.8. After the user enters text and clicks the Filter button, the contents of the selected column are filtered and updated.
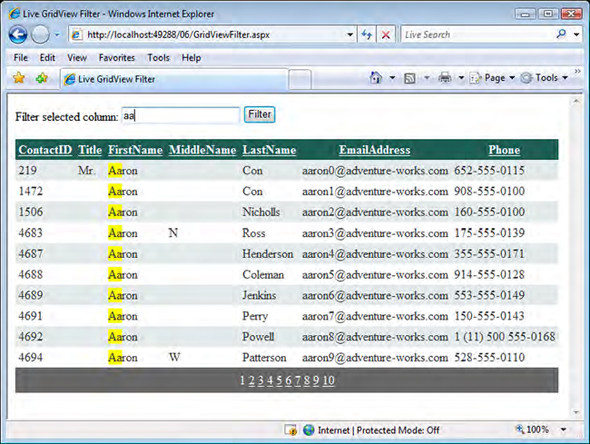
To effectively relay back to the user the results from the filter, the matched text found in the column is highlighted (a nice touch). Consequently, each update to the text box and button click display new filtered results.
Before you begin integrating the UpdatePanel and enhancing the filter behavior, you should understand how the current application works so you can assess what changes need to be made.
6.5.2. How does the GridView filter work?
Understanding how the current application works will assist you in deciding what steps to take next. A good starting point is to take inventory of the elements (or controls) on the page and how they’re configured.
Note
The data used to populate the GridView comes from the AdventureWorks database. AdventureWorks is a fictitious company created by Microsoft with the intention of simulating a real-world business. This example uses SQL Server Express (see appendix A for more information) but can also be configured for SQL Server 2000 or 2005.
Listing 6.16 contains the entire markup portion of the application before adding any enhancements.
Listing 6.16. The application contains a GridView and SqlDataSource configured to AdventureWorks.
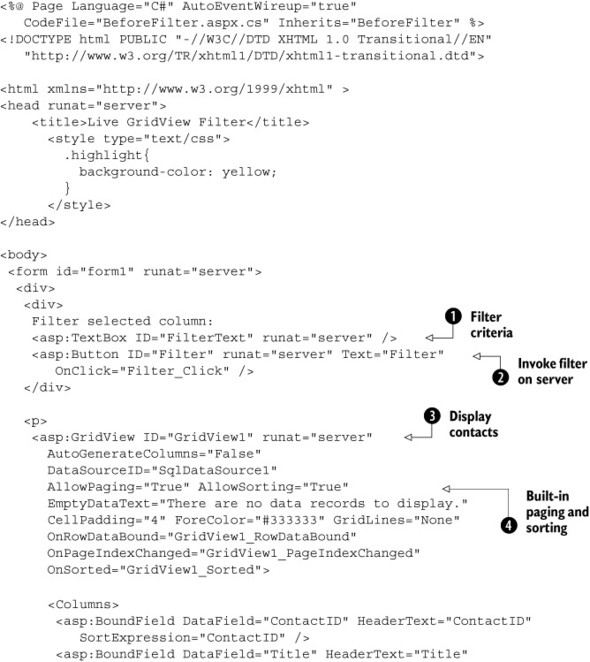
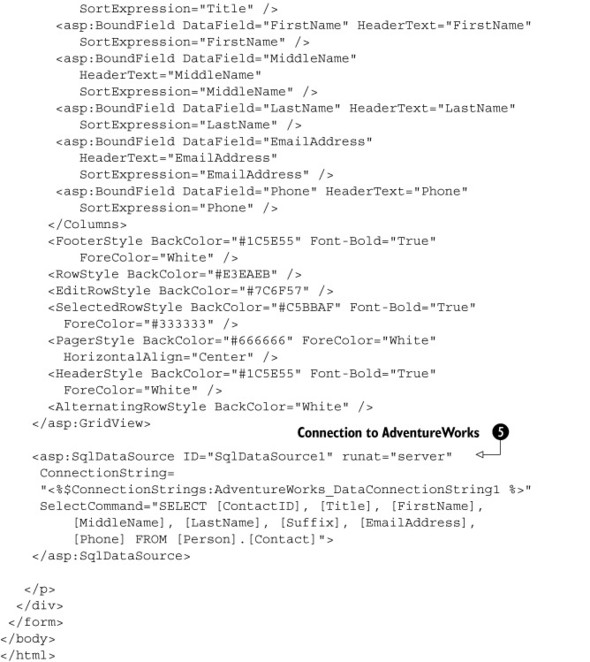
The page is simple so far. At the top are ![]() a TextBox and
a TextBox and ![]() a Button that work together to pass in filter criteria to the server. The results are displayed in a
a Button that work together to pass in filter criteria to the server. The results are displayed in a ![]() GridView that has built-in
GridView that has built-in ![]() paging and sorting enabled. The data source for the GridView is encapsulated in a
paging and sorting enabled. The data source for the GridView is encapsulated in a ![]() SqlDataSource control that retrieves the connection string for the database from the web.config file.
SqlDataSource control that retrieves the connection string for the database from the web.config file.
This should give you an understanding of how things are displayed. To complete your understanding of how the application manages the filtering and updates on the form, listing 6.17 shows the entire code for the server-side logic.
Listing 6.17. Applying a filter expression to the data source and updating the results
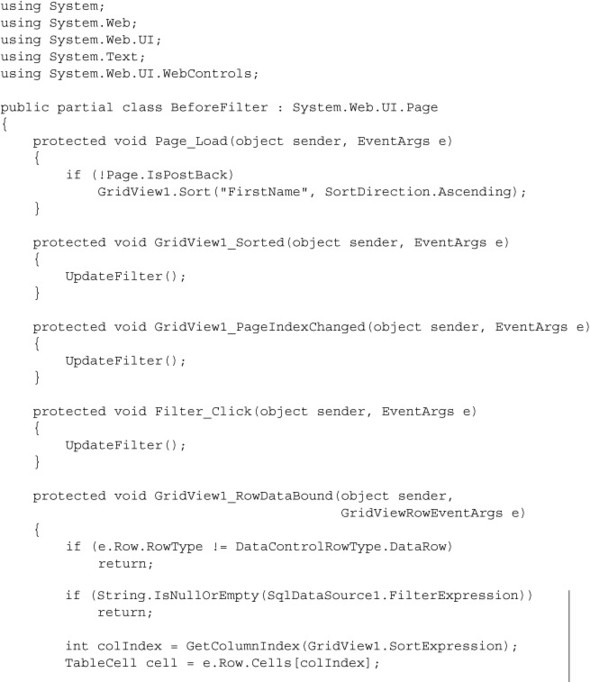
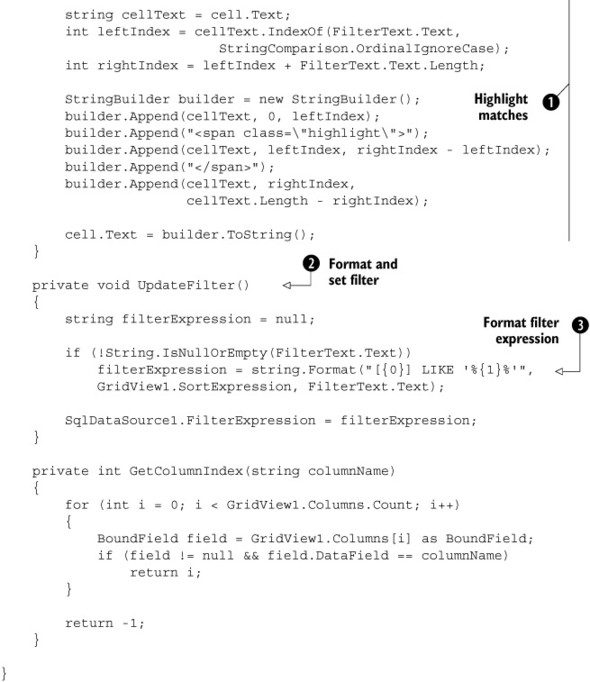
An interesting pattern is the way the event handlers for paging, sorting, and the filter button-click events each call a private
method called ![]() UpdateFilter. Because this logic is called from numerous places, it makes sense that it’s encapsulated into a single function. In this function,
the text that the user has entered is used to format an SQL statement to apply a
UpdateFilter. Because this logic is called from numerous places, it makes sense that it’s encapsulated into a single function. In this function,
the text that the user has entered is used to format an SQL statement to apply a ![]() filter expression to the data source. Then, when each row is bound in the GridView, a
filter expression to the data source. Then, when each row is bound in the GridView, a ![]() highlight is applied to the relative text in the table cell.
highlight is applied to the relative text in the table cell.
Now that you’re up to speed about how the application operates, let’s apply the enhancements that fulfill the goals of making it more responsive and engaging.
6.5.3. Adding Ajax to the GridView filter
Let’s address the postbacks that originate from the GridView first. If you add the ScriptManager control to the page and wrap the GridView and SqlDataSource controls in an UpdatePanel (see listing 6.18), you get rid of the page refreshes related to the sort and paging events. Also, to coordinate the updates with the Filter button, you can add a trigger to the UpdatePanel that correlates to its click event.
Listing 6.18. Wrapping the GridView and SqlDataSource within an UpdatePanel
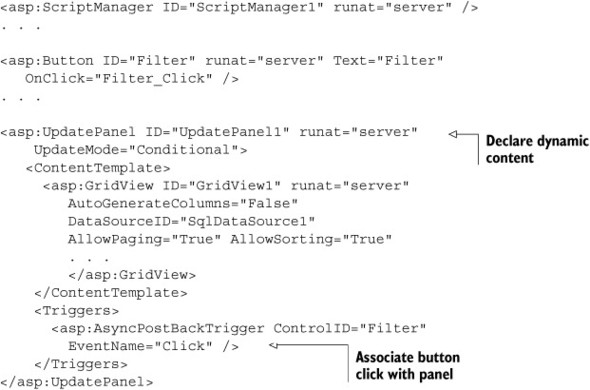
Notice how you set the UpdateMode of the UpdatePanel to Conditional. Again, this isn’t the default setting—but it should be. By setting the mode to Conditional, you relay to the ScriptManager that the rendering of this fragment of the page needs to happen only if one of its conditions is met.
Running the application now shows that you’ve met the first goal of replacing page refreshes with partial-page updates. What’s left is making the filtering more responsive to user actions, such as keystrokes in the TextBox.
6.5.4. It’s alive!
Updating the application has drastically enhanced the user experience—but you can do more. Imagine if you could update the filtered columns as the user was typing. If you’ve ever captured keystrokes, you already know that this happens in the browser, not the server. This presents you with a departure: Until now, you’ve been adding Ajax-like behavior without a single line of JavaScript. As you develop more complex solutions, you need to write some client-side code to be more efficient and sometimes take control of the client-side application.
For this application, the first thing you can do is remove the Filter button—it won’t be needed because you’ll use the keystrokes entered by the user to stimulate the filtered data (see listing 6.19). On the server side, you need to add a handler for the TextChanged event of the TextBox, which also calls the UpdateFilter method.
Listing 6.19. Removing the Filter button and adding the event handler for the TextChanged event
<div>
  Filter selected column:
  <asp:TextBox ID="FilterText" runat="server"
    OnTextChanged="FilterText_TextChanged" />
</div>
 . . .

protected void FilterText_TextChanged(object sender, EventArgs e)
{
  UpdateFilter();
}
You may be wondering why you’re adding server-side logic when we just mentioned that you’d be writing JavaScript code to make this happen. The reason is, the logic that performs the filtering still resides on the server. You need a way to invoke that logic from the client when the user is typing.
With the server-side logic in place, you need to bridge the gap between the capturing of the keystrokes on the client and the server-side code that updates the GridView. Listing 6.20 shows the JavaScript to add at the bottom of the page to make this a reality. You hook into the TextBox’s keydown event to launch a postback on the server; this calls the UpdateFilter method that refreshes the GridView.
Listing 6.20. Hooking into the keydown event to launch a postback on the server

In chapter 2, you were introduced to the application model that the Microsoft Ajax Library provides for client-side development. This model gives you an opportunity to write event-driven code on the client, similar to the server-side page lifecycle and event-handling code that server-side developers have grown accustomed to.
In this example, you start by registering callback ![]() functions for the browser load and unload events. When the page loads, you register a handler for the
functions for the browser load and unload events. When the page loads, you register a handler for the ![]() keypress event. When the page unloads, you
keypress event. When the page unloads, you ![]() release that handler to avoid any leaks (yes, leaks happen in JavaScript too).
release that handler to avoid any leaks (yes, leaks happen in JavaScript too).
Now for the tricky stuff—when you register the handler for the keypress event, you assign it a callback function called onFilterTextChanged. When this function is called (each time a keypress occurs), ![]() you clear any delays you previously had with the timer and add another timer delay that ultimately invokes a postback to
the server on behalf of the FilterText TextBox. You also give it a slight delay so the user can type in a few letters before the contents in the text box are submitted
for the filter.
you clear any delays you previously had with the timer and add another timer delay that ultimately invokes a postback to
the server on behalf of the FilterText TextBox. You also give it a slight delay so the user can type in a few letters before the contents in the text box are submitted
for the filter.
Because this is a postback and you want to handle it asynchronously (without a page refresh), you need to add it to the UpdatePanel’s Triggers collection:
 <Triggers>
  <asp:AsyncPostBackTrigger ControlID="FilterText"
       EventName="TextChanged" />
 </Triggers>
This time, when you run the application, the contents of the GridView are updated shortly after each update is made to the text box—a cool achievement! The final results of your hard work are shown in figure 6.9.
Figure 6.9. The results of a filter applied to a GridView as a result of keystrokes entered by the user.
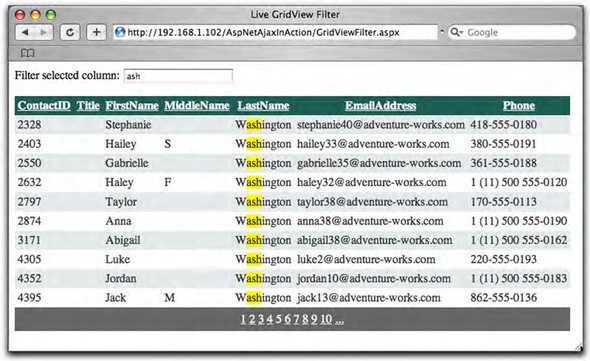
This example demonstrated how easy it is to take an existing ASP.NET application and improve the user’s experience with partial-page updates in place of traditional postbacks. In addition, it showed some of the new types of behaviors you can introduce to existing applications that you couldn’t do before—at least, not effectively.
6.6. Summary
In this chapter, we walked through basic examples that demonstrated how to use the UpdatePanel effectively. We also showed you a case where using JavaScript with the UpdatePanel can add interactivity and richness for the user. This chapter provides a solid foundation for understanding how the UpdatePanel works and should be used.
There remains a great deal more about the UpdatePanel. We didn’t address its caveats and limitations, and we have yet to explore its client-side model and how it can be used with another object called the PageRequestManager. Finally, we only touched on advanced techniques and how you can use the UpdatePanel to solve complex situations. The next chapter is dedicated to these issues and continues our look at how things work under the hood.
