
Chapter 5: Amazon Aurora
Amazon Aurora is a fully managed relational database offered by Amazon Web Services (AWS). It has many similarities to Amazon Relational Database Service (RDS), which we learned about in the previous chapter, but it also has many exclusive features. Aurora is a major topic within the AWS Certified Database – Specialty exam and as it features many of the same technologies as RDS it is highly recommended that you study Chapter 4, Relational Database Service, before this one.
In this chapter, we will learn about Amazon Aurora's architecture and how it differs from RDS, how we can achieve high availability and design Aurora to allow rapid disaster recovery, and we'll learn about some advanced options and features that only exist within Aurora.
This chapter includes a hands-on lab where we will deploy, configure, and explore an Aurora cluster, including how we can monitor it.
In this chapter, we're going to cover the following main topics:
- Overview of the Amazon Aurora service
- Understanding Aurora clusters and replicas
- Backing up and restoring Aurora
- Using Aurora's Global Database and Serverless options
- Understanding Aurora pricing
- Deploying an Aurora cluster
Let's start by making sure we understand what Aurora is, which database types it supports, and how it differs from RDS.
Technical requirements
You will require an AWS account with root access; everything we will do in this chapter will be available as Free Tier, which means you can run all the example code without spending any money as long as your account has only been opened within the last 12 months. You will also require AWS Command-Line Interface (CLI) access. The AWS CLI Configuration Guide (https://docs.aws.amazon.com/cli/latest/userguide/cli-chap-configure.html) will explain the steps required, but I will summarize them here:
- Open an AWS account if you have not already done so.
- Download the AWS CLI latest version (AWS CLI version 2) from the following link: https://docs.aws.amazon.com/cli/latest/userguide/cli-chap-welcome.html.
- Create an access key for your administration user: https://docs.aws.amazon.com/IAM/latest/UserGuide/getting-started_create-admin-group.html#getting-started_create-admin-group-cli.
- Run the aws configure command to set up a profile for your user.
You will also require a VPC that meets the minimum requirements for an RDS instance, which you can read about here: https://docs.aws.amazon.com/AmazonRDS/latest/UserGuide/USER_VPC.WorkingWithRDSInstanceinaVPC.html. If you completed the steps in Chapter 3, Understanding AWS infrastructure, you will already have a VPC that meets the requirements.
Overview of the Amazon Aurora service
Amazon Aurora is a managed database service. This means that AWS offers a wrapper around a relational database that handles many of the functions normally carried out by a Database Administrator (DBA). Where Aurora differs from RDS is that Aurora always speeds up the database functionality, and it can run up to five times faster than a non-Aurora version of the same database. Aurora manages such fast speeds by using a distributed storage system to avoid bandwidth and disk-read bottlenecks. Aurora has many benefits compared to RDS:
- Faster scaling: Aurora can almost instantly add additional read replicas whereas with RDS these can take some time to provision.
- Read replicas: Aurora supports up to 15 replicas compared to five on RDS.
- High durability: Aurora stores your data in six different locations across three Availability Zones (AZs) by default, so it has very high resilience as standard.
- Rapid disaster recovery: Aurora can recover faster from a failure. It can recreate what they call a compute node almost instantly to get your database back up and running if there was a failure.
- Storage costs: Aurora does not pre-provision storage. All storage is auto-scaled, which keeps costs efficient.
- Serverless: Aurora can be run in Serverless mode, which means you no longer need to define your computer requirements.
However, Aurora is more limited in the databases it supports compared to RDS and it can be harder to accurately calculate how much it will cost in advance.
Let's take a look at what database types Aurora supports and how this is decided.
Supported databases
Aurora is a type of RDS, so, therefore, it also only supports relational databases. However, because of the way in which Aurora works, it is described as being compatible with a database engine rather than using it. Currently, only two different database engines are compatible with Aurora:
- MySQL 5.6, 5.7, and 8.0 – InnoDB storage engine only
- PostgreSQL 9.6 onward
As you can see, compared to RDS, the choices are much more limited with Aurora. You will also find that newer versions of PostgreSQL and MySQL typically take longer to be supported in Aurora than RDS because the Aurora code wrapper has to be rewritten to support any changes.
As Aurora only supports open source databases, there are no licensing considerations to worry about. With Aurora, you only pay for what you use and you do not need a third-party license.
Compute and limitations
Aurora is very similar to RDS for both compute and access restrictions so we'll give a brief reminder here. If you are not using a Serverless Aurora cluster (which we will talk about in more depth in the Using Aurora's Global Database and Serverless options section of this chapter.), then the compute considerations are the same as for RDS. You will need to decide the size of the instance you need to handle your workload. The instance class can be changed after the database has been created.
Aurora also has similar restrictions on access as RDS; there is no access to the operating system or to root or sys accounts, and some functionality you would have on-premises has been changed to use Aurora-specific functions instead.
Service limits
Aurora also has certain service limits. Service limits indicate the maximums that you can use within RDS and includes the maximum amount of storage you can assign to the database, the maximum number of database connections, and even the number of Aurora instances you can run in your account. Here are some of the most common limits you may come across. These are often asked in the exam so it is worth trying to remember these numbers:
- Maximum storage allocated to a database: 128 tebibytes
- Largest table size: MySQL: 64 tebibytes, PostgreSQL 32 tebibytes
- Maximum number of Aurora instances allowed: 40 (this can be increased via a support request to AWS Support)
- Maximum number of Data API requests: 500 (Data API requests will be explained in more detail later in this chapter; however, this refers to the use of the awscli and similar tools that can be used for monitoring by sending requests for information from the database)
- Maximum number of read replicas: Five (this can be increased to a maximum of 15 via a Support Request to AWS Support)
- Maximum storage size for all DB instances: 100,000 (this can be increased to a maximum of 15 via a Support Request to AWS Support)
There are many other less-common service limits on Aurora but these will not come up in the exam. Please refer to the AWS documentation for the full list, which you can find at the following link: https://docs.aws.amazon.com/AmazonRDS/latest/AuroraUserGuide/CHAP_Limits.html.
Now that we understand what Aurora is and some of its benefits and limitations, we can start to learn some of the specific features, starting with clusters and replicas.
Understanding Aurora clusters and replicas
Amazon Aurora has been designed to benefit from cloud technology and as a result, it can use cloud ideologies such as auto-scaling (both horizontal and vertical) and decoupling of different parts of the application to improve resilience in a deeper manner than RDS. Let's take a closer look at an Aurora cluster to see how it decouples the compute layer and the storage layer to offer high redundancy and fast scaling.
Aurora clusters
An Aurora cluster is made up of two different types of nodes:
- Database instance: This is the power of the database and is where the database application sits and the processing of the data happens.
- Cluster volume: This is the storage layer spanning three AZs to offer the six data storage locations.
The following diagram shows how an Aurora cluster is arranged:
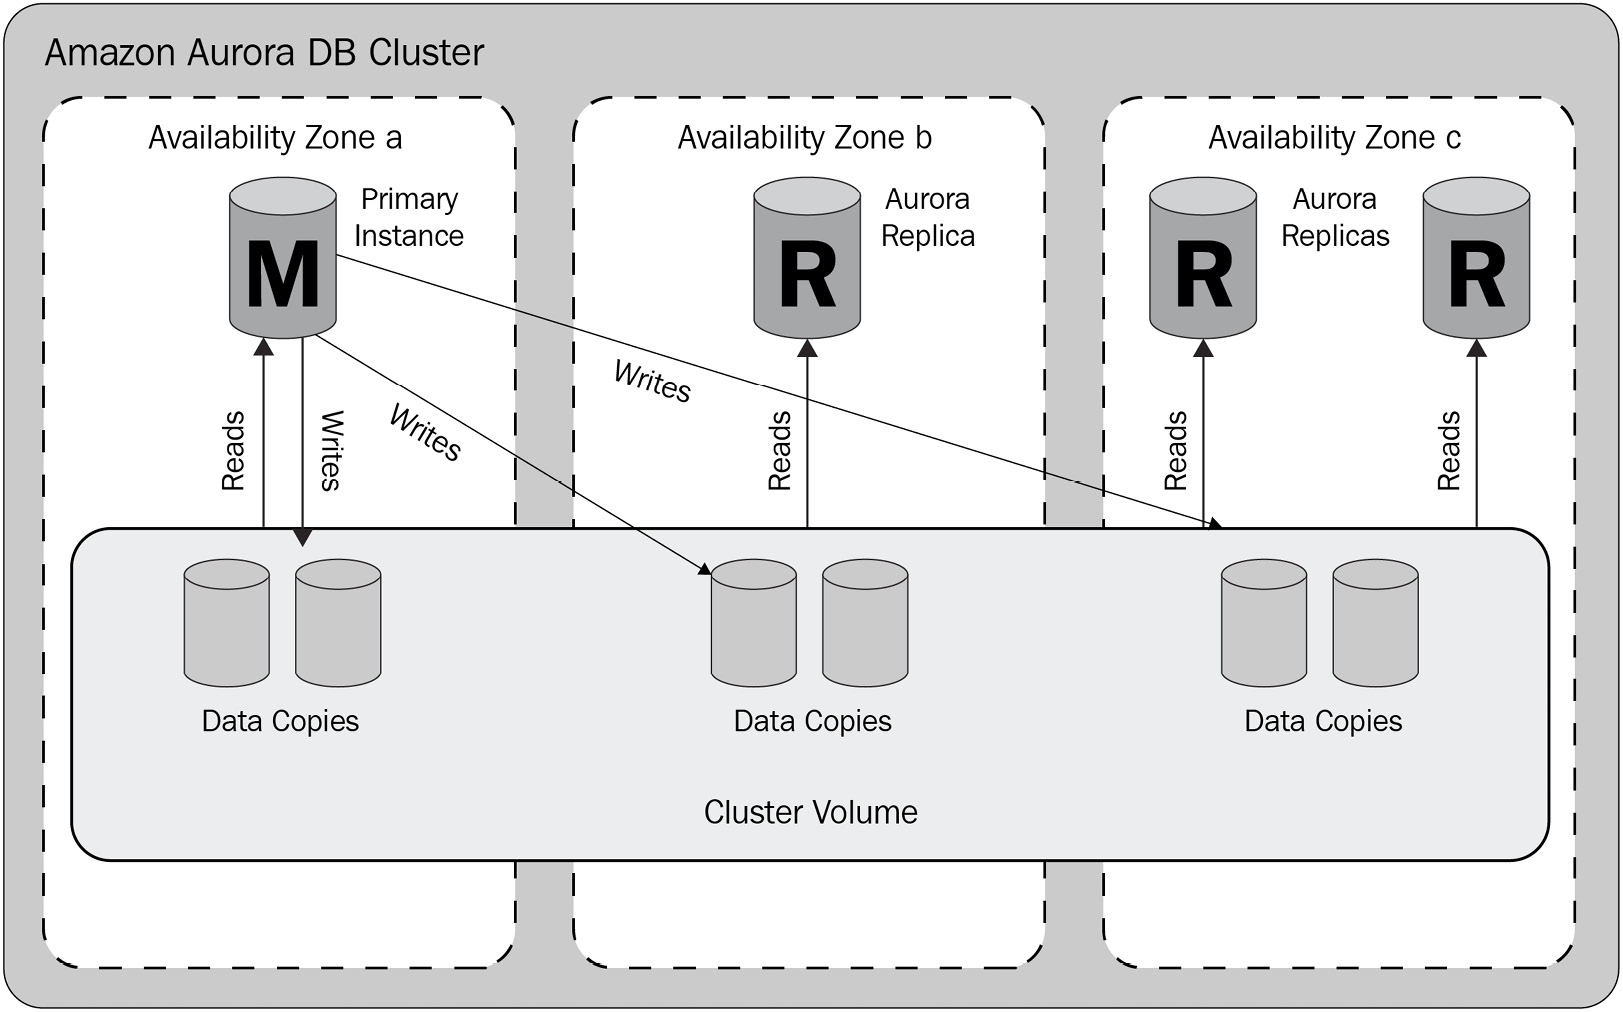
Figure 5.1 – Amazon Aurora cluster topology
All of the data is stored within the cluster volumes, and the database instances themselves only hold transient data in memory, which is lost if the instance reboots. The database instances can be read/write (primary) nodes or read replicas, and they communicate with the cluster volumes in the same AZ to improve latency and minimize cross-AZ traffic. The cluster volumes handle all replication, removing this from the database layer to further aid performance and to access the benefits of using the AWS storage backbone network. The database instances do not share data with each other. It is worth noting that even if you have a single database instance, it is still called a cluster as it will contain the single database instance and six cluster volumes. However, an Aurora cluster can contain up to 15 read replicas, which we will learn about now.
Read replicas
Amazon Aurora allows the creation of up to 15 read replicas, sometimes called reader instances, in the same region as the primary/writer instance. The reader instances can be used for two purposes:
- Performance: The application can be reconfigured to send read-only requests to the reader instances, reducing traffic against the writer instance.
- Resilience: A reader instance can be rapidly promoted to become a writer instance automatically if the original writer instance fails. This offers fast recovery of your databases. Amazon Aurora uses an endpoint that is automatically moved to the new writer instance, meaning no manual steps need to be carried out at the application layer to reconnect to the databases.
A reader instance can be a different instance class to the writer instance, allowing you to optimize the compute capabilities between reads and writes.
Let's look in more depth at what happens when a writer instance fails.
Failover
In the case of a failure of the writer instance, Aurora will automatically promote one of the reader instances to become the writer. Promote means to change the instance type from a reader to a writer. As you can create up to 15 reader instances, you can control the order in which the reader instances will be promoted first by assigning a tier to each reader instance. The lowest tier number denotes the highest priority for promotion, starting at tier zero. If more than one reader instance has the same tier, then Aurora will promote the instance that is the same instance class size as the original writer if one exists, and if not, it will pick one at random. This process takes less than 30 seconds to complete.
If you do not have a reader instance running when the writer instance fails, Aurora will recreate the writer instance for you. This will have considerably longer downtime than promoting a reader instance.
You can also manually promote a reader instance at any time without a failover. This creates a new standalone Aurora cluster to which you can now add reader instances.
We've looked at how read replicas or read instances work with Aurora but we haven't learned how we connect to them and how an application will send its read-only traffic to the right database instance. We do this via endpoints.
Endpoints
We learned in the previous section that Aurora uses a cluster endpoint that points to the writer instance. This endpoint is automatically moved if the writer instance fails and a reader instance is promoted. You can also create additional reader endpoints that will act as a load balancer to all the reader instances in your cluster.
You are also able to create custom endpoints for specific scenarios. For example, if you had a web application with read and write traffic and a reporting server with only reads, you might want to ensure the read traffic from both goes to different reader instances to balance the load. This method is also useful if you create reader instances of different sizes to suit different applications, so the reporting server might need to connect to the reader instance larger than the web application. You can use custom endpoints to create groups of reader and writer instances as well allowing for a highly specific configuration. Aurora will automatically stop traffic going to a promoted, deleted, or shut-down instance. You can also tell Aurora to add new instances to a custom endpoint automatically based on the exclusion and static list.
An example of how the endpoints can be configured is shown in the following diagram:
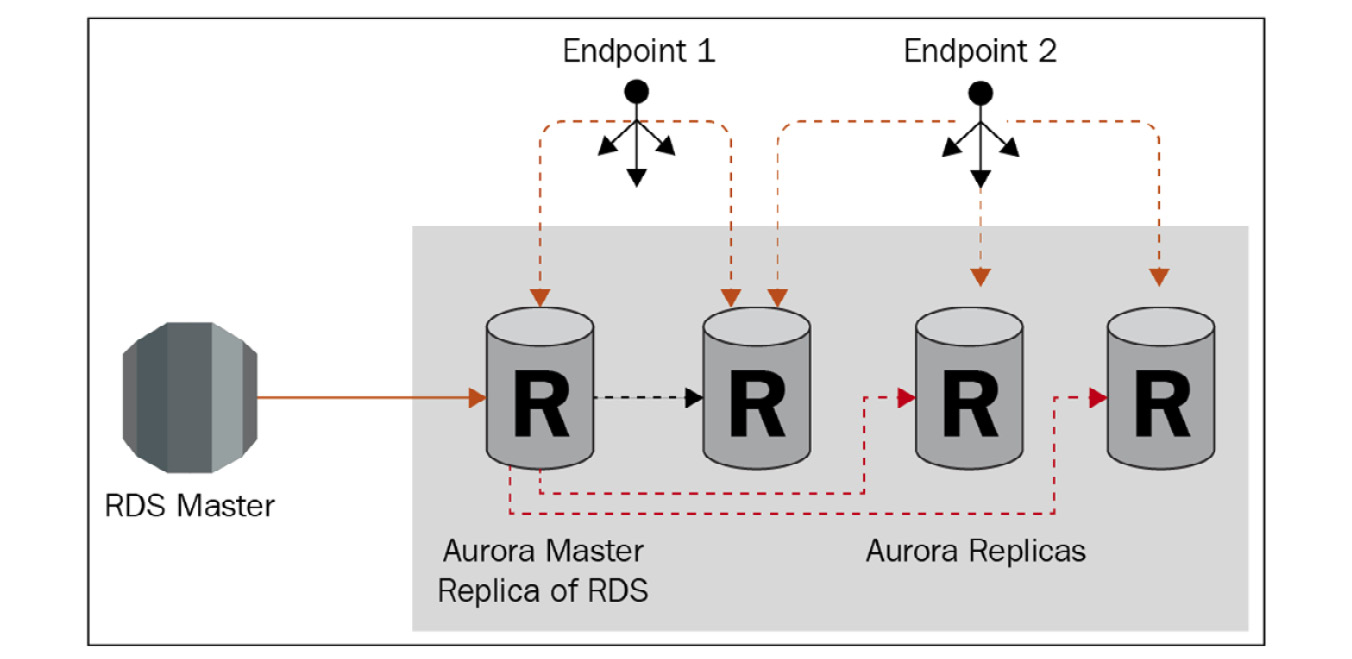
Figure 5.2 – Amazon Aurora endpoints
In this section, we've learned how an Aurora cluster works, how endpoints are used to control and configure access to the Aurora instances, and how they work with reader instances to split application traffic. In the next section, we are going to look at how Aurora is backed up and restored, and how you can migrate from RDS.
Backing up and restoring Aurora
Ensuring your data is secure and can be restored rapidly is a critical part of any reliable and resilient database system. Aurora has multiple options for backup and recovery strategies.
Backing up an Aurora cluster
Amazon Aurora is backed up continually and automatically as well as a system backup taken daily. The continual backups are taken throughout the day and do not have an impact on the performance of the database; this is a major advantage of the cluster volumes Aurora uses. The daily backup is taken during the backup window defined and this can have a low impact on performance, so the backup window should be chosen during a non-peak time. The backups are held in S3 until the retention time is reached, when they are deleted. The retention time can be set between one and 35 days and the default is one day regardless of whether the database is provisioned by the console or awscli.
You can also make ad-hoc backups at any time. These are called snapshots and they are not deleted unless done so manually, so these are often used to hold a backup beyond the retention period. The snapshots can also be used to create a new Aurora cluster and they can be shared with other accounts.
Restoring an Aurora cluster
An Aurora cluster can be restored from any Aurora snapshot. To restore the system, you use the snapshot to create a new cluster, which allows you to change the name. The new cluster will be associated with the default parameter unless you override it. If you need the same parameters or parameter group to be used, it is recommended that you do not remove the old group as the new cluster can be associated with it again.
A snapshot can only be restored in the same region or account it is currently stored in. If you wish to restore to a different account or region, you will need to copy or share the snapshot first. Let's learn how to do that now.
Copying and sharing a snapshot
First, let's look at copying a snapshot to a different Region in the same account.
To share a snapshot to a different region, you simply copy it and put the new region as the destination. If the Aurora cluster is encrypted, then all the backups will be too. As Key Management Service (KMS) keys are region-specific, the snapshot will need to be encrypted with a KMS key from the target region before you can copy it. Once the snapshot has been copied, you can use it to create a new Aurora cluster in the new region.
The snapshots do not automatically expire, so you will need to manually delete them to clear space if required; however, you must ensure the transfer has been completed fully before deleting the source snapshot, as its removal while the cross-region transfer is taking place can cause it to fail.
You can also share a snapshot with other AWS accounts within the same region. You can share an unencrypted snapshot publicly, which means any other AWS accounts can access it. If you wish to share an encrypted snapshot, you must also share the KMS key it was encrypted with to the other account. For security reasons, you cannot share an encrypted snapshot that was encrypted with the account default KMS key as this may grant access to decrypt other databases or systems that used the same key. By default, you can share a snapshot with up to 20 other AWS accounts.
If you wish to share with a different account in a different region, you must take a two-step approach, by doing either of the following:
- Share the snapshot to the new account in the same region; the recipient then copies the snapshot to the target region.
- Copy the snapshot to the target region, then share the snapshot to the new account from the target region.
Now we've learned how to work with Aurora backups, let's learn how to migrate an RDS database to Aurora.
Migrating from RDS to Aurora
Amazon Aurora is fully compatible with RDS MySQL and PostgreSQL. This means you can quickly and easily migrate from RDS to Aurora with minimal downtime. An RDS instance allows you to create an Aurora read replica instance that is solely designed for you to migrate.
When you first create an Aurora read replica, AWS takes a snapshot of your RDS instance and copies this to Aurora. This can take some time, several hours per tebibyte. When the read replica is created, RDS will start sending the transaction logs to Aurora so that the data is updated. This is an asynchronous replication, which means that the databases will not always be in sync, and at busy times you can get lag drift. You should monitor the lag and when it is at zero, you can promote the Aurora read replica to become a standalone Aurora cluster. At this point, you can switch the application to use the new Aurora cluster and you can delete the RDS database.
Backtrack
Aurora MySQL offers a feature called Backtrack, which lets you rewind a database to a prior point in time without having to restore the entire database. If you are used to working with Oracle databases, you can consider it as a similar feature to Oracle Flashback. You can enable Backtrack at any time by setting the Backtrack window for your database. Backtrack has a maximum window of 72 hours.
If you need to rewind the database, you can choose the exact moment at any time in your Backtrack window and the database will be put back as it was.
After migrating from RDS to Aurora, you can take advantage of two Aurora-specific features that do not exist in RDS: Global Database and Serverless. Let's learn about them now.
Using Aurora's Global Database and Serverless options
Aurora offers two advanced features that can make a huge difference for certain use cases. In particular, customers who have a worldwide customer base can use Global Database options to reduce the latency between the database and applications around the world, improving performance. Customers with unpredictable or intermittent workloads can benefit from Aurora Serverless, where they can use a database without having to define the compute. Let's start by looking at Aurora Global Database in more depth.
Aurora Global Database
Aurora Global Database allows you to create a cross-region Aurora cluster where you can send read requests all over the world. This allows you to have read replicas in the same regions as your applications and users to greatly reduce latency times and improve the performance of your applications.
Aurora Global Database can also offer rapid recovery from a region outage, as any of the secondary/read regions can be promoted to a primary writer region in under a minute.
There is no performance impact in enabling Global Database as the replication is handled at the cluster volume layer. The cross-region replication is asynchronous but typically suffers lag times of under a second, making it a good solution for read-heavy global workloads.
You are limited to a maximum of five secondary regions, allowing you to operate in six regions at any one time (including the primary region). The nodes in the secondary regions can differ in size and type from the primary, allowing for high customization to fit your use case and usage patterns. For example, if you wanted to run in three regions but the third region had far fewer customers, you could provision a t3.medium instance there instead of an m5.xlarge instance in the other two regions.
Let's now look at another feature of Aurora: Aurora Serverless.
Aurora Serverless
Aurora Serverless is an on-demand, auto-scaling version of Aurora. This means that you do not need to specify the compute or instance class for it as Aurora Serverless is not run on a virtual machine, but runs on AWS hardware instead. Aurora Serverless automatically scales in a fraction of a second and goes from being able to handle a few hundred transactions to hundreds of thousands. Aurora Serverless will also pause when not in use, making it cost-efficient. When Aurora Serverless pauses, it can take several seconds for it to wake up and allow transactions to start again. This is important as the restart period is not instant and therefore you need to carefully decide whether your workload will operate effectively with Aurora Serverless. The best use cases for Aurora are when your workload is unpredictable with sharp spikes and drops in usage. Aurora can almost instantly scale up and down to maintain the same performance level for the end users, regardless of the workload.
Aurora Serverless offers the same features as Aurora, including global tables and read replicas. You can also mix a cluster to feature both Serverless and standard provisioned nodes. This can be used to rapidly add fully automated scaling to any Aurora cluster, even one that's already running.
We've now learned about the key features of Aurora and how they can be used to meet different use cases. Questions around global tables and Aurora Serverless do appear in the exam. Let's now look at how Aurora is priced for both provisioned mode and Serverless.
Understanding Aurora pricing
Aurora pricing is different between provisioned mode and Serverless. In provisioned mode, Aurora is priced in a similar way to RDS, where you decide how much resources (CPU and memory) you need, as well as how much storage. In Serverless, you are billed based on the Aurora Capacity Units (ACUs), which are priced as a combination of CPU and memory. In addition, you pay for any specific features you use such as global tables and Backtrack. In addition, you pay for read/write I/O usage in Aurora, which is included as standard in RDS.
To calculate your total Aurora costs, you will need to choose an instance size, database engine (MySQL or PostgreSQL), storage size, and I/O requirements. You can use the AWS Calculator to help you build your estimate. The following screenshot shows the figures you need to add to the Calculator for storage and I/O rates:
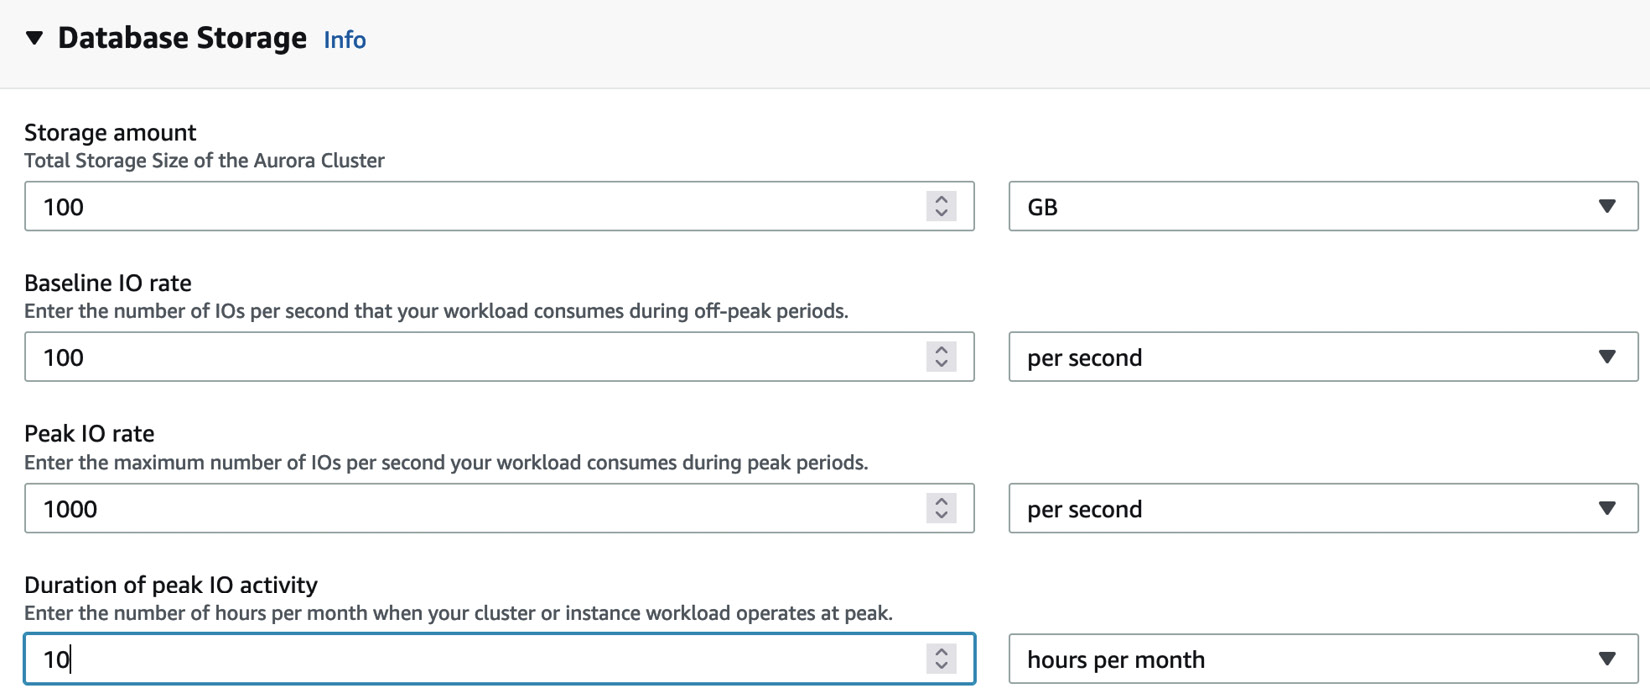
Figure 5.3 – AWS Calculator
The Calculator URL is https://calculator.aws/.
Aurora provisioned pricing is very similar to RDS, which we covered in Chapter 4, Relational Database Service, so let's look more closely at Aurora Serverless pricing to understand how it differs.
Aurora Serverless pricing
You do not choose an instance class for Aurora Serverless; instead, you can set two optional parameters to control the minimum and maximum amount of CPU and memory resources available to your database. The resources are called ACUs. If you do not set these ACU values, then your Aurora instance can grow from zero ACUs (that is, the database will be shut down) up to 256 ACUs, which equates to an r5.16xlarge instance class. On top of this, Aurora can also automatically scale your reader nodes to the same size. If you recall, you can have 15 reader nodes, giving you the equivalent in processing power of 16 r5.16xlarge instances, which is enough to consistently manage 96,000 simultaneous connections.
Aurora bills each ACU's usage by the second, so you will only pay for what you use. If the database is shut down because it is not being used, you will only pay for the storage being used and no charges will apply for any ACUs.
Global tables pricing
If you decide to use global tables, you will need to pay for any resource usage for the secondary regions in the same way as your primary region. This could be Aurora Serverless ACUs or provisioned compute. In addition, you will need to pay transfer fees. Transfer fees are paid when data is moved between regions or is moved outside of an AWS data center, for example, if your application sends data back to an on-premises server. To calculate the charges for global tables, you need to work out the write I/O on your primary region and then multiply those by the number of secondary regions. Once you have this figure, you can use the AWS Pricing Calculator to find out the specific cost for your regions.
High-level pricing questions come up in the exam, often focused on how a customer is billed for using Serverless and what they would need to consider when using global tables, so it's important to understand these costs, but you will not be asked to calculate the actual costs.
We've now looked at all the key Aurora features, how it differs from RDS, and how it's priced. Aurora questions are featured heavily in the exam and you will often be asked workload-specific questions where you need to be able to differentiate between a workload only suitable for RDS versus when you might want to use Aurora Serverless. Let's now practice creating and working with an Aurora cluster in a hands-on lab.
Deploying an Aurora cluster
Now we have learned about Aurora and its features, let's deploy our own cluster to practice and to see how the topics we've covered in this chapter work together. We will be deploying an Aurora cluster using the MySQL engine in Serverless mode and we'll then add Global Database. We'll use both the console and awscli for these steps.
Provisioning an Aurora cluster
We'll start by provisioning an Aurora MySQL cluster. We'll be using the Ohio (us-east-1) region. It is important to switch off encryption for this cluster, otherwise we will get an error when creating a global database. In a production environment, we would create a custom KMS key to be used for our multi-region databases, but for now, we will turn off encryption:
- Open the AWS console in an internet browser and log in using an account that has privileges to create and modify an RDS instance.
- Navigate to Amazon RDS (remember Aurora is a specific type of RDS).
- Click Create database in the middle of the page.
- This will open a page allowing you to enter the details of the database you want to create. Choose the following options. Any that are not mentioned here, leave as default:
- Choose database creation method: Standard create.
- Engine type: Amazon Aurora.
- Edition: Amazon Aurora MySQL-Compatible Edition.
- Capacity Type: Provisioned.
- Version: Choose the default.
- DB instance identifier: dbcertaur1.
- Master password: Choose your own.
- Availability and durability: Don't create an Aurora Replica.
- DB instance class: Burstable classes – db.r5.large.
- Virtual private cloud: Choose the one you created earlier.
- Public access: No.
- VPC security group: Use existing – dbcertdbsg.
- Enable encryption: Untick.
- Additional configuration: Leave all as default, but open this section to review the options.
- Click Create database.
- The database will take around 10 minutes to create and its status will change through various statuses, including MODIFYING, BACKING-UP, and finally AVAILABLE.
- Using awscli, we can check the database status while it is being created, as shown in the following:
aws rds describe-db-instances
You will see output similar to the following:
{
"DBInstances": [
{
"DBInstanceIdentifier": "dbcertaur1",
"DBInstanceClass": "db.r5.large",
"Engine": "mysql",
"DBInstanceStatus": "available",
...
}
]
}
Once the database has been provisioned and shows an AVAILABLE status, we can modify it.
Adding a read replica auto-scaling policy
We are now going to add a new reader instance to our cluster, but we are going to deploy it using an auto-scaling policy:
- Open the AWS console in an internet browser and log in using an account that has privileges to create and modify an RDS instance.
- Navigate to the RDS section (remember that Aurora is a specific type of RDS).
- Find the provisioned Aurora cluster you created earlier and select the Actions dropdown, then click Add replica auto-scaling:
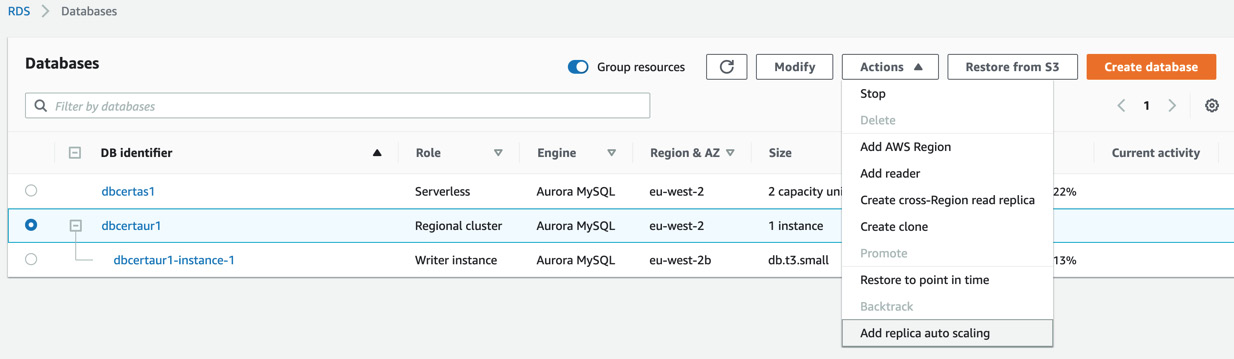
Figure 5.4 – Add replica auto-scaling
- Enter dbcertscale for the policy name and the target value as 75% CPU. Leave everything else as default.
Note
Take a look at the settings and options to ensure you understand what they mean and what they do before continuing.
- When you return to the console screen, you should see that a new reader instance is being created. This is because the minimum number of reader instances was set to one, therefore the Aurora cluster will need to immediately create a reader, as shown in the following screenshot:
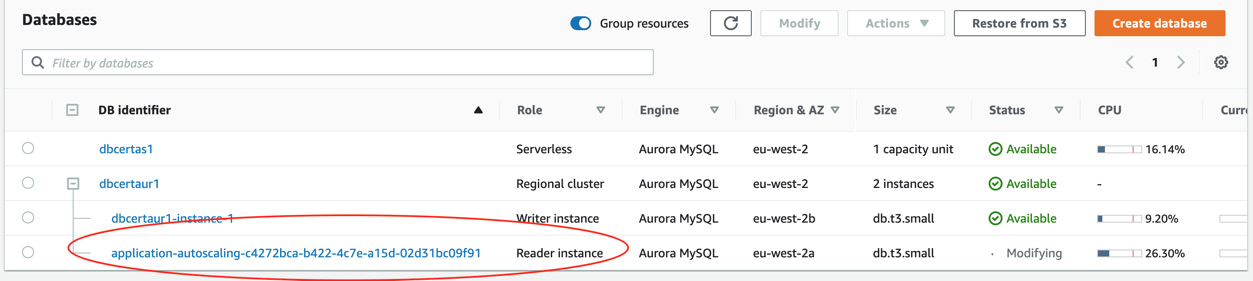
Figure 5.5 – AWS console showing the reader instance
If this is not visible immediately, go to the DB instance, and then the Logs and Events tab. You should see two entries like this, showing that the auto-scaling policy and the event to create a new read replica have been triggered:
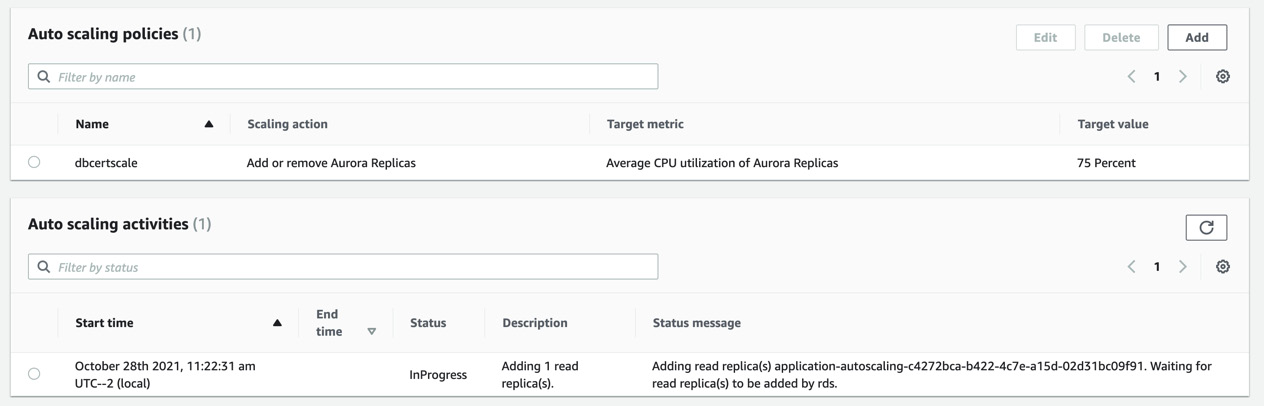
Figure 5.6 – Auto-scaling policies
Now we've got our cluster up and running with read replicas, let's make it global.
Adding global databases
Now we have our Aurora cluster running and we have the read replicas auto-scaling policy in place, let's create some global databases. The first thing we need to do is to change to a self-managed key; AWS default keys cannot be shared cross-region so we would hit an error if we tried to use one:
- Open the AWS console in an internet browser and log in using an account that has privileges to create and modify an RDS instance.
- Navigate to the RDS section (remember Aurora is a specific type of RDS).
- Highlight the dbcertaur1 database, click the Actions dropdown, and select Add AWS Region, as shown in the following screenshot:
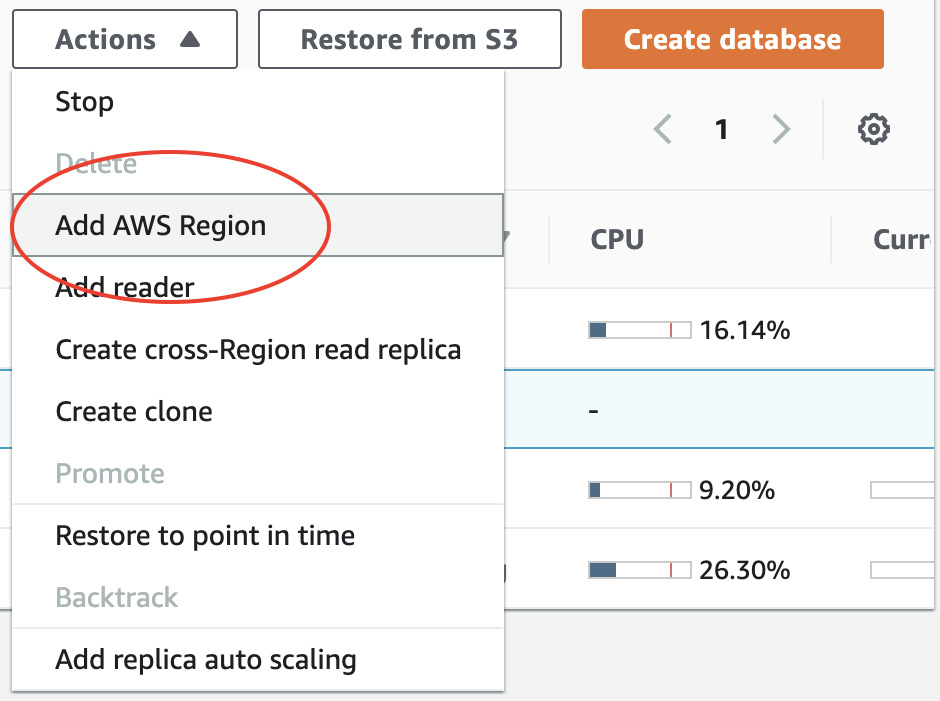
Figure 5.7 – Add AWS Region
You may get an error saying that the database version chosen doesn't meet the requirements for global databases. If this is the case, then click the Modify button and change to a supported type. You can see the supported types for Global Database by selecting the option. You may also need to change the instance size to a higher class if you did not select the r5.large option:
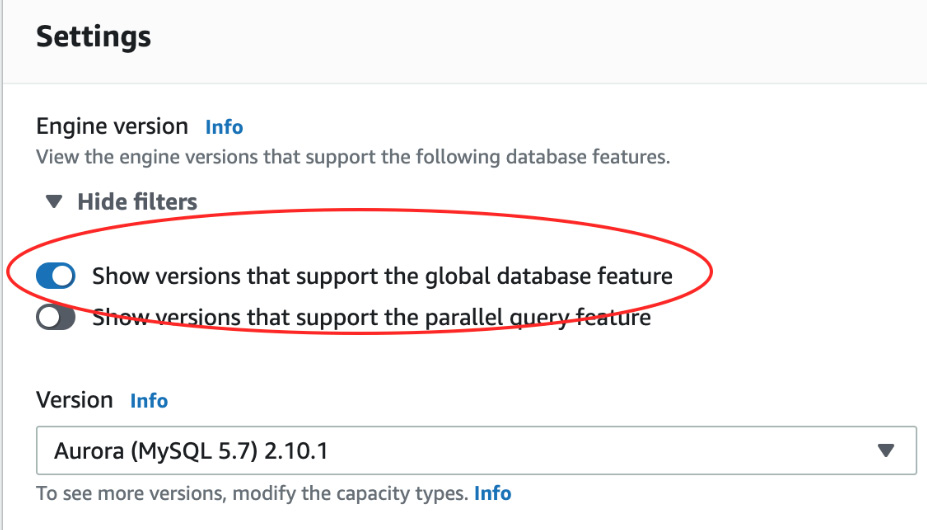
Figure 5.8 – Show only versions that support Global Database
The compatible options change regularly so you'll need to refer to the AWS guides (https://docs.aws.amazon.com/AmazonRDS/latest/AuroraUserGuide/Concepts.DBInstanceClass.html) to find the right combination.
- Give the global database a name: dbcertglob.
- Select any region in which you would like to deploy (make a note of which region you choose so you can check the database later. The AWS console is region-dependent).
- Select an instance class from the drop-down menu. The larger the class, the more it will cost, so for this hands-on lab, you should choose the smallest available. This will depend on which region you deploy, as shown here:
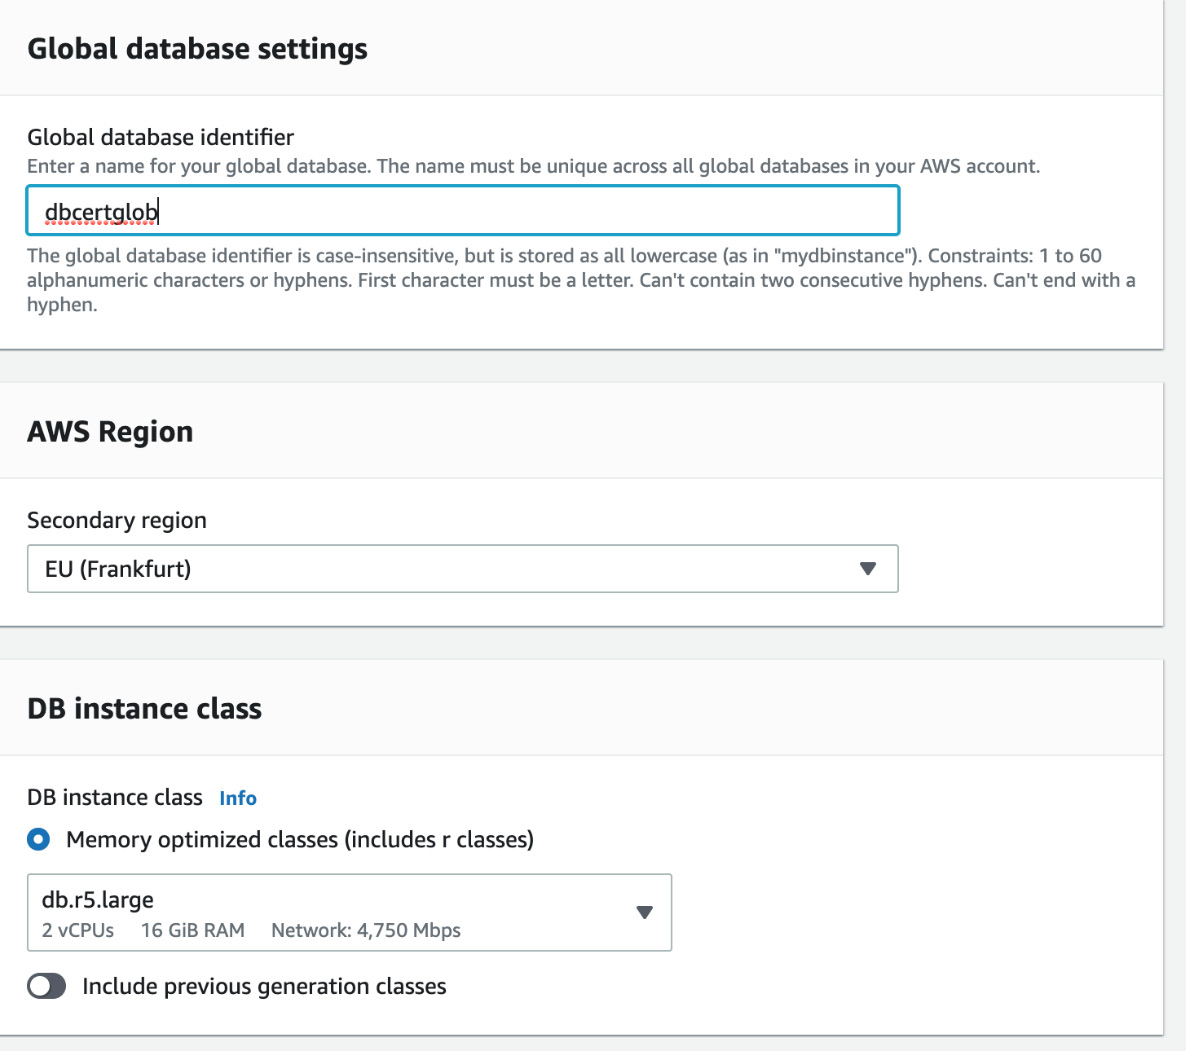
Figure 5.9 – Creating a global database
- Leave the connectivity options as default but make sure you understand them. As we have not created our own VPC in another region, we will use the default Amazon provides. This would not be good practice in a production system and you should set up a VPC manually first for more security and control.
- If it appears under the Encryption heading, turn encryption off to match the source database. If you enabled encryption on the source database, you will get an error. If this happens, go back to the Provisioning an Aurora cluster section and recreate the cluster without encryption to continue.
- Expand the Additional Configuration options and uncheck Enable Performance Insights and Enable Enhanced monitoring as we won't be using these and they have charges associated:

Figure 5.10 – Additional configuration options
- Click Add region.
- AWS will create a new Aurora cluster in the new region. This will take around 10 minutes to complete.
You've now created an Aurora global database across two regions. If you wish, you can now delete the Aurora cluster to save costs, as Aurora is not available on the Free Tier.
Summary
In this chapter, we have learned about Amazon Aurora. We have learned how Aurora differs from RDS, what database types are supported, how to deploy both a provisioned and Serverless Aurora cluster, and how to carry out some common maintenance and configuration tasks. We learned how to use both the AWS console and awscli to interact with our databases. These skills will enable us to work with Amazon Aurora databases confidently, as well as describe the use cases and benefits of Aurora compared to RDS.
During the AWS Certified Database – Specialty exam, your knowledge of Aurora will be tested heavily with questions around troubleshooting, service limits, Serverless and Global Database features, and migrating from RDS.
In the next chapter, we will be learning about AWS DynamoDB, which is a NoSQL database designed and fully managed by AWS. DynamoDB is very different from both RDS and Aurora as it supports unstructured data and does not rely on complex queries with joins.
Cheat sheet
This cheat sheet reminds you of the high-level topics and points covered in this chapter and should act as a revision guide and refresher:
- Amazon Aurora is a managed database service created by AWS that offers a database compatible with MySQL or PostgreSQL.
- An Aurora cluster features reader and writer instances with their own endpoints, allowing you to split your application workload between reads and writes.
- You do not define the storage capacity for Aurora as it can scale instantaneously and automatically. You also do not need to define any Input/Output Operations Per Second (IOPS) or throughput as you always get the maximum available with any Aurora instance or storage size.
- You can have up to 15 reader instances in any one cluster, but only one writer instance.
- Aurora automates many of the daily administrative functions typically carried out by a DBA. These include backups, log rotation, and patching of the operating system and database, and can include auto-scaling of the storage, the sizing of the writer instance, and the number and size of any reader nodes.
- Aurora is automatically a Multi-AZ deployment with six copies of your data being stored across three AZs.
- Aurora Serverless allows you to provision an Aurora cluster without specifying the instance size you need. Instead, you allocate maximum and minimum Aurora capacity units and the Serverless instance will scale automatically to handle any load.
- Global Database lets you quickly and easily offer a multi-region deployment to reduce latency between a global application and the database.
- Aurora Backtrack allows you to put the database back to how it was at any time in the Backtrack window without recovering from a backup.
Let's now check your knowledge of what you have learned during this chapter.
Review
To check your knowledge from this chapter, here are five questions that you should now be able to answer. Remember the exam techniques from Chapter 1, AWS Certified Database – Specialty Exam Overview, and remove the clearly incorrect answers first to help you:
- You have an application that has an Amazon Aurora MySQL backend database. The customer wants to grant access to a reporting tool. How can you modify the existing database to give access to the reporting tool, which must be highly available without impacting the performance of the online application in the most cost-efficient way?
- Create a cross-region Multi-AZ deployment and create a read replica in the second region.
- Move the instance to Amazon EC2 and create and manage snapshots manually.
- Create a Multi-AZ Aurora read replica of the Aurora DB instance.
- Create a Single-AZ Aurora read replica of the Aurora DB instance. Create a second Single-AZ Aurora read replica from the replica.
- You are managing a web application used by users in the United Kingdom and America. The application includes a database tier using a MySQL database hosted in eu-west-2 (London). The web tier runs from eu-west-2 and us-east-1 (Ohio), which has routing to direct users to the closest web tier. It has been noted that American customers are complaining of slow response times to queries. Which changes should be made to the database tier to improve performance?
- Migrate the database to Amazon RDS for MySQL. Configure Multi-AZ in the Ohio region.
- Migrate the database to Amazon Aurora. Use Aurora global tables to enable replication to additional regions.
- Deploy MySQL instances in each region. Deploy an Application Load Balancer in front of MySQL to reduce the load on the primary instance.
- Migrate the database to an Amazon Aurora global database in MySQL compatibility mode. Configure read replicas in Ohio.
- An application requires a Postgres database, which will only be used a few times a week for periods of less than an hour. The database needs to provide automatic start-up and scaling. Which database service is most suitable?
- Amazon Aurora
- Amazon Aurora Serverless
- Amazon RDS MySQL
- Amazon EC2 instance with MySQL database installed
- You are the DBA for a financial company that currently has data hosted in an Amazon Aurora MySQL DB. Since this database stores critical financial data, there is a need to ensure that it can be made available in another region in the case of a disaster. How can this be achieved in the most cost-efficient and simplest way?
- Create a read replica of Amazon Aurora in another region.
- Make a copy of the underlying EBS volumes in the Amazon cluster in another region.
- Enable Global Database for the Aurora database and provision in another region.
- Create an EBS snapshot of the underlying EBS volumes in the Amazon cluster and then copy them to another region.
- A large television company is running a critical application that uses Amazon RDS for PostgreSQL in Multi-AZ. The database size is currently 45 tebibytes. The head of IT wants to migrate the database to Amazon Aurora with minimal disruption to the business. What is the simplest and most resilient migration plan to meet these requirements?
- Use the AWS Schema Conversion Tool (AWS SCT) to copy the database schema from RDS for PostgreSQL to an Aurora PostgreSQL DB cluster. Create an AWS DMS task to copy the data.
- Create a manual script to continuously back up the RDS instance using pg_dump, and restore the backup to an Aurora PostgreSQL DB cluster using pg_restore.
- Create a read replica from the existing RDS instance. Check that the replication lag is zero and then promote the read replica as a standalone Aurora DB cluster.
- Create an Aurora replica from the existing RDS instance. Stop the writes on the master, check that the replication lag is zero, and then promote the Aurora replica as a standalone Aurora DB cluster.
Answers with explanations can be found in Chapter 17, Answers.
Further reading
In this chapter, we have covered the most common Aurora topics. In the AWS Certified Database – Specialty exam, you will be expected to know and understand how other areas of AWS interact with Aurora, which we will cover in more depth in later chapters. However, for a deeper understanding of how the underlying storage and network configuration of Aurora works, refer to the book AWS: Security Best Practices on AWS (https://subscription.packtpub.com/book/virtualization_and_cloud/9781789134513/2/ch02lvl1sec19/aws-kms).