
Chapter 12: AWS Database Security
Database security is a critical part of both the AWS Database Specialty exam and the work that an AWS DBA carries out daily. Database security focuses on how to restrict access to your databases and how to audit it efficiently, how to encrypt your data both in transit and at rest to stop unauthorized access to the data, and how to use other AWS services, such as Key Management Service and Secrets Manager, to protect passwords and login credentials. There will be several questions about database security in the AWS Database Specialty exam, so this is an important chapter if you wish to apply database security to a wide range of case studies.
In this chapter, we're going to cover the following main topics:
- Database encryption
- Working with RDS encryption
- Implementing database and VPC access controls
- Auditing databases
- Configuring AWS Key Management Service and Secrets Manager
Let's start by looking at database encryption, a topic we have already covered briefly in this book.
Technical requirements
For this chapter, you will need an AWS account with root access. Not everything we will do in this chapter may be available in the free tier, which means it may cost you a small amount to follow the hands-on sections. You will also require command-line interface (CLI) AWS access. The AWS guide at https://docs.aws.amazon.com/cli/latest/userguide/cli-chap-configure.html explains the steps you must follow, but I will summarize them here:
- Create an AWS account if you have not already done so.
- Download the latest version of the AWS CLI from https://docs.aws.amazon.com/cli/latest/userguide/welcome-versions.html#welcome-versions-v2.
- Create an admin user at https://docs.aws.amazon.com/IAM/latest/UserGuide/id_credentials_access-keys.html.
- Create an access key for your administration user: https://docs.aws.amazon.com/IAM/latest/UserGuide/getting-started_create-admin-group.html#getting-started_create-admin-group-cli.
- Run the aws configure command to set up a profile for your user: https://docs.aws.amazon.com/cli/latest/userguide/cli-configure-quickstart.html#cli-configure-quickstart-creds.
You will also need a VPC that meets the minimum requirements for an RDS instance: https://docs.aws.amazon.com/AmazonRDS/latest/UserGuide/USER_VPC.WorkingWithRDSInstanceinaVPC.html. If you followed the steps in Chapter 3, Understanding AWS Infrastructure, you will already have a VPC that meets these requirements.
Database encryption
Encryption is when the data that's stored or transmitted is encoded. Encoded means that it is changed from its original values into something meaningless without the means to decode it again. The decoding tool is called a key. An encryption key is a long string of alphanumeric characters that, when used alongside a mathematical function called an algorithm, allows your data to be encrypted and decrypted. Only applications or users with access to the decryption key will be able to read the data.
Data that's stored on disks is called data at rest. Data at rest within a managed AWS database, such as RDS, DynamoDB, DocumentDB, Neptune, and Timestream, can be encrypted using AES-256 encryption. Data that passes from the client or application to the database is called data in transit. Data in transit can be encrypted using SSL/TLS cryptography. Data at rest needs to be protected from someone gaining access to the instance or server your database is running on. If someone gains access to this server, they can retrieve the data that's stored there and if that isn't encrypted, it can be read without using any special tools. For data in transit, you must use encryption to stop someone from reading the data as it is sent from the database to the application. For the exam, you will not need to know about the different encryption standards, but you may need to know about the types that are commonly used.
Now, let's look at the different key options within AWS and how those keys are stored.
AWS Key Management Service (KMS)
Key Management Service (KMS) is a tool that's used to securely store any encryption keys that are being used in your AWS account. Two types of keys can be used within AWS databases:
- AWS managed keys: These keys are created by AWS when needed by a customer and stored within the AWS KMS service.
- Customer-managed keys: These keys are provided by the customer and created externally to AWS. This offers you a way to follow any cryptographic standards that are required by your organization. These keys are loaded into KMS to allow them to be used by AWS services.
AWS KMS creates and uses symmetric keys. This means that the same key is used to encrypt and decrypt your data. Anyone with access to the key can decrypt the information, so keeping the key safe and secure is critical.
AWS KMS keys are regional, which means a key can only be used in the same region where it was created. This can have an impact on cross-region databases or read replicas, as we will discuss in the next section.
Managing RDS encryption
Encryption in RDS is enabled by default when you create an instance, but you can opt to turn it off at instance creation time. Once the instance has been created, you can no longer change the encryption settings or change the encryption key. If you create an RDS instance without encryption and wish to add it at a later stage, you need to migrate to a new instance. Additionally, you cannot restore an unencrypted database snapshot or back it up in an encrypted RDS instance. If you want to encrypt an unencrypted RDS instance, then you need to create an encrypted snapshot of your source instance and restore this to the encrypted target. You must use the same key for encrypting the snapshot that you used for the encryption key of the target RDS instance.
If you ever lose the key or access to the key is revoked from an RDS instance, the RDS instance is immediately terminated. Even if you relocate the key or restore the correct privileges to the RDS instance, the only way to recover the data is to restore it from a backup. Therefore, it is critical to always back up any encrypted databases because otherwise, they can become entirely unrecoverable.
Finally, a read replica must use the same encryption key as the primary node if they are running in the same region. You cannot have unencrypted read replicas if the primary is encrypted, or encrypted read replicas if the primary is unencrypted. If you are using cross-region replicas, then the target replica must use a key from within its region, even though this will differ from the primary. When you copy the snapshot to the new region to restore it as the read replica, you can specify the key from the target region for encryption.
Encrypting data in transit
So far, we've looked at how to encrypt data stored on disks, but what about how to secure and encrypt data that's moving between an application and the database? RDS supports the usage of SSL/TLS-based encryption to secure data in transit. Each RDS instance that is provisioned will be configured with an RDS SSL certificate. You need to download, install, and configure the certificate within your application so that this is used to encrypt and decrypt database data. For RDS Oracle, you need to enable Oracle SSL via an Options group, which creates a new port for encryption connections.
Now, let's practice some of these encryption techniques in a lab.
Working with RDS encryption
In this lab, we are going to create an RDS instance without encryption and then create an encrypted snapshot to restore in a new instance to enable encryption. Then, we are going to migrate our encrypted database to a different region to learn how to use different keys to encrypt and share snapshots.
Encrypting an existing RDS instance
Let's begin by creating an RDS MySQL instance using the Dev/Test options. We cannot use the free tier here as there is no option to disable encryption. As you should have created several RDS instances by now in this book, these steps will be kept at a high level:
- Log in to the AWS console or use the AWS CLI to create a free tier RDS MySQL database but disable encryption before creating it. If you use a t3.micro, your costs will be very low.
- You can also disable Performance Insights and Monitoring if you wish.

Figure 12.1 – RDS encryption disabled
- When the database has a status of Available, we can take a snapshot. Click the selection circle next to the database you just created and then select Take a snapshot from the Actions dropdown. Fill in the form and click Take snapshot.
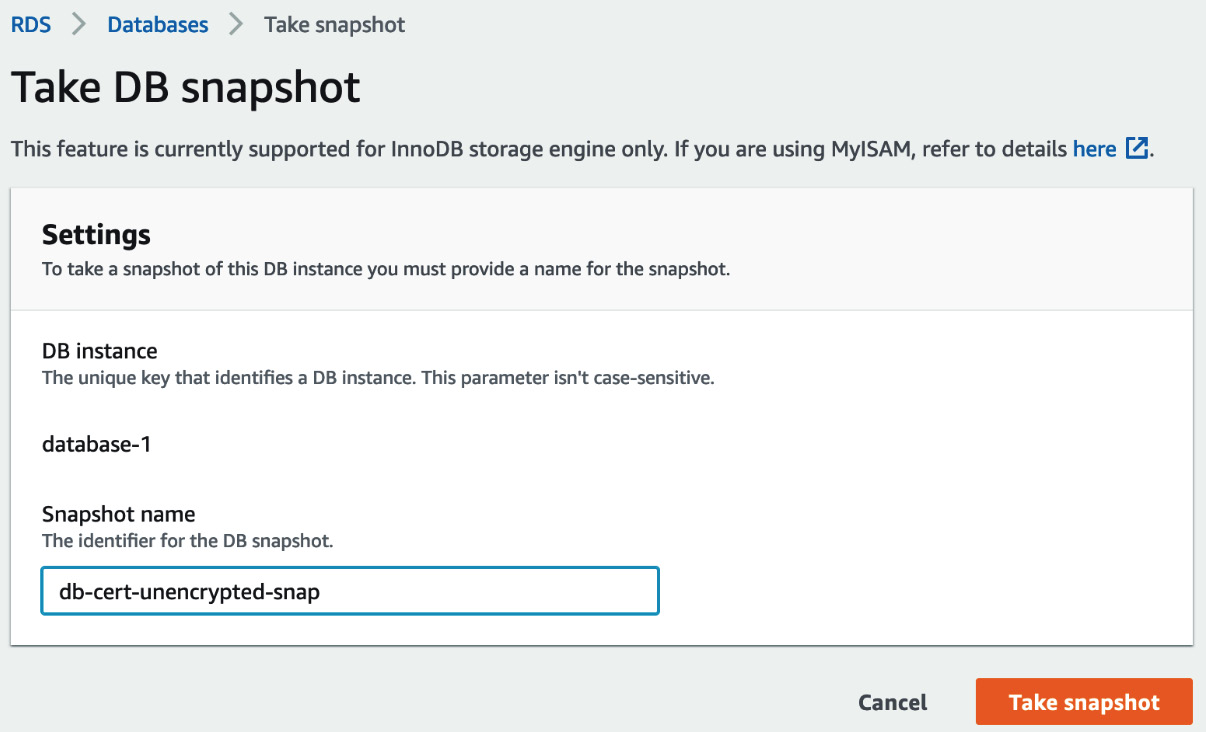
Figure 12.2 – Take DB snapshot
- This will take a few minutes to complete, but if you click the snapshot's name, you can look at its details. Toward the bottom of the page, you will see that KMS key ID is set to None, confirming that it isn't encrypted.

Figure 12.3 – KMS key ID
- When the snapshot's status is Available, we can create an encrypted version of it. Go to the Snapshots dashboard and click the checkbox next to the snapshot you created. Expand the Actions dropdown and select Copy snapshot.
- Fill in the form while leaving the destination region as the default (we will learn how to use this to create a cross-region database in the next stage of this lab). Tick the Enable encryption checkbox and leave the key as the default. Click Copy snapshot.
- It will take a couple of minutes to create the new snapshot. Wait until Status is set to Available. Then, click the Actions dropdown and select Restore snapshot.
- Fill in the RDS creation form with the same details you used previously to minimize costs. You will need to change the database's name to avoid any conflicts. At the bottom of the form, you will see that all the Encryption options are grayed out.
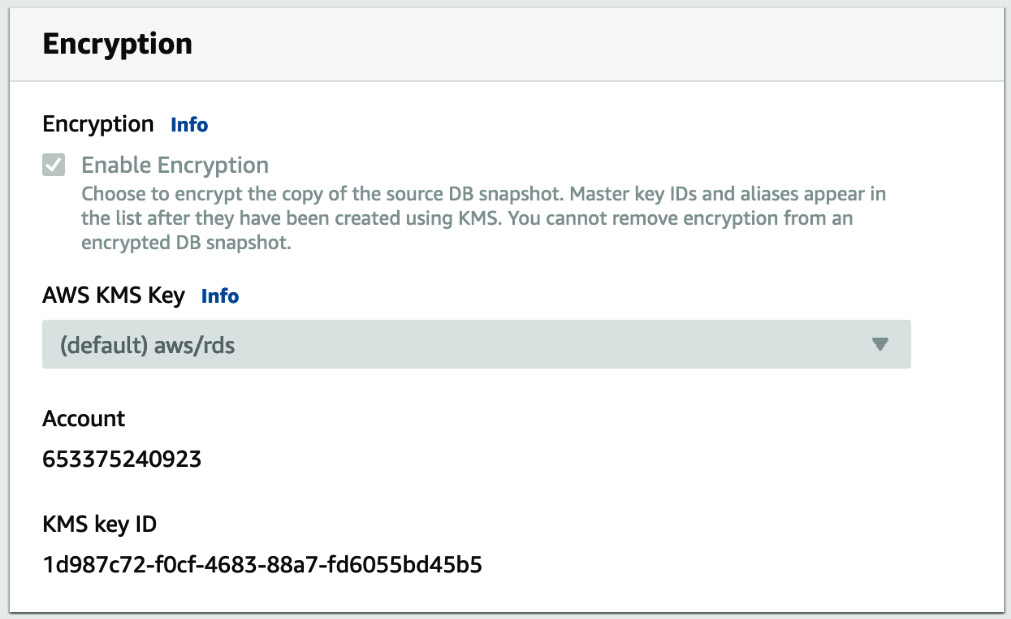
Figure 12.4 – Grayed out encryption options
Click Restore DB instance.
- When the instance has been restored and Status is set to Available, click the database name you just created and look at the Configuration tab.
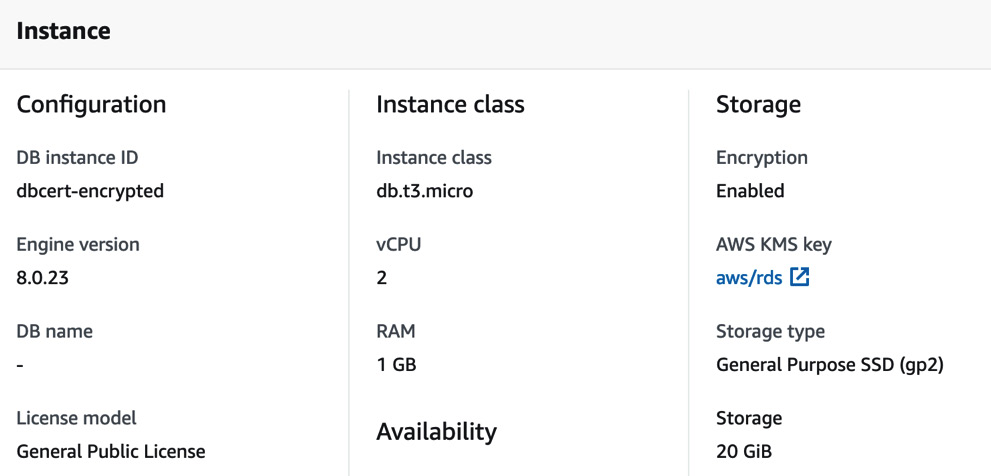
Figure 12.5 – The Configuration tab
You'll see that AWS KMS key now shows aws/rds, meaning that this is now an encrypted instance.
- Now, you can delete the instances, but do not delete the unencrypted snapshot we created as we will use it in the next section.
With that, you've learned how to encrypt an RDS instance using a snapshot restore. Now, let's learn how to migrate our database to a different region using a snapshot.
Migrating an encrypted database to a different region
Now, let's use a customer-managed key to encrypt and migrate our database to a different region using an encrypted snapshot. Follow these steps:
- First, we need to create a new customer-managed key with AWS KMS. Navigate to Key Management Service and change Region to your target destination by using the dropdown at the top right of the screen.
- Click Create a key.
- Choose Symmetric and leave the other options as-is. Click Next.
- Give the key an alias.
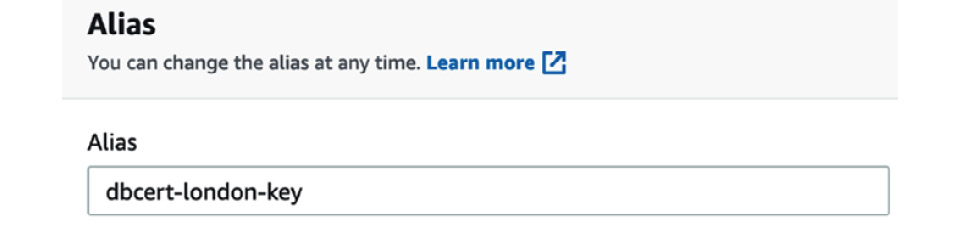
Figure 12.6 – Alias
- Change back to your source region.
- Navigate to the Snapshot section under Amazon RDS and locate the encrypted snapshot you took earlier.
- Check the box next to that snapshot and select Copy snapshot from the Action dropdown.
- Choose a different region from your current one. On the Encryption page, select the AWS KMS Key property you created in the target region. If you choose the wrong region, it will not appear.
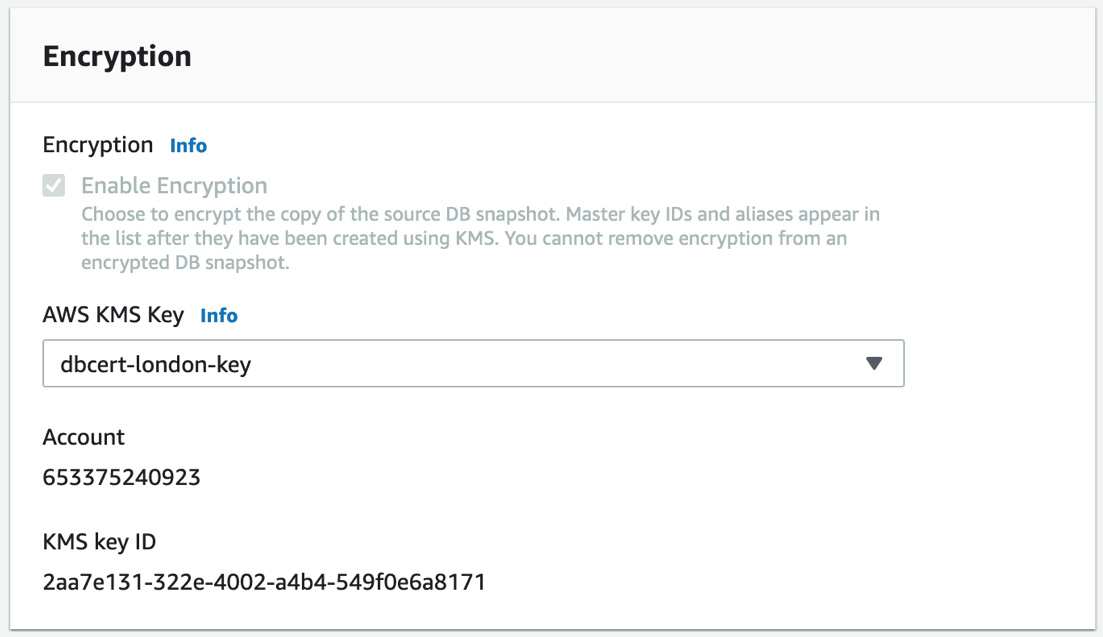
Figure 12.7 – Encryption options for the snapshot
Click Copy snapshot.
You will notice that our Snapshot does not appear in this dashboard. This is because snapshots are region-based. Change Region to your target to see the snapshot.
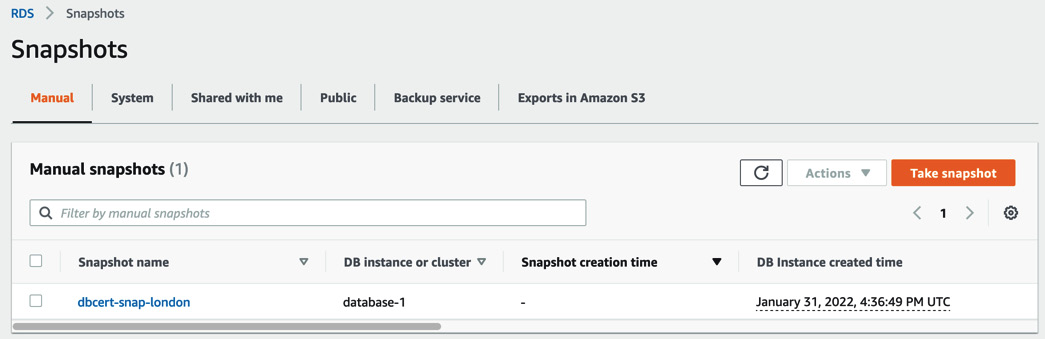
Figure 12.8 – Snapshot dashboard in the target region
- The snapshot will take a few minutes to create and the Snapshot creation time area will update when it is ready. Once the snapshot is ready, you can create a new database by using it in this region.
- Select Restore snapshot from the Actions dropdown and create the new database by filling in the form as required. As you are using a new region, you may not have created a VPC there. If that is the case, select Create a new VPC from the Virtual Private Cloud (VPC) dropdown.
- Click Restore DB instance.
With that, we've learned how to work with KMS and encryption options to encrypt and copy snapshots between regions while maintaining the encryption throughout. The exam will likely feature questions asking you how to encrypt an existing RDS instance or how to move an encrypted snapshot to a new region, so knowing these steps will help you answer correctly.
You can delete the instances in both regions and delete all the snapshots when you're ready to reduce your costs.
Now, let's learn how to use database and VPC access controls to limit who can access our databases.
Implementing database and VPC access controls
All RDS and Aurora databases run within a VPC. As you may recall, a VPC is a section of the AWS Cloud that is secured for your use only. A VPC operates similarly to a data center and can be secured using a variety of security measures, from user accounts to security groups. Databases that do not run within a VPC such as DynamoDB, Timestream, and QLDB use different security controls, such as AWS Identity and Access Management (IAM) roles and users, which we will discuss later in this section.
Let's start by learning how to use VPC subnets to keep your databases hidden from the internet.
Subnets and bastion hosts
Subnets are a range of IP addresses that form logical groups within a VPC. There are two types of subnets you can create: public and private. A public subnet is one where the servers and databases within it can reach the public internet and be reached from the internet via an internet gateway. A private subnet is one where the servers and databases within it cannot reach the public internet, nor can they be reached from the internet via an internet gateway.
Most databases are used to support an application, so any connections to the database will come from the application directly and will not come from an external internet connection. Therefore, you are advised to place your databases in a private subnet unless there is a requirement for it to be able to communicate with the public internet. Applications are typically accessed directly from the internet, so they would normally sit within a public subnet. The following diagram shows how you would typically provision an RDS instance and a web server:
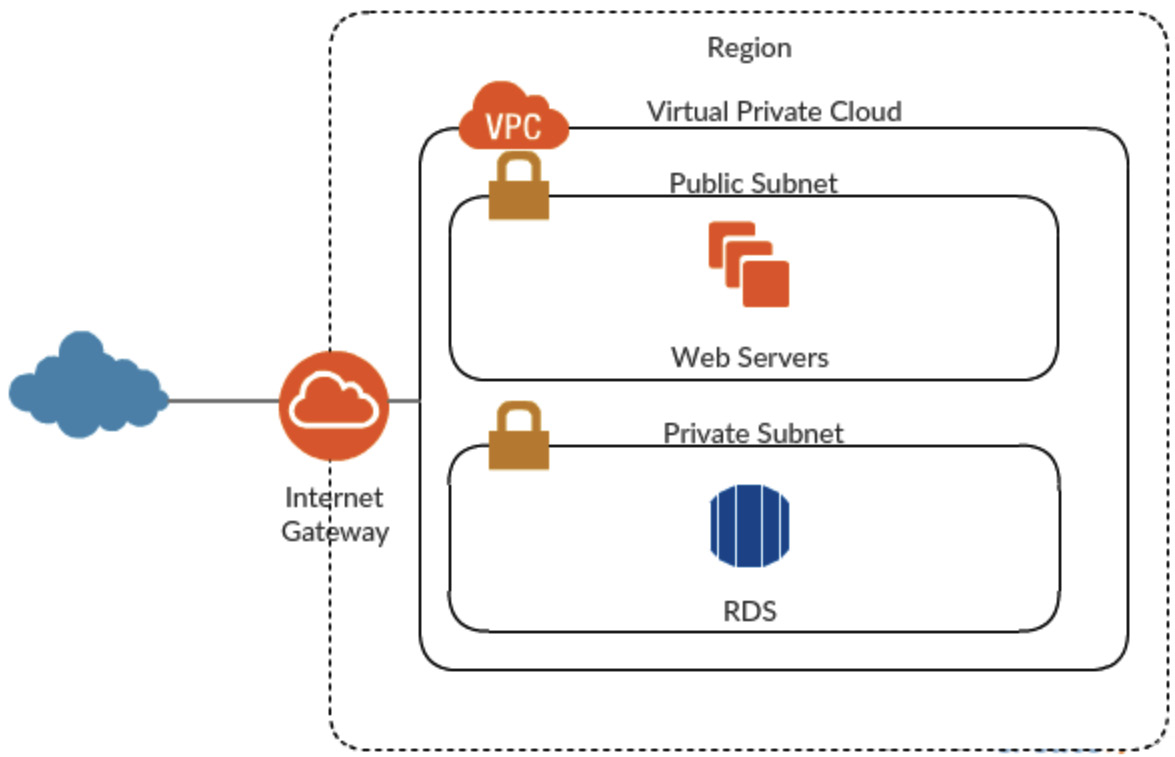
Figure 12.9 – Private and public subnets
This configuration can make it difficult for developers or database administrators to access a database as there will be no route from their laptop that they can use. To solve this problem, many companies use what is called a bastion host or a jump box. A bastion host is an EC2 server that sits in a public subnet that has your company's operational and database access tools installed on it. This server can be accessed from the public internet using secured credentials and is granted access to the database that is within the private VPC. As such, you can create an administrative route to the database that is still highly secured and requires someone with access to the bastion host to be able to use it. This technique is known as reducing the attack surface. By offering only one route or attack vector to the database, you only need to focus on keeping the bastion host secured to ensure the database is protected. You can also rapidly revoke access to the database from the bastion host if this is attacked without having to take your database offline or stop legitimate connections from the application servers. The following diagram shows how to use a bastion host:

Figure 12.10 – Bastion host
To allow the bastion host to communicate with the database, it must be granted permission through security group rules and network access control lists (NACLs). Let's learn more about how these are used for database security.
Security groups and NACLs
Security groups and NACLs are used to control the ingress and egress of network traffic. They can both be used to restrict access on certain ports, to certain IP addresses, and even to other security groups, allowing for highly customizable controls. We learned about security groups and NACLs in Chapter 3, Understanding AWS Infrastructure, so in this chapter, we'll focus on specific configurations for databases.
By default, security groups and NACLs contain no rules for access, which means that everything is blocked. To manage access to your database from only trusted hosts such as the application servers and your bastion host, you need to modify the rules to allow ingress into the RDS security group. A best practice is to always create a new security group for each database and application so that any rule changes only affect that single database.
You can set up security groups and rules to only allow specific routes and ports to be accessible. Your setup should look similar to the following:
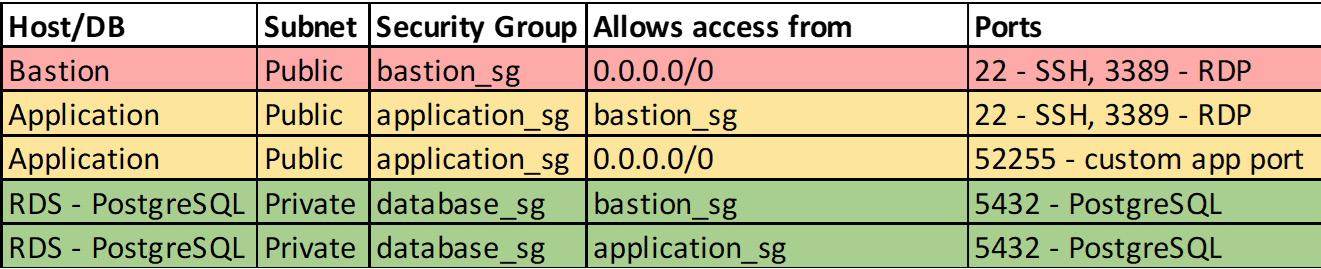
Figure 12.11 – Security group configuration
Here, you can see that only your bastion server is publicly accessible (0.0.0.0/0 means all IPs) and SSH/RDP access to the application server is restricted only to connections coming from the bastion server. However, anyone can connect to the application port, allowing users to connect from the internet. The RDS PostgreSQL database can be reached from the bastion server and the application server on the PostgreSQL port. If possible, you should further restrict bastion and application access to only known IP ranges, such as ones offered by a company or a VPN connection, to remove the requirement to open a bastion up to everyone. However, this can cause management overhead if your IP ranges regularly require access changes.
Security groups can only have allow rules; you cannot explicitly deny any IP addresses or ports. NACLs can be used to finely control access by explicitly denying access to certain IPs or ports. This can be useful if you become aware of an IP address that is trying to hack into your bastion server. Changing the rules to remove this one IP from the security group would be difficult, but you can add the IP to a deny rule within the NACL to resolve this problem. NACLs can also be used to ensure that someone changing a security group by mistake doesn't open your network to attack. Remember that NACLs work at the subnet level and that security groups work at the instance level, so NACLs can be used to secure the entire subnet, regardless of the security group settings.
The exam will likely contain questions focusing on a database being hacked or someone gaining unauthorized access and what steps you should take to secure it in the future, as well as questions about problems with accessing a database after someone has changed a corporation's IP address range or NACL settings.
Security groups, NACLs, and subnets can only be used for databases that reside within a VPC, so they cannot be used for DynamoDB, Timestream, or QLDB. To secure these databases, you must rely on IAM authentication.
IAM authentication
IAM authentication is where you use the AWS Identity and Access Management service to control access to your databases. An IAM user can be mapped to a database-level user to allow you to log in without using a password and simply rely on the IAM user to grant access. Access for the user is still controlled at the database level and only the login is handled by IAM. This means that if you create an IAM user with login privileges in your databases that map to an account called test but do not grant the required privileges to log into the test database user, then the login will still fail. Equally, if you grant the login privileges, this does not grant full database access to the IAM user as this is still controlled by internal database permissions. Using IAM authentication can be useful if you wish to avoid using passwords that are being stored or sent in plain text, which can be breached. It also allows easier administration of database accounts. For example, you can create a single database account for all DBAs to use, and then grant each DBA access to that account through their own personal IAM user. If a new DBA joins or leaves the team, you can create and remove the new accounts through IAM without needing to change the logins at the database layer. You can grant access to multiple databases to each IAM user as well, and IAM supports the use of wildcards so that you can grant access to all databases (or a subset) within an account in a single statement. This allows you to grant DBAs the correct access to all the databases within your account with minimal manual effort.
Using IAM authentication also offers benefits in terms of auditing. If you rely on database-level accounts, you will need to use database-level auditing to track logins, but if you use IAM authentication, then every login is tracked by Cloudtrail. Let's learn more about this.
Auditing databases
Database auditing can be configured to help you identify unauthorized access to the databases, as well as closely monitor highly sensitive tables to stop them from being tampered with. In AWS, you can use four different tools to comprehensively monitor your database estate:
- CloudWatch: You can configure your databases to send their logs to CloudWatch, which acts as a centralized repository.
- CloudTrail: This can be used to monitor actions that have been taken by a user or another AWS service that affects your RDS instance. Creating, deleting, or modifying an RDS would be recorded. This also tracks user logins using IAM authentication.
- Database Activity Stream: This is only used for RDS Oracle. It sends a record of all audited database changes to an external stream that the DBAs have no access to, thereby improving compliance.
- Database logs: As well as the other monitoring tools, RDS gives you access to the standard logs for each database, such as the alert log, monitoring log, and errors logs. You can access them via the console or via an AWS CLI call.
RDS offers a wide range of auditing and monitoring tools by default with minimal additional configuration, but if you need fine-grained auditing where only certain tables or queries are logged, then you will need to install audit plugins via the RDS option groups for your target database. Let's set auditing up for a sample RDS MySQL database.
Enabling auditing for an RDS MySQL database
For this lab, we are going to create (or reuse) an RDS MySQL database. We are going to create some sample tables and then enable auditing before running some test queries to make sure it's all working. As you should have created several RDS instances by now, these steps will be more high-level than in the previous chapters. Let's get started:
- Log in to the AWS console or gain access via the AWS CLI and create a single-AZ RDS MySQL on the smallest instance class available. Leave all the settings as-is.
- While you wait for the instance to become available, create a new option group that we can attach to the MySQL instance. Navigate to RDS Dashboard and select Option groups from the left-hand menu. Click Create group at the top right.
- Fill in the form as follows, ensuring that you match your Major Engine Version with the one you used to deploy the RDS MySQL instance. It should be 8.0.
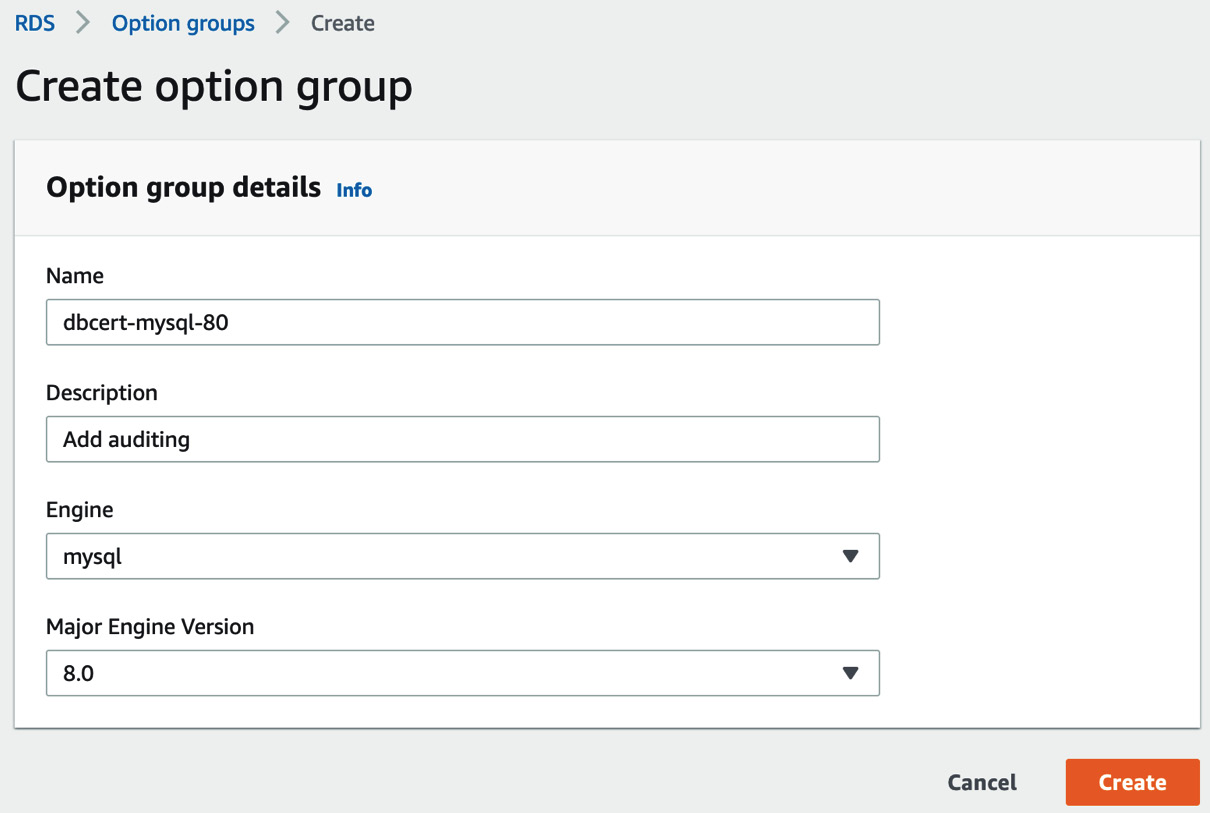
Figure 12.12 – Create option group
Click Create.
- Select your Option group by clicking its name. Scroll down until you see the Options section. Click Add option:

Figure 12.13 – Add option
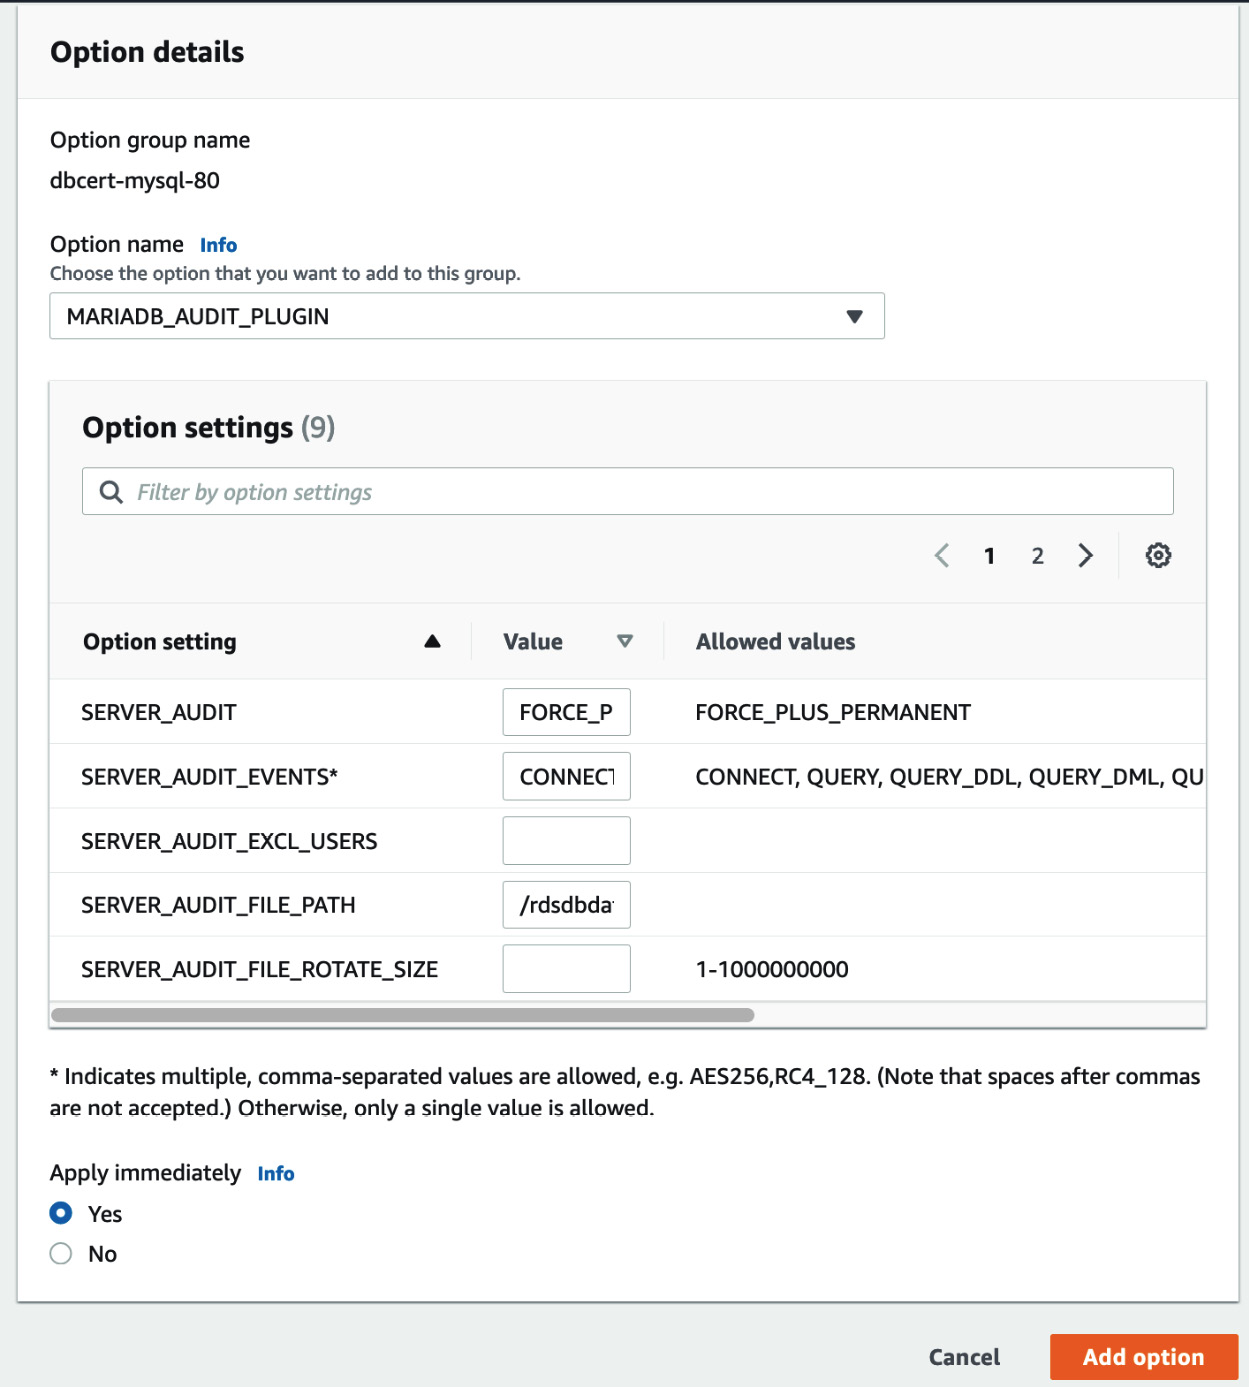
Figure 12.14 – Adding an audit option
Click Add option.
- With that, our RDS MySQL instance should have been created and be Available. Return to the Databases page and find the instance. Obtain its Endpoint settings and try to connect to it using a MySQL querying tool such as MySQL Workbench. If you hit any connectivity errors, try to resolve them by checking whether your database is publicly available and that the security groups allow you IP access.
- Download the World Database Sample schema from the MySQL website: https://downloads.mysql.com/docs/world-db.zip. This will download a ZIP file containing a single world.sql file. Open this file in your MySQL query tool and run it to create our sample schema.
- Now, let's enable auditing by attaching our Option group to our MySQL instance. Return to the AWS console's RDS Dashboard and click the checkbox next to the MySQL instance. Select Modify at the top right.
- Locate the Additional configuration section, click the Option group dropdown, and select our Option group.

Figure 12.15 – Option group
Leave all the other options as-is and click Continue.
- Select Apply immediately and then click Modify DB instance. Wait for the instance's status to change to Available from Modifying.
Now, let's generate some SQL statements to see how they get logged.
- Return to your MySQL query tool and run the following queries:
select * from world.city;
delete from world.city where ID=3;
Open the AWS console, navigate to RDS Dashboard, and click the name of the MySQL instance to view its details. Open the Logs & events tab and locate Logs.
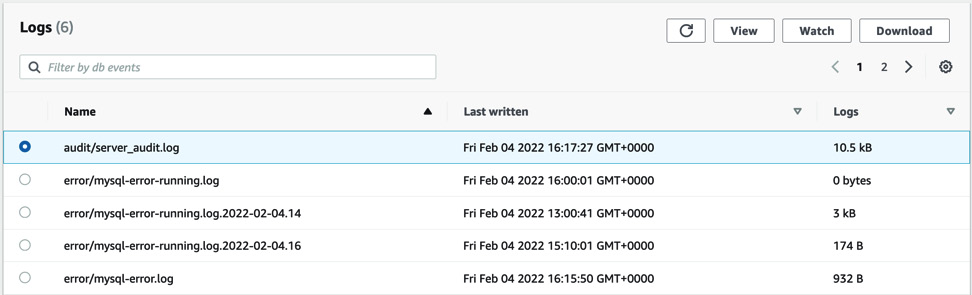
Figure 12.16 – Audit logs
- Select the audit/server_audit.log file and click View to open it. You will see some entries, as shown in the following screenshot:
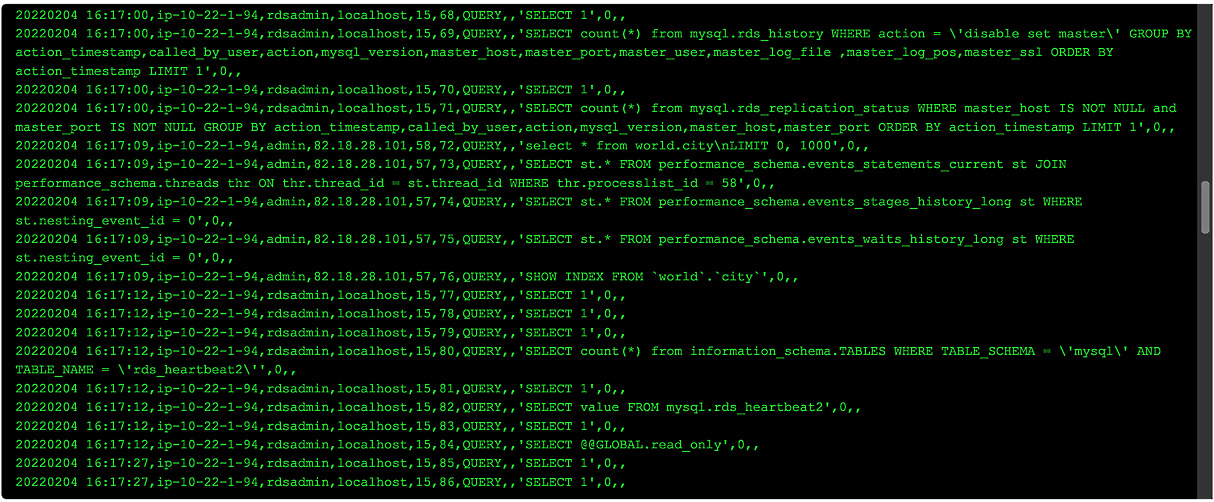
Figure 12.17 – Output of the audit file
If you are using a GUI tool to query the MySQL instance, you will likely see a lot of strange queries that you didn't run, such as SELECT 1',0,,. These are queries that have been generated by the tool and can be ignored. To make it easier to find the queries, you can download the log and view it in a text editor.
This completes this lab for database auditing. You can now delete or terminate your RDS instances if you wish.
So far, we've discussed using IAM authentication to access RDS and other database instances such as DynamoDB, but in some situations, IAM authentication cannot be deployed or isn't suitable or there is still a need for some users to use a password. In those cases, you should consider securing your passwords in Secrets Manager, as we'll see next.
Configuring AWS Key Management Service and Secrets Manager
Secrets Manager is an encrypted and secure key-value store where you can save any information you would like to keep secret. It integrates natively into a wide range of AWS services, including most of their database platforms, such as RDS and DocumentDB. It can automate password rotation and sync the changes to your databases to ensure your application is disrupted.
A common problem that is resolved using AWS Secrets Manager is storing database passwords within the application or in text files that can easily be accessed by unauthorized users. You can store the database passwords in AWS Secrets Manager and use the AWS CLI to retrieve them. These passwords can be changed on an automatic schedule and will update both the passwords stored with AWS Secrets Manager, as well as within the RDS databases. To allow your application to obtain these passwords from Secrets Manager, you will need to modify the code to allow your application to query AWS Secrets Manager. Users can obtain the passwords in plain text by using an API call that's similar to the following:
aws secretsmanager get-secret-value --secret-id databases/dbcert-mysql-admin
This will return a JSON output with the secret's details:
{
"ARN": "arn:aws:secretsmanager:eu-west-1:46035369564:secret:databases/ dbcert-mysql-admin",
"Name": " databases/dbcert-mysql-admin",
...
"SecretString": "dbcert_p@55word",
...
}
As well as storing passwords and usernames, you can store entire database connection strings. This can be useful if you want to change your database details without having to change any hardcoded values within the application.
Some databases, such as DynamoDB, do not have native syncing with AWS Secrets Manager, so you will need to create some code to do the database password rotation for you when AWS Secrets Manager rotates it. For these databases, you can use AWS Lambda code to do this for you. You will not need to know the Lambda code to do this for the exam, but there is a guide in the Further reading section at the end of this chapter.
Now, let's summarize what we've learned in this chapter.
Summary
In this chapter, we explored the key database security features that are offered by AWS. This included encryption, audit controls and monitoring, VPC security, and secure password storage.
We learned how to configure a VPC securely for our database and learned how to set a database in a private subnet that's protected by security groups that only allow access to authorized hosts. In addition, we learned how bastion hosts are used to provide administrative access to a database without exposing the database to the public internet.
Then, we looked at database encryption techniques and how to work with encrypted snapshots, including how to copy an encrypted snapshot between regions using customer-managed keys stored in AWS KMS.
Finally, we learned how to store secret database connection details and passwords using AWS Secrets Manager.
Database security is a major topic within the AWS Certified Database Specialty exam and there will be several questions about it. You may also see questions that ask for the most secure option out of the available answers. In the next chapter we will be learning CloudWatch and Logging which we use to identify and help us resolve database issues and problems.
Cheat sheet
This cheat sheet summarizes the key points from this chapter:
- AWS databases such as RDS and DynamoDB can be encrypted at rest and in transit.
- RDS uses SSL/TLS to encrypt data in transit, so you will need to download and install the right certificate in your application to allow it to connect.
- Databases should be placed in a private subnet within your VPC.
- You should use security groups to tightly control which source IPs are allowed to connect to the database. They should not be left as 0.0.0.0/0 (everywhere).
- Bastion hosts or jump boxes can be used to allow administrative traffic to the databases while maintaining a private subnet for the database.
- AWS Secrets Manager can store database credentials securely and rotate them on a schedule.
- Your applications can be written to request the password from AWS Secrets Manager rather than requiring the database password to be hardcoded within the application configuration files.
- Database auditing can be turned on via Option groups, allowing you to see specific queries being run within the databases.
- CloudTrail will log all the actions that have been taken to modify databases within your account. This includes creation, deletion, or modification.
Review
Now, let's practice a few exam-style questions:
- You are advising a large financial company on the best strategy to migrate its on-premises MySQL database, application, and web servers. RDS MySQL is being considered as the target database engine. Access to the database should be limited to only the application servers and a bastion host.
Which solution meets these security requirements?
- Provision the RDS MySQL database in a private subnet. Modify the login.cnf file on the RDS host to allow connections from only the application servers and bastion host.
- Provision the RDS MySQL database in a public subnet. Create a new security group with inbound rules to allow connections from only the security groups of the application servers and bastion host. Attach the new security group to the DB instance.
- Provision the RDS MySQL database in a private subnet. Create a new security group with inbound rules to allow connections from only the security groups of the application servers and bastion host. Attach the new security group to the DB instance.
- Provision the RDS MySQL database in a private subnet. Create an NACL with inbound and outbound rules to allow connections to and from the application servers and bastion host.
- An audit has highlighted the need to encrypt all databases at rest. You need to enable encryption at rest for all the existing RDS PostgreSQL DBs urgently. The business is prepared to take an outage during key hours if required.
What actions will complete the task in the simplest and fastest way?
- Export the database to an Amazon S3 bucket with encryption enabled. Create a new database and import the export file.
- Create a snapshot of the database. Create an encrypted copy of the snapshot. Restore a new database from the encrypted snapshot.
- Modify the database to enable encryption. Apply this setting immediately without waiting for the next scheduled maintenance window.
- Create a snapshot of the database. Restore the snapshot in a new database with encryption enabled.
- A new compliance rule has come into effect, which means you may no longer use shared passwords for database administration and each DBA must have its own named account. Your company has a large estate of Aurora instances that they need to modify to stop password sharing and to improve auditing of admin accounts.
What is the best way to configure this?
- Use the AWS CLI to retrieve the AWS usernames and passwords of all team members. For each username, create an Aurora user with the same password as the IAM account.
- Enable IAM database authentication on the Aurora cluster. Create a passwordless database user for DBA. Attach an IAM policy to each IAM user account that grants the connect privilege using their database user account.
- Create a database user for each team member. Email each user their new password. Set up a password policy to expire each user's password every 30 days.
- Create an IAM role and associate an IAM policy that grants the connect privilege using the shared account. Configure a trust policy that allows the administrator's IAM user account to use the role.
- An application was migrated over the weekend to a new EC2 instance. Users are complaining that they are seeing database timeout error messages when they try to run any queries through the application. The database is an RDS SQL Server instance.
What is the most likely problem, and what is the solution?
- The IP address has changed on the RDS instance. Modify the application to use the new IP address.
- The new application server has not been added to a security group with permissions to access the database. Add the EC2 instance to the correct security groups.
- The application is sending too many requests to the databases, causing timeouts. Review the application settings.
- The application server has been placed in a different VPC to the database. Set up VPC peering to resolve the connectivity issue.
- A company is using RDS PostgreSQL. The compliance team wants all database connection requests to be logged and retained for 180 days. The RDS PostgreSQL DB instance is currently using the default parameter group. You have identified that setting the log_connections parameter to 1 will enable connection logging.
Which steps should you take to meet these requirements? (Choose 2)
- Allow database engine logs to be published to an Amazon S3 bucket and set the life cycle policy to 180 days.
- Update the log_connections parameter in the default parameter group.
- Create a custom parameter group, update the log_connections parameter, and associate the parameter with the DB instance.
- Connect to the RDS PostgreSQL host and update the log_connections parameter in the postgresql.conf file.
- Allow database engine logs to be published to CloudWatch and set the expiration to 180 days.
Further reading
To learn more about the topics that were covered in this chapter, take a look at the following resources:
- Using AWS Lambda with AWS Secrets Manager: https://aws.amazon.com/premiumsupport/knowledge-center/lambda-function-secrets-manager/
- AWS Security Cookbook: https://www.packtpub.com/product/aws-security-cookbook/9781838826253