
Chapter 11: Database Task Automation
Automation is the practice of creating scripts, code, or programs to allow operational and development activities to be carried out automatically with minimal user involvement. Automation can be as simple as creating a script you can schedule to run at fixed time intervals to inspect a database, or it can be an entire package that deploys and configures an entire application stack within AWS. There is an IT field called Development Operations (DevOps) that specializes in using automation techniques to reduce failure, improve deployment speed and accuracy, and create systems that can fix themselves if something goes wrong. For the Database Specialty exam, we won't need to know advanced DevOps skills and tools, but questions on automation techniques that are specific to databases will be asked, so it's important to understand AWS automation techniques at a high level. By the end of this chapter you will be confidently able to use CloudFormation, AWS Glue and Athena to help automate your processes.
In this chapter, we're going to cover the following main topics:
- Overview of automation techniques
- Understanding AWS automation
- Creating infrastructure using CloudFormation
- AWS Glue
- Amazon Athena
- Querying data within an S3 bucket using AWS Glue and Amazon Athena
Technical requirements
For this chapter, you will require an AWS account with root access. Not everything we will do in this chapter will be available in the free tier, which means it may cost you a small amount to follow the hands-on sections. You will also require Command-line Interface (CLI) AWS access. The AWS guide at https://docs.aws.amazon.com/cli/latest/userguide/cli-chap-configure.html explains the steps you must follow, but I will summarize them here:
- Create an AWS account if you have not already done so.
- Download the latest version of the AWS CLI from https://docs.aws.amazon.com/cli/latest/userguide/welcome-versions.html#welcome-versions-v2.
- Create an admin user at https://docs.aws.amazon.com/IAM/latest/UserGuide/id_credentials_access-keys.html.
- Create an access key for your administration user: https://docs.aws.amazon.com/IAM/latest/UserGuide/getting-started_create-admin-group.html#getting-started_create-admin-group-cli.
- Run the aws configure command to set up a profile for your user: https://docs.aws.amazon.com/cli/latest/userguide/cli-configure-quickstart.html#cli-configure-quickstart-creds.
You will also require a VPC that meets the minimum requirements for an RDS instance, as specified here: https://docs.aws.amazon.com/AmazonRDS/latest/UserGuide/USER_VPC.WorkingWithRDSInstanceinaVPC.html. If you followed the steps in Chapter 3, Understanding AWS Infrastructure, you will already have a VPC that meets these requirements.
Overview of automation techniques
One of the fundamental benefits of cloud technologies is the ability to use code to describe and build your infrastructure. This is called Infrastructure as Code (IaC). You can use IaC techniques on-premises as well but often, you will be limited by physical restrictions such as running out of storage within your storage arrays or running out of physical CPU cores on your virtual machine coordinators (hypervisors, for example). While the same physical restrictions can impact a cloud deployment, a capacity outage on a cloud platform is extremely rare. Using IaC on-premises is also often complex due to a wide variety of technologies that do not use a command interface, programming language, or application programming interfaces (APIs).
IaC allows you to create code that can be run multiple times to create exact copies of the same infrastructure, which is extremely useful when you're creating test and development environments. You can use code versioning to ensure that all the changes that are made to the code are logged, audited, and controlled. This helps improve the consistency of builds, removes manual errors, and speeds up the provisioning process.
IaC can be used to deploy multiple services at the same time. For example, you may have an application that runs on an EC2 server that requires an RDS MySQL database and uses AWS Secrets Manager to store the database's credentials. You can create IaC to create all these elements at the same time and link them together to meet the requirements of the application team.
An additional benefit of using IaC is that you can create tools that allow users to create services. For example, you can build a service catalog where an authorized user can fill in a form with their database requirements, and then click a button to automatically deploy a database within AWS that adheres to all of your company's rules and regulations, without having to grant users access directly to the AWS Console. This can reduce the workload on the database administration team.
Let's take a closer look at some of the different automation tools within AWS.
Understanding AWS automation
AWS offers a wide range of automation tools that you can use to achieve different things. Some of the tools specialize in working with application functionality, while some are used with containers. Containers are self-contained modules in which an application can be deployed, along with all the dependencies needed to run it, such as a Java runtime environment. Containers are not covered within the Database Specialty exam, but there is a link about this in the Further reading section if you'd like to know more.
First, let's look at a tool we have used previously in this book – the AWS command-line interface (AWS CLI).
AWS command-line interface (AWS CLI)
The AWS CLI is a command-line tool you can download from AWS. It runs on Windows, macOS, and most Linux distributions. Once downloaded, installed, and configured, the AWS CLI allows you to interact with AWS services using text-based commands. The CLI is very powerful and can be used to create and administer a wide range of AWS services, including RDS, EC2, and VPC services such as security groups.
The CLI can be used for automation by creating simple scripts that call the CLI the same way each time. You can do this to carry out simple tasks, such as checking the statuses of databases that have been deployed in an account or taking database snapshot backups at a scheduled time. However, for complex deployment tasks or where some parameters may need to change in the command, the AWS CLI can become limited and difficult to maintain. You also need to keep and share versions of your scripts with anyone who needs them. Unless handled carefully, this can result in different people running different versions of the script and a lack of consistency.
Another issue with relying on the AWS CLI for deployment is that it doesn't have any state management. The following steps show why this can cause problems:
- You create an AWS CLI script to create a new RDS instance in a default VPC that also configures Cloudwatch monitoring and alerting within the script.
- The script creates a custom parameter group for the RDS instance before creating the RDS instance.
- You create an error in the parameter group code that stops the parameter group from being deployed.
- The AWS CLI doesn't know that the parameter group failed to be created, so it tries to create the RDS instance.
- This fails due to the missing parameter group.
- The AWS CLI doesn't know that the database has failed to be created, so it tries to create the Cloudwatch monitoring rules, which will fail.
As you can see, you will end up wasting a lot of time and generating a lot of errors due to a failure in the early part of the script. If you are planning to automate deployments, then note that two AWS tools will do the job much more effectively. These are AWS CloudFormation and AWS Code Development Kit. Let's look at AWS CloudFormation first.
AWS CloudFormation
AWS CloudFormation is a tool that's designed for automatically deploying AWS services. CloudFormation is based on IaC concepts and uses templates and code to describe your AWS architecture. CloudFormation can use templates written in JSON and YAML and can understand dependencies, ensuring that the aforementioned situation cannot occur. This is because CloudFormation will understand that the parameter group needs to exist before it tries to create the RDS instance using it. It will also understand that the parameter group cannot be deleted while the RDS is using it, so if a future update to the infrastructure tries to remove the parameter group, CloudFormation will provide an error. CloudFormation calls these connected services Stacks. You can provision, update, alter, and delete in one operation, ensuring that you cannot deploy only a partially working solution.
CloudFormation allows you to create StackSets, which allow you to use the same templates to deploy a stack in multiple regions or multiple accounts. This can rapidly deploy cross-region applications using a standard build.
CloudFormation also allows you to create ChangeSets, which let you test run your proposed changes before you deploy them. This ensures everything works as expected before you modify your live systems. CloudFormation also allows you to add or delete protection to your stacks, which stops others from deleting objects it creates from outside of CloudFormation. This can be very useful for locking down the ability to delete objects to only a small number of authorized accounts.
As you can see, CloudFormation is extremely powerful for deployments, but it does not support ad hoc scripts or individual object-level queries like the AWS CLI does. It also only supports JSON and YAML documents, which do not support code logic statements such as if, else, or while.
The final automation tool you will need to know for the Database Specialty exam is the AWS Cloud Development Kit (AWS CDK).
AWS Cloud Development Kit (AWS CDK)
The AWS CDK allows you to use a traditional programming language such as Python, Java, or C# to create and interact with AWS services. The AWS CDK works closely with CloudFormation to monitor the state of AWS services and objects to ensure stack integrity is maintained.
The main benefit of using the CDK is that it allows your infrastructure deployments to be written in the same code as the rest of your application. This allows developers to write complex infrastructure creation statements within a language framework they already know and work with, reducing their need to retrain.
CDK also allows you to deploy all your infrastructure along with your application code. You can integrate CDK into the application deployment cycle, which can deploy, upgrade, and configure any required databases while updating the application code. In this way, your developers start to own and control the database deployments for what they need rather than relying on other teams to do this for them. This can increase the speed at which they can test and develop solutions.
Creating infrastructure using CloudFormation
Now, let's create a CloudFormation template that will create a full database stack for us. The template we are going to make and then launch will create and configure the following:
- An RDS MySQL instance
- A parameter group for the database
- Security group rules to let anyone access the database on port 3306
To do this, we are going to use a template from within this book's GitHub repository that can be modified if required. This template contains variables called parameters, which allow us to pass values to the CloudFormation service at runtime. This allows us to reuse the same template and create multiple databases.
Before you begin, download the Chapter11.yaml file from GitHub. You will also need to know which VPC to deploy in and which subnets to use. If you have more than one VPC, you will need to ensure you chose the correct ones when creating the stack. If you have do not have a VPC with at least two subnets in different AZs, you will need to create one now manually. You can refer to Chapter 3, Understanding AWS Infrastructure, to assist you if needed.
We are going to use both the AWS Console and the AWS CLI to create our database stack to learn how to use them. First, we are going to use the console and look at the graphic designer, which can help us create CloudFormation templates.
Using the CloudFormation console
- Log in to the AWS Console with an account with permissions to create databases and security groups and one that can use CloudFormation.
- Navigate to the CloudFormation service using the main menu.
- Select Create stack from the top right and choose With new resources (standard).

Figure 11.1 – Create stack – part I
- Select Template is ready, and then Upload a template file. Click Choose file and locate the Chapter11.yaml file you downloaded from this book's GitHub repository (https://github.com/PacktPublishing/AWS-Certified-Database---Specialty-DBS-C01-Certification).
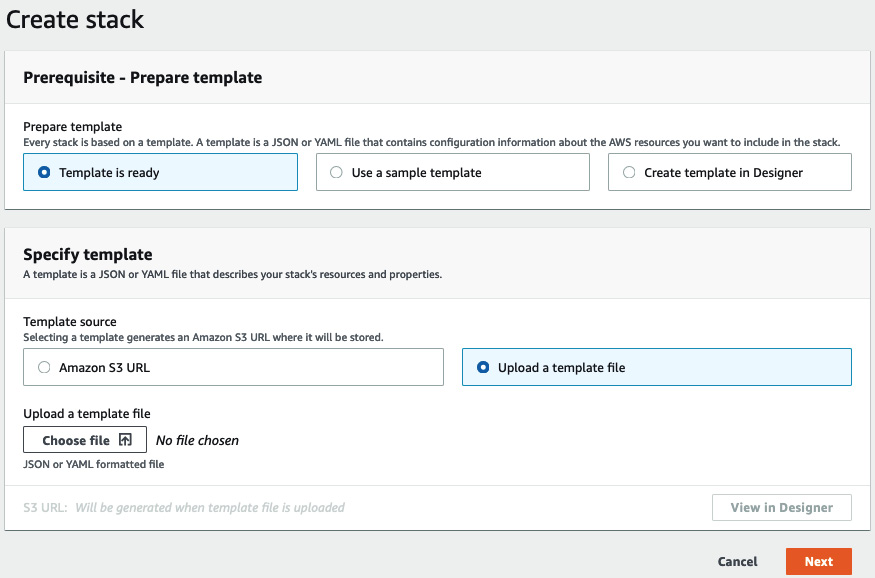
Figure 11.2 – Create stack – part II
- Once you have opened the template file, click View in Designer. This will open a page that looks similar to the following:
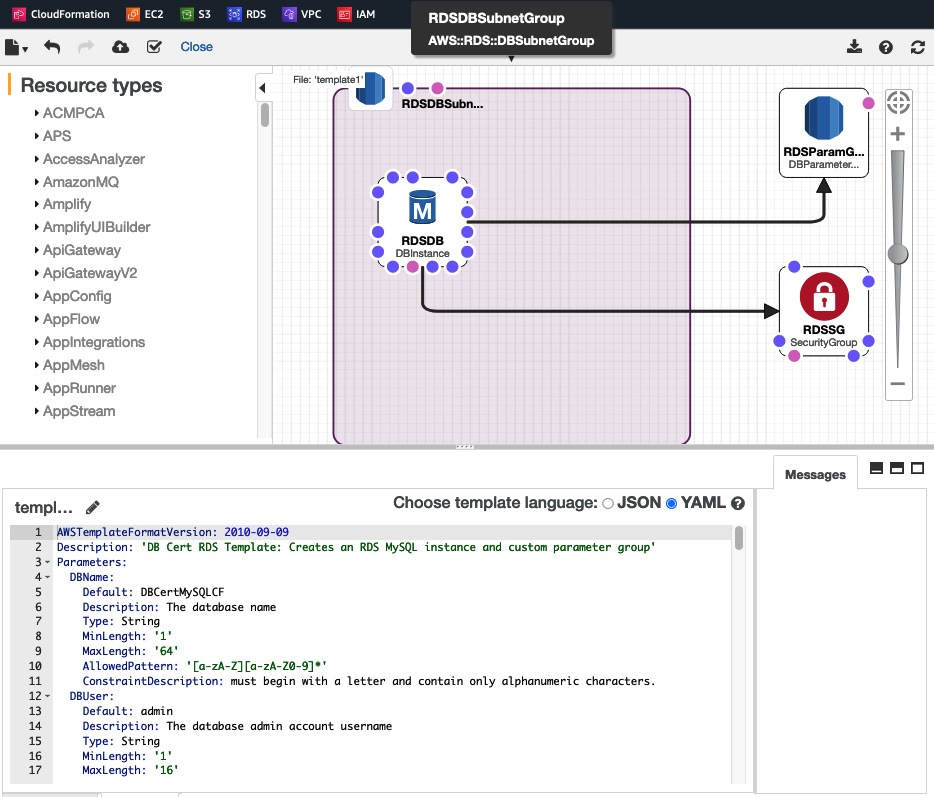
Figure 11.3 – CloudFormation Designer
- The Designer view provides a graphical representation of the stack you are going to create. You can click on each element to view the specific code for each part. You can also simply scroll through the code and try to understand it. See whether you can understand the !Ref variables within the code.
- When you are ready to create the stack, click the cloud logo on the top menu bar and click Next on the page that appears.

Figure 11.4 – The Create stack logo
- Fill in the form by selecting the VPC and subnets you need. CloudFormation will show all the available subnets across all VPCs. It does not filter them based on the VPC you select, so ensure that you choose the correct ones.
- Click Next on the next screen to leave all the settings as-is. Then, click Create stack to deploy the resources.
- You will return to a dashboard showing the correct status of your stack. You can watch the stack being deployed by clicking the Events tab.

Figure 11.5 – Stack events
- When complete, the stack's status will change to CREATE_COMPLETE. If you navigate to the Output tab, it will show you the connection string for the database. We created this as an output for the script.
- You can check the RDS dashboard to see that the new database has been created.
- Once you have finished reviewing the outputs from the CloudFormation script, you need to delete everything. To do this, navigate to CloudFormation and select the stack you created. Then, click Delete at the top right. This will remove all the resources you created in one go.
With that, we've learned how to use the AWS Console to deploy a CloudFormation stack, but for true automation, we need to use the command line to avoid having to use a graphical interface. Let's learn how to deploy the same CloudFormation template via the AWS CLI.
Using the CloudFormation AWS CLI
For this lab, you will need to have downloaded and configured the AWS CLI with your account's access keys and secret key. If you have not done so, please refer to the Technical requirements section. We are going to use the AWS CLI to create the same CloudFormation stack we created using the AWS Console. Let's get started:
- Let's try to create the stack in the same way we did previously and let CloudFormation prompt us for the necessary parameters, such as DBName, Password, and VPC, when we run the code. Open your command-line tool (Command Prompt on Windows or Terminal on Mac/Linux), navigate to the folder that contains the YAML file you downloaded, and enter the following code:
aws cloudformation create-stack --stack-name DBCertCLI --template-body file://./Chapter11.yaml
You will receive an error similar to the following:
An error occurred (ValidationError) when calling the CreateStack operation: Parameters: [DBPassword, PrivateSubnet02, VPCID, PrivateSubnet01] must have values
- Unlike the Console, when we use the AWS CLI to run CloudFormation commands, we must pass all the values within the initial command. Obtain the VPC and Subnet IDs that you want to use. Modify the code by adding the required parameters. Note that you won't be prompted for the DBUserName parameter. This is because this parameter has a default of admin, which will be used if we don't provide a value to override it. You will need to change the DBName parameter so that we do not clash with the existing database that was created via the Console.
- Your command should now look as follows (your values will be different for the VPC and Subnet IDs):
aws cloudformation create-stack --stack-name DBCertCLI --template-body file://./Chapter11.yaml --parameters ParameterKey=DBName,ParameterValue=DBCertCLI ParameterKey=DBPassword,ParameterValue=Password1 ParameterKey=VPCID,ParameterValue=vpc-4fcc2634 ParameterKey=PrivateSubnet01,ParameterValue=subnet-b9876d88 ParameterKey=PrivateSubnet02,ParameterValue=subnet-68bca225
You will receive StackId as output to let you know that the stack is being created:
{
"StackId": "arn:aws:cloudformation:us-east-1:254711704212:stack/DBCertCLI/052b5c40-7d31-11ec-aa90-0e68693b1117"
}
- You can monitor the stack creation process by using the following command and entering your --stack-name:
aws cloudformation describe-stacks --stack-name DBCertCLI
You will see an output similar to the following:
{
"Stacks": [
{
"StackId": "arn:aws:cloudformation:us-east-1:254711704212:stack/DBCertCLI/052b5c40-7d31-11ec-aa90-0e68693b1117",
"StackName": "DBCertCLI",
...
"StackStatus": "CREATE_COMPLETE",
...
}
When StackStatus is CREATE_COMPLETE, the database will be deployed.
- To delete the stack, you can run a delete command from the CLI:
aws cloudformation delete-stack --stack-name DBCertCLI
With that, you can see how easy it would be to accidentally delete the wrong stack. CloudFormation has two protection mechanisms you can set. The first is the termination protection mechanism, which stops anyone from deleting a stack. To delete a stack, you will need to switch this off. This is strongly recommended for any production system. Then, there's the deletion policy, which allows you to add a flag to your resources so that if the stack is deleted, the resources are not.
So far, we've learned how to use both the AWS Console and the AWS CLI to create and delete CloudFormation stacks. We've also learned how to enable termination protection to stop stacks from being accidentally deleted. Now, let's learn about two AWS services that are used to process data and can help automate database-level tasks, starting with AWS Glue.
AWS Glue
AWS Glue is a fully managed, serverless data integration and ETL service. It can extract, manipulate, and transform data from a wide range of sources, allowing you to create accurate data models that can be imported into a database, loaded into an analytics platform, or used for machine learning models.
AWS Glue can be controlled using both the Console and CLI commands to allow you to configure automated data handling and data loading into your databases.
There are three components that AWS Glue uses:
- AWS Glue Data Catalog: This is a central repository that holds information about your data. It acts as an index to your schema and data stores, which helps control your ETL jobs.
- Job Scheduling System: This is a highly customizable scheduler. It can handle not only time-based scheduling but also contains options to allow it to watch for new files or new data to be processed, as well as event-driven scheduling.
- ETL Engine: AWS Glue's ETL engine is the component that handles the actual data extraction, transformation, and loading. This is where you write the ETL code. AWS Glue supports the Python and Scala languages. You can use a GUI tool to write code for you that you can then manually customize.
AWS Glue offers a lot of benefits compared to trying to use external tools or manually creating ETL scripts, but it also has some restrictions that you'll need to know for the Database Specialty exam. Let's look at some of the benefits and limitations of using AWS Glue:
- The following are the benefits:
- Pay-as-you-go: You only need to pay for what you use. There are no long-term contracts and costs are only occurred while AWS Glue is running.
- Scheduling: AWS Glue lets you create complex custom schedules with multiple rules and event handling.
- GUI: Using a GUI to assist with the creation of ETL code can allow non-developers to create powerful ETL jobs and functionality.
- Fully managed: AWS Glue is a serverless and fully managed service. AWS takes responsibility for the infrastructure that's running the service, allowing you to focus directly on the ETL code.
- The following are the limitations:
- Complex: AWS Glue offers so many customizations that new users may struggle to fully understand the platform and options that are available.
- Language support: You are only able to use either Python or Scala to write ETL jobs.
- AWS only: AWS Glue is only able to integrate with other AWS services; it cannot integrate with on-premises or non-AWS systems.
A common use case for AWS Glue is to retrieve data from an RDS database and a group of CSV files within S3. AWS Glue then processes the data to remove "bad records" and merge all the data into a combined dataset that is then pushed to an analytics platform such as Amazon Athena or Amazon EMR (a big data analytics tool). The data flow may look like this:
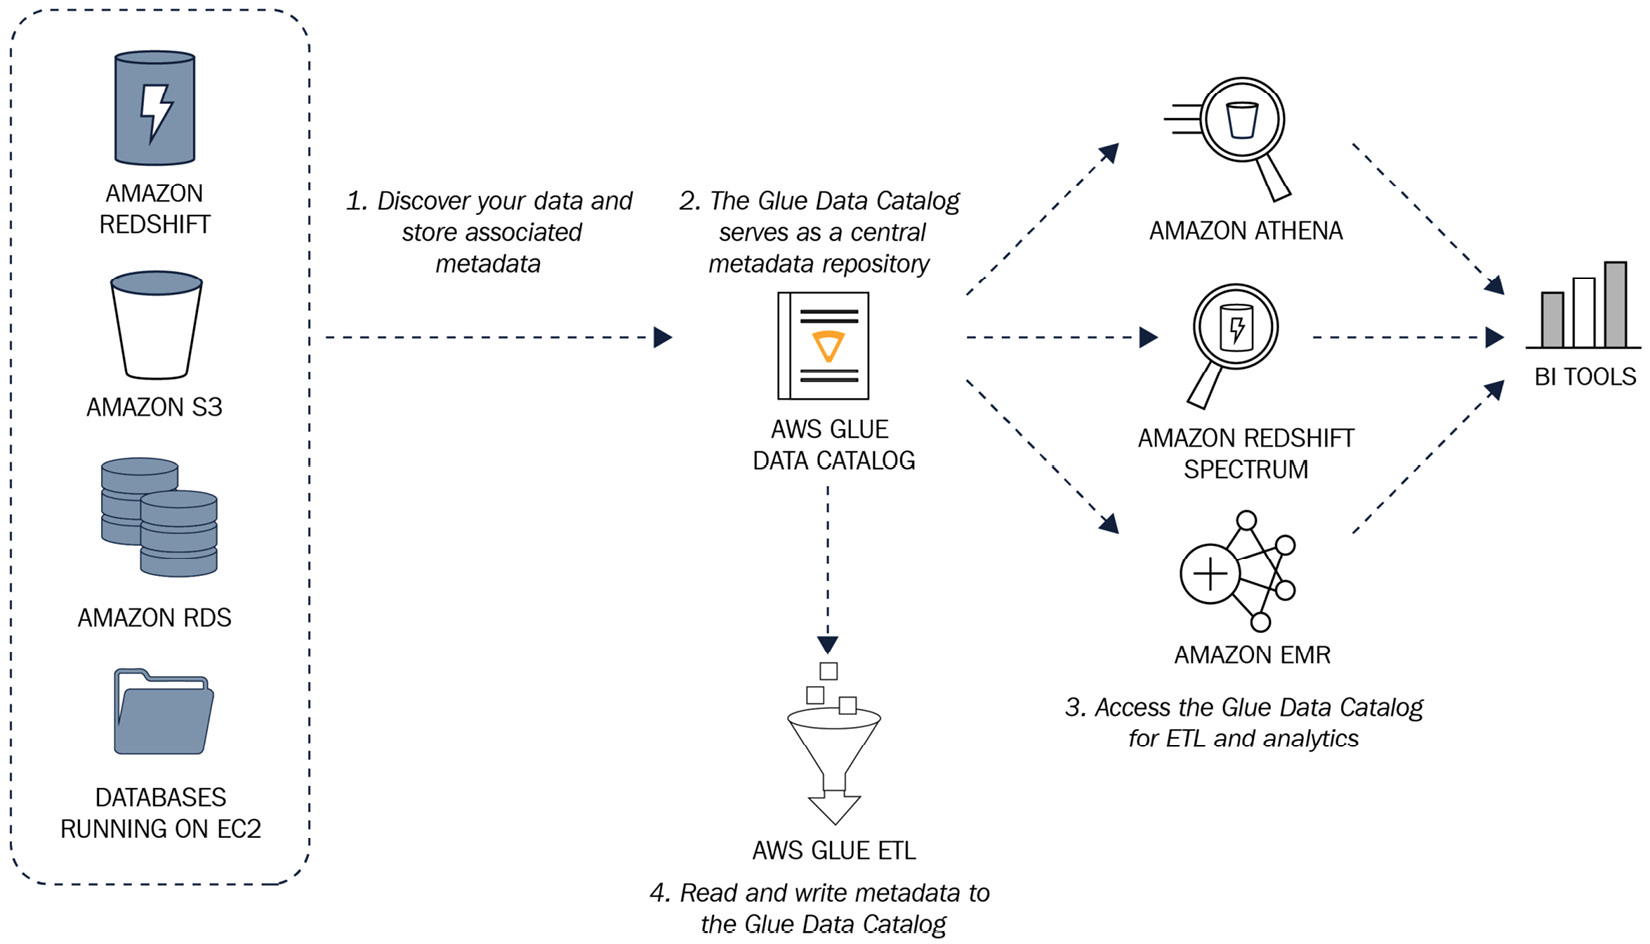
Figure 11.6 – AWS Glue data flow
To set up an AWS Glue job, you must create a crawler. This will be the ETL job itself and will be responsible for locating, extracting, and analyzing the data while following the rules you have defined. The crawler creates the necessary metadata, which can be consumed by other services such as Amazon Athena to allow them to view and process the data. The metadata that is created makes the data appear as if it is a database table and it can be queried using standard SQL. The following screenshot shows an AWS Glue table based on a sample dataset of flight details:
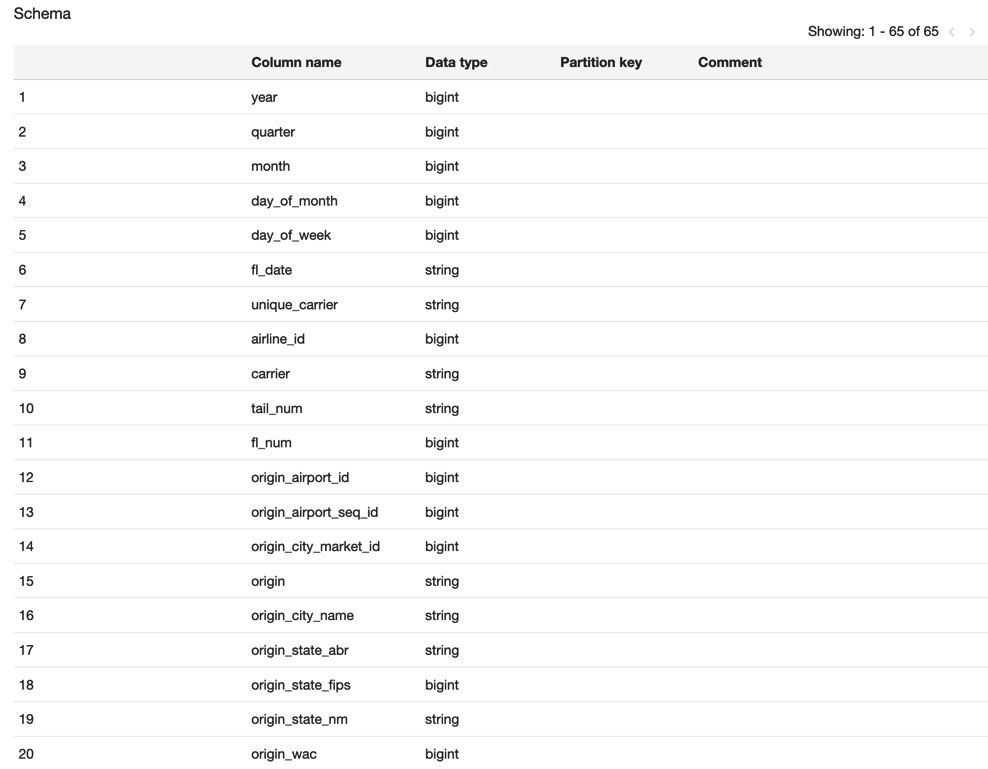
Figure 11.7 – AWS Glue schema
Note that the crawler has only created a metadata view; no actual data is stored at this time. AWS Glue is an interface that allows you to query data from other sources but it does not move or migrate any data – the data stays in its original location unless you use another tool such as Amazon Athena to move it.
You can use AWS Glue to partition and index your data. This can greatly speed up the performance of queries against it. AWS Glue will automatically find partitions within the data. For example, if you load data in monthly files, it will create a monthly partition. Indexes can also be created on the columns you will use for querying to improve the performance.
AWS Glue only supports datasets within the same region. To use cross-region data, you need to create a NAT gateway to allow AWS Glue to access the internet, which can be considered a security risk. However, AWS Glue does support cross-account access via the usage of resource policies, which are IAM-based.
With that, we've learned how AWS Glue works to create a view of our data that can be used by other services to query data in a wide range of locations as if they were database tables. Now, let's look at one of the tools that ingests AWS Glue metadata and allows us to query the actual data: Amazon Athena.
Amazon Athena
Amazon Athena is a serverless, data querying service. It is designed to allow you to run queries against data stored within an AWS S3 bucket without needing to import it into a database first. Athena uses a SQL programming language called Presto, which supports common SQL syntax such as joins and where clauses. Athena can connect to data within an S3 bucket on its own, or it can use a schema that's been created by AWS Glue. If you do not use AWS Glue, then Athena cannot use indexes or partitions to help speed up your queries, so Athena without Glue is only suitable for smaller datasets.
Athena offers a lot of benefits around querying data without you having to import it into a database first, but it also has some restrictions that you'll need to know for the Database Specialty exam. Let's look at some of the benefits and limitations of using Amazon Athena:
- The following are the benefits:
- Uses SQL: You can use SQL syntax to run the queries. This is a commonly used language by database developers, so they will not need to learn a new language.
- Serverless and fully managed: The infrastructure is fully managed by AWS, allowing you to focus on your data querying rather than worrying about patching or server provisioning.
- Performance: The Presto SQL language offers parallelism for larger datasets.
- Pay-as-you-go: You are only charged for what you use, based on the amount of data you query.
- The following are the limitations:
- Few data controls: Athena cannot create indexes, which can cause larger queries to perform poorly.
- Code objects: Athena cannot use stored procedures, functions, or triggers.
- Table names: You cannot read data from a table whose name starts with an underscore.
- No S3 Glacier: Athena cannot query data stored within S3 Glacier or S3 Deep Glacier Archive.
Athena supports both structured and unstructured data types. It can query files stored in CSV, JSON, Optimized Row Columnar (ORC), Apache Parquet, and Apache Avro format. It can also read files that are zipped using GZIP, LZO, Zlib, or Snappy without having to extract them first.
Due to some of the limitations around indexing and partitioning data, Amazon Athena is commonly used in conjunction with AWS Glue to form a complete ETL and querying tool.
Now, let's learn how to create an AWS Glue crawler of some sample data files in S3 before using Amazon Athena to run some queries against it.
Querying data within an S3 bucket using AWS Glue and Amazon Athena
In this hands-on lab, we are going to use some public sample flight data that is stored within a public S3 bucket to create an AWS Glue table. Then, we are going to run queries against that AWS Glue table to find out some flight information. Let's get started:
- Log in to the AWS Console and navigate to AWS Glue.
- Click on Crawlers from the main left-hand menu and then click Add crawler.
- Enter DBCertCrawler for Crawler name and click Next.
- Leave all the defaults on the Specify crawler source type page as-is:
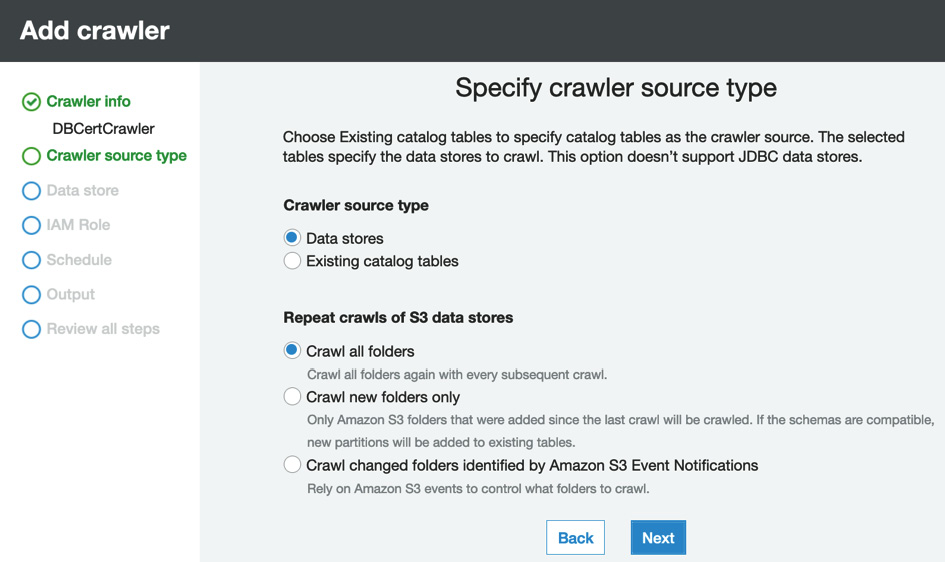
Figure 11.8 – Specify crawler source type
- On the next page, leave the data source as S3 and click Add connection. Complete the popup by using the following details:
- Name: DBCertFlight
- Include path: s3://athena-examples/flight/
The following screenshot shows how the form should be completed:
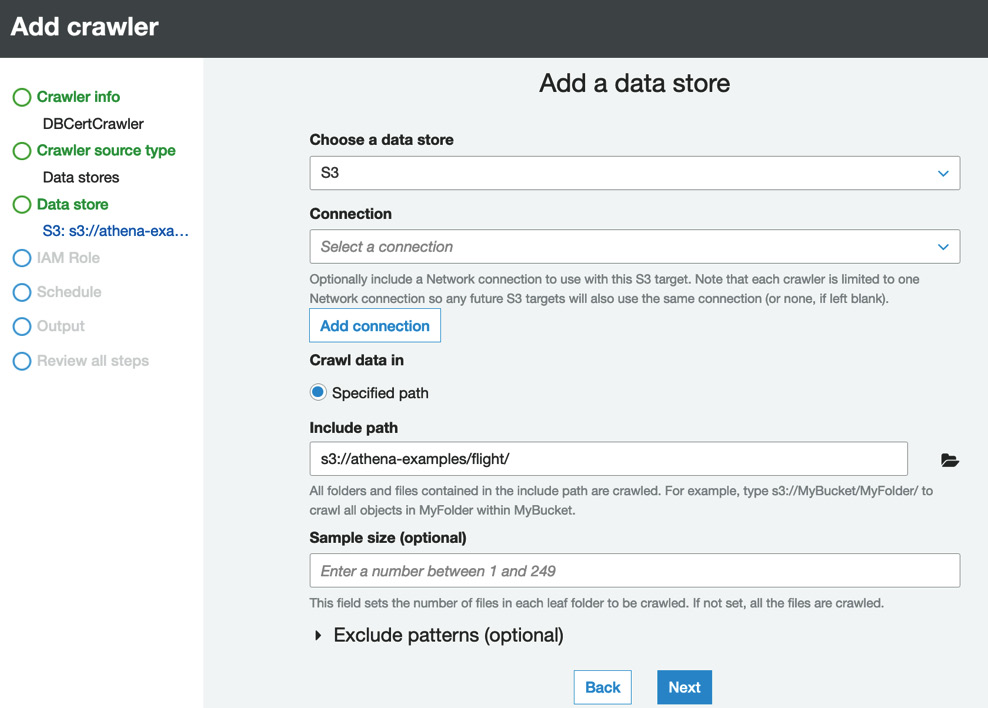
Figure 11.9 – Add a data store
Click Next.
- Select No and click Next on the Add another data store page.
- Enter DBCertGlue for IAM role and click Next.
- Leave Frequency set to Run on demand and click Next.
Click Add database and set Database name to dbcertflight. Then, click Create.
Click Next.
- Click Finish to create the table.
- You will be taken back to the Crawlers dashboard. At the top of the screen, you will see the following message:
Figure 11.10 – Run it now?
Click Run it now?.
- Let the crawler run. It will take around 1 minute to complete. When its status is Ready, click Tables from the left-hand menu. You will see that four new tables have been created. Click avro.
- You will be able to see the schema that AWS Glue has created for us based on the avro file in S3. We can now use Athena to query it.
- Navigate to Amazon Athena from the main menu.
- Click on Data sources from the left-hand menu. You should see a data source called AwsDataCatalog. Upon clicking this, you will see the dbcertflight database we created in AWS Glue.
- Click Query editor in the left-hand menu. Check that AwsDataCatalog has been selected for Data Source and choose dbcertflight from the Database dropdown.
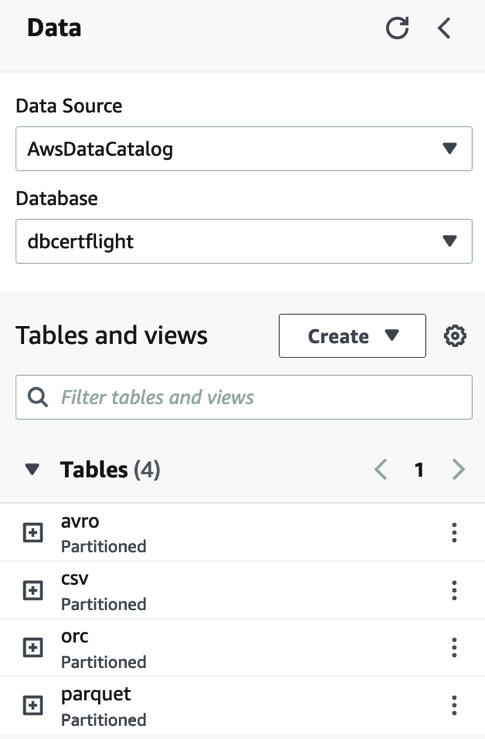
Figure 11.11 – Amazon Athena Query editor setup
- Before we can run a query, we need to set up an S3 bucket for our query results. Click the Settings tab and then click Manage.
- Enter an S3 bucket path in the box. You can also Browse S3 to find a suitable bucket if needed. Once you have chosen your S3 bucket, click Save.
- Go back to the Editor tab so that we can run our SQL queries. If you expand the avro table by clicking the (+) symbol next to it, you will see all the columns that you can query. Enter the following query into the box to find all the flights that were delayed by more than 15 minutes:
SELECT *
FROM avro
WHERE depdelay > 15;
This query will take around 90 seconds to complete as it's running a query against a GB dataset. When complete, you will see an output similar to the following:

Figure 11.12 – Athena query output
Now, you can run other queries to learn more about querying with Athena and any SQL limitations.
- Athena saves all the query output to the S3 bucket you specified earlier. If you wish, you can navigate to S3 to find the output files. The output files can now be used by another service if you wish, such as a graphical tool such as AWS Quicksight, but that is beyond the scope of this lab.
That completes the hands-on lab for AWS Glue and Amazon Athena. First, we created an AWS Glue table based on flight data stored in an S3 bucket and then we connected Athena to this Glue table to allow us to run SQL queries against it.
Now, let's summarize what we've learned in this chapter.
Summary
In this chapter, we learned about three different tools that are commonly used with AWS to automate infrastructure creation and administration – that is, the AWS CLI, CloudFormation, and CDK. Then, we learned how to automate how to load and handle data from S3 using AWS Glue and Amazon Athena.
Regarding automation, we learned how to create a CloudFormation stack using YAML or JSON templates and how to launch those stacks using both the AWS Console and the AWS CLI. We learned how we can use parameters within our stacks to allow the same code to be reused to create a controlled and automated method to create databases.
We finished this chapter by learning how to create an ETL job using AWS Glue and how to use Amazon Athena to query the data that's held within S3 without having to import it into a database first.
In the next chapter, we are going to learn about database security. We came across a few different database security tools and features earlier in this book, but now, we are going to look at the best practices for deploying secure and well-architected databases within AWS Cloud in more depth.
Cheat sheet
This cheat sheet summarizes the key points from this chapter:
- You can use a variety of tools to automate your AWS processes by using the AWS CLI, CloudFormation, and the CDK, depending on the use case.
- The AWS CLI is well suited for running creation tasks or for obtaining the status and information about your AWS infrastructure and services.
- CloudFormation is used to create stacks. Stacks are groups of AWS components that should be deployed together. They can be used to create a full application stack containing a VPC, security groups, EC2 servers, RDS databases, and almost all other AWS services.
- CloudFormation can offer deletion protection to stop someone from accidentally deleting a stack and its components.
- AWS Glue is used to create a metadata schema of a wide variety of data sources, such as CSV files within S3 or Amazon Redshift tables. It can also be used to create more complex ETL jobs by adding data transformation rules.
- AWS Glue supports both partitioned data and indexes.
- AWS Glue uses either Python or Scala to write ETL jobs.
- Amazon Athena is used to query data within an S3 bucket without you having to import it first.
- Amazon Athena uses the Presto language for querying, which is a SQL-compliant language.
- Amazon Athena saves all output to an S3 bucket that can be used by other tools, including graphical analytics tools such as AWS Quicksight.
- Amazon Athena supports cross-region querying.
Review
Now, let's practice a few exam-style questions:
- Amazon Athena is being used by a large company to query data that's being held in S3 buckets in the eu-central-1 and eu-west-1 regions. The company wants to use Athena in eu-west-1 to query data from Amazon S3 in both regions. The solution must be as low-cost as possible.
What is the best solution?
- Enable S3 cross-region replication from eu-central-1 to eu-west-1. Run the AWS Glue crawler in eu-west-1 to create the AWS Glue Data Catalog and run Athena queries.
- Use AWS DMS to migrate the AWS Glue Data Catalog from eu-central-1 to eu-west-1. Run Athena queries in eu-west-1.
- Update the AWS Glue resource policy's IAM permissions to provide the eu-central-1 AWS Glue Data Catalog with access to eu-west-1. Once the catalog in eu-west-1 has access to the catalog in eu-central-1, run Athena queries in eu-west-1.
- Run the AWS Glue crawler in eu-west-1 to catalog the datasets in all regions. Once the data has been crawled, run Athena queries in eu-west-1.
- You are working with a company to help analyze a large amount of data held in JSON format logs. These logs are uploaded hourly to an S3 bucket.
Which is the most cost-effective and efficient way to analyze this data?
- Import the data into an RDS MySQL database and run SQL queries against it.
- Import the data into Redshift and run SQL queries against it.
- Use Amazon Athena to query the data directly from S3.
- Create an EC2 instance to hold the data and use Bash scripting to retrieve the data you require.
- A company uploads multiple 110 GB .gzip files to S3 Glacier each month that contain financial records. The company needs to query the data in the file for an audit request. Which is the most cost-effective method you can use?
- Query the data using Amazon Athena directly from S3 Glacier.
- Temporarily move the data into S3 and use Amazon Athena to query it.
- Load the data into DynamoDB to run the queries.
- Move the data into S3 and use Amazon Redshift Spectrum to query it.
- Your company uses CloudFormation to create AWS resources. One morning when you arrive at work, you discover that a production RDS database has been deleted when someone accidentally deleted a CloudFormation stack.
What sensible steps can you take to stop this from happening again? (Choose 2)
- Revoke permissions to CloudFormation from all users.
- Enable deletion protection on all production CloudFormation stacks.
- Enable termination protection on all production CloudFormation stacks.
- Revoke permissions to delete any RDS instances from all users.
- Enable deletion protection on the production RDS resources within the stack.
- A company wants to create a method to quickly create and then delete test environments to support their development teams. Which is the best solution?
- Use CloudFormation templates to provision the entire stack.
- Use IAM policies to create templates that can be used to provision the required resources.
- Use AutoScaling groups to allow the infrastructure to grow when required.
- Create custom scripts using the AWS CLI to create and delete resources when required.
Further reading
For more information on the topics that were covered in this chapter, please refer to the following resources:
- Complete 2020 AWS DevOps Bootcamp for Beginners: https://subscription.packtpub.com/video/cloud_and_networking/9781800566132/p1/video1_1/introduction
- Actionable Insights with Amazon Quicksight: https://subscription.packtpub.com/book/data/9781801079297/1
- Mastering AWS CloudFormation: https://subscription.packtpub.com/book/cloud_&_networking/9781789130935/12/ch12lvl1sec82/introducing-aws-cdk