
Although today's Flash platform does many things, at its heart Flash is always, and hopefully always will be, an animation tool. Traditionally, animation was created by applying tweens to objects on the Stage and controlling them through the Timeline. Although this approach still works, and has in fact been vastly improved in Flash CS4 Professional, you also have the ability to animate objects entirely through code.
A common misconception about animating in ActionScript is that it relies on loops. To an extent, there is some logic there: It makes sense that if you wanted to move an object across the Stage, you might create a while loop that increments the x property of the object repeatedly until it reaches the opposite edge of the Stage. The problem, however, is that loops force the screen to redraw, so that kind of loop would simply cause the object to appear at the far edge of the screen.
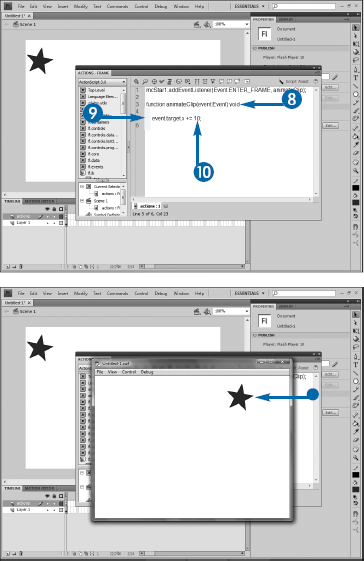
This problem can be avoided by instead recalling that ActionScript is event-driven, and like all other actions, animation relies on an event to occur. The most common event to use is EnterFrame, which is called at the movie's frame rate. In other words, if you are using the default 20 frames-per-second rate, the event will occur 20 times per second. You use the event just as you would any other — by creating an event handler to specify what you want to happen with the event and a listener to attach it to an object. See Chapter 7 for more specifics on events.

Note
See Chapter 3 for details on creating clips and naming instances.


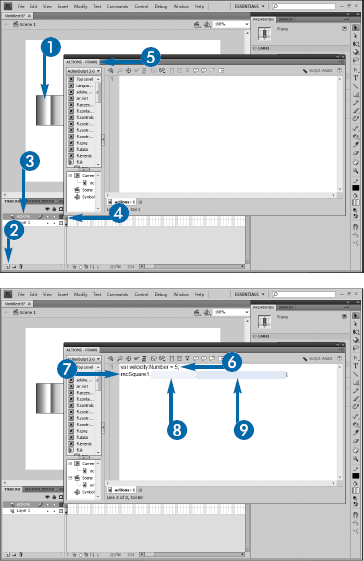
Any properties of the MovieClip can be altered in the event. If you want the clip to move diagonally from the top-left corner to the bottom-right corner while rotating, you can simply add the code to alter those properties as well:
mcSquare1.x += 10;
mcSquare1.y += 10;
mcSquare1.rotation += 30;
As mentioned earlier, the += operator is used as a shortcut for adding a new value to an existing value, so the line mcSquare1.x += 10 is the same as mcSquare1.x = mcSquare1.x + 10.
You can also use the random method of the Math class to move clips at random speeds:
mcSquare1.x += Math.round(Math.random() *10) + 1;
Most animation involves moving objects from one location to another. However, you can apply any change to an object such as a MovieClip over time and have that change animate.
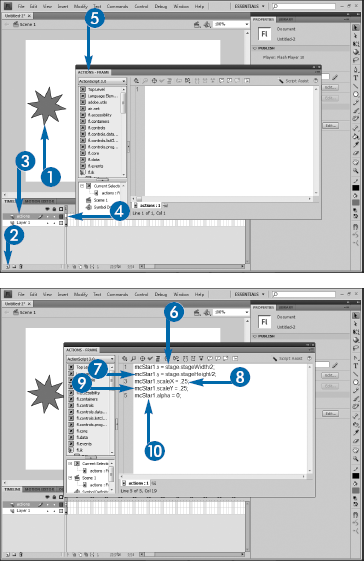
You can change the size of a clip over time by adjusting its width and height properties. The properties take as their values an integer. There is no direct property in the language that allows you to scale the width and height in proportion to each other or to the initial values, but you can maintain proportions by using mathematical expressions to calculate the new values and being careful to use the same expression on both.
You can also scale clips by adjusting the scaleX and scaleY properties. Both take a number that represents a multiplier of the original value. The end result of using these properties, versus multiplying the width or height, is the same. For example, if you want to double the size of a clip, you could either use mcClip1.width *= 2 or mcClip2.scaleX = 2. To scale a clip down, provide a decimal value for these properties.
You can also fade clips using the alpha property. alpha is expressed as a number between 0 and 1, where 1 is completely opaque and 0 completely transparent. Levels of semitransparency are then expressed as a decimal number, so 50% transparent would be an alpha of .5. Be aware that alpha animations can be very processor-intensive at runtime in Flash Player, so they should be used sparingly.
Note
See Chapter 3 for details on creating clips and naming instances.
Note
The following steps assume that the instance name given in step 1 is
mcStar1. If you named your instance something else, adjust the code accordingly.Note
See Chapter 8 for details on working with the Stage.
Note
The following steps assume that you use the name
scaleAndFadefor the event handler.


Unfortunately, Flash is inconsistent in its use of the alpha property. If you want to adjust the alpha visually on the Stage with the Properties panel, its values are expressed as percentages, with 0% being transparent and 100% opaque. Prior versions of ActionScript treated the property the same, but ActionScript 3.0 changed it to use a decimal between 0 and 1. A common error in code-based fade animations is to forget this and attempt to set the alpha property using a number that represents a percent. This can be a difficult error to diagnose, as the code will run without generating an error, but any value greater than 1 is simply treated as opaque, so no fading will occur.
Of course, scaling and fading animations can be combined with movement. You can easily alter the x, y, width, height, alpha, and any other properties that you want at the same time to achieve whatever animation effect you need.
Objects in motion in the real world rarely travel at a consistent rate of speed. Rather, they accelerate or decelerate over time. Although we cannot necessarily see this, we know instinctively that a ball falling toward the ground speeds up as it falls and that a ball being thrown up in the air slows down as it rises.
You can add realism to your animations by having objects follow these same principles. When animating using tweens, you can apply easing to your tweens to have them speed up or slow down over the course of the animation. In ActionScript, you can achieve the same effect by using a combination of variables and basic math to alter the rate at which an object moves.
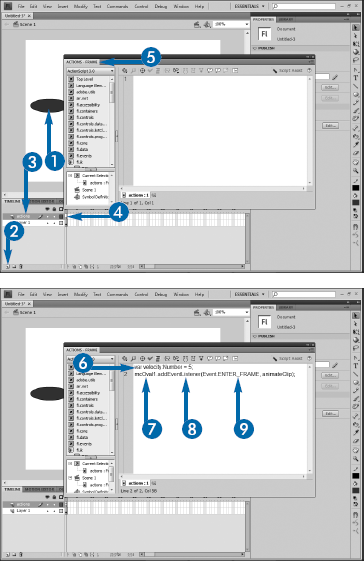
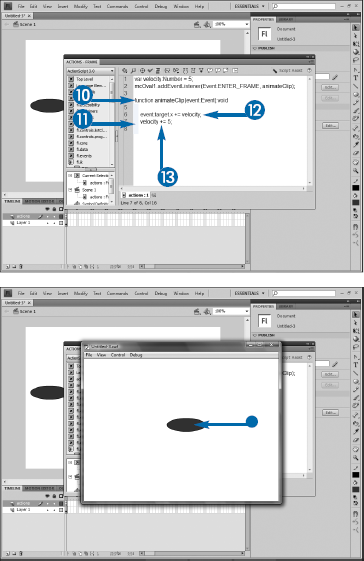
Simple animation in code involves modifying the x and y coordinates of an object over time by manipulating their values within an EnterFrame event handler. The rate at which the variables change affects the speed at which they move: An object whose x coordinate is changing by 1 pixel in each event will move slower than one that is changing by 10 pixels. Rather than hard-coding this change into your handler, however, you can instead set the initial speed of the object — this rate at which the object will change — as a variable, which can in turn be modified within the event handler. This way, the speed at which the object moves will vary from one call to the handler to the next, causing the rate at which the object moves to speed up or slow down.
It is possible to easily simulate the effect of gravity on an object by getting a bit creative with your velocity variable, as in the following:
var mcBall1:MovieClip = new Ball();
addChild(mcBall1);
var xVelocity:Number = 2;
var yVelocity:Number = −10;
mcBall1.addEventListener(Event.ENTER_FRAME, bouncingBall);
function bouncingBall(event:Event):void
{
                   mcBall1.x += xVelocity;
                   mcBall1.y += yVelocity;
                   yVelocity ++;
}
In this code, the ball will move horizontally at a consistent rate. However, it will begin moving up and slow down because the y coordinates are being altered by a negative value. After ten iterations of the event, however, the yVelocity variable will be 0 — stopping the object. After that, yVelocity begins to be set to a positive value, causing the ball to begin moving back down and speeding up.
If you are familiar with Timeline-based animation in Flash, then using the EnterFrame event will make sense to you. However, it does have a couple of important limitations. First, the frequency with which it occurs is based on the movie's frame rate; therefore, the frequency with which your animation occurs will change if the frame rate changes. Second, there are limits to how fast Flash Player can reliably play back a movie. In theory, the frame rate can be set as high as 120 frames per second, but in practice the actual rate at which your movie can be played smoothly is much less. This performance issue has been steadily improving with each new version of Flash Player, but even with Flash Player 10, you cannot rely on animations that run at much faster than 25 or 30 frames per second. Unfortunately, this has as much to do with your user's computers, so it is extremely difficult to accurately test.
The alternative to the EnterFrame event is to animate via an instance of the Timer class. These time-based animations will be measured in milliseconds, so they are reliable and consistent across movies and varying frame rates.
To use timer-based animation, you need to first create an instance of the Timer class, using the standard notation with the new keyword and a call to its constructor. The constructor takes a required argument that represents the delay, in milliseconds, before the timer fires. You can then add an event listener, using the TIMER constant of the TimerEvent class, and perform any actions that you want.
When you instantiate the class, the timer does not start automatically. Instead, you need to call its start() method.
Note
See Chapter 3 for details on creating clips and naming instances.


The constructor for the Timer class can take as a second, optional argument the number of times that the timer will repeat. Omitting this parameter will cause the timer to fire infinitely; providing a numeric value will cause it to fire only that number of times. Each of these repeats occurs after the delay specified in the first argument.
You must be certain to always call the start method of the class. The timer will not work otherwise. The class also has a stop method, which can be used to programmatically end the timer even if it still has repetitions to perform, and a reset method, which both stops the timer and resets the repeat count to 0. You could use these in a stopwatch application, which has the user click one button to start the timer — the button's event handler would therefore call the start method — another button to stop it, and a third to reset it back to 0.
Simple animations can be created visually on the Stage through the process of tweening. In this process, you as the designer define the object as a symbol and define its starting and ending locations and the number of frames over which the animation should occur. Flash then calculates the necessary position for the symbol in each of the frames between the start and end and handles the animation for you.
Tweens can be created in code as well. You do not have as much control over the animation when coding a tween as you do when you simply alter the properties of the object directly, but it can be a way to quickly get an object from one point to another without worrying about details such as precise locations.
To use a tween, you must first import the Tween class and the classes in the easing package. You will then create an instance of the Tween class by using the new keyword and calling its constructor. The constructor takes a series of arguments. The first is an instance of the object that you want to move. The second is the property that you want to alter with the tween. The third is a reference to a predefined function for easing, which is covered in more detail in the next section, "Ease Tweened Animation." Next, you provide the beginning and ending values for the property you will be altering and the duration of the tween. Finally, you need to provide a Boolean value, where true states that you will use seconds to evaluate the duration and false that you will use frames.

Note
See Chapter 3 for details on creating clips and naming instances.
Note
See the following section, "Ease Tweened Animation," for more details on this line.

You need to create a separate instance of the Tween class for each property that you want to animate. Although this might seem tedious, it has a big advantage: Each property can be timed individually. In the following example, a MovieClip named mcSquare1 has its x and y properties tweened over the course of 3 seconds, while its alpha property tweens to fade the clip from transparent to opaque over the course of 5 seconds. Therefore, the clip will stop moving before it finishes fading in.
import fl.transitions.Tween;
import fl.transitions.easing.*;
mcSquare1.x = 100;
mcSquare1.y = 100;
mcSquare1.alpha = 0;
var myTweenX:Tween = new Tween(mcSquare1, "x", None.easeOut, 100, stage.width, 3, true);
var myTweenY:Tween = new Tween(mcSquare1, "y", None.easeOut, 100, stage.height, 3, true);
var myTweenAlpha:Tween = new Tween(mcSquare1, "alpha", None.easeOut, 0, 1, 3, true);
You can use easing to change the speed at which an animation occurs to be nonlinear. When creating animation in code by manually adjusting property values, you can simulate easing by altering the value by which the property changes over time; see the section "Change the Speed of Animation" earlier in this chapter for details. When using tweens, you can use one of the classes in the easing package to apply a similar effect.
The easing package contains a set of classes that apply easing to tweens: Back, Bounce, Elastic, None, Regular, and Strong. Each class supports easing in through its easeIn method and easing out through the easeOut method. The Back class backs up the object and then moves it toward the target when easing in and overshoots the target and then backs to it when easing out. Bounce does what its name implies: It bounces the object. Bounce.easeIn increases the speed of the bounce, and easeOut slows it down. Elastic causes the object to bounce in an exponentially decaying sine wave, accelerating with easeIn and decelerating with easeOut. None applies no easing. Regular simply speeds the object up gradually when easing in and slows it down when easing out. Strong functions much like Regular but is more pronounced.
You must import the class or classes that you want to use when applying an ease. You can be most efficient in your code by importing only the specific ease class you want to use, so if you plan to use Bounce, you could write import fl.transitions.easing.Bounce. However, you will need to write a separate import statement for each ease you will use; therefore, the generally accepted practice is to simply import all the classes by using the asterisk wildcard: import fl.transitions.easing.*.
Note
See Chapter 3 for details on creating clips and naming instances.

Note
Easing can only be used in conjunction with code-based tweening. See the preceding section, "Create Tweens in Script," for details.

The easing classes, except None, support a third method, easeInOut, that enables you to apply both the in and out effect on the same ease. You must always provide a reference to one of the easing classes as part of the constructor for the Tween class. The None easing class is provided to allow you to reference easing without actually applying it. The class actually contains four methods: easeIn, easeOut, easeNone, and easeInOut, although all four do the exact same thing: They do not apply easing. Therefore, it makes no difference at all which of the four methods you choose to call. easeNone is provided as it makes the most logical sense; the other three exist to provide consistency with the other ease classes.
You cannot apply more than one ease to any given tween; however, each instance of a tween could in theory use a difference ease. Take care when applying different tweens to related properties. For example, applying a Bounce ease to the x property and an Elastic ease to the y property of the same object is possible but will likely produce an extremely strange result.
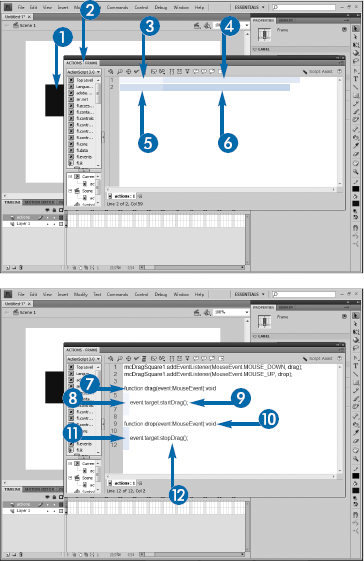
You can add an additional level of interactivity to your movies by adding drag-and-drop capabilities. This way, your users will be able to "pick up" objects on the Stage and move them to other locations.
The Sprite class contains two methods to enable dragging and dropping. The appropriately named startDrag() method enables you to specify an object that the user can drag. You can then allow them to "let go" of the object — drop it — with the equally appropriate stopDrag() method.
Almost always, you will use the MOUSE_DOWN and MOUSE_UP events to trigger drag and drop. Although you can in theory use any event to trigger the action, these are the ones your user will most likely expect you to use. They are also the easiest to use because they represent opposing actions.
When dragging objects, you can test to determine whether it is touching another object by calling the hitTestObject() method. The method takes a single required argument: a reference to the object that you want to test to see if the object being dragged is hitting. For example, if you wanted to see if a MovieClip named mcStar1 was touching another clip, mcTarget1, when it was dropped, you would write mcStar1.hitTestObject(mcTarget1). The method returns a Boolean value and is thus almost always used as the condition in an if statement. A related hitTestPoint() method can be used to determine if an object has been dragged over a given x and y coordinate point. It therefore takes two required arguments: the x and y coordinates against which you want to test.

The startDrag() method accepts an optional argument, lockCenter. You can provide a Boolean value to the argument; when true, the clip's center point will lock onto, or snap to, the mouse position. If you provide a value of false, the object will be dragged from whichever point the user actually clicked on it. The default value for the argument is false.
Likewise, the hitTestPoint() method also accepts an additional, optional argument, shapeFlag. This argument, also a Boolean, determines whether Flash Player should determine whether the shape is over the target pixel based on its actual pixels if true or its bounding box if false. Obviously, if the shape is rectangular, these are the same, and the argument is meaningless; however, if the shape is an ellipse, polygon, star, or other shape, then its bounding box will be larger than its actual pixels. If the argument is set to true and the shape is dragged over the target such that its bounding box, but not its pixels, are over the point, the method will return false. The default value of the argument is false.
One of the most exciting additions to Flash Player 10 and Flash CS4 Professional is the ability to animate objects in three dimensions. 3D animation can be done on the Stage using the new 3D tools, which enable you to rotate objects not just along x and y axes, but also on the z axis. You can also move objects along the same z axis, the effect of which is to move the object toward or away from an imaginary vanishing point.
These properties also exist in ActionScript. Therefore, in addition to rotating objects in 2D by altering the rotationX and rotationY properties, you can use the rotationZ property to spin an object along that axis, providing a "flip" effect. You can also move an object toward or away from the vanishing point by changing the z property.
Increasing the z property causes the object to appear to move closer to the "camera," whereas decreasing it moves the object away. In effect, Flash will scale the shape up or down as it applies the effect, but the scaling will maintain perspective. If you want to use the rotationZ property, you must also use either rotationX or rotationY or both, as you will be unable to see the effect of the z rotation by itself.
Support for the z and rotationZ properties is unique to Flash Player 10. This version of the player was released in October 2008 alongside Flash CS4 Professional. Past experience suggests that it should take no more than one year for this version of Flash Player to reach 90% or better adoption. You can view version-specific adoption statistics for Flash Player at www.adobe.com/products/player_census/flashplayer/version_penetration.html.

Flash Player does not provide for "true" 3D effects. When you draw a shape on the Stage, it is a flat, 2D object. You can move or spin this object in all three dimensions, but it will remain a flat shape. Because of this, some developers have referred to the Flash 3D model as "postcards in space." True 3D animation — taking a shape that is actually drawn in all three dimensions and so actually has multiple sides and planes — requires a specific 3D tool such as Maya 3D or Bryce 3D.
You will most often apply these 3D effects to MovieClips. As MovieClips can contain almost any other object, the possibilities for 3D animation are almost endless. For example, you could use the clip to display images that could then be rotated in 3D. You can even insert video into the clip that will continue to play even as it is rotated.