
Flash animates movies in much the same way film creates the illusion of motion onscreen. In both cases, a static image is displayed in a frame. The image is then changed slightly in the next frame, and then again in the next, and so on. When the frames are played back in quick succession, our eyes and brains are fooled into believing that we are seeing motion, thanks to something known as persistence of vision.
In Flash, this change in images over frames is controlled on the Timeline, a panel in the Flash interface. The Timeline panel shows each of the frames in the movie — Flash movies can contain up to 16,000 frames. Flash Player runs through the frames in the movie at the movie's frame rate. In Flash CS4 Professional, the default frame rate is 20 frames per second, but this can be changed if needed. As Flash Player proceeds through the frames, a play head indicates the current frame.
You can add keyframes, which are special containers in which you can change the position, color, transparency, size, or any other property of objects on the Stage. You can use ActionScript to control the play head. By default, Flash Player loops all movies, so when it reaches the end of a movie, it automatically rewinds the movie and then begins playing it again.
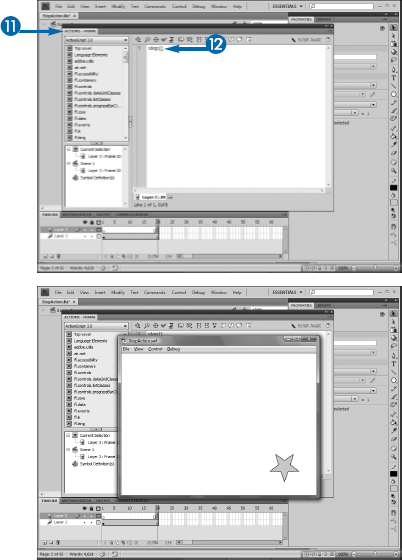
You can use the stop() global method in ActionScript to prevent this behavior by simply adding the method to the keyframe on which you want to end the movie. A global method is one that is available throughout your ActionScript code and does not require you to instantiate or even specify an associated object.


The Convert to Symbol dialog box appears.


Flash adds a motion tween to the Timeline.


Note
See Chapter 1 for details on opening the panel.


The movie plays in Flash Player. The animation plays once and then stops.
After the play head has been stopped, you can programmatically start it again using the play() global method. Like stop(), play() takes no arguments, as there is no other information it needs: It simply begins at the current location of the play head and proceeds from there.
Motion tweens are the most common type of Timeline-based animation in Flash. In creating a motion tween, you simply define the starting and ending states of the symbol to be animated and then have Flash worry about the frames in between those. Motion tweens can only be done on symbols and text fields.
However, two other types of animation are possible — shape tweens and frame-by-frame animation. Shape tweens are similar to motion tweens, in that you need to draw only the beginning and ending states, but shape tweens can be performed only on drawn shapes, not symbols or text. Frame-by-frame animation is the third and most time-consuming method, whereby you must set up each frame individually. More details on animating in Flash can be found in Master VISUALLY Dreamweaver CS4 and Flash CS4 Professional, published by Wiley.
You can use ActionScript to cause the play head to jump to a specific frame in a movie. Once there, the play head can either continue to play from that point or stop, depending on whether you are calling the gotoAndPlay() or gotoAndStop() global method.
Both methods take a single argument, which is the frame to which the play head should jump when the method is called. You can specify the frame using either its number or an arbitrary label. You can add the label in Flash by selecting the frame on the Timeline and then entering the label on the Properties panel. Only keyframes can be labeled. The label is referenced in the gotoAndPlay() and gotoAndStop() methods as a string, so it can contain special characters such as spaces without causing problems. However, as with everything else in ActionScript, the label is case-sensitive, so be sure to be consistent when labeling frames.
Often, going to a specific frame is used to provide navigation within a movie. You may have a navigation button that takes a user to a different section of a project or allows him or her to move forward or backward through a presentation. If you stop a movie at the end, you might provide a button on the last frame that returns to the beginning and replays the movie.
Providing navigation like this gives your users more control over their experience within your project. Instead of a passive viewing of the project, they can feel like they are controlling the action.
Note
See the preceding section, "Stop a Movie," for details on creating motion tweens and adding stop actions.

You can also press F6 on your keyboard to add a keyframe.
Note
See Chapter 3 for details on creating buttons.
The movie plays. When it reaches the end of the animation, it stops, and the button appears.

The movie rewinds and plays again.

In general, it is always a best practice to label frames and reference the label rather than reference frames by number. The problem with numeric references, beyond the obvious that they are harder to remember, is that the number may change if you add or delete frames before the one you are referencing, causing the action to go to the wrong frame. For example, the last frame in your movie might be frame 160, but if you later edit the movie and add 10 more frames, an action calling gotoAndStop(160) will now jump to a stop 10 frames before the end. In contrast, if you labeled the final frame "end," gotoAndStop("end") would work regardless of the additional frames.
An additional benefit of labeling frames is that labels will appear in the Timeline itself. If important points in your animation are labeled, you will be able to merely look at the Timeline and understand when those moments occur rather than have to manually move through the movie to find them. Labels should be placed in keyframes on their own layer, although many Flash developers combine the layer for the actions with the one for layers. The important point is keeping both separated from your visual elements.
MovieClips, like all symbols, have their own Timeline. The Timeline looks exactly like the movie's. You can add layers to the clip's Timeline and animate objects on the Stage within the clip. What makes a MovieClip unique, however, is that its Timeline is independent from that of the movie. Therefore, if you stop a movie, any animation within a clip will continue to play. You must stop the clip directly to get its animation to stop.
Because the MovieClip's Timeline functions exactly like the movie's, you can add frames to the clip and, in turn, add ActionScript to those frames. Therefore, a MovieClip can contain its own set of ActionScript code, which will execute independently from the movie's code. Although it is not a best practice, it is legal to have variables of the same name exist in both the movie's code and a clip's code; as the two execute independently of one another, they will not be in conflict.
Keep in mind, however, that you can and almost certainly will have multiple instances of a single symbol on the Stage. Any code that is written on the Timeline of a clip will be executed by each instance of the clip, although each will execute independently of the others. Generally, you will want to add code to a clip's Timeline only when you need code that will execute for every instance of the clip; code that should more logically be associated with individual instances should be placed on the Timeline of the movie itself.
In order to add code to the Timeline of a MovieClip, you need to edit the symbol. You can either double-click an instance of the symbol to enter editing mode or right-click the symbol in the library and select Edit.

The earlier statement that the Timeline of a MovieClip looks and functions like the main movie's Timeline is actually misleading. In fact, the opposite is technically true: The main movie's Timeline is what looks and feels like a MovieClip's because in point of fact, the main movie is actually nothing more than a special instance of a MovieClip. Keeping this in mind, there are few if any restrictions on the code you place within the Timeline of a MovieClip: In general, any code that can be added to the main Timeline can be added to a clip, and vice versa. Keep in mind as well that all symbols can contain other symbols, so the MovieClip's Timeline can contain code that will control nested MovieClips or buttons.
You can also add code directly to the Timeline of a button. As with MovieClips, a button's Timeline is independent from the movie's. As discussed in Chapter 3, buttons have a unique Timeline that contains only four frames, but this does not prevent you from adding code to the Timeline. Although it is possible to also add script to the Timeline of a graphic symbol, remember that a graphic's Timeline is synchronized with the movie's and thus does not execute independently.
Adding code directly to the Timeline of a MovieClip can be useful when you have code that needs to execute with every instance of the symbol. More often, however, you are likely to need to write code that will affect only a single instance. For example, if you wanted every instance of a MovieClip to rotate when it was clicked, you could add the necessary code to the clip itself; if instead you wanted only certain instances to rotate when clicked, you would write the needed code on the main Timeline, where you can specifically target individual instances.
Any property or method of the clip can be called from the Timeline by referencing the clip's instance name and then the property of method that you want to use, separated by a dot. For example, if you had an instance of a clip named mcBounce1 and you wanted to stop the clip from the main Timeline, you could write
mcBounce1.stop();
You can use this technique not only to control clips' Timelines by starting, stopping, or jumping to specific frames, but also to set the properties of clips, such as their position on the Stage or their size. If the clip is an instance of a custom class, you can use the same technique to set any properties or call any methods of the class.

Instances of symbols can only be called from the Timeline in the same frame in which they are created — or any frame after that. If you try to reference an instance of a symbol on a frame before it is created, a runtime error will occur. For example, you cannot add an event listener to a clip in frame 1 if that clip does not get added to the Stage until frame 20. In order to add the listener, you need to either add it in frame 20 or declare the clip as a variable in frame 1 so that a reference to it exists. You can declare an instance of a symbol as a variable in the same way that you declare other variables, being careful to use the correct data type:
var mcSquare1:MovieClip;
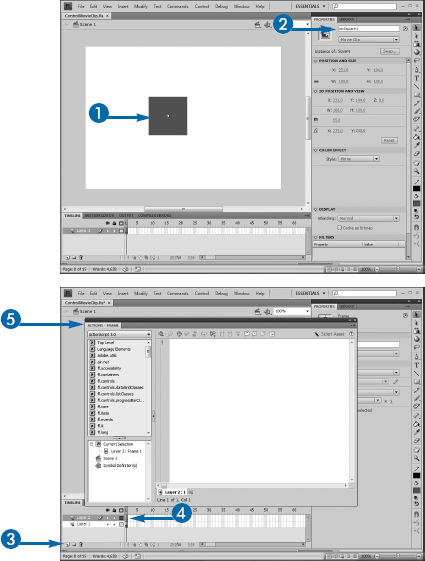
In Flash CS4 Professional, as with all prior versions of Flash, the Stage represents the area where you can draw and place objects to have them visible at runtime. ActionScript 3.0 also has a Stage class, which is a container for all the objects on the display list, or everything currently visible in Flash Player. Technically, the two are not implementations of the same thing, but for practical purposes, you can think of them in much the same light.
An instance of the Stage class, called stage, is automatically created when a movie loads in Flash Player. The instance contains several useful properties and methods that you can leverage in your code. For example, stage.stageWidth and stage.stageHeight can be used to determine the width and height of the Stage or to position other instances relative to that width and height. Therefore, an instance named mcSquare1 could be centered on the Stage by setting its x property to one half the width of the Stage and its y property to one half the height:
mcSquare1.x = stage.stageWidth/2;
mcSquare1.y = stage.stageHeight/2;
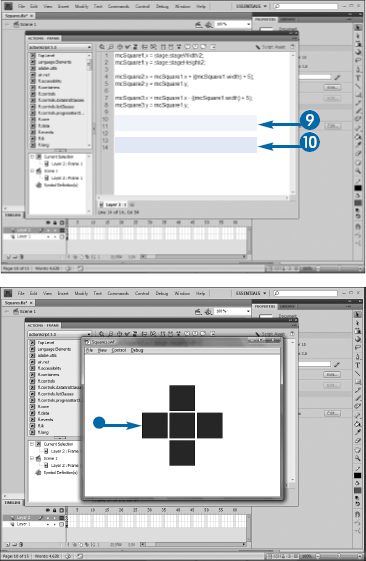
In the example shown here, a MovieClip will be placed in the center of the Stage, and then four more clips will be precisely placed relative to the first.
Note
This example shows placing five instances.
Note
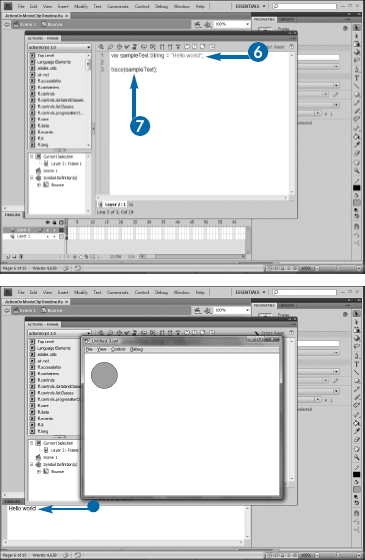
This example uses the names
mcSquare1throughmcSquare5.

The stage class has a frameRate property, which controls the speed at which the movie plays. This property can be changed at runtime, allowing you to provide your users with the ability to speed up or slow down your movie:
btSpeedUp.addEventListener(MouseEvent.CLICK, speedUp);
btSlowDown.addEventListener(MouseEvent.CLICK, slowDown);
function speedUp(event:MouseEvent):void
{
                   stage.frameRate = stage.frameRate + 5;
}
function slowDown(event:MouseEvent):void
{                  stage.frameRate = stage.frameRate −5;

}ActionScript classes can be placed into three broad categories. First, there are classes that can be created only visually with the drawing tools, such as SimpleButton. Second, there are classes that can be created only through code, such as Math, Date, and Array. Third are the classes that can be created either with the drawing tools or through code. The most common of this last class is MovieClip.
MovieClips that you plan to add through code can still be created using the drawing tools. The difference is that you will not place an instance of the clip on the Stage but will instead add it through code.
However, you must explicitly tell Flash that you plan to use the symbol in code. By default, instances of symbols that exist in the Flash library that do not have a corresponding instance on the Stage will not be exported to the published SWF. This is done to save file size in the SWF, as many designers will keep a lot of unused symbols in their library because they do not have to worry about those increasing the final sizes of their SWFs. This creates a problem when you are trying to add the clip through code because Flash will not know that it is supposed to include the symbol when it publishes the movie. The solution is to export the clip for ActionScript, which you do via the symbol's Properties dialog box. You can access the Properties dialog box from the Library panel. By default, the box shows only a few properties, but it contains an Advanced mode with other properties, including the setting to allow the symbol to be exported for ActionScript.
The Convert to Symbol dialog box appears.
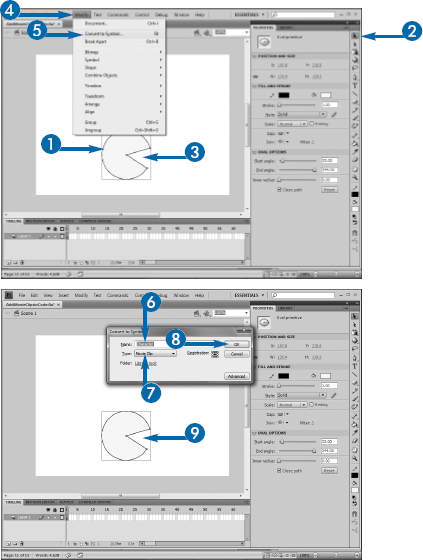
The symbol is created and appears in the Library panel. An instance of the symbol is on the Stage.
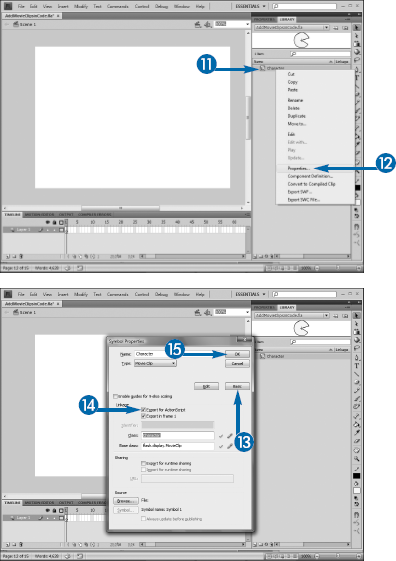
When you check Export for ActionScript in the Properties dialog box, you will see boxes to specify the class and base class for the symbol. These are used to define the symbol as being an instance of some class other than MovieClip. See Chapter 6 for more details.
You will also notice a box labeled Identifier, which will be grayed out and thus inaccessible. This was used in ActionScript versions 1 and 2 to provide a name for the exported symbol. This served the same purpose — exporting the symbol for ActionScript — but was used because those versions of the language did not support the creation of custom classes.
Keep in mind that this extra step is necessary because Flash does not want to export symbols that will not be used and thus needlessly increase the file size of the SWF. Therefore, you should not export any extraneous symbols, either. Only set the Export for ActionScript option on those symbols that you will actually reference in code.
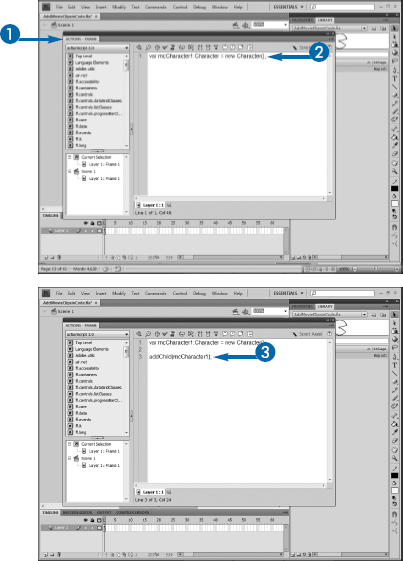
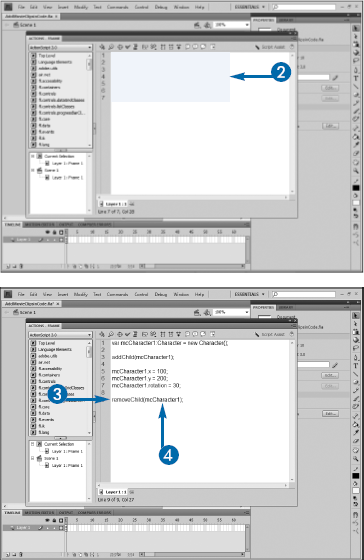
After a MovieClip has been exported for ActionScript, you can create instances of it in your code. You must first create it as an instance by giving it a name and using the new keyword to call its constructor.
Then you can add it to your movie by calling the addChild() method of the Stage class, passing as its argument the name of the instance. All objects that appear visually in your movie are part of the display list on the Stage. The display list tells Flash Player what objects should appear on the Stage and in what order. The addChild() method adds the instance to this display list as its last item.
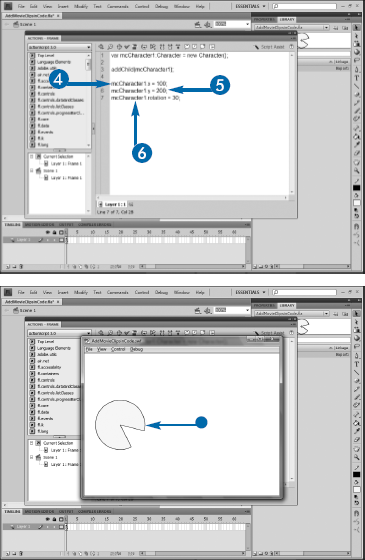
The new symbol will be placed at the 0,0 coordinate on the Stage — the top-left corner. You can set the x and y coordinates of the instance to place it elsewhere on the Stage, just as you would a symbol that you drew on the Stage in Flash. Any other properties of the symbol can also be set as you would normally, and any of the symbol's methods can be called.
You must repeat these steps for each instance that you want to add, so you need to create the instance by naming it and calling its constructor and then call addChild() for each.
Creating the MovieClip by declaring the variable and using the new keyword to call the constructor is fundamentally the same process as dragging an instance of the symbol onto the Stage and then naming it in the Properties panel. Therefore, you should follow the same instance naming conventions for clips created through code as you would for those created visually: Begin with the mc prefix and then include the name of the symbol itself and an identifying number.
You can easily create multiple instances of a symbol by placing the line where you declare the instance and the line where you call addChild() within a loop. Loops are discussed in Chapter 12.
Overlapping objects appear on the Stage in the order that they are added to the display list, so if you call addChild() on two objects and do not specify different x and y coordinates, the second will appear on top of the first. The stacking order can be changed by adding instances using the addChildAt() method instead of addChild(). This method takes two arguments: the name of the instance to add and a level at which it should be added. The level is given as an integer, and as you would expect, objects placed at higher levels appear on top of those placed at lower levels. Should you accidentally add an object at a level already in use, the object currently using the level and all those above it will be moved up one level to accommodate the new object.
Just as MovieClips can be added to the Stage with addChild(), ActionScript provides a removeChild() method to remove objects programmatically. Like its counterpart, the method takes a single argument: the object to be removed. When called, the method removes the specified object from the display list.
However, removeChild() does not remove the object from memory, so you can redisplay it by simply calling addChild() again. If the object will not be needed anymore, it is a good idea to be sure to remove it from memory as well as the display list, which can be done by setting its value to null.
You should also get in the habit of removing any event listeners from the object that you may have added. Even if an object has been removed from memory, its event listeners can remain and continue to consume resources as they try unsuccessfully to respond to events. The code to completely remove a MovieClip with a mouse click event might look like this:
removeChild(mcStar1);
mcStar1.removeEventListener(MouseEvent.CLICK,
 clickHandler);
mcStar1 = null;
If you forget to remove objects from memory as well as the display list, your Flash movie may eventually end up with memory leaks or other potential errors.
Note
See the prior task, "Add MovieClips to the Stage through Code" for details on these steps.
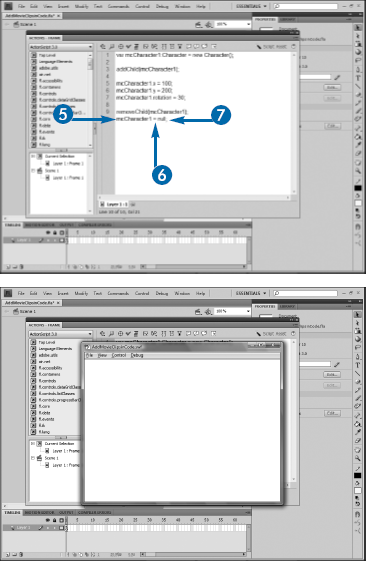
The movie plays. The symbol that was removed will not appear on the Stage.
If you need to remove an object where you know the level at which it resides but not its name, you can use the removeChildAt() method instead of removeChild(). It takes a single argument: an integer representing the level at which the object should be removed. Unlike removeChild(), removeChildAt() actually removes the object itself by setting its value to null. When you call removeChildAt(), all objects on levels above the one removed are moved down one level to fill the vacated space.
Levels are similar conceptually to layers, but they are not the same. Layers define the stacking order of objects that you draw visually on the Stage, whereas levels are used by the display list to order objects that are created in ActionScript. You cannot reference or access the layers in your movie through your code, and you do not have any way to access levels outside of code. In fact, objects added with addChild() and addChildAt() will not be visible on the Stage, as they are added at runtime.