
ActionScript provides a full programming interface that allows you to draw objects onscreen through code, freeing you from having to rely on the Flash Professional drawing tools. This interface is particularly helpful in that you can have objects drawn at runtime based on user-provided variables.
Drawing in ActionScript relies on the Graphics class, which defines line and fill styles and lets you draw lines, curves, and shapes. All the methods of the class can be called via the graphics property of the display object onto which you are drawing. It can be helpful, although not required, to create a specific object, often using the Sprite class, to hold your drawings rather than place them directly onto the Stage, as this provides a central reference that allows you to later move or resize the drawn shapes as a group if needed.
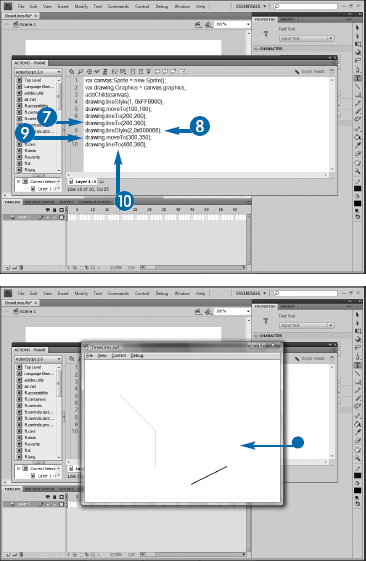
To draw lines, you need to first call the lineStyle method. The first argument for the method is the width or thickness of the line, in pixels. The second argument is the color, given as a hexadecimal value.
Next, you need to draw the actual line. You begin by calling the moveTo method, which takes x and y coordinates to define the starting point of the line and then calling the lineTo method, passing the line's endpoint as x and y arguments. You can continue drawing connected lines by repeatedly calling lineTo, or you can start a new line with a new call to the moveTo method. You can change the appearance of the line at any point by recalling the lineStyle method.

You can also set other properties of the line in the lineStyle method beyond the thickness and color. Any of the properties you can set in the Properties panel can be set through the method. These include alpha, given as a number between 0 and 1; pixelHinting, which takes a Boolean value and affects the way lines and curves join; scaleMode, which takes a string with accepted values of normal, none, vertical, and horizontal and affects the way in which the line is scaled if the shape is scaled; caps, which takes a constant from the CapsStyle class of NONE, ROUND, and SQUARE and allows you to set the appearance of the end caps of the line; joints, which takes either JointStyle.BEVEL, JointStyle.MITER, or JointStyle.ROUND and sets the appearance of the joints in connected lines; and miterLimit, which takes a number that determines the limit at which the miter is cut off. Details and examples of each of these can be found at http://livedocs.adobe.com/flash/9.0/ActionScriptLangRefV3/flash/display/Graphics.html#lineStyle().
You can draw curves in code by defining a lineStyle method and determining a starting point with the moveTo method. See the previous section, "Draw Lines in Code," for details on these two methods.
After setting the style and initial point, you can call the curveTo method to draw a curve. Like other vector-based drawing tools, Flash draws Bezier curves. However, other programs such as Adobe Illustrator and Adobe Fireworks use what is known as a cubic curve model, in which the curve is defined using separate control points or handles for each endpoint on the curve. Flash, on the other hand, uses a quadratic Bezier model, whereby the curve is defined by a single control point for the curve. Although this can cause confusion when drawing on the Stage in Flash, if you are experienced with other vector tools, it greatly simplifies the code needed to draw the curve. Thus, the curveTo method takes four arguments: two numbers to specify the x and y coordinates of the control point and two numbers for the x and y coordinates of the end of the line. The control point is the imaginary point where the control handles would meet. Determining the exact location of the control point in your code requires a bit of practice and a lot of trial and error.
Once done, you should get in the habit of resetting the drawing point to an arbitrary place on the Stage to prevent future lines from connecting to your existing shape. You simply need to call the moveTo method to accomplish this.


It is possible to draw a circle by repeatedly calling the curveTo method, but ActionScript includes a drawCircle method that greatly simplifies this process. The method is discussed in the following section, "Draw Shapes in Code."
You can clear an existing line style by calling the lineStyle method but providing no arguments.
You can freely switch between drawing curves and lines based on the order in which you call successive lineTo and curveTo methods. Therefore, a straight line, followed by a curve, followed by a straight line could be created like this:
drawing.moveTo(100,100);
drawing.lineTo(150, 100);
drawing.curveTo(200,0,200,100);
drawing.lineTo(250,100);
Although you can draw complete shapes by creating a series of connected lines or curves, ActionScript provides a far easier path via its drawCircle, drawEllipse, drawRect, and drawRoundRect methods. Each offers an easy way to draw closed shapes.
The drawCircle method takes as its arguments three numbers: The first and second represent the x and y coordinates of the center of the circle, and the third is the radius, in pixels. The related drawEllipse method takes four arguments: The first two are the same as for the circle — the x and y of the shape's center, and the final two arguments are the width and height of the ellipse, both in pixels.
You can draw a rectangle with square corners by using the drawRect method. Like the ellipse, it takes as its first two arguments x and y coordinates, although they represent the top-left corner of the rectangle rather than its center, and as its last two arguments the width and height of the shape. Finally, the drawRoundRect draws a rectangle with rounded corners. Its first four arguments are the same as that of the rectangle, but it includes a fifth argument, in which you specify the corner radius, in pixels as usual.
Any of these methods should be preceded by a call to the lineStyle method, discussed in the previous sections of this chapter, to set the appearance of their lines. You need not call the moveTo method because the shapes reference the point at which they are drawn directly. You can fill the shapes with solid or gradient colors, which is covered in the following section, "Create Fills."


When calling the lineStyle method, you can set its width to 0, which sets it to a hairline thickness. The maximum thickness of the line is 255 pixels; if you pass in a value greater than that, it will be ignored and the thickness set to 255. The parameter must be an integer, so you cannot set a thickness to, say, 1.5. The caps, joints, and miter settings of the method are not always obvious when simply drawing lines but will be clear if you apply them to rectangles.
ActionScript does not provide methods to draw stars and polygons, even though tools exist for those shapes in Flash Professional. You need to draw them manually with the moveTo and lineTo methods to draw a series of lines. Closed shapes can be drawn by simply having a final lineTo method return to the original point specified by the initial moveTo call.
While drawing shapes, you can also add fills. When creating a filled shape using the drawing tools in Flash Professional, you can set the fill color and its alpha, or transparency. You can do the same when adding fills in code.
Before you begin drawing the lines or curves, you need to call the beginFill method. It takes two arguments: the color of the fill and its alpha. The color is a hexadecimal value, and the alpha is a number between 0 and 1, where 0 is completely transparent and 1 completely opaque. The alpha value is optional and defaults to 1.
After setting the fill, you can draw the line using the moveTo, lineTo, and curveTo methods. See the prior sections in this chapter for details on these methods. You need to call the endFill method, which takes no arguments, after any lineTo or curveTo calls to complete the shape.
Using the drawing tools, you can use gradients to fill shapes, and you can also use them when drawing in code. Rather than call the beginFill method, you use the beginGradientFill method. This method takes four arguments. The first defines the type of gradient, using either the RADIAL or LINEAR constants of the GradientType class. Second, you provide an array of colors that will be used to fill the gradient. Third is an array of alpha for each color, and the final argument is an array of ratios that determine how the gradient is applied. Just as with the beginFill method, you complete your shape by calling the endFill method.


The beginGradientFill method takes arrays as its arguments instead of simple values because gradients can take more than one color, alpha, or ratio value. You can, for example, specify as many colors as you want for a gradient.
The ratios argument defines how the gradient is applied through the shape. In the example shown here where the values are set to 0 and 255, the gradient is applied evenly through the shape. A ratio of 0, 127 would cause the gradient to be applied only over the first third or so of the shape, so the second color would be solid through most of it. A ratio of 127, 255 would have the opposite effect: The first color would be solid through the first two-thirds of the shape, with the gradient being applied only in the last third. These settings mimic the ability to drag the color stops to the left and right in the Color Mixer panel in Flash CS4 Professional to adjust the ratios of the gradients.
You can have a gradient move from transparent to opaque by adding an array of alphas going from 0 to 1. You still need to provide at least two colors. Even though the first color will be transparent when it starts, it will be somewhat visible as the alpha shifts over the course of the gradient.
You can change the color of an object on the Stage at runtime through an instance of the ColorTransform class. This class allows you to adjust the red, green, and blue channels that make up the object, as well as its alpha, or transparency, channel.
When using the ColorTransform class, you can change the channels with either a multiplier or an offset. Using the multipliers, you can, for example, double the amount of red in the object by setting the redMultiplier property to 2, or you can cut the amount of blue in half by setting the blueMultiplier to .5. If you would prefer, you can use the offsets instead, setting the channels to a value between −255 and 255. The new value will be added or subtracted to the current value to achieve a new color or alpha setting.
Once created, the instance of the ColorTransform class can be applied to one or more clips on the Stage by setting the instance to the colorTransform property of the display object's transform object. Therefore, if you created an instance of ColorTransform called ct, you could apply it to a MovieClip called mcBox1 with the following:
mcBox1.transform.colorTransform = ct;
In the example shown here, the Math object's random method will be used to calculate random offsets for a Sprite's color. The Math object and the random method are discussed in Chapter 4.


Any time you need to apply a series of properties to a single object, you can reduce the amount of typing needed by using the with operator. The code to set the properties of the ColorTransform object shown in this section is written as follows:
ct:ColorTransform = new ColorTransform();
ct.redOffset = Math.round((Math.random() * 510)-255);
ct.greenOffset = Math.round((Math.random() * 510)-255);
ct.blueOffset = Math.round((Math.random() * 510)-255);
Instead, it could be written using with:
ct:ColorTransform = new ColorTransform();
with(ct)
{
                   redOffset = Math.round((Math.random() * 510)-255);
                   greenOffset = Math.round((Math.random() * 510)-255);
                   blueOffset = Math.round((Math.random() * 510)-255);
}
Unfortunately, the ActionScript panel in Flash Professional will not provide code hinting when using with, so you need to weigh the advantages of code hinting against not needing to type the object name when deciding whether or not you use it.
Filters, first introduced in Flash 8, allow you to apply visual effects to objects on the Stage such as drop shadows, blur, and bevel. Although the Properties panel allows you to set up and apply these filters, you can also do so through code. Fortunately, the code required almost exactly mirrors the settings in the Properties panel, so if you are familiar with the panel, you will not find this code difficult to remember.
Each of the filters has a corresponding class in ActionScript: DropShadowFilter, BlurFilter, GlowFilter, BevelFilter, GradientGlowFilter, and GradientBevelFilter. In order to use the filter, you need to first create an instance of the appropriate class and set its properties. For example, if you want to create a dark gray drop shadow that will be 5 pixels from the object, have x and y blurs of 15 pixels, and a 75% alpha, you might create a DropShadowFilter instance called ds and then add ds.color=0x888888, ds.distance=5, ds.blurX=15, ds.blurY=15, and ds.alpha=.75.
Once created, filters can be applied to an object by calling the object's filters property. The property takes as its value an array of filters, which allows you to apply multiple filters to the same object at once.
If the object to which you are applying filters is animated, the filter will animate with it. You could alter the properties of the filter over time as you animate the object if you want to have it animate on its own; for example, you may want a shadow to become lighter and blurrier as the shape moves away from the Stage. However, you should be aware that animating filters is extremely processor-intensive, so it should be used with caution.


Although the example in this section demonstrates the ability to apply a filter to a Sprite drawn in code, filters can in fact be applied to objects that you place or draw directly on the Stage as well. Therefore, instead of using the initial lines in the example to draw a Sprite, you could manually draw a shape on the Stage, convert it to a MovieClip, and then apply the filter to the clip. Alternatively, you could import a bitmap image of some kind, convert it to a MovieClip, and then apply the filter. Of course, there would be no functional difference at that point between applying the filter in code versus applying it through the Properties panel, so most often you will see code-generation filters applied only to those objects that are created, or at least instantiated, through code themselves.
The easiest way to determine the available properties of a filter is to look at the Properties panel for that filter. You can also reference the filter's class on the online ActionScript reference at http://livedocs.adobe.com/flash/9.0/ActionScriptLangRefV3/.
Computer graphics can be drawn as either vectors or bitmaps. Vectors use mathematical calculations to draw lines or curves between defined points, whereas bitmaps fill individual pixels with colors. Flash is primarily a vector drawing program; all the drawing you do with the tools from the Tools panel and all the drawing done thus far in this chapter have relied on vectors.
However, you can work with bitmaps in Flash. Bitmaps, most often photographs, can be imported from other applications such as Adobe Photoshop, directly from a digital camera or scanner, or downloaded from a stock photo service online such as iStockphoto (www.istockphoto.com).
Rather than import graphics, you can temporarily convert vectors to bitmaps in Flash. When animating, vectors require considerable processing overhead, as they must be constantly recalculated. Bitmaps, on the other hand, require no processing as they are based on filled pixels rather than calculated lines and curves.
You can cache a vector as a bitmap by simply setting its cacheAsBitmap property to true. When you do this, Flash creates a surface, or bitmap representation of the vector. The appearance will not be affected; if the vector needs to be scaled or changed, Flash will discard the bitmap, modify the vector, and then create a new bitmap. Therefore, your user will not be able to tell visually when this process occurs. However, they may be able to notice that you are caching bitmaps because if the image is not changing as it animates, storing it as a bitmap will save processor cycles and may result in your movie playing faster or giving you smoother playback.


When you create a nonrectangular shape in Flash, either through the drawing tools or ActionScript, the shape is given a transparent background. You can achieve even greater performance gains by applying solid backgrounds to shapes so that the transparency can be ignored as well. ActionScript provides an opaqueBackground property, which takes a hexadecimal color value, that allows you to set this background color.
The performance gains achieved by caching a vector as a bitmap will be noticeable only on relatively static objects, such as backgrounds in your animations. If the object is moving or being scaled repeatedly, any performance savings gained by the caching will be lost by the need to constantly delete and regenerate the new bitmaps. In general, it should only be used sparingly and only when you notice that you have performance lags that you believe may be helped by the technique.
You can create shapes through code that are stored internally as bitmaps rather than vectors. You can fill the bitmap with either a solid fill or a picture from the library. This section demonstrates using a solid fill, and the next section, "Add an Image to the Library and Create a Bitmap from It," shows how to insert an image from the library.
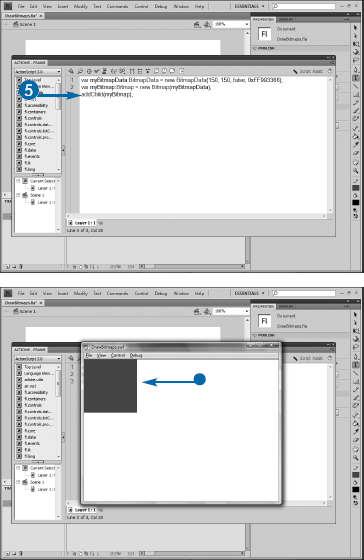
In order to draw a bitmap, you must first create an instance of the BitmapData class. This class defines the visual aspects of the bitmap but does not create the image itself. An example of creating the bitmap might look like this:
var bitData:BitmapData = new BitmapData(150, 150, false, 0xFF0000FF);
As you can see, the class constructor takes four arguments. The first two are the width and height of the image, in pixels. The third, a Boolean, defines whether the object can support transparency. The final argument defines the color to be used to fill the bitmap. As usual with colors, it is given in hexadecimal format, but note here that it takes four pairs of values, rather than the normal three. The additional pair, given first, is the alpha, or transparency value.
As noted earlier, the BitmapData class merely defines the pixels to be used; it does not draw the shape. The drawing is handled by an instance of the Bitmap class, whose constructor takes an instance of the BitmapData class. Once created, you can simply call the addChild method to add the Bitmap instance to the Stage.

Creating semitransparent bitmaps can be a bit challenging due to the need to use hexadecimal to specify the alpha value rather than an integer. You need to understand that hexadecimal is a method of counting from 0 to 255 in two digits rather than three. This is done by using a base-16 counting system, in which the letters A to F represent the additional six digits.
You can convert from decimal to hexadecimal by taking the decimal number and dividing by 16. The whole portion of the result becomes the first digit, and the remainder is the second. For example, take a decimal value of 127. 127/16 is 7, with a remainder of 15. 15 is the equivalent of F in hexadecimal, so 127 is the same as 7F. As 127 is approximately half of 255, a value of 7F would roughly equal an alpha transparency of 50%. Remember that in order to use transparency, you must also set the third argument of the BitmapData's constructor to true. For example, if you wanted a blue square with 50% transparency, you could write var mySquare:BitmapData = new BitmapData(100, 100, true, 0x7FFF0000);.
Rather than draw a solid fill in a bitmap shape, you can use an image that you have imported into Flash and stored in the library. This allows you to create bitmap images from any image that you may have on your computer.
Before you can use a library image, you must first export it for ActionScript and give it a class name. It can be anything, but to maintain consistency, it should be a single word that uses Pascal case, so it should begin with a capital letter.
In your code, you can then create an instance of the BitmapData class, as discussed in the preceding section, "Draw a Bitmap." However, rather than create the instance by calling the BitmapData's constructor, you should call the constructor of the new image class that you created when you exported the image. You must pass to the constructor a width and height, but oddly, these will be ignored and the actual width and height of the image used. For ease of use, it can be helpful to set both values at 0 — for example,
var myImage:BitmapData = new WeddingPhoto(0,0);
Finally, you can create an instance of the Bitmap class, passing the BitmapData variable to it. Call addChild to actually draw the bitmap on the screen, and your image will appear.

The Import to Library dialog box appears.


The image is imported to the library.


You can retrieve the width and height of the BitmapData object by calling those properties. If, for example, you have a BitmapData object named myPicData, you could display its width and height in the Output window using this:
trace("The width is " + myPicData.width);
trace("The height is " + myPicData.height);
If you animate a Bitmap off the Stage, it is a good idea to remove it from memory to free up those resources. This can be accomplished via the dispose() method. Once called, the method sets the width and height each to 0 and causes any other calls to the object to fail:
myPicData.dispose();
myPicData.hitTest(); //fails and throws exception