
Chapter 8: Understanding the QuickSight API
In this chapter, we will learn how to perform operations using the Amazon QuickSight API. We will also explore patterns to automate dataset operations, and we'll demonstrate some of the API actions that allow us to control our account settings. After completing this chapter, you will be familiar with the QuickSight API and how to programmatically control its resources, which is essential when building automation.
We will cover the following topics in this chapter:
- Introducing the QuickSight API
- Controlling resources using the API
Technical requirements
For this chapter, you will need access to the following:
- An AWS account and an AWS Identity and Access Management (IAM) user, with elevated access
- Python 3
- An Amazon QuickSight account with Author and Reader users configured
- The environment created in Chapter 1, Introducing the AWS Analytics Ecosystem
- The dashboards created in Chapter 3, Preparing Data with Amazon QuickSight
Introducing the QuickSight API
In this section, we will introduce the Amazon QuickSight API. An application programming interface (API) is a set of defined functions that allow application developers to access the features of a certain application or library. The AWS API allows developers to access AWS services programmatically. Traditionally, AWS provided infrastructure services, allowing developers to programmatically provision virtual machines on the cloud. Now, AWS provides many more services, many of which are not infrastructure services. Amazon QuickSight is a great example of one such service. QuickSight is a cloud-based business intelligence (BI) service that runs on AWS infrastructure, but developers don't need to provision infrastructure. Instead, developers can use the QuickSight API to access features and conduct actions in the application, such as creating datasets, performing data analysis, or sharing dashboards. So far in this book, we have learned how to complete these operations using the QuickSight console with a graphical user interface (GUI) accessed via a web browser. In this chapter, we will learn how to complete these operations programmatically, which will allow us to build automation when creating BI applications. First, we will learn how to access the QuickSight API.
Accessing the QuickSight API
In this section, we will learn about the methods you can use to access the QuickSight API. There are two main ways of accessing AWS APIs:
- Using a software development kit (SDK)
- Using the command-line interface (CLI)
Next, we will look at these options in more detail with hands-on examples.
Accessing the QuickSight API using the AWS CLI
AWS provides a simple CLI that allows developers to access the AWS API. Before using the CLI, you will need to install it. Follow the AWS instructions to install the CLI for your operating system:
https://docs.aws.amazon.com/cli/latest/userguide/cli-chap-install.html
Verifying the installation
Once installed, open a terminal and run the following command to check what CLI version was installed:
$aws –version
aws-cli/2.1.13 Python/3.7.4 Darwin/20.5.0 exe/x86_64 prompt/off
Configuring the AWS CLI
Now that we have installed the CLI, we need to configure it. First, we need to create a set of credentials that will be used by the CLI:
- Log in to the AWS Console with your user credentials.
- Open Services and select Identity and Access Manager.
- Under Access Management, select Users, and then click on the IAM username whose security credentials need to be generated.
- On the next page, select the Security credentials tab.

Figure 8.1 – Creating access keys

Figure 8.2 – Retrieving the access key
- Note the values in the Access key ID and Secret access key fields.
- Next, open the terminal, run the following command, and add your access key ID and secret access key when prompted. Leave everything else as-is by hitting the Return key.
$aws configure
Accessing the QuickSight API using the CLI
Now that we have configured the CLI, we can run a few commands:
- To get a list of all QuickSight CLI commands, type the following:
$aws quicksight help
- To list our dashboards, type the following command:
$ aws quicksight list-dashboards --aws-account-id <numerical account id> --region us-east-1
{
"Status": 200,
"DashboardSummaryList": [
{
"Arn": "arn:aws:quicksight:us-east-1:xxxxxxx:dashboard/xxxxxxxx",
"DashboardId": "xxxxxxx",
"Name": "New York Taxi Dashboard",
"CreatedTime": "2021-06-02T20:19:00.285000+01:00",
"LastUpdatedTime": "2021-07-06T23:55:04.960000+01:00",
"PublishedVersionNumber": 14,
"LastPublishedTime": "2021-06-02T20:19:00.285000+01:00"
}
],
"RequestId": "xxxxxxx"
}
Note the structure of the CLI command:
- aws: To access all CLI commands.
- quicksight: To access the QuickSight CLI commands.
- list-dashboards: To access the API that returns all the dashboards for an account and region.
- Options (--): Use this symbol to add options for the command.
Now that we have configured the CLI and run a simple command, feel free to experiment with the other commands before proceeding to the next section. Refer to the AWS documentation to view the available and required options for your selected CLI command:
https://awscli.amazonaws.com/v2/documentation/api/latest/reference/quicksight/index.html
Next, we will access the QuickSight API using the AWS SDK.
Accessing the QuickSight API using SDKs
AWS provides various development kits that support a number of programming languages. This means developers can integrate their applications with AWS services without the need to change their programming language. Most common programming languages are supported by AWS, including Python, Java, C++, Go, JavaScript, and Ruby. For more information on the latest language support, refer to the AWS documentation at https://aws.amazon.com/tools/. To better understand the AWS SDK, we will use a simple hands-on example. For this example, we will use the Python SDK to programmatically retrieve the QuickSight dashboards and print their names on the screen.
Installing the AWS SDK
For this example, we will use the Python AWS SDK. You will need to install Python in your environment if you haven't already.
If you have Python installed, then type the following command in a terminal:
$pip install boto3
Next, open your preferred code editor, and type in the upcoming Python code.
Note
AWS provides a cloud-based integrated development environment (IDE), called Cloud9.
To create a Cloud9 environment, log in to the AWS Console and select Cloud9 from the services list. For this tutorial, you can leave all the default settings as they are. For more information on setting up Cloud9, follow the AWS documentation:
https://docs.aws.amazon.com/cloud9/latest/user-guide/create-environment.html
Before running the following code, replace the AwsAccountId value with the numerical account ID from your environment:
import boto3
client = boto3.client('quicksight',region_name='us-east-1')
response = client.list_dashboards(AwsAccountId='xxxxxxxxx')
dashboards_list = response['DashboardSummaryList']
print('Number of dashboards: ' + str(len(dashboards_list)) + ' ')
for dashboard in dashboards_list:
print(dashboard['Name'])
Save the Python script and run it. It should print the total number of dashboards for that region, followed by the name of each dashboard.
Controlling resources using the QuickSight API
In this section, we will learn how to control QuickSight resources using the QuickSight API. This section is not meant to be a full reference guide to the QuickSight API, nor is it going to cover every possible action that can be done using the API. For a full reference guide to the QuickSight API, please refer to the QuickSight documentation:
https://docs.aws.amazon.com/quicksight/latest/APIReference/Welcome.html
This section will provide you with practical hands-on examples of using the API to control QuickSight resources. These examples will give you a solid understanding of the types of activities that can be completed using the API, which in turn will help you to manage your QuickSight environment.
Our first example will be to learn how to set up a data source using the QuickSight API.
Setting up a dataset using the CLI
In Chapter 2, Introduction to Amazon QuickSight, we learned how to create data sources and datasets. To create these resources, we accessed the QuickSight GUI via our web browser. While the GUI is user-friendly, we can create datasets programmatically using the API. This can be a good option when we need to ensure the consistency of a specific configuration, as manual configurations can be prone to errors. Let's create a data source from the data warehouse we created in Chapter 1, Introducing the AWS Analytics Ecosystem.
Note
The tutorial from Chapter 1, Introducing the AWS Analytics Ecosystem, included creating a sample Amazon Redshift cluster, which will incur charges. For this tutorial, you don't need the cluster running. A paused cluster can work well for this example, as we only need to configure the dataset and we won't need a live connection to it.
Now, let's create a Redshift data source using the CLI. We will use the create-data-source CLI command to create a Redshift data source:
https://docs.aws.amazon.com/cli/latest/reference/quicksight/create-data-source.html
Here are a few parameters we need to configure:
- AwsAccountId: This value represents your AWS numerical account ID.
- DataSourceId and Name: You will need to define a unique account and region identifier and a user-friendly name to describe your data source.
- Type: This is the type of data source. For Redshift data sources, this needs to be set up as REDSHIFT.
- DataSourceParameters: The type of data source parameters will depend on the type of data source you configure. For Redshift data sources, you will need to define the hostname, port number, Redshift database name, and cluster identifier.
- Credentials: These are the credentials required by QuickSight to access the data store. For Redshift data sources, you can use a credential pair consisting of a username and password.
- Permissions: In this section, you will need to define the permissions for the newly created datasets and determine which user has access to it and what levels of access they have. For our example, we want our reader user to be able to create datasets from the newly created data source, but we also want to restrict that user from deleting or updating the data source.
Now, let's see how to configure the Redshift connection described previously, using the QuickSight CLI:
- First, open a text editor and copy the following JSON configuration. Replace the highlighted values with those from your environment. For the permissions, note that we only give permissions to the PassDataSource, DescribeDataSource, and DescribeDataSourcePermissions actions, which will allow this user to use this data source to set up new datasets, but it will not allow them to update or delete the data source:
{
"AwsAccountId": "<account id>",
"DataSourceId": "RedshiftDatasouceCLI",
"Name": "CLI Datasouce",
"Type": "REDSHIFT",
"DataSourceParameters": {
"RedshiftParameters": {
"Host": "hostname",
"Port": 5439,
"Database": "dev",
"ClusterId": "mycluster"
}
},
"Credentials": {
"CredentialPair": {
"Username": "admin",
"Password": "R3dsh1ft"
}
},
"Permissions": [
{
"Principal": "arn:aws:quicksight:us-east-1 :xxxxxxxxxxx:user/default/author",
"Actions": [
"quicksight:DescribeDataSource",
"quicksight:DescribeDataSourcePermissions",
"quicksight:PassDataSource"
]
}
]
}
- Save the file as create-data-source.json.
- Run aws quicksight create-data-source --cli-input-json file://create-data-source.json.
The result of this command will look like the following:
{
"Status": 202,
"DataSourceId": "SampleRedshiftDatasouce",
"RequestId": "xxxxxx-xxxxx-xxxxx-xxxxx-xxxxxxxxxx",
"CreationStatus": "CREATION_IN_PROGRESS",
"Arn": "arn:aws:quicksight:us-east-1:xxxxxxxxxx:datasource/SampleRedshiftDatasouce"
}
Now that we have configured the new data source, let's validate that the Author user will be able to use it to set up a new dataset:
- For this tutorial, we can verify the newly created data source simply by logging into QuickSight as the author user.
- Then, navigate to Datasets, and then click New Datasets. You should be able to find the newly created data source under the FROM EXISTING DATA SOURCES menu, as shown in the following figure:
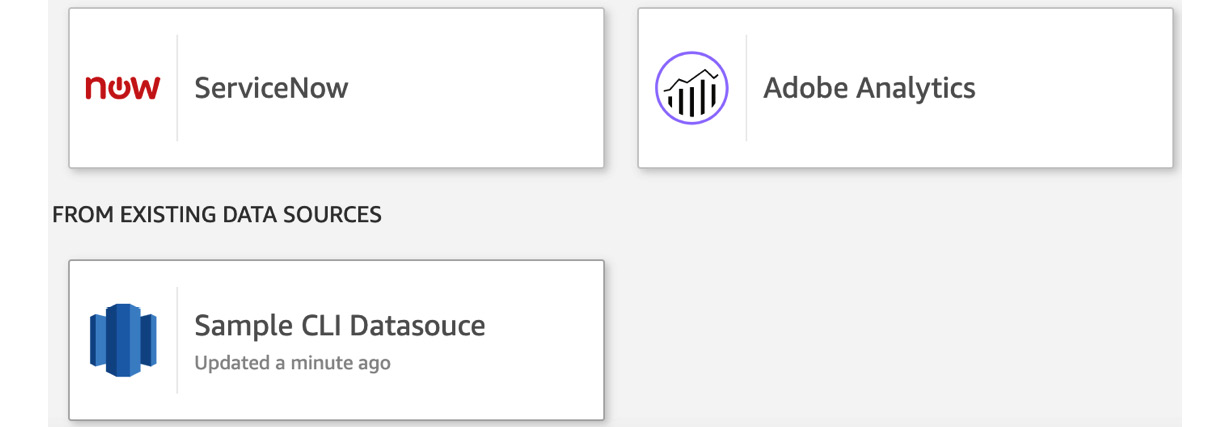
Figure 8.3 – Creating a data source using the CLI
- Click on the data source. Note that the buttons to delete or edit the data source are not shown, as this user doesn't have the permissions required to update or delete this data source:

Figure 8.4 – Sample CLI data source permissions
Now that we have learned how to configure a data source, we will use the QuickSight CLI to change the QuickSight settings for our environment.
Editing account settings using the QuickSight API
In this section, we will use the QuickSight API to edit settings on our account. This allows us to configure account customizations on our account. For our example, we will change the default theme for our QuickSight Account.
- First, let's use the QuickSight API to retrieve the global QuickSight account details. Using the CLI as a QuickSight or AWS admin, type the following command, replacing the aws-account-id value with the value from your environment:
$aws quicksight describe-account-settings --aws-account-id <account-id>
The response should look like the following:
{
"Status": 200,
"AccountSettings": {
"DefaultNamespace": "default",
"Edition": "ENTERPRISE",
"NotificationEmail": "your-email",
"AccountName": "quicksight-account-name"
},
"RequestId": "xxxxxxxxxxxxxxxxxxxxxx"
}
- Next, let's type the following command to get our QuickSight account customizations. Account customizations refer to a set of settings that can be parameterized for a QuickSight account. Currently, you can add a custom default theme by using account customization:
$aws quicksight describe-account-customization --aws-account-id <account-id>
Since we haven't yet added any customizations, the response would most likely look like the following:
An error occurred (ResourceNotFoundException) when calling the DescribeAccountCustomization operation: Account customization does not exist for AwsAccountId <account-id>
- Now, let's add an account customization and set Midnight as the default theme. Type the following command using the CLI, replacing the aws-account-id value with your account ID value:
aws quicksight create-account-customization --aws-account-id <account-id> --account-customization DefaultTheme=arn:aws:quicksight::aws:theme/MIDNIGHT --region=us-east-1
- Now, let's confirm the creation of the new account customization by running again the describe-account-customization command from Step 2. This time, the response should look like the following:
{
"Status": 200,
"RequestId": "xxxxxx-xxxx-xxxx-xxxx-xxxxxxxxxxx",
"AccountCustomization": {
"DefaultTheme": "arn:aws:quicksight::aws:theme/MIDNIGHT"
},
"Arn": "arn:aws:quicksight:us-east-1:xxxxxxxxxxxx:customization/account/xxxxxxxxxxxx ",
"AwsAccountId": "xxxxxxxxxxxx "
}
Note
The account customization applies at the account and AWS Region levels.
To verify that the customization setting has been applied on this account, you can create a sample analysis on the account for the same region where you applied the account customization.
Now that we have learned how to edit our account settings using the CLI, in the next section, we will learn how to use the template API, which is useful when developing analysis and dashboards across multiple environments.
Reusing assets using the template API
QuickSight offers a template API, which allows you to build blueprints for analysis and then use those blueprints to create other analyses for different users, or even for different accounts, with consistency. Templates are not visible on the GUI, and we can access them only by using the API. Next, we will show a simple example of creating a template using the New York Taxi analysis:
- First, let's list our existing analysis. Using the CLI, type the following command, replacing the <account-id> value with the value from your account:
$aws quicksight list-analyses --aws-account-id <account-id> --region us-east-1
Note the analysis-id value from our New York Taxi analysis.
- Next, we will capture additional analysis details, including details about our datasets. Type the following command, replacing the <account-id> and analysis-id values with the values from your environment:
aws quicksight describe-analysis --aws-account-id <account-id> --analysis-id xxxxxxx-xxxx-xxxxx-xxxxx-xxxxxxxxxx --region us-east-1
The response should look like this:
{
"Status": 200,
"Analysis": {
"Status": "CREATION_SUCCESSFUL",
"Name": "yellowtrips_3mo analysis",
"LastUpdatedTime": 1629144517.0,
"DataSetArns": [
"arn:aws:quicksight:us-east-1: xxxxxxxxxxxx:dataset/xxxxxxx-xxxx-xxxxx-xxxxx-xxxxxxxxxx",
"arn:aws:quicksight:us-east-1: xxxxxxxxxxxx:dataset/xxxxxxx-xxxx-xxxxx-xxxxx-xxxxxxxxxx "
],
"CreatedTime": 1621766161.633,
"Sheets": [
{
"SheetId": " xxxxxxx-xxxx-xxxxx-xxxxx-xxxxxxxxxx ",
"Name": "Executive Summary"
}
],
"ThemeArn": "arn:aws:quicksight::aws:theme/MIDNIGHT",
"Arn": "arn:aws:quicksight:us-east-1: xxxxxxxxxxxx:analysis/xxxxxxx-xxxx-xxxxx-xxxxx-xxxxxxxxxx",
"AnalysisId": "xxxxxxx-xxxx-xxxxx-xxxxx-xxxxxxxxxx"
},
"RequestId": " xxxxxxx-xxxx-xxxxx-xxxxx-xxxxxxxxxx "
}
Capture the dataset's arn value (highlighted), as we will use them in the next step.
- Next, open a text editor and paste the following JSON configuration, which will be used to create our first QuickSight template. Replace the AwsAccountId, source analysis arn, and dataset references arn values with the values from your environment. Save the file as create-template.json:
{
"AwsAccountId": "xxxxxxxxxxxx",
"TemplateId": "first-template",
"Name": "My First Template",
"SourceEntity": {
"SourceAnalysis": {
"Arn": "arn:aws:quicksight:us-east-1: xxxxxxxxxxxx:analysis/xxxxxxx-xxxx-xxxxx-xxxxx-xxxxxxxxxx",
"DataSetReferences": [
{
"DataSetPlaceholder": "Main Dataset",
"DataSetArn": "arn:aws:quicksight:us-east-1: xxxxxxxxxxxx:dataset/xxxxxxx-xxxx-xxxxx-xxxxx-xxxxxxxxxx"
},
{
"DataSetPlaceholder": "Enrich Dataset",
"DataSetArn": "arn:aws:quicksight:us-east-1: xxxxxxxxxxxx:dataset/xxxxxxx-xxxx-xxxxx-xxxxx-xxxxxxxxxx"
}
]
}
},
"VersionDescription": "1"
}
- Next, we will confirm the creation of our template. As mentioned earlier, a template can only be used and listed using the QuickSight API, and there isn't a UI element to it. Using the CLI, we will type the following command:
$aws quicksight list-templates --aws-account-id <account-id> --region us-east-1
The response should look like this:
{
"Status": 200,
"TemplateSummaryList": [
{
"LatestVersionNumber": 1,
"LastUpdatedTime": 1629320961.782,
"TemplateId": "first-template",
"CreatedTime": 1629320961.782,
"Arn": "arn:aws:quicksight:us-east-1:xxxxxxxxxxxxxx:template/first-template",
"Name": "My First Template"
}
],
"RequestId": "xxxxxxxxxxx"
}
- Next, we will use this template to create a new analysis. For this example, to avoid incurring costs, we will use our existing Author user, and we'll create an analysis from a template. For this part, we'll use the create-analysis CLI command. Open a text editor and paste the following, then save it as create-analysis-from-template.json. Replace the highlighted values with those matching your environment:
{
"AwsAccountId": "xxxxxxxxxxx",
"AnalysisId": "analysis-from-template",
"Name": "Analysis From Template",
"Permissions": [
{
"Principal": "arn:aws:quicksight:us-east-1:xxxxxxxxxxxx:user/default/author",
"Actions": [
"quicksight:RestoreAnalysis",
"quicksight:UpdateAnalysisPermissions",
"quicksight:DeleteAnalysis",
"quicksight:DescribeAnalysisPermissions",
"quicksight:QueryAnalysis",
"quicksight:DescribeAnalysis",
"quicksight:UpdateAnalysis"
]
}
],
"SourceEntity": {
"SourceTemplate": {
"DataSetReferences": [
{
"DataSetPlaceholder": "Main Dataset",
"DataSetArn": "arn:aws:quicksight:us-east-1: xxxxxxxxxxxx:dataset/xxxxxxx-xxxx-xxxxx-xxxxx-xxxxxxxxxx" },
{
"DataSetPlaceholder": "Enrich Dataset",
"DataSetArn": "arn:aws:quicksight:us-east-1: xxxxxxxxxxxx:dataset/xxxxxxx-xxxx-xxxxx-xxxxx-xxxxxxxxxx"
}
],
"Arn": "arn:aws:quicksight:us-east-1:xxxxxxxxxxx:template/first-template"
}
}
}
- Next, type the following command:
$aws quicksight create-analysis --cli-input-json file://create-analysis-from-template.json --region us-east-1
- You can confirm the creation of the analysis by using the list-analyses CLI command:
$aws quicksight list-analyses --aws-account-id xxxxxxxxxxxx
- Log back into the QuickSight UI as the Author user and view the newly created analysis:

Figure 8.5 – Generating an analysis from a template
Once you open the analysis, you will notice an identical analysis to the one we created in previous chapters. The main difference is that the analysis from the template was created programmatically using a few CLI commands. Using the template and analysis API, we can create and share a blueprint of an analysis, and then using this blueprint, we can create a new analysis and share it with other users or accounts. Without the template API, you would need to recreate the analysis manually, which can involve many steps and makes it harder to apply changes consistently.
Now that we have learned how to control QuickSight resources programmatically, in the next section, we will discuss patterns to build automations.
Building automation using the QuickSight API
So far, we have learned how to use the QuickSight API to control resources by using the AWS CLI. In this section, we will discuss an architecture that will allow us to call the QuickSight API automatically.
Understanding the role of AWS Lambda
AWS Lambda is a serverless compute service that allows you to run code without creating servers. The unit of computation is a Lambda function. Lambda functions can be triggered by specific events or at a specific point in time. Using AWS Lambda and the AWS SDK, we can control QuickSight resources programmatically to respond to specific events or changes to our infrastructure. For example, instead of scheduling a refresh on an interval, we could use the SDK to set our data to refresh on specific events.
Amazon EventBridge can be used for more complex integrations. Amazon EventBridge is a serverless event bus that makes it easier to build event-driven applications on AWS. Using EventBridge, you can deliver real-time events that are generated by your applications, integrated software-as-a-service (SaaS) applications, and AWS services. AWS Lambda can be a target of these events, and this allows you to design responses to certain events. To better understand how to automate QuickSight operations, in the next section, we will create a simple event-driven ingestion from an Amazon S3 data source using AWS Lambda.
Automating the ingestion of an Amazon S3 data source
In this section, we will configure a simple application that will automatically refresh an Amazon SPICE data source when the underlying S3 data is updated. With this approach, instead of waiting for a scheduled refresh (which would introduce delays), we will trigger a refresh as soon as new data is available (which will minimize delays). For this example, we will use a sample .csv file, which will be configured as an S3 data source in QuickSight. Then, we will configure a Lambda function that will be triggered by S3 notifications. The Lambda function will call the createIngestion function of the QuickSight API, which will result in QuickSight importing the new dataset into SPICE. The following figure shows how the various components work together:
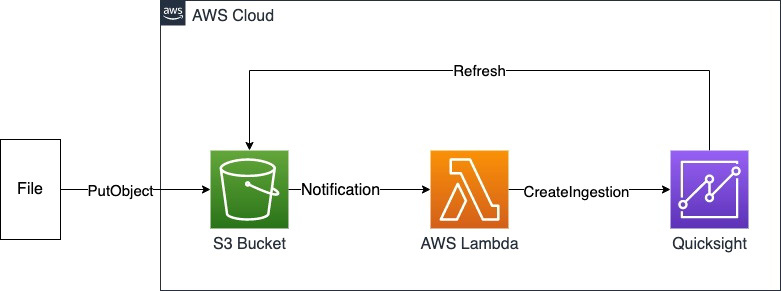
Figure 8.6 – An event-driven data refresh
Now that we have discussed the high-level architecture, to better understand it, let's explore a hands-on example.
Creating an S3 dataset
Let's begin by creating a sample dataset. We will need to create a .csv file and a manifest file:
- First, open a text editor and create a sample.csv file. Copy the following as its content:
"Name","Age"
"George","54"
- Upload the file into the S3 data lake you created in Chapter 1, Introducing the AWS Analytics Ecosystem. Create a folder named samples under your data lake bucket, or simply use the s3 cp CLI command to upload your .csv file:
$aws s3 cp sample.csv s3://<data-lake-xxxxxxxxx>/samples/
- Next, we will create a manifest file, which defines which files need to be imported into QuickSight. We can have more than one file, but in this example and for simplicity, we will import a single file. Open a text editor and create a manifest.json file. Copy the following, replacing the highlighted values with the values from your environment:
{
"fileLocations": [
{
"URIs": [
"s3://data-lake-xxxxxxxxxx/samples/sample.csv"
]
}
]
}
- Next, we will create an S3 data source in QuickSight. Log in to QuickSight as an Author user and click Datasets, and then click Create. Select S3 from the list of available sources. Next, name your data source, and upload the manifest file.
- Once imported, you should be able to edit the dataset and verify its content.

Figure 8.7 – Creating an S3 data source
Now that we have configured our S3 data source and imported it into SPICE, in the next section, we will configure the Lambda function that will trigger a SPICE refresh.
Configuring the QuickSight ingestion Lambda function
In this section, we will learn how to configure a Lambda function to trigger a SPICE refresh. The function will call the createIngestion QuickSight API call to refresh the sample dataset we created during the previous steps.
Log in to the AWS console and select AWS Lambda. In the Lambda console, select Create function. Add the following details:
- Name: quicksight-refresh
- Runtime: Python 3.8
- Execution Role: Create a new role with basic Lambda permissions
Leave the remaining options with their default values, and then click Create function.
Before we proceed, we need to make sure our lambda function has the required permissions to call the QuickSight API. Select the IAM role for this function, and add a policy that allows access to the following QuickSight API actions:
- quicksight:CreateIngestion
- quicksight:CancelIngestion
- quicksight:DeleteDataSource
- quicksight:DeleteDataSet
For this tutorial, you can use the following policy document. Replace the highlighted values with those from your environment:
{
"Version": "2012-10-17",
"Statement": [
{
"Sid": "VisualEditor0",
"Effect": "Allow",
"Action": "quicksight:DeleteDataSet",
"Resource": "arn:aws:quicksight:*:<aws-account-id>:dataset/*"
},
{
"Sid": "VisualEditor1",
"Effect": "Allow",
"Action": [
"quicksight:CreateIngestion",
"quicksight:DeleteDataSource",
"quicksight:CancelIngestion"
],
"Resource": [
"arn:aws:quicksight:*:<aws-account-id>:datasource/*",
"arn:aws:quicksight:*:<aws-account-id>:dataset/*/ingestion/*"
]
}
]
}
Now that our Lambda function has access to the required APIs, let's add the Python code. Using the lambda code editor, simply paste the following code. Replace the highlighted values with the values from your environment:
import boto3
import uuid
client = boto3.client('quicksight')
def lambda_handler(event, context):
response = client.create_ingestion(
DataSetId='<dataset-id>,
IngestionId=uuid.uuid4().hex,
AwsAccountId='<aws-account-id>'
)
return response
After you complete this step, click Deploy. We can test our Lambda function and verify that it triggers a refresh. Look for "IngestionStatus": "INITIALIZED" in the response to verify the response from the QuickSight API.
Now that we have configured our Lambda functions, in the next section, we will configure our S3 trigger.
Configuring an S3 trigger
In this section, we will configure our S3 trigger. The trigger should only trigger a refresh when we have new objects in the samples folders of our data lake:
- Open the Lambda console and select Add trigger.
- Select the S3 service from the drop-down menu, and then your S3 data lake bucket. Then, configure the following values:
- Event type: All object create events
- Prefix: samples/
- Suffix: .csv
- Click Add to add the new trigger.
Now that we have configured our trigger, in the next section, we will test our application.
Testing the application
To test the application, complete the following steps:
- Open the sample.csv file and add a new line so that it looks like the following:
"Name","Age"
"George","54"
"Anna","56"
- Next, we will update the file in S3. You can either use the AWS Console or AWS CLI:
$aws s3 cp sample.csv s3://<data-lake-xxxxxxxxx>/samples/
- This should trigger our Lambda function, which in turn will call the API and trigger a refresh. To verify, log in to QuickSight and select Datasets. Select the sample dataset and then edit to access the preview mode:
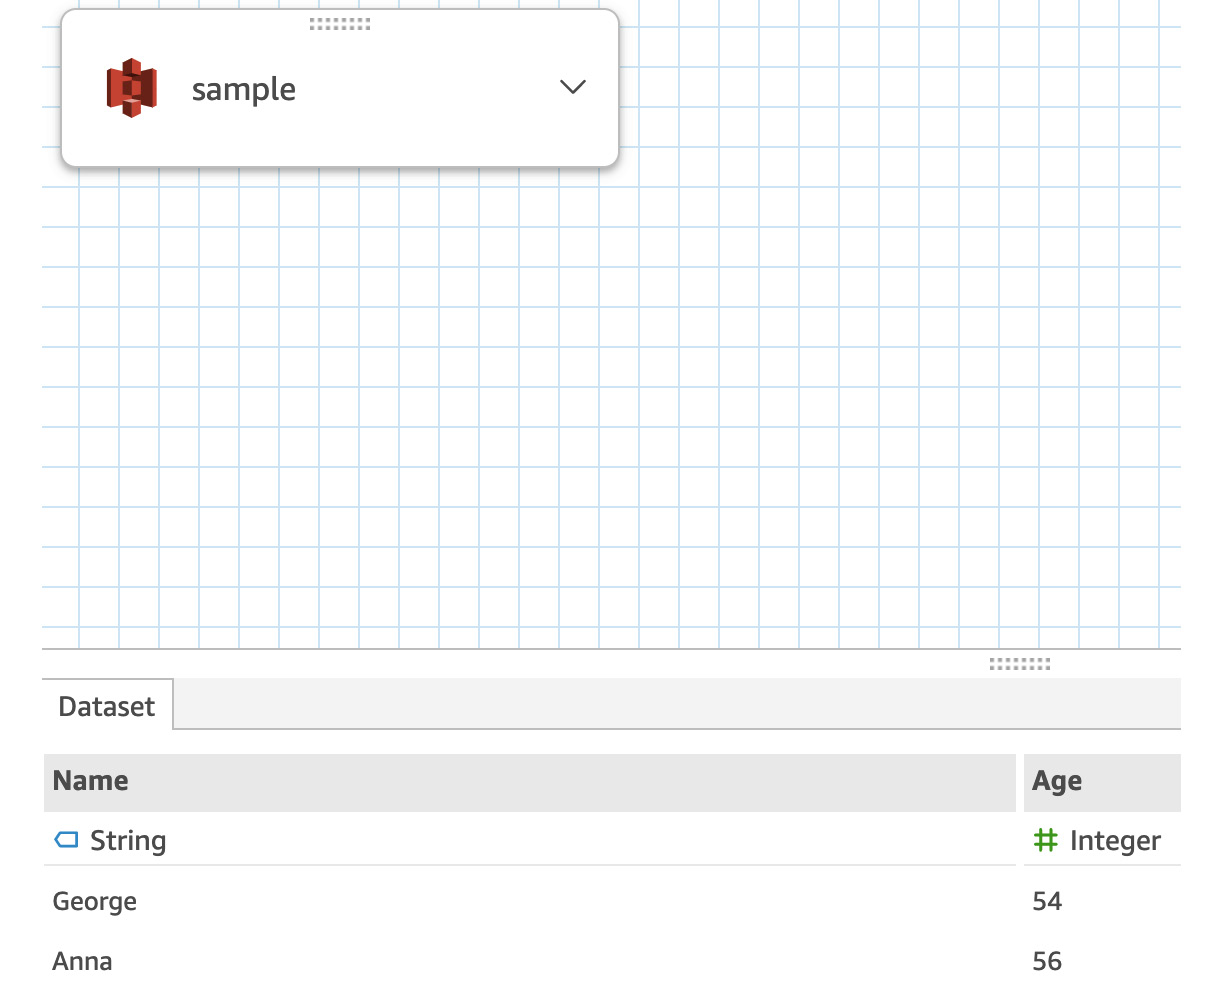
Figure 8.8 – Previewing the imported data
Note the new values in our dataset. QuickSight completed the ingestion, and now the new values are in SPICE, shortly after we updated the file. A key benefit of our event-driven architecture is that we don't need to wait for a scheduled refresh – instead, data is refreshed as soon as we have new values.
Summary
Congratulations on completing this chapter.
In this chapter, we learned the different options of accessing the QuickSight API, including the CLI, and we have seen an example using the Python SDK. Then, using the AWS CLI, we learned how to control our QuickSight resources programmatically. We learned how to create a new data source programmatically, and we also used the QuickSight API to control the account settings (such as changing the default theme of QuickSight). Finally, using a simple example, we learned how to use the template API to create an analysis blueprint, and then how to use the template to create an analysis programmatically.
Using the things you learned in this chapter, you will be able to control QuickSight resources programmatically, which will make it easier to work across multiple environments and securely and consistently apply changes to your QuickSight account. Finally, using a simple hands-on example, we learned how to build an event-driven application that calls the QuickSight API and automatically imports an S3 dataset into SPICE. In the next chapter, we will learn how to manage QuickSight permissions and usage.
Questions
Here are a few questions to revise what we learned in this chapter.
- What is a QuickSight template?
- How can we access the QuickSight API?
- How can we create an analysis from a template?
- How can you build automation using the QuickSight API?
Further reading
- Amazon QuickSight User Guide:
https://docs.aws.amazon.com/quicksight/latest/user/amazon-quicksight-user.pdf