
Chapter 10: Multitenancy in Amazon QuickSight
In this chapter, we will learn how to set up multitenancy in Amazon QuickSight. Specifically, we will look into multi-tenant architectures and understand how QuickSight namespaces can help us build multi-tenant environments.
We will cover the following topics in this chapter:
- Introducing multitenancy using namespaces
- Setting up multitenancy
Technical requirements
For this chapter, you will need access to the following:
- An AWS account and AWS Identity and Access Management (IAM) user, with elevated access
- An Amazon QuickSight (Enterprise edition) account with an Admin user configured
- The dashboard created in Chapter 4, Developing Visuals and Dashboards
Introducing multitenancy using namespaces
In this section, we will introduce the concept of multitenancy in Amazon QuickSight. Based on what we have learned so far, a user that owns a QuickSight asset can share the resource with any other registered user in the account. However, there are use cases where a single QuickSight account needs to support multiple tenants.
Understanding multitenancy
QuickSight offers features that allow developers to build multi-tenant business intelligence (BI) platforms. Due to its cloud-native architecture, QuickSight scales automatically depending on the number of users. This feature, coupled with QuickSight's embedding capabilities and its API actions that can be accessed programmatically, helps developers to implement multi-tenant BI platforms.
A key characteristic of a multi-tenant platform is that tenants don't interact with each other, which effectively prevents a tenant from granting (or revoking) access to users belonging to another tenant. It is also common that different tenants can have different permission requirements for their users and different look and feel requirements. Multi-tenant platforms can serve large corporations, where a tenant can be each subsidiary or a separate department within the company.
Another use case can be software vendors who offer BI capabilities to their customers. In this example, each tenant of the platform would represent a customer of the software vendor. Each tenant would be able to manage their own BI assets and share them with their own users (but not with other tenants). For this scenario, the tenants would typically access QuickSight through a web portal. To separate and organize users from different tenants, QuickSight introduced the concept of namespaces.
In the next section, we will introduce QuickSight namespaces.
Introducing QuickSight namespaces
To address multitenancy requirements, Amazon QuickSight introduced the namespace API. The namespace API allows organizations to build multi-tenant environments without the need to create multiple QuickSight accounts.
A QuickSight namespace is a logical container of users and groups, and it can be used to separate different departments or organizations. While users within the same namespace can share assets between themselves, users from different namespaces cannot interact with each other.
A namespace can be one of the following:
- Default namespace
- Custom namespace
When you create a new QuickSight account, your first Author and Admin users will belong to the default namespace. Any other namespaces that you create are custom namespaces.
Note
In custom namespaces, only federated SSO users can access the QuickSight console. For other types of users (such as users authenticated with a QuickSight username and password), you should use the default namespace.
A user cannot belong to more than one namespace. It is not possible to move users between namespaces. Other QuickSight assets, such as analysis dashboards and datasets, don't belong exclusively to namespaces. Instead, access to QuickSight assets is managed using the Access API, as we learned in Chapter 8, Understanding the QuickSight API. Therefore, it is possible to programmatically share an asset with users from different namespaces. For example, an organization might need to share a common dashboard with all users of all namespaces.
The following figure depicts an example architecture for multi-tenant BI analytics:

Figure 10.1 – Multi-tenant architecture
The main components of the architecture are as follows:
- Custom namespaces: These are to organize the users from different tenants.
- Default namespace: These are for Admin users.
- Amazon SPICE and datasets: These are specific to a QuickSight account. Access to these resources is managed separately using the QuickSight API, as we learned in Chapter 3, Preparing Data with Amazon QuickSight, and Chapter 9, Managing QuickSight Permissions and Usage.
- Embedded portal and Identity Store: This allows users into the QuickSight console. For those use cases that don't need an embedded web portal, the QuickSight web app can be used instead. The embedded portal can be any custom-built web app. Implementation details on how to build web applications are outside the scope of this book.
Now that we have learned the fundamentals of using multi-tenant architectures in QuickSight, in the next section, we will look at a hands-on example.
Setting up multitenancy
In this chapter, we will set up a simple multi-tenant environment using the namespace API. This exercise will help you understand how to set up multi-tenant environments as a QuickSight Admin user. It will also help you understand what your BI users' experience will be in multi-tenant scenarios, and how QuickSight prevents users from sharing assets with other tenants.
Creating a namespace
Creating namespaces is simple, and it can be done using the QuickSight API. At the time of writing, it is not possible to create namespaces through the QuickSight graphical user interface (GUI):
- First, you need to log into Amazon QuickSight as the QuickSight Admin user.
- Next, open the AWS Command Line Interface (CLI), and type the following command, replacing the highlighted values with the values from your environment. For this exercise, we will create a custom namespace called companyA. Note that we already have a default namespace for our existing Admin, Author, and Reader users used throughout this book:
$aws quicksight create-namespace --aws-account-id <account-id> --namespace companyA --identity-store QUICKSIGHT
This will result in an asynchronous creation of the new namespace. Note, in the CLI response, the status is CREATING:
{
"Status": 202,
"Name": "companyA",
"CapacityRegion": "us-east-1",
"CreationStatus": "CREATING",
"IdentityStore": "QUICKSIGHT",
"RequestId": "xxxxxx-xxxxx-xxxxxxxxxxxxx"
}
- To confirm that the new namespace has been created, we will use the list-namespaces CLI command. Type the following command, replacing the highlighted values with those from your environment:
$aws quicksight list-namespaces --aws-account-id <aws-account-id>
Note the response. It should look like the following:
{
"Status": 200,
"Namespaces": [
{
"Name": "companyA",
"Arn": "arn:aws:quicksight:us-east-1:<account-id>:namespace/companyA",
"CapacityRegion": "us-east-1",
"CreationStatus": "CREATED",
"IdentityStore": "QUICKSIGHT"
},
{
"Name": "default",
"Arn": "arn:aws:quicksight:us-east-1: :<account-id>:namespace/default",
"CapacityRegion": "us-east-1",
"CreationStatus": "CREATED",
"IdentityStore": "QUICKSIGHT"
}
],
"RequestId": "xxxxxxx-xxx-xxx-xxx-xxx"
}
Both namespaces have now been created successfully.
Note
Namespaces span AWS Regions, and a user will be assigned to the same QuickSight namespace, regardless of which Region they are using.
Now that we have created our new namespace, in the next section, we will allocate a new user to the namespace.
Using QuickSight namespaces
In this section, we will add users, and then we will see how namespaces don't allow users to share assets with other namespaces. At the end of this section, we will learn how we can configure common assets across namespaces.
Adding users
Now that we have a new namespace, we will register new users using the new namespace. For this exercise, we will register a new IAM user in QuickSight:
- First, create a new IAM user called author-a using the AWS Console. Select IAM, and then the users from the left-hand side menu.
- Select Add users. On the next screen, choose a user name, and then check the Password – AWS Management Console access checkbox, as shown in the following screenshot:
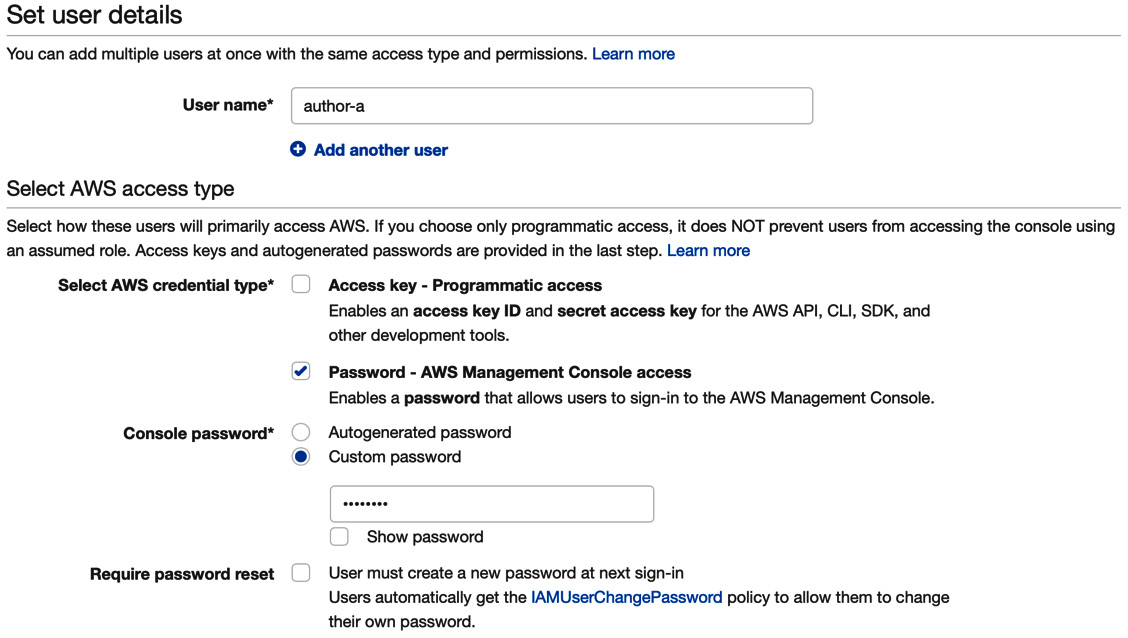
Figure 10.2 – Creating an IAM user
- On the next screen, leave the permissions empty and click Create. Take note of the user arn value, as we will use it in the next step.
- Now that we have created our new user, we will register them with QuickSight under the companyA namespace. Using the CLI, type the following command, replacing the highlighted values with those from your environment:
$aws quicksight register-user --identity-type IAM --email <your-email> --user-role AUTHOR --iam-arn arn:aws:iam::<aws-account-id>:user/author-a --aws-account-id <aws-account-id> --namespace companyA
To confirm the creation of the user, we will use the list-users CLI command. Note that we specify companyA as the namespace:
$aws quicksight list-users --aws-account-id <aws-account-id> --namespace companyA
The response will look like the following:
{
"Status": 200,
"UserList": [
{
"Arn": "arn:aws:quicksight:us-east-1:xxxxxxxxxxxx:user/companyA/author-a",
"UserName": "author-a",
"Email": "xxx@xxx",
"Role": "AUTHOR",
"IdentityType": "IAM",
"Active": true,
"PrincipalId": "federated/iam/xxxxx"
}
],
"RequestId": "xxxx-xxxx-xxxx-xxxx"
}
- Now that we have successfully created our user, let's try to understand the effects of a namespace. Open the AWS Console, and log into QuickSight as the newly created user. Expand the top-right menu. Note the namespace name, as shown in the following screenshot:

Figure 10.3 – Logging in to a multi-tenant QuickSight account
- Next, we want to ensure that this user cannot share their dashboards, analyses, or datasets with users from other namespaces. The easiest way to check this is to quickly create a new dataset, analysis, or dashboard and try sharing it with other users. Once the asset is created, open its permissions manager and try to invite a Author or Reader user who belongs to a different namespace:

Figure 10.4 – Sharing assets in multi-tenant environments
When sharing assets, QuickSight autocompletes when it finds relevant users. You will notice that as you type author, there is no suggestion from QuickSight, and the dataset cannot be shared. The reason for this is that the Author user belongs to a different namespace to the author-a user.
Now that we have seen how namespaces prevent users from sharing assets with other users, we will see how it is possible to configure common assets between users in different namespaces.
Sharing common assets
It is possible to have use cases where assets need to be visible to users that inhabit different namespaces. For example, a large corporation might want to share a specific dashboard with users that belong to different departments, which are configured as namespaces. To complete this action, we will need to use the QuickSight API. As we learned in the previous section, completing this via the QuickSight console is not possible, as users from one namespace cannot discover users from another namespace.
To better understand this concept, we will use the New York Taxi dashboard configured in Chapter 4, Developing Visuals and Dashboards. For this tutorial, we will use the QuickSight Admin user and the AWS CLI:
- First, open a terminal with the AWS CLI installed.
- List the dashboards using the list-dashboard action. Type the following command, replacing the highlighted values with those from your environment:
$aws quicksight list-dashboards --aws-account <aws-account-id>
Focus on the DashboardSummaryList array, and capture the DashboardId value, as we will use it in the next step:
"DashboardSummaryList": [
{
"Arn": "arn:aws:quicksight:us-east-1:xxxxxxxxx:dashboard/xxxx-xxxx-xxxx-xxxx-xxxx",
"DashboardId": "xxxx-xxxx-xxxx-xxxx-xxxx",
"Name": "New York Taxi Dashboard",
…
}
- To update the dashboard permissions, we will use the update-dashboard-permissions CLI command. Type the following command, replacing the highlighted values with those from your environment:
$aws quicksight update-dashboard-permissions --aws-account-id <aws-account-id> --dashboard-id <dashboard-id> --grant-permissions Actions=quicksight:DescribeDashboard,quicksight:ListDashboardVersions,quicksight:UpdateDashboardPermissions,quicksight:QueryDashboard,quicksight:UpdateDashboard,quicksight:DeleteDashboard,quicksight:DescribeDashboardPermissions,quicksight:UpdateDashboardPublishedVersion,Principal=arn:aws:quicksight:us-east-1:<aws-account-id>:user/companyA/author-a
Now that we have provided access to our author-a user, we will log in to the QuickSight console and view the available dashboards.
- Log into the QuickSight console as the author-a user. Then, navigate to Dashboards to view the available dashboards. The New York Taxi dashboard should now be available for you to view, as shown in the following screenshot:
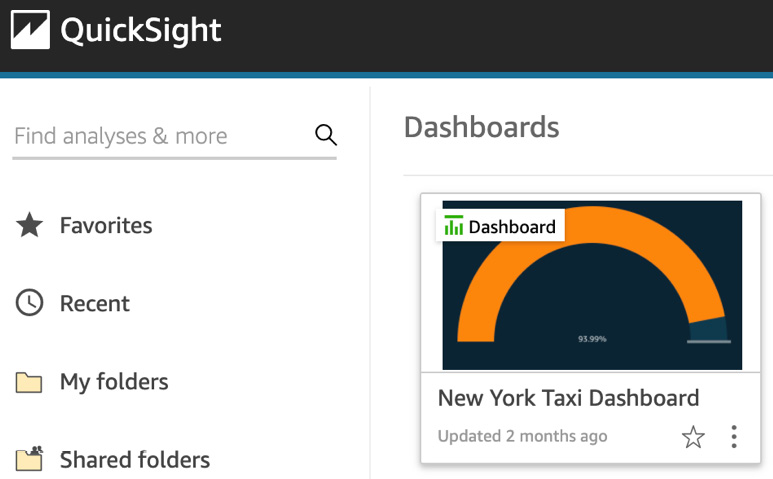
Figure 10.5 – Viewing common assets in a multi-tenant environment
In a similar way to dashboards, other assets (such as datasets or analyses) can be shared using the QuickSight API.
Summary
Congratulations on completing this chapter, which is the final chapter of this book.
In this chapter, we learned about multitenancy in Amazon QuickSight. We also looked closely at an example architecture that allows multiple tenants to access embedded assets in QuickSight through a web portal. Then, we focused on QuickSight namespaces, and we learned how to configure them. Finally, we looked at two hands-on examples to understand how namespaces prevent users from sharing assets, and how an Admin user can configure common assets for users in different namespaces.
You should now understand the fundamental concepts of multitenancy in Amazon QuickSight, and you should know how to use the AWS CLI to create namespaces and organize your different tenants.
Before you close this book, please ensure that all AWS resources created for this book and its exercises are shut down to prevent charges to your AWS account.
I want to thank you for your time, and I hope this book met your expectations. For any comments and further questions, you can find me on LinkedIn. Feel free to connect with me, I would love to hear your thoughts and feedback. Happy learning!
Questions
- What are the main characteristics of multi-tenant platforms?
- What are the main use cases for creating multi-tenant BI platforms?
- What are QuickSight namespaces, and how do you configure them?
Further reading
- Amazon QuickSight User Guide: https://docs.aws.amazon.com/quicksight/latest/user/amazon-quicksight-user.pdf
- Supporting Multitenancy with Isolated Namespaces: https://docs.aws.amazon.com/quicksight/latest/user/namespaces.html