Adhesive Applications and Bonding Processes
The availability of a variety of adhesive-bonding methods is helpful in assembling components by adhesive bonding. The choice of the application method could restrict the design of the end product. The application method can also affect the selection of manufacturing materials, quality, performance of the product, and the product assembly cost.
Keywords
Adherends; dispensers; spraying; silk screening; pressure-sensitive adhesive
8.1 Introduction
The availability of a variety of adhesive-bonding methods is helpful in assembling components by adhesive bonding. The choice of the application method could restrict the design of the end product. The application method can also affect the selection of manufacturing materials, quality, performance of the product, and the product assembly cost. The following factors must be considered in selecting the bonding method [1]:
• Size and shape of the parts to be bonded
• Specific areas to which the adhesive is to be applied
• Number of assemblies to be produced
• Viscosity or other characteristics of the adhesive
• Form of the adhesive (liquid, paste, powder, film, and hot melt).
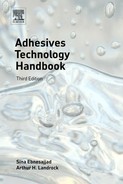
Figure 8.1 shows the schematic of a general adhesive-bonding operation. Table 8.1 describes each step in the bonding line briefly.
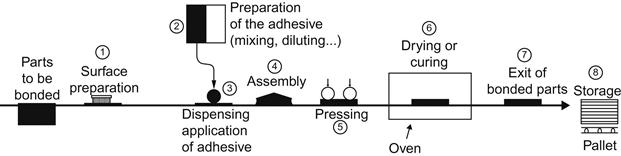
Table 8.1
Description of Different Step in a Bonding Line (see Figure 8.1) [2]
| Steps | Types of operation/Equipment |
| 1. Preparation of substrates | Planning, cleaning |
| Abrading, chemical surface treatment | |
| Conditioning of materials before bonding | |
| 2. Preparation of the adhesive | Addition of fillers |
| Dilution and adjustment of viscosity | |
| Metering and mixing of the two components | |
| 3. Coating/dispensing | Brush, trowel |
| Spraying, extrusion | |
| Roll application (manual or automatic) | |
| Hot-melt equipment | |
| Stencil, dip coating | |
| Film adhesives | |
| Pressure-sensitive adhesives | |
| Preformed adhesives and sealants (in solid form) | |
| 4. Drying, waiting time, open time | Waiting for evaporation of solvents or water |
| 5. Heat reactivation of the adhesive | |
| 6. Assembly of parts | Handmade or automatic |
| 7. Pressing | Time, pressure, and temperature |
| Manual (clamps) roll or platen press | |
| Cold or hot pressing | |
| Frames, autoclaves | |
| 8. Curing, hardening, polymerization | Hot or cold curing |
| Temperature, time, different types of oven and autoclaves | |
| Different modes of polymerization; chemical reactions, UV, HF, EB |
8.2 Adhesive
8.2.1 Storage
Many adhesives must be stored in the dark or in opaque containers, while others should be stored at low temperatures (e.g., 5°C) to prolong shelf life [3]. The manufacturer’s directions, usually found in technical bulletins on a particular adhesive, frequently provide information on storage requirements. For example, the epoxy-phenolic film adhesive HT-424 (Cytec Corp.) should be properly refrigerated (Table 8.2) during storage [4].
Table 8.2
Useful Life of Epoxy-Phenolic Film Adhesive HT-424 vs. Temperature [4]
| Storage Adhesive (°C) | Useful Life (days) |
| −23 | 180 |
| −18 | 150 |
| −1 | 75 |
| 24 | 12 |
| 29 | 3 |
| 38 | 1 |
Basic resins and curing agents for thermosetting adhesives should be kept apart so that accidental container breakage will not lead to contamination problems. Containers for solvent-based adhesives should generally by sealed immediately after use to prevent solvent loss and the emission of toxic or flammable vapors [3].
8.3 Adhesive Preparation
Adhesive preparation requires very careful attention. When removed from refrigerated storage, the adhesive must be brought to application temperature. Usually this is at room temperature, but in some cases, such as in hot-melt adhesive, much higher temperatures are used. When separate components are mixed together (two-part adhesive), it is usually important to measure the proportions correctly to obtain optimum properties. This is particularly true with catalytic reactions, such as with amine curing agents for epoxy resins, where insufficient catalyst prevents complete polymerization of the base resin, while too much catalyst may lead to brittleness in the cured material. Excess unreacted curing agent may also cause corrosion of metallic adherends. Some two-component adhesives (fatty polyamides used with epoxies) have less critical mixing ratios and component volumes may often be measured by eye without too adverse an effect on the ultimate bond strength [3].
The components of a multiple-part adhesive must be measured and then mixed together thoroughly until no color streaks or density stratifications are noticeable. Avoiding overagitation will help prevention of air entrainment into the mixture. The introduction of air can cause foaming of the adhesive during heat cure, resulting in porous bond lines. If air entrainment presents a problem, air can be removed by vacuum degassing prior to application. Only minimum necessary adhesive should be mixed to avoid adhesive cure in the pot. The useful life (pot life) of the adhesive is decreased as the ambient temperature and batch size increase. One-part adhesives, and some heat-curing, two-part adhesives, have very long pot lives at room temperature, and application and assembly speed or batch size are not critical. For a large-scale bonding operation, mechanized mixing is preferable over hand mixing, which is costly, messy, and slow. Repeatability is also entirely dependent on the operator in hand mixing. Equipment is available not only for mixing but also for metering, and for dispensing multicomponent adhesives on a continuous or short-term basis [5].
8.4 Adhesive Dispensers
Adhesive dispensing systems are used for delivering either single or multiple-component adhesives from their original containers to an application point where the adhesive can be applied to the workpiece in either metered shots or continuous beads. Adhesives with a wide range of viscosities can be processed in this way by advanced adhesive dispensing systems, from low to high level.
Adhesive dispensing systems for applying single-component adhesives can be fed by either a pressure-feed container for light viscosity adhesives or ram-mounted drum pumps for medium to heavy viscosity adhesives. Application can be manual or automatic.
Multiple-component adhesives, such as epoxy resins, polyurethanes, and silicones, can be processed by piston or gear-type metering and mixing adhesive dispensing systems [6].
8.4.1 Small-Portion Mixer Dispensers
Packaging systems are available that store small amounts of liquid adhesive components (thermosetting) and provide means for convenient mixing and dispensing, all within the package. These may take the form of flexible plastic pouches with removable dividers (clamps) separating the components (for two- or three-part resin systems with mixing ratios from 1:100). The pouches contain amounts of resin varying from 2 g up to as much as 100 g. Other forms of container dispensers are also available in the form of two-barrel hypodermic syringes fused together. Polyethylene cartridge assemblies have an advantage over the pouches in that they make it easier to apply the adhesive to localized areas. The components in the pouches, which are frequently colored, are kneaded by hand until completely mixed, as evidenced by the resulting uniformity of color. A corner of the pouch is then snipped off with scissors and the pouch then functions as a dispenser when the adhesive is squeezed out. A large number of systems are available for use with these units, many for the home craftsman. The useful life of these units is extended considerably by refrigerated storage.
8.5 Methods of Adhesive Application
Adhesive applicator systems are used for delivering either single or multiple-component adhesives from their original containers to an application point where the adhesive can be applied to the workpiece in either metered shots or continuous beads. Adhesives with a wide range of viscosities can be processed by a well-designed adhesive applicator system.
Adhesive applicator systems for applying single-component adhesives can be fed by either a pressure-feed container for light viscosity adhesives or ram-mounted drum pumps for medium to heavy viscosity adhesives. Application can be manual or automatic. Multiple-component adhesives, such as epoxy resins, polyurethanes, and silicones can be processed by piston or gear-type metering and mixing adhesive dispensing systems [6].
The selection of the application method depends on the adhesive form, whether liquid, paste, powder, film, or hot melt. Other factors influencing the choice of application method are the size and shape of parts to be bonded, the areas where the adhesive is to be applied, and production volume and rate [5].
Some of the significant application techniques have been described in the following sections.
8.5.1 Liquid Adhesives
Adhesives in liquid form may be applied by the methods described in the following sections.
8.5.1.1 Brushing [3,7]
Brushing is often used when the adherends have complex shapes, or when it is desired to apply the adhesive to selected areas of a surface without the use of masks. With brushing, the control of film thickness is limited and the resultant adhesive films are often uneven and blobbed. Brushing is generally not suited to rapid assembly work. Stiff brushes provide the best results. Good brushes may be used repeatedly.
8.5.1.2 Flowing [3,7]
Flowing is particularly useful for applying liquid adhesive to flat surfaces having irregular shapes. This method is superior to brushing in that it provides a more uniform adhesive film thickness and a higher production rate. In this method, the adhesive is fed under pressure through either a simple nozzle or a hollow brush. When a nozzle is used, the device is known as a flow gun. With a brush it is called a flow brush. The adhesive should be brushed on in a single smooth sweep. A second sweep over the same area is not practical with most adhesive types.
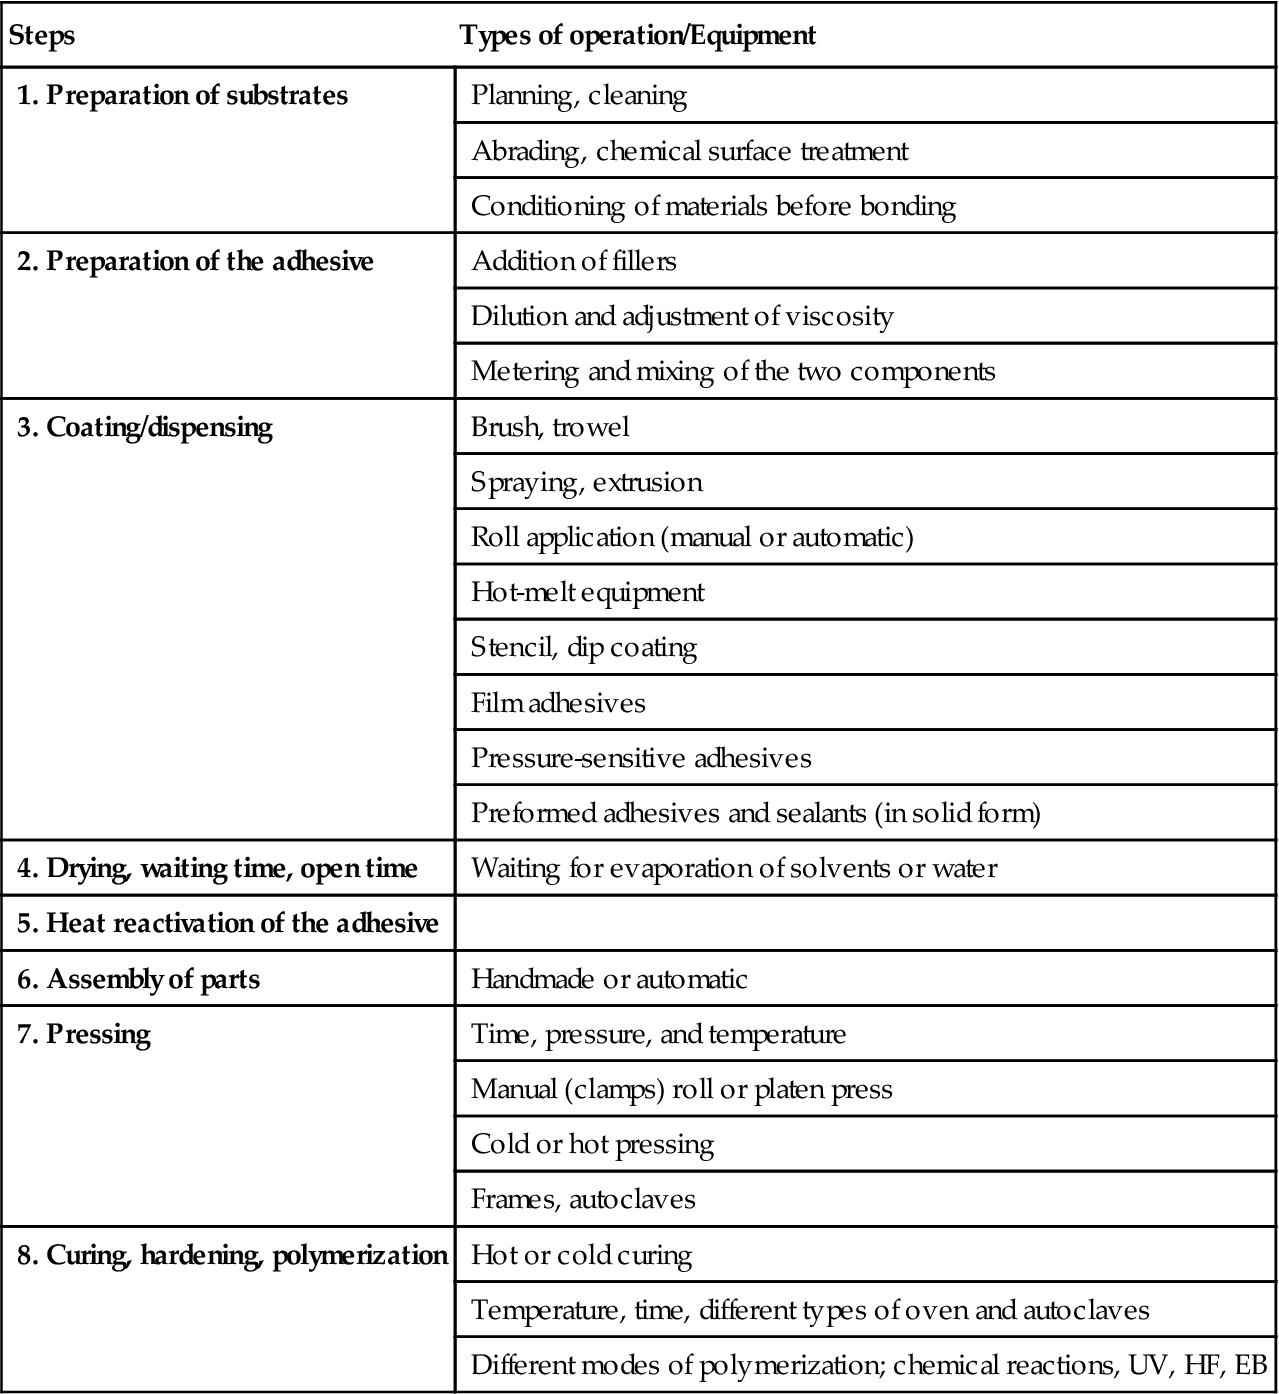
8.5.1.3 Spraying [3,7]
Spraying is primarily used for covering large areas with uniform contours. The spraying technique is widely used to apply an even coat of adhesive on large and flat surfaces (Figure 8.2). This method provides a higher production rate than flowing and also offers a more uniform film thickness. The solids content and consistency of the adhesive, however, must be rigidly controlled to insure an even coating. The equipment used is quite similar to that used for spraying paints. The exact equipment design and operating conditions may be varied to permit the production of almost any desired type and thickness of coverage. The presence of a possible health hazard resulting from solvent-spray mists must be considered and adequate ventilation provided.
There are several methods of spraying [9]. All techniques can be manual or automatic. Three common types of spraying include air spray, airless spray, hot spray, and hot-melt spray. In the air spray technique, the adhesive is pumped under low pressure, generally 1 bar, to the gun. Pressurized air (from 3 to 7 bars) arrives also at the bottom of the gun. Inside the spray head, the pressurized air causes the atomization of the adhesives into small particles (less than 1 mm diameter), which are sprayed on to the substrate to be coated.
Airless spraying is based on the application of high pressure (30–400 bars) to the adhesive, which is forced at high speed through a small orifice. As the adhesive exits the orifice and comes back to ambient pressure, it expands and breaks into fine particles. The size of the orifice determines the amount of filtration required: impurities or other particles that are larger than the orifice would plug its openings.
With increase in the temperature of the adhesive, its viscosity decreases. Many adhesives may be heated to 40–70°C before spraying. The adhesive passes through a heating element. Only a small part of the adhesive circulates in the heated section and receives heating. When the worker starts spraying, the pump sucks in a certain amount of cold adhesive from its container, but the temperature at the gun remains almost constant because this newly entered quantity is quickly heated in the heater and mixed with the existing hot adhesive, and is circulated. The heater must be close to the gun so that there is no loss of heat between these two units.
Hot-melt adhesives may also be sprayed, the main technique being fiberization or swirl application, where the bead of adhesive coming out the gun head is swirled in the air to produce a loop pattern. This technique gives very thin “hairs” of adhesive, which may be sprayed usually at moderate temperatures (from 120°C to 160°C). During passage in the air between the gun head and the substrate, the hot melt cools down quickly, and its temperature is only 50–70°C when it reaches the substrate, so that it may be sprayed on heat-sensitive materials such as polyolefin films or polystyrene foam without causing damage.
8.5.1.4 Roll Coating [3,7]
This technique is based on the transfer of adhesive material from a trough by means of a pickup roller partially immersed in it, to a contacting transfer roller sheet. Material is continuously coated with adhesive when fed between the transfer roller and a pressure roller, which is adjusted to determine the thickness required. Roll coating is most suitable for applying adhesives to flat sheets and film, and may be used for parts as large as 1.83 m. Under optimal conditions, it provides the highest production rate and the most uniform coverage. On many occasions, when a small stamping must be coated, it is economical to roll-coat large sheets, and then stamp out the parts from the coated sheets. Producing waste adhesive material is less costly than coating small individual parts.
When multiple coats of an adhesive are required, the most uniform film thickness is achieved by applying the second coat perpendicular to the first. In addition, the time between successive coats must be carefully regulated. Too short a drying time may result in sagging, bubbling, or blistering, while too long a time may lend to the lifting of earlier coats.
8.5.1.5 Knife Coating
This method employs an adjustable knife blade, bar, or rod to control the deposition of adhesive flowing onto a sheet moving under the blade. The distance between the blade edge and the adherend surface determines the adhesive coating thickness.
8.5.1.6 Silk Screening [1,3]
This is a manual technique that is used when selected areas or patterned spaces are adhesive coated. Low-viscosity adhesives work well because they pass readily through the woven mesh or cloth onto the surface of the substrate. However, only relatively thin films can be applied by this method. By filling-in the pores in a mesh over areas to remain uncoated and leaving the pores in the other portions of the mesh unfilled, effective masking is effected. The adhesive is then poured on top of the mesh and a rubber squeegee is used to facilitate flow of the adhesive down through the open pores of the mesh openings. The squeegee alone is another manual method of applying an adhesive. As a general rule, fast-driving or tacky adhesives cannot be satisfactorily applied by silk screening.
8.5.1.7 Oil Can and Squeeze Bottle
A hand-pump oil can or polyethylene squeeze bottle is often used for sport application of adhesives. Where it is necessary to apply adhesives inside a blind hole, or some other point with limited access, an oil can with a stem of appropriate length is a simple solution. The tip at the end of the stem can be adapted to deliver multiple spots of adhesive. The squeeze bottle can sometimes be used for the same purpose and also to apply a continuous bond. Some liquid adhesives are applied in squeeze-bottle containers. When using polyethylene squeeze bottles, care should be taken that the adhesive does not affect the polyethylene itself [1].
8.5.1.8 Dip Coating
Dip coating requires a very fluid adhesive in the viscosity range of 50–500 mPas. The parts to be coated are dipped into the adhesive tank and then slowly removed and left for a few seconds on top of the tank to allow the adhesive to drip. Dip coating is suitable for complex shapes and curved parts, which could not be coated by any technique other than brushing [9]. Dipping may be manual or automatic. The dipping process is capable of speeding up the coating of relatively large surfaces. Automatic units are the most satisfactory, but hand dipping can also be used to speed up the application of adhesives. The devices used to facilitate immersion of parts into an adhesive bath or a trough range from baskets to screens to perforated drums [1].
8.5.1.9 Roll and Knife Method
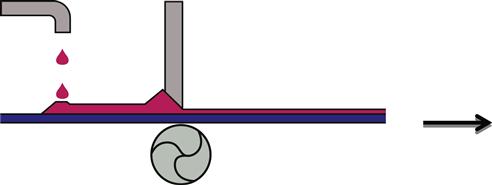
In roll and knife application, the adhesive forms a thick fillet behind the adjustable knife (doctor blade). Adjustable springs press the knife or doctor blade against the web to obtain the desired adhesive thickness (Figure 8.3). There are several possible shapes for the knife in order to adjust to the viscosity and rheology and to the amount of adhesive required. The adhesive may be fed by gravity, either along the knife or directly on the web or it may be pumped into a trough, which is also adjustable. The roll allows the web to advance as the adhesive is applied [9].
8.5.1.10 Application by Extrusion
Most adhesives and sealants can be extruded through a hole or die or slot; it is only necessary to propel the product by means of pressure, this pressure depending only on the viscosity and rheology of the adhesive or sealant and the slot orifice size. When the adhesive exits from the head, die, or slot, the product may be applied as beads, lines, dots, or bands to obtain the required pattern adapted to the job and the required joint shape and thickness.
8.5.2 Pastes
Bulk adhesives such as pastes or mastics are the simplest and most reproducible adhesives to apply. These systems can be troweled on or extruded through a caulking gun. Little operator skill is required. Since the thixotropic nature of the paste prevents it from flowing excessively, application is usually clean and little waste results [5]. A typical example of use is the application of adhesives in paste or mastic form to wall panels instead of using nails, which would be visible.
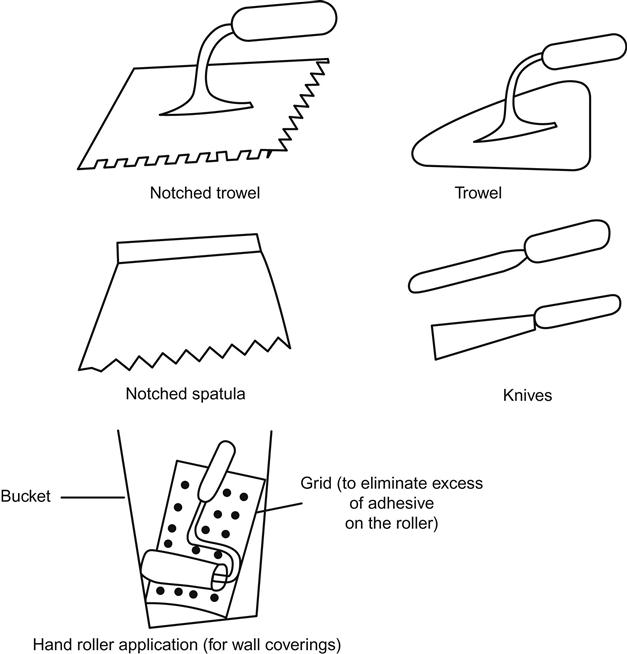
8.5.2.1 Spatulas, Knives, Trowels
A simple application tool particularly effective for hard-to-spread adhesive is the spatula. Knives and trowels, both of which may have notches cut into their applying edges, are variations of the spatula (Figure 8.4). The depth of notches and the spacing between them help regulate the amount of adhesive applied. The blade should be held firmly and at a right angle to the surface. The preferred shape for trowel notches is square. Triangular notches present sharp teeth that wear out faster than the wide contact surfaces of the square notches. Shallow, rounded, and closely spaced notches are often used with adhesives of higher liquid content, because such notches permit the adhesive streams to flow together and form a continuous unbroken film [1].
8.5.3 Powders
Powder adhesives can be applied in three ways:
1. They may be sifted onto a preheated substrate. The powder, which falls onto the substrate, melts and adheres to it (called powder coating). The assembly is then mated and cured according to the recommended processes.
2. A preheated substrate can also be dipped into the powder and then removed with an attached coating of adhesive (as in fluidized-bed coating). This method helps assure even powder distribution.
3. The powder can be melted into a paste or liquid form and applied by conventional means.
Powder adhesives are generally one-part epoxy-based systems that require heat and pressure to cure. They do not require metering and mixing, but must often be refrigerated to obtain maximum shelf life. Because coating uniformity is poor, large variations in joint strength may result from the use of these adhesives [5].
8.5.4 Films
The use of dry adhesive films is expanding more rapidly than for other forms because of the following advantages:
• High repeatability: no mixing or metering; constant thickness
• Ease of handing: low equipment cost; relatively hazard-free; clean operating
• Very little waste: preforms can be cut to size
• Excellent physical properties: wide variety of types available.
Film adhesives may be used only on flat surfaces or simple curves. Application requires a relatively high degree of cure to ensure nonwrinkling and removal of separator sheets. Characteristics of available film adhesives vary widely, depending on the type of adhesives used. Film adhesives are supplied in both unsupported and supported types. The carrier for supported films is generally fibrous fabric or mat. Film adhesives are supplied in heat-activated, pressure-sensitive, or solvent-activated forms.
Solvent-activated forms are tackified and rendered pressure-sensitive by wiping with solvent. This type of adhesive is not as strong as other types, but is well suited for contoured, curved, or irregularly shaped parts. Manual solvent activation methods should be closely monitored so that excessive solvent is not used. Chemical formations available in solvent-activated forms include neoprene, nitrile, and butyral phenolics. Decorative trim and nameplates are usually fastened onto a product with solvent-activated adhesives [5].
8.5.5 Hot Melts
In spite of a number of variations in equipment, two basic types of systems are used to heat and apply hot-melt adhesives: melt-reservoir and pressure-feed systems [3,10].
8.5.5.1 Melt-Reservoir System (Tank-Type Applications)
This type is composed of a melting pot or reservoir, a pump, feed hose, and an extrusion gun or application wheel to apply the melted adhesive to the product. Spray or jet guns are also used in packaging applications. Metering pumps are used in automated systems. Extrusion guns are triggered manually for assembly of products that do not lend themselves to automation. Hot-melt adhesive is loaded into the reservoir in granular, block, or chip form, where it is heated and maintained at the desired delivery temperature. A typical reservoir system delivers about 4.54 kg/h, depending on the adhesive used. Operation temperatures are kept below 204°C. These systems work quite well, handing low-performance, low-viscosity adhesives of 1,000–50,000 cps or 1–50 Pa s.
Despite the reservoir-type system’s advantage of holding large amounts of fluid adhesive in readiness, it also has some drawbacks. It is sometimes difficult to maintain a uniform temperature in a large volume of adhesive when from time to time makeup material must be added to replace the material consumed. A second issue has to do with the temperature of the fluid adhesive being too high at the nozzle, which can cause the adhesive bond to be degraded. It can also result in the formation of carbonized deposits and subsequent plugging of the nozzle. High-performance hot melts are especially susceptible to these problems. These formulations have high molecular weight and viscosity. They tend to degrade more rapidly when heated in the presence of oxygen. These adhesives require close temperature control and, for best results, elimination of oxygen from the dispensing system using a nitrogen blanket.
8.5.5.2 Progressive-Feed Systems
These systems heat only a small amount of adhesive at a time, thereby eliminating some of the problems inherent in a reservoir system. Several versions of the “first-in first-out” equipment are in use. In one type, granules or pellets of adhesive are loaded into a hopper. The adhesive melts on a heated grid, then flows to a gear pump, and is immediately transferred under pressure, through an electrically heated hose, to a heated gun. This equipment can feed hot melts at the rate of 9.1 kg or more per hour, even though less than 500 g of adhesive is maintained in the molten state.
Another type of progressive-feed system is a self-contained applicator gun (portable hot-melt gun). This system requires no insulted hose, because the adhesive is melted at the gun, from adhesive cartridges, pellets (slugs), or coiled cord. In guns using cartridge or pellet adhesives, air pressure moves the fluid adhesive to the nozzle; in the coil-fed system, the coil is mechanically driven, which forces the adhesive though the gun onto the workpiece.
Progressive-feed systems benefit from the first-out principle of application, which minimizes the possibility of adhesive degradation and permits the use of higher-performance (usually more heat-sensitive) materials. Operating temperatures range from 176°C to 315°C. Another advantage of self-contained applicators is their portability. These guns handle high-performance types of adhesive that are used for structural applications, with viscosities up to 500,000 cps (5,000 Pa s). A disadvantage of the systems for some adhesives (principally polyamides) is that there is no holding period to allow time for moisture flash-off. Material cost is higher than with the systems that use the granular form. The lower delivery rates (1.4–1.8 kg/h) of cartridge and coil-type progressive-feed systems may pose a limit, but only for applicators requiring very long adhesive beads. These applicators cannot be used for tacky or low-durometer adhesives without special arrangements.
Handheld applicator guns of the type described previously can be used for applications such as [11]:
8.6 Joint-Assembly Methods
A number of methods have been developed for assembling bonded joints. The following basic principles apply to all the methods [7]:
• The adhesive coating must become liquid at some point in the process to insure wetting of adherend surface and enhanced contact.
• Foreign materials, such as solvent moisture, must be removed from the joint to prevent the formation of voids, vapor lock, and faults in the glue line.
• Pressure must be applied to the joint to hold the assembly together until the adhesive sets sufficiently, without accidental misalignment of the adherends.
While specific methods of joint assembly may differ in the details, they can be classified into one of four basic types: wet assembly, pressure-sensitive and contact bonding, solvent activation, and heat activation.
8.6.1 Wet Assembly
This is the most common of the joint-assembly techniques. Any type of adhesive that can wet adherend surfaces without being heated may be used as long as the adherend surface is porous. With nonporous adherends, however, wet assembly is only applicable when the adhesive is free of volatile solvents, otherwise trapped solvent would produce voids. The process consists of applying the adhesive, aligning the parts, pressing the joint components together while the adhesive is still wet, and maintaining the pressure. The last step of holding pressure should be continued until the bond is sufficiently strong to hold the assembly together. To reduce the pressure hold time, sometimes the adhesive coating is allowed to partially dry before assembly. The permissible predrying time is known as the “open assembly time” of the adhesive.
8.6.2 Pressure-Sensitive and Contact Bonding
These methods are usable only when the adhesive retains some tack when dry. The only difference between the two techniques is that in pressure-sensitive bonding only one adherend is coated versus both surfaces in contact bonding. In both techniques, joint assembly consists of permitting the adhesive coating to dry completely, then aligning the parts and pressing them together to form the bond [12].
8.6.3 Solvent Activation
This method is a postponed wet-assembly process and is usually unsuitable for nonporous adherends. It is applicable to adhesives that can be reactivated by solvents unlike most two-part adhesives. Solvent activation is primarily desirable when it is convenient to precoat parts that are to be bonded at a later date, or when the adhesive has an exceptionally slow drying rate. Solvent activation consists of permitting the adhesive coating to dry completely, dampening the surface of the coating with a fast-drying solvent (e.g., methyl ethyl ketone), quickly aligning the parts, and promptly applying pressure until the adhesive sets and a self-sustaining bond develops. Water is used as the solvent for “gummed” adhesives such as those used in gummed-tape labels. Water-activated adhesives are usually made from animal glues or dextrin. Adhesives activated using organic solvents have not been accepted broadly because of the fire and health hazard and the inconvenience of solvent activation. They are used in certain applications where a pressure-sensitive adhesive (PSA) tape cannot supply the bond strength, solvent, or heat resistance required [7,12].
8.6.4 Heat Activation
This method may be applied only with adherends that can tolerate heat. It is especially useful with nonporous adherends because no volatile solvents are employed. Two-part adhesives are therefore excluded. Heat activation consists of permitting the adhesive coating to dry completely, aligning the parts, applying heat and pressure, and finally allowing the adhesive to cool sufficiently to form the bond. Occasionally, the parts are heated before their bonding surfaces are mated [7]. Heat-activated adhesives are used on tapes, which can be applied with heat and pressure. They can be made from a wide variety of thermoplastic materials such as waxes, polyethylene, cellulose esters and ethers, nitrocellulose, polyvinyl acetate, polyvinyl chloride, and many rubber–resin combinations. Typical tape applications are in fabric mending and tape and paperboard box manufacture (stay-tapes). Heat-activated adhesives provide highly irreversible bonds. No fire or health hazards are involved in their application. One disadvantage is the need for high-temperature presses to apply this type of adhesive [12].
8.7 Curing
A number of high-strength structural adhesives must be cured to develop joint strength. These materials exist in film and liquid form, the latter usually relying on catalytic reaction to effect a cure. Application of a premixed liquid adhesive–catalyst system must be completed within its working life if spreading and wetting are to be adequate. Following its application, adequate time must be allowed for the adhesive to cure. Room-temperature-curing adhesives often require a number of hours to set, although some that set within minutes are also available. Some metallic adherends require an inert atmosphere. Some adhesives contain volatile components to improve their consistency. In these cases, processing may involve an intermediate liquid-removal stage (heat-assisted) before bonding takes place. Other forms are supplied as films, which may or may not be supported on carrier cloths. Structural adhesive films generally require sustained high bonding pressures during hot cure. Another approach to expedite curing at room temperature is ultraviolet (UV) radiation [13–15].
The exact conditions required for curing the adhesive joints depend on the properties of the specific adhesive used. Manufacturers usually recommend the optimum procedures. In most instances, curing is accomplished through the application of heat, pressure, or both. Depending on the properties of the adhesive, cure pressure may range from contact pressure, 6.9–34.5 kPa, to 3,447 kPa, while curing temperatures may range from room temperature up to 350°C. The typical maximum temperature is usually about 180°C. Ceramic-based adhesives depend on a sintering action for adhesion during which the temperature can reach 1,800°C [3,7].
8.8 Bonding Equipment
After application of adhesive, the assembly must be mated as quickly as possible to prevent contamination of the bond surface. The substrates are held together under pressure and heated, if necessary, until cure is achieved. The equipment required to perform these functions must provide adequate heat and pressure and maintain constant and uniform pressure during the entire cure cycle. For adhesives that cure at contact pressure at room temperature, extensive bonding equipment is not required [5].
8.8.1 Pressure Equipment
Pressure devices should be designed to maintain constant pressure on the bond during the entire cure cycle. These devices must compensate for thickness reduction from adhesive flow outwards and thermal expansion of assembly parts. Screw-activated devices, such as C-clamps, and bolted fixtures are not acceptable when constant pressure is required. Spring pressure can often be used to supplement clamps and compensate for thickness variation. Dead-weight loading may be applied in many instances. Such loading takes the form of bags of sand or shot, or similar materials. Dead-weight loads may be used only on relatively flat adherends to provide relatively low pressure. This method is impractical for heat-cure conditions [5].
Pneumatic and hydraulic presses are excellent tools for applying constant pressure. Steam or electrically heated platen presses with hydraulic rams are often used for adhesive bonding. Some units have multiple platens, thereby permitting the bonding of several assemblies at one time. Large bonded areas, such as on aircraft parts, are usually cured in an autoclave. The parts are first joined and then covered with a rubber blanket to provide uniform pressure distribution. The entire assembly is then placed in an autoclave, which can be pressurized and heated. This method, which is widely used in the aerospace industry, requires capital equipment [5].
In autoclave bonding, pressure in the assembly is obtained by the pressurization of fluid by means of compressed air, and in older installations, from steam. The actual pressure on the parts is exerted by the pressure differential over the autoclave blanket or membrane, which is connected with the bonding table by means of an airtight seal. The differential can be produced by placing the assembly on a sealed table in a pressure vessel, while the assembly is connected with the atmosphere or a vacuum installation. The autoclave itself can be either cylindrical or of the clamshell (watch-case) type. The latter is limited to relatively small panels. Heat and pressure can be applied by injection of live steam. Subsequent injections of cold air will allow for relatively rapid cooling. The advantages of live steam include simple operation and short curing cycles. The disadvantages include achievement of independent variations of temperature and pressure. Presence of high moisture in the autoclave leads to several practical problems, of which the entry of moisture into the bonded parts before the final cure is an important one. Pressurizing is usually accomplished by application of compressed air from an accumulator next to the autoclave [16].
Autoclave bonding generally involves high pressure, which can create assembly distortion problems not significant in other bonding equipment. For example, variation in glue-line pressure as a result of nonconformity of assembly parts is often a problem. The concentration of bonding pressure at adherend edges causes thinning of the glue lines at the edge, which may lead to distortion of the structure [3].
Vacuum bags are effective not only in applying pressure, but also in withdrawing any volatiles produced in curing. This type of assembly is usually prepared using flat panels, or panels of simple contour, where light pressure suffice to hold mating surfaces in contact. Such an assembly can be laid out on a steam or electrically heated water-cooled table. A rubber blanked or plastic sheet, such as polyvinyl alcohol, is placed over the assembly and sealed to the table with a bead-type seal. The table is provided with a pipe or hose outlet to a vacuum pump. When the vacuum is applied, atmospheric pressure holds the assembly together. The table is then heated and the adhesive cured. This type of equipment is considerably less cumbersome than a press, but it is limited to assemblies that need no more than atmospheric pressure (101.3 kPa) [17]. Greater pressure may be achieved using “pressure bars” between the wall of the bag and the enclosed joint. For example, 412 kPa may be achieved on a 2.5 cm joint by a T-bar with a 2.5 cm face against the wall of the bag [7].
8.8.2 Heating Equipment
Many structural adhesives require heat and pressure. The strongest bonds are often achieved by an elevated temperature cure. With many adhesives, trade-offs between cure time and temperature are permissible. Generally, manufacturers recommend specific curing schedules for optimum properties. If a cure of 60 min at 149°C is recommended, this does not mean that the assembly should be placed in a 149°C oven for 60 min. Such conditions would result in an undercure. It is the bond line that should maintain these conditions. Total oven time should be 60 min plus whatever time is required to bring the adhesive up to 149°C. Large parts may act as heat sinks and may require substantial time for the adhesive in the bond line to reach the required temperature. Thermocouples are placed as close to the adhesive as possible. In some cases, it may be desirable to place a thermocouple directly in the adhesive joint for the first few assemblies being cured [5].
8.8.2.1 Direct Heating Curing
Oven heating: Ovens are the most common source of heat for bonded parts, even though long curing cycles are required because of the heat-sink action of large assemblies. Ovens may be heated via gas, oil, electricity, or infrared units. Good air circulation within the oven is essential to prevent nonuniform heating [5]. Ovens that can reach temperatures up to 450±1°C are available [3].
Liquid baths: Various liquids are used to provide rapid heat transfer by conduction. Water is commonly used, but for higher curing temperatures mineral or silicone oils are required. The silicone oils are useful nontoxic heating media for temperatures up to 572°F (300°C). Direct contact between the adherends and hot silicone oil results in heating the bond and its cure [3].
Hot presses or platens: This equipment relies on electrical resistance heaters or steam to provide heat to the platens compressing the bonded assembly. The highest temperatures are obtained with electrical heating elements. These elements can be controlled by relay mechanisms where the curing cycle involves various temperature–time stages. Steam heating is a faster process, and it is often advantageous to circulate cooling water through the piping after curing. This technique is particularly effective in bonding assemblies that must be cooled under pressure [3,7].
8.8.2.2 Radiation Curing
The main process in radiation curing is the direct conversion of liquids into solids. When using irradiation, either UV or electron beam (EB), this conversion occurs nearly instantly. There are specific areas where EB irradiation is more suitable than irradiation by UV light. In general, these include applications where thick layers of coatings or adhesives are applied. Other instances are coatings with high levels of inorganic pigments and/or fillers, which usually cannot be cured by UV radiation because of their opacity [18].
The capital cost of standard EB curing equipment is considerably higher than that of a UV curing line. However, the recent trend is to build smaller EB processors operating at much lower voltage. Such machines are considerably less expensive and consequently present formidable competition to UV curing equipment in an increasing number of applications. At any rate, EB curing lines operate at much higher line speeds and compare favorably if they are used for continuous, long runs.
One application of this technique involves infrared radiation heaters, producing an increase in the heat transfer rate that exceeds the rate deliverable by oven heaters. Infrared lamps provide a useful way of removing solvents from contact adhesives prior to bonding and are useful in the rapid heating of localized areas of a substrate. The rate of heat transfer also depends on the color of the workpiece; thus the darker the part, the more rapid the heating.
Light-cure adhesives offer a few advantages, including fast cure time and low energy use. The major benefit of UV curing is that it is a cure-on-demand process. The adhesive will not cure until the UV light is shone on it, and, when that occurs, it takes only seconds to form a complete bond. The process is fast, solvent free, and economical [19].
UV-acrylics cure because their photoinitiators decompose into free radicals when exposed to irradiation of predetermined wavelengths usually in the UVA or visible light range between 350 and 420 nm. The release of free radicals causes extremely fast polymerization of the monomers within the adhesive system. This continues as long as there is exposure to the light source and enough free radicals being generated to polymerize the monomers.
Cationic epoxies can be used to bond substrates that are not transparent. Unlike radically curing acrylic adhesives, cationic products can be sufficiently preactivated by UV light; they will then continue to cure once the light has been removed. Cationic epoxies can be equally as effective for applications where one or more components are transparent, or none at all. After applying the adhesive, it needs to be activated before the other component is assembled. However, there is only a limited window for applying the second component.
Dual curing adhesives offer more than one curing mechanism. They are designed for applications with shadow areas, which are not accessible to UV light. Full cure in shadow areas will be achieved by anaerobic cure in the absence of oxygen with metal contact, or by adding heat.
Developments in EB design, particularly lower voltage, and in materials used, have made EB curing of PSAs affordable, practicable, and possible [18]. Typical EB doses used for PSAs are in the range of 15–20 kGy. The advantages of EB curing of PSAs include:
8.8.2.3 Electric Resistance Heaters
In this method, a conductive strip of metal is embedded in the adhesive to act as an internal resistance heater. The heating of the bond is accomplished by passing electric current through a metallic adherend or conductor within, or adjacent to, the glue line for nonmetallic adherends. Graphite is also used as an internal electric resistance heater for curing structural adhesives. It is available in various physical forms such as felts, yarns, woven fabrics, and tapes. It can be utilized as a heating element over a wide range of temperatures, up to 360°C in air and beyond (2,800°C) in an inert atmosphere. A negative coefficient of resistance with temperature prevents current surges during heating. Rapid heating and cooling of the woven mesh/cloth results from the low thermal mass and high emissivity of radiation per unit area of graphite fabric. This internal heat-surface method with graphite resistance elements provides good bond strength of joints, which compare favorably with similar joints prepared by oven curing. The advantages of this method over conventional external heating methods include [3]:
• Rapid attainment of cure temperatures, as the adhesive is heated directly; provision is usually made for heat loss to adherends and the environment.
• Easy application of heat to localized areas of an assembly.
• Fabrication of assemblies with high-temperature-cure adhesives without the risk of distortion; uniform heating of fabric eliminates hot spots.
• Closer control of glue-line temperatures with consequent realization of maximum adhesion performance. The fabric acts as a glue-line spacer and insures uniform thickness of the adhesive layer.
• Restriction of heating to the glue line, thereby avoiding unnecessary heating of adherends; reduced expenditure on large assemblies by lower power consumption.
• Simplicity of process, obviating the need for ovens; ready on-site repair of damaged assemblies with transportable power equipment.
• Realization of improvements in design and on-site modifications to structural units in a room-temperature environment.
The graphite fabric technique may be used to advantage with hot-melt adhesives to achieve easier processing. In conventional usage, assemblies are heated up to the melting point of the hot melt (applied as a film or powder between the adherends) and then cooled. By impregnating graphite fabric with the hot melt and passing a current for a short period to liquefy the adhesive, the need to heat up and cool down of the assembly is eliminated and processing times considerably reduced [3].
Other methods for electrical heating of bonded assemblies utilize wraparound electrical heating tapes or resistance elements within the jig supporting the jointed structure. It is generally difficult to attain uniform heating with these methods [3].
8.8.2.4 High-Frequency Dielectric (Radio Frequency) Heating
The curing of glue lines by heat conduction from hot plates is inefficient where thick, nonconductive adherends are involved. High-frequency dielectric heating has been developed as a curing means for bonds based on organic polar materials, or materials that behave as polar materials through the water they contain, which are poor conductors (unlike metals, for which inductive heating is preferred) or insulators (e.g., polystyrene). This process is particularly effective with the thermosetting resins used for woodworking applications, and to lesser extent, animal and casein glues. The process is based on the absorption of energy by the adherend material (or dielectric) when it is placed in an alternating electric field. At high frequencies, 10–15×106 Hz, molecular vibration (resonance) occurs, which leads to heat generation within the material, provided the material has an appropriate loss factor at that frequency. High loss factors favor rapid heating. Loss factor is equal to dielectric constant (permittivity) multiplied by power factor [3,20].
8.8.2.5 Induction Heating
This technique is similar to dielectric heating. Electric power is used to generate heat in a conductive material. The treatment is therefore applicable to metal adherends, or to adhesive materials filled with metal powder. If one adherend is conductive and the other nonconductive, either dielectric or induction heating may be applied. The possibility of heat charring the adhesive, where rapid heat-curing is involved, should be recognized and care should be taken to provide adequate control of heat input. Rapid heating, in general, should be avoided [3].
Some of the benefits of induction heating and cure include [21]:
• Adhesive curing in minutes to seconds
• Joining of metallic parts (induction curing) or of metallic with nonmetallic substrates
• Potting and bonding of nonmetal components (glass, ceramics, plastics, printed circuit boards, etc.) that won’t be heated themselves
• Preferably at bond line thicknesses above ca. 0.5 mm and for potting of medium to high volumes.
When applying induction curing, the energy is introduced in the substrate by means of alternating electromagnetic fields in the kHz frequency range. In the case of conductive metallic parts, the workpieces will heat very quickly and so will the bond line. Compared to traditional heating, there is no extended time needed for heat transfer, and thus the adhesives can be cured within minutes or even seconds. In the case of nonconductive substrates, like ceramics, polymers, or composites, the adhesives will be modified with appropriate fillers. This will cause direct heating of the bond line and hence rapid curing [21].
A similar effect can be achieved by using microwave energy in the GHz frequency range, preferably in case of nonmetallic or partial metallic bonding partners. Generally, adhesives show a good absorption of microwave energy due to their polar groups and will heat within seconds independently of their thermal conductivity and across the whole volume. Design and use of appropriate microwave probes will enable a targeted irradiation of the bond line.
8.8.2.6 Low-Voltage Heating
This method utilizes the principle of resistance heating in a simple and straightforward manner. The use of low voltage permits an inexpensive heating element to be used and allows for relatively safe handling. For efficient operation, the heating element should be in direct contact with the work being glued, so that heat transfer occurs through conduction. The only apparatus required is a step-down transformer with a capability of providing low voltages (4, 6, or 12 V with currents of 500–1,000 A) which are applied to a metal platen, usually made from galvanized or tinned mild steel or stainless steel. Low-voltage heating is used for a variety of wood-bonding applications (e.g., scarf-joint manufacture, boat-building hull work). This method is inexpensive in comparison with dielectric heating but is not as efficient for gluing wood if the distance to the glue line is more than a few millimeters. The temperature of low-voltage heating elements may vary between 75°C and 200°C [3,20].
8.8.3 Ultrasonic Activation
This method of curing the adhesive is based on the transmission of mechanical vibrations from an ultrasonic transducer to the adhesive at the interface between the mating parts. It is used most efficiently where a bead or film adhesive can be incorporated. Energy concentrations of 1.085×10⁶ W/m2/s are sufficient for melt, flow, and cure of many thermoplastic adhesives. The equipment used is the same as that for ultrasonic welding of thermoplastics [22–25].
A wide variety of adhesives can be used with ultrasonic activation, but efficiency may vary according to viscoelasticity and curing characteristics. Thermoplastics of value include most hot-melt and heat-reactivated adhesives, particularly those with some elastomeric qualities. Thermosetting adhesives may be used if a proper balance of activation and cure rate can be accomplished. Epoxy, nitrile, and phenolic adhesives have been used with some success. A fast-curing thermoset (B-stage) gives good results, since the resin can be quickly melted and allowed to flow to the adherends. The curing reaction is initiated by the heat remaining in the adherends. With slow-curing thermosets, flow can be accomplished, but continued ultrasonic activation causes a rapid temperature rise. This may initiate chemical or mechanical decomposition of the adhesive before cross-linking reactions have been completed [22].
The adhesive can be used in the form of a film, scrim, or a coating preapplied to one or both adherends, or a ribbon applied to one of the adherends. Liquid adhesives are generally unsatisfactory. Viscoelastic adhesives are particularly suitable. Ultrasonic activation usually increases the bond strength and reduces curing time in situations where it can be employed as an alternative to conventional thermal or drying processes [22].
8.8.4 Adhesive Thickness
It is highly desirable to have a uniformly thin (0.05–0.25 mm) adhesive bond line. Starved adhesive joints (where some areas have no adhesive) result in poor bonds. Three basic methods are used to control adhesive (bond line) thickness [5]:
1. Use of mechanical shims or stops, which can be removed after the curing operation. Sometimes it is possible to design stops into the joints.
2. Employment of a film adhesive that becomes highly viscous during the cure cycle, preventing excessive adhesive flow out. With supported films, the adhesive carrier itself can act as the “shim.” Generally, the cured bond line thickness will be determined by the original thickness of the adhesive film.
3. Use of trial and error to determine the correct pressure-adhesive viscosity factors that will yield the desired bond thickness.
8.9 Weldbonding
Weldbonding is also called spot-weld adhesive bonding. It is a method of fabricating hardware that uses both welding and adhesive-bonding techniques. A layer of adhesive, either in paste or in film form, is applied to one of the metal members to be joined. The other metal member is placed on top, forming a lap-type joint, and the assembly is clamped or resistance tack-welded to maintain part alignment. Resistance welding through the adhesive using a conventional spot or seam welder then joints the two members. The welds are commonly spaced 2.5–5 cm apart, center to center, as shown in Figure 8.5. After curing at ambient or elevated temperature, the adhesive forms a gas-tight seal. Hardware fabricated by this method has higher tensile-shear strength, and improved corrosion resistance, compared to equivalent resistance-welded structures. Both cost and weight savings are significant compared to riveted or mechanically fastened structures [27].
When properly applied, weldbonding will provide a joint structurally comparable to an adhesive-bonded joint, while eliminating the complex and expensive tooling generally required for adhesive bonding. Weldbonding may be accomplished by applying the adhesive to the faying surfaces prior to welding (weld-thru), or a low-viscosity adhesive may be used to infiltrate the faying surfaces by capillary action after the welding has been accomplished. Both techniques have been used in Russia [28,29].
8.9.1 Weldbond Configuration
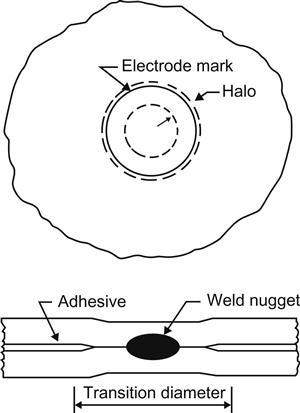
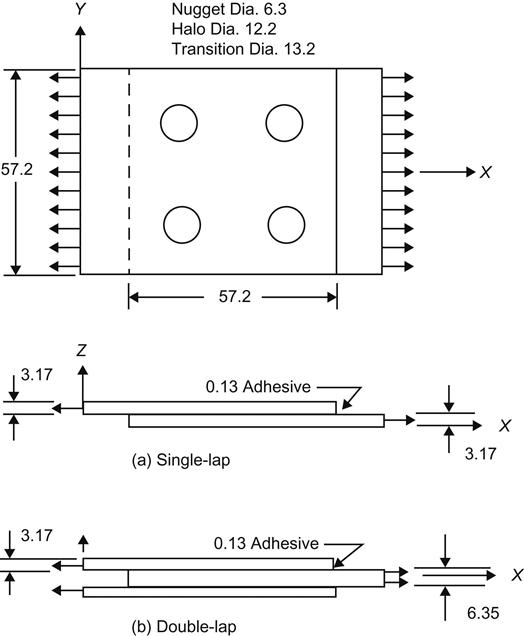
Figure 8.5 shows schematic (not to scale) details of spot-weld and the surrounding adhesive-bonded region of a single-lap weldbond joint. In the most common process, a paste adhesive is applied to the metal sheet material and the metal is then spot-welded through the uncured adhesive. The spot-welding pressure and heat result in displacement of the adhesive and fusion of the metal to form a solid weld nugget. In the figure, the solid circle represents the visible mark at the edge of the surface of contact between the spot-welding electrode and the metal sheet. The inner dashed circle outlines the weld nugget. The area between the two dashed circles, or “halo,” is effectively unbounded due to the displacement and heating of the adhesive during the spot-welding process. Beyond the halo is a region of transition to full adhesive thickness. The exact shape and dimensions of the features are functions of several variables. These include stiffness and thickness of the metal sheet and uncured adhesive and welding parameters such as pressure, current, resistance, time, and electrode shape [26,30]. Figure 8.6 shows a single-lap and a comparable double-lap weldbond joint.
High-quality welds can be made in high-strength aluminum alloys up to 72 h after layup of the parts with adhesive at the parts interface. A substantial production cost saving is realized when compared to other methods of joining because the weldbond process is highly adaptable to mechanization and automation [31].
8.9.1.1 Advantages and Limitations
The advantages of a weldbond structure over a similar structure jointed by rivets or mechanical fasteners are as follows [32]:
• Increased tensile-shear strength (static strength)
• Gas-tight structure suitable for gas or liquid containers
• Improved corrosion resistance of the lap-type joint
• Inexpensive tooling requirements for fabrication
• Smooth hermetically sealed inner and outer surfaces improve aerodynamics hardware attachments
• Complete interface bond improves load transfer between inner and outer members.
Weldbond is competitive in static strength with titanium fasteners in sheet thicknesses up to 0.40 cm. Beyond this point, the spot-welding limitations and static-strength capacity make weldbonds less desirable.
8.9.2 Surface Preparation
Chapter 3 provides details on surface-preparation methods for aluminum and titanium. Chemical cleaning of surfaces for weldbonding is necessary for high-strength joints. For noncritical weldbonds used in automotive applications involving aluminum alloys and steel, no cleaning or special surface preparation is necessary [32–34]. Low-voltage phosphoric acid/sodium dichromate anodizing is a versatile process, since it is capable of producing the required boehmite oxide layer (αAI2O3![]() H2O), which is tenaciously bonded to the aluminum alloy substrate, and a variety of alloys. It is, however, essential to remove the “as received” oxide layer (bayerite) before anodization to assure maximum corrosion resistance and bond durability. Since the boehmite layer thickness is controllable, class A spot-welds can be produced consistently, even with corrosion-inhibited weldbond paste adhesive in place. Addition of chromates to adhesives improves corrosion resistance under salt and humid environments.
H2O), which is tenaciously bonded to the aluminum alloy substrate, and a variety of alloys. It is, however, essential to remove the “as received” oxide layer (bayerite) before anodization to assure maximum corrosion resistance and bond durability. Since the boehmite layer thickness is controllable, class A spot-welds can be produced consistently, even with corrosion-inhibited weldbond paste adhesive in place. Addition of chromates to adhesives improves corrosion resistance under salt and humid environments.
8.9.3 Adhesive Choice
Epoxy, modified-epoxy, acrylic, and urethane adhesive are commonly used in weldbonding aluminum. Epoxy and polyimide adhesives are used for titanium. Polyimides are particularly suitable for titanium because of their very high temperature resistance (matching the resistance of titanium). Epoxy and modified-epoxy adhesives are available in one- or two-part liquid, paste, capillary, or unsupported-film form [32].
The most suitable adhesive for general weldbond applications is a modified-epoxy one-part paste type containing metal filler. Most adhesives used for weldbonding are arbitrarily selected from adhesives that were developed for other purposes, resulting in a compromise when used for weldbonding. Adhesives specifically developed for weldbonding should show improvements over general-purpose adhesives [32].
Fillers for epoxy adhesives used in weldbonding include silica (Cab-O-Sil, 7% by wt) to prevent runoff, 3% strontium chromate to provide corrosion inhibition, and conductive metal powders. Viscosity of adhesives in paste form has an important effect on the weld and bonded joint. Viscosity must be low enough to allow the force of the electrodes to push the adhesive out of the interface contact area, yet sufficiently high or thixotropic so that it will not flow out of the joint during the cure cycle [35].
Film adhesives have been found by some workers to be impractical because spot-welds could not be made consistently, due to the carrier [36]. On the other hand, film adhesives have been found to provide substantial benefits because they improve product workmanship in the production facility. The first requirement for any adhesive for the weld-through process of weldbonding is that the adhesives have the capability of being moved under pressure of the welding electrodes in order for metal-to-metal contact to occur at the joint interface. The second requirement is that the heat resulting from the spot-weld has only a limited detrimental effect on the strength of the bond [36].
8.9.4 Tooling for Weldbonding
Tooling for weldbonding falls into four general categories: (1) part handling, (2) adhesive application, (3) tacking, and (4) welding. Since three of these categories are commonly used in industry, only (2), tooling for adhesive application, will be discussed. Tooling for paste–adhesive application, must take into account parts fixture and control location, width, and thickness of the adhesive stripe. The tooling should have a platen to locate the part, and a movable head consisting of gridded shim stock to control width and thickness of the stripe. The adhesive can be applied with an air-activated caulking gun and spread to a uniform thickness of 0.15–0.41 mm and uniform width by drawing a plastic spreader along the shim stock. The open position of the fixture should provide access for solvent cleaning of the shim stock prior to the next adhesive application. Automatic adhesive application and spreading can be incorporated into the fixture if high production rates are required [32].
8.9.5 Weldbonding Techniques
Class A resistance spot or seam welds can be made through the adhesive in weldbond structures when recommended spot-weld cleaning or surface-preparation techniques are used. When a modified-epoxy paste adhesive containing conductive powder filler is used, the welding parameters are nearly the same as those used for welding without adhesive. Welding through an adhesive causes a higher percentage of irregularly shaped nuggets, but the strength of the weldbond joint is not adversely affected. When welding through adhesive on material prepared by the recommended surface preparation, there is a tendency for a high percentage of the spot-welds to exhibit expulsion (production of a black patch of mixed aluminum oxide and charred adhesive for aluminum substrates), resulting in lower quality and lower strength welds [36].
Weldbond process specifications have been drawn up by the industry for use by government agencies [37–40]. These process specifications give detailed steps to be taken to provide optimum weldbonds. The actual joining of parts by weldbonding is relatively straightforward. Most of the processes involved in resistance spot-welding are applicable to weldbonding. The parts are chemically cleaned as for spot-welding, wrapped and stored for up to 36 h, if required, and removed for welding. Paste adhesive of the consistency of room-temperature honey is applied to the parts by laying a small bead of adhesive on the part surface and spreading it, using a nylon spatula. The parts are then brought together and temporarily clamped. They are then placed between the electrodes of a conventional three-phase, variable pressure-type spot-welder, and welded together. The welding setup used to join the parts is only slightly modified from a conventional setup. After welding, the structure is placed in a low-temperature oven and cured for about an hour. Time and temperature depend on the type of adhesive and method involved [31,41].