9
Implementing and Managing Hyper-V on Windows Server
The previous chapter covered the Storage services available in Azure.
This chapter covers content from AZ-800 Administering Windows Server Hybrid Core Infrastructure: Manage Hyper-V and Guest Virtual Machines.
First, we will introduce the concept of virtualization and cover implementing, managing, and securing Microsoft’s Hypervisor, Hyper-V. We will conclude with some hands-on exercises to help you develop your skills further.
The following topics are included in this chapter:
- Introduction to virtualization and Hyper-V
- Implementing and managing Hyper-V
- Creating and managing Hyper-V virtual machines
- Securing Hyper-V workloads with Guarded Fabric
- Hands-on exercises
In addition to the topics listed in this chapter, this chapter’s goal is to take your knowledge beyond the exam objectives to prepare you for a real-world, day-to-day hybrid environment-focused role.
Introduction to virtualization and Hyper-V
In this section, we will introduce the concept of virtualization, specifically in the context of compute – that is, CPU and memory – as opposed to storage or network virtualization.
Computers (machines), whether virtual or physical, are the core building blocks of on-premise solutions and Azure IaaS solutions.
The term we use for these virtualized physical machines is virtual machine (VM). VMs are the virtualization of a computer’s physical memory and processor resources; physical computers are emulated in software. This allows a physical machine’s resources to be subdivided and have a portion allocated to each virtual machine. Each VM runs its own isolated OS, the same as a physical server. The OS accesses virtual compute resources such as virtual processors (virtual CPU or vCPU) and virtual memory.
The next section will look at the relationship between physical computers and VMs.
Comparing virtual and physical machines
To understand the virtualization model over the physical model, we will briefly explore the physical hardware model of operation.
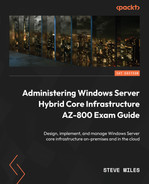
Historically, an organization operated on a model where, typically, the application and dedicated instance of an OS were mapped one-to-one to physical hardware. This was not very efficient in terms of costs or operations and also not very scalable since each app or new workload requested by the business required a new physical server. This led to scale-out server sprawl with increased rack space and associated costs.
This traditional physical approach model is outlined in the following diagram:
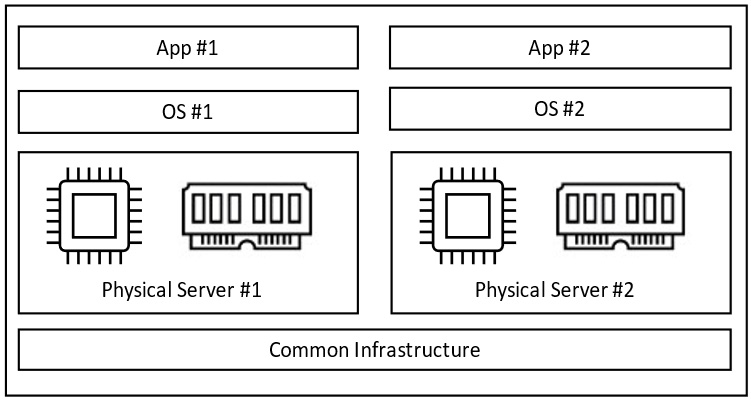
Figure 9.1 – Physical server app deployment model
This traditional app delivery approach with a one-to-one relationship can benefit from the virtualization model. Virtualization addresses the following key challenges of the traditional physical hardware model:
- Utilization
- Scale
- Cost
The concept of virtualization is based on hardware abstraction, and for compute virtualization, the hypervisor is the technology layer that enables this hardware abstraction.
Abstraction involves removing dependencies and ignoring or filtering out some aspects that are no longer relevant so that what is important can remain the focus. In this hardware abstraction context, the VM is no longer dependent on the hardware layer it runs on when we abstract it (that is, when we remove the hardware from the equation); we no longer need that layer or need to concern ourselves with it.
This means that the value of virtualization is that we can do more with less by utilizing resources at more efficient costs and economies of scale.
We can achieve these efficiencies and optimizations by running multiple VMs from one physical server. This also means less rack space, fewer physical assets to cool, power, and maintain, and possibly less human capital. Technology can be seen as a more tangible value creation center, not a cost center.
The nutshell version is that when we look at the preceding diagram (Figure 9.1), we can deliver more apps with fewer physical servers through virtualization, which translates to a lower cost to deliver and operate those apps for the business.
Each VM shares the hardware resources from the underlying physical server (referred to as the host) that it is located on. These can be referred to as host resources. The subdivision of the host resources means we can create many virtual processors and memory resources to be assigned to the host VM. The following diagram illustrates this virtualization approach:

Figure 9.2 – Virtualization app deployment model
The diagram shown in Figure 9.1 illustrates that we deployed two physical servers to run two applications with virtualization. In the example shown in Figure 9.2, we can deploy one physical server to run four applications; this is the benefit and value of virtualization. The underlying physical server host resources will determine how many VMs can be run… your mileage may vary.
In this section, we compared physical computers and VMs and learned the value and benefits of virtualization. In the next section, we will introduce Hyper-V.
What is Hyper-V?
Now that we have understood virtualization’s value and benefits, we will introduce Hyper-V as the enabler.
Hyper-V is Microsoft’s hypervisor, a piece of virtualization software and the technology layer that enables this hardware abstraction.
Example use cases for Hyper-V are as follows:
- Physical computer infrastructure consolidation
- Remote Desktop Virtualization/Virtual Desktop Infrastructure (VDI) implementations
- Test and development environments
- Private and hybrid cloud infrastructure environments, including Azure Stack Hub and Azure Stack Hyper-Converged Infrastructure (HCI) implementations
The following diagram outlines the Hyper-V system architecture:
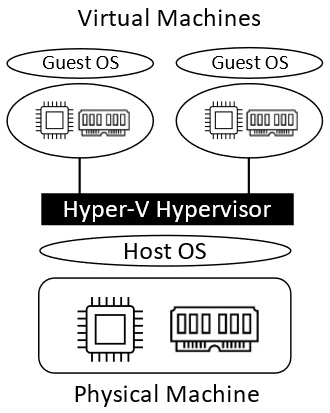
Figure 9.3 – Hyper-V system architecture
The preceding diagram shows that interaction with the physical machine layer is passed through the hypervisor software. The physical machine OS is known as the host OS, and the virtual machine OS is known as the guest OS.
In this section, we introduced Hyper-V as the virtualization software layer that allows us to create and run VMs. In the next section, we will learn how to implement and manage Hyper-V.
Implementing and managing Hyper-V
Hyper-V can be installed as a server role in Windows Server using Server Manager, PowerShell, or Windows Admin Center (WAC).
The PowerShell Install-WindowsFeature cmdlet can be used to install the role locally or on remote hosts. The PowerShell Get-WindowsFeature cmdlet can then be run to verify the installation of Hyper-V. We will look at the installation steps in the Hands-on exercises section.
When installing the Hyper-V role, it should be the only server role that’s installed on the host server; you should not install roles such as Domain Services or a File Server role.
The Server Core installation of Hyper-V has the following benefits over the full GUI OS installation option:
- Minimized hardware resources and better utilization for OS and guest VMs
- Minimized OS resources running and better utilization for OS and guest VMs
- Fewer software updates
- Smaller attack/vulnerable surface area; fewer services are running
- Streamlined deployment and remote management
The system hardware requirements for implementing Hyper-V are as follows:
- 64-bit processor
- Second-Level Address Translation (SLAT)
- VM Monitor Mode extensions
- Intel Virtualization Technology (Intel VT) or AMD Virtualization (AMD-V)
- Hardware-enforced Data Execution Prevention (DEP)
- Intel XD bit and AMD NX bit
The Hyper-V hosts should have sufficient processors and memory resources to support the number of VMs required to run on each host. Sufficient storage that is fast enough, network speed, and capacity should also be planned.
The OS that runs on a VM is referred to as a guest OS. Hyper-V supports the following guest OS types:
- All supported versions of Windows
- CentOS, Red Hat Enterprise Linux, Debian, Oracle Linux, SUSE, Ubuntu, and FreeBSD
Where possible, generation 2 VMs should be used for the guests; this provides capabilities such as secure boot, shielded VMs, and hot add/remove virtual network adapters.
Hyper-V networking
For communication on the network, the two primary components are as follows:
- Virtual network adapter
- Virtual network switch
The VM is configured with a virtual network adapter that connects to a port on the virtual network switch.
Two virtual network adapter types are supported:
- Legacy network adapter: These are only in generation 1 VMs and can be used for installation tasks using a network boot.
- Network adapter: Also called a synthetic adapter, it can be used with generation 1 and 2 VMs. It does not support the network boot for generation 1 VMs.
Three types of virtual network switches are supported:
- Private: This provides communication between VMs on the same Hyper-V host only; there is no communication between VMs and the Hyper-V host.
- Internal: This provides communication between VMs on the same Hyper-V host and between VMs and the Hyper-V host.
- External: This provides communication outside the host server, such as to the internet or another network.
A Virtual LAN (VLAN) can logically separate networks and partition traffic.
Virtual switches can be created and managed using Hyper-V Manager, Windows Admin Center, or PowerShell. The PowerShell cmdlet for this is New-VMSwitch.
Nested virtualization
Nested virtualization allows an instance of Hyper-V to be installed on a VM, which then runs VMs created within this second layer of virtualization; the host VM runs as a virtualized Hyper-V host. The following diagram visualizes this concept:

Figure 9.4 – Nested virtualization
The preceding diagram shows that Level 0 is a physical layer that contains the virtualization host(s) hardware, onto which a hypervisor is installed; this host-level hypervisor creates the Level 1 virtualization platform.
The virtualized layer running inside a VM as opposed to running on hardware is what we term Level 2 virtualization; this means it is running a nested virtualization layer.
The following are the requirements for nested virtualization:
- Server 2016 or later
- Enough memory resources
- Version 8.0 or later for guest VMs
- An Intel processor with Virtual Machine Extensions (VT-x) and Extended Page Tables (EPTs) for the physical host server
- MAC address spoofing enabled
To enable nested virtualization, use the following PowerShell cmdlet from the physical host server:
Set-VMProcessor -VMName <VMName> -ExposeVirtualizationExtensions $trueThe guest VM must be in the Off state.
Installing the Hyper-V role on the guest VM is the same process as installing the physical host server of the Hyper-V role.
Managing Hyper-V
Hyper-V Manager is a component that provides a GUI for managing local and remote Hyper-V hosts. Hyper-V Manager is shown in the following diagram:

Figure 9.5 – Hyper-V Manager
The following functions are available in Hyper-V Manager:
- Connect to and manage local and remote Hyper-V host servers
- Configure Hyper-V settings
- Manage Hyper-V Integration Services
- Manage Hyper-V guest VMs
- Manage virtual hard disks
- Manage virtual switches – Virtual Switch Manager
- Manage virtual SANs – Virtual SAN Manager
- Manage Hyper-V replication
- Manage checkpoints
- Support for the WS-Management protocol
- Support for previous versions of Hyper-V hosts
In addition to Hyper-V Manager, PowerShell and WAC can also be used to manage Hyper-V hosts.
In this section, we learned how to create and manage Hyper-V host computers. In the next section, we will learn how to create and manage the VMs that will run on the Hyper-V hosts.
Creating and managing Hyper-V virtual machines
We can create and manage Hyper-V using the New Virtual Machine Wizard area in the Hyper-V Manager console or with PowerShell using the New-VM cmdlet.
The process for implementing a VM consists of the following steps:
- Create a VM through Hyper-V Manager or PowerShell.
- Install the guest OS on the VM using Hyper-V Manager.
- Install or upgrade Integration Services using Hyper-V Manager.
We will learn how to create and manage VMs in more detail in the Hands-on exercises section of this chapter.
VM generation versions
The VM generation determines what hardware features and capabilities are available to the VM, such as the OS type supported, size of boot volume, boot methods, and so on.
Hyper-V supports generation 1 and generation 2 VMs.
Generation 1 VMs support the following features:
- 32-bit and 64-bit guest OS
- Maximum of 2 TB boot volume with four partitions
- Legacy BIOS
- VHD and VHDX format disks
Generation 2 VMs support the following features:
- 64-bit only guest OS
- Maximum of 64 TB boot volume
- UEFI
- Secure boot
- Shielded VMs
- VHDX-only formatted disks
A VM generation is selected at the time of VM creation and cannot be changed after. The following screenshot shows the VM creation wizard screen:
Figure 9.6 – VM generations
There is a negligible difference in performance between generation 1 and generation 2 VMs; this should not be the main deciding factor. The main difference is 64-bit OS only in generation 2 and UEFI only.
VM configuration versions
A VM configuration version provides information about the compatibility of VM components. The Hyper-V version determines the VM configuration the VM will receive at the time it is created.
For each VM, its configuration version identifies the following information:
- Configuration: This provides information about the processor, memory, and storage attached to the VM
- Checkpoint: These are files that represent runtime state and configuration files, which are used to create checkpoints
The configuration version of a VM can be found in the Summary tab. Here, you can choose the Configuration Version value from Hyper-V Manager.
The following PowerShell cmdlet can also get the VM version:
Get-VM * | Format-Table Name, Version.The VM configuration versions that a Hyper-V host supports can be found using the following PowerShell cmdlet:
Get-VMHostSupportedVersionThe default version that will be used for all VMs that are created on a Hyper-V host can be found using the following PowerShell cmdlet:
Get-VMHostSupportedVersion -DefaultThe VM configuration version can be updated with the following PowerShell cmdlet:
Update-VMVersion <vmname>To update the version, the VM must be turned off. It is not possible to downgrade a VM configuration version once it has been upgraded.
The following VM configuration versions are supported for each Hyper-V host Windows version:
- Windows Server 2012 R2, 2016, 2019, and 2022
- Windows 10 20H2, Enterprise 2016 LTSC, and 2019 LTSC
- Windows 11
For additional reference, the following are some examples of the minimum configuration versions for compatibility with certain Hyper-V requirements:
- Hibernation support: Version 9.0
- Hot add/remove memory: Version 6.2
- Large memory VMs: Version 8.0
- Nested virtualization: Version 8.0
- PowerShell Direct: Version 6.2
- Secure Boot for Linux VMs: Version 6.2
- Virtual processor count: Version 8.0
- Virtual Trusted Platform Module (vTPM): Version 7.0
The configuration version is important to know since VMs created on earlier Hyper-V hosts may not work on newer Hyper-V hosts with a newer OS version. You may need to move a VM between Hyper-V hosts, and you will want to know that the hosts support the VM’s configuration. A host that doesn’t support the VM configuration version of the VM will not allow that VM to start.
VM settings
The VM’s configuration and properties settings are grouped into Hardware and Management; they are represented for each generation type, as shown in the following figure:
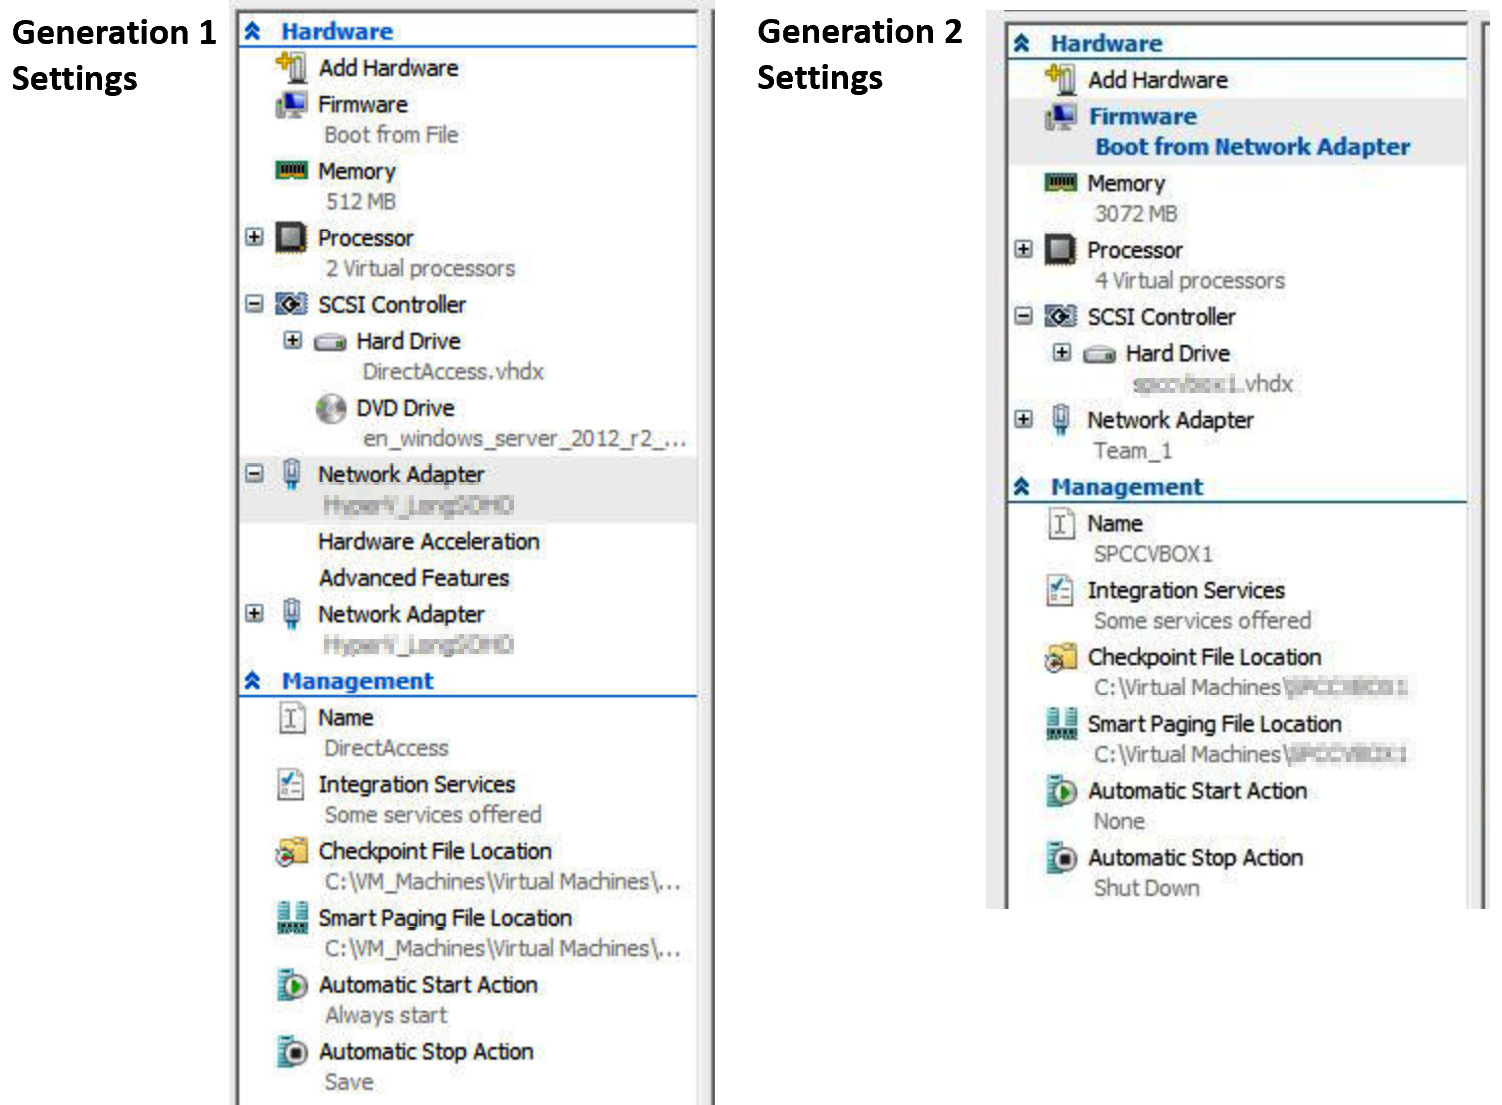
Figure 9.7 – VM generation settings
The available simulated hardware components that mediate access to the real hardware components depend on the generation version of the VM.
Generation 1 VMs have the following hardware that can be accessed:
- BIOS
- Memory
- Processor
- Non-Uniform Memory Access (NUMA)
- IDE controller
- SCSI controller
- Network
- COM port
- Diskette drive
Generation 2 VMs have the following hardware that can be accessed:
- Firmware
- Memory
- Processor
- SCSI controller
- Network adapter
- Fibre channel adapter
The management settings provide configuration information on the characteristics of a VM; these are as follows:
- Name: Used for the display name of the VM; does not change the VM’s hostname
- Integration Services: Used to configure which integration settings are enabled for the VM
- Checkpoints: Used to enable, disable, specify the type of checkpoints, and specify where they will be stored:
- A VM can be in one of the following states: Off, Starting, Running, Paused, or Saved
- There are two types of checkpoints that are point-in-time snapshots of a VM: production and standard checkpoints
- There are a maximum of 50 checkpoints for a VM
- Smart Paging File Location: Used to configure the location where Smart Paging files are stored
- Automatic Start Action: Used to define how a VM responds when you turn on a Hyper-V host
- Automatic Stop Action: Used to define how a VM responds when you shut down a Hyper-V host gracefully
The Hardware and Management information is stored in configuration files. The following two file formats are used:
- .vmcx files: This format is used for VM configuration
- .vmrs files: This format is used for runtime data
These are binary files that cannot be manually edited; Hyper-V Manager or PowerShell is required to read these files and make changes to them.
VM virtual hard disk formats
A virtual hard disk (VHD) is a software representation of a physical hard disk, the same as a VM's processor, and memory is a software representation of a physical computer’s processor and memory. You can create partitions, files, and folders, just like you can for a physical disk. You install the VM’s OS and any applications and services on these VHDs. Multiple VHDs, such as physical computers, can be attached to meet storage requirement use cases.
VHDs can be created and managed using the following:
- Hyper-V Manager
- Windows Disk Management
- PowerShell, using the New-VHD cmdlet
- The Disk Management console
- The command line, using the Diskpart tool
Two VHD formats are available when a new VHD is created for a VM; these are as follows:
- VHD: This is the format that was created by older Hyper-V versions and can create disks with a maximum size of 2,040 GB.
- VHDX: This is the newer format and can create disks up to 64 TB in size. It supports large block sizes for better performance.
You can convert a disk between formats using the Edit Virtual Hard Disk Wizard area of Hyper-V Manager or with PowerShell using the Convert-VHD cmdlet. This creates a new disk and copies the contents of the existing disk into it.
VM disk types
Hyper-V provides different disk types to suit different needs:
- Fixed-size VHD: Immediately allocates all of the disk space.
- Dynamic size VHD: A maximum size is defined when created and only allocates space as needed to grow.
- Differencing VHD: This is linked to a parent VHD with a base configuration. Changes are only made to the differencing disk, preserving the configuration on the parent. This could be a use case for multiple child disk configuration images based on the same parent configuration image.
- Pass-through physical disk: This allows you to directly connect to a physical hard disk through the host computer.
You can convert a disk between types using the Edit Virtual Hard Disk Wizard area of Hyper-V Manager; the same disk format should be used.
In this section, we looked at implementing and managing Hyper-V VMs; we covered generation versions, configuration versions, VM settings, disk formats, and types. Now, let’s look at VM memory.
VM memory
A VM’s memory can be configured as required from the Hardware section of the VM settings in Hyper-V Manager, as shown in the following screenshot:
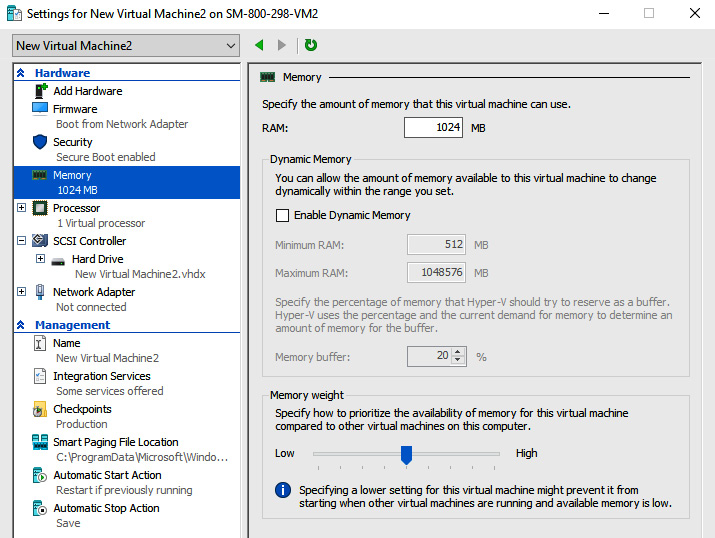
Figure 9.8 – VM memory settings
A VM can be enabled to use Dynamic Memory. As its name suggests, this allows you to dynamically size and allocate the available memory to a VM based on demand. A benefit of this is that the VM doesn’t need to be powered off, as in the case without Dynamic Memory.
There are four aspects of configuring Dynamic Memory when it is enabled; these are as follows:
- Startup RAM: This is the amount of memory a VM has when it starts, irrespective of Dynamic Memory being enabled.
- Minimum RAM: This is the minimum level that will be dynamically allocated based on the load.
- Maximum RAM: This is the maximum level that will be dynamically allocated based on the load.
- Memory Buffer: This determines the size of memory allocation that will grow in chunks of memory and increase to the maximum RAM. It is represented as a percentage of the RAM configured. The default is 20%, meaning it will increase memory in 204 MB chunks if the total memory is 1,024 MB.
The settings for configuring VM memory are shown in the following screenshot:
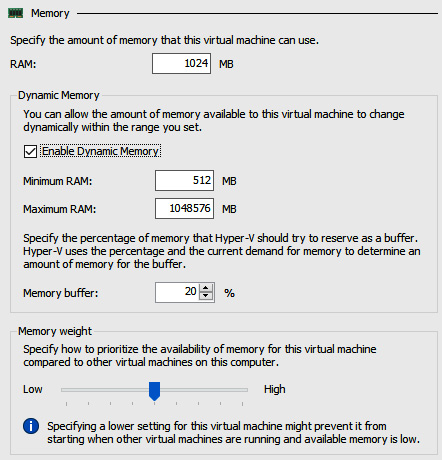
Figure 9.9 – Configuring a VM’s memory
Dynamic Memory cannot be used with NUMA. Integration Services must be updated as Dynamic Memory requires these services to control this function.
Hyper-V Integration Services
Hyper-V Integration Services provides operational functionality to VMs, also called integration components. These services (components) allow the VM to communicate with the Hyper-V host for its operations. Keeping these services (components) updated is important to ensure the smooth operation of the VM’s functions and capabilities.
You will need to install Integration Services on Hyper-V hosts earlier than Windows Server 2016 and Windows 10. To install it, from Hyper-V Manager, connect to the VM and, from the action menu, select Insert Integration Services Setup Disk. Windows Server 2016 and Windows 10 or newer Hyper-V hosts do not require this.
The following Integration Services are available:
- Hyper-V Heartbeat Service: Reports whether a VM is running correctly
- Hyper-V Guest Shutdown Service: Permits a host to trigger a VM shutdown
- Hyper-V Time Synchronization Service: Synchronizes the VM’s clock with the host
- Hyper-V Data Exchange Service (KVP): Provides a metadata exchange between the VM and the host
- Hyper-V Volume Shadow Copy Requestor: Provides a VSS backup of the VM without it being shut down
- Hyper-V Guest Service Interface: Provides an interface to copy files to or from a VM from the host
- Hyper-V PowerShell Direct Service: Provides PowerShell access to a VM without a network connection
Integration Services can be turned on and off using Hyper-V Manager or PowerShell.
To use Hyper-V Manager, right-click on the VM to access its settings, then select Integration Services under the Management section.
For PowerShell, you can use the following cmdlets:
Enable-VMIntegrationServiceDisable-VMIntegrationServiceTo get a list of the Integration Services enabled on a VM, use the following PowerShell cmdlet:
Get-VMIntegrationService -VMName "VM1"Discrete Device Assignment
Discrete Device Assignment (DDA) allows a VM to directly access physical PCIe hardware on the host whenever it’s available and supported. Two device classes are supported:
- Graphics adapters
- NVMe storage devices
Generation 1 and 2 VMs support DDA. When a device is attached, the following VM features are restricted and not available to the VM:
- Dynamic Memory
- VM save/restore
- Live migration
- High availability cluster member
The following steps should be taken to configure DDA:
- Turn off the Automatic Stop Action by using the following PowerShell cmdlet:
Set-VM -Name VMName -AutomaticStopAction TurnOff.
- Disable the device by using Device Manager or the following PowerShell cmdlets:
Get-PnpDevice
Disable-PnpDevice
- Dismount the device from the host partition using the following PowerShell cmdlet:
Dismount-VMHostAssignableDevice -LocationPath $locationPath.
- Assign the device to the VM using the following PowerShell cmdlet:
Add-VMAssignableDevice -LocationPath $locationPath -VMName VMName.
If you wish to remove the device from the VM and return to the host, you can run the following from PowerShell ISE:
#Remove the device from the VM
Remove-VMAssignableDevice -LocationPath $locationPath -VMName VMName
#Mount the device back in the host
Mount-VMHostAssignableDevice -LocationPath $locationPath
The device can then be re-enabled on the host. Use Device Manager or the following PowerShell cmdlets to do so:
Get-PnpDeviceEnable-PnpDeviceEnhanced session mode
Enhanced Session Mode allows local computer resources such as printers, clipboards, local drives, USB drives, and so on to be redirected for use by the guest VMs. This is enabled through Virtual Machine Connection (VMConnect).
The following are the requirements for using the local resources in a VM:
- Both the Enhanced Session Mode policy and Enhanced Session Mode must be enabled on the Hyper-V Host
- The computer running VMConnect must use Windows 8.1/10 and Windows Server 2012 R2/2016
- The VM must use Windows 8.1/10, Windows Server 2012 R2/2016, and have Remote Desktop Services enabled
If available on the computer where VMConnect is run, the following local resources can be redirected:
- Drives
- USB devices
- Supported plug-and-play devices
- Smart cards
- Printers
- Audio
- Display settings
- Clipboards
By default, Windows 10 OS Hyper-V hosts have Enhanced Session Mode; Windows 2012 R2 and Windows Server 2016 are now considered out of support. The following steps cover Enhanced Session Mode:
- This can be turned on from Hyper-V Settings; select Enhanced Session Mode Policy under the Server settings, as shown in the following screenshot:

Figure 9.10 – Enabling the Enhanced Session Mode Policy setting
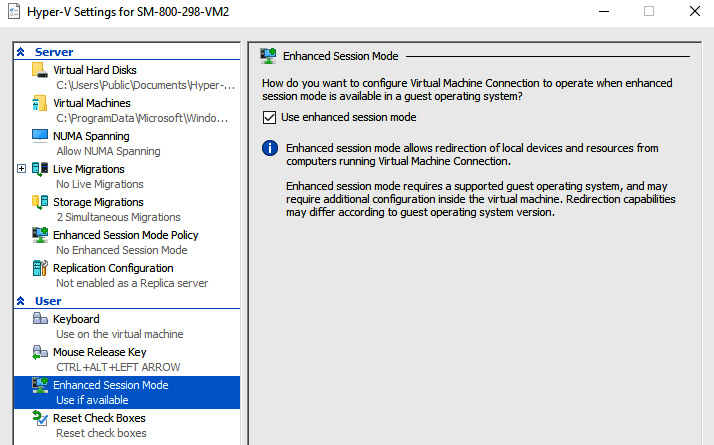
Figure 9.11 – Enable the Enhanced Session Mode setting
When you open VMConnect, you will see the VM’s local device resources that can be accessed and used:

Figure 9.12 – Accessing local resources via VMConnect
The settings for VMConnect can be changed using Command Prompt or PowerShell with the following command:
VMConnect.exe <ServerName> <VMName> /editVM resource groups
You can use VM resource groups to group VMs and perform orchestrated operations at scale on the group rather than individual VMs.
The following are the PowerShell cmdlets for this function:
- Add-VMGroupMember
- Get-VMGroup
- New-VMGroup
- Remove-VMGroup
- Remove-VMGroupMember
- Rename-VMGroup
This can only be implemented using PowerShell as there is no Hyper-V Manager option.
CPU groups
VM CPU groups allow you to manage and allocate host CPU resources across guest VMs with ease. With CPU groups, you can do the following:
- Create groups of VMs with differing allocations shared across the group for the host’s CPU resources. Different classes of services can be created for differing VM types.
- Set specific groups so that they have CPU resource limits; this caps the group’s amount of host CPU resources it can consume. This can enforce a class of service that’s desired for that group.
- Set a group’s constraints to run only on a specific set of the host’s CPUs. This can provide VM isolation between different CPU group members.
The Hyper-V Host Compute Service (HCS) manages CPU groups. Here, the cpugroups.exe command-line utility can be used.
CPU groups can be quite complex and there’s more to them than what’s been detailed in this section; please refer to the following Microsoft documentation on this functionality: https://docs.microsoft.com/en-us/windows-server/virtualization/hyper-v/manage/manage-hyper-v-cpugroups.
Hypervisor schedulers
Windows Server 2016 introduced new virtual processor scheduling logic modes. How work is managed and allocated across guest virtual processors by the Hyper-V hosts is defined by these modes or scheduler logic types.
The scheduler types are as follows:
- Classic scheduler
- Core scheduler
- Root scheduler
More details on each of these scheduler types can be found in the following Microsoft article on the topic: https://docs.microsoft.com/en-gb/windows-server/virtualization/hyper-v/manage/about-hyper-v-scheduler-type-selection.
Beginning with Windows Server 2019, the core scheduler is the default for the maximum-security posture to ensure security is by default. For these security reasons, Microsoft recommends changing the default classic scheduler in Windows Server 2016 to enable the core scheduler to protect against potentially malicious VMs.
When the core scheduler is configured, the guest VMs can optionally use simultaneous multithreading (SMT), which allows separate, independent execution threads to share the same processor resources.
SMT can be enabled on a guest VM with the following PowerShell command:
Set-VMProcessor -VMName <VMName> -HwThreadCountPerCore <n>The scheduler is configured on the host via the entry in the hypervisorschedulertype BCD. You can change the scheduler type from Command Prompt with administrator privileges using the following command:
bcdedit /set hypervisorschedulertype "type"Here, "type" is either the classic, core, or root scheduler that can be entered into the command.
Note
Hyper-V does not support, at the time of writing, the root scheduler and should not be configured for virtualization scenarios.
VM checkpoints
Each guest VM in Hyper-V can have one of the following checkpoints configured:
- Production checkpoint: This is a point-in-time image of a VM that can be restored. This uses a backup function within the VM to create the checkpoint instead of the saved state function.
- Standard checkpoint: This is a running VM’s state, data, and hardware configuration capture. It is intended for test and development use cases.
Checkpoints for each VM can be enabled or disabled. Follow these steps to enable checkpoints:
- From Hyper-V Manager, right-click the VM and click Settings.
- Select Checkpoints under the Management section.
- Select Enable checkpoints; to disable it, clear the checkbox.
- Click Apply to save your changes, then click OK to finish.
To change the checkpoint type, follow these steps:
- From Hyper-V Manager, right-click the VM and click Settings.
- Select Checkpoints under the Management section.
- Select Production or Standard checkpoints.
- Optionally, you can choose to store the checkpoints in a different location; use the Checkpoint File Location section and set it as required.
- Click Apply to save your changes, then click OK to finish.
The default for new machines is production.
NIC teaming
Network Interface Card (NIC) teaming is a technology provided by third-party hardware vendors and uses multiple network adapters to aggregate bandwidth. If a network adapter fails, traffic failover is provided to avoid connectivity and traffic flow loss.
However, Microsoft provides no support channel for this hardware vendor’s technology and no configuration information for the individual hardware vendors implementing this technology; your hardware vendor should provide configuration assistance for your scenario.
Please refer to the following official Microsoft support policy for NIC teaming with Hyper-V: https://docs.microsoft.com/en-us/troubleshoot/windows-server/virtualization/support-policy-nic-teaming.
Hyper-V Replica
Hyper-V Replica is a built-in capability in the Hyper-V role. It allows you to replicate VMs between Hyper-V hosts to support high availability goals; it creates a live copy of a VM that’s replicated to an offline VM. The data can be configured to synchronize every 30 seconds, 5 minutes, or 30 minutes to meet your Recovery Point Objective (RPO) target.
The primary and secondary host servers can be in the same physical location or replicated over a WAN link. Hyper-V Replica supports standalone and clustered Hyper-V hosts. There is no dependency on Active Directory for the Hyper-V hosts.
Follow these steps to configure Hyper-V Replica:
- Configure the Hyper-V hosts:
- A minimum of two hosts are required, with one or more VMs on each.
- From the Hyper-V settings of the host, select Enable this computer as a Replica server in the Replication Configuration section.
- Select Use Kerberos for HTTP or use Certificate-based authentication for HTTPS.
- To allow the replica server to allow VM replication traffic from any authenticated primary server, select Allow replication from any authenticated server. To accept VM replication traffic only from the specifically selected primary servers, select Allow replication from the specified servers.
- Click OK to complete.
- Configure the firewall(s). VM replication traffic must be permitted across the network; you should configure the Windows firewall and any third-party firewalls.
- Enable VM replication. For each VM to replicate, do the following:
- From Hyper-V Manager, right-click a VM and open the Enable Replication Wizard area by clicking on Enable replication. Complete the wizard’s steps as per your requirements. Detailed steps can be found in the following Microsoft documentation: https://docs.microsoft.com/en-gb/windows-server/virtualization/hyper-v/manage/set-up-hyper-v-replica.
- Carry out a failover. You can run a test failover, a planned failover, or an unplanned failover.
Only a single recovery point with the latest replication from the primary server is the default configuration for Hyper-V Replica. Additional recovery points can be stored up to a maximum of 24-hourly recovery points. Both crash-consistent and app-consistent recovery points can be created.
Managing a VM remotely
The following tools are all ways to connect remotely to a VM running on a Hyper-V Host; this may be useful for automated configuration and operations, as well as troubleshooting and support tasks where console access may have been lost:
- PowerShell Remoting: This method allows a local user’s PowerShell session to send commands to be executed locally on a remote VM running on the Hyper-V host. This can be enabled with the PowerShell Enable-PSRemoting cmdlet.
- PowerShell Direct: This method allows you to directly connect inside a VM running on a Hyper-V host without the need for a network connection. This uses the Hyper-V VMBus to connect to the VM. You can use the PowerShell PSSession or Invoke-Command cmdlet.
- HVC.exe: This method allows a direct secure shell protocol (SSH) connection to a Linux VM on a Hyper-V host.
In this section, we learned how to create and manage Hyper-V guest VMs. In the next section, we will look at securing the workloads running on the Hyper-V hosts.
Securing Hyper-V workloads with Guarded Fabric
We will introduce this section by looking at the Guarded Fabric security solution at an overview level and then explore each component in the following subsections.
Guarded Fabric
Guarded Fabric is a collection of component services and capabilities that allows a security solution to protect VMs against inspection, theft, and tampering, and malicious actors, humans, or malware from compromised VMs or hosts.
Guarded Fabric is comprised of the following components at its core:
- Shielded VM: You specify templates and images that a VM must use to be a Shielded VM.
- Guarded Host: You specify which hosts are secure for running Shielded VMs.
- Host Guardian Service (HGS): This ensures that only authorized and secure Guarded Fabric Hosts can run Shielded VMs. It provides the key service to the Guarded Hosts.
The Guarded Fabric security solution is shown in the following diagram:
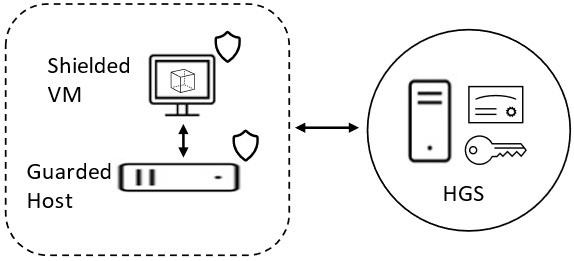
Figure 9.13 – Guarded Fabric components
The following VM types can run in Guarded Fabric with different security levels:
- Shielded VM: Provides the greatest protection with the highest security measures
- Encrypted Standard VMs: Not as protected as Shielded VMs
- Standard VMs: No protection and provides the least security measures
In this section, we introduced the Guarded Fabric security solution. The following subsection will look at the Host Guardian Service’s components and operation.
Host Guardian Service
The Host Guardian Service (HGS) comprises two core components:
- HGS Attestation service: Only authorized and safeguarded hosts can run a Shielded VM through Attestation. Two Attestation modes are available to ensure Guarded Hosts only run approved code; these are as follows:
- Key Protection Service (KPS): This allows a Guarded Host to power on Shielded VMs through provided keys. A Shielded VM can also be migrated to another Guarded Host with these security keys.
The Admin-trusted Attestation mode was included in Windows Server 2016 but was deprecated in Windows Server 2019.
The following steps can be used to start a Shielded VM in Guarded Fabric:
- The Shielded VM is requested to be started by a user.
- The Guarded Host requests Attestation for the HGS before the Shielded VM can start.
- The HGS Attestation service validates the credentials of the Guarded Host.
- A certificate is sent to the Guarded Host by the HGS Attestation service.
- The Attestation certificate is submitted to the KPS by the Guarded Host. Using an encrypted secret, a key is requested to unlock the Shielded VM.
- The KPS determines the certificate’s validity from the Guarded Host, retrieving the key to unlock the Shielded VM by decrypting the secret.
- The Guarded Host receives the key from KPS.
- The Shielded VM is started by it being unlocked with the key.
The HGS role can be implemented using the Add Roles and Features Wizard area of Server Manager or with the following PowerShell cmdlet:
Install-WindowsFeature HostGuardianServiceRole -IncludeManagementTools -RestartIn this section, we looked at securing Hyper-V workloads. In the next section, we will complete some hands-on exercises to reinforce some of the concepts covered in this chapter.
Hands-on exercises
To support your learning with some practical skills, we will utilize the concepts and understanding we gained from this chapter and put them to practical use.
We will look at the following exercises:
- Exercise – implementing the Hyper-V role using Server Manager
- Exercise – implementing the Hyper-V role using PowerShell
- Exercise – creating a guest VM
Getting started
To get started with this section, you will need access to a Windows server; this can be physical, virtual, or an Azure IaaS VM. You must ensure the physical computer or VM meets the installation requirements for Hyper-V, as per the following article: https://docs.microsoft.com/en-us/windows-server/virtualization/hyper-v/system-requirements-for-hyper-v-on-windows.
Let’s move on to the exercises for this chapter.
Exercise – Implementing the Hyper-V role using Server Manager
In this exercise, we will implement the Hyper-V role using Server Manager. For this exercise, we will be using a Windows Server 2019 Gen2 VM.
Follow these steps to get started:
- Log into your Windows Server for this exercise using an admin account, click Add Roles and Features from the Manage screen of Server Manager, and click Next on the Before You Begin screen.
- Select Role-based or feature-based installation on the Installation Type screen and click Next.
- From the Server Selection screen, accept the default selection of the current server and click Next.
- Select Hyper-V from the Roles list on the Server Roles screen.
- Click Add Features on the pop-up screen. Then, click Next:
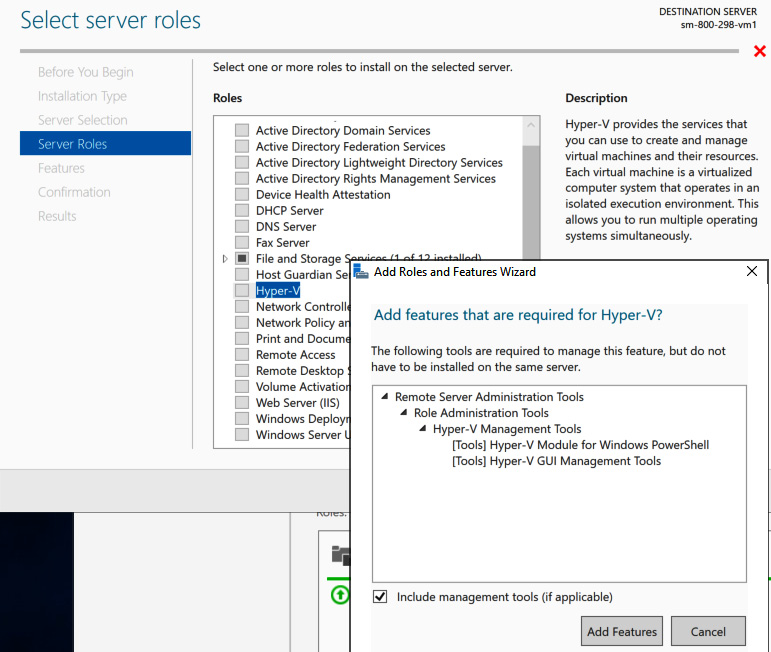
Figure 9.14 – Adding a Hyper-V server role
- On the Server Roles screen, click Next.
- On the Features screen, click Next.
- On the Hyper-V screen, click Next:
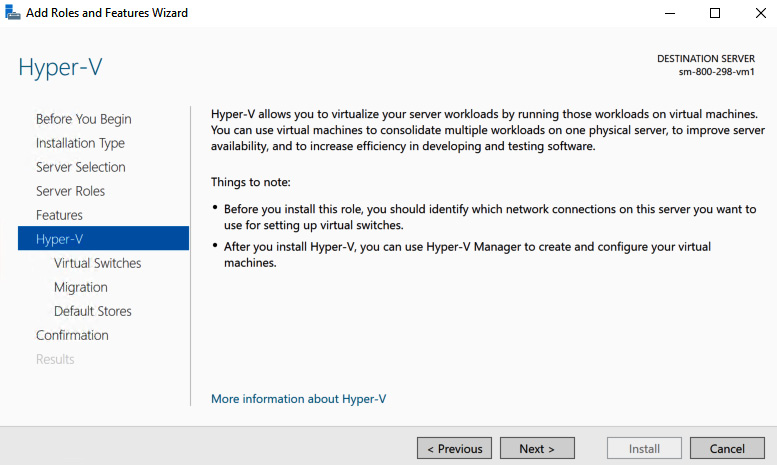
Figure 9.15 – Adding a Hyper-V server role
- On the Create Virtual Switches screen, select a network adapter and click Next:

Figure 9.16 – The Create Virtual Switches screen
- On the Virtual Machine Migration screen, accept the defaults and click Next:

Figure 9.17 – Enabling migrations
- On the Default Stores screen, accept the defaults and click Next:

Figure 9.18 – Setting the default stores
- On the Confirm installation selections screen, select Restart the destination server automatically if required, click Yes on the server restart popup that appears, and then click Install:
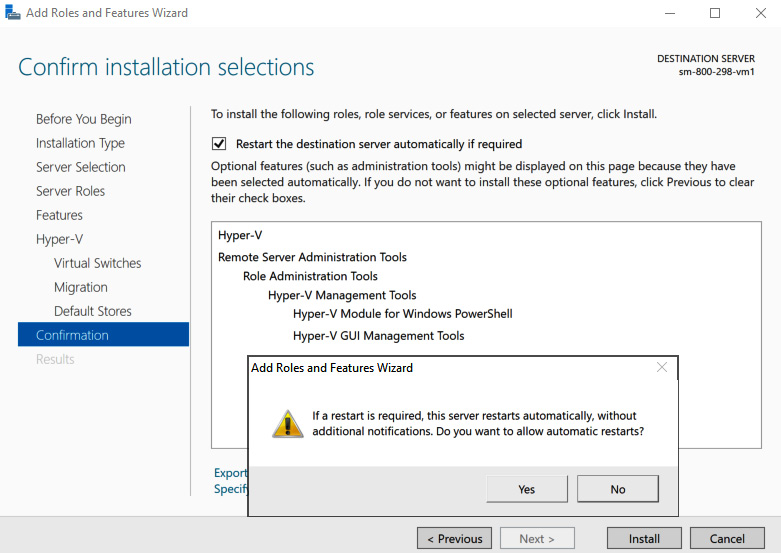
Figure 9.19 – The Confirm installation selections screen
- The installation will start:
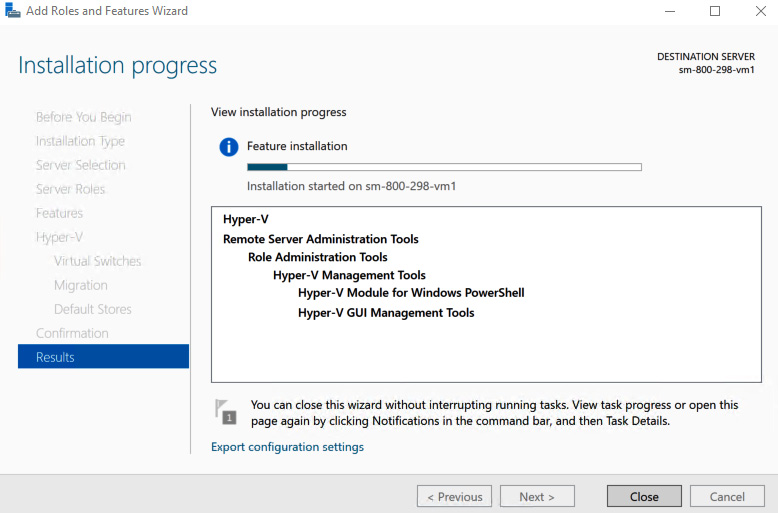
Figure 9.20 – The Installation progress screen
- When the installation has succeeded, click Close to finish installing the wizard. The Hyper-V role will now appear under Server Manager > Dashboard:

Figure 9.21 – Hyper-V server role installed
With that, we have completed this exercise. This exercise taught us the skills to implement the Hyper-V role on Windows Server using Server Manager. In the next exercise, we will implement the Hyper-V role on Windows Server using PowerShell.
Exercise – implementing the Hyper-V role using PowerShell
In this exercise, we will implement the Hyper-V role using PowerShell. For this exercise, we will use a Windows Server 2019 Gen2 VM and install it locally on our server.
Follow these steps to get started:
- Log into your Windows Server for this exercise using an admin account and launch a PowerShell session running as an Administrator.
- Run the following command to install Hyper-V locally onto this server:

Figure 9.22 – PowerShell installation
- The installation will start:
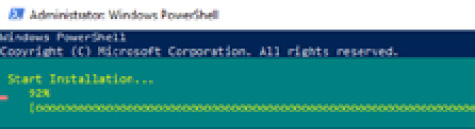
Figure 9.23 – Installation in progress
- The server will restart; the Hyper-V role will now appear under Server Manager > Dashboard:

Figure 9.24 – Hyper-V server role installed
With that, we have completed this exercise. This exercise taught us the skills to implement the Hyper-V role on Windows Server using PowerShell. In the next exercise, we will look at creating a guest VM.
Exercise – creating a guest VM
In this exercise, we will create a guest VM. Follow these steps to get started:
- Log into your Windows Server for this exercise using an admin account and open Hyper-V Manager.
- Click New from the Action pane and click Virtual Machine…:
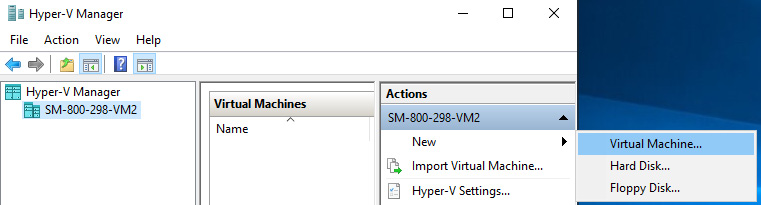
Figure 9.25 – Creating a VM
- From the New Virtual Machine Wizard area, click Next:
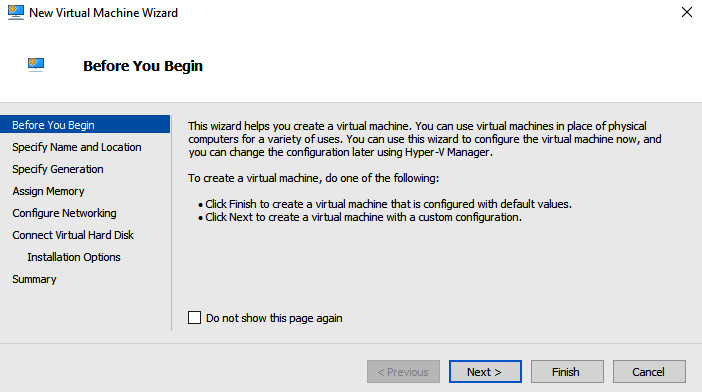
Figure 9.26 – New Virtual Machine Wizard – Before You Begin
- For this exercise, I have selected all the defaults presented. You could select each option as required. You can review each of the options and the defaults by reading the following Microsoft documentation: https://docs.microsoft.com/en-us/windows-server/virtualization/hyper-v/get-started/create-a-virtual-machine-in-hyper-v#options-in-hyper-v-manager-new-virtual-machine-wizard.
- On the Summary screen, click Finish once you have confirmed your choices:
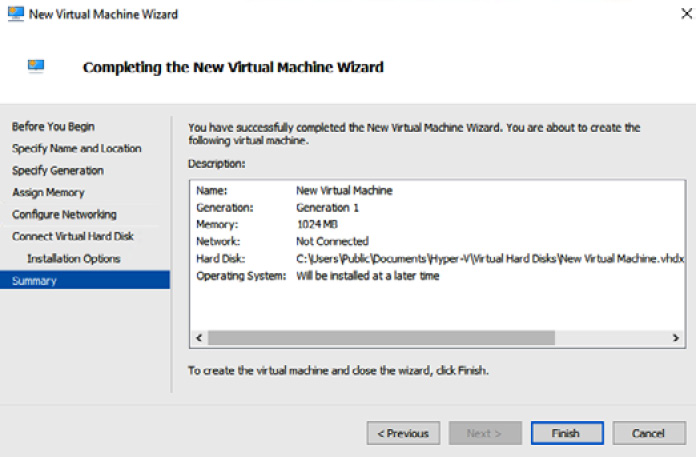
Figure 9.27 – New Virtual Machine Wizard – Summary
- Select Actions | Start from the Virtual Machine Connection window:

Figure 9.28 – Starting a VM
- Select Actions | Connect… from the Virtual Machine Connection window:

Figure 9.29 – Connecting to a VM
With that, we have completed this exercise. This exercise taught us the skills to create a guest VM. Now, let’s summarize this chapter.
Summary
This chapter’s content has helped develop your knowledge and skills regarding virtualization with Hyper-V and provided coverage for AZ-800 Administering Windows Server Hybrid Core Infrastructure: Manage Hyper-V and Guest Virtual Machines.
First, you learned about virtualization and how to implement and manage Hyper-V and secure workloads using the Guarded Fabric security solution. We finished with hands-on exercises to help you develop your skills further.
You have gained new skills through the information provided and taken your knowledge beyond the exam objectives to prepare you for a real-world, day-to-day hybrid environment-focused role.
In the next chapter, you will learn how to implement and manage Windows Server containers.
Further reading
This section provides links to additional study references and additional exam information:
- Microsoft Certified: Windows Server Hybrid Administrator Associate: https://docs.microsoft.com/en-us/learn/certifications/windows-server-hybrid-administrator/
- Exam AZ-800: Administering Windows Server Hybrid Core Infrastructure: https://docs.microsoft.com/en-us/learn/certifications/exams/az-800
- Exam AZ-800: Study Guide: https://query.prod.cms.rt.microsoft.com/cms/api/am/binary/RWKI0r
- Microsoft Learn: https://docs.microsoft.com/en-us/learn/paths/manage-virtualization-containers-hybrid-environment/
Skills check
Check what you have learned in this chapter by answering the following questions:
- What are the benefits and values of the virtualization computing model over the traditional physical computing model?
- What is Hyper-V?
- What are some of the hardware requirements for implementing Hyper-V?
- What are some of the benefits of implementing Hyper-V on Server Core instead of a full GUI OS installation?
- What guest OS types are supported?
- What are the two primary network components?
- What are the three virtual network switch types, and how do they differ in functionality?
- What is nested virtualization?
- Name some of the requirements for nested virtualization.
- Name at least six of the functions available in Hyper-V Manager.
- In what ways can we manage Hyper-V hosts and guest VMs?
- What are VM generation versions?
- What are VM configuration versions?
- What is the difference between generation 1 and generation 2 VM settings?
- What VHD disk formats are supported, and how do they differ?
- What are the different VHD disk types, and what are the use cases for these different types?
- What is Dynamic Memory, and how is it configured?
- What is Hyper-V Integration Services?
- What is Discrete Device Assignment?
- What functionality does Enhanced Session Mode provide?
- What is the benefit of VM resource groups and CPU groups?
- What are the three scheduler types?
- Explain the two VM checkpoint types.
- How is high availability provided?
- Explain the components and operation of Guarded Fabric.