12
Managing Windows Server in a Hybrid Environment
In the previous chapter, we added skills for managing Windows Server virtual machines (VMs) in Azure.
This chapter covers content from AZ-800 Administering Windows Server Hybrid Core Infrastructure: Manage Windows Servers and workloads in a hybrid environment.
We will cover implementing Windows Admin Center (WAC) to simplify remote server management, covering the different deployment methods of the gateway and Azure portal approaches. We will also cover PowerShell remoting and how we can enhance security through the use of the Just Enough Administration (JEA) capability that can be used in conjunction. We will then conclude with a hands-on exercise to develop your skills further.
This chapter does not aim to cover all aspects; the content is limited in scope to only the exam objectives and will cover the following topics:
- Deploying a WAC gateway server
- Deploying WAC within the Azure portal
- PowerShell remoting
- Hands-on exercise
In addition to the topics listed in this chapter, this chapter’s goal is to take your knowledge beyond the exam objectives to prepare you for a real-world, day-to-day, hybrid environment-focused role.
Deploying a WAC gateway server
This section will look at managing multiple Azure VMs by manually deploying WAC to an Azure VM. Before we jump into the configuration, we should introduce how WAC works.
WAC uses an installed gateway component with a web server to manage servers through PowerShell remoting and Windows Management Instrumentation (WMI) over Windows Remote Management (WinRM). These components are outlined in the following diagram:

Figure 12.1 – WAC components
The WAC gateway can be deployed to a new or existing Azure VM using a script or manually via the Azure portal.
Script deployment
To deploy the WAG gateway to an Azure VM using the Azure portal, you will first need to download the Deploy-WACAzVM.ps1 script (https://aka.ms/deploy-wacazvm), which runs a Microsoft installer (MSI) to create all the resources required for the environment, such as a resource group, VM, and virtual network (VNet). Alternatively, you can deploy to an existing VM and use a local MSI that has been downloaded and reference the file path in the script.
In both cases, you will require a certificate; this should be created and stored in Azure Key Vault, or a self-signed certificate from the MSI could be used.
The script is run from Azure Cloud Shell; the following is an example script.
First, set the variables:
$ResourceGroupName = "az800-wac-rg"$VirtualNetworkName = "az800-wac-vnet"$SecurityGroupName = "az800-wac-nsg"$SubnetName = "az800-wac-subnet"$VaultName = "az800-wac-keyvault"$CertName = "az800-wac-cert"$Location = "uksouth"$PublicIpAddressName = "az800-wac-publicip"$Size = "Standard_B2ms_v3"$Image = "Win2019Datacenter"$Credential = Get-CredentialThe following script deploys WAC to a new VM, resource group, and VNet, as set in the preceding variables; it utilizes the MSI from aka.ms/WACDownload and the MSI-generated self-signed certificate:
$scriptParams = @{ ResourceGroupName = $ResourceGroupName Name = "az800-wac-vm1" Credential = $Credential VirtualNetworkName = $VirtualNetworkName SubnetName = $SubnetName GenerateSslCert = $true}./Deploy-WACAzVM.ps1 @scriptParamsThis deployment method is covered in more detail in the following Microsoft documentation article: https://docs.microsoft.com/en-gb/windows-server/manage/windows-admin-center/azure/deploy-wac-in-azure#deploy-using-script.
Manual deployment
To manually deploy the WAG gateway to an Azure VM, you first create an Azure VM for use as the WAG gateway. You then need to download the MSI installer directly to the VM or a local machine and copy the installer onto the VM; the installer can be downloaded from https://www.microsoft.com/en-gb/evalcenter/download-windows-admin-center.
Launch the MSI installer on the WAC gateway VM and follow the wizard instructions. You will need a certificate that you can provide or let the MSI generate a self-signed certificate.
For communication, port 443 (HTTPS) is used by default by the installer; you should allow this communication through any network filter, such as a network security group (NSG) or firewall.
Accessing WAC
WAC is accessed via a browser using the gateway VM’s DNS name; that is, https://<DNS name of your VM>.
If you set a port other than the default 443, you will need to get access using the following URL:
https://<DNS name of your VM>:<custom port>The browser will prompt for credentials to authenticate the session on the local VM where WAC is installed. These credentials should be for an account that is a member of the VM’s local users or administrators group.
The following screenshot shows the WAC browser-based interface:
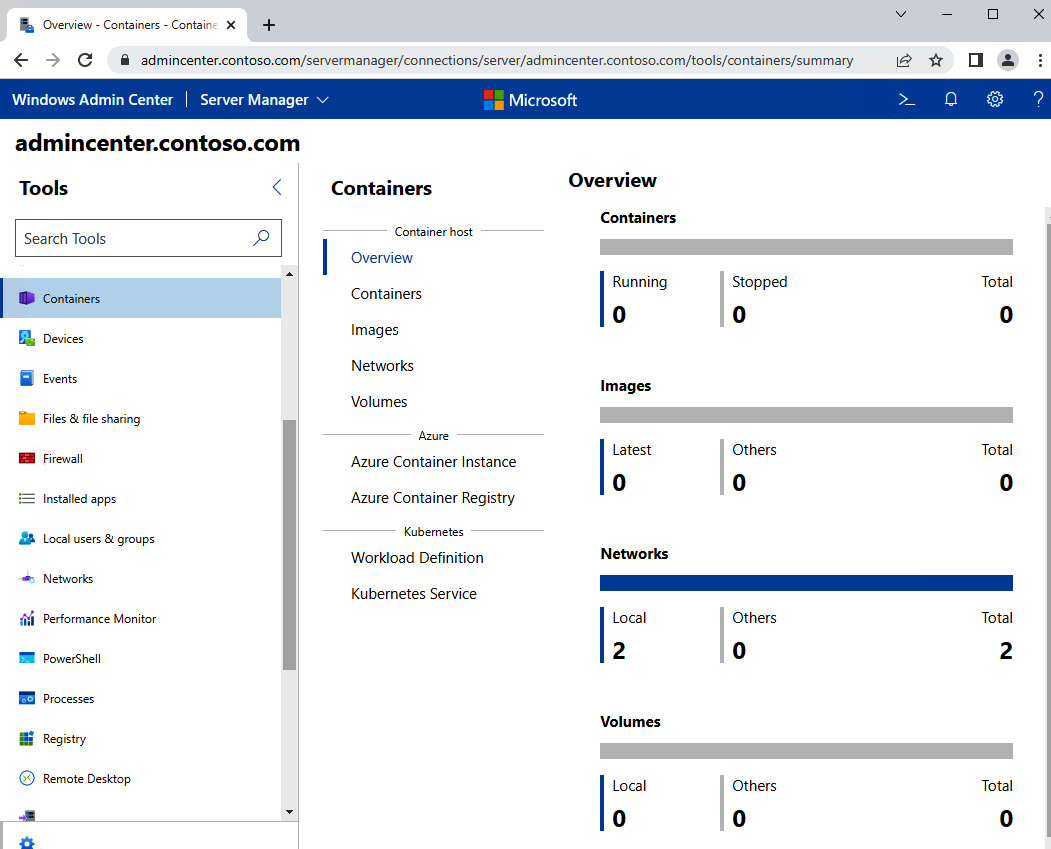
Figure 12.2 – WAC browser interface
In this section, we looked at deploying a WAC gateway VM and covered the manual installation, as well as an automated installation of WAC with a script. In the next section, we will look at installing WAC on a VM so that it can be managed via WAC within the Azure portal.
Deploying WAC within the Azure portal
We can target the management of Azure and hybrid resources using WAC and its integration with Azure services and the Azure portal. The following are the three resources that can be currently targeted for management by WAC using the Azure portal:
- Azure infrastructure-as-a-service (IaaS) VMs
- Azure Stack HCI
- Azure Arc-enabled servers
For the exam objectives, we will focus the content of this section on how to target Azure IaaS VMs.
Requirements for WAC
To use the capability of WAC in the Azure portal, WAC is installed on each Azure VM to be managed by it. The Azure VMs to be managed by WAC in the Azure portal must meet the following requirements:
- Windows Server 2016, Windows Server 2019, Windows Server 2022.
- Minimum of 3 GB memory.
- Must be in an Azure public cloud region; Azure China, Azure Government, and other non-public clouds are not supported.
- Outbound internet access allowing HTTPS traffic to the WindowsAdminCenter and AzureActiveDirectory service tags.
- Inbound access allowing HTTPS traffic.
- Inbound access must be directed to the IP address of a VM; it cannot be redirected from another service, such as a firewall.
In addition to the VM requirements, there are requirements for the management machine that is used to connect to the Azure portal; these are as follows:
- A web browser such as Microsoft Edge or Google Chrome
Access is recommended via a virtual private network (VPN) or ExpressRoute to the same VNet as the VMs that have WAC installed that you need to manage using WAC. This access method is more secure than exposing the VMs to public IP addresses. If you access via a public IP address, you should create an access rule to restrict access from known IP addresses only and allow an inbound rule for ports 443 HTTPS and 6516 TCP.
Once all requirements are met, you can install WAC onto each Azure VM to be managed.
We will continue with this topic as a hands-on installation task in the Hands-on exercise section of this chapter.
In this section, we looked at targeting the management of Azure and hybrid resources using WAC and its integration with Azure services and the Azure portal. We walked through implementing WAC inside the Azure portal and accessing an Azure VM to manage it from WAC within the Azure portal.
This concluded the sections on deploying WAC. In the next section, we will look at PowerShell remoting.
PowerShell remoting
PowerShell remoting allows a single command to be run on hundreds of machines or just one remote machine. PowerShell remoting uses the WS-Management (WS-Man) protocol.
PowerShell remoting is enabled by default in Windows Server 2012/R2, 2016.
PowerShell remoting is enabled with the following elevated command:
Enable-PSRemotingThe following are the requirements for PowerShell remoting:
- PowerShell installed on the local machine where commands will be run from and a remote machine
- PowerShell remoting must be enabled
- WinRM enabled each machine to connect and run a command
We will look at some example cmdlets that can be run against remote computers.
PowerShell remoting examples
The following cmdlet starts an interactive session with a single remote computer:
Enter-PSSession Computer-1Command Prompt will show the remote computer’s display name; all commands entered will display on the local computer but are executed on the remote computer.
The interactive session can be ended with the following cmdlet:
Exit-PSSessionThe Invoke-Command cmdlet can be used to run scripts on one or more remote computers; an example would be as follows:
Invoke-Command -ComputerName Computer-1, Computer-2 –FilePath C:az800demoaz800script.ps1The script would be at the path on your local machine and execute on the remote computers; the results would display on your local screen.
The New-PSSession cmdlet can be used for a persistent session; an example would be the following:
$s = New-PSSession -ComputerName Computer-1,Computer-2Second-hop PowerShell remoting
A challenge arises when you establish a session to a first remote computer as the first hop, but that computer requires access to resources on a second computer.
Access to the second server is a second hop, which will be denied access. This is because the session was established with the first server; the session credentials are not passed from the first server to the second server where the resources are.
The following are the methods of configuration to support and resolve this scenario:
- Pass credentials inside an Invoke-Command script block: Provides the simplest configuration but lesser security
- Configure resource-based Kerberos-constrained delegation: Provides higher security with a simpler configuration
- Kerberos-constrained delegation: Provides the highest security but requires the domain administrator
- JEA: Provides the best security but has detailed configuration
- PSSessionConfiguration using RunAs: Provides simpler configuration but more complex credential management
- Configure Credential Security Support Provider (CredSSP): The best balance of security and ease of configuration
- Kerberos delegation (unconstrained): Not recommended
CredSSP is disabled by default and should only be used in the most trusted environments. CredSSP caches the credentials on the first-hop remote server and uses those credentials to pass to the second-hop server from where we are directly opening a session. This makes us open to credential theft attacks if the remote server is compromised.
JEA
JEA provides delegated administration through role-based access control (RBAC) and is built on the foundation of PowerShell remoting.
JEA limits the amount of access and privileges in terms of what users can do and which cmdlets they can run and provides auditing to understand better who did what during a session. It’s a key defense against lateral movement attacks through compromised privileged accounts and works based on least privilege access and rights.
JEA is included in PowerShell 5.0 and later. To check which version of PowerShell is installed, you can run the following PowerShell cmdlet:
$PSVersionTable.PSVersionTo start using JEA, you would want to see a result that shows as follows, with the Major release being 5 or higher:
Major Minor Build Revision----- ----- ----- --------5 1 14393 1000Having the latest version of PowerShell available for your machine is always recommended.
The following list details the JEA availability via OS type:
- Pre-installed: Windows Server 2016+, Windows 10 1607+
- Pre-installed with reduced functionality: Windows 10 1603, 1511
- Full functionality with Windows Management Framework (WMF) 5.1: Windows Server 2012/R2, Windows 8, 8.1
- Reduced functionality with WMF 5.1: Windows Server 2008/R2, Windows 7
- Not available: Windows 10 1507
PowerShell remoting is a required foundation for JEA and must be enabled before JEA can be used. PowerShell remoting is enabled by default in Windows Server 2012/R2, 2016; the Enable-PSRemoting command is used to enable it.
JEA creates configured endpoints that users connect to; there are files associated with a configured endpoint, and these are as follows:
- Role capabilities file
- Session configuration file
The role capabilities file can be identified with a .prsc file extension. The session configuration file can be identified with a .pssc file extension.
As its name suggests, the role capabilities file describes what can be done in a session using the basis of RBAC; the cmdlets, providers, functions, and external programs are listed.
Who can use the endpoints and which role capabilities they have access to are defined in the session configuration file.
A template for a blank configuration file can be created using the following command:
New-PSSessionConfigurationFile -SessionType RestrictedRemoteServer -Path .MyJEAEndpoint.psscThe final piece after the role capability file and session configuration file have been created is the registration of the endpoint; the following PowerShell command is used for this:
Register-PSSessionConfiguration -Path .AZ800JEAConfig.pssc -Name 'JEAServiveDEsk' -ForceFurther information on configurations can be found in the following Microsoft documentation article: https://docs.microsoft.com/en-gb/powershell/scripting/learn/remoting/jea/session-configurations.
This section looked at configuring PowerShell remoting and some challenges and risks. In the next section, we will complete a hands-on exercise section to re-enforce some of the concepts covered in this chapter.
Hands-on exercise
To support your learning with some practical skills, we will utilize the concepts and understanding gained from the earlier sections of this chapter and put them into practical application.
We will look at the following exercise:
- Exercise – implementing WAC within the Azure portal
Getting started
To get started with this section, if you do not already have an Azure subscription, you can create a free Azure account at https://Azure.microsoft.com/free. This free Azure account provides the following:
- 12 months of free services
- USD $200 credit to explore Azure for 30 days
- 25+ services that are always free
Let’s move on to the exercise for this chapter.
Exercise – implementing WAC within the Azure portal
This exercise will look at implementing WAC within the Azure portal to manage an Azure VM.
You will need the following in place for this exercise:
- An Azure VM to act as the management target.
- Access to the VM with a local admin account.
- Access to the same VNet as the VM from a management machine used to connect to the Azure portal; this could be via a VPN, public IP address, or another Azure VM on the same VNet used as a jump host. If connecting via a public IP address, you should create an inbound port rule for HTTP 443 and TCP 6516.
Follow these steps to get started:
- You should click on Windows Admin Center (preview) from the VM to be managed under the Settings section:

Figure 12.3 – Azure VM to be managed

Figure 12.4 – Installing WAC extension to VM
- You will receive a notification in the portal that the WAC extension was successfully installed on the VM:
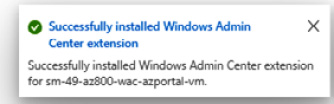
Figure 12.5 – WAC extension successfully installed on VM
- Now that the WAC extension has been installed on the VM, we can use WAC within the Azure portal to manage the VM without the need for RDP or PowerShell.
- To connect to the VM, navigate to the VM in the Azure portal, select an IP address to connect to the VM (public or private), and select Connect:
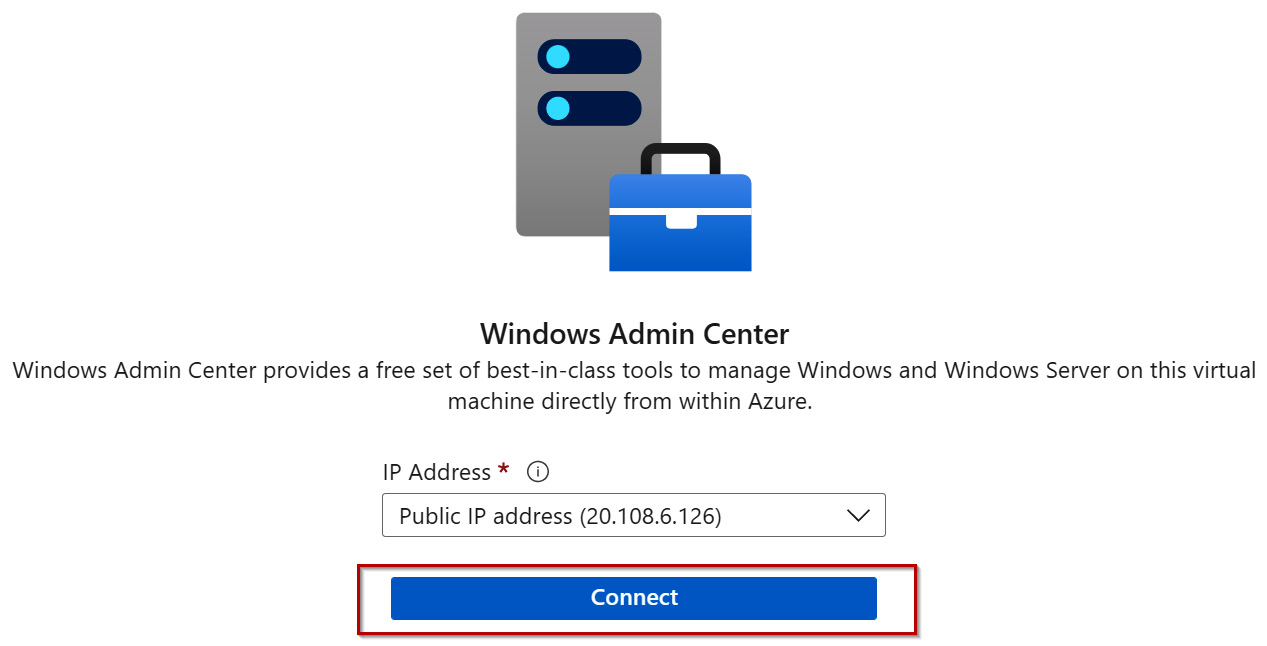
Figure 12.6 – Connecting WAC to VM
- You will be prompted to sign in; you should use a local admin account for the VM for this exercise (the admin account set when creating the VM was used in this lab example).
- You will now have access to WAC running integrated within the Azure portal:

Figure 12.7 – WAC within Azure portal
With this, we have completed this exercise. This exercise taught us the skills needed to install WAC on an Azure VM and connect to it using WAC within the Azure portal. Now, let’s summarize this chapter.
Summary
This chapter provided coverage for the AZ-800 Administering Windows Server Hybrid Core Infrastructure: Manage Windows Servers and workloads in a hybrid environment exam.
This chapter’s content further developed your knowledge and skills for hybrid management services.
You learned about deploying a WAC gateway for the management of multiple VMs and how to install WAC so that a VM can be managed using WAC from within the Azure portal; we then concluded by looking at PowerShell remoting. We then finished the chapter with a hands-on exercise to develop your skills further.
You added new skills through the information provided, with the chapter’s goal to take your knowledge beyond the exam objectives so that you are prepared for a real-world, day-to-day, hybrid environment-focused role.
The next chapter will teach you about implementing and managing Azure network infrastructure.
Further reading
This section provides links to additional study references and additional exam information:
- Microsoft Certified: Windows Server Hybrid Administrator Associate: https://docs.microsoft.com/en-us/learn/certifications/windows-server-hybrid-administrator/
- Exam AZ-800: Administering Windows Server Hybrid Core Infrastructure: https://docs.microsoft.com/en-us/learn/certifications/exams/az-800
- Exam AZ-800: skills outline: https://query.prod.cms.rt.microsoft.com/cms/api/am/binary/RWKI0r
- Microsoft Learn: https://docs.microsoft.com/en-us/learn/paths/manage-windows-servers-workloads-hybrid-environment/
Skills check
Challenge yourself with what you have learned in this chapter:
- What is a WAC gateway server?
- How does WAC work?
- Which ports are required to be allowed for WAC deployment?
- How is WAC accessed?
- List the requirements for implementing WAC within the Azure portal.
- What is PowerShell remoting?
- How is PowerShell remoting enabled?
- What is second-hop PowerShell remoting?
- What is JEA?
- What are the requirements for JEA?