Getting Started
Adobe® Photoshop® Elements 4.0 delivers image-editing tools that balance power and versatility with ease of use. Photoshop Elements 4.0 is ideal for home users, hobbyists, business users, and professional photographers—anyone who wants to produce good-looking pictures and sophisticated graphics for the Web and for print.
If you’ve used earlier versions of Photoshop Elements, you’ll find that this Classroom in a Book® teaches many advanced skills and innovative features that Adobe Systems introduces in this version. If you’re new to Adobe Photoshop Elements 4.0, you’ll learn the fundamental concepts and techniques that help you master the application.
About Classroom in a Book
Adobe Photoshop Elements 4.0 Classroom in a Book is part of the official training series for Adobe graphics and publishing software developed by Adobe product experts. Each lesson in this book is made up of a series of self-paced projects that give you hands-on experience using Photoshop Elements 4.0.
The Adobe Photoshop Elements 4.0 Classroom in a Book includes a CD attached to the inside back cover of this book. On the CD you’ll find all the image files used for the lessons in this book, along with additional learning resources.
Prerequisites
Before you begin working on the lessons in this book, make sure that you and your computer are ready.
Note: The lessons in this book are designed to be used only on Windows 2000 or Windows XP.
Requirements on your computer
You’ll need about 300 MB of free space on your hard disk for the lesson files and the work files you’ll create. The lesson files are on the CD attached to the inside back cover of this book, and are necessary for your work in the lessons.
Required skills
The lessons in the Adobe Photoshop Elements 4.0 Classroom in a Book assume that you have a working knowledge of your computer and its operating system. This book does not teach the most basic and generic computer skills. If you can answer yes to the following questions, then you’re probably well-qualified to start working on the projects in these lessons. Most users should work on the lessons in the order in which they occur in the book.
• Do you know how to use the Microsoft Windows Start button and the Windows Taskbar? Can you open menus and submenus, and choose items from those menus?
• Do you know how to use My Computer, Windows Explorer, or Internet Explorer to find items stored in folders on your computer or browse the Internet?
• Are you comfortable using the mouse to move the cursor, select items, drag, and deselect? Have you used context menus, which open when you right-click items?
• When you have two or more open applications, do you know how to switch from one to another? Do you know how to switch to the Windows Desktop?
• Do you know how to open, close, and minimize individual windows? Can you move them to different locations on your screen? Can you resize a window by dragging?
• Can you scroll (vertically and horizontally) within a window to see contents that may not be visible in the displayed area?
• Are you familiar with the menus across the top of an application and how to use those menus?
• Have you used dialog boxes, such as the Print dialog box? Do you know how to click arrow icons to open a drop-down menu within a dialog box?
• Can you open, save, and close a file? Are you familiar with word processing tasks, such as typing, selecting words, backspacing, deleting, copying, pasting, and changing text?
• Do you know how to open and find information in Microsoft Windows Help?
If there are gaps in your mastery of these skills, see the Microsoft documentation for your version of Windows. Or, ask a computer-savvy friend or instructor for help.
Installing Adobe Photoshop Elements 4.0
You must purchase the Adobe Photoshop Elements 4.0 software separately and install it on a computer running Windows 2000 or Windows XP. For system requirements and complete instructions on installing the software, see the Photoshop Elements 4.0 application CD and documentation.
Copying the Classroom in a Book files
The CD attached to the inside back cover of this book includes all the electronic files for the lessons in this book. The files will be organized using a catalog that is an essential part of many projects. Keep all the lesson files on your computer until after you have finished all the lessons.
Note: The images on the CD are practice files, provided for your personal use in these lessons. You are not authorized to use these photographs commercially, or to publish or distribute them in any form without written permissions from Adobe Systems, Inc., and the individual photographers who took the pictures, or other copyright holders.
Copying the Lessons files from the CD
1 Insert the Adobe Photoshop Elements 4.0 Classroom in a Book CD in your CD-ROM drive. If a message appears asking what you want Windows to do, select Open Folder to View Files Using Windows Explorer, and click OK. If no message appears, open My Computer and double-click the CD icon to open it.
2 Locate the Lessons folder on the CD and copy it to the My Documents folder on your computer.
3 When your computer finishes copying the Lessons file, remove the CD from your CD-ROM drive and put it away.
Go to the procedure on the next page before you start the lessons.
Creating a work folder
You’ll want to create a folder where you can save all of your work as you complete the lessons in this book. You’ll use this folder in many of the lessons.
1 In Windows Explorer open the Lessons folder that you copied to the My Documents folder on your hard drive.
2 In the Lessons folder choose File > New > Folder. A new folder is created in the Lessons folder. Type My CIB Work to name the folder.
Creating a catalog
You’ll use a catalog to organize the image files for the lessons in this book. This keeps all your images together in one easy-to-access location. You’ll use the process of importing files into a catalog whenever you need to import images into Photoshop Elements from your digital camera, or import images already stored on your hard drive.
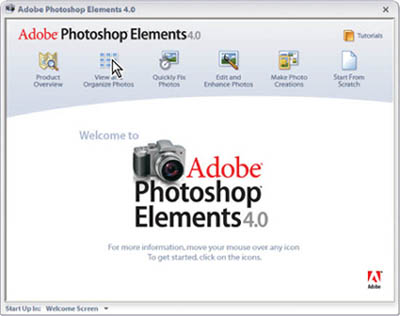
1 Start Adobe Photoshop Elements 4.0. In the Photoshop Elements Welcome Screen, choose View and Organize Photos. This starts Photoshop Elements in the Organizer mode.
Note: If this is the first time you have started the Organizer, an alert message may appear asking if you would like to specify the location of photos. Click No if this alert message appears.
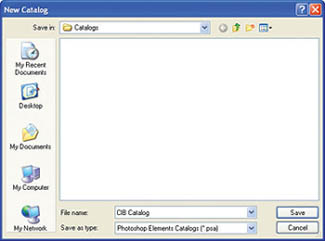
2 Choose File > Catalog and in the Catalog window that opens, click the New button. Enter the file name CIB Catalog and then click the Save button.
Note: Do not change the location of where the Catalog file is stored.
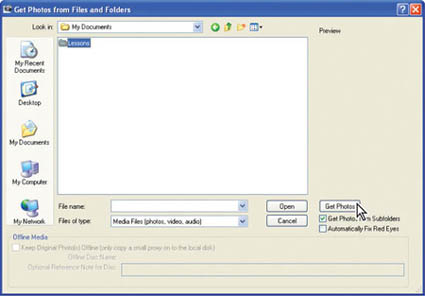
3 Choose File > Get Photos > From Files and Folders. In the Get Photos from Files and Folders window, open the My Documents folder. Click only once to select the Lessons folder that you copied from the CD. Do not double-click, as you do not want to open the Lessons folder.
4 Set the following options in the Get Photos from Files and Folders window:
• Confirm that the Get Photos from Subfolders checkbox is selected in the lower right corner of the window.
• Deselect the Automatically Fix Red Eyes option. This is a great option that you will learn more about as you work through the lessons, but we won’t use it just yet. Click the Get Photos button. A window will open showing the photos being imported.
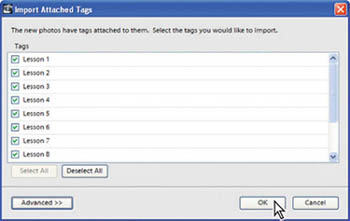
5 The Import Attached Tags window opens. Click the Select All button, and then click the OK button. The images you are bringing into the catalog contain additional information, known as tags, that will help you organize them as you proceed through the book. We’ve added these tags to help make it easier to work with the lessons in this book. You’ll learn all about tags in Lesson 2.
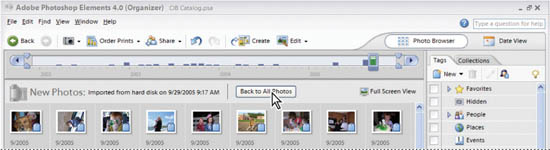
After the image files are imported into the catalog, the tags are displayed along the right side of the display. The tags will be referenced in the lessons throughout this book.
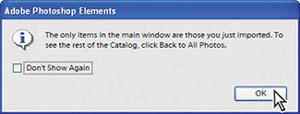
6 Photoshop Elements may display a dialog box, informing you that the only items displayed in the Organizer are those you just imported. If an alert is displayed, click OK to close this window. Click the Back to All Photos button.
Reconnecting missing files to a catalog
After images are added to a catalog, Adobe Photoshop Elements expects them to remain in the same location. If you move the Lessons folder or any of the files after you have created the catalog, you may need to reconnect the files. This procedure is only necessary if you move the Lesson files or other images after you have imported them into the catalog. Photoshop Elements alerts you that it cannot find an image file, you will need to follow the following procedure. If your lesson files have not been moved, or you have not received an alert message regarding missing files, you do not need to follow this procedure and can go on to the first lesson.
Moving or renaming a catalogued image file or folder can break the catalog connections. Fortunately, reconnecting them is easy. If you ever receive a message that individual files cannot be located, simply complete the following steps:
1 Choose File > Reconnect > All Missing Files. If a message appears, “There are no files to reconnect,” click OK, and then skip the rest of this procedure. Your files do not need to be reconnected.
2 If a message appears, “Searching for missing files,” click the Browse button. The Reconnect Missing Files dialog box opens.
3 In the Browse tab on the right side of the Reconnect Missing Files dialog box, navigate to and open the Lessons folder.
4 Continuing to work in the Browse tab, locate and click once to select the folder that has the same name as the folder listed underneath the image thumbnail. The folder name is listed on the left side of the Reconnect Missing Files dialog box, directly under the image thumbnail.
5 After you select the appropriate folder and the correct thumbnail picture appears in the right side of the dialog box, click the Reconnect button.
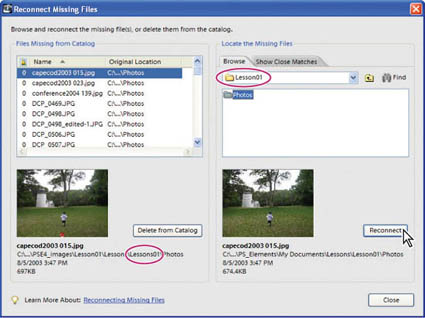
6 Repeat steps 4 and 5, continuing to select the appropriate folders, and clicking the Reconnect button as you find matching files. When all the files are reconnected, click the Close button.
You can now use the Photoshop Elements Organizer to select and open files in the Photoshop Elements Editor.
Note: This procedure also eliminates error messages regarding missing files when you work with Creations, or print from the Organizer.
Additional resources
Adobe Photoshop Elements 4.0 Classroom in a Book is not meant to replace documentation that comes with the program, nor is it designed to be a comprehensive reference for every feature in Photoshop Elements 4.0. For additional information about program features, refer to any of these resources:
• Photoshop Elements Help, which is built into the Adobe Photoshop Elements 4.0 application. You can view it by choosing Help > Photoshop Elements Help.
• The Adobe Web site (www.adobe.com), which you can view by choosing Help > Photoshop Elements Online. You can also choose Help > Online Support for access to the support pages on the Adobe Web site. Both of these options require that you have Internet access.
• The Adobe Photoshop Elements 4.0 Getting Started Guide, which is included either in the box with your copy of Adobe Photoshop Elements 4.0 or on the installation CD for the application software in PDF format. If you don’t already have Adobe Reader (or if you have an older version of Adobe Acrobat Reader) installed on your computer, you can download a free copy from the Adobe Web site (www.adobe.com).
Adobe Certification
The Adobe Training and Certification Programs are designed to help Adobe customers improve and promote their product-proficiency skills. The Adobe Certified Expert (ACE) program is designed to recognize the high-level skills of expert users. Adobe Certified Training Providers (ACTP) use only Adobe Certified Experts to teach Adobe software classes. Available in either ACTP classrooms or on-site, the ACE program is the best way to master Adobe products. For Adobe Certified Training Programs information, visit the Partnering with Adobe Web site at http://partners.adobe.com.