5. Fixing Exposure Problems
You can use Photoshop Elements to fix most images that are too dark or too light. This lesson leads you through several approaches to correcting exposure problems in photographs. This aspect of color correction is often easier to fix than you might imagine.
In this lesson you will learn how to do the following:
• Brighten underexposed photographs.
• Bring out details and colors in overexposed and faded photographs.
• Correct different areas of an image individually.
• Save selection shapes to reuse in later sessions.
• Create and apply adjustment layers.
Most users can complete this lesson in a little over an hour.
This lesson assumes that you are already familiar with the overall features of the Photoshop Elements 4.0 work area and recognize the two ways in which you can use Photoshop Elements: the Editor and the Organizer. If you need to learn more about these items, see Lesson 1, “A Quick Tour of Photoshop Elements” and Photoshop Elements Help. This lesson also builds on the skills and concepts covered in the earlier lessons.
If you are starting your work in this book with this lesson, make sure that you have already copied the project files from the CD attached to the inside back cover of this book. See “Copying the Classroom in a Book files” on page 3.
In this lesson, you will use the CIB Catalog you created earlier in the book. If necessary, open this catalog by choosing File > Catalog in Photo Organizer, then click Open
Getting started
You’ll start this lesson in the same way as you started your work in Lesson 4. You will process all the image files for this lesson at once to apply automatic fixes available in Photoshop Elements 4.0. You’ll save these files so that you can compare them to the files that you fix using manual techniques.
1 Start Photoshop Elements in Standard Edit by selecting Edit and Enhance Photos on the Welcome Screen. Or, if the Organizer is open, click Edit (![]() ) and choose Go to Standard Edit.
) and choose Go to Standard Edit.
2 Choose File > Process Multiple Files.
3 In the Process Multiple Files window, do the following:
• Choose Folder on the Process Files From drop-down menu.
• Under Source, select the Browse button, and then locate and select the Lesson05 folder, and click OK.
• Under Destination, click Browse, and then locate and select the My CIB Work folder.
• Select Rename Files. Type Autofix_ in the first option, and select Document Name in the second option. This adds the prefix “Autofix_” to the existing document name as the files are saved in the My CIB Work folder.
4 On the right side of the window, select all four Quick Fix options: Auto Levels, Auto Contrast, Auto Color, and Sharpen. Review your settings, and then click OK.
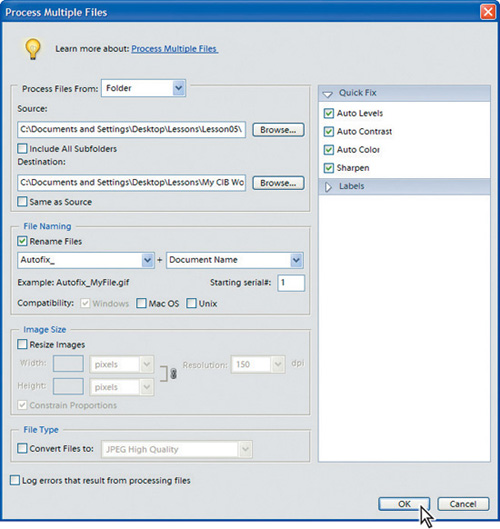
It takes a few seconds for Photoshop Elements to process the files. Image windows will open and close automatically as the changes are applied. There’s nothing else you need to do. If any alerts or warnings are displayed, click OK.
At the end of this lesson, you’ll compare the results of this simple, automatic fixing of the images with the manual techniques. In many cases, this automatic method of fixing files may be sufficient to meet your needs.
Brightening an underexposed image
Slightly underexposed photographs look dingy and dull. While the auto-fix lighting feature does a terrific job of brightening up many of these photos, here you’ll use layers to adjust the exposure.
Note: You’ll need to access the files in the CIB Catalog you created at the start of this book. If this catalog is not open, open it now by choosing File > Catalog and clicking Open.
1 Click the Photo Browser button to load the Organizer workspace.
2 In the Tags palette, click the Find box to the left of the Lesson 5 tag.
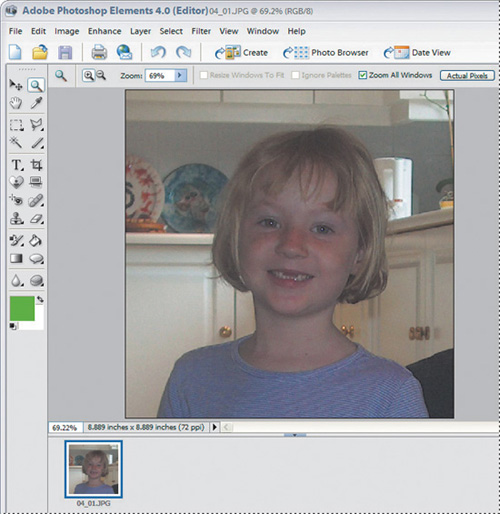
3 Open the file for this exercise by double-clicking the picture of the girl in the kitchen.
4 Choose Go to Standard Edit from the Edit menu in the shortcuts bar.
5 Do only one of the following to duplicate the Background layer of the image:
• Choose Layer > Duplicate Layer, and click OK to accept the default name.
• Right-click Background in the Layers palette, and choose Duplicate Layer. Click OK.
• Drag the Background to the New Layer shortcut (![]() ) at the top of the Layers palette.
) at the top of the Layers palette.
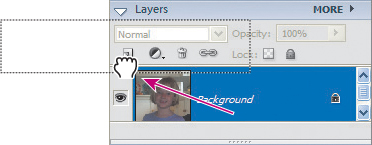
The new Background Copy layer is highlighted in the Layers palette, indicating it is the selected (active) layer.
6 In the Layers palette, choose Screen as the blending mode. Notice how the image becomes brighter.
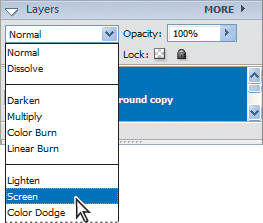
Note: If the drop-down menu shown above is not available, make sure that the Background Copy layer, not the original Background layer, is selected in the Layers palette.
7 Choose File > Save, and save the file as 05_01_Work.psd in the My CIB Work folder that you created at the start of the book. Make sure that Include in the Organizer is selected, and that you’ve deselected the Save in Version Set with the Original option.
If a message appears about maximizing compatibility, click OK to close it. Or, follow the instructions in the message to prevent it from appearing again.
8 When you’ve finished viewing the results, close the file.
Here you’ve seen how simple it is to use blending modes to brighten a dull image. In other exercises, you’ll use other blending modes to correct different kinds of image problems.
Improving faded or overexposed images
In this exercise, you’ll work with the scan of an old photograph that has faded badly and is in danger of being lost forever. Although it’s not necessarily an award-winning shot, it could represent an era of personal history that you might want to preserve for future generations.
The automatic fixes you applied earlier in this lesson to a copy of this image improve the photograph quite a bit. In this project, you’ll try to do even better using other techniques.
Creating a set of duplicate files
You’re going to compare a variety of techniques during the course of this project. You’ll start by creating individual files for each technique and giving them unique names. These names will help you identify the technique used to adjust each file.
1 If necessary, click on the Photo Browser button to load the Organizer workspace, then click the Back to All Photos button. Click the Find button for the Lesson 5 tag. Select the faded picture of the boy, then choose Edit > Go to Standard Edit from the shortcuts bar.
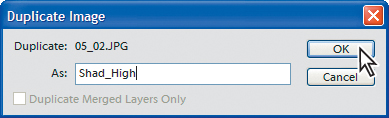
2 Choose File > Duplicate, and type Shad_High in the Duplicate Image dialog box, then click OK.
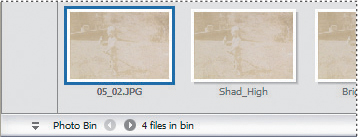
3 Repeat Step 2 two more times, naming the duplicate files Bright_Con and Levels.
4 In the Photo Bin, select the 05_02.jpg thumbnail to make that image active.
5 Choose File > Save As. When a dialog box appears, type Blend_Mode as the new file name and select Photoshop (PSD) in the Format drop-down menu. Select the My CIB Work folder as the Save In location. If Save in Version Set with Original is selected, be sure to deselect it before you click Save. Click OK in any dialog boxes or messages that appear to accept the default settings. Leave all four images open for the rest of the project.
Using blending modes to fix a faded image
This technique is similar to the one you used earlier to correct an underexposed image. In this case, you’ll use other blending modes to fix the exposure.
Blending modes make layers interact with the layers under them in various ways. Multiply intensifies the dark pixels in an image. Overlay tends to brighten an image. For this project, using Overlay adds clarity and brilliance without canceling out the effect of the Multiply blending mode on the underlying layers.
The stacking order of the layers makes a difference, so if you dragged one of the Multiply blending-mode layers to the top of the layer stack, you’d see slightly different results.
1 In the Photo Bin, make sure that Blend_Mode.psd is highlighted, or click its thumbnail to make it active.
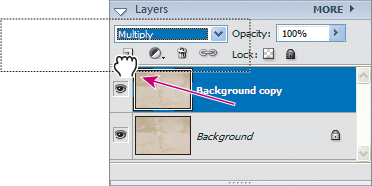
2 Duplicate the Background layer (by choosing Layer > Duplicate Layer). Click OK in the dialog box that appears, to accept the default name, Background copy.
Leave the Background copy layer selected for the next step.
3 In the Layers palette, do both the following:
• Choose Multiply on the blending modes drop-down menu.
• Drag the Background copy layer to the New Layer icon (![]() ) to create another duplicate, Background copy 2.
) to create another duplicate, Background copy 2.
4 In the Layers palette, select the following options for the Background copy 2 layer:
• Change the blending mode from Multiply to Overlay.
• Set the Opacity to 50%, either by typing or by dragging the Opacity slider.
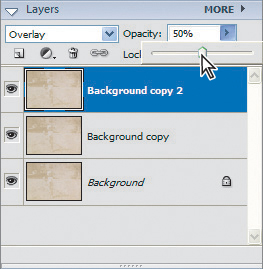
The Overlay blending mode brightens the image considerably, but the image contrast is still unimpressive.
5 Select the Background copy layer (not Background copy 2), and choose Layer > Duplicate Layer. Click OK in the dialog box to accept the default name, Background copy 3.
The new duplicate layer also has Multiply blending mode, which adds the extra bit of muscle this picture needs.
6 (Optional) Fine-tune the results by adjusting the Opacity settings for the individual layers until the image achieves a pleasing balance.
Note: You cannot change the Opacity of the locked Background layer.
7 Choose File > Save As, and save the file in the My CIB Work folder. If Save in Version Set with Original is selected, be sure to deselect it before you click Save. Choose to replace the existing file when asked. Leave the file open.
If a message appears about maximizing compatibility, click OK to close it. Or, follow the instructions in the message to prevent it from appearing again.
Adjusting shadows and highlights manually
Although both auto-fixing and blending modes do a good job of correcting fading images, some of your own photos may be more challenging. You’ll try three new techniques in the next three procedures.
The first technique involves making adjustments for Shadows, Highlights, and Midtone Contrast.
1 In the Photo Bin, select the Shad_High thumbnail.
2 Choose Enhance > Adjust Lighting > Shadows/Highlights.
3 Select the Preview option in the Shadows/Highlights dialog box, if it is not already selected. If necessary, move the dialog box so that you can also see most of the Shad_High image window.
By default, the Lighten Shadows setting is 25%, so you’ll see a difference in the image already.
4 In the Shadows/Highlights dialog box, do all the following:
• Drag the Lighten Shadows slider to the right to 30%, or type 30%.
• Drag the slider, or type, to set Darken Highlights at 15%.
• Drag the slider, or type, to set the Midtone Contrast at about +30%.
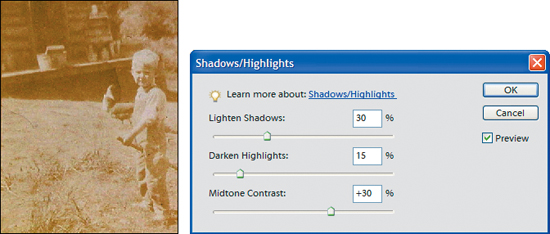
5 Readjust the three settings as needed until you think the image is as good as it can be. Then click OK to close the Shadows/Highlights dialog box.
6 Choose File > Save As, and save the file in the My CIB Work folder. If Save in Version Set with Original is selected, be sure to deselect it before you click Save. Click OK to accept the default settings in the JPEG Options dialog box. Leave the file open.
![]() The adjustments you used in this technique are also available in the Lighting palette in Quick Fix mode.
The adjustments you used in this technique are also available in the Lighting palette in Quick Fix mode.
Adjusting brightness and contrast manually
The next approach you’ll take for fixing exposure problems uses another dialog box, which you open from the Enhance > Adjust Lighting menu.
1 In the Photo Bin, select the Bright_Con thumbnail.
2 Choose Enhance > Adjust Lighting > Brightness/Contrast.
If necessary, drag the window aside so that you can also see most of the Bright_Con image window.
3 In the Brightness/Contrast window, do all the following:
• Select Preview, if it is not already selected.
• Drag the Brightness slider to -30, or type -30 in the box, being careful to include the minus sign when you type.
• Drag or type to set the Contrast at +55.

4 If necessary, adjust the Brightness and Contrast settings until you are happy with the quality of the image. Click OK to close the dialog box.
5 Choose File > Save As, and save the file in the My CIB Work folder as the location. If Save in Version Set with Original is selected, be sure to deselect it before you click Save. Click OK when the JPEG Options dialog box appears. Leave the file open.
Adjusting levels
Levels are the range of color values—the degree of darkness or lightness, whether the color is red, yellow, purple, or another color. In this procedure, you’ll enhance the photograph by shifting the reference points for levels.
1 In the Photo Bin, select the Levels thumbnail.
2 Choose Enhance > Adjust Lighting > Levels.
3 Select the Preview option in the Levels dialog box, if it is not already selected.
The graph represents the distribution of pixel values in the image. There are no truly white pixels or truly black ones. By dragging the sliders inward to where the pixels start to appear in the graph, you redefine what levels are calculated as dark and light. This enhances the contrast between the lightest pixels in the image and the darkest ones.
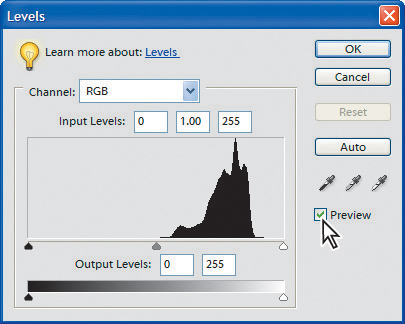
If necessary, drag the dialog box aside so that you can also see most of the image window.
4 In the Levels dialog box, do all the following:
• Drag the black arrow that is beneath the left side of the graph to the right and position it under the first steep spike in the graph shape. At that position, the value in the first Input Levels box is approximately 143.
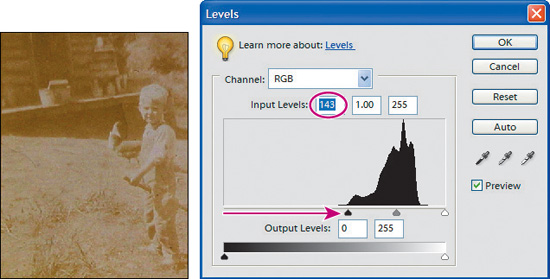
• Drag the white arrow on the right side of the graph until it reaches the edge of the final spike in the graph shape. The value of the third Input Levels box changes to approximately 225.
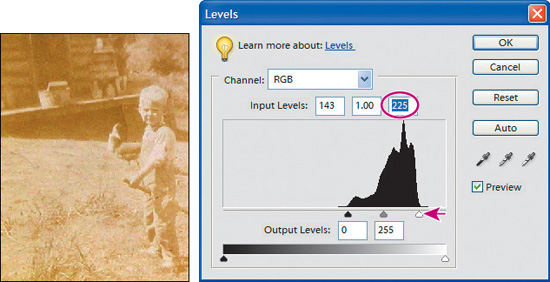
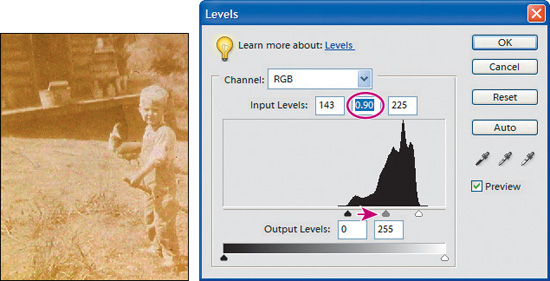
• Drag the gray center arrow under the graph toward the right until the middle Input Level value is approximately 0.90. Click OK to close the Levels dialog box.
5 Choose File > Save As, and save it with the others in the My CIB Work folder. If Save in Version Set with Original is selected, be sure to deselect it before you click Save. Leave the file open after you click OK in the JPEG Options dialog box.
Comparing results
You can now compare the five versions of the image: these four and the one that you auto-fixed at the beginning of this lesson.
1 In Standard Edit, use the File > Open command to find and open the Autofix_05_02.jpg file in the My CIB Work folder.
2 In the Photo Bin, make sure that only the five files for this project are open: Blend_Mode, Shad_High, Bright_Con, Levels, and Autofix_05_02. Close any other open files.

3 Click Automatically Tile Windows on the right side of the menu bar or choose Window > Images > Tile.
Note: If you do not see the icon for tiling windows, make sure that you are in Standard Edit mode, not Quick Fix.
4 You’ll reduce the zoom level for all active windows. Select the Zoom tool (![]() ). In the tool options bar, select Zoom Out and Zoom All Windows. Then click in the image window until you can see the entire image.
). In the tool options bar, select Zoom Out and Zoom All Windows. Then click in the image window until you can see the entire image.
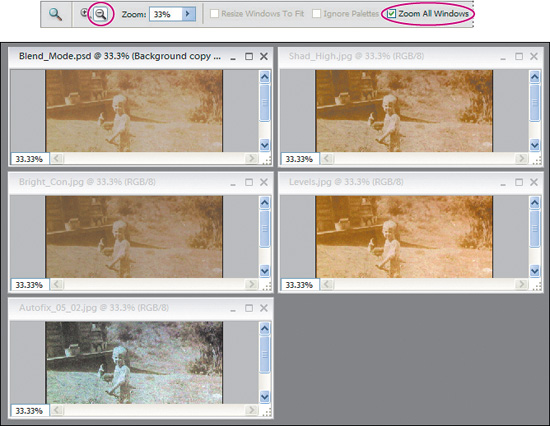
5 Compare the files. The best method for fixing a file depends on the type of problem being addressed, the affected areas of the image, and how you will use the resulting image.
6 Click Automatically Tile Windows (![]() ) again to deselect it. You won’t see any difference in the arrangement of image windows, but it will stop the automatic rearrangement when you open or close other images.
) again to deselect it. You won’t see any difference in the arrangement of image windows, but it will stop the automatic rearrangement when you open or close other images.
7 Choose File > Close All. Save your changes if prompted to do so.
Congratulations—you’ve successfully completed another exercise. In doing so, you’ve used various automatic and manual approaches to correct overexposed photographs and scans of faded prints. You’ve tried auto fixes, blending modes, and the three dialog boxes that are available on the Enhance > Adjust Lighting submenu. You know that you can apply these different adjustments either separately or in combinations.
Using adjustment layers to edit images
If you were to open one of the files from the previous exercise that used the Adjust Lighting submenu, you’d see that the values you entered when adjusting the images no longer appear. This change took place as soon as you clicked OK in those dialog boxes, before you closed the file. Because of this, it is not possible to return the Levels or other adjustments back to their starting point.
Sometimes you need to go back and tweak your settings after the first adjustment, or even during a much later work session. Adjustment layers are a way of applying changes to layers that you can easily revise.
Creating adjustment layers for lighting
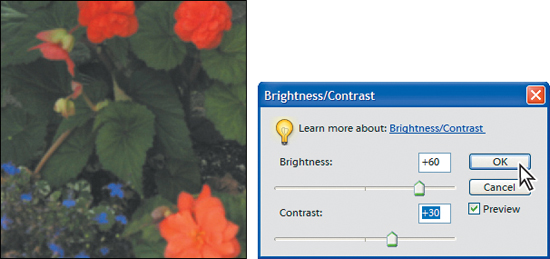
In this project, you’ll use a badly underexposed photograph of some flowering plants. It’s hard to imagine that this picture could ever be useful, but Photoshop Elements can rescue what you perceive to be a hopelessly bad picture.
Before you begin, make sure that Photoshop Elements is open in Standard Edit mode and that the Layers palette is available in the Palette Bin.
1 Switch to the Organizer, then click the 05_03.jpg image, the picture of flowers, to select it. Choose Go to Standard Edit in the shortcuts bar to open the image in Standard Edit mode.
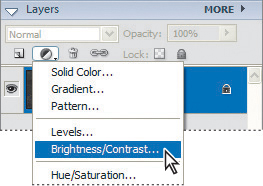
2 Click Create Adjustment Layer (![]() ) on the Layers palette and choose Brightness/Contrast from the drop-down menu.
) on the Layers palette and choose Brightness/Contrast from the drop-down menu.
3 If necessary, drag the Brightness/Contrast window aside so that you can also see most of the image window. In the Brightness/Contrast window, drag the sliders so that Brightness is +60 and Contrast is +30, then click OK.
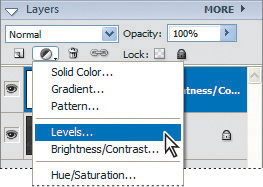
4 Repeat Step 2, but this time choose Levels (instead of Brightness/Contrast), so that the new adjustment layer will allow you to adjust levels.
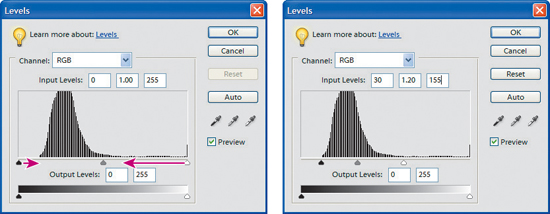
5 In the Levels dialog box, drag the black, white, and gray arrows that are under the graph to the left or right until the balance of dark and light areas looks right to you. We selected values of 30, 1.2, and 155.
6 Click OK to close the Levels dialog box.
The beauty of adjustment layers is that you can revert to earlier settings, even in later work sessions, as long as you save the file in Photoshop (PSD) format (the default). For example, if you double-click the Brightness/Contrast icon in the layer thumbnail, your original settings (+60 and +30) still appear in the Brightness/Contrast dialog box, and can be further refined or removed.
If necessary, you can even revert to the original, uncorrected image by either hiding or deleting the adjustment layers. This is not necessary for this image. Keep the image open for the next exercise.
Applying an adjustment layer to a limited area
Although the adjustment layers do a fine job of bringing out the colors and details from the dark original image, the orange-colored blossoms are now too vivid. You’ll compensate for this by adding a new adjustment layer that addresses color rather than lighting.
1 In the toolbox, select the Magic Wand tool (![]() ). In the tool options bar, type 48 for Tolerance, and make sure that New Selection and Contiguous are selected.
). In the tool options bar, type 48 for Tolerance, and make sure that New Selection and Contiguous are selected.
![]()
2 Click one of the two extremely bright blossoms in the upper area of the image. A selection marquee appears around most of the flower.
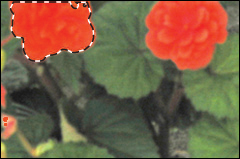
The selected blossom.
3 In the tool options bar, select Add to Selection (![]() ).
).
4 Click the second bright blossom to add it to the selection. If necessary, click again to add any unselected patches of color within the two blossom areas.
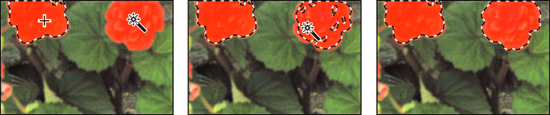
Adding to the existing selection.
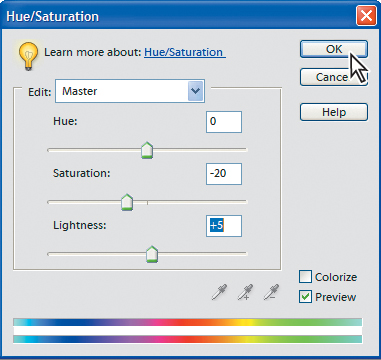
5 Choose Layer > New Adjustment Layer > Hue/Saturation. Click OK to accept the default name, Hue/Saturation 1. You’ll notice that the selection marquee disappears in the image window, but don’t worry, because it has already done its job.
6 Leave the Hue setting unchanged, but drag the Saturation slider to -20 and the Lightness setting to +5. Click OK.
Notice that the changes affect only the two selected blossoms, not the rest of the picture.
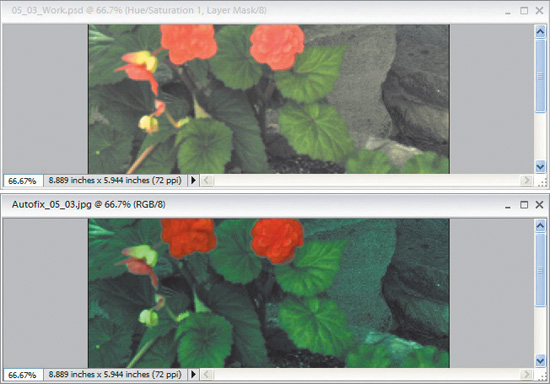
7 Choose File > Save. In the Save As dialog box, save the file in the My CIB Work folder, and name the file 05_03_Work.psd, accepting Photoshop (PSD) as the Format. If Save in Version Set with Original is selected, be sure to deselect it before you click Save.
If a message appears about maximizing compatibility, click OK to close it. Or, follow the instructions in the message to prevent it from appearing again.
As you can see, Photoshop Elements can dramatically improve images that you perceived as unsalvageable.
![]() For complex selections, you can use keyboard shortcuts with selection tools instead of tool options bar icons to temporarily switch between New, Add, or Subtract selection modes. Hold down Shift to add, or Alt to subtract, as you click or drag the selection tool.
For complex selections, you can use keyboard shortcuts with selection tools instead of tool options bar icons to temporarily switch between New, Add, or Subtract selection modes. Hold down Shift to add, or Alt to subtract, as you click or drag the selection tool.
Comparing results of adjustment layers and auto fixes
You’ll compare the manual adjustments you made with the results of the autofix you performed at the start of the lesson.
1 In Standard Edit mode, open the Autofix_05_03.jpg file in the My CIB Work folder by choosing File > Open and opening the file.
This is one of the files you fixed by applying the Auto Fix options at the beginning of the lesson. See “Getting started” at the beginning of this lesson, if you have not done that procedure.
Note: When the “Import Attached Tags” window appears, click on the check box next to Lesson 5 to include the lesson tag in your imported file.
2 Choose Window > Images > Tile to arrange the files in the work area.
3 Review the images to see the results achieved using different methods of correcting the files.
4 Choose File > Close All.
In this exercise, you’ve experienced the power and versatility of adjustment layers to alter lighting and color settings.
Correcting parts of an image
When you made color and lighting adjustments earlier in this lesson, they applied to the entire picture. Here you will adjust sections of an image.
Creating a selection
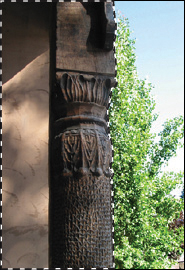
In this task, you’ll select the area on the right side of the pillar where you see the leafy branches and sky. You’ll begin by making a rectangular selection of most of the area and then adding details to that selection.
1 Switch to the Organizer, then click the 05_04.jpg image, the picture of the pillar, to select it. Choose Go to Standard Edit from the Edit menu in the shortcuts bar to open the image in Standard Edit mode.
2 In the toolbox, select the Rectangular Marquee tool (![]() ), which is grouped with the Elliptical Marquee tool (
), which is grouped with the Elliptical Marquee tool (![]() ) in the toolbox.
) in the toolbox.
3 Drag from the upper right corner to the bottom of the image, to the right of the pillar. Make sure that the selection rectangle fits snugly against the right side of the image.

4 Select the Magnetic Lasso tool (![]() ), which is grouped with the Lasso tool (
), which is grouped with the Lasso tool (![]() ) in the toolbox.
) in the toolbox.
5 In the tool options bar, select Add to Selection (![]() ).
).
Confirm the other (default) settings in the tool options bar, which should be Feather at 0 px, Width at 10 px, Edge Contrast at 10%, and Frequency at 57.
![]()
6 Click and release at the upper right corner of the selection rectangle to set an anchor point. Move the Magnetic Lasso across to the pillar and down its right edge.
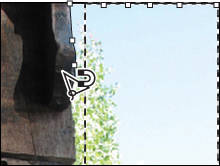
7 When you reach the bottom, click once. Move the cursor inside the lower left corner of the original selection rectangle. Double-click to complete the selection.
The Magnetic Lasso tool detects the edges of contrasting areas automatically but not perfectly. Keep the area selected and go on to the next procedure.
Refining and saving the selection
The Magnetic Lasso tool does an excellent job of selecting areas that contrast sharply with the surrounding area. For this image, the leaves in some areas have similar tonal values to the pillar, so you may need to do some clean-up work.
1 Select the Zoom tool (![]() ) in the toolbox and then Zoom In (
) in the toolbox and then Zoom In (![]() ) in the tool options bar. Zoom in so that you can see details of the selection you made in the previous procedure. If the selection is no longer active, repeat the previous procedure “Creating a selection.”
) in the tool options bar. Zoom in so that you can see details of the selection you made in the previous procedure. If the selection is no longer active, repeat the previous procedure “Creating a selection.”
2 Scroll up and down the right side of the image, looking for areas where the selection marquee does not line up with the edge of the pillar.
3 Select the Polygonal Lasso tool (![]() ).
).
4 Remove any areas of the pillar that are included in the selection, as follows:
• Select Subtract from Selection (![]() ) in the tool options bar.
) in the tool options bar.
• Click once to set a starting anchor point.
• Move the Polygonal Lasso tool a short distance along the edge of the pillar, and click again as needed to set additional anchor points.
• Double-click the tool to close the shape and complete the selection removal.
Note: If moving the cursor continues to create a line in the image window, the selection is not closed. Try clicking the starting point of the selection, or double-clicking again to close it.
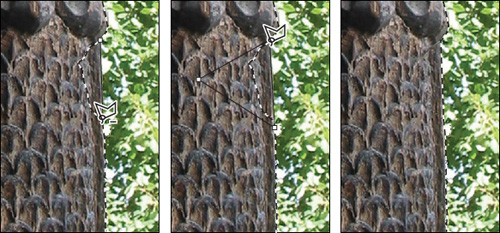
Removing areas from the selection.
5 Add any areas of the trees that the selection missed, as follows:
• Select Add to Selection (![]() ) in the tool options bar.
) in the tool options bar.
• Click to set anchor points around the area that you want to add to the selection, and then close the selection.
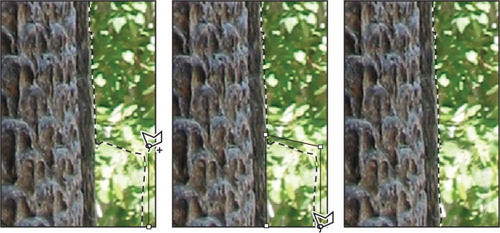
Adding to the selected area.
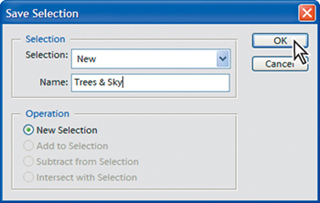
6 Choose Select > Save Selection.
7 In the Save Selection dialog box, type Trees & Sky to name the selection, and click OK. Saving the selection makes it easy to re-use it at a later time.
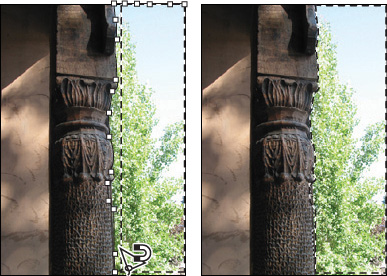
Correcting an overexposed area of the image
One of the aims in this exercise is to intensify the color and contrast in the overexposed area of the trees and sky. The pillar and shaded area are already a bit darker, so you won’t want to adjust them. Your approach here is to divide and conquer—to apply different solutions to different areas of the image. Creating a copy of just the area you selected is the first step in this process.
1 In the Layers palette, click MORE in the upper right corner of the Layers palette to open the Layers palette menu, and choose Layers Palette Options.
2 Select the medium-sized thumbnail option, if it is not already selected, and click OK.
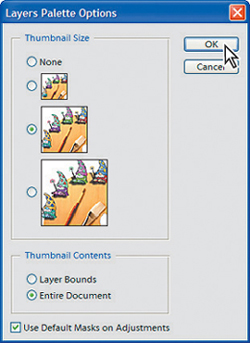
It’s OK to select another size, but do not select None. The layer thumbnail can help you visualize the layers you will work with in this project.
3 Zoom out so that you can see the entire image, and then do one of the following:
• If the selection you made in the previous topic is still active, go to Step 4.
• If the selection is not active, choose Select > Load Selection. Make sure that Trees & Sky is selected, and click OK.
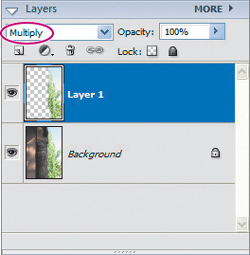
4 Choose Edit > Copy to copy the selected area.
5 Choose Edit > Paste to paste the copied area onto a new layer, Layer 1.
In the image window, the only difference you’ll see is that the selection marquee has disappeared. But in the Layers palette, you can see that there’s a new layer.
6 With Layer 1 (the copy of the tree and sky area) selected in the Layers palette, set the blending mode to Multiply. Now the trees and sky look more colorful.
Correcting an underexposed area with other blending modes
You can lighten the shadows of just the shaded areas with techniques that are similar to the ones you used to intensify the trees and sky.
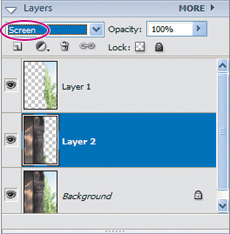
1 In the Layers palette, select the Background layer.
2 Choose Select > Reselect, and then choose Select > Inverse.
Now the pillar and stucco wall are selected instead of the trees and sky.
Note: If you get a different selection or if the Reselect command is not available, choose Select > Load Selection, and then select the Invert option and Trees & Sky before completing Step 3.
3 Choose Edit > Copy and then choose Edit > Paste.
Note: If an error message appears saying that the selected area is empty, make sure that the Background layer is selected in the Layers palette, and try again.
4 With Layer 2 (the copy of the pillar and wall area) selected in the Layers palette, choose Screen as the blending mode. Notice that the pillar and wall are now brighter.
Adding more intensity and saving
Now the entire photograph looks much more lively. All that remains is to make any minor adjustments you like, and then see how this file compares to the one you automatically corrected at the beginning of this lesson.
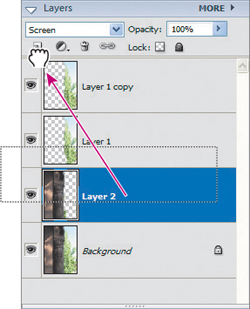
1 Drag Layer 1 to the New Layer icon (![]() ) in the Layers palette to create a duplicate layer, Layer 1 Copy.
) in the Layers palette to create a duplicate layer, Layer 1 Copy.

2 Drag Layer 2 to New Layer in the Layers palette to create a duplicate layer, Layer 2 Copy.
3 With Layer 2 Copy selected in the Layers palette, do the following:
• Choose Overlay as the blending mode.
• Click the arrow to the right of the Opacity setting to open the slider, and drag to 50%. Or type 50%.
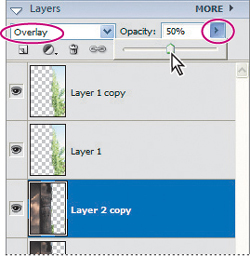
4 Examine the entire image, looking critically at the brightness and intensities in the different areas. Using your own judgment, adjust the opacity of the copied layers, Layer 1 copy and Layer 2 copy, to achieve the right balance in the image.
Note: You cannot change the Opacity or position of the Background layer, which is locked by default.
5 When you are satisfied with the results, choose File > Save.
6 In the Save As dialog box, save the file in the My CIB Work folder, naming the file 05_04_Work and accepting Photoshop (PSD) as the Format. If Save in Version Set with Original is selected, be sure to deselect it before you click Save.
If a message appears about maximizing compatibility, click OK to close it. Or, follow the instructions in the message to prevent it from appearing again
7 Leave the file open and go on to the next procedure.
Comparing your results to the auto-fixed version
Let’s see how your careful work compares to the version you created earlier in this project.
1 In Standard Edit mode, use the File > Open command to locate and select the My CIB Work folder.
2 Double-click on the Autofix_05_04.jpg file to open it.
If the 05_04_Work.psd file is not still open from the previous procedure, double-click that file (in the same My CIB Work folder) to open it, too.
3 Arrange the files on top of each other, using Window > Images > Tile.
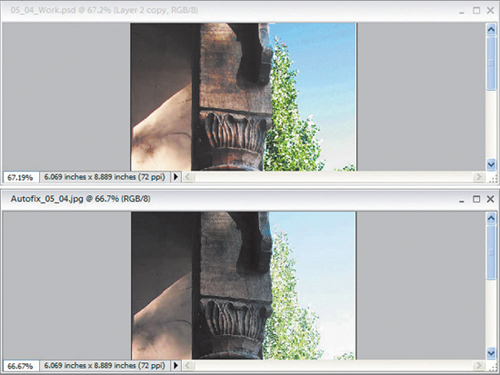
4 When you finish comparing the two results, choose File > Close All.
You’ve finished the final exercise in this lesson. In this exercise, you’ve learned how to use selections along with techniques you’ve practiced in other Lesson 5 exercises to correct images with complex exposure problems.
Saving and organizing your finished files
You’re going to add tags to the work files, which were already added to the Organizer when you saved them, thanks to the Include in the Organizer option in the Save As dialog box.
1 Click Photo Browser (![]() ) on the Photoshop Elements Editor shortcuts bar to switch to the Organizer. If Back to All Photos appears on the Organizer shortcuts bar, select it.
) on the Photoshop Elements Editor shortcuts bar to switch to the Organizer. If Back to All Photos appears on the Organizer shortcuts bar, select it.
2 Choose File > Get Photos > From Files and Folders. Go to the My CIB Work folder, and select the four auto-fixed files that you prepared at the beginning of Lesson 5. In the Import Attached Tags window, click Select All, then click OK. The files you created in this lesson are displayed.
Note: When the “Import Attached Tags” window appears, click the checkbox next to Lesson 5 to include the lesson tag in your imported file.
3 Choose Edit > Select All or press Ctrl+A to select all the thumbnails, and then drag the Work Files tag from the Tags palette to any one of the thumbnails to tag them all. Repeat this step to apply the Lesson 5 tag to your work files.
Note: If the Work Files tag doesn’t appear in your Tags palette, see “Creating a tag for working files” in Lesson 2 for instructions on how to create it.
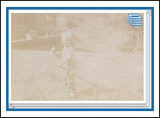
4 In the Organizer, click and then Ctrl+click to select all five versions of the Project 2 file, the sepia-toned image of the little boy.
5 Choose Edit > Stack > Stack Selected Photos to organize all the versions under one thumbnail.
6 Repeat Steps 5 and 6 for the various versions of the other three projects.
You can now select Back to All Photos to see the entire catalog of thumbnails.
Congratulations! You’ve now finished Lesson 5. In this lesson, you’ve used a variety of methods for fixing images with exposure problems. You’ve used automatic fixes, layers with blending modes, adjustment layers, and a series of methods from the Enhance menu.
• Review questions
1 Describe two ways to create an exact copy of an existing layer.
2 Where can you find the controls for adjusting the lighting in a photograph?
3 How do you change the arrangement of image windows in the work area?
4 What is an adjustment layer, and what are its unique benefits?
• Review answers
1 Photoshop Elements 4.0 must be running in Standard Edit mode to copy a layer. You can select the layer you want to duplicate in the Layers palette, and then choose Layer > Duplicate Layer. Alternatively, drag the layer to the New Layer button in the Layers palette. In either case, you get two identical layers, stacked one above the other.
2 You can adjust the lighting for a photo in either Standard Edit or Quick Fix mode. In Standard Edit, you must use the Enhance > Adjust Lighting menu to open various dialog boxes that contain the controls. Or, you can choose Enhance > Auto Levels, or Enhance > Auto Contrast. In Quick Fix mode, you can use the Lighting palette in the Palette Bin.
3 You cannot rearrange image windows in Quick Fix, which displays only one photograph at a time. In Standard Edit, there are several ways you can arrange them. One is to choose Window > Images, and choose one of the items listed there. Another method is to use the buttons in the upper right corner of the work area, just below the Minimize, Restore/Maximize, and Close buttons for Photoshop Elements 4.0. A third way is to drag the image window title bar to move an image window and to drag a corner to resize it (provided Maximize mode is not currently active).
4 An adjustment layer does not contain an image. Instead, it modifies some quality of all the layers below it in the Layer palette. For example, a Brightness/Contrast layer can alter the brightness and contrast of any underlying layers. One advantage of using an adjustment layer instead of adjusting an existing layer directly is that adjustment layers are easily reversible. You can click the eye icon for the adjustment layer to remove the effects instantly, and then restore the eye icon to apply the adjustments again. You can change a setting in the adjustment layer to zero to revert to its original condition.