4. Adjusting Color in Images
Unwanted color casts can be introduced into your images because of poor lighting or the type of input device used. In this lesson, you will learn how to adjust for these color casts.
In this lesson, you will learn how to do the following:
• Auto-correct images from either Quick Fix or Standard Edit mode.
• Use individual automatic options to improve images.
• Adjust skin tones.
• Correct an image using Smart Fix.
• Apply the Color Variations feature to shift color balance.
• Fix red eye reflections, both manually and automatically.
• Replace the color of a pictured object with another color.
• Make and save selection areas for future use.
• Troubleshoot common problems when printing color pictures.
• Work with color management.
This lesson shows you many different ways to change the color balance in your pictures, beginning with the one-step correction features. From there, you’ll discover advanced features and adjustment techniques that can be mastered easily.
Most people need at least an hour and a half to complete the work in this lesson. The work involves several independent projects, so you can do them all in one session or in several sessions.
In this lesson, you will use the CIB Catalog you created earlier in the book. If necessary, open this catalog by choosing File > Catalog in Organizer mode, then click Open.
This lesson assumes that you are already familiar with the overall features of the Photoshop Elements 4.0 work area and recognize the two ways in which you can use Photoshop Elements: the Editor and the Organizer. This lesson focuses primarily on the Editor. Lesson 4 also builds on the skills and concepts covered in Lessons 1, 2, and 3. If you need to learn more about these items, see Photoshop Elements Help.
If you haven’t already copied the project files from the CD attached to the inside back cover of this book, do so now. See “Copying the Classroom in a Book files” on page 3.
Note: As you gain advanced skills in Photoshop Elements 4.0, you may require additional information about issues and problems. For help with common problems you might have when completing lessons in this book, see “Why won’t Photoshop Elements do what I tell it to do?” later in this lesson.
Getting started
Before you start working on files, take a few moments to make sure that your work area and palettes are set up to match the illustrations shown for these projects.
1 Start Photoshop Elements in Standard Edit mode by selecting Edit and Enhance Photos in the Photoshop Elements Welcome Screen. If the Organizer is already open, click and hold on the Edit button (![]() ) and release on Go to Standard Edit.
) and release on Go to Standard Edit.
2 In Standard Edit, use the Window menu to make the Layers, Styles and Effects, Navigator, and Undo History palettes visible. In both Standard Edit and Quick Fix, collapsed palettes can be expanded by clicking the arrow beside the palette name on the palette title bar.
Note: For instructions on how to add or remove palettes from the Standard Edit Palette Bin, see “Using the Palette Bin” in Lesson 3, “Sharing Creations.” You cannot add or remove palettes in Quick Fix mode.
Palette Bin for Standard Edit mode, and for Quick Fix mode.
Now your Palette Bins are set up in both modes for the work you’ll do in this lesson. In some procedures, you’ll use Quick Fix mode and in others you’ll use Standard Edit mode, so it’s convenient to set them up ahead of time.
Fixing photographs automatically
You’ve probably noticed that not all the photographs used for the lesson projects are of professional quality. But that doesn’t mean they are not valuable images, or that they don’t deserve to be made as good as possible. Many photographs selected for this book typify the challenges ordinary people, with modest camera skills, might face when attempting to make the most of their pictures.
Quick Fix multiple files as a batch
Photoshop Elements can fix photographs without even opening them. In this section, you’ll apply automatic fixes to all the image files used in this lesson. You’ll save those fixed files as copies of the originals so that you can compare the results at the end of each project.
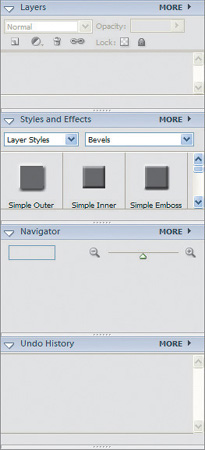
1 Choose File > Process Multiple Files. The Process Multiple Files window opens.
2 In the Process Multiple Files window, set the source and destination folders as follows:
• For Process Files From, select Folder, if it is not already selected.
• Under Source, make sure Include All Subfolders is deselected. Then click Browse. Find and select the Lesson04 folder in the Lessons folder. Click OK to close the Browse for Folder dialog box.
• Under Destination, click Browse. Then find and select the My CIB Work folder that you created at the start of the book. Click OK to close the Browse for Folder dialog box.
3 Select Rename Files. Type Autofix_ in the first field, and select Document Name in the second field.
4 Under Quick Fix, on the right side of the dialog box, select all four options: Auto Levels, Auto Contrast, Auto Color, and Sharpen.
5 Review all selections in the dialog box, comparing them to the illustration below. Make sure that there are no check marks for the Resize Images or Convert Files to options.
Note: If an error message appears, saying that some files couldn’t be processed, ignore it. This refers to a hidden file that is not an image, so it has no effect on the success of your project. If an error message appears saying that files are missing, that means that the Lessons folder has been moved or was not expanded correctly. See “Copying the Classroom in a Book files” on page 3 and redo that procedure, following the instructions exactly.
6 When you are sure that all selections are correct, click OK.
Photoshop Elements goes to work, automatically opening and closing image windows. All you need to do is sit back and wait for the process to finish.
Note: You can see the Quick Fixed images using Windows Explorer or in Photoshop Elements by clicking on the Photo Browser button to open the Photo Browser. Then find and select the My CIB Work folder in the Folder palette so that the thumbnails for the Quick Fixed files appear in the Photo Browser. For more information on the Photo Browser, see Photoshop Elements Help.
Adding the corrected files to the Organizer
The Save, Save As, and Save Optimized As dialog boxes all have an Include in Organizer option that is selected by default. When you use the Process Multiple Files feature, this option isn’t part of the process, so you must do that manually.
Note: You’ll need to access the files in the CIB Catalog you created at the start of this book. If this catalog is not open, open the Organizer and then open the CIB Catalog by choosing File > Catalog and clicking Open.
1 Click Photo Browser button (![]() ) to open the Organizer.
) to open the Organizer.
2 Choose File > Get Photos > From Files and Folders.
3 In the dialog box that appears, locate and open the My CIB Work folder.
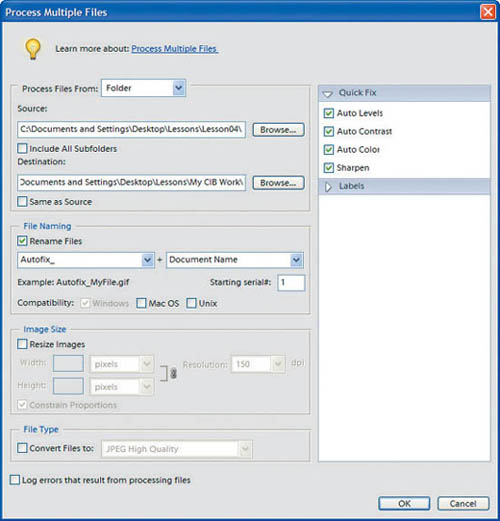
4 Select the five Autofix_ files by holding down Shift or Ctrl as you click to select all five. Then select Get Photos.
If a red eye message appears, click OK.
5 The Import Attached Tags window opens. Click OK to import the images without tags, as you’ll be adding tags manually in the next few steps. The Organizer displays the newly added image thumbnails.
When the Auto Red Eye Fix Complete window appears, click OK. If a message appears reminding you that only the new photos will appear, click OK.
6 Choose Edit > Select All, or press Ctrl+A.
7 Drag the Lesson 4 tag to the thumbnails to apply it.
8 Select Back to All Photos.
Now you are ready to discover other methods for correcting color.
Using Quick Fix for editing
Quick Fix conveniently assembles many of the basic photo fixing tools in Photoshop Elements. If one control doesn’t work for your image, click the Reset button and try another one. You can also adjust your image using the slider controls, whether you’ve used the Quick Fix feature or not.
Applying individual automatic adjustments with Quick Fix
When you apply automatic fixes to images using the Process Multiple Files dialog box, you only briefly see the before, during, and after versions of the file.
In this project, you’ll apply individual aspects of automatic fixing one at a time. This is useful because it allows you to see how the different phases affect the image, and also enables you to make individual adjustments to the correction process.
Opening image files for Quick Fix editing
You’ll use the same technique you learned in Lesson 2 for using the Organizer to find and open files for editing in Quick Fix mode.
1 If the Organizer is no longer forward, switch to it now.
2 In the Tags palette, click the Find box to the left of the Lesson 4 tag.
3 Select the picture of the three vases, 04_01.jpg, to make it active.
Note: To view your file names in the Organizer choose Edit > Preferences > General and select Show File Names in Details.
4 Click Edit (![]() ) on the Organizer shortcuts bar, and choose Go to Quick Fix.
) on the Organizer shortcuts bar, and choose Go to Quick Fix.
Unlike Standard Edit mode, the active image file fills the entire work area by default.
5 In the View drop-down menu in the lower left area of the image window, choose Before and After (Portrait).
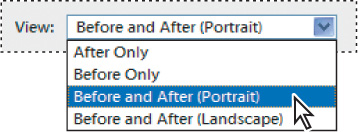
Note: You can change from Before and After (Portrait) to Before and After (Landscape) if that arrangement works better for you. The portrait view shows the before and after versions of the image side by side. The landscape view shows them one above the other.
Using Smart Fix
Assuming Photoshop Elements is still open in Quick Fix mode, you see four palettes—General Fixes, Lighting, Color, and Sharpen, in the Palette Bin on the right. In the General Fixes palette, the first option available is called Smart Fix.
Smart Fix corrects overall color balance and improves shadow and highlight detail in your image. As with other automatic fixes in Quick Fix mode, you can click the Auto button to apply these corrections automatically. You can also move the Smart Fix slider to vary the amount of the adjustment. Or, as in the following steps, you can use a combination of both.
1 In the Palette Bin, under General Fixes, select the Auto button for Smart Fix. Notice the immediate effect on the image.
2 Now move the Smart Fix slider to change the adjustments of the color balance and detail in your image. You can make a determination visually as to which adjustment works best for you. In our example the slider is in the middle.
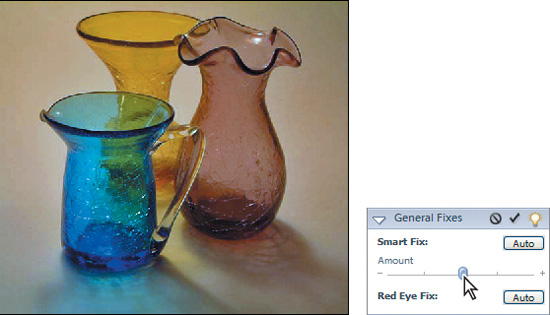
Note: Use of the other General Fixes control, Red Eye Fix, will be discussed later in this lesson.
Applying other automatic fixes
Additional automatic fixes are available in the Palette Bin.
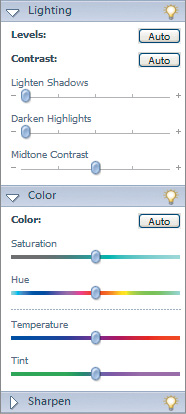
1 In the Palette Bin, under Lighting, select the Auto button for Levels. Depending upon the adjustment you made in Smart Fix, you may or may not see a big shift in the lighting of this image.
2 One at a time, select the Auto buttons for Contrast, Color, and Sharpen, noticing the difference in the image between each action. You may need to open a palette to see the Auto button.
3 Choose File > Save As. In the Save As dialog box, locate and select the My CIB Work folder, rename the file 04_01_Work, and save it in the JPEG format. If Save in Version Set with Original is selected, deselect it. Choose Save. When the JPEG Options dialog box appears, select High in the Quality drop-down menu, and click OK.
4 Choose File > Close, to close your file.
Comparing methods of fixing color
The automatic correction features in Photoshop Elements 4.0 do an excellent job of bringing out the best in most photographs. But each photograph is unique, and so are the potential problems. Some photographs don’t respond well to automatic fixes and require a more hands-on approach to color correction.
Photoshop Elements 4.0 offers many approaches to color correction. The more approaches you master, the more likely you’ll be able meet the challenge of fixing a difficult photograph. In this section, you’ll study three different procedures for correcting a color problem and compare the results.
Creating extra working copies of an image
You’re going to compare three approaches to color correction, so you’ll need three copies of the same photograph.
Note: By now, you’ve should have mastered the procedure for using tags to locate the files you need in the Organizer. From now on, the instructions for opening files will be summarized rather than explained in detail.
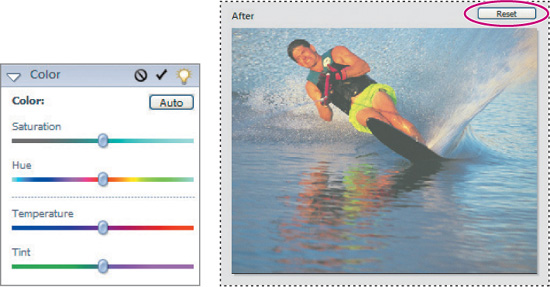
1 If necessary, click the Photo Browser button (![]() ) on the shortcuts bar to switch to the Organizer, and use the Lesson 4 tag to find the 04_02.jpg file, the photo of the waterskier.
) on the shortcuts bar to switch to the Organizer, and use the Lesson 4 tag to find the 04_02.jpg file, the photo of the waterskier.
2 Select the image thumbnail. Then click Edit (![]() ) and choose Go to Quick Fix.
) and choose Go to Quick Fix.
3 In Quick Fix mode of the Editor, choose File > Duplicate. When a message appears, click OK to accept the default name, 04_02 copy.jpg.
4 Repeat Step 3 to create another duplicate, 04_02 copy 2.jpg.
Leave all three copies of the image file open for the next topics. You can tell that all are open because the thumbnails appear in the Photo Bin at the bottom of your screen.
Automatically fixing color
At the beginning of this lesson, you applied all four Quick Fix options to each of the images used in this lesson and saved the results in a separate location. In this procedure, you’ll apply just one type of Quick Fix.
1 In the Photo Bin, select the 04_02.jpg thumbnail to make it the active file.
2 In the Color palette, click Auto to fix only the color.
Compare the Before and After views of the file.
3 Choose File > Save, saving the file in the My CIB Work folder and in JPEG format, changing the name to 04_02_Work. Make sure Save in Version Set with Original is deselected. Click Save, leaving all other options in the Save and JPEG Options dialog box unchanged.
About viewing modes and image window arrangements
When you work in Quick Fix mode, only one image file appears in the work area, regardless of how many files are open. The inactive, open files appear as thumbnails in the Photo Bin but not in the work area.
When you work in Standard Edit mode, other arrangements are possible. You can usually adjust the size and placement of image windows in the work area. If you can’t arrange individual windows freely, then your view is probably set to Maximize Mode. If opening or closing some files causes unexpected rearrangements of image windows, your view is probably set to Automatically Tile.
Maximize fills the work area with the active image window, so it’s the only image you can see.
Automatically Tile resizes and arranges all open images so that the image windows cover the work area. If Automatically Tile mode is active when you close an image file or open a new one, Photoshop Elements will rearrange the image windows in tile formation.
Multi-window enables you to resize, arrange, or minimize files.
There are two ways to switch from one mode to another.
• Use the Window > Images menu and choose the arrangement you want: Maximize, Tile, or Cascade. Or, if there is a checkmark on the Maximize command, choosing Maximize again deactivates it and switches to Multi-window mode.
• Select an icon on the far right end of the menu bar.
The available icons vary, depending on which viewing mode is active and on the size of the work area on your monitor. If the work area is reduced, these icons may not appear. The illustration below shows which icons you’ll see in different modes.

Icons available with Maximize mode active, Automatically Tile mode active, and Multi-window mode active.
For more information, see Adobe Photoshop Elements 4.0 Help.
Adjusting the results of an automatic fix
In this procedure, you’ll experiment with one of the sliders in the Quick Fix palettes.
1 In the Photo Bin, select the 04_02 copy thumbnail to make it the active file.
2 Click the Auto button for Color. The results are the same as you had in the previous procedure.
3 Drag the Temperature slider a small amount to the left.
This cools down the image, enhancing the blue and green tones while reducing yellows, reds, and oranges.
4 Examine the results, paying particular attention to the skin tones and water colors.
5 Readjust the Temperature slider until you are satisfied with the realistic balance between warm skin tones and cool water colors. Then click the Commit button (![]() ) at the top of the Color palette. We moved our Temperature slider slightly to the left.
) at the top of the Color palette. We moved our Temperature slider slightly to the left.
Note: If you aren’t happy with the results and want to start over, click Cancel (![]() ) on the Color palette tab. If you decide to undo the color fix after you click the Commit button, click the Reset button above the image. This restores the image to its original condition.
) on the Color palette tab. If you decide to undo the color fix after you click the Commit button, click the Reset button above the image. This restores the image to its original condition.
6 Choose File > Save, saving the file in the My CIB Work folder and in JPEG format, changing the name to 04_02 copy_Work. Make sure Save in Version Set with Original is deselected. Click Save, leaving all other options in the Save and JPEG Options dialog boxes unchanged.
Combining automatic fix and manual image corrections
The top four commands in the Enhance menu apply the same changes as the Auto buttons in Quick Fix. These commands are available in both Quick Fix and Standard Edit.
Both Quick Fix and Standard Edit offer other methods of enhancing color in images.
These are found on submenus on the lower half of the Enhance menu. In this procedure, you use a manual option to tweak the results produced by an automatic fix button.
1 In the Photo Bin, select the 04_02 copy 2 thumbnail to make it the active file.
2 In the Color palette, click Auto to apply the automatic color correction.
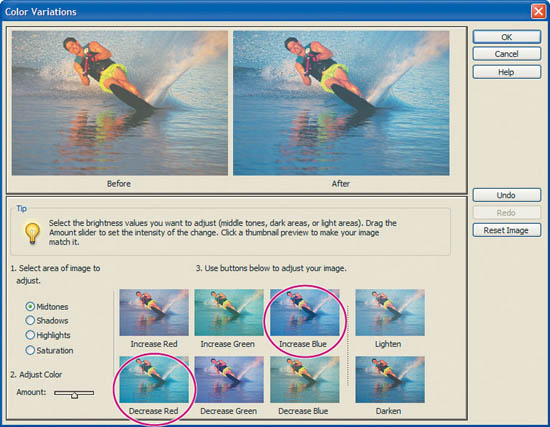
3 Choose Enhance > Adjust Color > Color Variations.
4 In the lower left area of the dialog box, make sure that Midtones is selected and that the Amount slider is approximately centered. Then, do the following:
• Click the Increase Blue thumbnail once.
• Click the Decrease Red thumbnail once, and click OK.
5 Choose File > Save As and navigate to the My CIB Work folder. Rename the file 04_02 copy 2_Work and select the JPEG format. Deselect Save in Version Set with Original if it is selected. Click Save in the shortcuts bar, and accept the default JPEG Options.
This combination of fixes gives the water a turquoise look and makes the swimming trunks electric green. To try a different combination, you can undo the changes and start again. (Choose Edit > Undo Color Variations, and then try again, starting with Step 3.)
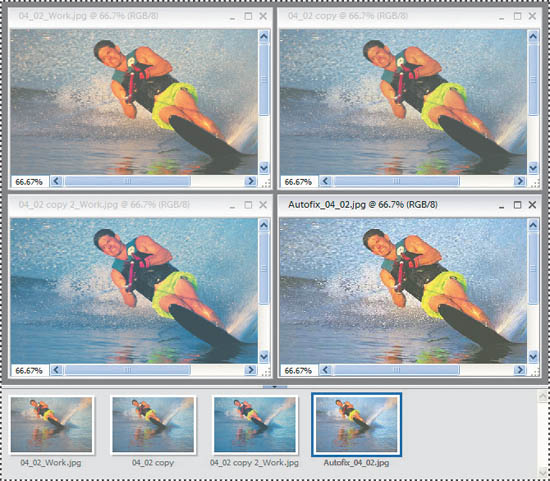
Comparing results
As you can tell by viewing the Photo Bin, all three copies of the image are open. You’ll compare them to the file you processed at the beginning of this lesson.
1 Choose File > Open. Locate and select the My CIB Work folder. Select the Autofix_04_02 file and click Open.
2 Select Standard Edit (![]() ) on the shortcuts bar to switch to that mode.
) on the shortcuts bar to switch to that mode.
3 Choose Window > Images > Tile, if it’s not already selected.
4 In the toolbox, select the Zoom tool (![]() ).
).
5 In the tool options bar, select Zoom Out, and then do one of the following:
• Click in the active image window until you can see the entire photo. Then choose Window > Images > Match Zoom.
• If it’s not already selected, select Zoom All Windows in the tool options bar, and then click in the active window.
![]()
Look for the highlighted thumbnail in the Photo Bin to see which file is active. Or look at the title bars of the open image windows; the text is dimmed on inactive image windows.
6 Examine the water, spray, skin tones, and clothing colors in the four versions. Decide which image looks best. Then drag any corner edge of the image window to resize it so it fills the space, and turn off automatic tiling.
7 Choose View > Fit on Screen to enlarge the image so it fits in the window.
Adjusting skin tones
Sometimes the combination of ambient light and surrounding color can cause skin tones in your image to be tinted with unwanted color. Photoshop Elements offers a unique solution, in both the Standard and Quick Fix modes.
To adjust color for skin tones:
1 Choose Enhance > Adjust Color > Adjust Color for Skin Tone.
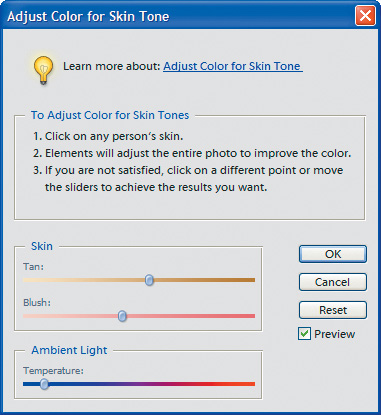
2 Click on the waterskier’s skin with the eyedropper cursor that appears.
Photoshop Elements automatically adjusts the entire photo to improve the color of the waterskier’s skin.
3 If you’re unsatisfied with the correction, click on a different point in the image or move the Tan, Blush, and Temperature sliders to achieve the desired result.
4 When you’re satisfied with the skin tone, click OK and then choose File > Close All. When asked, do not save the changes.
Working with red eye
Red eye occurs when a camera flash is reflected off the human retina so that the dark center of the eye looks bright red. Photoshop Elements can automatically fix red eye when you bring photos into the Organizer. Just select Automatically Fix Red Eyes in the Get Photos dialog box when you import your photos.
Using automatic Red Eye Fix
Just as you automatically corrected color balance earlier in this lesson with Smart Fix, you can also apply an automatic red eye correction in Quick Fix mode. This method might not successfully remove red eye from all images, but Photoshop Elements provides other options.
For this project, you’ll use a flash photo of a boy and his dog, concentrating first on removing the boy’s red eyes.
1 Click the Photo Browser button to load the Organizer workspace. If you only see one image, select the Back to All Photos button.
2 If necessary, in the Tags palette, click the Find box to the left of the Lesson 4 tag.
3 Open the file for this exercise by double-clicking on the uncorrected picture of the boy and his dog, 04_03.jpg.
4 Click on the photo to select it, and choose Edit > Go to Quick Fix.
5 In the Palette Bin, under General Fixes, click the Auto button for Red Eye Fix. There is no slider available for this correction. As you can see, the Auto correction has no effect on this image.

The Red Eye Fix feature works for many images, but in this example extra steps are required.
Note: The Red Eye Fix correction is also available as a command under the Enhance menu, along with other automatic correction controls like Smart Fix, in both Quick Fix and Standard Edit modes.
The Red Eye Removal tool
For those stubborn red eye problems, the Red Eye Removal tool (![]() ) is a simple and automatic solution. In this part of the lesson, you will remove the red eye from the boy’s eyes.
) is a simple and automatic solution. In this part of the lesson, you will remove the red eye from the boy’s eyes.
1 Have 04_03.jpg open in either Quick Fix or Standard Edit. If you choose to work in Standard Edit, work on the After version of the image.
2 Select the Zoom tool and click on the Zoom In button (![]() ) in the tool options bar, then click and drag to surround the boy’s eyes.
) in the tool options bar, then click and drag to surround the boy’s eyes.
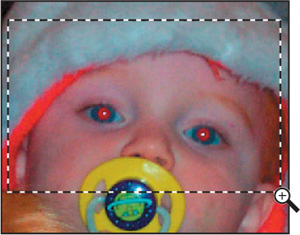
3 Select the Red Eye Removal tool (![]() ).
).
4 Click and release the mouse on the red area of the boy’s left eye.
When you release the mouse button the red is removed from the eye.
You can also drag to create a selection with the Red Eye Removal tool.
5 Using the Red Eye Removal tool, click and drag to draw a selection surrounding the boy’s right eye.
As smart as the Red Eye Removal tool is, its use is limited to red eyes. You can’t use it to make your brown eyes blue. It also won’t work for other colors of retinal reflections, such as the glowing eyes of an animal struck by a light beam or camera flash. Fortunately, there’s another tool that does the job almost as easily as the Red Eye Removal tool.
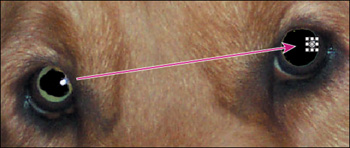
Darkening reflective animal eyes
For this part of the lesson, you’ll focus on the dog in the image. This picture is typical of the kind of retinal reflection that animal eyes produce in response to direct, strong light.
1 Make sure that the picture of the boy and his dog, 04_03.jpg, is still open. If you are not in Standard Edit mode, click the Standard Edit button now.
2 In the toolbox, do the following:
• Press D on your keyboard to set the colors to the default black and white. Or click the Default Foreground and Background Colors icon (![]() ), located below the Foreground Color and Background Color swatches in the toolbox.
), located below the Foreground Color and Background Color swatches in the toolbox.
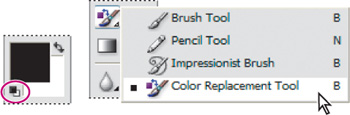
• Hold down the mouse on the Brush tool (![]() ) until the hidden tools appear. Select the Color Replacement tool (
) until the hidden tools appear. Select the Color Replacement tool (![]() ).
).
Notice that the tool options change.
3 Locate the Brush drop-down menu. Click and hold on the arrow to the right of the Brush size. If 13, the default, is not selected, use the slider or type 13 in the Diameter text field. Press Enter to close this menu.
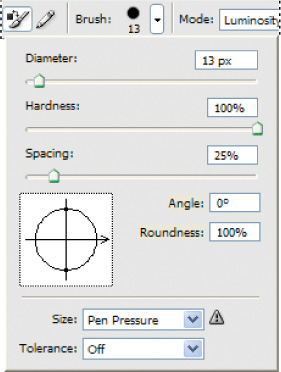
4 In the Mode drop-down menu, select Luminosity.
5 Select the Sampling: Once button (![]() ).
).
![]()
About Sampling options for the Color Replacement tool
The Sampling option determines what colors will be changed by the Color Replacement tool. That color is determined by sampling the pixels that are directly under the crosshairs in the center of the brush shape. There are two types of sampling: Once and Continuous.
Once—Use this option to keep the sampling color the same throughout each stroke. For example, if the crosshairs are over a yellow area when you start to drag, then only yellow areas of the image will be changed as you continue the brush stroke across the image. If the crosshairs pass over a different color, the Color Replacement tool still changes only pixels matching the original yellow sample. This option is a good choice for changing small areas that don’t have much variation in color, such as the dog’s eyes.
Continuous—Use this option to constantly resample as you move the Color Replacement tool. For example, if the position of the crosshairs is over a yellow area when you start to drag, and then the crosshairs pass over a red area, the Color Replacement tool will start out changing yellow pixels and then begin changing red pixels. The Continuous sampling option works better for large areas with shifts of color because you can release the mouse button from time to time. In this way, if you make a mistake and want to undo a step, you won’t lose all your color replacement work, just the most recent stroke.
6 Type 25 into the Tolerance text field, and press Enter.
![]() For some tool options, you can change the value by scrubbing. To scrub, move the cursor over the label (such as the word Tolerance for the Color Replacement tool), so that the cursor changes to include a double-sided arrow (
For some tool options, you can change the value by scrubbing. To scrub, move the cursor over the label (such as the word Tolerance for the Color Replacement tool), so that the cursor changes to include a double-sided arrow (![]() ). Drag the cursor left or right across the label to make the number larger or smaller.
). Drag the cursor left or right across the label to make the number larger or smaller.
If your Navigator palette is not visible, choose Window > Navigator.
7 In the Navigator palette, drag the slider to the right to enlarge your view. Then drag the red frame to the dog’s face in the thumbnail so that the dog’s left eye is centered in the image and fill most of the image window.

8 Center the Color Replacement tool over the upper part of the eye on the left side. Drag over the pupil without releasing until black fills most of the pupil area. One small surface highlight area remains white.
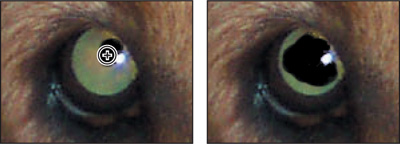
Note: If you keep the brush within the shape of the pupil, the tool will replace only the brilliant yellow color reflected by the dog’s retina. If your results differ, review the tool options settings and try again.
9 Scroll to the right, so the eye on the right side is centered in the window. Move the crosshairs over the right eye and drag over that pupil to make it solid black.
Using the Navigator palette
The Navigator palette is an easy way to zoom and scroll in an image. The beauty of this feature is that you can remain on your current tool, and yet zoom in and out of your image. Dragging the red frame to the area you want to see is considerably quicker than doing vertical and horizontal scrolling. This method also helps you keep oriented about what part of the image you’re seeing at very high zoom levels.
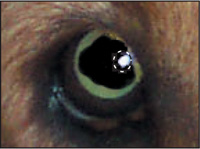
Restoring surface highlights
Unlike retinal reflections, surface reflections from the surface of the eye add realism and liveliness to a picture. The Color Replacement tool left the surface reflection in one of the dog’s eyes. You’ll take advantage of that by copying the reflection into the other eye.
1 In the toolbox, select the Elliptical Marquee tool (![]() ), which is grouped with the Rectangular Marquee tool (
), which is grouped with the Rectangular Marquee tool (![]() ).
).
2 Scroll back to the left eye. Drag a selection marquee around the small, white reflection in the eye on the left, including some of the black area.
3 If necessary, zoom in even more so that the eye is very large. (200% works well for this step.) Then select the Move tool (![]() ).
).
4 Position the cursor inside the selection. The cursor then appears as a black arrowhead (![]() ).
).
5 Clone or copy the selected area by holding down the Alt key and dragging a short distance. Release the Alt key and drag the copied selection into the dog’s other eye.
Note: Be careful not to drag one of the corner handles; this would enlarge and distort the selection instead of moving it. If that happens, click Cancel (![]() ) in the tool options bar and try again.
) in the tool options bar and try again.
6 Deselect the selection by choosing Select > Deselect.
7 Drag the slider in the Navigator palette to the left until you can see the entire image, and review the overall results.
8 Choose File > Save As. Navigate to the My CIB Work folder and name the file 04_03_Work. Select the JPEG format. Keep Save in Version Set with Original deselected.
Then click Save. Click OK in the JPEG Options dialog box.
9 Choose File > Close to close the 04_03_Work.jpg file.
![]() Holding down the Alt key while you drag with the Move tool is a power-user technique. It’s almost the same as copying and pasting, except that copying and pasting places the copied area onto a separate layer. As you can see in the Layers palette, Alt+dragging leaves the copied pixels on the same layer as its source.
Holding down the Alt key while you drag with the Move tool is a power-user technique. It’s almost the same as copying and pasting, except that copying and pasting places the copied area onto a separate layer. As you can see in the Layers palette, Alt+dragging leaves the copied pixels on the same layer as its source.
Congratulations. You’ve learned how to use the Color Replacement tool for situations where the Red Eye Removal tool doesn’t produce results. You’ve also learned a nifty shortcut for duplicating the image in a selected area by Alt+dragging with the Move tool. In the next exercise, you’ll learn about the many ways you can use selections to control where adjustments occur within an image.
Making selections
In the previous exercise you were introduced to the process of creating selections by using the elliptical marquee. Ordinarily, the entire image area can be altered by the changes you apply to an image or image layer. That’s because, as a default, the whole image is active. A selection is a portion of the image area that you designate as the only active area of the image. When a selection is active, any changes you apply affect only the area within the selection; the rest of the image layer is protected, or masked.
Typically, a selection marquee—a border of dashed black and white lines that flashes—shows the boundaries of a selection. You can save a selection and re-use it at a later time. This can be a terrific time-saver when you need to use the selection several times.
Several tools create selections, and you’ll get experience with most of them in the course of doing the lessons in this book. Selections can be geometric in shape or free form, and they can have crisp or soft edges. Selections can be created by using the mouse, or by using similarities of color within the image.
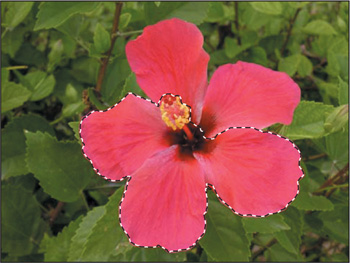
Perhaps the simplest, most effective way to create a selection is to paint it on an image. This exercise focuses on the use of two selection tools in Photoshop Elements, the Selection Brush and the Magic Selection Brush.
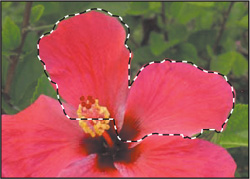
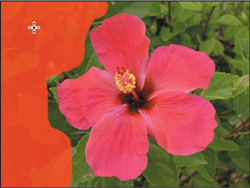
1 Using the Organizer, select the image of the flower, 04_04.psd. Then switch to Standard Edit mode by choosing Edit > Go to Standard Edit.
2 Though it is not visible, a portion of the flower has already been selected and saved in the file. You’ll now make your own selection and add it to the saved selection.
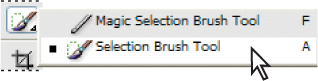
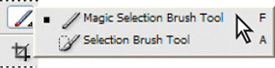
3 In the toolbox, select the Selection Brush tool (![]() ). It is grouped with the Magic Selection Brush tool.
). It is grouped with the Magic Selection Brush tool.
Using the Selection Brush tool
The Selection Brush tool makes selections in two ways. You can paint over the area you want to select in Selection mode, or you can paint over areas you don’t want to select using a semi-opaque overlay in Mask mode.
1 From the options bar, set the Selection Brush controls to the following:
• Add to selection
• 25 pixels wide
• Mode: Selection
• Hardness: 100%
![]()
2 Click and drag with the Selection Brush to paint over the large interior areas of the top two petals of the flower. Do not try to paint the edges, you will do that in the next step.
Notice that as you paint, you’re actually painting with the flashing dashed line that indicates a selection. Release the mouse button to see what you’ve selected.
Now you’ll reduce your brush size and paint the edges of the two petals, adding them to your selection as you paint.
While you could move the Size slider to change your brush size, it’s easier to use the open bracket key ([) to size the brush down, and the close bracket key (]) to size the brush up. The brush size increases or decreases in size each time you press the open or close bracket key.
3 Press the left bracket key ([), to reduce the Selection Brush size to 10 pixels.
4 Paint the edges of the two top petals with the Selection Brush by clicking and dragging over them.
5 Continue to paint, using the brackets to change the brush size as needed, until the top two petals have a selection outline completely encompassing them.
Editing a saved selection
Next you’ll add your selection to the pre-made selection, which was saved with the file. For more information on saving selections, see “Changing the color of a pictured object” later in this lesson. You can modify saved selections by replacing, adding to, or subtracting from them.
1 With your selection still active, choose Select > Load Selection.
2 In the Load Selection dialog box, choose low_petals and in the Operation section, choose Add to Selection. Click OK.
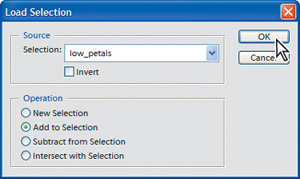
Note: The New Selection option replaces the saved selection with the current selection. Subtract from Selection subtracts the current selection from the saved selection. Intersect with Selection replaces the saved selection with the intersection between the current selection and the saved selection.
3 You should now see the entire flower outlined by the flashing selection boundary.

If you’ve missed a spot, simply paint it in with the Selection Brush tool. If you’ve selected too much, click on the Subtract from Selection button in the shortcuts bar and “paint out” your mistakes.
Note: You can also modify a saved selection by loading it and using selection tools to add to it (Shift+drag) or subtract from it (Alt+drag).
![]() By switching the Mode in the options bar from Selection to Mask, you can use the Selection Brush to paint out the areas that you don’t want selected in your image.
By switching the Mode in the options bar from Selection to Mask, you can use the Selection Brush to paint out the areas that you don’t want selected in your image.
Leave the flower selected.
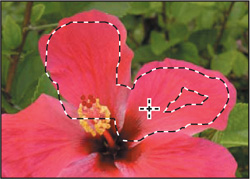
Using the Magic Selection Brush
The Magic Selection Brush works similarly to the Selection Brush, except that it allows you to draw, scribble, or click on the object you want to be selected (or in this case, masked). The mark you make doesn’t need to be precise, because when you release the mouse, Photoshop Elements draws the selection border.
1 In the Toolbox, select the Magic Selection Brush tool (![]() ).
).
If the Adobe Photoshop Elements window appears, click OK.
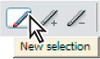
2 In the options bar, make sure New Selection is selected.
3 In the options bar, choose a brush size from the Size menu. If you want to simply scribble over the area, you can use a larger brush. For a more precise outline, choose a smaller brush size.
![]()
4 In the flower image’s background, do one of the following to create a selection:
• Click on an area in the background.
• Click and drag to draw a selection around the area behind the flower.
• Scribble over the background, and then release the mouse button.
The tool draws red on your image, but turns into a selection when you release the mouse. Now that the background is selected, you will turn the selection “inside out.”
5 Turn the selection inside out, thereby masking the background and selecting the flower, by choosing Select > Inverse.
To tighten up the selection, you can choose, from the tool options, the Indicate Foreground tool (![]() ) to add to the selection, or the Indicate Background tool (
) to add to the selection, or the Indicate Background tool (![]() ) to subtract from the selection.
) to subtract from the selection.
The value of selections
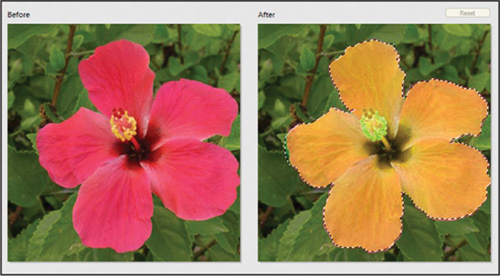
You now have a flashing selection outline around the flower. You’ll now apply a simple hue adjustment in Quick Fix mode.
1 With the flower image open, click on the Quick Fix button in the shortcuts toolbar to launch that mode.
2 To make comparing easier, choose Before and After (Portrait) from the View drop-down in the lower left.
3 From the Color Auto Fix palette on the right, click and drag the Hue slider to the right to change the color of the flower.
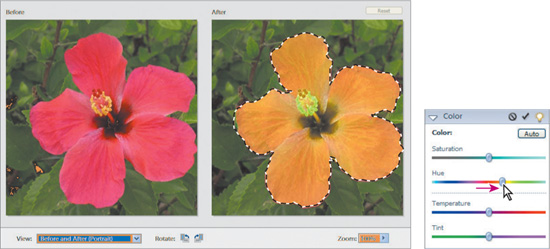
Notice that the flower changes color, but the leafy background does not. This is because only pixels inside the selection change.
4 Choose File > Close, without saving your changes.
Congratulations, you’ve finished another exercise. In this exercise, you’ve learned how to use the Selection Brush and the Magic Selection Brush to isolate areas of an image. You’ve also learned to mask out areas that you don’t want changes to be applied to. And you’ve learned how to add these new selections to existing, saved selections. This knowledge will be invaluable as you learn to use other selection tools.
Changing the color of a pictured object
Photoshop Elements offers two methods of swapping color. The first method is to use the Color Replacement tool, as you did when you replaced yellow with black in the dog’s eyes. You can also use this technique to change any color simply by changing the Foreground Color.
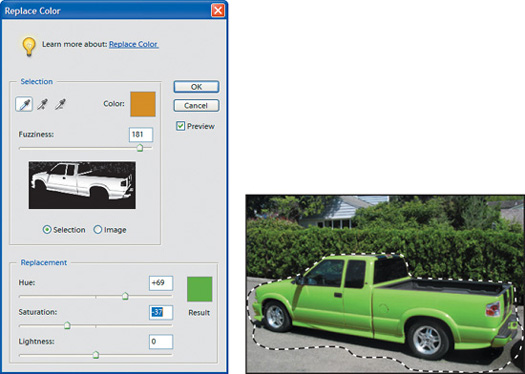
The second method is to use the Replace Color window. It’s faster and more automatic than using the Color Replacement tool, but it doesn’t work well for all types of images. This method is easiest when the color of the object you want to change is not found in other areas of the image. The color photograph of a bright yellow truck has very little yellow elsewhere in the image, making it a perfect example for this approach.
You will use the Replace Color window in the next exercise.
Setting up layers and saving a selection
In this project, you’ll change the color of a yellow truck. You’ll do your work on a duplicate of the Background layer, which makes it easy to compare the finished project with the original picture.
In a previous exercise, you made a selection of the highlight in the dog’s eye. In this project, you’re going to make a more difficult, free-form selection. As a safeguard, you’re going to save the selection shape itself as a permanent part of the work file. Saving any complex selection is a good idea if there’s any chance you may have to use it again, either to retrace your steps or to do something else with that selection.
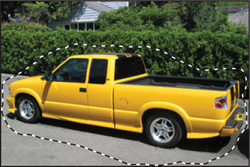
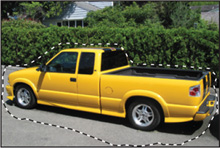
1 Using the Organizer, find the 04_05.jpg file, the picture of the yellow truck. Open it in Standard Edit mode by choosing Edit > Go to Standard Edit.
2 Choose Layer > Duplicate Layer and accept the default name, or drag the Background layer up to the New Layer icon (![]() ) in the Layers palette. By duplicating the layer, you have an original to return to if you need it.
) in the Layers palette. By duplicating the layer, you have an original to return to if you need it.
3 Select the Lasso tool (![]() ) and click and drag with the mouse to draw a rough selection around the truck. It’s OK if some of the road and background shrubbery are included in the selection.
) and click and drag with the mouse to draw a rough selection around the truck. It’s OK if some of the road and background shrubbery are included in the selection.
Note: The Lasso tool is found in the toolbox with the Magnetic Lasso tool (![]() ) and the Polygonal Lasso tool (
) and the Polygonal Lasso tool (![]() ). You can quickly switch from one lasso tool to another by selecting it in the tool options bar instead of using the drop-down in the toolbox.
). You can quickly switch from one lasso tool to another by selecting it in the tool options bar instead of using the drop-down in the toolbox.
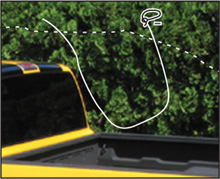
4 In the tool options bar, select Subtract from Selection (![]() ), and then drag a shape around some of the background greenery to remove it from the selection.
), and then drag a shape around some of the background greenery to remove it from the selection.
Note: It may be helpful to zoom in for this part of the process. Use the slider in the Navigator palette to zoom in so that you don’t have to switch tools, or use the zoom-in keyboard shortcut, Ctrl+ = (equal sign).
5 Continue to remove areas of greenery from the selection until the selection marquee fits reasonably well around the top of the truck—it doesn’t need to be perfect, as long as the entire truck is included.
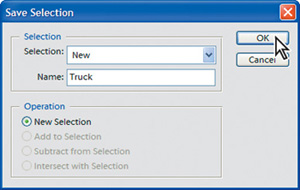
6 Choose Select > Save Selection, and name the selection Truck. Click OK.
7 Press Ctrl+D to deselect, or choose Select > Deselect.
If you zoomed in for Step 4, you can zoom out by clicking Ctrl+O so that you can see the whole image.
Replacing a color throughout the image
What’s nice about the Replace Color feature is that you don’t have to be too careful when you apply it. In spite of that, you can produce spectacular results. You’re going to do this exercise twice. First you’ll do it without loading the selection you saved. This will show you how much the color changes will affect the areas outside the truck, such as the landscaping. You will then use your saved selection for the second part of this exercise.
1 In the Layers palette, select the Background Copy layer, if it is not already selected.
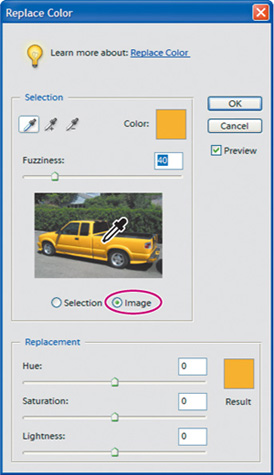
2 Choose Enhance > Adjust Color > Replace Color.
3 In the Replace Color dialog box, select Image so that you see the color thumbnail of the truck picture, and make sure that the Eyedropper tool (![]() ) within the dialog box is selected. Then click a bright area of the yellow paint.
) within the dialog box is selected. Then click a bright area of the yellow paint.
4 Click the Selection option under the thumbnail to see a black-and-white thumbnail, where white indicates the area that is selected.
5 Drag the Hue, Saturation, and Lightness sliders to change the color of the selected area. For example, try Hue = −60, Saturation = 8, and Lightness = −9 to make the truck red.

6 To adjust the color-application area, start by selecting the Add to Sample eyedropper (![]() ), and click the thumbnail in an area corresponding to paint that still has a mustardy tinge to it.
), and click the thumbnail in an area corresponding to paint that still has a mustardy tinge to it.
7 Drag the Fuzziness slider to the right until you reach an acceptable compromise between the color replacement on the truck and the effect the change has on the bushes in the background.
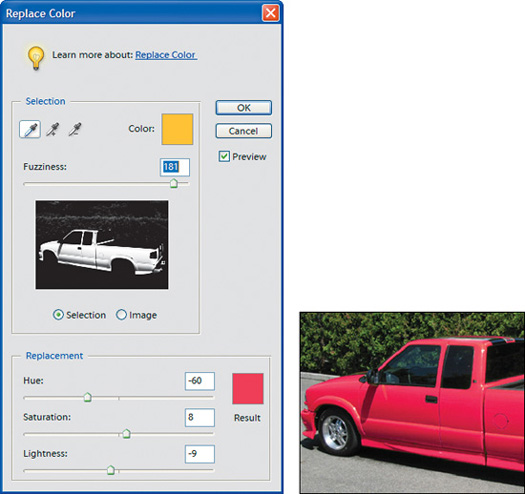
8 When you are satisfied with the results, click OK.
Depending on what color and color characteristics you used to replace the yellow, you probably can see a shift in the color of the shrubbery behind the truck. If this is a compromise you can live with, that’s great. If not, you may need to try another technique, which is what you’ll do in the next procedure.
Replacing a color in a limited area of the image
You’re going to try the previous procedure again, but this time you’ll limit the affected area by loading a selection.
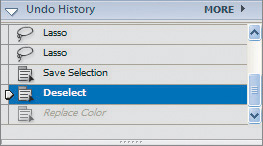
1 Choose Edit > Undo Replace Color, or select the step before Replace Color on the Undo History palette.
2 Choose Select > Load Selection. Make sure that Truck is displayed as the selection, and click OK.
3 Choose Enhance > Adjust Color > Replace Color.
4 Using the same techniques and settings you used in the previous procedure, make adjustments in the Replace Color dialog box to change the color of the truck. (See “Replacing a color throughout the image,” steps 3-6.)
5 When you are satisfied with the results, click OK to close the dialog box.
6 Choose Select > Deselect, or press Ctrl+D.
7 Choose File > Save As, and save the file in the My CIB Work folder. For File Name, type 04_05_Work. Make sure that the Format option is Photoshop (PSD). If Save in Version Set with Original is selected, deselect it before you click Save.
8 Choose File > Close, to close the file.
Take a bow—you’ve finished the five exercises in this lesson. In the last exercise, you learned how to make a selection with the Lasso tool. You edited that selection to make it fit more closely, and you saved it so that you can reload it on the image later or in future work sessions. You then replaced one color with another using the Replace Color dialog box rather than the Color Replacement brush. In the process, you’ve also used the Undo History palette to step backwards to a specific point in your work.
Saving and organizing finished files
You’ll use tags to organize the new work files. These lesson files offer an opportunity to use the Stacking feature in the Organizer, which makes reviewing and finding image files even easier.
1 If necessary, click Photo Browser (![]() ) on the shortcuts bar to switch to the Organizer. If the Back to All Photos button appears on the Organizer shortcuts bar, select it.
) on the shortcuts bar to switch to the Organizer. If the Back to All Photos button appears on the Organizer shortcuts bar, select it.
2 Drag the Work Files tag to the thumbnails to apply it to the work files you created in this lesson.
3 Select the first waterskier thumbnail and then hold down Ctrl and click each of the waterskier thumbnails. The waterskier thumbnails are highlighted with a blue outline.
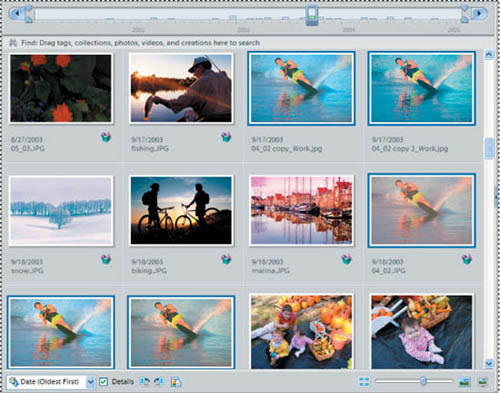
4 Choose Edit > Stack > Stack Selected Photos.
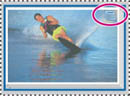
Now only one waterskier image appears, but it has a Stack icon in the upper right corner, indicating that other versions of this image are stacked with it.
5 Repeat Steps 4 and 5 for all copies of the dog, the vases, and the truck.
You can change which image appears at the top of a stack by selecting the stack thumbnail and choosing Edit > Stack > Reveal Photos in Stack. This limits the Organizer thumbnail display to just the images in that stack. Select the thumbnail you want to use, and choose Edit > Stack > Set As Top Photo. When you click Back to All Photos above the thumbnail area, the thumbnail you selected appears at the top.
Why won’t Photoshop Elements do what I tell it to do?
In some situations, the changes you try to apply to an image may not seem to work. Or you may hear a beep sound, indicating that you’re trying to do something that’s not allowed.
The following list offers common explanations and solutions for what might be blocking your progress.
Commit is required
Several tools, including the Type tool (![]() ) require you to click the Commit button (
) require you to click the Commit button (![]() ) in the tool options bar before you can move on to another task. The same is true when you crop with the Crop tool or resize a layer or selection with the Move tool.
) in the tool options bar before you can move on to another task. The same is true when you crop with the Crop tool or resize a layer or selection with the Move tool.
Cancel is required
The Undo command isn’t available while you have uncommitted changes made with the Type tool, Move tool, or Crop tool, for example. If you want to undo those changes, click Cancel (![]() ) in the tool options bar instead of using the Undo command or shortcut.
) in the tool options bar instead of using the Undo command or shortcut.
Edits are restricted by an active selection
When you create a selection (using a marquee tool, the Magic Wand tool, or the Selection Brush tool, for example), you limit the active area of the image. Any edits you make will apply only within the selected area. If you try to make changes to an area outside the selection, nothing happens. If you want to deactivate a selection, choose Select > Deselect, and then you can work on any area of the image.
Move tool is required
If you drag a selection, the selection marquee, not the image within the selection marquee, moves. If you want to move a selected part of the image or an entire layer, use the Move tool (![]() ).
).
Background layer is selected
Many changes cannot be applied to the Background layer. For example, you can’t erase, delete, change the opacity, or drag the Background layer to a higher level in the layer stack. If you need to apply changes to the Background layer, double-click it and rename it (or accept the default name, Layer 0).
In most cases, the edits you make apply to only the currently selected layer—the one highlighted in the Layers palette. If an eye icon (![]() ) does not appear by that layer in the Layers palette, then the layer is hidden and you cannot edit it. Or, if the image on the selected layer is not visible because it is blocked by an opaque upper layer, you actually will be changing that layer but you won’t see the changes in the image window.
) does not appear by that layer in the Layers palette, then the layer is hidden and you cannot edit it. Or, if the image on the selected layer is not visible because it is blocked by an opaque upper layer, you actually will be changing that layer but you won’t see the changes in the image window.
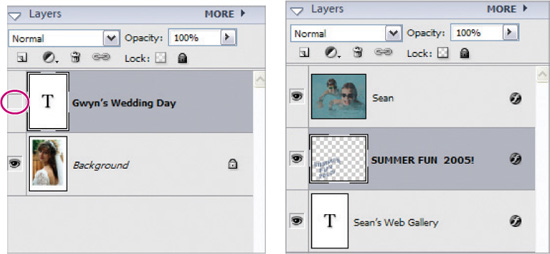
The active layer is hidden, and layer view blocked by opaque upper layer.
Active layer is locked
If you lock a layer by selecting the layer and then selecting the Lock (![]() ) in the Layers palette, the lock prevents the layer from changing. To unlock a layer, select the layer and then select the Lock at the top of the Layers palette to remove the lock.
) in the Layers palette, the lock prevents the layer from changing. To unlock a layer, select the layer and then select the Lock at the top of the Layers palette to remove the lock.
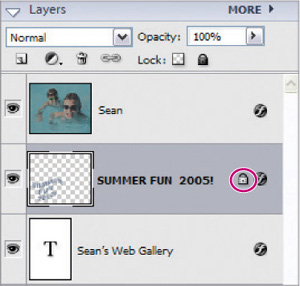
Locking or unlocking a layer.
Wrong layer is selected (for editing text)
If you want to make changes to a text layer, be sure that layer is selected in the Layers palette before you start. If a nontext layer is selected when you click the Type tool in the image window, Photoshop Elements creates a new text layer instead of placing the cursor in the existing text layer.
About printing color pictures
Sometimes, pictures that look great on your computer don’t turn out so well when you print them. How can you make them look as good in print as they do on screen?
Color problems can arise from a variety of sources. One may be the camera or the conditions under which the photograph was taken. If the photograph is flawed, then you can usually make it better by editing it with Photoshop Elements, as you did with the images in this lesson.
There are other possible contributors to color problems. One may be your monitor, which may shift colors. You can correct that by calibrating your monitor.
Another possibility is that your color printer interprets color information differently than your computer. You can correct that by activating the appropriate type of color management.
Working with color management
Moving an image from your camera to your monitor, and finally to a printer, makes the image colors shift. This shift occurs because every device has a different color gamut, or range of colors, that it can display or produce. To achieve consistent color among digital cameras, scanners, computer monitors, and printers, you need to use color management.
Color management acts as a color interpreter, translating the image colors so that each device can reproduce them in the same way. It knows how each device and/or program understands color, and adjusts colors so that the colors you see on your monitor are similar to the colors in your printed image. It should be noted, however, that not all colors may match exactly.
Color management is achieved through the use of profiles, or mathematical descriptions of each device’s color space. If these profiles are compliant with the standards of the ICC (International Color Consortium), they help you maintain consistent color.
Photoshop Elements’ color management controls are located under the Edit menu.
Setting up color management
1 In the Editor, choose Edit > Color Settings.
2 Select one of these color management options:
• No Color Management uses your monitor profile as the working space. It removes any embedded profiles when opening images, and does not tag or apply a profile when saving.
• Always Optimize for Computer Screens uses sRGB as the working space, preserves embedded profiles, and assigns sRGB when opening untagged files.
• Always Optimize for Printing uses Adobe RGB as the working space, preserves embedded profiles, and assigns Adobe RGB when opening untagged files.
• Allow Me to Choose lets you choose to assign sRGB (the default) or Adobe RGB when opening untagged files.
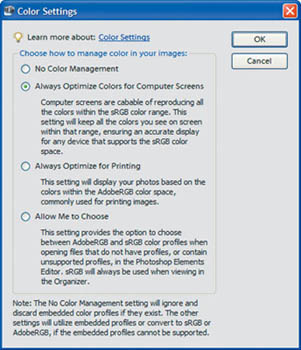
3 Click OK.
Note: When you save a file, select ICC Profile in the Save As dialog box.
Further information on color management, including monitor calibration, can be found in a series of topics in Help. To access this information, choose Help > Photoshop Elements Help and search for these subjects.
• Review questions
1 What is the key difference between adjusting an image in Standard Edit mode versus adjusting it in Quick Fix mode?
2 Can you apply automatic fixes when you are in Standard Edit mode?
3 What tool do you use to manually fix the red-eye phenomenon created by some flash cameras? Can you use the same tool to fix glowing animal eyes?
4 What makes selections so important for adjusting color?
5 Name two selection tools and describe how they work.
• Review answers
1 Standard Edit provides a more flexible and powerful image correction environment. It has lighting and color correction commands, along with tools you’ll need to fix image defects, make selections, add text, and paint on your images. Quick Fix provides access to the more basic photo fixing controls in Photoshop Elements, and allows you to make quick adjustments to your images using those controls.
2 Yes. The Enhance menu contains commands that are equivalent to the buttons in the Quick Fix palettes: Auto Smart Fix, Auto Levels, Auto Contrast, Auto Color Correction, and Auto Red Eye Fix. The Enhance menu also provides an Adjust Smart Fix command, which opens a dialog box in which you can change the amount of automatic fixing.
3 The Red Eye Removal tool does an extraordinarily good job of automatically fixing red eye. However, it works only with red, not with the glowing yellow or green eyes that a camera flash or other strong light will create in an animal’s eyes. To change animal eyes, you need to use other techniques, such as using the Color Replacement tool, as described in this lesson.
4 You use a selection to define an area as the only part of a layer that can be altered. The areas outside the selection are protected from change for as long as the selection is active. This aids greatly in image correction, as it allows you make different adjustments to selected portions of your image.
5 The Elliptical Marquee tool and the Rectangular Marquee tool make selections in fixed geometric shapes when you drag them across the image. Another tool you can use to make selections is the Selection Brush tool, which works like a paintbrush. Similar to the Selection Brush, the Magic Selection Brush tool is a faster, more flexible option for creating a selection. The Lasso tool creates free-form selections; you drag the Lasso tool around the area that you want to select. You can also use the Magic Wand tool, which selects all the areas with the same color as the color on which you click.