9. Advanced Editing Techniques
In this lesson, you will discover how to take advantage of advanced editing techniques in Adobe Photoshop Elements. You will discover how to improve the quality and clarity of your images with advanced use of tools in Photoshop Elements. You will learn the following:
• Use camera raw images from your digital camera.
• Save conversions in the DNG format.
• Use histograms to understand the characteristics of an image.
• Understand highlights and shadows.
• Resize and sharpen an image.
• Create effects with the filter gallery.
• Use the cookie cutter.
Most users can complete this lesson in a little over an hour.
This lesson assumes that you are already familiar with the overall features of the Photoshop Elements 4.0 work area and recognize the two ways in which you can use Photoshop Elements: the Editor and the Organizer. If you need to learn more about these items, see Photoshop Elements Help and the Adobe Photoshop Elements 4.0 Getting Started Guide. This lesson also builds on the skills and concepts covered in the earlier lessons.
In this lesson, you will use the CIB Catalog you created earlier in the book. If necessary, open this catalog by choosing File > Catalog in Photo Organizer, then click Open
What is a raw image?
Unlike many of the other file names that you may know, such as JPEG, or GIF, raw files are referred to as such because they are unprocessed by the digital camera.
Whether you are a professional or amateur photographer, it can be difficult to understand all the process settings on your digital camera. Processing images incorrectly may degrade the quality of an image. One solution is to use the camera’s raw setting. Raw images are derived directly from the camera’s sensors, prior to any camera processing. Not all digital cameras offer the ability to shoot raw images, but many of the newer and more advanced cameras have this option.
Note: Raw files have different extensions depending upon the camera used to take the picture, such as Canon’s .CRW and .CR2, Minolta’s .MRW, Olympus’ .ORF, and the various flavors of Nikon’s .NEF.
You can open a raw file in Photoshop Elements, process it, and save it—instead of relying on the camera to process the file. Working with camera raw files lets you adjust proper white balance, tonal range, contrast, color saturation, and sharpening, after the image has been taken.
The benefits of a raw image
Raw images are high-quality image files that contain the maximum amount of original image data in a relatively small file size. Though larger than a compressed file, such as JPEG, raw images contain more data and take less space than a TIFF image.
Flexibility is another benefit, since many of the camera settings like sharpening, white balance, levels, and color adjustments can be undone when using Photoshop Elements. For instance, adjustments to exposure can be undone and recalculated based on the raw data. Also, because raw has 12 bits of available data, you are able to extract shadow and highlight detail which would have been lost in the 8 bits/channel JPEG or TIFF format.
Raw files provide an archival image format, much like a digital negative, but one that outlasts the usefulness and longevity of film. You can reprocess the file repeatedly to achieve the results you want. Photoshop Elements doesn’t save your changes to the original raw file, rather it saves the last setting you used to process it.
Workflow overview
To use raw files, you need to set your camera to save files in its own raw file format. When you download the files from the camera. Photoshop Elements can open raw files only from the supported cameras listed on Adobe’s Web site, www.adobe.com.
After processing the raw image file with the Camera Raw window, you open the image in Photoshop Elements, where you can work with it in the same way that you work with any photo. Then, you can save the file in any format supported by Photoshop Elements, such as PSD.
Note: The RAW plug-in, which is used to open files from a digital camera, is updated over time as new cameras are supported. It may be necessary for you to replace your plug-in with the latest version from the www.adobe.com Web site.
Getting started
Before you start working on files, take a few moments to make sure that your work area is set up for these projects.
1 Start Photoshop Elements in Standard Edit mode, either by selecting Edit and Enhance Photos in the Welcome Screen. If the Organizer is already open click the Edit button (![]() ) and choose Go to Standard Edit.
) and choose Go to Standard Edit.
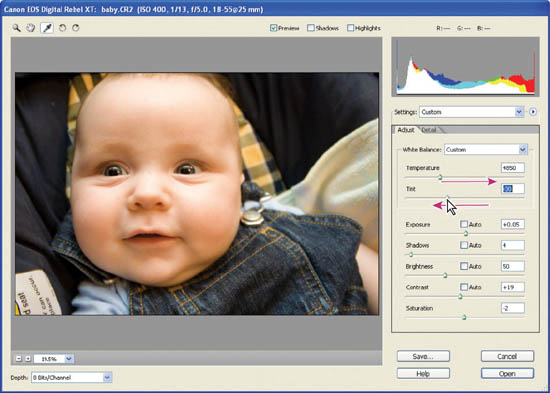
2 While in Standard Edit mode, choose File > Open. Navigate to the Lesson09 folder and open baby.CR2. The Camera Raw window appears.
Note: CR2 is the extension for a raw image generated from a Canon EOS Digital Rebel XT camera.
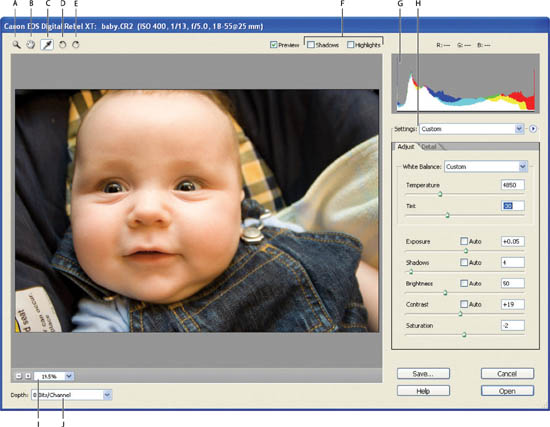
The camera raw window provides the tools that you need to make adjustments to your image.
A. Zoom tool. B. Hand tool. C. White Balance tool. D. Rotate counter-clockwise. E. Rotate clockwise. F. Shadows and Highlights. G. Histogram. H. Settings. I. Zoom level. J. Bit Depth.
3 Make sure that Preview is checked.
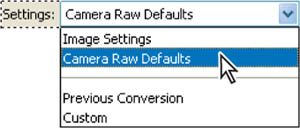
When you open a camera raw file, Photoshop Elements reads information in the file to see which model of camera created it, and then applies the appropriate camera settings to the image. You can select saved settings from the Settings drop-down menu. Later in this lesson you will learn how to save settings.
4 In the Settings drop-down menu, make sure that Camera Raw Defaults is selected.
![]() You can save the current settings as the default for the camera that created the image by clicking the triangle next to the Settings menu and selecting Save New Camera Raw Defaults.
You can save the current settings as the default for the camera that created the image by clicking the triangle next to the Settings menu and selecting Save New Camera Raw Defaults.
You can also use the Photoshop Elements default settings for your camera, by clicking the triangle (![]() )next to the Settings menu and selecting Reset Camera Raw Defaults.
)next to the Settings menu and selecting Reset Camera Raw Defaults.
There are two palettes in the Camera Raw window: Adjust and Detail.
The Adjust palette gives you the controls to fine-tune using options not available within the standard edit tools in Photoshop Elements. The Detail palette gives you controls to adjust sharpening and noise. You will use the controls on the Adjust palette.
Note: Any correction you make to an image removes data from that image. Because you are working with much more information in a RAW file, any changes you make to the settings, such as exposure and white balance, will have less impact on the image than if you made drastic changes in a .PSD, TIFF, or JPEG file.
Zoom tool—Sets the preview zoom to the next preset zoom value when you click in the preview image. Alt+click to set the next lower zoom value. Drag the Zoom tool in the preview image to zoom in on a selected area. To return to 100%, double-click the Zoom tool.
Hand tool—Moves the image in the preview window if the preview image is set at a zoom level higher than 100%. Hold down the spacebar to access the Hand tool while using another tool. Double-click the Hand tool to fit the preview image in the window.
White Balance tool—Sets the area you click to a neutral gray tone to remove color casts and adjust the color of the entire image. The Temperature and Tint values change to reflect the color adjustment.
Rotate buttons—Rotates the photo either counterclockwise or clockwise.
Shadow and Highlight—Turn on the display of shadow and highlight clipping. Clipped shadows appear in blue, and clipped highlights appear in red.
Note: Clipped highlights are highlight areas that are uniformly white with no detail. Likewise, clipped shadows are shadow areas that are uniformly black with no detail.
RGB—Indicates the Red, Green, and Blue values of the pixel directly below the cursor as you move it over the preview image. The values display when you are using either the Zoom tool, Hand tool, or the White Balance eyedropper.
Depth—Specifies whether the image opens as 8 or 16 bits per color channel.
Settings Options—in this menu set or reset color, lighting, sharpening, and noise settings to the image based on another image or the camera’s default settings. Choose from the following options:
Image Settings—restores the settings of the current image to their values at the time you first opened the Camera Raw dialog box.
Camera Default—applies the default camera raw settings.
Previous Conversion—applies the setting used for the last camera raw image you processed.
Custom—is automatically chosen when one of the sliders is adjusted. It allows you to work with an image without using any presets.
—From Photoshop Elements Help
5 In the Adjust palette, experiment by trying some of the presets available in the White Balance drop down menu.
Presets are helpful if you need to accommodate for color casts introduced by poor lighting conditions when the image was taken. For example, if your camera was not set up correctly to deal with a cloudy day, you can fix it here by selecting Cloudy from the White Balance drop-down window.
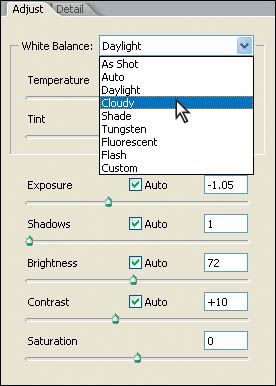
Notice the change in the preview window as you select various White Balance presets. In the next section you will discover why selecting the correct white balance is very important to the overall look of the image.
6 Before moving to the next part of this lesson, select As Shot from the White Balance drop-down menu.
Adjusting the white balance
In this lesson you are going to adjust the white balance by locating a neutral and selecting it with the White Balance tool. Neutral colors include black, white, and gray. By understanding what a neutral is and how it works, you can easily and quickly remove color tints from an image in the Raw window.
1 Make sure that the Auto checkboxes for Exposure, Shadows, Brightness, Contrast and Saturation are unchecked.
2 Select the White Balance tool (![]() ) from the tools at the top of the Camera Raw window.
) from the tools at the top of the Camera Raw window.
3 Locate a neutral in the image. A good example of a neutral in the image is the tag in the lower left of the image. Click on the white area in the middle of the tag.
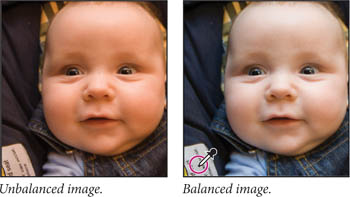
The White Balance is now at Custom and the image is balanced.
Using the White Balance tool accurately removes any color cast, or tint, from an image. Depending upon the subject matter, you might want a slight controlled color tint. In this instance you will warm up the image using the Temperature and Tint controls.
4 Click on the Temperature slider. Temperature controls the blue-yellow balance. Either click and drag the slider slightly to the right, or press the arrow up key (![]() ) to increase the color temperature 50 Kelvin increments at a time. This is a visual adjustment, so adjust until you add just a touch of yellow to the image. We moved the slider to 4850.
) to increase the color temperature 50 Kelvin increments at a time. This is a visual adjustment, so adjust until you add just a touch of yellow to the image. We moved the slider to 4850.
What is color temperature?
The term color temperature derives from the position of a color along a continuum from warm (red) to cool (blue). It is the degree of heat (in Kelvin) that an object would have to absorb before it glowed in a certain color. Each color is associated with a color temperature, as are various kinds of light.
The Tint allows you to adjust the red and green balance. You will add a slight amount of red to this image.
5 Drag the Tint slider to the left to increase the red. We dragged the slider to -30. Leave the image open for the next part of this lesson.
Use Tint and Temperature to adjust the color tint of an image. Your values may differ slightly than those shown.
Using the tone controls
Tonal controls are located under the White Balance controls in the raw window. In this next section, you find out how to use the tone controls to adjust for incorrect exposure as well as check shadows, adjust brightness, contrast, and saturation.
Before you make adjustments, make certain you understand these essential items:
Exposure is a measure of the amount of light in which a photo was taken. Underexposed digital photos are too dark; overexposed ones, too light. Use this control to recover the lighter, or blown-out, information from overexposed images.
Shadows are the darkest elements in an image. Use this control to darken the shadows in an image.
Brightness controls the relative lightness or darkness of an image and the colors in the image.
Contrast is the difference in brightness between light and dark areas of an image. Contrast determines the number of shades in the image. An image without contrast can appear “washed out.” An image with too much contrast can lose the smooth gradation of one shade of color to the next.
Saturation is the purity, or strength, of a color. Also called chroma. A fully saturated color contains no gray. Saturation controls make colors more vivid (less black or white added) or more muted (more black or white added).
You will check the Exposure of this image and make adjustments based upon the lightness values in this image.
Adjusting the exposure
If there is detail to be found in an overexposed image, adjusting the Exposure slider will helps to recover it. Before you adjust the exposure, you should understand two terms: Specular highlights and clipping.
Specular highlights Specular highlights are areas of an image that should be pure white. Examples of specular highlights are: the chrome of a car bumper, the reflection on shiny jewelry, the flame of a candle, or in this image, the reflection on the buckle of the overalls. These specular highlights should remain bright white to add impact and allow the rest of the image a better tonal range. Pure white on an image is generally reserved for specular highlights.

Clipping can make the highlights more white and shadows more black. This can be done in the highlight and shadows of an image. In most cases, some clipping can be helpful, but too much clipping eliminates valuable information.
You will now adjust the Exposure and Shadow sliders. By moving the sliders to the left or right you can adjust the exposure of an image.
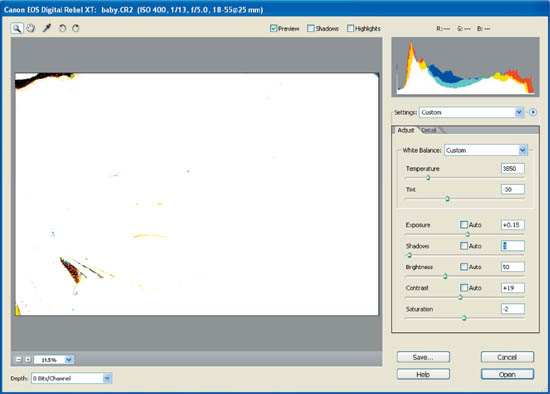
1 Hold down the Alt key while moving the Exposure slider. This shows the clipping (what will be forced to white) as you adjust the exposure. We moved the slider to -0.60.

Hold down the Alt key while sliding the Exposure to see highlight clipping.
Now you will adjust the shadow.
2 Hold down the Alt key and click and drag the Shadow slider. Any areas that appear in the clipping preview will be forced to a solid black. Release when only the deep areas of shadow in the image appear as black. If a large amount of the pupils of the eye appear you have made too much of an adjustment. The image will lose detail in the fabric behind the baby if you push the shadow too far. We moved the slider to 3.
3 Select the Brightness slider and press the up arrow on the keyboard to increase the value to 55.
4 Select the Contrast slider and press the up arrow key on the keyboard to increase the value to +30.
5 Leave the Saturation slider untouched.
![]() For an interesting effect you can drag the Saturation slider all the way to the left to neutralize your image, essentially creating a three-color grayscale.
For an interesting effect you can drag the Saturation slider all the way to the left to neutralize your image, essentially creating a three-color grayscale.
Saving the image
You can reprocess this raw file repeatedly to achieve the results you want by saving in the DNG format. Photoshop Elements doesn’t save your changes to the original raw file, but it saves the last setting you used to process it.
The DNG format
Raw file formats are becoming extremely popular in digital photography. However, each camera manufacturer has their own proprietary raw format. This means that not every raw file can be read by software other than the one provided with the camera. This may make it difficult to use these images in the future, as the camera manufacturer may not support the file format indefinitely. This is also a problem if you want to use software other than what was supplied by the camera manufacturer.
To help alleviate these problems, you can save raw images from Photoshop Elements in the DNG format, a publicly available archival format for the raw files generated by digital cameras. The DNG format provides an open standard for the files created by individual camera models, and helps to ensure that you will be able to access your files in the future.
1 In the baby.CR2 raw window click Save. The Save Options window appears.
2 With Save in New Location selected in the Destination drop-down menu, click on the Select Folder button and navigate to your My CIB Work folder.
3 In the File Naming section, leave the name in the drop-down menu on the left side unchanged. Click the drop-down menu on the right and select 2 Digit Serial Number. This puts the numbers 01 following the name.
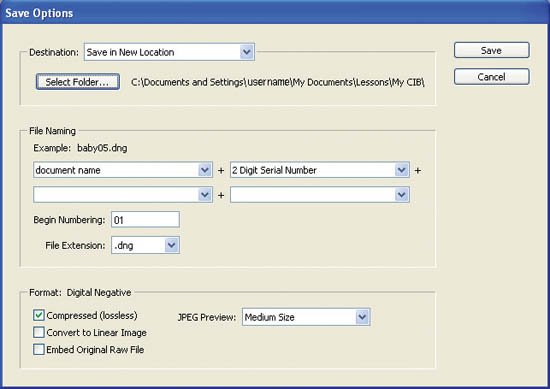
4 Click Save. The file along with the present settings has been saved as a DNG file, using a format which you can retrieve repeatedly.
5 The Save Options window closes and the raw window is displayed again. Click the Open button.
The baby.CR2 file opens in Photoshop Elements. Now you can work with this file the same way that you work with any photo.
6 Choose File > Save. Navigate to the My CIB Work folder. Name the file baby_edited-work.psd. Make sure the selection in the Format drop-down menu is Photoshop. Click Save.
7 Choose File > Close.
Using histograms
Many of your images may be saved using a variety of formats, including JPEG, TIFF, or PSD. For these images you will make your adjustments in the Standard Editor. In this part of the lesson, you will discover how to use the histogram to understand what changes can be made to your images to improve their quality.
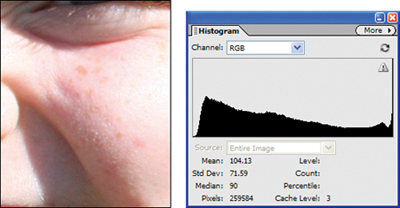
In this section, you will open an image that was shot with poor lighting, and also has a slight magenta cast to it. Many digital cameras introduce a slight cast into images.
What is a histogram?
The Histogram palette, located under Window > Histogram, shows whether the image contains enough detail in the shadows, midtones, and highlights. A histogram also helps you recognize where changes need to be made in the image.
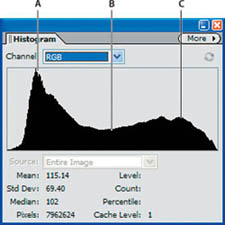
Histograms show detail and tonal range of an image.
A. Shadows. B. Midtones. C. Highlights.
Tonal corrections, such as lightening an image, remove information from the image. Excessive correction is recognizable by the viewer, and causes posterization, or banding in the image.
This histogram shows the detail necessary to make corrections.

This histogram reveals that this image is already lacking detail.
Additional corrections will degrade the image even more.
Understanding highlights and shadows
In the next part of this lesson, you will open an image and adjust the highlight and shadow. You will also make additional tonal corrections while keeping an eye on the Histogram palette.
1 Return to the Organizer by clicking on the Photo Browser button in the shortcuts bar in the Standard Editor.
2 Select Edit > Preferences > General and make sure that Show File Names in Details is checked.
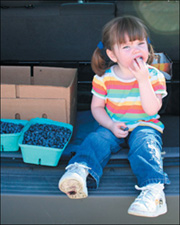
3 Go to the Organizer, select the file face.psd and choose Edit > Go to Standard Edit. The image is tagged with the Lesson 9 tag to make it easy to locate. Notice the image is a little dark.
4 Choose File > Save As and navigate to the My CIB Work folder. Save the image as face_work.psd. Click Save.
5 If it is not visible choose Window > Histogram.
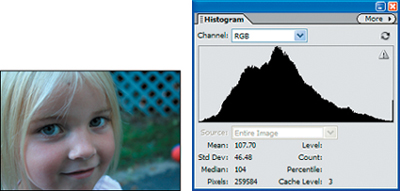
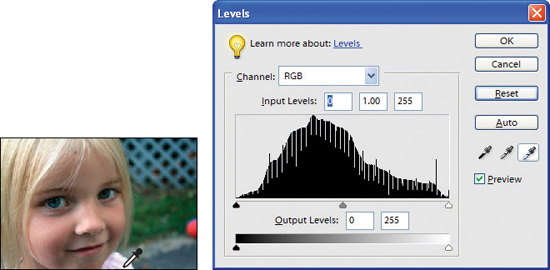
This image needs more information in the lighter areas of the image.
According to the Histogram palette, the vast amount of the data in this image is located in the middle (midtones) of the image and the left (shadow). You will open the tonal range of this image using Levels.
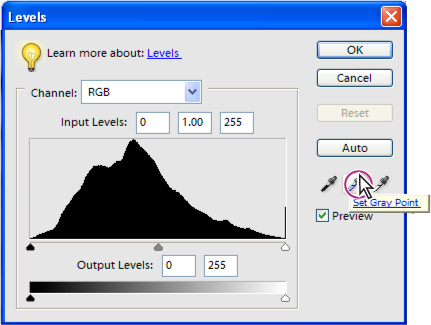
6 Choose Enhance > Adjust Lighting > Levels. The Levels window appears.
You will use the shadow, midtone, and highlight sliders, as well as the Set Black Point, Set Gray Point, and Set White Point eyedroppers in this exercise.
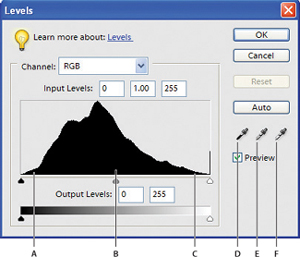
The Levels window.
A. Shadow. B. Midtone. C. Highlight. D. Set Black Point.
E. Set Gray Point. F. Set White Point.
7 Double-click on the Set White Point eyedropper. This opens the Color Picker. In this window, you will choose the highlight of your image. You will designate the lightest, non-specular, point in the image as being the highlight.
8 Type 240 in the R (Red), G (Green), and B (Blue) text fields. This defines the light point of your image as a light gray, not pure white. Pure white is reserved for specular highlights in an image. Click OK in the Color Picker window.
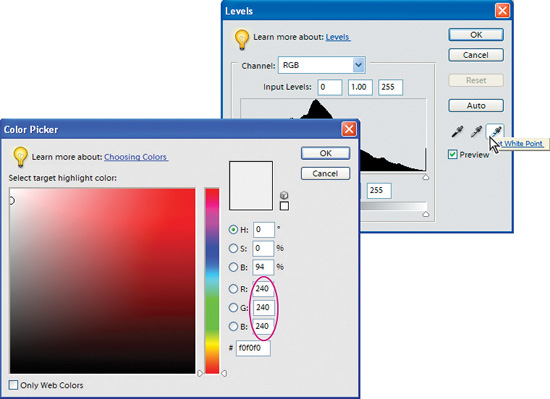
Double-click on the Set White Point eyedropper to change the highlight value in the Color Picker.
9 Hold down the Alt key and click on the Highlight slider. The clipping preview for the highlight appears. The visible areas are the lightest area of the image. Release the Alt key to see you’ve located the lightest portion of the sweater in the image.
10 Select the Set White Point eyedropper and click on the location of your image (light part of the sweater) that appeared in the clipping preview.
You will now set the Shadow area using a slightly different technique.
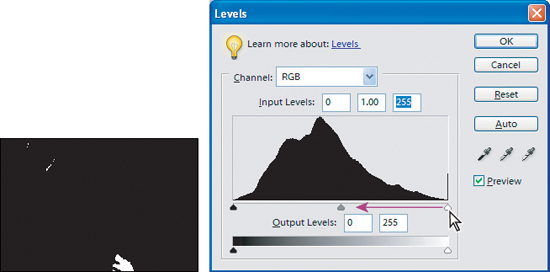
11 Hold down the Alt key and click then drag the shadow slider to the right until the eyes, or darkest area of the image, appear as dark spots in the shadow clipping preview.

12 Adjust the midtone visually by selecting the midtone slider (middle) and dragging it to the left. This is lightens the midtones. Watch the Histogram palette as you make this change to see the old data (displayed as gray) compared to the correction that you are now making (displayed as black). We adjusted our midtone to 1.56.
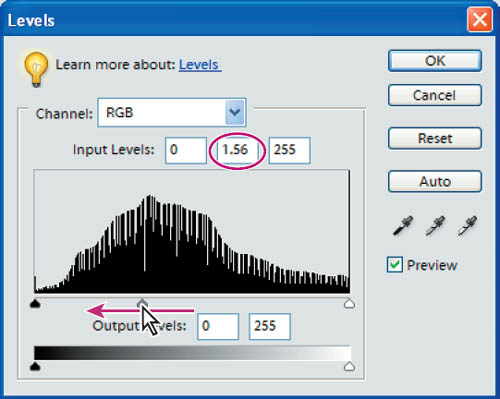
Adjust the midtones.

Watch change in Histogram palette.
Some gaps will be created, but you want to avoid creating very large gaps. Even if the image looks fine on screen, large gaps may cause a loss of data that is visible when printed.
Using Set Gray Point
If you have a neutral in your image, you can remove a color cast quickly using the Set Gray Point dropper. Neutrals are pixels in the white to black range, preferably more toward gray.
1 Select the Set Gray Point eyedropper in the Levels window and click on a neutral gray in the image. In this case, click on any part of the road in the background. Any color cast is removed.
Note: You do not want to remove color cast from every image. You may want some images to be warmer or cooler for a visual effect.
2 Click OK. When the Adobe Photoshop Elements alert window appears, click Yes. You want to save the new target colors so you do not have to set the white point every time you use the Levels window to make adjustments.
3 Select Edit > Undo Levels or press Ctrl+Z to see how the image looked prior to changing the highlights and shadows. Choose Edit > Redo Levels or Press Ctrl+Y to bring back the correction you made.
Leave this image open for the next part of this lesson.
Unsharp mask
Here you will add some crispness to your image and make it “pop” when printed. Using the sharpening tools correctly can have a significant impact on your image.
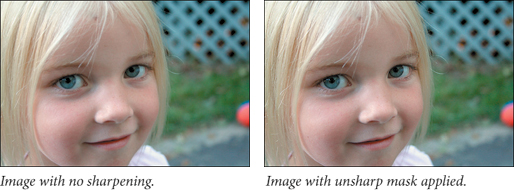
You’ll use the Unsharp mask feature in Photoshop Elements. How can something be unsharp and yet sharpen an image? The term unsharp mask has it roots in the print production industry: the technique was implemented by making an out-of-focus negative film—the unsharp mask—and then printing the original in a sandwich with this negative film. This produces a halo around the edges of objects – giving them more definition.
![]() If you are planning to resize an image, resize first then apply the Unsharp mask filter.
If you are planning to resize an image, resize first then apply the Unsharp mask filter.
1 With the face_work.psd image still open, choose Image > Resize > Image Size. This image needs to be made smaller, but with a higher resolution (pixels per inch).
2 If necessary, uncheck the Resample Image checkbox at the bottom of the window, and type 300 into the Resolution text field. Notice that the width and height increments adjust. This method to increases the resolution in the image without losing information.
Resolution is the fineness of detail you can see in an image. It is measured in pixels per inch (ppi). The more pixels per inch, the greater the resolution. Generally, the higher the resolution of your image, the better the printed image quality.
3 Re-check Resample image to reduce the height and width of the image and not affect the resolution. Type 3 into the width text field. In this case, we are throwing away the data that we do not need for a larger image. Click OK.
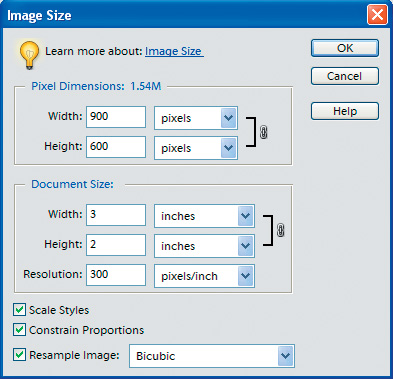
Always resize before sharpening an image.
4 Choose File > Save. Keep the file open for the next part of this lesson.
Applying the Unsharp Mask filter
Before applying any filter in Adobe Photoshop Elements, it is best to be at 100% view.
1 With the face_work.psd image still open, choose View > Actual pixels.
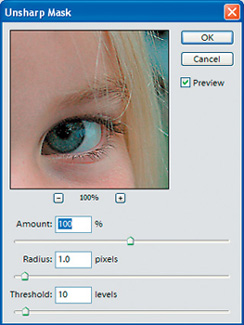
2 Choose Filter > Sharpen > Unsharp Mask.
The Unsharp Mask window appears. The amount of unsharp masking you apply is determined by the subject matter. A portrait, such as this image, should be softer than an image of an object such as an automobile. The adjustments range from 100 to 500, with 500 being the sharpest.
3 Slide the Amount adjustment or type 100 in the Adjustment text field.
![]() Disable the preview in the Unsharp Mask window by clicking and holding down on the preview pane. When you release the mouse, the preview is enabled again. To reveal other portions of the image click and drag in the preview pane.
Disable the preview in the Unsharp Mask window by clicking and holding down on the preview pane. When you release the mouse, the preview is enabled again. To reveal other portions of the image click and drag in the preview pane.
4 Leave the Radius at 1 pixel, but change the Threshold to 10 pixels. Threshold is a key control in this window, as it tells the filter what not to sharpen, In this case the value 10 tells it to not sharpen a pixel if it is within 10 shades of the pixel next to it.
5 Click OK and choose File > Save, then choose File > Close.
Create effects with the filter gallery
You can experiment and apply interesting filter effects using the Filter Gallery. The Filter Gallery allows you to apply multiple filters at the same time, as well as re-arrange the order in which they affect the image.
1 In the Organizer select the file named blues.psd and choose Edit > Go to Standard Edit from the shortcuts bar.
2 Choose File > Save and navigate to the My CIB Work folder. Name the file blues_work.psd.
Because many filters use the active foreground and background colors to create effects, take a moment and set them now.
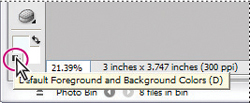
3 Click on the Default Foreground and Background Color swatches at the bottom of the toolbar. This resets the default black foreground and white background colors.
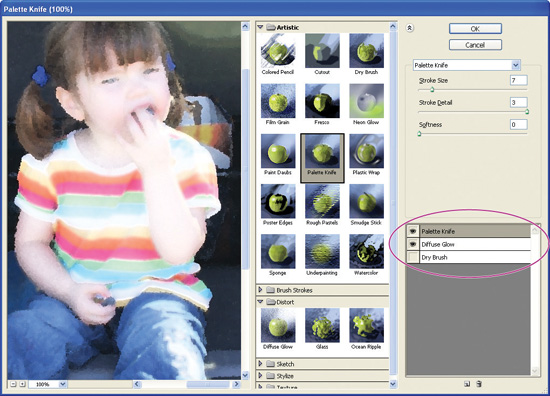
4 Choose Filter > Filter Gallery. The Filter Gallery window appears.
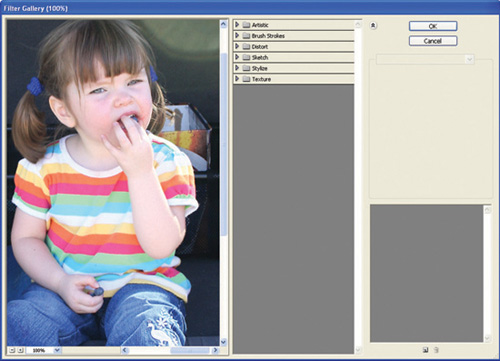
5 Click and hold on the mouse to temporarily change the cursor into the hand tool (![]() ) in the preview pane. While holding the mouse down, drag the image so that you can see the image of a girl in the preview pane.
) in the preview pane. While holding the mouse down, drag the image so that you can see the image of a girl in the preview pane.
Note: It is important to view images at 100% view to see accurate results.
Listed in the Filter Gallery are several categories of filters from which you can choose.
6 Expand the Artistic category by clicking on the arrow to the left of Artistic.
7 Select Palette Knife. The filter is applied in the preview image.
8 Using the Stroke Size slider, change the value to 7.
9 Click the New Effect layer (![]() ) on the bottom right, then select Dry Brush from the Artistic filters. Both the Palette Knife and Dry Brush filters are applied simultaneously.
) on the bottom right, then select Dry Brush from the Artistic filters. Both the Palette Knife and Dry Brush filters are applied simultaneously.
10 Click on the New Effect layer again. This time, expand the Distort filters and select Diffuse Glow.
11 Using the Glow amount slider, change the value to 2.
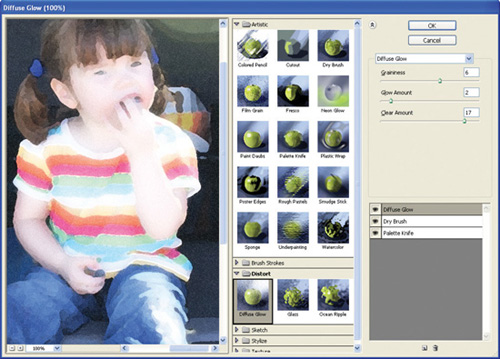
The Filter Gallery allows you to apply multiple filters simultaneously.
Note: You can read more details about what each filter does in “About filters” in Adobe Photoshop Elements Help.
Experimenting with filters in the gallery
Experiment with the three filters that you have applied by turning off the visibility of selected filters or rearranging their placement in the gallery.
1 Turn off a Dry Brush filter in the Filter Gallery by clicking on the eye icon (![]() ) to the left of the Dry Brush.
) to the left of the Dry Brush.
2 Re-arrange the filters by clicking and dragging the Palette Knife filter to the top of the list.
3 Click OK to close the Filter Gallery window and apply the changes.
4 Choose File > Save. Keep this file open for the next part of the lesson.
Using the Cookie Cutter tool
The Cookie Cutter tool allows you to crop an image into a shape that you choose.
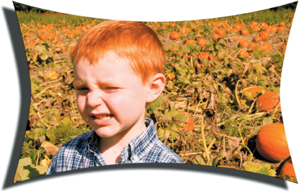
Use the Cookie Cutter tool to clip a photo into a fun or interesting shape. In this part of the lesson, you’ll add a rough edge to the image.
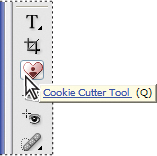
1 Select the Cookie Cutter tool from the tool box.
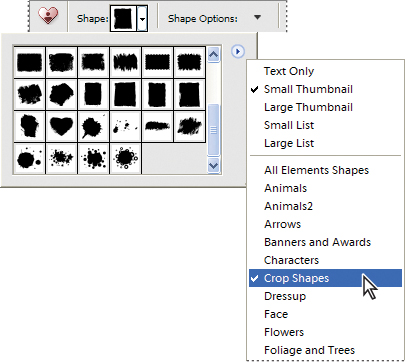
2 Click the Shapes menu on the tool options bar to view a library of shapes from which you can select. The visible selections are the default shapes.
3 Click and hold the triangle (![]() ) on the right side of the shapes library. Choose Crop Shapes from the list that appears.
) on the right side of the shapes library. Choose Crop Shapes from the list that appears.
Note: The assigned names for each of the shapes appears as a tooltip when you cross over it.
4 Select the shape Crop Shape 30.
5 Click and drag to create the shape on the image. Use the handles to scale the crop.

Unconstrained—Draws the shape to any size or dimension you’d like.
Defined Proportions—Keeps the height and width of the cropped shape in proportion.
Defined Size—Crops the photo to the exact size of the shape you chose.
Fixed Size—Specifies exact measurements for the finished shape.
From Center—Draws the shape from the center.
Enter a value for Feather to soften the edges of the finished shape.
Note: Feathering softens the edges of the cropped image so that the edges fade out and blend in with the background.
—From Adobe Photoshop Elements Help
6 Click the Commit button (![]() ) located in the tool options bar, or press Enter to finish the cropping. If you want to cancel the cropping operation, click the Cancel button (
) located in the tool options bar, or press Enter to finish the cropping. If you want to cancel the cropping operation, click the Cancel button (![]() ) or press the Esc key.
) or press the Esc key.
7 Choose File > Save. Then choose File > Close.
Congratulations, you have finished the lesson on advanced editing techniques in Adobe Photoshop Elements. You discovered how to take advantage of the raw features and adjust images using the histogram as a reference. You also found out how to make playful frames using the Cookie Cutter tool.
Exploring on your own
1 Review the raw feature in Adobe Photoshop Elements by opening the file named farm.CR2. Experiment with the tint and temperature to create a better image
2 Open the file named read.psd and practice adjusting the highlight and shadow using the Levels window.
3 Open any image; if you do not have one you would like to use, open pumpkin.psd from the Lesson09 folder. Use the Cookie Cutter tool and select a shape. Don’t forget that you have additional choices in the library.
When you have applied a cookie cutter crop, experiment with some effects. Choose Window > Styles and Effects. Experiment with different beveled edges and drop shadows to create interesting effects to your crop. Read more about the Styles and Effects in Adobe Photoshop Elements Help “About filters, effects, and layer styles.”
Learning more
We hope you’ve gained confidence, skill, and knowledge about how to use Photoshop Elements for your digital photography work. But this book is just the start. You can learn even more by studying the Photoshop Elements 4.0 Help system, which is built into the application by choosing Help > Photoshop Elements Help. Also, don’t forget to look for tutorials, tips, and expert advice on the Adobe Web site, www.adobe.com.
• Review questions
1 What is a camera raw image, and what are three benefits to using it?
2 What different methods can you use to control the white balance in the raw window?
3 What tools can you use in the Levels control to set highlight and shadow?
4 What is the Cookie Cutter tool used for?
• Review answers
1 A raw file is one that is unprocessed by a digital camera. Not a cameras create raw files.
Benefits include the following:
Flexibility—many of the camera settings, such as sharpening, white balance, levels and color adjustments can be undone when using Photoshop Elements.
Quality—because RAW has 12 bits of available data, you are able to extract shadow and highlight detail which would have been lost in a 8 bits/channel JPEG or TIFF format.
Archive—RAW files provide an archival image format, much like a digital negative, but one that outlasts the usefulness and longevity of film. You can reprocess the file repeatedly to achieve the results you want.
2 Three methods to control the White balance in the Raw window include:
• You can set the white balance in an image automatically by using the White Balance eyedropper tool in the raw window. By selecting the White Balance eyedropper and clicking on a neutral, the Temperature and Tint sliders are automatically adjusted.
• Another method is to select a preset white balance from the White Balance drop-down menu. Here you can choose from options that include corrections based upon whether the flash was used, it was a cloudy day, or the image was shot in fluorescent light, to name a few.
• You can also manually change the Temperature and Tint adjustments by using the appropriate sliders under White Balance.
3 Use the Set Black Point and Set White Point eyedropper tools in the Levels window.
• In the Levels window you can double-click on the Set Black Point and Set White Point tools to enter the desired values.
• To find the light point, you can Alt+drag the shadow or highlight slider. This turns on the clipping preview.
• Select the darkest point with the Set Black Point tool by selecting the tool and clicking on the darkest part of the image.
• Select the lightest point by using the Set White Point tool to click on the lightest part of the image.
4 The Cookie Cutter tool is used to clip an image in a variety of shapes. Use the default shapes in the Shape drop-down menu, or select from a variety of libraries available in the Shape window’s palette.